Posted on Leave a comment

Color Changing Sublimation Mugs

I love trying new things!

Affiliate links may be present in the below and as an Amazon Associate I earn from qualifying purchases. What that means is that I may receive compensation if you purchase through the links I have provided. The price you pay for the product or service is not higher but I may get compensated for sharing.

I am so excited to share this project! Well frankly, I’m excited to make myself some new coffee mugs.
I saw these color changing mugs at 143 Vinyl and knew I had to try it out.
I’ve been so excited to use my new mug press on the StarCraft 8-in-1 heat press that I’ve got all kinds of ideas!
Check out the post I did on the heat press HERE with my first project.

Note: this is a photo heavy tutorial but I also have a video tutorial on the the Silhouette Secrets+ YouTube Channel HERE too!

Let’s get started!

Measure your blanks and write down the measurements if needed.

Draw a template shape with the Drawing Tools in Silhouette Studio and adjust the height and width to match your measurements.

Select designs and scale to fit within template shape.

I used these designs:
Coffee Clipart, Sublimation, Zombie, Mombie by CuddleBunnieStudio
Funny Coffee Bundle SVG by BlackCatsMedia
Tree Night Skyline Sublimation by Enliven Designs

Chose File > Print and select the sublimation printer to print the design onto sublimation paper.

Gather all supplies needed to apply the sublimation print to the mug.

Supplies used:
Color Changing Mugs from 143 Vinyl
Protective Project Mat from Artesprix (optional but so worth it) – with stands up to 400 degrees F
heat safe gloves (not pictured)
Lint Roller
– Heat Tape
Heat Tape Dispenser (optional but so worth it)
Alcohol swabs
Paper Trimmer
– Printed Sublimation Paper
Mug Press – mine is the StarCraft 8-in-1 Heat Press
– Epson F170 Sublimation Printer

Trim design as needed. This can make it easier to handle and line up the design.

A paper trimmer is a handy tool to have in the craft room.

Clean mugs with alcohol wipe and a lint roller to remove any debris and oils.
The alcohol removes oils & dirt while the lint roller picks up fibers and debris unseen to the eye.
Fibers can cause colored specks to appear on the sublimated blank as the ink binds to those areas and is permanent on your blank.

Check the pressure on the mug press by placing the mug in it and closing before you heat the press up. This will help ensure that the pressure is right before you have the design in place.
Make any adjustments needed before it’s hot.

Securely tape the sublimation prints onto the mug.

Set the mug press time and temperature according to the recommended directions. These called for 370 degrees for 250 seconds found in the description on the 143 Vinyl website.

Wrap parchment paper (blow out) paper around the mug and carefully slide into the mug press. This will protect your mug press adapter from any sublimation ink that might “blow out” around the print.

Press for the time and temperature recommended.

Using heat safe gloves carefully remove the mug and place on a safe surface. This silicone high temperature protective mat from Artesprix is great for sublimation and keeping my workspace safe from burns.

Let the mugs cool completely on this safe surface.

Since the mug is hot, you can see that the color changed from black to white.

As the mug cools, the black color comes back. This is perfect to know when the mug is cool enough to handle and remove the sublimation print.

Waiting for it to cool can be the longest part of the process.

But the reveal is worth it…. well…. maybe.

It does say on the product description that it is a black color-changing coating (image slightly visible under coating).

Just add a hot liquid

and watch it appear!

Check out the full video tutorial video HERE.

I also want to add that the product description does state they are not microwave or dishwasher safe.

Loving my 2 new coffee mugs for my Studio area!

What new things have you tried lately?
Let us know below.

I would love to see what you are creating with your Silhouette software or machines!
Feel free to post on my Facebook group at 
Silhouette Secrets with EllyMae.

Save this for future reference by pinning the image below.

Enjoy !

This image has an empty alt attribute; its file name is logo.jpg

THANK YOU for your support! How can you help? Click HERE & buy a coffee.
Every little bit helps with the cost of running the site.

Or if you are looking for more in-depth, step-by-step classes, check out all of my online Silhouette classes on my Teachable site HERE.

SS Logo snip it
**This post may contain affiliate links. What that means is that I may receive compensation if you purchase through the links I have provided. The price you pay for the product or service is not higher but I may get compensated for sharing.
Posted on 9 Comments

Printing Sublimation Designs from Silhouette Studio – Basics

One of the easiest ways to get started with sublimation is to use ready-made designs.

Print the design and press it.
That is the really the basics of sublimation.

Let’s take a look at a few tips that can help in printing png files from Silhouette Studio. Png files are a common file that is used in sublimation and can be opened with the Basic Silhouette Studio software, which is free.

Tutorial written in Silhouette Studio v4.4.552
Affiliate links may be present in the following blog post and as an Amazon Associate I earn from qualifying purchases.

Sublimation Prints From Silhouette Studio

The first thing I would recommend doing is to turn OFF Autotrace.

Autotrace is a new feature that was introduced in v4.4.247 of Silhouette Studio. There are still some bugs in the Autotrace feature and these vary by the software version you are using. However, the biggest thing is that while this is a neat feature if you are cutting around a png file, it is not necessary when you are just printing from Silhouette. It also adds more data to the file and takes longer to process when opening or working with the file because it traces the design to get a cut line when it’s opened.

Autotrace happens on transparent png files when opened and is ON as a software default when you are using any version higher than v4.4.247.

Some things you may notice if Autotrace is on are:
– The software takes a long time to open the file
– The software crashes when trying to open a png
– The software lags after the png file is opened
– The png file opens at a larger size than it should

For more details on Autotrace, check out this post
Let’s Explore v4 – Autotrace.

How to turn Autotrace OFF

Click on the gear icon in the bottom right corner of the Design tab.

Or in the top left menu, under Edit > Preferences
or
the keyboard short cut is Ctrl+K

Choose the Import tab and then uncheck the Auto-trace for png files.

Click Apply and Ok.

Since we are only printing from Silhouette, we do not need the cut lines around the png file. Turning it off can make designing in Silhouette Studio easier on you and your computer.

Printing from Silhouette Studio

I am using a file from the St Patrick’s Day Sublimation bundle available HERE
Download the file to be used and extract/unzip the folder.

In the Silhouette Studio software, use File > Open and find the location the png file is save to.

Measure the blank that you will be using to determine the size you want.

In the Silhouette software, on the left, choose the Draw Rectangle tool. Draw a rectangle and size it, using the Scale tools, to the size needed for your object.

I like to draw a template box using the drawing tools to fit my design in so I can see what size it is and how it will look.

You may notice that png files can open with extra space around the image, so the measurement may not be accurate on the design. It doesn’t happen to all png files, but if it does, that is why the template box is so nice to have to judge the size of the design.

This is most likely due to how the original file was saved. I did test several png files all the way back to v4.1.206 of the Silhouette Studio software and they opened the exact same way. So it’s not something that has changed in Silhouette, but I think we may see it now more than before because more people are using Silhouette Studio to print from for things like sublimation.


Extra tip: If you would really like to get a more accurate size of the png file, draw a rectangle or shape that just fits around the size of your design.
Notice in the photo below that the selection box is 10.1″ for the png file.

Select both the drawn shape and the png image. Then open the Modify Panel and choose Crop. This should crop the image down to the size of your shape you drew around it.
Make sure that the entire png was inside the boundaries of the drawn shape or it will be removed when you crop.

After the image is cropped, the selection box now measures what the shape drawn was. In this case, it is 7.2″ instead of the extra space with 10.1″.

This is not absolutely necessary in this project because we are using the original drawn “template” rectangle for our size, but it is an extra tip for future projects.


Once I have my design sized the way I want, I can move the original rectangle or delete it. It is only used as a sizing template.

Next, set up the Page Setup Panel.

Choose – Cutting Mat – none.
Since I am not cutting the design with my Silhouette, I do not need my mat set on the screen.

Set up the page size for the size being printed.
I am using letter size or 8.5″ x 11″ size sublimation paper.

And check the box next to the Show Print Border at the bottom.
This will show us what our maximum print borders are for the current printer selected.

Printing Tip – Does your design need mirrored?
I am using an Epson F170 Sublimation printer and since it’s set up as a sublimation printer, it automatically mirrors my design for me. If you are using a converted printer, you may need to manually do this yourself by right clicking on the design in the Design tab and choose Flip > Horizontally before printing.

Once it’s all set up to print, click File > Print.

I am using v4.4.552 and the print preview shows after clicking File > Print. I like this option as I can double check if anything looks off.
Click Print again to go to the Printer Menu.

Note: Printer menus can vary in look and options due to the different models and brands of printers and also between MAC and Windows computers.

Change the printer selection if needed.

Printing Menu Tip: If switching between printers or changing page sizes, you may need to click Apply and then Cancel and go back to the Design tab and start at File > Print again, just to double check the print margins adjusted. This will vary by user and printer.

The next step I like to do is click on the Preferences button in the printer options.

Then I check the Print Preview, just so I can make sure it’s going to print how I like before I use up my ink and paper. I’ve caught mistakes by doing this and so glad I did. But not everyone likes that extra step.

Click Ok and then click on Print.

With this preview, I can make sure that my design is going to print mirrored and is within the printer borders.
If everything looks good, click Print.

Note: as I mentioned in the Basic Sublimation with Silhouette Studio tutorial last week, the print will look dull. The heat and pressure is what brings out the full color in the transfer.

I don’t typically turn my heat press on until after I have printed my design. This is only a personal preference because it can take me so long to decide what I really want to print for my project.

Set the heat press to the time and temperature according to your sublimation blank or sublimation paper. I use 400 degrees for 60 seconds for most items, but still check for specific instructions on the objects I’m using.

I secure the print to my sublimation blank with heat tape. Then press the object. Make sure to use parchment paper on bottom and top to protect your heat press platens.

More tips on this in the Basic Sublimation with Silhouette Studio tutorial HERE.

Let it cool a bit after the press and then carefully remove the sublimation paper.

Sublimation is just another option that can be done with your Silhouette Studio software.
And hopefully with the tip provided about Autotrace, it will make it much easier for you to work with!

I am enjoying testing my new Epson F170 sublimation printer and look forward to playing with it more. Stay tuned for more information!

I would love to see what you are creating with your Silhouette software or machines!
Or if you have any questions, feel free to post photos or questions on my Facebook group at 
Silhouette Secrets with EllyMae.

Save this for future reference by pinning the image below.

Enjoy !

This image has an empty alt attribute; its file name is logo.jpg

THANK YOU for your support! How can you help? Click HERE & buy a coffee.
Every little bit helps with the cost of running the site.

Or if you are looking for more in-depth, step-by-step classes, check out all of my online Silhouette classes on my Teachable site HERE.

SS Logo snip it
**This post may contain affiliate links. What that means is that I may receive compensation if you purchase through the links I have provided. The price you pay for the product or service is not higher but I may get compensated for sharing.
Posted on 7 Comments

Basic Sublimation Print from Silhouette

Beginner Sublimation and Silhouette

Sublimation is becoming very popular and more and more users are using Silhouette Studio in their sublimation. Today we are going to go through a quick beginner tutorial on using Silhouette with Sublimation.

What is sublimation?

In very basic terms, sublimation is an ink transfer that uses high heat and pressure. The high heat and pressure turn the ink into a gas, which transfers to the object. Sublimation printing requires a designated printer using sublimation inks, printing onto sublimation paper, and then applying that to a sublimation blank. It cannot be applied to just any blank as the sublimation ink bonds to a special coating on the blank or to high polyester material.

Over the last couple years, we have seen a rise in not just sublimation printing, but in new sublimation markers, sublimation transfers, and infusible ink sheets.
These are perfect ways to test out the area of sublimation without investing in all the equipment necessary for sublimation printing.

For more information on Artesprix sublimation markers, check out this recent post
Sublimation Markers and Silhouette HERE

Affiliate links may be present in the following blog post and as an Amazon Associate I earn from qualifying purchases.

Sublimation Printing with Silhouette

Basic Supplies

– Sublimation printer: Sawgrass printer, Epson F170 (more details coming), converted Epson printer
– Sublimation ink – varies by printer
– Sublimation paper
– Heat tape: Craft Chameleon, Amazon
– Sublimation blanks: high polyester materials, mugs, mousepads, luggage tags, photo panels, ornaments, etc.
Parchment Paper or butcher paper
Heat Press that can go higher than 400 degrees F

Basics of Sublimation in Silhouette

Today we are going to cover the very basics of Sublimation with Silhouette Studio.

I do not feel that basic sublimation is difficult. The basics of it are just print and press.
You do not need to cut with the Silhouette machine for a basic sublimation print.

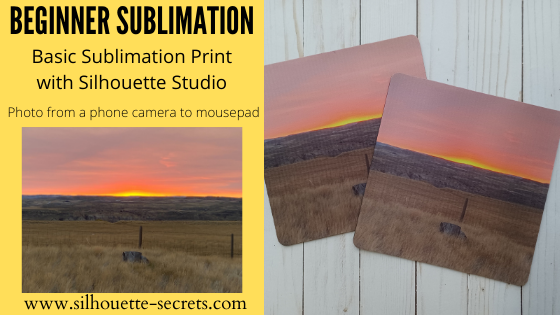
I am using a photo my husband took with his phone as an example.

Step 1 – Measure the blank. I am using a sublimation mouse pad that is 7-13/16″ square.
For a beginner project, I would recommend a flat object to start.

Step 2 – Open Silhouette Studio

Step 3 – On the Page Setup Panel, set the Media Size to the sublimation paper size to be printed on.

I am using a 8.5″ x 11″ paper, so I have it set up with Cutting mat = none (since I’m not cutting on the Silhouette machine it’s not needed) and the Media size = 8.5″ x 11″ for printing.

Tip: If using a page size larger than the cutting mat – you will need to choose No mat and change page size to the size you are using.

Step 4 – Check the box next to the Show Print Border at the bottom of the Page Setup Panel. This turns on your print border set by the current printer selected.
This will allow you to see if there are any changes that need to be made to the File > Print Page Setup.

Step 5 – Using the Drawing Tools on the left side, draw a template shape for blank.
Allow for a bit of overage on the design so you make sure to cover everything. I drew a 8″ square, which is a little bit bigger than the actual measurements of the sublimation mouse pad being used.

Step 6 – Open the photo or design in Silhouette Studio.
If using a photo, it may open at a large size. Photos can be large files. Resize it using the Quick Access Toolbar (QAT) – Scale tools to make it more manageable. I choose 33% or 50% usually to see what will work best.
Immediately after choosing the Scale Option, use the Center to Page option in the QAT and it will bring it back to your design mat.

If the photo opens on a new design mat, copy and paste it into the template file you created.

Step 7 – Add the photo or design to template shape to fill entire template

Step 8 – If needed, use the Crop tool in the Modify Panel to crop the image down to the size needed for the print.

Step 9 – Save the file
It is always a good idea to save every so often, especially if you are working with photo files, png graphics, graphic images, etc. as they can be very large files.

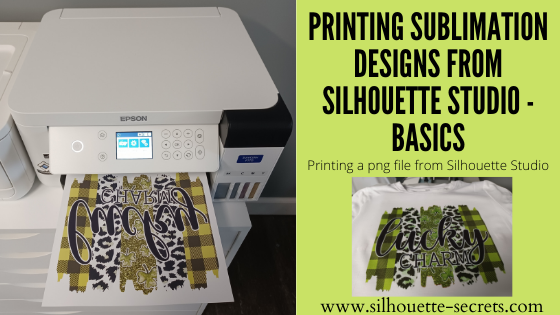
Step 10 – Once the file is ready, choose File > Print in the top left menu.
In v4.4 software versions the Print Preview pops up.

In later versions of v4.4, you have the option to disable this preview under the Preferences, however, I do not recommend that as it can be very helpful in catching any issues prior to printing and using your ink.

Click on Print in the bottom right corner and then select the printer if you need to switch.

Select the sublimation printer or Sawgrass Print Manager. This will vary based on what printer you are using for sublimation. I am using a Sawgrass 400 in this tutorial, so I choose the Sawgrass Print Manager.
(More information coming soon on my new Epson F170 printer and a comparison)

Note: if you do need to switch between the printer or your print border does not look correct, select the correct printer, then click Apply and Cancel. Then change what needs to be to changed, whether it is the page size or just going back to the Design Tab so the printer margins reset. Some users may need to save the file, close Silhouette, and open again in order to reset printer margins if the printer was changed.
This is needed in some versions of the v4.4 software.

Note: Sublimation prints need to be printed mirrored. If using a Sawgrass printer, Print Manager does it for you. If you are using another printer, you may need to flip your image prior to sending to print. Right click on it and choose Flip > Horizontal.

Step 11 – If everything looks good, click on Print.

If you are using a Sawgrass with the Print Manager, it will then open Print Manager and you have 1 more chance to make sure things are going to print correctly and choose your material that you are pressing on. This can make a difference in the print quality.
Then choose Print when ready.

Sublimation prints will be dull when printed. They do not reach their full potential until the heat and pressure is applied to it.

Step 12 – Center the blank on top of the printed page and apply heat tape to hold it in place so it does not move while pressing.

If the blank or the paper moves during the press at all, it can create a “ghosting” effect that will make the image blurred.

Step 13 – Heat up the heat press to the temperature needed. I used 400 degrees for 60 seconds for this mouse pad, but this will depend on the blank you are pressing it on to. A sublimation blank may vary in the time and temperature needed, please refer to the retailer or manufacturer for the recommended settings for the specific material you are using.

The key to this is you need high heat and firm pressure for the full time frame for sublimation to work properly.

I used my Craft Pro 15″ x 15″ heat press. I love this press as it has a pull out bottom platen which helps to save my knuckles from getting burnt when placing my materials on the press.

I love the 15″ x 15″ since I make large shirt sizes. Check out all the heat press options from Heat Press Nation HERE. They now have more color options and sizes than when I first bought mine.

Step 14 – Add butcher or parchment paper (NOT wax paper) on the bottom platen of the heat press – this is often referred to as “blow out” paper as it will protect your press surface from any ink that “blows out” of the paper.
Do not use a teflon sheet.

Note: if you get ink on the top or bottom platen, it can transfer to future heat press projects. Make sure to protect your press surface.

Step 15 – Place your blank, with the sublimation print, on top of the “blow out” paper.
Then add another layer of the parchment (blow out) paper to cover the top.
This makes your “sublimation sandwich”.

Press with medium/firm pressure depending on your blank for the set time and temperature.

Item will be HOT! Handle carefully. Let cool and carefully remove heat tape and sublimation paper from blank.

Yes, you will still see part of the image on the sublimation paper – that is normal.

And then sometimes things just happen and it doesn’t turn out. This was my second one. Maybe I put it in upside down. Maybe the pressure was not high enough. Not sure what happened. But, I can reprint and try again.

After pressing the 3rd one, I think I had it upside down. It just goes to show that it happens to us all. You aren’t alone!
And I would recommend buying extra sublimation blanks, especially while you are still learning and a beginner. I know no one likes to “waste” materials, but you are learning and it is a “learning” experience, not a waste.

My husband loved it. I gave him one for his home office and one for his work office. It was great to be able to take a photo he had taken and turn that into something he would use and see each day.

And that is it!
While I broke it down into 15 steps, it really is just print and press.
It is great that you can use the Silhouette Studio software to make the sizes needed, use shapes as templates, etc.

Where to find sublimation blanks

As the popularity of things grows, so do the list of places you can find sublimation blanks and materials.

Fabrics need a high polyester count in order for the sublimation ink to bind to it. So keep that in mind when shopping. The ink will just wash out of other materials such as cotton.

Here are a few places that I’ve found sublimation blanks. I have a collection started of blanks to try and gifts to make with them, so I have not been able to test them all yet.

These are listed in alphabetical order:
Artesprix – user code SARAH10 for 10% off
Craft Chameleon
Heat Press Nation
Johnson Plastics Plus
Amazon

I have so many things I want to try and before I get the chance something else catches my attention and I want to do that too!

I love that with the Silhouette software you can use it for more than just cutting!

Stay tuned for more information coming and a comparison with the new Epson F170 sublimation printer too!

I would love to see what you are creating with your Silhouette software or machines!
Or if you have any questions, feel free to post photos or questions on my Facebook group at 
Silhouette Secrets with EllyMae.

Save this for future reference by pinning the image below.

Enjoy !

This image has an empty alt attribute; its file name is logo.jpg

THANK YOU for your support! How can you help? Click HERE & buy a coffee.
Every little bit helps with the cost of running the site.

Or if you are looking for more in-depth, step-by-step classes, check out all of my online Silhouette classes on my Teachable site HERE.

SS Logo snip it
**This post may contain affiliate links. What that means is that I may receive compensation if you purchase through the links I have provided. The price you pay for the product or service is not higher but I may get compensated for sharing.