Posted on 3 Comments

Welding Text to Shapes in Silhouette Studio

Have you ever wanted to weld text to a shape, but it disappears when you weld it together?

Let’s take a look at how to create a welded design so it doesn’t get swallowed up when it’s welded.

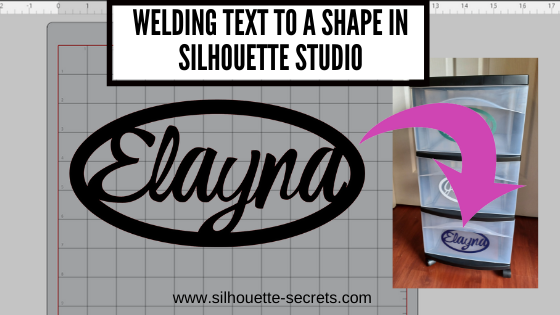
Welding text to a shape in Silhouette Studio

Draw the shape that you want to use.
I used the Drawing Tools on the left to draw an oval.
The size does not have to be specific because we can change it to the exact dimension needed.

Open the Transform Panel – Scale Tab or use the Scale tools in the Quick Access Toolbar (QAT) to adjust the size exactly as needed.

How do I know how big to make it?
Grab a ruler and measure the space you have to put the decal.

Open the Offset Panel and choose an Internal Offset.
Adjust the distance as desired. I used a distance of 0.400″.

Select both the shapes and make sure they are centered together using either the QAT or Transform Panel – Align Tab.
Then right click, and choose Make Compound Path.

The Compound Path is what gives the ability to weld to a shape. Weld means that you combine 2 shapes together to make one or make one continuous cut. If you have only 1 shape drawn and try to weld to that, it just merges the 2 designs together. By creating the Compound Path, you now have a “frame” to weld the text to.

Fill the shape with color and you will see the compound path that was created.

Compound Paths are probably the hardest concept for any user to grasp, but once you do, you don’t forget it. To find out more on Compound Paths check out this post HERE.

Now we can create our text to use.
Click on the Text Tool on the left side, then click on the design mat, and start typing.

Click off of the text to deselect it, then back on the text 1 time to select it.
Open the Text Style Panel on the right side and choose a Font Style.

Affiliate links may be present in the following blog post and as an Amazon Associate I earn from qualifying purchases.

I am using a font called ZP Xiphoid Script Oblique by Illustration Ink – Design #167413

Adjust the text as needed. Each font style is going to vary in what you may need to do. In this case, I increased the character spacing just a bit. Then made a copy of the word and moved it off to the left side so I have an original. Then I right clicked and chose Ungroup and moved the letters individually so that they all formed smoother transitions as a script font.
Note: when text is changed in any way such as ungrouping, welding, convert to path, etc. it is no longer editable text. This is the main reason to make a copy of the original before changing it.

Tip: Move the text in smaller increments by using your keyboard arrow keys with the Snap to Grid turned off.

Once the letters are positioned how you like, right click and choose Weld. All overlapping text will then be welded together and form one continuous cut.
Note: keep in mind that all font styles will vary and there is no perfect or one click button to modify all text styles.

Fill the text with color to see it better and move it up into the shape drawn previously.
Using the corner bounding boxes, scale the text to a size that fits within the shape and overlaps on the edges. Use the Center – Align tool as needed and adjust as desired.

Tip: some designs will look odd when using the Center function on the software. Adjust as needed to your desire. In this design the center point placed the design too high in the oval because of the y in the name. I used the arrow keys and bumped the name down until I felt it looked better.

Select both the oval frame & text, make a copy, and pull it off to the side.
Then select both the frame & the text on the design mat, right click, and choose Weld.
Any overlapping parts will then be welded together.

Tip: Always make a copy of your design before welding it together because once you save and close the file, you cannot undo a weld.

Click on the Send tab and see where the cut lines are to make sure it welded properly and it will cut where you want.

And that is it!
Create custom labels cut from adhesive vinyl, cardstock, card sentiments, and more!

Welding text into any shape can be done with just a few simple steps to make the shape workable.

Check out the full video tutorial on my YouTube channel HERE.

Have further questions?
Feel free post on the
Silhouette Secrets+ Facebook Group.

Save this for future reference by pinning the image below.

Enjoy!

This image has an empty alt attribute; its file name is logo.jpg

THANK YOU for your support! How can you help? Click HERE & buy a coffee.
Every little bit helps with the cost of running the site.

Or if you are looking for more in-depth, step-by-step classes, check out all of my online Silhouette classes on my Teachable site HERE.

SS Logo snip it
**This post may contain affiliate links. What that means is that I may receive compensation if you purchase through the links I have provided. The price you pay for the product or service is not higher but I may get compensated for sharing.
Posted on 35 Comments

Let’s Explore v4 – Text Style Panel

Let’s talk about text – the Text Style Panel!

Silhouette Studio software will pull in any font that you have installed on your computer. Once it’s installed, a text style name should show up in the Text Style Panel.

Let’s take a look.

Text Style Panel copy

  1. Text Search bar – The name of the font that is selected will appear in this box or you can highlight it and type a name in the box and it will select that font.Text Search bar copy
  2. Text Size – Use the drop down box to change the text size smaller or larger here or highlight and type in a new number to change the pt size.
  3. Text Style Panel – The first 2 sections to appear in the Panel are the “Frequently Used” and “Recently Used” sections. You may have other sections in the Panel because you’ve created folders in your Fonts folder in the Silhouette cloud library. When you choose a font style for your text, the font style name will be highlighted.
  4. Text Properties – If a font has the options, choose Bold, Italic or Underlined here. Some text styles may have additional options available and the drop down box next to U will be available to select.
  5. Text Alignment – Choose your text to be align left (default), align centered, align right or Full. Text Properties copy
  6. Horizontal/Vertical Text – Choose whether your text runs horizontally or vertically on your design mat.
  7. Line Spacing – Increase or decrease the space between each line of text. This will affect text created in the same text box.
  8. Character Spacing – Increase or decrease the spacing between each character. This can come in handy when you are trying to weld something and the letters do not overlap.
  9. Kerning – This feature adjusts the spacing between letters to make them look better, such as AW or AV. Instead of having such a wide space between then, you can turn the Kern on and they move closer together.Character Spacing

Now, let’s talk a little about how to create with Text.

First click on the Text Tool on the left side of the Silhouette Software. Click on the design mat & type out the words. Click off of the words to deselect it and then click back on the text once to select it. Fill the text with color to make it easier to see & work with. Click on the Text Style Panel on the right side.

Working with text copy

Now, click on a Font Style Name, the text will change to that font style. You can then either click on each font, use the text search bar if you know what you are looking for or use the arrow keys to scroll through the text list and as you do the words will change to each font – this is my favorite method if I don’t know what font I want.

Font Style copy

You will notice that I have red lines still going through my letters. Because my letters are overlapping, I want to weld this before I cut so that it will cut anything part that overlaps as one piece. Right click on the design and choose Weld.

Weld copy

This will change the text from editable text to a vector image, so you might want to make a copy and pull it off your mat before welding. Once it’s welded, you will see that any piece that was not overlapping will have now become it’s own separate section with a bounding box around it.

Weld separate pieces

To keep the pieces together, we want to Group. There are several ways to Group – right click & choose Group, Ctrl (Cmd) + G, Object tab at top & Group or use the QAT (Quick Access Toolbar) at the top and select the Group icon. Group QAT copy

And now your font is ready to cut.

Final Font

I hope that helps to explain the different parts of the Text Style Panel and how to create text designs.

If you want to learn even more about text and how to get accurate text sizes, check out my guest post on Silhouette School’s blog about Forcing Accurate Text Size.

Check out the other posts in the Let’s Explore v4 Series HERE.

Enjoy !

THANK YOU for your support! How can you help? Click HERE & buy a coffee. Every little bit helps with the cost of running the site.

Looking for more in-depth, step-by-step classes, check out all of my online Silhouette classes on my Teachable site HERE.

SS Logo snip it

**This post may contain affiliate links. What that means is that I may receive compensation if you purchase through the links I have provided. The price you pay for the product or service is not higher but I may get compensated for sharing.