In today’s tutorial I’m going to share how I create a template file in Silhouette Studio that can be reused for future projects. In this particular example, I’ll be using an air freshener sublimation blank. But, this same technique can be applied for all kinds of future projects.
This is a great trick to have in your toolbox, especially if you are using the same blanks over and over.
Affiliate links may be present in the following blog post and as an Amazon Associate I earn from qualifying purchases.
Supplies used:
– Sublimation air freshener square blanks from Heat Transfer Warehouse
– Epson F170 sublimation printer
– Epson sublimation ink
– Sublimation paper
– Heat Tape
– Parchment Paper
– Heat Safe Gloves
– Patterns or photos
Patterns in demo below:
– Tie-Dye Pattern by Renee Jablow – Design #330722
– Tropical Watercolor Leopard Print by Sophie Galo – Design #416584
– Do More of What Makes You Happy Phrase by Lori Whitlock – Design #35309
– Sharpie Pen font by Flycatcher Design – Design #299019
– Heat source – Siser Heat Press
Optional:
– Artesprix Protective Pad (heat safe surface)
– Air Purifier (helps with any smells from sublimation)
– Tape dispenser
Silhouette Step-by-Step Tutorials
Check out the full written tutorial below or find a video tutorial on the Silhouette Secrets+ YouTube channel HERE.
How to create a Template in Silhouette Studio
Measure sublimation blank.
Use drawing tools in the Silhouette Studio software to draw the shape needed.
Use the Scale Tools under the Transform Panel or the Quick Access Toolbar (QAT) at the top to size the template as needed.
With sublimation it is a good idea to make your print a bit larger than actual size, so you have a little wiggle room when placing your image on the blank. Add a small extra border to the exact measurement you took of the blank and use that as your template.
If you plan to print several on the same page, make copies of the template shape.
If needed, check the Show Print Border option on the Page Setup Panel – Tab 1 to see where your printer page margins are and make sure your design won’t get cut off.
When you have the shape, save the file as your template file that can be reused in the future.
When you are ready to use the template file, open it, then choose File > Save As and rename it for your current project.
Now, we can fill the template shapes with the images or patterns for the project.
If your sublimation blanks are double sided, you will need patterns for both sides.
How to Fill in Template Shapes
With Silhouette Studio you have so many options to design within your template shapes.
Here are a couple ways.
Use the Pattern Fill Panel to add a pattern to the shape
Or access larger images of the Patterns folder from the Show/Hide library option by clicking the folder icon in the bottom left corner of the Silhouette Studio Design Tab.
This will open up a split screen between the library and the design area. It can be easier to view things from the library, especially patterns at a larger size.
Or drag and drop a photo from your computer into the shape too!
Add any additional elements to the design you want.
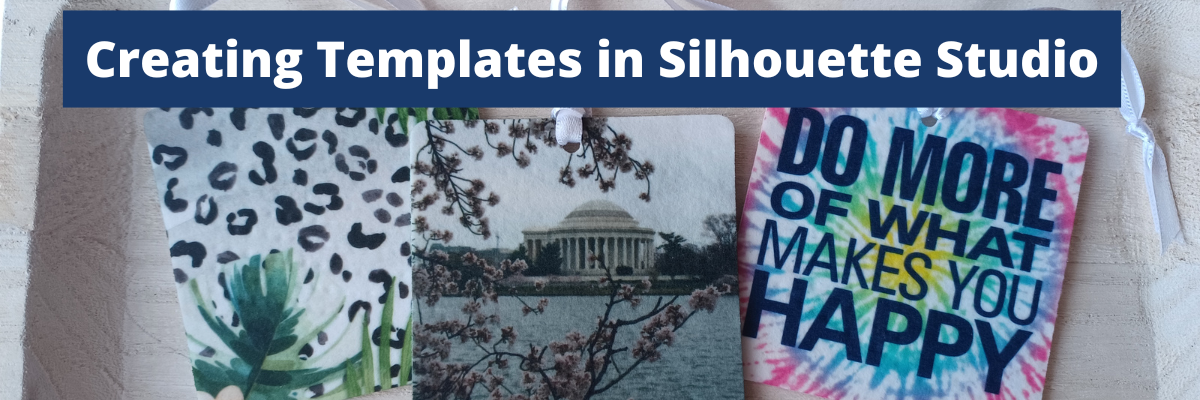
I added a text design Do More of What Makes You Happy Phrase by Lori Whitlock to the top and text for the location using Sharpie Pen font by Flycatcher Design to the bottom one.
If you do add elements and you want both sides to match exactly, make a copy of the one you altered and delete the template. Then they will match exactly.
Make sure to save your file often and keep in mind that the more graphics you add to a file it increases the size of that file. If you find your computer taking longer to process, it could be due to large photos and patterns.
When you are ready to print, go to File > Print and follow the direction for printing to the sublimation printer you have.
Check that the print came out properly. Any text should be mirrored when it prints because it’s an ink transfer.
Sublimation on Air Freshener Blanks
Cut the printed designs apart and secure the print to the sublimation blank with heat tape.
Even though these are double sided, you still want to press each side separately. The side with the print should be the side that is against the top platen of the heat press, so it gets the adequate heat for a full transfer.
Use a piece of parchment paper on the bottom of the heat press surface to protect it.
Then place the sublimation blank on top with paper side up.
Cover with another piece of parchment paper to protect the top platen of the press.
Press the sublimation blank according to the manufacturer’s instructions.
For these air fresheners it calls for 400 degrees F for 60 seconds with medium to firm pressure. Hot peel!
Be very careful when removing the items after pressing as they will be hot.
Throw out any parchment paper that has ink on it as it can transfer to the next blanks or your press.
These are a hot peel and you better be quick about it!
I would recommend having heat safe gloves ready to go. I had to run get mine the first time and it was not quick enough.
I found it much easier to press 1 at a time and then after remove the sublimation paper quickly and press it down on my Artesprix Heat Safe Protective Mat to help it stay flat and not curl.
I learned several things during this process.
At first I tried to press 3 at a time. I wasn’t fast enough to remove the paper before they cooled and the paper stuck to the blank. I’ll work on ways to remove that in the future and see if I can save those blanks.
Once cooled, secure the sublimation print to the blank with heat tape on the other side of the blank.
Press again at the recommended time and temperature and quickly remove the sublimation paper.
Important Tips
Follow the instructions for any sublimation blank or material you are using.
These specified “hot peel” and I definitely found that out the hard way. The first 3 I did, did not turn out because I wasn’t fast enough.
Get extra blanks.
Especially if it’s the first time you are working with a material! Extra blanks are always a good idea.
Only press one air freshener at a time so you can work quickly.
Unless you are pressing the entire sheet of fresheners with the same pattern. Then you can do the full sheet with a full printed sheet as Heat Transfer Warehouse showed in this tutorial HERE.
They also share how to scent the fresheners there too!
Keep in mind that when you are pressing a print to a surface, the surface can affect the final colors as well. You can see in my projects that my darker photo of Washington D.C. looks a bit darker and not as bright as the others. That is due to how the photo started and the surface of the blank too!
I think this might be my favorite one!
Save this for future reference by pinning the image below.
Enjoy !
THANK YOU for your support! How can you help? Click HERE & buy a coffee.
Every little bit helps with the cost of running the site.
Looking for more in-depth, step-by-step classes, check out all of my online Silhouette classes on my Teachable site HERE.
**This post may contain affiliate links. What that means is that I may receive compensation if you purchase through the links I have provided. The price you pay for the product or service is not higher but I may get compensated for sharing.