Posted on Leave a comment

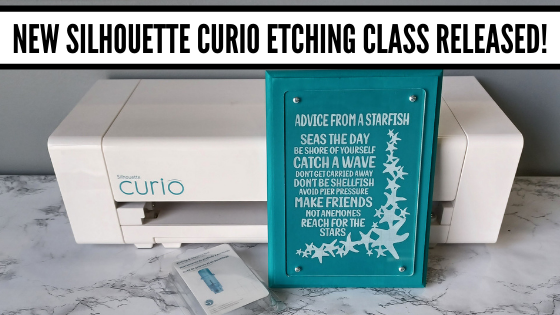
New Silhouette Curio class released!

I have so much fun playing with my Silhouette Curio and all the things it can do!
I want to share that with you!
Join me in this Silhouette Curio class to create an acrylic etched panel!
Check out the class HERE.

This is an Advanced Beginner Curio class that will cover the setup step-by-step to getting the Curio ready to etch, creating a template in Silhouette Studio for the etching, and then creating the design to be etched. You will create your own word art design using tools in the Silhouette Studio software! Tips are shared throughout the video class for getting successful etches with your Silhouette Curio machine.

Check out the class

HERE

Here is a sneak peek at the class content and the videos included:

Supplies & Setup Video – 17:55 minutes

Creating the Etched Acrylic Panel Template in Silhouette Studio – 31:30 minutes
– Using the drawing tools to create a template
– Creating template with nail holes to avoid
– Alignment Tools
– Move By Tool

Designing & Etching the Acrylic Panel in Silhouette Studio – 1 hour 3 minutes
– Opening Starfish border Design #3653
– Compound paths
– Text Tool
– Creating the design with multiple lines of text
– Creating “word art” with text
– Adding an etch fill
– “Secret” to getting a tighter etch fill
– Setting up the Curio to etch
– Etching
– Finish and assembly

Class Supplies:

Affiliate links are present in the following supply list and as an Amazon Associate, I earn from qualifying purchases. The cost to you is no different, but I may earn a commission by you using the links provided.

-Silhouette Curio machine
Silhouette Etching Tool
– New Silhouette Curio Cutting mat – highly recommend a sticky mat
Starfish border Design by Calli Arroyo – Design #3653
Fish Grill font by 7nTypes – Design #292330
4” x 6” Acrylic Panel with 4 holes from Craft Chameleon
Double sided sticky tape from Craft Chameleon
– 6” x 8” Basswood board by Walnut Hollow – Amazon or Walnut Hollow
#4 x ½” Sheet Metal Screws
– Dark colored paint or stain
– Paint brush
– Screwdriver
Hand drill
– Weeding tool
– Optional: baby wipes, Teflon sheet, apron

Optional:
LW Wide Marker Font by Lori Whitlock – Design #82132
Acrylic Panel no holes from Craft Chameleon
Wood stand

Additional Resources

No matter how many times I etch a project, even the same design, I still do a little happy dance when it’s finished!

Find this class on my Teachable site HERE

I love being able to customize my gifts & projects with the Silhouette Curio!

Want more ideas of what you can create with your Curio?
Check this out – Gift Ideas with your Silhouette Curio

Just getting started with your Curio?
The possibilities are endless in what you can create!
Check out the other Silhouette Curio class on my Teachable site HERE.

I would love to see what you are creating with your Silhouette software or machines!
Feel free to post on my Facebook group at 
Silhouette Secrets with EllyMae.

Save this for future reference by pinning the image below.

Enjoy !

This image has an empty alt attribute; its file name is logo.jpg

THANK YOU for your support! How can you help? Click HERE & buy a coffee.
Every little bit helps with the cost of running the site.

SS Logo snip it
**This post may contain affiliate links. What that means is that I may receive compensation if you purchase through the links I have provided. The price you pay for the product or service is not higher but I may get compensated for sharing.
Posted on 9 Comments

Let’s Explore v4 – Warp Templates

The warp templates area new to the v4.2 software release. They are available with the Designer Edition upgrade or higher and a version higher than v4.2.279 of the Silhouette software.

To update the Silhouette software version, I would highly recommend going to the Silhouette website and downloading the update direct from there.

Before updating the software version, I would highly recommend making a backup of the library. You can find more details on the Silhouette library for versions before v4.2 in this post – Let’s Explore v4 – Silhouette Library Tips.

Warp Templates

The warp templates are found under the Warp Panel on the right side. Depending on your screen size, you may have a pop out menu or you may see the full list of panel icons on the right side.

Warp Panel copy

In the left photo, you will see the fly out menu for a smaller screen and on the right side, you will see the full panel list expanded. Again, this is dependent on screen size.

There are 6 different options for Warp Templates.

Here are the first 3 on the left side of the Warp Panel.

Warp first 3 shapes copy

And here are the 3 templates from the right side of the Panel.

Warp last 3 shapes copy

The templates can be used as is or you have even more options to customize the text.

Points copy

By grabbing and moving the points, you can edit the text even further.

Move points copy

Another tool that would come in handy here is the Snap to Grid feature. Most times when I use the software, I like the freedom to move my design freely and in small increments.
With the Snap to Grid option, it will move to the next grid space measurement that you have selected. This can help in aligning the points of a warped shape.
For instance, if you move the left bottom point and you want to make sure that you move the right bottom point so it’s perfectly aligned.

Snap to Grid option copy

Open the Page Setup Panel – top right icon. Click on the 2nd tab at the top to bring up the Grid Options.

Check the box next to Show Grid and Snap to Grid. Now, when the orange points are moved, they will snap to the grid spacing.

I love letting the software do the work for me!

At this point, the text can still be changed by double clicking in it to get the text cursor.

Change text copy

When you are satisfied with the changes to the text, then choose the Release Warp option and it will change it take it out of the Warp edit.

Release Warp copy

Notice that it separates each letter and you will need to group the design back together for it to move as one object.

If the changes are not what you had in mind, choose the Restore Original Shapes option and the text will revert back to the original design.

Restore original copy

And there is more!!!

Grab the slider on the right side of the panels and it reveals more Warp Template options.

Slider more options copy

So much fun to play with all the options available to you in the software.

Left side 2 copy

Right side 2 copy

Now, what are some ideas that you can think of to create Word Art with these Warp Templates?

Final copy

Feel free to post your comments and questions below or on my Facebook group at Silhouette Secrets with EllyMae.

Enjoy!

SS_Signature copySS Logo snip it

**This post may contain affiliate links. What that means is that I may receive compensation if you purchase through the links I have provided. The price you pay for the product or service is not higher but I may get compensated for sharing.


