Posted on — 35 Comments

Let’s Explore v4 – Text Style Panel

Let’s talk about text – the Text Style Panel!

Silhouette Studio software will pull in any font that you have installed on your computer. Once it’s installed, a text style name should show up in the Text Style Panel.

Let’s take a look.

Text Style Panel copy

  1. Text Search bar – The name of the font that is selected will appear in this box or you can highlight it and type a name in the box and it will select that font.Text Search bar copy
  2. Text Size – Use the drop down box to change the text size smaller or larger here or highlight and type in a new number to change the pt size.
  3. Text Style Panel – The first 2 sections to appear in the Panel are the “Frequently Used” and “Recently Used” sections. You may have other sections in the Panel because you’ve created folders in your Fonts folder in the Silhouette cloud library. When you choose a font style for your text, the font style name will be highlighted.
  4. Text Properties – If a font has the options, choose Bold, Italic or Underlined here. Some text styles may have additional options available and the drop down box next to U will be available to select.
  5. Text Alignment – Choose your text to be align left (default), align centered, align right or Full. Text Properties copy
  6. Horizontal/Vertical Text – Choose whether your text runs horizontally or vertically on your design mat.
  7. Line Spacing – Increase or decrease the space between each line of text. This will affect text created in the same text box.
  8. Character Spacing – Increase or decrease the spacing between each character. This can come in handy when you are trying to weld something and the letters do not overlap.
  9. Kerning – This feature adjusts the spacing between letters to make them look better, such as AW or AV. Instead of having such a wide space between then, you can turn the Kern on and they move closer together.Character Spacing

Now, let’s talk a little about how to create with Text.

First click on the Text Tool on the left side of the Silhouette Software. Click on the design mat & type out the words. Click off of the words to deselect it and then click back on the text once to select it. Fill the text with color to make it easier to see & work with. Click on the Text Style Panel on the right side.

Working with text copy

Now, click on a Font Style Name, the text will change to that font style. You can then either click on each font, use the text search bar if you know what you are looking for or use the arrow keys to scroll through the text list and as you do the words will change to each font – this is my favorite method if I don’t know what font I want.

Font Style copy

You will notice that I have red lines still going through my letters. Because my letters are overlapping, I want to weld this before I cut so that it will cut anything part that overlaps as one piece. Right click on the design and choose Weld.

Weld copy

This will change the text from editable text to a vector image, so you might want to make a copy and pull it off your mat before welding. Once it’s welded, you will see that any piece that was not overlapping will have now become it’s own separate section with a bounding box around it.

Weld separate pieces

To keep the pieces together, we want to Group. There are several ways to Group – right click & choose Group, Ctrl (Cmd) + G, Object tab at top & Group or use the QAT (Quick Access Toolbar) at the top and select the Group icon. Group QAT copy

And now your font is ready to cut.

Final Font

I hope that helps to explain the different parts of the Text Style Panel and how to create text designs.

If you want to learn even more about text and how to get accurate text sizes, check out my guest post on Silhouette School’s blog about Forcing Accurate Text Size.

Check out the other posts in the Let’s Explore v4 Series HERE.

Enjoy !

THANK YOU for your support! How can you help? Click HERE & buy a coffee. Every little bit helps with the cost of running the site.

Looking for more in-depth, step-by-step classes, check out all of my online Silhouette classes on my Teachable site HERE.

SS Logo snip it

**This post may contain affiliate links. What that means is that I may receive compensation if you purchase through the links I have provided. The price you pay for the product or service is not higher but I may get compensated for sharing.

Posted on — 22 Comments

Let’s Explore v4 – Magnet Trace

We are finishing up the Trace panel today by exploring the options of Magnet Trace. The Magnet trace is a feature that is unlocked when you have the Designer Edition upgrade to the software.

You will find this feature on the 3rd tab of the Tracing Panel, that is found on the right side of v4.

Magnet Trace Panel copy

While there are not many options on this Panel, it still has so much potential. Let’s take a look.

Magnetic Trace Panel copy

  1. Magnet Trace – Select your object to trace & then “Magnet Trace” is available. Click on it and you will get a red circle with a red dot in it. This is your trace tool.Magnet Trace Demo copy
  2. Size – Change the size of your Magnet Trace tool by using the slider bar, the arrow up or down keys or highlighting the numbers and typing new numbers in.Size copy
  3. Trace – After your Magnet trace is complete, click here to create your cut lines. You can see the red cut lines around my flower below. Trace option Note: this photo is on the Send tab, to get the bold red cut lines to show up. Trace
  4. Trace & Detach – Choose this option if you want your design to be detached from the background. This works great if you are wanting to do a Print and Cut project with your design.Trace and detach

This is a really neat feature and it took me a bit to think of what I would do with it. You can see that the edges of my design are not perfect and I would do some clean up on this image. So let’s do a little bit of point editing to clean it up.

First, check out these edit points, double click on the image to bring up the Point Editing window. All those little dots, those are edit points. Now, edit points can be intimidating but they can also be fun to play with. If we were to cut this as it is, it will sound funny as it cuts because the Silhouette machine has to hit every single one of those edit points when it cuts.

Edit points

Let’s zoom in and check out the edges.

Edit point zoom

As you can see there are some edges that can be cleaned up.

You are able to move and delete edit points to your desired effect. I can say that this cleanup took only a few minutes. The more you play with the edit points, the better you will understand what they do. Just by moving the edit points in towards the flower, I eliminated the excess background that the trace grabbed.

Edit point zoom cleanup

You can select multiple edit points by holding down the Shift key and dragging your mouse over the ones you want to highlight and then you can move them all at once or delete them all at once.

Cleaned up

What a difference a little edit point clean up makes.

Now here are all the edit points after I’ve cleaned it up. Since this is a flower with lots of curves, it will still have many edit points so you can keep the realistic look of the flower.

Cleaned up edit points

But, it has a lot less than the original trace.

Now, I’m sure as you read this you have asked yourself, what would you do with this? I’ll be honest, I did the same when I started looking into it because I have never played with this before. And now ideas are hitting me about all the possibilities.

If you do not have Photoshop or access to photo editing software, you can use the Silhouette software and this is one way to grab something from a photo.

Or you could use your own photos that you’ve taken and make Print and Cut stickers. These are photos of flowers I took at a friend’s poolside last summer. I think they would make gorgeous stickers that you could add to your planner or calendar to enjoy everyday.

Magnet Trace Demo final

To learn more on how to set up a Print and Cut check out the Page Setup Panel – Registration Marks post.

You can find all of the Let’s Explore v4 post HERE.

I hope you enjoyed exploring the Magnet Trace feature in the Silhouette Studio v4 software. This program is amazing and I learn new things every day!

Enjoy !

THANK YOU for your support! How can you help? Click HERE & buy a coffee. Every little bit helps with the cost of running the site.

Looking for more in-depth, step-by-step classes, check out all of my online Silhouette classes on my Teachable site HERE.

SS Logo snip it

**This post may contain affiliate links. What that means is that I may receive compensation if you purchase through the links I have provided. The price you pay for the product or service is not higher but I may get compensated for sharing.

Posted on — 19 Comments

Let’s Explore v4 – Tracing Panel

If you are just joining in, we have explored our way through several of the icons on the v4 Silhouette software – you can find all of those HERE – starting with the Page Setup Panel.

And our next step in the Let’s Explore v4 series is the Tracing Panel – Tab 1.

This is a very popular Panel and there is so much that you can do with it from tracing an image to tracing a photo. But, I will say right from the get-go, it is not a one size fits all Panel. Each image you trace is going to require you to adjust it differently than the last one. So while the concepts can be taught, the technique varies some each time a trace is done.

You will find the Trace Panel on the right side of the v4 software and it resembles a butterfly or a piece of bread.

Trace Panel copy

Now, let’s take a look at the Trace Panel. Tutorial written in version 4.1.441 Updated 6/8/21 – trace panel has not changed since original post

Trace Panel detail v4.1

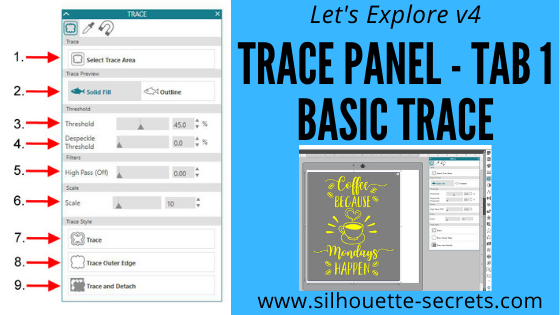
  1. Select Trace Area – Click on Select Trace Area and then draw a rectangle around the image you want to trace. A gray box shows up around the image and you should see some yellow show for your trace. For a good trace, you want as much yellow and as crisp, clear lines as possible. Select Trace v4.1.441
  2. Trace Preview – Choose between Solid Fill (as shown above) or Outline fill.Outline Fill v4.1.441 I prefer to use the Solid Fill so I know exactly where it will trace.
  3. Threshold – Determines how the trace filters are applied to your image.
  4. Despeckle Threshold – Eliminates noise in your trace. *
  5. High Pass Filter – Trace lines begin from the outside and work to the center of your image. *
  6. Scale –  Scale the trace up or down to get the look you want ** Each image will be different in how it traces and you will need to adjust the Threshold & filters to what works best for you particular image.
  7. Trace – Click on this when you want to trace around all the yellow of the design. This is the most common Trace and the one that I use the most often. After clicking trace, move your design away and the cut lines will be there around the area traced.Trace Style
  8. Trace Outer – This traces the outside edge of a design on your screen. If you stamped an image and wanted to trace around the outside edge of it, this is the option you choose. Then your cut lines will only generate on the outside of the image and as you can see below, it did not trace the 2 circles on the inside of my image. Trace Outer Edge 2 v4.1.441
  9. Trace and Detach – This will trace the image and then detach it from the background. It works great if you have a jpeg image. For instance, if I wanted to use this little guy for a Print and Cut Valentine. Trace and Detach v4.1

For a basic trace, black traces the absolute best. The resolution of your image also plays a big factor in your trace. If the file you are tracing is very pixelated, then it will trace all of those pixels. This results in a very choppy cut line and a lot of edit points.

And there you have your Trace Panel – Tab 1. It is a fun option to play around with and I suggest practicing with it and seeing what works best for you. A lot of it is moving the filters and finding out what works best for the image you are working with.

Affiliate links may be present in the following blog post and as an Amazon Associate I earn from qualifying purchases.

For my information on the filters, I consulted the Silhouette Handbook that is available in the Silhouette store.

Make sure to check out all the other sections of Let’s Explore v4 and learn more about what you can do in the software.

The images used in this post can be found here: CoffeeMondays by Scout and Rose Designs Stinkin Cute by Scout and Rose Designs Love Frog by MissKateCuttables

We would love to see what you are working on! Feel free post on the Silhouette Secrets+ Facebook Group.

Save this for future reference by pinning the image below.

Trace panel Pin

**This has been updated on 4-12-18 to reflect the changes released with the v4.1.441 software version.** *Updated 6/8/21 – the Trace panel has not changed since the original post was written.

Enjoy !

THANK YOU for your support! How can you help? Click HERE & buy a coffee. Every little bit helps with the cost of running the site.

Looking for more in-depth, step-by-step classes, check out all of my online Silhouette classes on my Teachable site HERE.

SS Logo snip it

**This post may contain affiliate links. What that means is that I may receive compensation if you purchase through the links I have provided. The price you pay for the product or service is not higher but I may get compensated for sharing.

Posted on — 31 Comments

Let’s Explore v4 – Setup Panel – Tab 2

Welcome back to my new series “Let’s Explore v4“!
If you are just joining me you can check out my first post of the series HERE – about Tab 1 of the Page Setup Panel.

Today I am going to be going through the features of Tab 2 on the Page Setup Panel in Silhouette Studio v4.
This panel is located on the right side of your v4 software at the very top.

Tutorial written in v4.1.206

Affiliate links may be present in the following blog post and as an Amazon Associate I earn from qualifying purchases.

This panel is about your Grid spacing. Do you want your Grid to show? Do you want your designs or fonts to ‘Snap to grid’? What increments do you want your grid to show at? What color do you want your grid?

So let’s jump in and go through each option that is available to you. It is all a matter of personal preference and once you understand what each feature does, then you can decide what you want to use.

1 – Show Grid
This option allows you to turn the Grid lines on or off on your Design mat. These grid lines can be useful when you are designing and spacing out objects.Show Grid copy

2 – Snap to Grid
If you have this option checked then your design will jump from grid line to grid line. If you un-check this option you have more control over moving your design in smaller increments.

3 – Show Guides
By checking this option, you can pull “Guides” down from the top ruler or over from the right side ruler. If you click on the ruler, either on the top or right side and hold down and drag, it will drag a “guide” line out and you can place it where you’d like on your design mat. This is another tool used to line up designs or for example make sure you have a design in a square. These “guide” lines do not cut and they do not save to your file. Rulers are an upgrade feature, therefore this is an option only for those who have the Designer Edition upgrade or higher.Guides copy

4 – Snap to Guides
This works the same way as the ‘Snap to Grid’ feature does. If you have it checked and have placed guides on your Design mat, when you move your design, it will snap to the guide lines you have placed.

5 – Ruler
You can turn the rulers that are along the top & right side on & off by selecting this. Rulers are an upgrade feature available in the Designer Edition upgrade or higher.

6 – Crosshairs
This will toggle a cross-hair pointer at the end of your mouse pointer on your screen. If you look closely, you can see the lines running horizontally & vertically from the red square.
Cross hairs_copy

7 – Square vs Isometric
You can choose whether your grid lines show up in a square pattern or for further design purposes, you can change them to an Isometric pattern. Below on the left, I have Square chosen and on the right I have chosen the Isometric.

8 – Spacing
This is used to change the spacing of your grid lines to the increment you want. You can change the spacing by using the slider bar left or right, highlight & type a new number or by the arrow keys to the right of the number.

9 – Divisions
You can choose the number of divisions that your grid spacing is divided into. Below you will see I have my grid spacing set at 2″ for both photos, but the photo on the left I have my Divisions set for 5 and on the right my Divisions are set at 10.

10 – Color
You can change the color that your grid lines show on the screen. There are several colors pre-selected to choose from or you can select a custom color from the color box.Color

These are the features of the Page Setup Panel – Tab 2.
Most of these features are used for designing purposes within the software and you will find each user develops their own preferences for what they see on their screen.

I like to have my mat revealed 100%, while another user may not like that look at all. Now, you know what each feature is and what it does, so you can decide how you like your design mat to look when you are using the software.

I did mention that a few of the features are upgrade features. This means that in order for them to appear on your screen you would need a software upgrade. There are 3 steps of upgrades – Designer Edition, Designers Edition+, and Business Edition. You can find out what features are unlocked with each software upgrade by viewing the chart HERE at the Silhouette America website.
If you would like to purchase an upgrade to your software, I recommend buying through an authorized Silhouette retailer such as Swing Design. After your purchase, you are sent a instant code and can enter the code and activate your upgrade immediately.
Click HERE to be directed to the Swing Design site.

I hope you have enjoyed learning more about the Silhouette Studio v4 software today.

I have made a video of everything covered in the series today.
Check it out here:

The design used in today’s video is called Drink Your Wine We Have Crafts to Do by Lori Whitlock and can be found HERE.

Feel free to post your questions & project photos on my Facebook group at Silhouette Secrets with EllyMae.

Save this for future reference by pinning the image below.

Enjoy !

THANK YOU for your support! How can you help? Click HERE & buy a coffee.
Every little bit helps with the cost of running the site.

Looking for more in-depth, step-by-step classes, check out all of my online Silhouette classes on my Teachable site HERE.

SS Logo snip it
**This post may contain affiliate links. What that means is that I may receive compensation if you purchase through the links I have provided. The price you pay for the product or service is not higher but I may get compensated for sharing.
Posted on — 37 Comments

Let’s Explore v4 – Page Setup Panel

Today I’m kicking off a new series called “Let’s Explore v4”. Each week I will highlight a new Panel available in Silhouette Studio v4 and explain a bit about that panel.

One of my goals as a TJC Licensed Silhouette Instructor is to not “reinvent the wheel”. There are lots of great posts, tutorials and videos that are a wealth of information and if you are on my Silhouette Secrets+ Facebook Page or Group, you will see that I share information from other colleagues and industry leader who I think you may benefit from. You will see me post links to their pages, share their information and link them up in my blog posts. Why? I am not in competition with them, we can all learn from multiple sources and what I’ve found is there is always something new to learn with the Silhouette Studio software & the Silhouette machines.

Now on to the fun stuff! I am using Silhouette Software v4.1.201, this information can be found under the Help>About in the software. If you are using an older software version, then my screen will look very different than yours and some of the options may not be available to you. If you’d like to upgrade your software to the latest version, you can find the upgrade HERE on the Silhouette America site, v4.1.206 is the most recent and it will work for these tutorials. You do not want to choose the Beta version unless you know the software very well and are able to spot a bug or two that may be in the program and report that back to Silhouette.

Page Setup Panel

The Page Setup Panel is located on the right side at the top of your Panel bar. Click on it and the Panel will pop up. Now with v4, you can move your panels around – this is called Floating Panels. If you grab the Blue area where it says Page Setup, you can move that panel around and drop it where you like. These Panels will stay open if you do move them on your screen, so it is a nice feature instead of having to keep clicking on the Panel icons on the right side.

Page Setup copy

If your Panel is not letting you grab and move it, check out the Preferences under Edit > Preferences. Under Defaults, change the Panel mode to ‘Flexible Panel Mode’.

Preferences - Flexible Panel mode copy

Now let’s break down the first tab in the Page Setup Panel.

LEv4-Page Setup copy

  1. Page Size – Here you can select the Automatic (machine) size and it will default to whichever machine you have plugged in to your computer or the last recognized connection. Click on the drop down arrow and you have many selections to choose from including a Current Printer option, if you have one connected.
  2. Width & Height – You can make the page size any size from 12″ wide to 10′ long. If I choose to change my Page size to 10″ x 12″, notice how it adjusts the white page or the red cut border (if Show Cut Border is checked). Something to note, if you have your page size set and your design is outside of that page size, it will not cut outside of the Page border. Custom page size
  3. Orientation – this will flip your page either vertical or horizontal on your mat.
  4. Cutting Mat – The Silhouette Cameo can cut any material that has a backing, such as vinyl & HTV without a mat. It can cut materials up to 10 feet long and this is how you accomplish that. You can tell the software you are cutting with ‘None’ or you can choose a 12″ x 12″ or 12″ x 24″ mat or several other options for other machines. Below you will notice that my Cut border is the full dimension of my mat. I have my Preferences set to ‘Cut to Edge of mat’. It does not always cut to the very edge, but it comes close. When you choose to cut with a mat, you are telling the software that it needs to feed that mat in to a certain location before it can begin cutting. It should only be cutting on the grid area of your mat. If it happens to cut higher than that, go check if you have it set to cut without a mat.Mat-Cut Border Now in the photo below, I have chosen Cutting Mat ‘None’ and I want to point out a few differences. You will see that the Cut border (red line) starts immediately at the top of the page. If your design is right at the top of the design mat, when you load your vinyl, it will begin cutting exactly where you have placed it on your screen. Also note, the Cut border on the left & right side. You lose about 1/4″ of cuttable space on both sides of your vinyl when you cut with no mat. This is the allowance that the machine needs to grip the vinyl in the machine. And you will see the Cut border end approximately 1″ from the back end of the page size, this is again cuttable space that is lost so the machine can hold that vinyl in the machine to finish the cut.No Mat - cut borderWhile you can cut without a mat, I personally prefer to use my mat any time that my material will fit on it. It provides stability and there is less that can go wrong, such as your vinyl sliding.Now, if you do decide to cut without a mat, I would strongly suggest investing in a roll feeder. I just used this for a large cut job and it worked beautifully and I did not have to babysit it as much as without. Here is what that looks like: Roll Feeder You can find the Silhouette roll feeder HERE.
  5. Reveal – This one is a favorite of mine. At 0% your design mat shows a white space that equals your page size. As you slide the bar up it starts to reveal the grid lines of the mat underneath that are the exact match to your Silhouette cutting mat. At 100%, it shows your entire cutting mat grid area and this is how I prefer to use my software most of the time.
  6. Rotate – this rotates the orientation of your mat on the screen. It is for visual purposes only and does not actually rotate your design or the way the mat is fed into the Cameo. Notice the photo on the left, it is at 0 degrees – the arrow is facing up. The arrow is the direction you load your Silhouette mat into the machine, it matches the arrow on the physical Silhouette mat. I have placed a design from the Silhouette store (Design #181402) on my mat, so you can see how it changes. Now, look at the photo on the right, I have changed the Rotate to 270 degrees and the arrow is now pointed to the left. This option rotates your entire mat and anything on your mat, but it does not change where your design will cut on your mat. It will still cut in the top left corner because you are loading the mat into the Cameo with the arrow pointing in.
  7. Show Print Border – If you check the box next to it, a gray box will appear on your screen. This is the Print Border for the current printer you have connected to your computer. It shows you the maximum border that you can put a design at to be able to print it on a material. Show Print Border
  8. Show Cut Border – This is another feature that I always have checked. As you can see in the photo above, I have the Show Cut Border feature checked and it shows a red line around what my maximum cut border is. I have it set to Letter size paper, so it is showing me it will cut to and 8.5″ x 11″ space. If I change my Paper size to 12″ x 12″, it will expand to the full 12″ x 12″ and outline my grid on my mat, as seen in several photos above.

I encourage you to check out each of these features in the Page Setup Panel and as you click on them, you will see things change on your screen. If you have an understanding of how these features work, you can spot and fix a problem when you notice something is not right.

I hope you have enjoyed the first session of “Let’s Explore v4.”

I am EllyMae with Silhouette Secrets+ and my goal as a TJC Licensed Silhouette Instructor is to teach the Silhouette Studio software. Once you know how to do things in the software, you have the skills to create any design for a project that you want.

Check out my Silhouette Instructions and Events tab for more information on Personalize Silhouette Instruction.

Have fun Exploring your Silhouette Software v4!

Enjoy !

THANK YOU for your support! How can you help? Click HERE & buy a coffee. Every little bit helps with the cost of running the site.

Looking for more in-depth, step-by-step classes, check out all of my online Silhouette classes on my Teachable site HERE.

SS Logo snip it

**This post may contain affiliate links. What that means is that I may receive compensation if you purchase through the links I have provided. The price you pay for the product or service is not higher but I may get compensated for sharing.

Posted on — Leave a comment

Personalized Christmas gifts

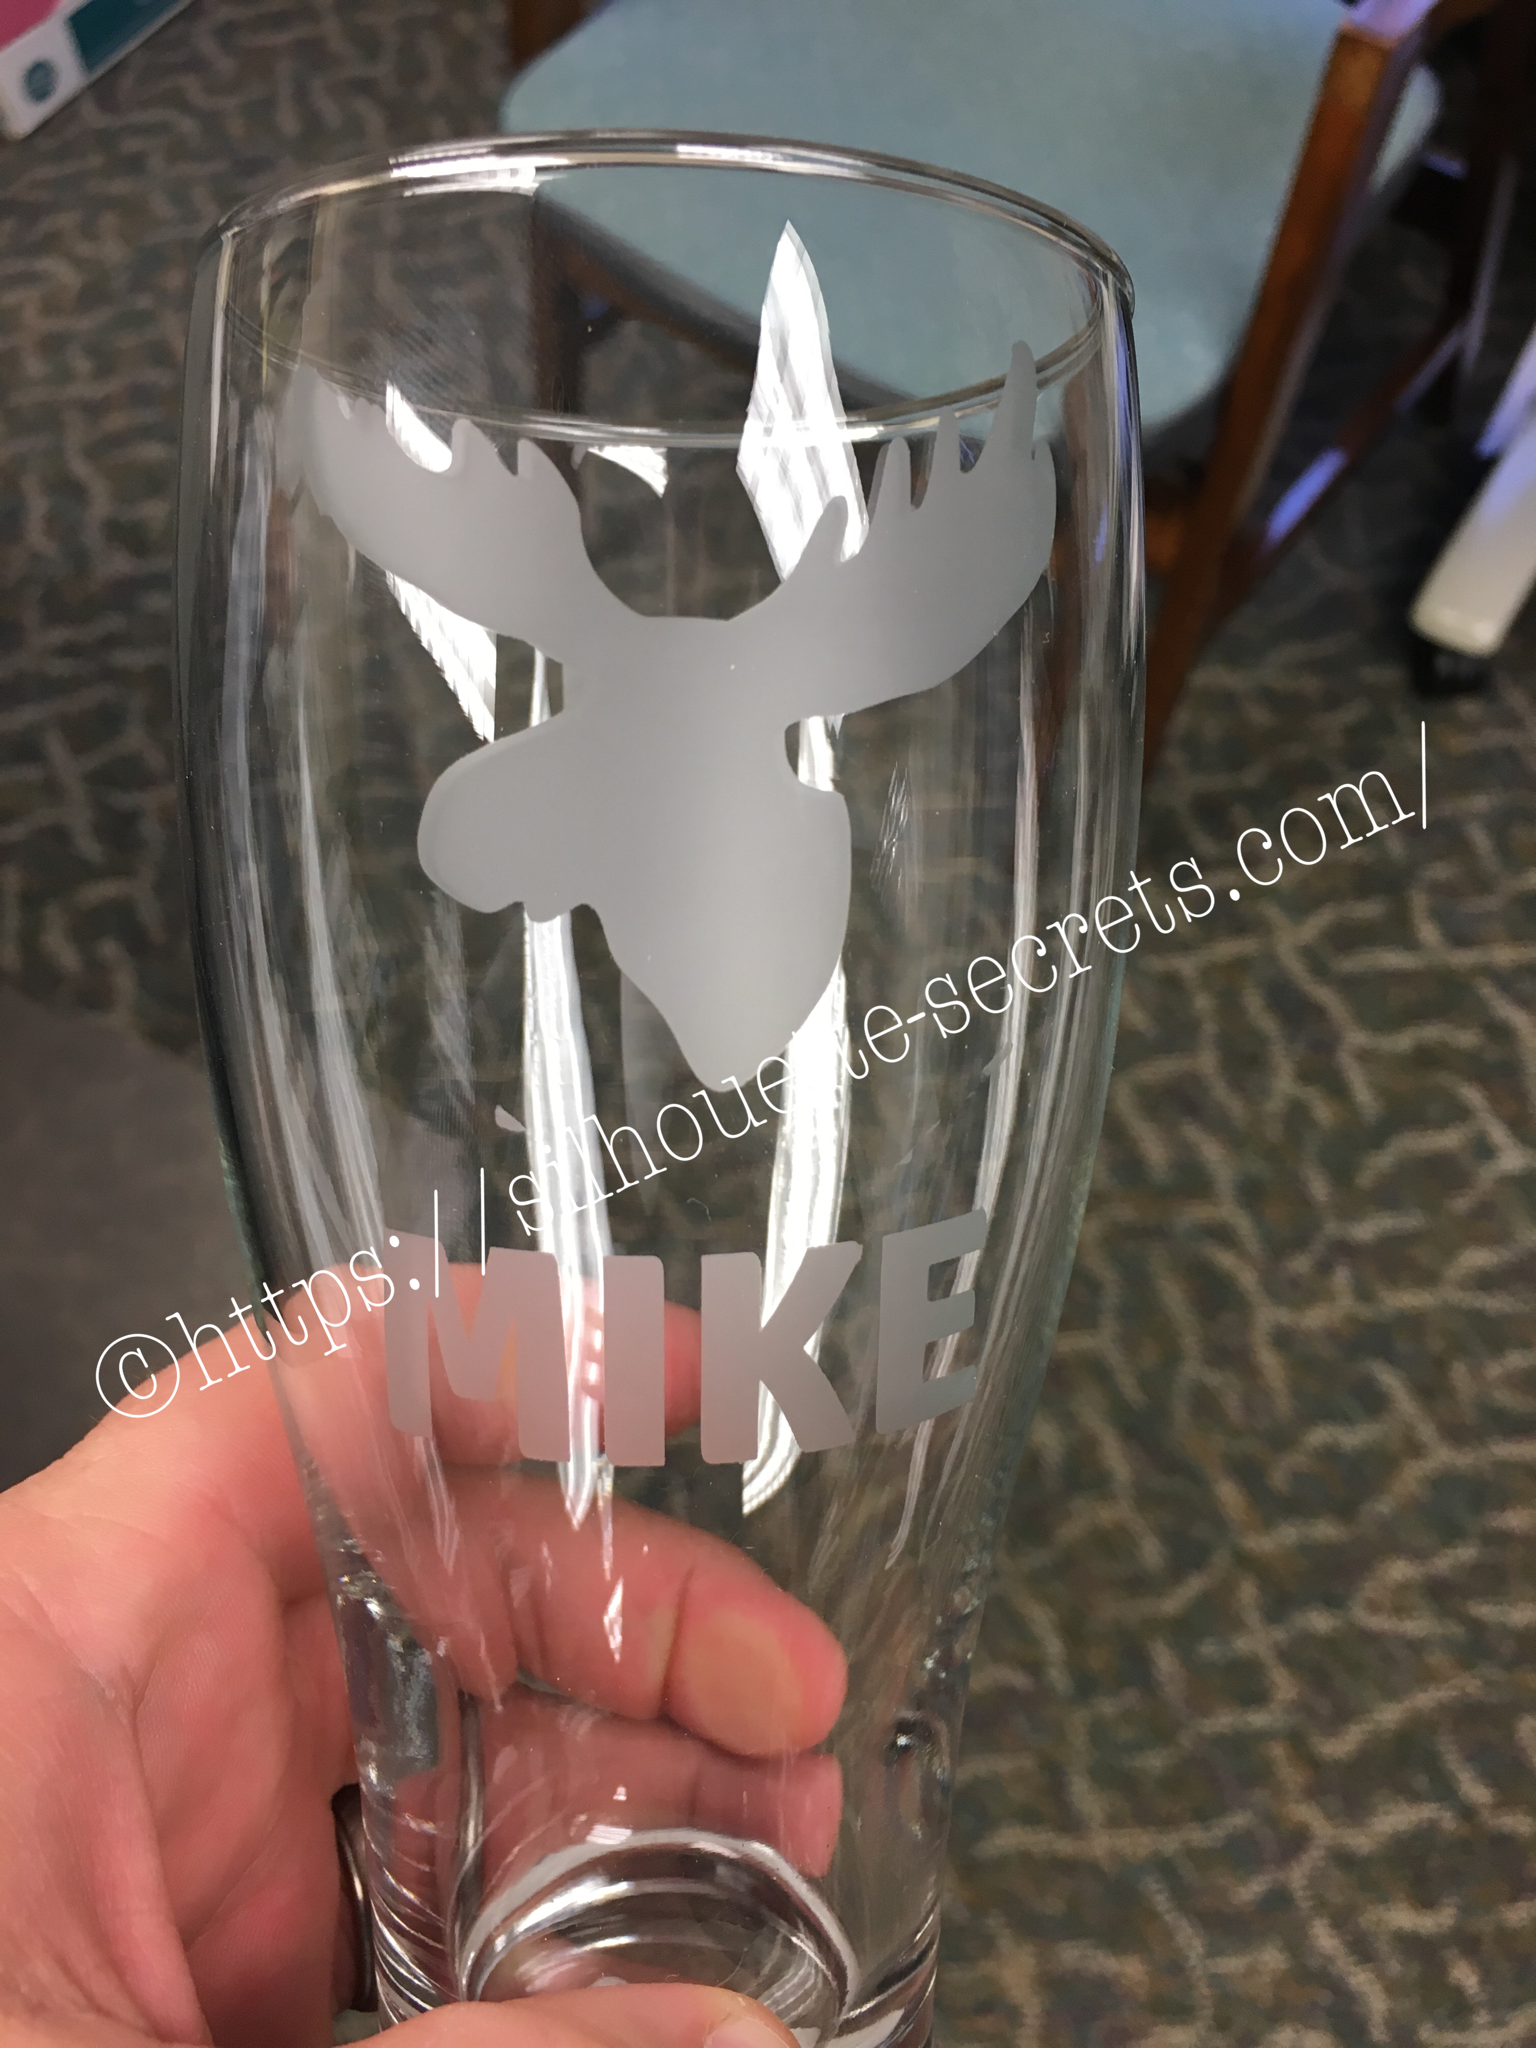
After one of my retreats with Terri Johnson Creates this summer, I brought home my finished glass etching ornaments and my husband asked if I could make something for a few of his co-workers. It started as a personalized ornament, but then we changed it to beer glasses….. I love that I can personalize an item with my Silhouette and a few basic supplies.

He thought of the individualization he wanted on each and that is what I worked with.
I found images of what he wanted and traced them and then worked with a font that would be bold and readable.

Here are the designs I came up with:
christmas-glasses

I cut these out of vinyl and then we applied them to the glasses. Hubby wanted to help with the project and remembered to grab a couple photos of the process.

img_5165

Hubby is applying the vinyl to the glass above and smoothing it out to make sure it has a tight seal around the edges where we want to apply the etching cream.

img_5166

Then we apply painters tape around the edges of the design, just in case the etching cream goes outside the area of the vinyl.

img_5188

And I am amazed each time I rinse that etching cream off and peel back my stencil. I love this etched glass look and it really adds to these plain ole glasses.
Now, I wish I had remembered to take photos of the rest of them before he took them with him to work.
There’s always something I forget!!!

Another Christmas gift complete!

Enjoy !

THANK YOU for your support! How can you help? Click HERE & buy a coffee.
Every little bit helps with the cost of running the site.

Looking for more in-depth, step-by-step classes, check out all of my online Silhouette classes on my Teachable site HERE.

SS Logo snip it
**This post may contain affiliate links. What that means is that I may receive compensation if you purchase through the links I have provided. The price you pay for the product or service is not higher but I may get compensated for sharing.