Ready to take your Silhouette crafting skills to the next level? In our latest LIVE tutorial, we demonstrated the exciting world of working with leatherette, faux leather, and adding dazzling details with heat foiling using the Silhouette Heat Pen. Whether you’re creating personalized accessories, decorative pieces, or custom gifts, these techniques will help you achieve professional-looking results with ease. If you missed it, don’t worry—we’ve got all the tips, tricks, and must-know details right here! And I am sharing more tips below too!
Affiliate links may be present in the following blog post and as an Amazon Associate, I earn from qualifying purchases.
We had such an amazing time during this month’s Live Silhouette Tutorial! The session was packed with valuable tips, tricks, and techniques to help you elevate your crafting game. I walked through the entire process of creating a bookmark shape, adding a design, and using the Silhouette Heat Pen for stunning foiled details. Plus, I shared insider tips on using the Knife Tool and so much more!
Grab your favorite drink, get comfy, and check out the replay on the Silhouette Secrets+ YouTube channel under the Live section. Don’t miss the chance to learn and create along with us! And that’s not all! I have a couple more tips I wanted to elaborate on below to help you be more successful in your Silhouette journey!
What if you don’t have a newer model machine that can utilize the Silhouette Heat Pen? No problem, the same tips, techniques, and tricks I shared in the video and below can still be useful. I’ve included additional resources below as well for users with older model machines.
When I asked the viewers if they wanted to see more, they said yes! They stuck around while I set up another design but this time with a fill option. Don’t believe that little timer in the Silhouette Studio software!!! The filled design took around 10 minutes to foil completely. That was twice as long as the estimated timer in Silhouette.
In the live, I also mentioned some tips about tool storage with the new powered tools and I wanted to share a bit more about that.
If these prongs get damaged, the powered tools will no longer work. The new tools are not cheap, so I would recommend storing them safely where they will not get beat up. In the video, I shared a brief glimpse at the storage I’m using, which is a storage container by Creative Options.
This works well for the storage of many Silhouette tools as you can see. The Silhouette Gold and Silver Foil have their own space so they won’t get damaged. The sections are adjustable so I’m able to partition the Silhouette powered tools off and store them so their prongs are not going to get knocked into anything else that could damage them. I also have my Silhouette Power Engraver in this container along with a couple blades and the Silhouette Embossing Tools.
My Options container is part of a larger Creative Options system that can house even more supplies too! I love the color of it too!
I shared even more storage tips in this blog post HERE.
One of the other tips that I mentioned in the video that is very important for using these new Silhouette powered tools. That is to keep the machine clean and free of dust and debris.
Any dirt or debris that gets in the powered tool housing connection or on the prongs of the powered tools can affect the functionality of those tools.
I want you to be as successful with your Silhouette machines and tools as possible!
And I know I mention that the end of the Live video that I will record another video sharing the tassel creation, however, when I got started making it, I found I’m no expert on this topic. So I’m sharing the video I followed to create my tassels by Notches Sewing found HERE.
Here is a list of the supplies I used for creating these foiled leatherette projects:
Save this for future reference by pinning the image below.
Enjoy !
THANK YOU for your support! How can you help? Click HERE & buy a coffee. Every little bit helps with the cost of running the site.
Silhouette Classes
Never stop learning! Let me help you take the anxiety out of learning with Silhouette and get to creating faster! My Silhouette classes are heavily focused on software, so you can take the skills & techniques taught and apply them to many future projects!
**This post may contain affiliate links. What that means is that I may receive compensation if you purchase through the links I have provided. The price you pay for the product or service is not higher but I may get compensated for sharing.
Heat foil projects are a show-stopping way to add a touch of elegance and shimmer to your designs, whether you’re crafting cards, gifts, or custom decor. With the right tools and techniques, creating stunning heat foil projects can be simple and rewarding. In this guide, we’ll walk you through five easy steps to achieve excellent results using your Silhouette machine. Whether you’re a beginner or looking to enhance your foiling skills, these tips will help you create dazzling projects that shine every time. Let’s get started!
Affiliate links may be present in the following blog post and as an Amazon Associate, I earn from qualifying purchases.
5 Steps for Gorgeous Heat Foil Projects
Create Your Design – design or select your project in Silhouette Studio
Set Up the Foil Action – adjust your settings for the perfect foil application
Prepare the Mat – place the foil on your material in the correct position & secure it
Send to Foil – let your Silhouette machine work it’s magic
Reveal Your Design – carefully remove the foil to unveil your stunning creation
New video on the Silhouette Secrets+ YouTube channel – Additional Tips!
We’ve just released a brand-new video on the Silhouette Secrets+ YouTube channel, Silhouette Heat Foil Pen Dos & Don’ts: Tips for Perfect Foiling Every Time! In this video, we break down the essential tips and common mistakes to avoid when using the Silhouette Heat Foil Pen. You can see the machine in action and what goes right and what did not. Use these tips along with the step-by-step details below for perfecting your foiling techniques.
Don’t forget to like, subscribe, and hit the notification bell to stay up-to-date with all our Silhouette tips and tricks on YouTube.
Your Step-by-Step Guide to Flawless Heat Foil Projects
1 – Create the Heat Foil Design
Choose a design to foil, or create your own custom design in Silhouette Studio.
Decide if you want the outline of the design to be foiled or if you prefer to fill the entire design with foil.
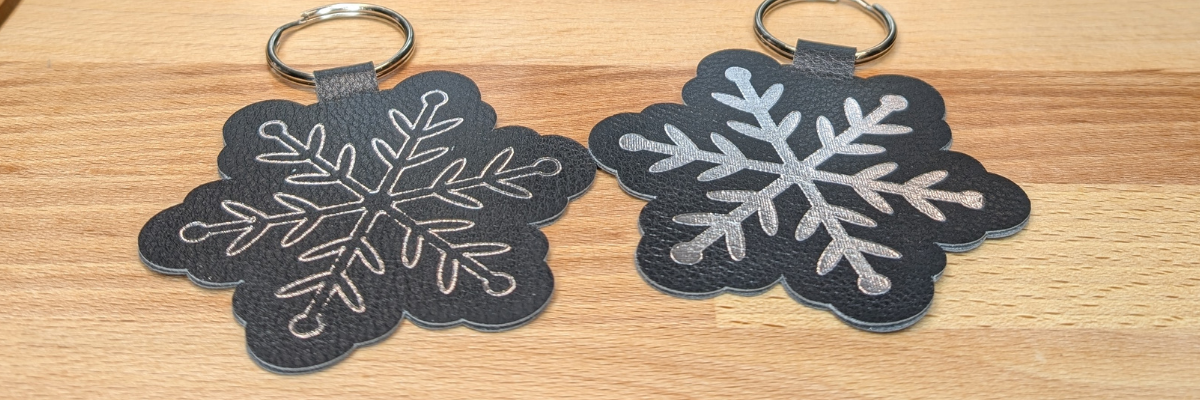
Silhouette Studio is a cutting program, so any design that is on the screen is automatically an outline. Filling it with a color only changes how it looks on the screen and is used for printing through a printer. The design on the left in the photo above is the snowflake design sent without adding any additional steps to it. The design on the right is filled with a cross-hatched fill using the Specialty Tools Panel – Heat Pen Tab.
The best fill and spacing is really dependent on the design and materials that are being used. The only way to really know what will look the best is to test it and see for yourself.
If the fill on your design is too tight, it can cause the foil to be removed from certain areas due to multiple passes over the same spot, leaving blank spaces. On the other hand, if the fill is too loose, it can also result in gaps. The ideal fill depends on the desired final look, and the best way to determine what works is to test it out.
I set my foiling and sketch projects up with blue as the foil/sketch lines and red for the cut line using the Line Color in the QAT or the Line Style Panel. This will be helpful when setting up the foiling settings in the next step.
For those who are using older model Silhouette machines and the Foil Quill, the Sketch/Line Effects Panel can be used to add a fill to the design following the same tips listed above.
2 – Set Up the Heat Foil Action
When using the Silhouette Heat Pen, there is an Action for the Heat Pen that may need to be set up. Click on the Send tab and then select your material such as Cardstock, Plain Cardstock, or Leatherette. If there is no Heat Foil Action that shows up for the material, then a custom setting will need to be created. This is not hard to do and we will go through it below.
On the Send tab, in Silhouette Studio, once the Heat Pen has been recognized in the Silhouette Cameo 5, Portrait 4, or Curio 2, you should see a message asking if you want to turn it on. The Silhouette Heat Pen takes approximately 3 minutes to heat up before it can be used properly.
I use the Cut by Line option on the Send tab, so the different actions can easily be turned on and off, so the design can first be foiled, then the foil removed, and then cut if the project requires.
Select the material setting for the red color cut lines. Test cuts will be the only way you know what the perfect setting is for your material, so don’t skip that step before you start and waste materials.
When using the Cut by Line or Cut by Fill Color options, it’s important to ensure the correct color is selected when adjusting settings in the bottom section of the Send tab. For example, if red is selected at the bottom but isn’t the box check for cutting, any changes made will apply to the red cut lines instead of the intended selection. Always double-check that the selected color matches the cut settings you’re adjusting. More details and a visual example of that in this Silhouette Cutting Issues – Cut by Line or Fill Color video.
The next thing to note is that if there is no Heat Pen action programmed for a material, you will see a Setting not found message. This is not a problem, we will create a custom setting by clicking on the MORE button and then creating our own setting for our material.
Click the + sign at the bottom of the materials list, name your material, and then select the machine model.
Now, the next steps are important so the setting is not created with actions that are not needed.
With the material you added selected, select Carriage 2, then click on the + sign on the right side. Choose Add Foil Action. Adjust the settings for force, speed, etc. The only way to know what settings work will be to test and use those settings.
Now, the important part. Click on the Kraft Action and choose REMOVE ACTION at the bottom of the Send tab.
If the Kraft Action or any other action that is set for a material is not removed, it will show up in the settings when the material is selected and can be confusing and cause future issues for projects.
Next click the drop down shown above and select the material that is closest to what you are using for this setting. I don’t actually know that this does anything other than serve as a reminder to you, but it was added randomly to the software many versions back.
Click SAVE if it’s available and then click the giant X at the top of the Send tab to close this window.
Then select the new material created in the drop down next to the line color you want it applied to. User Created Settings will appear at the bottom of the Materials selection drop box.
Verify that the settings are what you created and look right.
Congratulations! You have created your own custom setting. I would also recommend writing down these settings in a safe place. Sometimes they can disappear out of the software. They can also be exported by clicking on the MORE button and right click on the material and export, however, that file cannot always be successfully imported back in. These are just some things we’ve seen over the years with different software versions.
For older model machines and creating a custom setting, please see this tutorial HERE.
3 – Prepare the Mat
If the material will be cut after the foiling, place the materials at the bottom of the Silhouette cutting mat so it easier to remove the foil before sending the material to be cut.
Apply the foil in the same location on the material and mat that is set up in the Silhouette Studio software. Make sure the foil covers the entire area of the design to be foiled and that the washi tape is not in the areas being foiled or it can interfere with a complete foiled image.
Add the washi tape to one corner and then move to the diagonal corner and apply the washi tape, pulling it taunt. Then add washi tape to the final 2 corners and pull taunt as applied. Adjust as needed so the foil does not have any slack or creases. If it catches or has creases, it can affect the final results.
Once the foil is secured flat on the materials, load the cutting mat in the Silhouette machine.
When the design is placed in the top left corner as we are used to, then it can be difficult to remove the foil without unloading the mat. I got too excited and did that on my first design.
It took a bit more work, but I was able to remove the washi tape and foil without unloading the cutting mat. If this every happens to you, make sure to check for any washi tape that might get stuck under the roller bar or in the machine. I found a small piece that could have been a BIG problem on future projects if I had not seen it.
4 – Send to Foil
Check the box next to the Heat Foil setting and verify it’s set for Tool 2. Make sure the red is unchecked so you have time to remove the foil before it cuts the design. Then click Send in the bottom right and approve any windows that might pop up.
Remove the foil before cutting or the foil can dull the blade faster or get caught up in the machine during the cut and the project can be ruined.
5 – Reveal Your Design
Make sure to carefully remove the washi tape & don’t let the foil touch the adhesive cutting mat. It will stick immediately and then be stuck onto your cutting mat. If you reveal it slowly and it did not foil well, you can try securing the foil back down and run it again to see if it will foil better. You may need to adjust the settings and this is why testing is so important.
Do not unload the cutting mat between the foil and cut action or the design may not cut in the correct location. This is why the location of the design at the bottom is easily to work with.
Next, on the Send tab in Silhouette Studio, uncheck the blue line color and check the red color, then send the design to be cut.
When it’s finished, check the cut before unloading the cutting mat. If it did not cut well, you can send it again. After it’s cut, unload the cutting mat, flip the mat over, and peel the mat away from the material at a sharp angle to help it release.
Keep in mind that anytime you sketch or foil with a fill, the tool is going over the design multiple times depending on your fill options. This can mean that the material will be stuck down to the cutting mat in that area and may need a bit more care to remove without damage.
Finish out the project with any assembly needed and then enjoy!
Make sure to check out the video on the Silhouette Secrets+ YouTube channel for a visual of creating these projects and additional Dos and Don’ts too! Find it HERE.
Additional Resources for Mastering Heat Foiling Techniques
Save this for future reference by pinning the image below.
Enjoy !
THANK YOU for your support! How can you help? Click HERE & buy a coffee. Every little bit helps with the cost of running the site.
Silhouette Classes
Never stop learning! Let me help you take the anxiety out of learning with Silhouette and get to creating faster! My Silhouette classes are heavily focused on software, so you can take the skills & techniques taught and apply them to many future projects!
**This post may contain affiliate links. What that means is that I may receive compensation if you purchase through the links I have provided. The price you pay for the product or service is not higher but I may get compensated for sharing.
Each month in the Silhouette Secrets+ newsletters, I team up with a talented designer to offer a free file. I then use that file to create multiple projects, showcasing the endless possibilities you can achieve with just one design. In this blog post I am sharing a variety of creative projects made using the Poinsettia Gift Tag file by Jamie Lane Designs.
Affiliate links may be present in the following blog post and as an Amazon Associate, I earn from qualifying purchases.
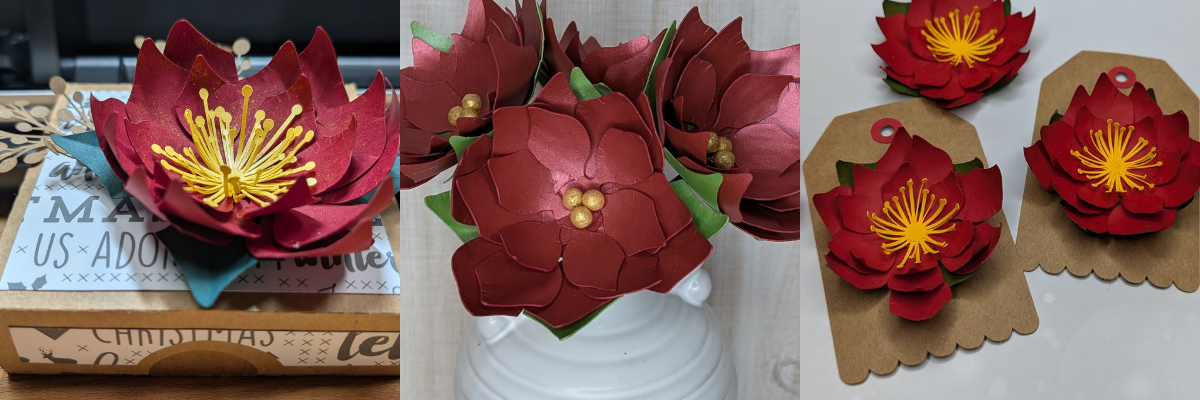
To start the month off, I cut the design and assembled it for gift tags using kraft cardstock and colored cardstock. I then inked the edges of the cut pieces and used some paper shaping tools to add dimension to the flowers before gluing it all together.
I scaled the flower design down just a bit and used it as an embellishment on our Christmas card.
This one shown isn’t quite mail friendly, so I kept it for myself and used it as decoration for this year.
I added an easel to the back of all the Christmas cards I sent out and the one shown above that I have on display in my home.
The Silhouette LIVE tutorial on the Silhouette Secrets+ YouTube channel from November is what started the entire idea of using this with my Christmas card design. In the live I followed a suggestion from a viewer which began the creation of this years Christmas cards. I also shared sketching tips and a demo using the Silhouette Electrostatic Mat.
I scaled the poinsettia design up a little bit, cut a few more center pieces for the flower and added it on top of a hinged gift box. Added a little bit of gold sparkle spread on the poinsettia and now have a custom made gift box ready to go.
Want to know the perfect cut settings for all cardstock? There isn’t one. There are many factors that affect cut results such as: brand, color, weight, paper finish, blade life, cutting mat adhesion, humidity, the design, and more! Test cuts are the best way to know what will work for your particular cardstock or any material in fact. This will save you time, frustration, money, and supplies.
Over a year ago, I started working on a poinsettia project and crafted these gold-painted wool ball centers for the flowers. While that project was never finished, I kept all the pieces neatly tucked away in a basket, waiting for the right moment to complete it. As I revisited the project, I realized I had used this exact poinsettia flower file from Jamie Lane Designs. Inspired, I decided to pair it with beautiful pearlescent papers from 12 x 12 Cardstock Shop to create a stunning bouquet.
I ordered the cardstock and when I went to use it I was surprised at how thick it was. I wasn’t sure if I would be able to successfully cut it with the Silhouette Electrostatic Mat. After feeling it, I went looking for the weight and found it was 105 cover that’s 285 gsm. Even though I thought it might be too thick, the only way you really know if something will work is to test it! So I did just that. I did have to adjust my cut settings a bit at the beginning and then it cut beautifully!
As I mentioned above, there are no perfect cut settings that work for all cardstock. The faster you can learn to accept that, the less frustrating it will be. You will quickly learn that test cuts will save you time and if you are like me, kick yourself when you don’t do them.
Check out the new video on the Silhouette Secrets+ YouTube channel where I shared how I created this paper flower bouquet with tips to using the Electrostatic Mat too!
I miss counted when I was cutting the flowers out and I had more flower pieces cut than I had wool ball centers, but I wasn’t going to let this one sit unfinished. I had extra center pieces leftover from the previous projects and still finished these out to use for a future project or gift.
What are some ideas you have for projects this year?
I love exploring how one design can inspire multiple creative projects! The Crafting Creativity blog series is your go-to source for endless inspiration, packed with innovative ideas, practical tips, and expert techniques to elevate your crafting. Whether you’re reimagining a favorite design, experimenting with new materials, or mastering advanced skills, these posts are here to ignite your imagination and help you bring your creative visions to life. Head over to the Crafting Creativity series HERE and discover where your creativity can take you!
Save this for future reference by pinning the image below.
Enjoy !
THANK YOU for your support! How can you help? Click HERE & buy a coffee. Every little bit helps with the cost of running the site.
Silhouette Classes
Never stop learning! Let me help you take the anxiety out of learning with Silhouette and get to creating faster! My Silhouette classes are heavily focused on software, so you can take the skills & techniques taught and apply them to many future projects!
**This post may contain affiliate links. What that means is that I may receive compensation if you purchase through the links I have provided. The price you pay for the product or service is not higher but I may get compensated for sharing.
THANK YOU for your support! How can you help? Click the link to buy a coffee. Every little bit helps in the cost of running the site.