Posted on 2 Comments

Using multiple files to create a design

Where do you find your ideas?

I am a big Pinterest lover. I pin a lot of things of all categories and sometimes just sit and pin ideas for hours. I find it relaxing. Do I make all the pins I save? No – but I have made quite a few.

Check out my Pinterest boards HERE and maybe you’ll get some ideas.

My son was looking for something to put on a shirt and he found one he really liked. I realized I could re-create it with designs from the Silhouette Design Store. My son loves Legos. He will wake up and create something before his eyes are fully opened. And he is good! I have to have directions to follow to make something and that goes for anything – I just don’t have that engineering mind. He can just imagine something and then create it out of Legos. It’s amazing and love that at 6 years old, he is doing that.

While creating this shirt, I used many of the features we have already reviewed in the “Let’s Explore v4” series. Watch for links throughout this post that will explain more about each function I used in designing the shirt.

temp_1

First, I went shopping in the Silhouette Design Store and here are the designs I picked up:

Sleep Icon by Rhonna Farrer – Design #200750 Sleep photo DS

ZP Brick Blocks Print by ScrapNFonts – Design #120497 ZP Brick Blocks Print

Building Block by Snapdragon Snippets – Design #34936 Building Block DS

Kitchen Dingbats by Lori Whitlock – Design #215176 Kitchen Dingbats by LW

Now, I am ready to create my design. I opened each of the designs from my Silhouette library and have them on my mat.

Designs on page1

Now I can start editing them to delete the pieces I do not need.

By releasing and making compound paths, I was able to alter both of these designs to ones that I could use in with HTV on the shirt.

Designs on page1

You can find more information on Compound Paths HERE.

Altered designs

I like to fill all my designs with color as it makes it easier to work with the design and you can see it better. Check out more information on the Fill Color Panel HERE.

Next, I took the drawing tools on the left side and drew a rounded rectangle.

Rounded Rectangle copy

Then I right clicked on the rectangle and chose “Convert to Path”.

Convert to Path copy

This will set the design as a solid rectangle. Before convert to path is chosen, the red dots can still be moved in the top left corner and this will change the angle of the rounded rectangle corners.

Now, make an offset of the rounded rectangle. Find more information on creating an Offset HERE.

Offset

Then select both rectangles, right click and choose “Make Compound Path“. Then fill with color and now there is a rectangle outline.

Rectangle outline

Then the rectangle can be replicated 2 more times for design. Check out more information on the Replicate Panel HERE.

Replicate rectangle

Next, I used the Lori Whitlock Kitchen Dingbats for my fork and knife.

I accessed the Dingbat font in the Text Style Panel under the Glyphs panel and double clicked on the character I wanted.

For more information on accessing glyphs directly in the software click HERE.

LW Dingbats copy

Then I right clicked and chose “Release Compound Path“, deleted the spoon, moved the fork to the right side, selected both and grouped them back together.

Now I have all my designs and just need to resize them to fit inside the rectangles.

Transform Panel - Align

Now that the designs are sized how I like, I can use the Transform Panel – Align tools to make sure they are centered and the spacing between each section is the same. Check out more information on using the Align tools HERE.

All that is left is to create my text. For this, I used the ZP Brick Blocks Print by ScrapNFonts from the Silhouette Design Store.

Block font

I used the Text Style Panel to choose the font that I wanted and then used the Transform -Align Panel to center the words to each rectangle.

Once I have everything centered and aligned how I want it, I select it all and then Group it together, so it moves as one object.

Flip Horizontal

Then I right clicked on the design and chose “Flip Horizontal”, since I am cutting this from Heat Transfer Vinyl. I prefer to flip the image myself and then tell the software to “Send As Is” when it gives me the pop up after clicking on Send, so there is no issue with it flipping it to the wrong side of my mat.

Flip copy

And now you are ready to send this to cut after making sure you blade is installed right and choosing the correct material.

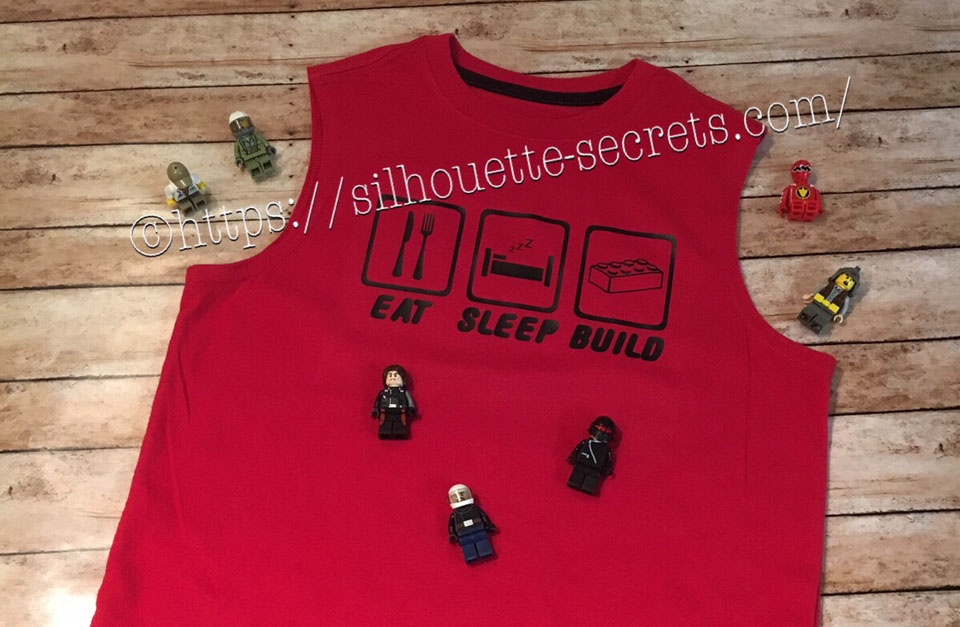
This design is cut out of Siser Easyweed Black HTV and I applied it using my heat press with a Siser Pressing pillow to help raise the design area above the seams.

IMG_4003_edited

My son loved his shirt and I loved creating it by combining several designs.

temp

Are you not finding the exact design that you envision for a project? Why not create your own? Combine designs that you buy, create your own or a combination of both.

Feel free to share the creations you make on my Facebook group at Silhouette Secrets+ with EllyMae.

Enjoy !

THANK YOU for your support! How can you help? Click HERE & buy a coffee. Every little bit helps with the cost of running the site.

Looking for more in-depth, step-by-step classes, check out all of my online Silhouette classes on my Teachable site HERE.

SS Logo snip it

**This post may contain affiliate links. What that means is that I may receive compensation if you purchase through the links I have provided. The price you pay for the product or service is not higher but I may get compensated for sharing.

Posted on 7 Comments

Let’s Explore v4 – Text Style – Glyphs

Have you heard of Glyphs? These are special characters that some fonts have included with them. Glyphs can be flourishes, fancy letters, punctuation or characters with accents, shapes, etc.

Glyph

With the software Silhouette Studio version of v4.1.197 and the Designer Edition software upgrade, came the option to unlock the glyphs feature in Silhouette Studio. This is amazing as I had such a hard time with the small Character map on my PC.

Access the Glyphs panel on the second tab of the Test Style Panel on the right side of Silhouette Studio v4.

Glyphs panel copy

Let’s Explore the glyphs tab in the Text Style Panel!

Glyphs detailed copy

  1. Text Search bar – Just like on Tab 1,  the name of the font that is selected will appear in this box or you can highlight it and type a name in the box and it will select that font.
  2. Glyphs – This area is where you will see the glyphs of the font that you are using show up. Note: sometimes not all the glyphs will show up here and you will need to access those through Character Map (PC) or Fontbook (Mac).  It just depends on how the font was created.
  3. Recently Used Glyphs – This handy feature shows the ones you have recently accessed.
  4. Icon size – You can change the size of how the Icons appear in the glyphs panel. And when you hover over a glyph it magnifies it as well. Large vs small icons copy

Now, there is still 1 more tab option in the Text Style Panel and it’s a good one.

Spellcheck

If you type out a word that is either not in the dictionary or is not spelled correctly, you will see a green squiggly line show up under it. Here I’ve typed my business name with no space. That is not in the dictionary, so it let’s me know that.

Spell check copy

If I want to add that word to my dictionary, I can right click on it and choose “Add ‘SilhouetteSecrets’ to Dictionary”.

Add to Library copy

Once it is added to the dictionary, the green line disappears.

Added

So let’s explore the Spelling Panel.

Replace text copy

If you type out several words which are misspelled (which is very hard for me to do on purpose), you will notice the green squiggly lines under those that are not in the dictionary.

Click on Replace and it will pop up a list of suggestions to replace it with. Choose the one you want, click on Replace again and it will change it.

If you know the word is spelled correctly, choose Add to Dictionary and the green line will disappear. This word has now been added to your Silhouette dictionary.

The Arrows at the top of the panel are the Undo and Redo buttons, in case you picked the wrong replacement word, you can simply Undo it.

Undo Redo copy

And then you have some Advanced options.

Advance Dictionary copy

  1. Automatic Spellchecking – check it on or off.
  2. Select Language – Select your default language.
  3. Custom Dictionary – Any words you add to the dictionary will appear here.
  4. Text box – Type in a new word to add it to your dictionary.

If you ever need to delete a word you have added to the Dictionary, click on the word and the delete option will show up.

Dictionary delete

And there you have all of the Text Style Panel. Keep in mind that the Glyphs panel is an option available to you when you upgrade the software to Designer Edition or higher.

Check out the other posts in the Let’s Explore v4 Series HERE.

Enjoy !

THANK YOU for your support! How can you help? Click HERE & buy a coffee. Every little bit helps with the cost of running the site.

Looking for more in-depth, step-by-step classes, check out all of my online Silhouette classes on my Teachable site HERE.

SS Logo snip it

**This post may contain affiliate links. What that means is that I may receive compensation if you purchase through the links I have provided. The price you pay for the product or service is not higher but I may get compensated for sharing.

Posted on Leave a comment

Simple Santa Ornament

Here is another simple ornament made using basic shapes within the Silhouette Studio program.
I created a long rectangle belt after measuring the circumference of my square ornament, which I then cut out of black 651 vinyl.
Then I made 2 squares and used the Subtract all feature to make the belt, which I cut out of silver 651 vinyl. santa-ornament-copy

I then used transfer tape to place the images onto my ornament.

img_4059-1

And added a few clear rhinestones with some E6000 glue and you have a simple Santa belt ornament.

img_4062-2

Hope you are able to create something today1


Enjoy !

THANK YOU for your support! How can you help? Click HERE & buy a coffee.
Every little bit helps with the cost of running the site.

Looking for more in-depth, step-by-step classes, check out all of my online Silhouette classes on my Teachable site HERE.

SS Logo snip it
**This post may contain affiliate links. What that means is that I may receive compensation if you purchase through the links I have provided. The price you pay for the product or servic