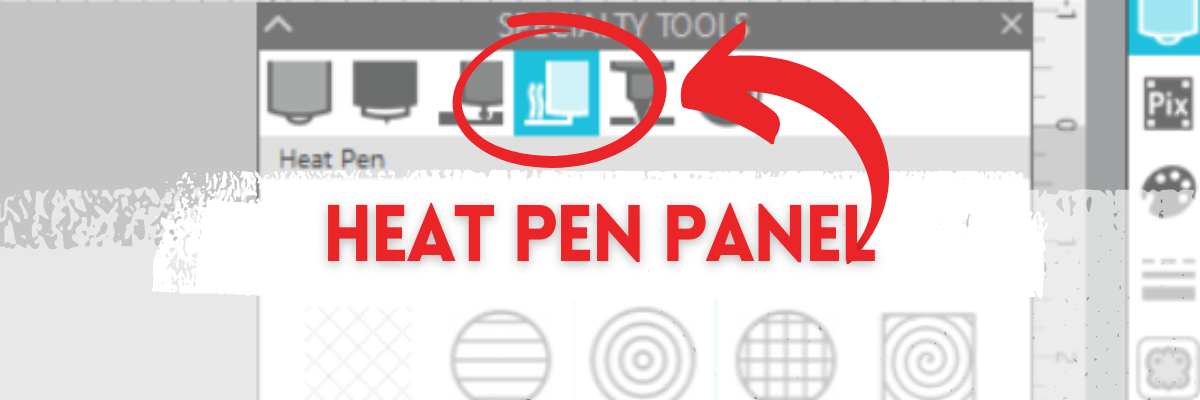
Under the new Specialty Tools Panel on Tab 4 in Silhouette Studio, is the Heat Pen Panel.
This tutorial was written in Silhouette Studio version 4.5.770.
The Specialty Tools Panel was released in v4.5+ software versions. If you don’t see it on the right side of the Silhouette Studio, your software version may be older than v4.5.
Affiliate links may be present in the following blog post and as an Amazon Associate, I earn from qualifying purchases.
Here is a look at the details of the Heat Pen Panel in Silhouette Studio.
1 – Heat Pen Fill Patterns – choose from None, Lined, Concentric, Cross-hatched, and Spiral
All designs will vary in how the pattern fills in the area. I used Hi by Diva Watts Design – Design #399489 and at the size shown, there isn’t much inside the Concentric Pattern fill at a 0.079 spacing. Testing is the only way to know what fill pattern and spacing will look good on the finished project.
2 – Spacing– Increase or decrease the grid spacing between the lines of the pattern. A spacing of 0.004″ will fill in the design more, but depending on the pattern chosen, there can still be some bare spots.
In this example, the Concentric fill pattern at a 0.004″ spacing fills in most areas, but there are still some white spaces in certain areas. Zoom in on your designs so you can see the tight fills and how each pattern fills in the designs.
These spaces may or may not affect the outcome of the final project. Testing is the the only way to know what will work and all designs will vary.
This is another area where you are changing a lot of data at one time, so be patient with your computer if it is thinking.
3 – Angle – Change the angle of the fill pattern.
4 – Release Heat Pen Fill – selecting this option will take the fill from an editable fill pattern and makes it a vector design.
When using this feature, be aware that once the fill has been released and file saved and closed, it is a permanent change to that file. If the design needs to be adjusted, you would need to start over.
Save this for future reference by pinning the image below.
Enjoy !
THANK YOU for your support! How can you help? Click HERE & buy a coffee. Every little bit helps with the cost of running the site.
Silhouette Classes
Never stop learning! Let me help you take the anxiety out of learning with Silhouette and get to creating faster! My Silhouette classes are heavily focused on software, so you can take the skills & techniques taught and apply them to many future projects!
**This post may contain affiliate links. What that means is that I may receive compensation if you purchase through the links I have provided. The price you pay for the product or service is not higher but I may get compensated for sharing.
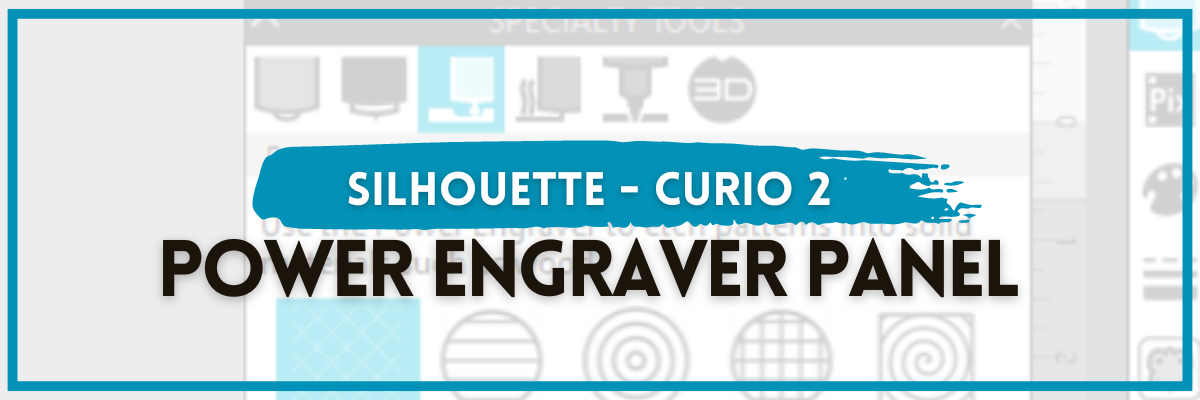
Under the new Specialty Tools Panel on Tab 3 in Silhouette Studio, is the Power Engraver Panel.
This tutorial was written in Silhouette Studio version 4.5.770. The Specialty Tools Panel was released in v4.5+ software versions. If you don’t see it on the right side of the Silhouette Studio, your software version may be older than v4.5.
Affiliate links may be present in the following blog post and as an Amazon Associate, I earn from qualifying purchases.
The Power Engraver is specific to the Silhouette Curio 2 and is one of the new powered tools that was announced and released in September 2023.
The backside of the Power Engraver features a power plug that sits in the Carriage 2 housing and powers the device through the Silhouette Curio 2 machine. The end of the tool is a router tip that spins to perform the engrave process. It functions like a Dremel tool and sounds like one too. The sound changes depending on the materials being used.
And I’ll just say – I love it!
Specialty Tools Panel – Power Engraver – Tab 3
Here is a look at the details of the Power Engraver Panel in Silhouette Studio.
1 – Power Engraver Etch Fill Patterns – choose from None, Lined, Concentric, Cross-hatched, and Spiral
2 – Spacing– Increase or decrease the grid spacing between the lines of the pattern. The dark red star shows a 0.004″ spacing – a really tight etch fill
This is another area where you are changing a lot of data at one time, so be patient with your computer if it is thinking.
3 – Angle – Change the angle of the etch pattern.
4 – Release Engraving Fill – selecting this option will take the fill from an editable fill pattern and makes it a vector design.
This can be helpful if you are trying to stack multiple layers of etch for engraving on harder materials. It is not necessary to do this with simple etch designs or softer materials such as acrylic.
When using this feature, be aware that once the fill has been released and file saved and closed, it is a permanent change to that file. If the design needs to be adjusted, you would need to start over.
Find the Silhouette Curio 2, Power Engraver Tool, and the Curio Debris Tray at either CrafterCuts, Silhouette America, or Amazon. CrafterCuts has free shipping on orders over $35 and use code SECRETS to save 10% on supplies & accessories (not valid on machines). Silhouette America has free shipping on orders over $50 if you are a Silhouette Club member.
Save this for future reference by pinning the image below.
Enjoy !
THANK YOU for your support! How can you help? Click HERE & buy a coffee. Every little bit helps with the cost of running the site.
Silhouette Classes
Never stop learning! Let me help you take the anxiety out of learning with Silhouette and get to creating faster! My Silhouette classes are heavily focused on software, so you can take the skills & techniques taught and apply them to many future projects!
**This post may contain affiliate links. What that means is that I may receive compensation if you purchase through the links I have provided. The price you pay for the product or service is not higher but I may get compensated for sharing.
Under the new Specialty Tools Panel on Tab 2 in Silhouette Studio, is the Score & Emboss Panel.
This tutorial was written in Silhouette Studio version 4.5.770. The Specialty Tools Panel was released in v4.5+ software versions. If you don’t see it on the right side of the Silhouette Studio, your software version may be older than v4.5.
Affiliate links may be present in the following blog post and as an Amazon Associate, I earn from qualifying purchases.
The score & emboss process is designed to cut a shallow line before embossing, intending to deepen the embossing.
This option is available to Silhouette Curio 1, Silhouette Curio 2, and Silhouette Cameo 5 model owners. If one of these machines is not plugged in and recognized, the panel will gray out, and you may not be able to select the options.
Specialty Tools Panel – Score & Emboss – Tab 2
Here is a look at the details of the Score & Emboss Panel.
1 – Tool Selection – Choose either the Fine or Wide Embossing tool according to what you are using.
Fine Embossing tool is a 1 mm tip and designated by a light blue/green top. Wide Embossing tool is a 3 mm tip and designated by a darker blue top.
2 – Passes – choose the number of passes for the tool to complete from 1 – 10 3 – Fill – check this to add a fill to the object selected. 4 – Apply Score & Emboss Lines – selecting this confirms to the software that you want to apply both these actions to the selected object
Score & Emboss on the Send Tab in Silhouette
Once you apply the Score & Emboss, clicking on the Send tab will display both a red cut line and a blue emboss line around the design.
Carriage 1 performs the red cut line with a blade installed, and Carriage 2 performs the blue emboss line with the embossing tool.
To be honest, I tested both with and without the Score line and it did not make a difference that I could tell with my cardstock, except that scoring increased the time & caused more debris. All cardstock will vary and testing is the only way to know what will work best with your brand and thickness of cardstock.
Here is a look at the Score & Emboss results. I noticed that it created debris and separation in some areas where it scored and embossed.
Results may vary depending on the actual cardstock being used. Silhouette does have a Score & Emboss paper that they recommend for this method. However, you can test with any cardstock and simply select the Score & Emboss Paper as the material on the Send tab.
Tips to Keep in Mind with Score & Emboss
When using the Score & Emboss feature, keep in mind that it increases the time for the project to complete because you have 2 tools working consecutively. Depending on what you tell the software to do, it can be a lot of data to process, so be patient with your computer if it is thinking.
Embossing is available on the following Silhouette model machines: Curio 1, Curio 2, Cameo 5.
At the time of publishing this post, a bug persists in the Silhouette software for the Silhouette Cameo 5 causing it not to emboss where it shows on the screen. I will not release a tutorial until this bug is fixed, as I don’t want users to ruin their $30 embossing mat, as I did on the first try.
If you do attempt to do this with the Silhouette Cameo 5, I would highly recommend that you use a full 12″ x 12″ sheet of cardstock to protect the entire emboss mat surface.
Cutting completely through a material on top of the Silhouette Embossing mat is not recommended as it can damage the embossing pad and tear it up.
As new information is released and the bugs are fixed, I will add additional resources for embossing.
Silhouette Cameo 5 additional resources found HERE
Silhouette Curio 2 additional resources found HERE
Silhouette Studio Specialty Tools Panel Tabs (coming soon)
Specialty Tools Panel – Tab 3 – Power Engraver – details HERE
Save this for future reference by pinning the image below.
Enjoy !
THANK YOU for your support! How can you help? Click HERE & buy a coffee. Every little bit helps with the cost of running the site.
Silhouette Classes
Never stop learning! Let me help you take the anxiety out of learning with Silhouette and get to creating faster! My Silhouette classes are heavily focused on software, so you can take the skills & techniques taught and apply them to many future projects!
**This post may contain affiliate links. What that means is that I may receive compensation if you purchase through the links I have provided. The price you pay for the product or service is not higher but I may get compensated for sharing.
Affiliate links may be present in the following blog post and as an Amazon Associate, I earn from qualifying purchases.
One of the most asked questions we see is about software upgrades and unlocking features in the Silhouette Studio software.
Silhouette Software Upgrades
Software upgrades can be purchased through an authorized Silhouette retailer. Please be careful buying through sites like Etsy, etc. as they can sometime not be the real deal or exactly as advertised. Look for reviews first.
Sales happen often – check each one to see where you might score the best deal!
What is an upgrade?
A software upgrade is a code you purchase that unlocks additional features in the software. It is a one-time fee that can be active on up to 3 computers per code.
I highly recommend at least the Designer Edition upgrade for all of my students. It makes life easier and saves you time and headache. Just being able to open a SVG file and cut is well worth it.
But I LOVE the Business Edition upgrade because it unlocks it ALL and I never have to question if some tool/feature is available to me. Both are well worth the investment!
Don’t let the name “Business” edition fool you though – you do not have to have a business to use it or have it be useful. There are just some features that are helpful to those that run a business such as using multiple machines.
If you have the basic (free) software, you will want to purchase 1 of 3 options depending on what upgrade you want to go to: Option 1 – Silhouette Studio to Designer Edition (highly recommend at least this) Option 2 – Silhouette Studio to Designer Plus (unlocks a few more features – see below) In all honesty, if you are upgrading to Designer Edition Plus, you might as well go all the way and unlock it all Option 3 – Silhouette Studio to Business Edition (unlocks it all)
Now here is the important part, if you already have an upgrade, you only need to purchase the step up to the next level you want.
For instance, if you already have the Designer Edition upgrade but you want to go to Business Edition, you want to buy the Designer Edition to Business Edition upgrade. You do not need to buy the full upgrade. You would purchase the level that you need to go from to the level you want to be at. On the Silhouette website, you simply select the Business Edition upgrade, and it will recognize which upgrade(s) you already have when you are logged in and only show the price for the upgrade you need.
Now, keep in mind, if you purchase the upgrades in steps it is no different than purchasing the upgrade all together.
What does each level of upgrade do?
Here are a few of my favorite features and the ones I find most might use in the software:
Designer Edition unlocks:
Ability to open SVG and pdf file directly in the software
Edition Toggle (this is great for those of us who teach, so we can see exactly what the students see in their version) And more…
Now, the list above is not the extensive list of all the features unlocked with each upgrade. However, it is a list of the features I find the most useful in each upgrade. For the complete comparison chart click HERE to go look at Silhouette America.
I want you to be successful and use your Silhouette software to the fullest!
How to activate the upgrade
It is now easier than ever to activate an upgrade!
I have all the details outlined in this post depending on what software version you are currently using.
Additional Resources on Silhouette Upgrades & Troubleshooting:
If you have question about an upgrade just let me know in the comments below.
Save this for future reference by pinning the image below.
Sign up for the Silhouette Secrets+ Newsletter for more information delivered to your inbox each week!
Silhouette Secrets+ Newsletter
Never miss out on the news, tips, “secrets”, deals, classes, and more that I share on Silhouette Secrets+. Sign up for the newsletter and get information delivered to your inbox every Friday. Unsubscribe at any time.
THANK YOU for your support! How can you help? Click HERE & buy a coffee. Every little bit helps with the cost of running the site.
Silhouette Classes
Never stop learning! Let me help you take the anxiety out of learning with Silhouette and get to creating faster! My Silhouette classes are heavily focused on software, so you can take the skills & techniques taught and apply them to many future projects!
**This post may contain affiliate links. What that means is that I may receive compensation if you purchase through the links I have provided. The price you pay for the product or service is not higher, but I may get compensated for sharing.
Over the years the Silhouette Studio software has changed. If you’ve been using Silhouette for a while, you may have seen it, but if you are new, you may not have noticed these changes.
I’m sharing an updated tutorial today on the Page Setup Panel in the Silhouette Studio software v4.5+. With new versions, new features are added or moved. This means the panels change and sometimes they can change quickly.
If you are still using an older version of software or yours looks a bit different, that is ok – you do NOT need to update. Check out these older tutorials HERE for more details. This is all dependent on your software version. Again, I DO NOT recommend you update just so it looks like this tutorial, especially if your software is running just fine.
From this screen we can tell what the exact software version is and what level of upgrade the user has. This helps immensely in troubleshooting issues with users as some bugs can be version specific.
Let’s Explore v4 – Page Setup Panel
The Page Setup Panel is found in the top right corner of the Silhouette Studio software and it opens automatically when you open the software.
It is one of the most important panels in the software because it’s where you tell the program, and ultimately your Silhouette machine, exactly what you are doing.
Simply click the top right icon if you need the Page Setup Panel to open again.
Now, let’s take an in-depth look at what is included on this panel. As I mentioned above, it is one of the most important panels in the setup for your projects.
At the top of the Page Setup Panel is the Design Area Setup.
This is where you tell the software and machine exactly what you are using.
#1 – Machine This where you tell the software what machine you will be using.
With the release of v4.4 software, several changes were added and you have more options in the machines selection, even if you do not own that particular model machine.
#2 Feed Type This one you may or may not see. It is completely dependent on what Silhouette model machine you have. This option will show up when the Cameo 4, Cameo Plus, Cameo Pro, or Portrait 3 models are selected. This is only an option for the Silhouette Auto Sheet Feeder.
#3 – Cutting Mat This is where you tell the software & machine what size cutting mat you are using or if you are not using a cutting mat.
When a cutting mat is selected, you will see the cutting mat appear on the screen. Notice the gray border around the cuttable area. The Silhouette software virtual mat is calibrated exactly to a Silhouette cutting mat. This is how the machine knows how far in to pull the cutting mat before it starts the cut.
The black arrow is ALWAYS the top of the cutting mat that is the leading edge going into the machine, no matter what direction it is turned on the screen.
When no mat is selected, you will only see a white page and you are telling the machine to start the cut at the top of the material.
#4 – Media Size This means your page size or your material size. Media = material.
Select from the preset option in the drop down or set your own custom size in the width and height boxes.
Transparency Slide the transparency slider over to reveal the cutting mat below the media page.
At 0.0% it means the media will be white* (*read below for additional information)
As you slide the Transparency up, it reveals the cutting mat below. The media becomes more transparent on the mat. The photo above shows at 65% transparency.
I use this option all the time when making projects. It is how I line up multiple colors of material on one cutting mat and send it through the machine to cut once. Check out this tutorial on Cutting Multiple Colors at Once HERE. It also is how I make my mats last longer and save the adhesive on my cutting mat. Shhhh don’t tell anyone!
Constrain Media to Mat This was introduced in v4.4 and it is often confusing for users. Basically it means with this option checked that the media will not go outside of the cutting mat borders, no matter what the user sets it to.
As as example, if I set the media size to 14″ wide and 11″ height, with the Constrain Media not checked, the page/media will hang off the edge of the cutting mat as shown in the photo.
With the Constrain Media to mat, it will not allow you to set the custom media size to larger than the cutting mat size. It will automatically recalculate that based on the machine selected and cutting mat selected.
Orientation This is in reference to your media size. Portrait Orientation is vertical and Landscape is horizontal. Here is an example of Portrait Orientation.
With the release of v4.4 software versions there was a bug released that we call the “orientation bug”. It is a bit difficult to explain in photos and this tutorial is already photo heavy, so I would recommend checking out the video tutorial HERE for more details on that. At the time I write this, the “orientation bug” has been present since July 2020, so I don’t really see it going away. I explain in the video how it works and why.
Now let’s take a look at the bottom half of the Page Setup Panel.
Media Color This is new and was introduced somewhere around v4.4.8xx.
This was implemented as a user request to make it easier to see what a design might look like on top of a particular color instead of drawing a rectangle behind the design and filling it with color.
It does not print or cut, but simply changes the color of the background of the media set in #4 at the top of the Page Setup Panel.
Rotate View This is a visual reference only! Rotate the cutting mat or material (set to no mat) on the screen for better viewing while you are designing.
No matter what direction you rotate the mat on the screen, the black arrow is ALWAYS the top of the cutting mat or leading edge of the material that gets fed into the machine.
Show Print Border Check this option and a gray box appears around the area that is set by the current printer set up with your computer. I recommend checking this box anytime you are doing a print and cut project or printing from the Silhouette Studio software.
The Print border does NOT affect your cutting ability. It only affects printing and if your design is outside of your print border, it will not print. This is especially important if your registration marks for a print and cut are outside of this area and do not print properly.
Show Cut Border Check this option to see a red border for the maximum cuttable area on the media size you have setup.
If you do not see your Cut Border extended to the edge of the page and you want it to, click the gear icon in the bottom right corner to open the Preferences Panel. Then select the Defaults tab and check the box to Cut to Edge of Page. Click Apply (if available) and OK.
I work with my Cut Border on the majority of the time. It is especially handy when you are cutting without a mat and need to know the space you have to place your design so it will cut.
Look at where the red cut border is adjusted to when cutting without a mat. This is for a very specific reason! The left and right margins and the 1″ on the backside are for the rollers on the machine to securely grip the materials as it’s being cut. If you try to “trick” the machine, you risk the material falling out of the machine when it’s cutting. It’s an easy way to waste a good piece of vinyl.
Whew! Who knew the Page Setup Panel contained so much information! It is one of the most important panels as it’s where you start with the setup of your project!
Save this for future reference by pinning the image below.
Enjoy !
THANK YOU for your support! How can you help? Click HERE & buy a coffee. Every little bit helps with the cost of running the site.
Silhouette Classes
Never stop learning! Let me help you take the anxiety out of learning with Silhouette and get to creating faster! My Silhouette classes are heavily focused on software, so you can take the skills & techniques taught and apply them to many future projects!
**This post may contain affiliate links. What that means is that I may receive compensation if you purchase through the links I have provided. The price you pay for the product or service is not higher but I may get compensated for sharing.
But, you can also find it under the Edit menu in the top left corner of the Silhouette Studio software too.
Once you have selected the tool, a panel will open on the right side and you have several options that you can use. Click on either the By Line or the By Fill option at the top and you will see a list of colors for the design on the screen show up.
Select a color of your choice and all of the pieces of that same color will be selected at once. This comes in handy when you have multiple pieces throughout a design and want to easily group them together quickly or select them all for any reason.
At the bottom of the Select By Color Panel, you have a few more options to further specialize the way the tool works.
The Select By Color tool worked awesome when creating this faux stained glass design with Oracal 8300 transparent vinyl and black Oracal 651.
Check out my recent blog post about Custom Color Palettes HERE and how they can help you in your project creation too! It came in real handy for the butterfly project as well!
So many tools in the Silhouette Studio software that can help you in your projects now and in the future!
Don’t miss out on any Silhouette tutorials, classes, or news! Sign up below to get email notifications every time I publish a new blog post. My goal is for 1 new post a week, unless there is exciting news to share in between. I know we are all busy and daily emails are not my thing.
Enter your email address to follow this blog and receive notifications of new posts by email.
Save this for future reference by pinning the image below.
Enjoy !
THANK YOU for your support! How can you help? Click HERE & buy a coffee. Every little bit helps with the cost of running the site.
Silhouette Classes
Never stop learning! Let me help you take the anxiety out of learning with Silhouette and get to creating faster! My Silhouette classes are heavily focused on software, so you can take the skills & techniques taught and apply them to many future projects!
**This post may contain affiliate links. What that means is that I may receive compensation if you purchase through the links I have provided. The price you pay for the product or service is not higher but I may get compensated for sharing.
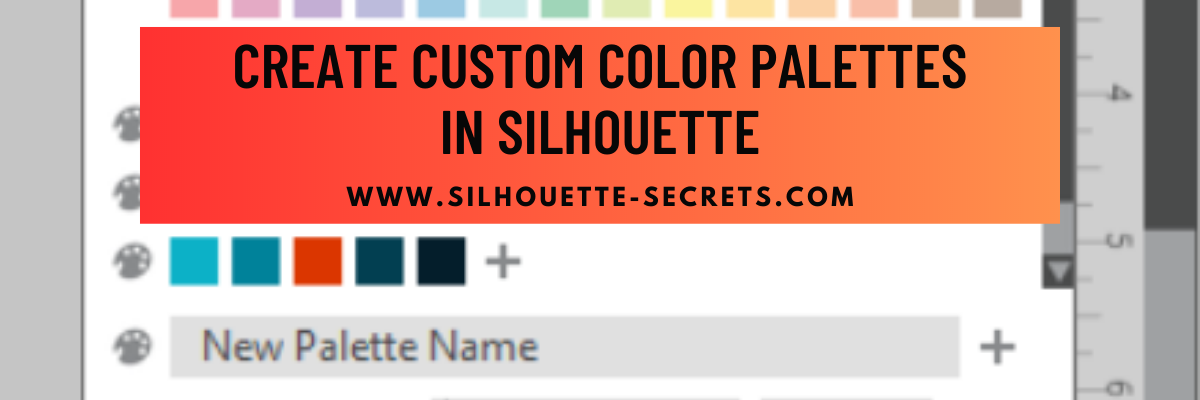
Did you know you can add your own custom color palette into the Silhouette Studio software?
This is a feature that was first introduced in version 4.3.263 in September 2019, but I don’t think a lot of users know about it still.
This tutorial is written in v4.5.196.
Today I wanted to share some examples of how you can use this in your projects.
There are a few limits to mention before we get started.
The first I want to mention is that custom color palette’s are computer specific. They are not saved with you “cloud” data, so will not show if you use the software on multiple computers. But, you could easily add them into another computer by saving the original file to your Silhouette library and open on the new computer. Then follow the same steps below to add that custom palette to the other computer.
As you can see in the photo above, the panel space is limited so you will only see a few custom palettes displayed if you create lots. This can also depend on your screen size. Smaller screens sizes can’t fit as many icons as a larger screen size could. You’ll also see this in the panels displayed along the right side and in the QAT at the top too. There is a scroll bar on the right side of the panel so you can scroll down and see more of the options you have created.
Also keep in mind that the colors that show on your computer screen may be different than what your printer actually prints. The only way to know what color will print is to test it.
And the media that you are printing on can make a difference in the final color outcome as well. Different brands of media, different types of paper, glossy, photo, matte, etc. can all vary in the final color outputs.
Enter your email address to follow this blog and receive notifications of new posts by email.
Affiliate links may be present in the following blog post and as an Amazon Associate I earn from qualifying purchases.
How to Create a Custom Color Palette
Let’s take a look at the basics to create a custom color palette. Here is a video from Silhouette America on how to create a custom palette
Now that we know how it works, let’s take a look at how we can use it in projects.
Now you may be the type of crafter who can pick and choose color combinations easily, but I need help. I found this really neat website called Paper Heart Design Co. and I reached out to the artist, Anne Stout, to ask if I could share in a tutorial.
Anne is a graphic designer and has these amazing color palette’s on her website that caught my eye one evening as I was scrolling through Pinterest and I fell in love. Not only does she provide a visual of the photo used for the colors, but she also provides the Hex code as well.
When you view the color palette’s on the Paper Heart Design Co. website, the HEX code is listed below the color palette.
This gives you a couple options for working in the Silhouette Studio software. We can use the eyedropper tool to grab the colors or at the bottom of the Fill Color Panel, you can enter the Hex code for each color.
I saved the specific color palette from Paper Heart Design Co. and then opened it into the Silhouette software. This will be the reference I use to create a custom color palette and change the colors in my design. By creating the custom color palette, I can come back and use that palette over and over again without the setup work.
The eyedropper can be found in the top of the Fill Color Panel, while the HEX code can be found at the bottom of the Fill Color Panel.
I created a Summer Color Palette and then used it to change the colors in my design.
I actually really like the navy color the original design had in it, so I worked with it as well, but you could also mix and match additional color palette to add more colors in.
Now, if I want to come back and use this same colors on a different design, it’s all in my Fill Color Panel and ready to go.
You could use this for so many things from printing on actual projects or creating mock-ups to see how a design or color combination can work together.
Here is another example of using a custom color palette on a more complex project. This was a class taught by my colleague Barbara Foster of Let’s Go Silhouetting at the All Things Silhouette Conference in 2022.
We created a custom color palette with the colors of Oracal 8300 we were using for the faux stained glass design and then it also helped to be able to Select by Color and group all the pieces of the design when we went to cut.
As I mentioned above, this tool can have many uses. Here are a few ideas: – Print and Cut projects: cards, home décor, scrapbook layouts – custom branding for theme projects – visual only on screen – creating mock ups – testing out material colors – selecting colors to cut easier on complex designs
Hopefully this information has sparked a creative thought process on how you might use this tool in your projects.
Save this for future reference by pinning the image below.
Enjoy !
THANK YOU for your support! How can you help? Click HERE & buy a coffee. Every little bit helps with the cost of running the site.
Silhouette Classes
Never stop learning! Let me help you take the anxiety out of learning with Silhouette and get to creating faster! My Silhouette classes are heavily focused on software, so you can take the skills & techniques taught and apply them to many future projects!
**This post may contain affiliate links. What that means is that I may receive compensation if you purchase through the links I have provided. The price you pay for the product or service is not higher but I may get compensated for sharing.
There are several things you can do for your Silhouette machine maintenance. In 2021, I published a tutorial on several things you can do to keep your machines in good condition. Check out the Silhouette Machine Maintenance tutorial HERE.
One of those things I touched on was the cutting strip on the Silhouette machines. I changed mine this year after 2 years of owning the Cameo 4 and I was surprised by what I found. Read below to see what I found on my machine. This is a very important piece. Let’s explore more about that in detail.
Cutting Strip
The cutting strip is the rubber strip that runs below the housing of all Silhouette model machines except the Curio, Alta, and Mint.
If it’s damaged, it will cause inconsistent cutting issues that have a wide range of results. This could be missed areas cut, cutting too deep, not cutting at all, blade getting stuck, etc. For each user it can be different because each situation is different.
When we troubleshoot, the cutting strip is the last thing we look at if nothing else has fixed it. But we first go through everything else that could be affecting the cut. The cutting strip is what provides the even surface underneath where the blade cuts. If that is uneven from damage, that can affect the cut.
The cutting strip is an important component of how the machine can complete the cuts whether you are using a mat or cutting matless. It provides the “solid” bottom to where the blade cuts in order to complete that cut. If it is uneven or missing, the blade just pushes down and meets no resistance, which means the material gets pushed into a “hole”. The cut will be incomplete, missing areas, etc.
Damage to the cutting strip may be visible or able to be felt by running your hand along the strip. But, often times we may not even be able to see the damage that there is to the cutting strip because it’s translucent and only seen when it’s removed. That was the case for my Cameo 4. The damage was not visible to me. We won’t even talk about my Cameo 1, my cutting strip looks like a complete wreck, but it still cuts perfectly fine, so I do not mess with it.
Here is mine after replacing it on my Cameo 4. Keep in mind that this is after 2 years of thousands and thousands of cuts, class development, and testing on the Cameo 4.
Lines cut through and a chunk missing on the edge of the cutting strip.
More cuts and damage to the cutting strip.
Completely cut through on the end.
Damage to the cutting strip can happen for several reasons. Here are a few, however, this is not an extensive list. – cut settings too deep – blade depth too deep – blade getting stuck in the material or mat – sending to cut without material loaded – using the Kraft or Rotary blade with too deep of settings – cutting completely through materials with no mat
For those who replaced and it didn’t fix the issue, it’s generally for 2 reasons. 1. It was not the issue to begin with. 2. They didn’t install it completely flat. I’ve seen users rush and not remove the old adhesive completely or install it with an edge lifted. Both will affect the cuts. If the instructions are followed carefully, it is pretty easy to do.
Affiliate links may be present in the below and as an Amazon Associate I earn from qualifying purchases.What that means is that I may receive compensation if you purchase through the links I have provided. The price you pay for the product or service is not higher but I may get compensated for sharing.
How to Replace the Cutting Strip
The cutting strip can be replaced easily if the directions are followed carefully. The hardest part of the task is removing the adhesive completely from beneath the cutting strip. But, it is the most important part! If the cutting strip is not completely flat, it can cause future cutting issues.
I found that using the Silhouette Pick Me Up Tool and a little bit of elbow grease mixed in with some patience, that it was not difficult at all.
An alcohol swab will help remove some of the sticky residue and make the surface clean for the application.
Next, make sure you buy the correct cutting strip for your machine model.
Then follow the instructions step-by-step from Silhouette America found HERE. I printed them off and found it very easy to follow.
Ta-da! Nice new cutting strip ready for many Silhouette projects.
Enjoy !
THANK YOU for your support! How can you help? Click HERE & buy a coffee. Every little bit helps with the cost of running the site.
Or if you are looking for more in-depth, step-by-step classes, check out all of my online Silhouette classes on my Teachable site HERE.
**This post may contain affiliate links. What that means is that I may receive compensation if you purchase through the links I have provided. The price you pay for the product or service is not higher but I may get compensated for sharing.
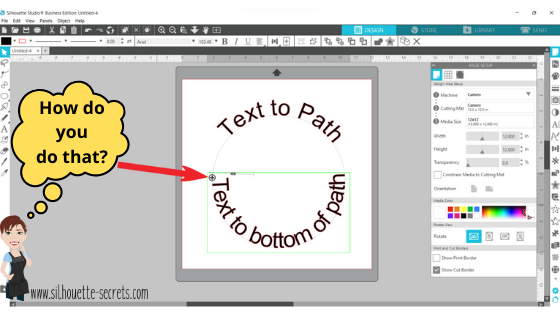
How do you place text around a circle? This is the question I see most often. It’s a very neat feature called Text to Path and it’s pretty simple to use.
I have updated this tutorial to include a video that is available on my YouTube channel HERE.
Check out the full written tutorial below showing all the different aspects of Text to Path.
Text to path
*original post written 3/2019 created in version 4.2 of the Silhouette software – all features are still current and up to day for 3/2022 v4.4
Let’s explore how to take ordinary text and make it more interesting by adding it onto a path. The most common way I see this used is when you want the text to form to a circle or oval shape. But why stop there? You can add text onto so many other paths.
Let’s take a look at how to do this.
Click on the Text tool on the left side, then click on the mat to get a text cursor and type out the text.
Next, I fill my text with color using the Fill Color Panel on the right side. This helps to see the text better and select the object easier.
Then, click on the Text Style Panel on the right side and change the text style.
Now, draw the shape that you want the text to snap to. Let’s start with an oval, since this is the most common shape I see users try to use. Note: I have increased the Line thickness so that you can see my shape easier.
Double click on the text and a control point will appear in the bottom left corner. Note: if the text has been changed in any way, such as welding or converting to path, it is no longer editable text and this will not appear.
Grab the control point and drag it to the object you want it to conform to.
When the text snaps to the shape, a slider bar will appear on the left side and the text can be adjusted.
Moving the slider up on the bar, moves the text out away from the shape.
Moving the slider down on the bar, moves the text inside of the line of the shape.
Make any additional changes to the text, such as increasing the character spacing, etc.
If you have a script text, right click and choose Weld.
This will weld any overlapping letters and then release the font from the shape. Now, keep in mind that the text is no longer editable once it is welded. Make a copy and pull it to the side if you want to keep the original text to go back to.
Each font style is going to look different and you may need to adjust the character spacing on the Text Style Panel to make it overlap so it welds.
If the text is not overlapping, right click on the text and choose Convert to Path.
This will release the font from the shape. Now, the text is a design and no longer editable text.
This is an important step, especially if you are cutting the design from HTV and need to flip the image before you cut. If the text is not converted to a path, it will not flip correctly.
Now, if that ever happens, you know why and how to fix it. Make sure to convert to path or weld before you flip the design.
Now, let’s play with some shapes.
Flexi-Shapes are a great option to play with. This is a Designer Edition Plus or Business Edition upgrade feature only. Flexi-shapes are found on the left side. More details on Flexi-Shapes can be found HERE. I chose the star and then changed the points to 5.
I have increased the Line thickness again, so it can be seen better.
Now, type out the text.
If the text does not fit on one line, grab the teal slider bar on the right side and move it farther right, until all the text is on one line.
Now, grab the control point that appears in the bottom left corner of the text box and drag it to the shape. Move it around the shape until you have it how you like.
Each font and shape will vary in what looks better or if it splits words, etc. Play with the character spacing, the text size, and more until the desired look is achieved.
I would love to see what you are creating with your Silhouette software or machines! Or if you have any questions, feel free to post photos or questions on my Facebook group at Silhouette Secrets with EllyMae.
Save this for future reference by pinning the image below.
Enjoy !
THANK YOU for your support! How can you help? Click HERE & buy a coffee. Every little bit helps with the cost of running the site.
Silhouette Classes
Never stop learning! Let me help you take the anxiety out of learning with Silhouette and get to creating faster! My Silhouette classes are heavily focused on software, so you can take the skills & techniques taught and apply them to many future projects!
**This post may contain affiliate links. What that means is that I may receive compensation if you purchase through the links I have provided. The price you pay for the product or service is not higher but I may get compensated for sharing.
What are those annoying lines that are following my mouse cursor?
Why did they appear?
These are 2 questions I see asked often.
Crosshairs
Crosshairs are a tool that can help in lining things up with other objects. It is a visual on the screen of a horizontal and vertical line that meets at the point of your mouse cursor.
Some people like them, some people do not.
Why do they show up?
The most common way that Crosshairs are activated is by pressing the letter H on the keyboard when not in text edit mode. The letter H is the keyboard shortcut to toggle the Crosshairs on and off.
This can happen easily if a user thinks they have activated the Text Tool and start typing or maybe if a cat walks across your keyboard or a child is pushing buttons.
3 other ways Crosshairs can be turned on
1 – Opening a .studio file created by someone else that was saved with the Crosshairs on. This setting can sometimes be saved with the settings of the file. Don’t like it? Press the letter H to toggle it off.
2 – On the Page Setup Panel – Tab 2.
Click the Crosshairs button to toggle it on and off.
3 – In the top menu, under View – choose “Show Crosshairs”.
Crosshairs are a great tool if you are designing in the software and want to line things up or have a visual of where things line up in relation to other object. They can be used in conjunction with the Alignment, Guides, Rulers, Smart Snapping tools as well to help in the design process.
Do you use the Crosshairs? I find I am distracted by them, but just like the other design tools, I may use them for certain projects.
If I don’t need them, I press the letter H and go on about my work.
I would love to see what you are creating with your Silhouette software or machines! Or if you have any questions, feel free to post photos or questions on my Facebook group at Silhouette Secrets with EllyMae.
Save this for future reference by pinning the image below.
Enjoy !
THANK YOU for your support! How can you help? Click HERE & buy a coffee. Every little bit helps with the cost of running the site.
Or if you are looking for more in-depth, step-by-step classes, check out all of my online Silhouette classes on my Teachable site HERE.
**This post may contain affiliate links. What that means is that I may receive compensation if you purchase through the links I have provided. The price you pay for the product or service is not higher but I may get compensated for sharing.
THANK YOU for your support! How can you help? Click the link to buy a coffee. Every little bit helps in the cost of running the site.