Have you been cutting along and then all of a sudden the Send button on the Send tab is no longer highlighted to press to send a job to cut?
Or the Silhouette machine is not being picked up on the Send tab? If there is no information on the right side of the Silhouette machine icon in the red rectangle area, then it is not being recognized properly.
Have you had a cut disconnect in the middle of cutting lately? Or you cannot get the cut settings to show up because the tool isn’t recognized?
If you are a Windows 10/11 user, the issue may be nothing related to your Silhouette machine at all, but could be because of a Windows update. In the two years I’ve noticed that Windows updates are changing and controlling more and more. This also includes shutting off power to the USB ports as it chooses.
4 Tips to Get Connected Again
#1 – Unplug all the cords from the Silhouette machine, including to the wall outlet and the power bank in the middle of the power cord.
Let it sit for 5 minutes. While it’s sitting do a complete computer shut down from the Windows Menu option, not just a restart.
Screenshot from Windows 11
Plug everything back in and try again.
A complete computer shut down can help to clear out everything and if it’s the #2 reason below it will reset it. Note: if it’s because of #2, it’s not a fix, but a short term resolution – read more under #2.
#2 – Power is being turned off to the usb port
One minute it shows as connected and you turn around and it’s no longer reading it. You see the “-” next to the machine icon.
So what is happening is Windows 10/11 is deciding on it’s own what it should turn off to “save power”. I had this happen to me on my brand new computer. I had disabled it in one location but it kept happening, so I had to do a little more digging and found there was one more location to disable the USB power save options.
I found the fix here and I would recommend for Silhouette users to change these settings if you are a Windows 10/11 user as well. This will help ensure you won’t lose connection in the middle of a cut or while you are working on a project. Follow Steps 2 and 3 at this link https://windowsreport.com/fix-windows-8-1-external-hard-drive-keeps-disconnecting/
And keep in mind that Windows updates hit user’s computers all at different times, so it may not be something that everyone experiences at the same time. I had not had the issue on my old computer, but when I started using the new computer regularly, it kept turning off my external hard drive access.
I have also had to do this every single time Windows does a new update since getting my new computer.
#3 – Uninstall USB port drivers and let them reinstall
If the above does not fix your connection issue, then I would suggest uninstalling the USB port drivers and letting them reinstall. I am also noticing that Windows updates are messing with this again too.
Or Google “Uninstall USB port driver” and several others pop up with instructions.
If you have had this happen in the past and are sitting scratching your head, hopefully this helped explain it. I know it can be very frustrating when it’s working and then it’s no longer there. I’ve was cussing at my new computer and external hard drive for a few days now. Unplugging it and plugging it back in restarted the power on it, but that was not a permanent “fix”. As much as I use my computer and external hard drive, I needed it to work all the time!
Once the Silhouette machine is recognized by the computer, it should show in the software like this.
The message next to the machine icon should say “Ready to Load”, “Ready”, “Available”, or possibly another term meaning it is ready to go and has been detected. The Send button at the bottom will be highlighted and the cut setting will appear for a Cameo 4, Cameo Plus, Cameo Pro, and Portrait 3 model that have the tool recognition.
If you see any messages in orange, that means something needs attention and it’s usually a Firmware update that is needed. This pertains to the Cameo 4, Cameo Plus, Cameo Pro, and Portrait 3 models as the firmware is automatically checked upon each connection to the machine. The firmware update can only be completed by USB connection.
You can switch between connections or machines by clicking on the Machine list icon at the bottom of the screen.
If you are still having issues, click HERE, choose PC or MAC, and follow these steps exactly. It is very important that steps are not skipped or it may not be resolved.
If you are a Cameo 1 or Portrait 1 user and you cannot get it to connect, it could also be due to Windows 10 but due to a different cause. You will need to update the firmware on the Cameo 1 or Portrait 1 in order to connect to a Windows 10 updated computer. Click HERE for step by step instructions on how to do that.
I’d love to see what you are creating with your Silhouette machines. Feel free post on the Silhouette Secrets+ Facebook Group. We love to see what you are doing and creating with your Silhouette machines!
Save this for future reference by pinning the image below.
Enjoy!
THANK YOU for your support! How can you help? Click HERE & buy a coffee. Every little bit helps with the cost of running the site.
Or if you are looking for more in-depth, step-by-step classes, check out all of my online Silhouette classes on my Teachable site HERE.
**This post may contain affiliate links. What that means is that I may receive compensation if you purchase through the links I have provided. The price you pay for the product or service is not higher but I may get compensated for sharing.
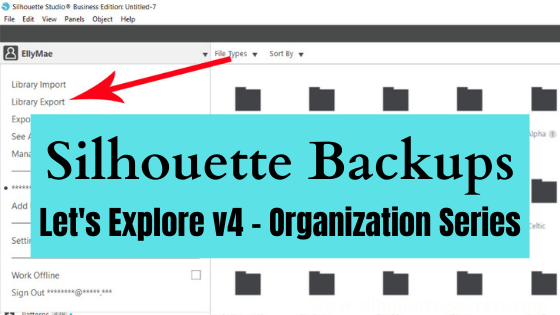
I see it asked often about how to organize designs, fonts, files, etc. So to kick 2022 off I will be doing a series on organizing different aspects of your Silhouette supplies. Let’s talk about Silhouette backups – this tutorial has a lot of details in it, but future you might thank past you for taking the time to review it all. This series will be focused on the digital side of things more than the physical products.
The one thing I want emphasize as you read this is that each Silhouette user will vary in what works best for them to backup. There is no perfect answer or solution to this. We all “work” and process things differently. What works for one individual, may not work the best for another.
And the next thing I want to emphasize is that it can be an ever evolving organization too! So no matter how you are doing it or how you want to do it, it may change in the future as you develop your best practices for YOU!
And I’m going to be completely honest with you and say that I have not kept up with making backups, organizing, or creating a good system. I was a digital scrapbooker prior to getting into Silhouette, so I just went with what I did before. Although I have gotten into some bad habits such as not backing up as often as I should. As a scrapbooker, we were always reminding each other to back up your photos constantly and to save in multiple locations as nothing is 100% safe. But I’ve gotten lazy and have slacked in this area. So let’s do this together!
Silhouette Backups
To start the series, we are going to discuss backing things up. All things! I’m going to share some tips and recommendations on backing it up, but you will need to decide what is going to work best for you. Hopefully this will give you some ideas to decide what is best for your work style.
What is a backup?
A backup is simply having a copy of your item(s) in a safe location in case something happens such as a computer crash, server crash, computer system update, etc.
The first point we should discuss is that there is nothing that is 100% safe. The best thing you can do is have a backup of your supplies whether that be photos, designs, fonts, files, etc.
And it’s a good idea to have a backup of your backup too!
What things should you backup?
All things you do not want to lose!
This could include: – Photos – Silhouette files – Designs – Fonts – Silhouette library – Your phone contacts
This is not a comprehensive list at all, but will give you an idea of where to start.
How often should you make a Silhouette backup?
This is going to vary by user, but a good start is monthly.
However, if you are a power user, business owner, or create/collect a lot of designs, fonts, etc. you may want to do it more often.
Next, set a time each month. If the beginning of the month is busy, set it for the middle of the month or another time that works well. But, make it consistent.
Let’s set an alarm. Pick a date for each month. Set an alarm in your phone and label it so you don’t forget why you set the alarm. Now, set the alarm to reoccur each month for 2022. And write it in your calendar too if you keep one.
Affiliate links may be present in the following blog post and as an Amazon Associate I earn from qualifying purchases.
What should you use to backup to?
This is also going to vary by user. There are many options available such as external hard drives, flash drives, cloud options, etc.
Personally, I keep all of my files on an external hard drive to keep my computer cleaner and not fill it up. I use an external hard drive so I don’t have to rely on having internet to access my files and when I travel, I have what I need with me.
Keep in mind that nothing is 100% safe, so having multiple options for a back up is always a good idea. And the best backup options are the ones that you are going to use! I have a daily use external hard drive and a “back up” external hard drive that I back up my daily one to several times a year.
What is the best external hard drive?
Most name brand external hard drives are good. I have owned Seagate, Hitachi, Toshiba, and Western. Why so many? Because as I grow with the blog and classes, I need more space and more backups.
Do you need that much space? You probably don’t, but it would last you many years. Or there are other options for 1 TB or 2 TB that you can choose from. For me, I do need more space, so it works great and it’s not too expensive. Keep in mind that it is something you will use all the time and for a long while. You can also find them in most places that sell computers. I’ve purchased at Sam’s Club or Best Buy in the past as well.
I also purchased a carry case for mine since I travel (at least before Covid). If you travel or even just to protect your external hard drive when you aren’t using it, I would recommend it. I purchased the Amazon Basics External Hard Drive case HERE.
When you buy an external hard drive, there are 2 types – portable and desktop. I had no idea what I was buying when I first started using one in 2007 and bought a desktop one. This style really is not meant to travel with, so keep that in mind.
MAC users, you will also want to make sure the external hard drive is MAC compatible or the external hard drive can be formatted for use with a MAC computer. This information should be found in the description of the external hard drive. As an example, this is the chart from the Toshiba External Hard Drive I linked above on Amazon. It lists that the MAC requires reformatting for 3 of the models before it can be used.
What is the best method?
The one that is going to work for you and you will use! You can have the best system available and if you do not use it, it doesn’t really work.
As I mentioned above, I own several. Some I have outgrown, while others are specific for certain file types. For instance, I keep my photos on one external hard drive versus one for my Silhouette digital supplies.
While I use an external hard drive, that may not be what works for you. There are many cloud options and I’d recommend researching each one to decide what method works for you. I will mention again, nothing is 100% safe and I have seen where even cloud options lose servers before and cannot recover that data. The safest place is in multiple locations!
Now that we have a few basics covered, let’s get started!
Backing Up Your Photos
While not directly related to Silhouette, I would bet most Silhouette users take photos in some form or fashion. You may be taking photos to use in your Silhouette projects or of your projects.
This is going to vary by person in how you back up. Do you take photos with your phone or a camera? Each process can be a bit different. Check into what the process is for your equipment. Can you plug the device into your computer and transfer images? Or do you have to download them from a cloud?
Personally, I use my phone a lot for photos from everyday photos to ones for the blog and classes. I have an Android phone through Google Fi and that means that my photos are all backed up automatically to Google. But, this also means that if I want to download them, I have to do so through Google Photo.
But I have become lazy backing up my photos and have misplaced some over the last couple years. Let’s change that in 2022.
If we do this monthly, it won’t seem like such a large task. However, that may vary depending on how many photos you take a month.
Silhouette Studio backups
There are few areas I would highly recommend backing up from Silhouette Studio.
Silhouette Studio Library Export
Note: the software version you are currently on may affect whether you see the same options I show. I will list other resources for older software below. Tutorial written in v4.4.552
Library Export
Click on the Library tab in the top right corner. Then click on your name in the top left corner. Choose Library Export from the menu.
Choose a safe location to save your Library backup to.
I created a new folder on my external hard drive specifically for backup files and I add the date the file name when I save it, so I know the date it was done easily.
How long will it take to export?
This will depend on how many files you have in your Silhouette library. The more files, the longer it takes.
While we are discussing number of files, I want to briefly mention that the Silhouette library was not designed as an all inclusive storage area, but as a syncing device. This is so you can access files on multiple computers.
The only files that Silhouette can guarantee to recover are those files from the Silhouette Design Store. Personally, I do not store many files to my Silhouette library. (Updated 7/24/24 after a major website update and issues with the Silhouette library)
Since it is not designed as an all inclusive storage area, the storage space is limited. If you get close or exceed the storage space limit, it can cause issues within your software. Each user is given 1 GB of storage space. If you are a Silhouette Club member or a have a Silhouette Design Store subscription, you get 5 GB.
We will discuss the Silhouette library in more detail later in the Let’s Explore v4 – Organization series.
Since it is not designed as an all inclusive storage area, I would highly recommend making regular backups of the library if you do store files in it.
What is this Library Export?
This is a backup of your Silhouette library only. It is not a file that can be opened outside the Silhouette Studio software. It is only a backup that can be imported back into the software should something happen. It does not contain individual files.
Want an optional way to export Silhouette Design Store files that have synced to your library? Library Extraction might be an option – more details HERE – please read carefully. Note: this will only work for files that have been synced properly to the Silhouette library on the computer you are using. I have tested this and it worked for me. I am a Windows user.
Silhouette Studio Export User Designs
This is a brand new feature that is available in Silhouette Studio v4.4.552 or higher.
This is a different type of export and it will export all of your User Designs (personal designs) as individual files. As a note, when exporting these User Designs, it will export the entire library folder structure. However, any designs from the Silhouette Design Store, the folders will be empty. Only the user created designs will be exported. This is due to the proprietary nature of the .studio files and to protect the designers of those files from theft.
For more details on this new features, check out this post
If you are using an older version of Silhouette Studio prior to v4, check out the Silhouette Library Tips post published on January 3, 2019 found HERE, for further details on creating backups of the library.
Silhouette Snapshot
Another great option to set up and have available as a backup source is the Silhouette Studio Snapshot.
In the Library tab, click the gear icon in the bottom right corner and choose Library Snapshot.
Next, choose how you want the Snapshot to be captured. I have mine set to Daily, however, something to note is that it will only take a snapshot when you open the software. If you are a user that keeps the software open for days on end, it doesn’t do it until the software is closed and reopened.
While this method might be rarely needed, why not set it up just in case. I’ve had to instruct a few users over the years to restore a Snapshot and it has saved them when something went wrong in the library.
Again, you are probably tired of reading it, but the safest place is multiple locations. So this is a great option available to you for those “just in case” moments.
All the details are in the post I linked above on the Snapshot if you’d like to learn more, but I do want to mention that the Snapshot is computer specific. So if you are accessing Silhouette Studio on multiple locations, it will create new snapshots on each computer.
User Defined Settings
If you create your own custom cut settings in the Silhouette Studio software, it is a great idea to back those up. In fact, I would highly recommend you do it right now! You never know what can affect this area such as a corrupt file or preference.
On the Send tab, click on the More button.
Scroll down on the materials list to the end where the User Defined Settings are located. Right click on the Material name and choose Export ‘name’
It will ask you where to save the file. I saved to my Silhouette backups folder and added the date as well. This saves as a CSV file which can be imported back into the software if needed.
To select multiple settings to export at once – click on one, hold the Shift key down, and then click on the last one to select. Then right click and choose Export
For more details, check out the video on Let’s Explore v4 – Custom Cut Settings found HERE.
Back Up Your Files & Fonts
This one kind of goes along the same lines as backing up your photos.
Where ever you store your files, back them up to another source. For instance, I use my external hard drive for all my designs, fonts, and files. But, I have another external hard drive that I use as my backup hard drive and back up to it several times a year. I need to do this more often.
I use a program called SyncBackFree and have for many years in order to Sync from my “working” external hard drive to my “back up” external hard drive.
As you can see, it has been awhile since I last did my backup. I completed it right before we did our move last year. So guess what I am now doing as I type the rest of this. As a note, the computer does need to be active while it performs the backup or sync that you set up. If it goes to sleep, then the sync/backup will pause. So depending on how many files you have to backup, the time needed may vary.
As I was working on the details, the sync finished – whew! 1 step done to creating backups for this month!
If I’m working on a class and have a lot a time invested into it, I will also upload those videos or content to my Google drive as a “just in case”. It can be very frustrating when something happens and hours of work is lost.
That is a lot of information on making backups. While it may seem like a big task, the easiest way to get it done is to get started. Tackle one backup at a time!
Now that my external hard drive is synced up, photos are the next things on my to-do list. Since it’s been awhile, it will take me some time to get that done. But, if I start to do it at the same time each month, it will take less time.
I hope those have given you a few ideas of what you should be backing up and some ideas of how you can.
I would love to see what you are creating with your Silhouette software or machines! Or if you have any questions, feel free to post photos or questions on my Facebook group at Silhouette Secrets with EllyMae.
Save this for future reference by pinning the image below.
Enjoy !
THANK YOU for your support! How can you help? Click HERE & buy a coffee. Every little bit helps with the cost of running the site.
Silhouette Classes
Never stop learning! Let me help you take the anxiety out of learning with Silhouette and get to creating faster! My Silhouette classes are heavily focused on software, so you can take the skills & techniques taught and apply them to many future projects!
**This post may contain affiliate links. What that means is that I may receive compensation if you purchase through the links I have provided. The price you pay for the product or service is not higher but I may get compensated for sharing.
If you have used any sort of software in your lifetime, you know that there are always updates. In the Silhouette software updates and upgrades are 2 different things.
Updates are free and add features, fix bugs, allow new machines to be accessed, make changes, etc. I recommend downloading the updates direct from the Silhouette America website.
Upgrades are paid software codes that unlock additional features.
If you are reading this post, you probably already have an upgrade code. If you do not, I’d recommend checking out this post Software Upgrades – My Favorite Features In the post, I have listed my favorite features of each upgrade and have linked to the lowest prices to get the upgrades.
These 2 words – update vs upgrade – are often confusing for new users (sometimes even experienced users don’t use them correctly either). But, they are very important to understand the difference.
Updates reference the version of Silhouette Studio you are using. This information can be found in your Silhouette software.
How to find what software version you have
For Windows users, find your software version under Help > About Silhouette at the top of Silhouette Studio. For MAC users, find your software version under Silhouette Studio in the top left and About Silhouette.
Note: I am a Beta tester and have a Beta testing version installed.
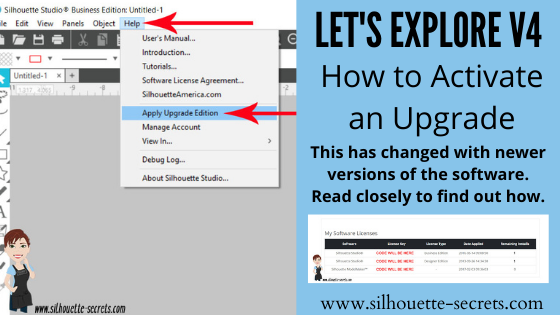
How to Activate an Upgrade
This process has changed recently so the following information is very specific to certain software versions and what you are using.
Please read the following very carefully!
This tutorial is published December 2021 updated on February 27, 2022
If you purchased an upgrade from an authorized Silhouette retailer, not direct at the Silhouette America site – follow Step 1 and 2 If you purchase direct from Silhouette America, skip to Step 2.
Step 1
If you just purchased a brand new upgrade code for the first time AND are using software of v4.4.554 or higher, you will go to the www.silhouette-america.com website. Click on Software at the top. Then choose Apply/Manage License Keys. Then Sign In and follow the instructions.
Step 2
In the Silhouette Studio software, click Help > Apply Upgrade Edition Enter your Silhouette America log in and click on Apply a New License Key to your Account. Enter your email address & password and click Sign In. Do NOT click the blue arrow. If the blue arrow is expanded, click to close it or it won’t work properly Do NOT enter the code – it has already been applied to the Silhouette America website. NOTE: this is for brand new upgrade purchases only!
If you already have an upgrade that has been applied in a prior software version the following applies:
If using software v4.4.554 or a higher version
You no longer have to enter the code on the computer you are using to activate it. The upgrade code is already activate on your account.
Open the Silhouette Studio software. At the top choose Help > Apply Upgrade Edition
Then enter your Silhouette America account information and click on Sign In. Do NOT click the blue arrow. If the blue arrow is expanded, click to close it or it won’t work properly Do NOT enter the code – it has already been applied to the Silhouette America website.
All codes that are connected to your Silhouette account will be activated on the computer.
A user is still only allowed to have 3 active computers associated with each upgrade code purchased. This means that if you log into a 4th computer, it will deactivate the upgrade on the computer that was used at the oldest timeframe.
What does that really mean?
As an example, if you have a computer that the upgrade was applied to that was used in January 2021. Then you have a 2nd computer that was used in March 2021. The 3rd computer was last used in November 2021. And now the you have a new computer you are trying to use the software on, a 4th computer, if you are using current software, when it activates, it will remove the code from the 1st computer that was last used in January 2021. It goes by the oldest date used.
Note: This only applies to computers that are using software versions of v4.4.554 or higher.
If you are using a Legacy version prior to v4.4.554
To activate the upgrade, open the Silhouette Studio software. Click Help > Upgrade. Enter the upgrade codes in the order you purchased them. For instance, if you purchased it in steps, you would need to enter the Designer Edition upgrade first and then the Business Edition.
Don’t know what your codes are?
Go to the www.silhouette-america.com website Sign in Click on Account Settings in the top right corner (little person icon)
Then click on My Account and choose License Keys.
Scroll down on the page and you will see all the License Keys for your Silhouette upgrades you have activated on your account.
The Silhouette Studio software is always changing! There are many, many neat features that have been released. However, I do not always recommend to update the software right away when it’s released. It will depend on each user’s situation and reasons they have for wanting to update.
This is one of those great features that will save the user and Silhouette Support time and frustration by being able to have it all automated and not have to manually reset the codes when a user hits 3 uses.
Keep in mind though that this new feature only affects users who are on software versions of v4.4.554 or higher.
Hope this helps you in your Silhouette journey!
I would love to see what you are creating with your Silhouette software or machines! Feel free to post photos or questions on my Facebook group at Silhouette Secrets with EllyMae.
Save this for future reference by pinning the image below.
Enjoy !
THANK YOU for your support! How can you help? Click HERE & buy a coffee. Every little bit helps with the cost of running the site.
Or if you are looking for more in-depth, step-by-step classes, check out all of my online Silhouette classes on my Teachable site HERE.
**This post may contain affiliate links. What that means is that I may receive compensation if you purchase through the links I have provided. The price you pay for the product or service is not higher but I may get compensated for sharing.
It all starts with 1 design. And then you never know where it will take you.
Long story short, I volunteered to provide a craft for my son’s 4th grade class. He picked the design and then it just snowballed from there. One project after another.
Affiliate links may be present in the following blog post and as an Amazon Associate I earn from qualifying purchases.
Today I’m going to show you how I took this simple Reindeer Gnome design by Lilium Pixel SVG and created a layered cut file from it using a few tools in Silhouette Studio.
The Design
The first thing to start with is the design. This one of the most important things to understand.
All files are created differently. Each designer creates differently. Each designer saves differently. Each design could be made up differently.
I will show you how I worked with this file and the more you do this, you will start to see patterns. The tools and steps I use may need to be done in a different order depending on how the file was created. That will make more sense after we get started and the more you work with files.
This makes it easier to work with Compound Paths. Compound Paths are one of the hardest design concepts for most users to understand. The basics of a compound path are each design is made up of pieces. If you make or release a compound path, it will affect how those “pieces” act. For more in-depth information on Compound Paths check out this post HERE. They are a great tool to play around with as you will see farther down.
Next, right click and choose Release Compound Path. This should break the design up into individual pieces. However, you may also need to right click and choose Ungroup. This will vary depending on each design. You may need to ungroup more than once or you may need to release compound path more than once.
What you are looking for is all those individual selection boxes around the “pieces” of the design. Each of those gray boxes is a selection box and now means that we can select those individual pieces and work with them.
Click off the design and then click back on 1 piece. Now, fill each piece with color using the Fill Color Panel or QAT dropdown.
Note: You will need to click exactly on the red cut line for each piece to select it. Using the Zoom tools at the top of the software can help to make it easier to click the lines.
Any pieces that are the same color can be selected together and then right click and choose Group.
Repeat this step for all the interior parts.
The more you do this, the more comfortable you will become with it, and start to recognize the patterns.
Don’t be afraid to push the buttons and the Undo button is your best friend! I am very familiar with the keyboard short cut for Undo – Ctrl+Z is one of my most used tools.
Next comes the background color.
Notice if you select the outside edge and fill it with black, it fills in all the little pieces in the area of the hat. So we need to change that.
If you filled the outer edge with color, change it back to transparent or hit Undo.
In order to take out the inner bits of the hat, select the outside edge of the design, hold the Shift key down, select the inside bits of the hat around the reindeer antler, and then right click and choose Make Compound Path.
Now, fill it with color to check that the right pieces were selected for the Compound Path. If not, hit Undo and try again.
Note: when a Compound Path is made or pieces are grouped together, it can reorder how the pieces are stacked on top of each other.
Right click on the black layer and choose Send to Back. This will send the black layer behind all the other colors.
Adjust the colors as desired to see how it will look.
Now you have a layered file that was created from the original black outline design.
The first project I did was cutting all the pieces from cardstock and creating craft kits for the 4th grade class.
Then I used the same layered file to create a shaped edge card.
And then my son asked how big I could make the gnome? Challenge accepted and we settled on a 36″ tall gnome who he named “Ger-gnomio” that I cut with my Cameo Pro. For more Cameo Pro tips, check out the header on the blog HERE.
One design turned into 3 different projects. I had no idea when I first started playing with the design that it would turn into several more projects. You never know when that creative bug will hit!
I would love to see what you are creating with your Silhouette software or machines! Feel free to post photos or questions on my Facebook group at Silhouette Secrets with EllyMae.
Save this for future reference by pinning the image below.
Enjoy!
THANK YOU for your support! How can you help? Click HERE & buy a coffee. Every little bit helps with the cost of running the site.
Silhouette Classes
Never stop learning! Let me help you take the anxiety out of learning with Silhouette and get to creating faster! My Silhouette classes are heavily focused on software, so you can take the skills & techniques taught and apply them to many future projects!
**This post may contain affiliate links. What that means is that I may receive compensation if you purchase through the links I have provided. The price you pay for the product or service is not higher but I may get compensated for sharing.
Are you a Silhouette owner and just got a new computer? Not sure where to go from there?
It is pretty easy to get setup and running with a new computer and I’m going to share a few tips.
First when you get a new computer, be prepared that it will take a little bit for it to be ready for you to start using. There will be some computer setup instructions for you to follow. And if you are a PC owner, you may find that you have a lot of Windows updates that need to install in order to get it ready for use. Be patient and let it setup correctly. I know you are excited, believe me, I was too when I got my new computer last year. But, there really is no rushing it. The updates will finish when they finish.
Silhouette Studio Software Installation
When you get a new computer, you will first need to download the software on to the new computer. This can be found on the Silhouette America website. Click on Software & then Get Software
Next, you will see a web page that will show all the software from Silhouette that’s available.
For the Silhouette cutting machines, you will select the Silhouette Studio option.
You will need to start with the Basic software. The current version is listed at the top.
For Legacy versions, continue scrolling down the page.
Choose the current version and then click on the either the Mac or the Windows option. This will download the installer to your computer and you will open that to start the installation.
Click HERE to go directly to the Software download page.
There may be some pop ups that come up that need approval in order to proceed. Watch the bottom task bar for any flashing shields if the pop up doesn’t actually pop up.
If a flashing shield appears, click on it and then approve all the pop ups.
Once the installation is complete, you can open the Silhouette Software.
If by chance you have a new Windows PC and it is running in S mode, it will not let any program that is outside of the Microsoft Store install on the computer. You will need to take it out of S mode in order to install any programs, including the Silhouette software. For more information on how to take it out of Windows S mode click HERE.
Silhouette Studio Upgrades
Affiliate links may be present in the following blog post and as an Amazon Associate I earn from qualifying purchases.
If you are using a software version of v4.4.554 or higher, you do not need to enter your upgrade codes in the software. Click on Help – Apply Upgrade Edition and enter your log in information. Do NOT enter your upgrade codes. Once you log in with your Silhouette account info, your upgrade should be active on any computer you log in to.
This is a new feature and is only available in software versions of v4.4.554 or higher. The upgrade can only be active on 3 computers at a time. If you log into a 4th computer, it will deactivate on the oldest computer that has not been active.
For older software, software upgrades do not automatically activate when you download the Silhouette software to a new computer. If you have ever entered an upgrade code, you will need enter the upgrade codes in the order that you purchased them for it to activate on the new computer. So if you purchased the Designer Edition and then the Business Edition later, you would need to enter the code for Designer first and then Business next. If you try to enter Business Edition first, you will get an error and it will not activate.
If you are a brand new user, there is a new system that is in process and you can activate the upgrade on the Silhouette America website to be used on any computer you log into. This is still very new and only available for those that are brand new and have never entered an upgrade code as of 10/15/21.
If you do not remember what the codes were, you can easily access them under your Silhouette account information in the Silhouette Design Store. Open the Silhouette Design Store, make sure you are signed in, move the mouse over the person icon in the top right corner, and then choose Account Settings.
Then click on the License Keys section.
Log into the Silhouette Library
Once the software is open, click in the top right corner on the Library tab.
Enter your Silhouette Account information and all of the files that are in the Silhouette Cloud should Sync up. It will depend on how many files you have in your Silhouette library on how long it will take to fully sync. Another hurry up and wait moment.
Plug in Silhouette machines to computer & turn on
If you have an older model Silhouette machine of a Cameo 3 or older, the free files download to the library once the machine is recognized. Plug in the Silhouette machine, turn it on, and click on the Send tab. Once it has recognized the machine, then the files will download to the library. You will need to do this for ALL machines that you have had plugged into your software to get those free files to download.
If you have multiple machines, click on the little machine icon in the bottom right corner of the Send tab to choose the machine you want active.
This will also unlock any panels that are associated with a particular machine such as the Emboss Panel for the Curio or the Stipple Panel for the Cameo 4, Cameo 3, Portrait 2, and Curio machines.
Exporting files on old computer
Note: this is only needed if files cannot be recovered in another way
If there are files that did not show up when you logged in and the library synced, the first reason would be they are the free with machine and I would suggest looking at the above information again. If you have done that, then it could be because those files were only stored on the Local User section of the old computer. This will be dependent on the Silhouette software version you were using before. If you were using a version prior to v4.1, you will find more tips on exporting the library in this post – Library Tips (v4.1).
If you have a library backup file, it can then be imported into the Silhouette library by clicking on your name in the top left of the Library and choose Library Import, then select the location of the file backup.
Screenshot from v4.4.892
But this only needs to be done if files are missing and you cannot get them to sync up any other way.
Install fonts on the new computer
Keep in mind that when you set up a new computer, you are starting from scratch. That means you will need to install any program or file that you were using on the old computer, if you want it on the new computer. This includes fonts. The new computer comes loaded with the default fonts only and these can vary by computer.
While I have heard of others being able to copy and paste the entire font file from their computer programs folders on the old computer and then pasting it into the new computer fonts folder, I was unable to do this on my new computer. I had to right click on the font and choose “Install for All Users”.
Luckily, I had saved all my font files that I’ve collected onto a folder in my external hard drive, so I could access them direct from the external drive. While I still had to install over 500 fonts, I did get to also pick and choose which ones I really “needed” on the new computer.
I have had 2 new computers in the last several years and on one I had to install each font and on the other, some worked by copy and paste.
Keep in mind that if you created designs using certain fonts, when you open the design file, if that font is not installed on the computer you are using to open the file, the font will revert to the default font style on that computer.
Export User Designs from Silhouette Library – New Feature!
If you have downloaded the current version or a version higher than v4.4.552, there is also a new feature that allows you to export all User Designs from the library as individual files.
Click on your name in the top left corner of the library tab and choose Export User Created Designs.
While I do NOT recommend storing your personal files in the Silhouette library, there are times that it is handy when you are accessing files on multiple computers or using Pattern Fills in the Silhouette software.
One big thing to note
when exporting these User Designs is that it will export the entire library folder structure. However, any designs from the Silhouette Design Store, the folders will be empty. Only the user created designs will be exported. This is due to the proprietary nature of the .studio files and to protect the designers of those files from theft.
I would HIGHLY recommend using this export feature when you update to the software of v4.4.552 or higher because it is a really nice feature. However, as a general note, I do not recommend that all users update to this version or higher. There are many factors that I consider before advising a user on whether they should update. It really comes down to the user’s choice, however, before I make a recommendation I do ask for more information. If you would like to know what I’d recommend for your situation, feel free to post on the Silhouette Secrets+ with EllyMae Facebook group and we can take a look at the factors.
Keep in mind that the Silhouette library is not designed as an all inclusive storage area but as a syncing device. This is one reason the Silhouette cloud storage is limited in size. All users get 1 GB of storage space, but if you are a Silhouette Club Member or a Silhouette Design Store Subscriber, you get 5 GB of storage.
I hope this helps you start enjoying that new computer and your Silhouette software a little bit quicker! The biggest tip I can say is to be patient! I am not the most patient person when it comes to setting up a new computer, but if I tell myself that in the beginning sometimes it helps.
We love seeing what you are creating with your Silhouette machines or software. Feel free to post photos or questions on my Facebook group at Silhouette Secrets with EllyMae.
Save this for future reference by pinning the image below.
Enjoy!
THANK YOU for your support! How can you help? Click HERE & buy a coffee. Every little bit helps with the cost of running the site.
Or if you are looking for more in-depth, step-by-step classes, check out all of my online Silhouette classes on my Teachable site HERE.
**This post may contain affiliate links. What that means is that I may receive compensation if you purchase through the links I have provided. The price you pay for the product or service is not higher but I may get compensated for sharing.
Today we are going to cover a very, very basic tutorial on bringing an outside image into Silhouette and turning it into a cut design.
Note: I am using the iPad and Procreate app, however, you can use this same technique in the tutorial in any other tablet drawing program as well.
Basic Tutorial using the Procreate App & Silhouette
I mentioned above, this is going to be very basic. I am not an artist and I am many years out of practice in my drawing techniques, but there are just times you want to add a hand made element to a design. This was the case a few months back when I was working on a design.
I needed a bee path that I would be able to share with students & that would fit within a certain space on the acrylic.
So I turned to my drawing app & thought I’d share how I did it. Now, this is not an in-depth tutorial in how to use Procreate or any other design program, but it is about exporting that design in a format you can open in Silhouette that can be used for a cut file. Or in my case, an etch file for the Curio.
Tip: Black is going to be the color that the Silhouette Studio software traces the best. I would highly recommend practicing with black designs to get the hang of tracing. Colors can be traced, but may need more adjustments to get that traced properly.
Draw and Exporting Designs from Drawing App
Open your drawing app program.
Draw your design.
Turn the background color off in the drawing app.
Export the design as a transparent png file. Export from Procreate as a png, test your file to make sure that it exports with a transparent background. I was able to use either the png option under Share Image or Share Layers and they both exported as transparent.
When exporting the design, choose a method that you know how to access the files from. I emailed the image to myself as you’ll see in the video clip below, however, you could use any method you are familiar with. A few options you may have in your drawing app are: email, google drive, cloud storage, air drop, etc.
Find the file you shared with yourself and download it to a safe place on your computer.
Open the file in Silhouette Studio.
2 Ways to Trace a PNG file in Silhouette Studio
Autotrace Feature
Autotrace is a new feature introduced in the v4.4 software starting in v4.4.247. This is a feature that will automatically trace any transparent png file that is opened.
Now, the first thing to note about this feature is that there are still some “bugs” in it. In early versions of v4.4, the software could crash when a png file was opened as it was too data heavy. It has been improved and in later versions there are different “bugs”. These included png files opening up larger than the actual design size and because of this being very data heavy so they take longer to process or can crash the software.
If you have experienced either one of these when opening png files, it could be because of Autotrace. The easiest thing to do is to turn it off under the Preference > Import tab.
But, for this tutorial, it should work for all users if you are in v4.4.
How It Works
Open the file in Silhouette and TA-DA! Red cut lines are around the outer edge of the png file.
When you click on the Send tab in the top right, you can see those bold red cut lines around the design.
Now, I say TA-DA but also keep in mind that Autotrace is a data heavy tool and processing time can vary by computer. Some computers may not handle it well. If you think about it, opening a photo file in itself can be a larger than usual file size and then you add on the “autotrace” adding more data at the same time, that makes it a little more interesting.
Now, “old school”. When I say that, I just mean doing it without the fancy new tools and how we’ve done it in the software for the 9+ (and more) years that I’ve been in the Silhouette world. The Trace Panel – either it looks like a butterfly or a piece of toast – depends on who you are.
Click on “Select Trace Area“, then left click & hold the mouse button down. Drag a box around the area that you want to trace.
Increase the Threshold to get as solid of a yellow as you can.
When you have it like you want, click on the Trace option at the bottom of the panel. Then move the original image away from the Trace.
Fill the traced image with color and it should look like your original image.
TA-DA! Now you have a cut line.
This technique can be applied to any jpeg or png file that you would open. Each design will vary in the trace techniques and the adjustments needed in order to get the trace how you’d like. But, a simple black design should trace well. Make sure to keep the size in mind as well when you are tracing. Trace at the size the image opens at for best results. This is due to those pixels of a photo image. When it’s enlarged, those pixels enlarge as well and the trace feature picks up every single pixel around the edge, which can result in a choppy trace.
Check out this video tutorial showing the above steps on my YouTube channel
Now, it’s your turn!
Practice Time
I have drawn this simple flower design in Procreate.
Download this file and the bee design to practice with HERE. Unzip/extract the folder after you download and test it out.
If you are on a software version of v4.4 or higher, test it out with both the Autotrace turned on and off. It is great to practice both ways so you know how it works.
Tips on Tracing Designs
Edit Points
Edit Points are the data points that the Silhouette reads in order to connect a cut. The Silhouette machine has to connect the dots and hit every single edit point when it’s cutting.
Double click on the traced line to bring up the gray edit points.
How many edit points are around the image will vary based on the image that was traced. A traced image always has more data points than if compared to a svg file because a trace picks up every single pixel in that image.
Simplifying the edit points on a trace can help make it a cleaner cut file. With the Edit Points activated, click on the Simplify button in the Edit Points panel and watch those gray dots change.
Here is a close up of the Edit Points before they are simplified.
And here is a close up of the Edit Points after it’s simplified.
Working with Edit Points is a great tool to have in your tool box. Check out more information on Edit Points and how they can help you in your Silhouette creations HERE Let’s Explore v4 – Edit Points
Ownership & Rights
Now, this is the one that most users do not want to hear and many may stop reading here, but it is just an important as all the rest.
Just because you can download images from the internet, does not give you the rights to trace and use those designs. They have an owner and obtaining the rights to use the images is your responsibility.
If an image is in public domain, then it is free to use. All other images are subject to copyright or trademark and you would need to research the image itself to find out if you can legally use it. It does not matter if it’s for personal use or commercial use. Someone owns it.
This is why I provided my own files to you to use for practice. I drew them, they are mine, and I can give you permission to use those files.
All Images Will Vary
And if you are still with me reading, one final tip on tracing. All images will vary in how they trace and what steps or adjustments will be needed.
Photographic images with shadows, colors, gradients, etc. will be more difficult to trace than a black and white image.
THANK YOU for your support! How can you help? Click HERE & buy a coffee. Every little bit helps with the cost of running the site.
Or if you are looking for more in-depth, step-by-step classes, check out all of my online Silhouette classes on my Teachable site HERE.
**This post may contain affiliate links. What that means is that I may receive compensation if you purchase through the links I have provided. The price you pay for the product or service is not higher but I may get compensated for sharing.
Using the Silhouette Software to Help Design Home Décor
I always have my eye out for things that I can use in creating with my Silhouette machine. Target had these little wooden houses available in their Dollar section.
After debating with my inner self, I finally picked up a set. I always have this inner dialog on – can I make that? Will I make that? Yes, I can cut the wood, but when will I get it done? Right now, in the process of moving, our wood shop is not set up, so I did it. I bought wood shapes.
If you have access to a saw, you could create your own shapes. This tutorial is not limited to these little house shapes, but think about the supplies you have on hand and you can use this same technique for any blanks you use.
Affiliate links may be present in the following blog post and as an Amazon Associate I earn from qualifying purchases.
Next, gather the rest of the supplies. – Paint – Foam brush – Paint palette or small dish – Sponge – Painters Tape – Adhesive Vinyl – Transfer Tape – Squeegee – Weeding tool
Tape off any sections needed with the painters tape. In this case, each house has a metal chimney.
Paint the houses any color you want. I chose to paint a solid color of gray, light blue, or dark gray as the first coat and then used the white chalk paint with the sponge on top of that to give it a distressed look.
Let the wood blanks dry completely.
Next, measure the space of each blank and write that down.
This is just a rough draft and does not have to be perfect or to scale.
Using the information from your measurements and drawing, draw shapes in the Silhouette software to design use as “design templates”.
For these houses I started by using a rectangle under the Drawing Tool on the left side and then used the Edit Points to pull up a point in the roof.
Check out this video tutorial showing the full process of drawing the shapes in Silhouette Studio.
Once all the designs are sized how you want them to cut, move the designs around on the virtual mat to cut out each color vinyl you want them in.
Then send to the Silhouette machine to cut all the adhesive vinyl pieces. I cut everything from Oracal 651 adhesive vinyl. I have been having an issue with the vinyl cutting too deep into the backing using the preset settings, so I am using the settings of: Blade depth – 2 Force – 5 Speed – 5 With a Silhouette Autoblade and it is cutting, weeding, and transferring beautifully.
Cut settings depend on many variables and test cuts will be the way to find out what is going to work best with your material and blade. For more tips on cut settings check out this post – Perfect Cut Setting in Silhouette.
Carefully weed the excess vinyl from around the designs.
This takes practice and the cut settings can make a big difference in the ease of weeding. Do not rip it off like a bandaid.
After all the weeding is done, apply vinyl to blanks
Here is a quick real time video of the application process on one of the wood blanks.
In the above video, I reference a recent tutorial on the Smart Snapping lines. This can be a very helpful tool as shown in the video. Check out the Let’s Explore v4 – Smart Snapping post HERE
And now you have some seasonal or year round décor.
Double sided means that they can pull double duty in your seasonal decorations.
And if I were to ever want to change the designs out, I would just carefully remove the vinyl. Sand it if needed and repaint, then cut and place new vinyl designs on them.
Keep in mind that you can use these tips & techniques for any blanks you might have!
Save this for future reference by pinning the image below.
Enjoy!
THANK YOU for your support! How can you help? Click HERE & buy a coffee. Every little bit helps with the cost of running the site.
Or if you are looking for more in-depth, step-by-step classes, check out all of my online Silhouette classes on my Teachable site HERE.
**This post may contain affiliate links. What that means is that I may receive compensation if you purchase through the links I have provided. The price you pay for the product or service is not higher but I may get compensated for sharing.
If you have been using a Silhouette Studio version of v4.4.247 or higher, you may have noticed some new blue lines appearing on your Silhouette software.
Smart Snapping Tool
Affiliate links may be present in the following blog post and as an Amazon Associate I earn from qualifying purchases.
This is a new feature called Smart Snapping and it is an alignment tool that can be helpful when creating designs. As a design is moved around in the software, blue lines will appear that are showing where an object could be aligned with another object.
Smart Snapping can be found on the Page Setup Panel – Tab 2. This is a new feature added to v4.4.247 or higher.
To toggle the Smart Snapping on, check the box next to “Enable Smart Snapping”. To toggle it off, uncheck the box next to “Enable Smart Snapping”.
Or clicking the ‘S’ key on the keyboard with toggle the Smart Snapping on and off too.
The “Tolerance” can be adjusted up or down. A tolerance level of 0.00″ means no smart snapping lines appear. Sliding the tolerance higher creates more smart snapping points.
The Smart Snapping lines will vary according to the design and objects on your page and their relation to each other.
There are so many neat features in the Silhouette Studio software!
We love seeing what you are creating with your Silhouette software & machines! Feel free to post on the Silhouette Secrets+ Facebook Group.
Save this for future reference by pinning the image below.
Enjoy!
THANK YOU for your support! How can you help? Click HERE & buy a coffee. Every little bit helps with the cost of running the site.
Or if you are looking for more in-depth, step-by-step classes, check out all of my online Silhouette classes on my Teachable site HERE.
**This post may contain affiliate links. What that means is that I may receive compensation if you purchase through the links I have provided. The price you pay for the product or service is not higher but I may get compensated for sharing.
Just a quick post to let you know there is a new video tutorial up on my YouTube channel HERE
This one is showing how you can create custom cut settings in the Silhouette Studio software. I also share some tips on what the icons mean and how to export & import those settings as well for safe keeping.
In my video tutorial I reference cut settings, but you can use this same method for any action in the Silhouette software – sketch, cut, etch, etc.
I hope you have a fabulous day and get time to play in your Silhouette software soon!
Save this for future reference by pinning the image below.
Enjoy!
THANK YOU for your support! How can you help? Click HERE & buy a coffee. Every little bit helps with the cost of running the site.
Or if you are looking for more in-depth, step-by-step classes, check out all of my online Silhouette classes on my Teachable site HERE.
**This post may contain affiliate links. What that means is that I may receive compensation if you purchase through the links I have provided. The price you pay for the product or service is not higher but I may get compensated for sharing.
This post has been a long time in the construction process. After almost 2 years of testing this blade, I feel comfortable in being able to give you some tips on it.
The Kraft blades are designed to cut thicker materials. And they do, but it is not a blade that you can simply pop into the machine and cut perfect with right away. It can take some time, testing, and materials to find out what will work. And I’ll tell you right off the bat, not all materials or designs will work well with these specialty blades.
Affiliate links may be present in the following blog post and as an Amazon Associate I earn from qualifying purchases.
First, let’s go over some information about these blades that will help to understand a little bit more on what machines they work with and how the blades work.
Silhouette Kraft blades
There are currently 3 Kraft blades for the Silhouette machines.
2 mm Kraft blade
This 2 mm Kraft blade pictured above is compatible in the – Silhouette Cameo 4 models with the white adapter – Silhouette Portrait 3 with the white adapter – Silhouette Cameo 3 – Silhouette Portrait 2 – Silhouette Curio
2 mm Kraft blade (Type B)
This 2 mm Kraft blade (Type B) pictured above is compatible in the – Silhouette Cameo 4 – Silhouette Cameo 4 Plus – Silhouette Cameo 4 Pro – Silhouette Portrait 3
The Type B 2 mm Kraft blade fits in the Tool 1 housing and is designated with a 1 on the front of the blade. No adapter is required.
3 mm Kraft blade
This 3 mm Kraft blade pictured above is compatible in the – Silhouette Cameo 4 – Silhouette Cameo 4 Plus – Silhouette Cameo 4 Pro
The 3 mm Kraft blade fits directly in the Tool 2 housing on the Cameo 4 models only and is designated with a 2 on the front of the blade.
You can find the Kraft blades at most Silhouette Retailers: Silhouette America – use code 10OFF to take 10% off your order (coupon code not available on machines) The Vinyl Spectrum – fast shipping Swing Design – use code SECRETS10 to save 10% (coupon code doesn’t apply to all products)
In order to have access to the Kraft blade settings, user’s will need to use a version of Silhouette software of v4.3.370 or higher.
Blade Depth
The Kraft blades are all a manual blade, which means that you have to turn the bottom of the blade to adjust the blade depth.
The numbers on the bottom of the blade are the blade depth in increments of 0.10 mm. Blade depth is how far out the blade extends from the bottom of the blade housing. In the photo above, the 2 mm Kraft blade is on the left and the 3 mm Kraft blade is on the right.
Just as a heads up. More is not always better, but we will discuss that in a bit.
Blade comparison
Like I said above, this is not a blade that you just pop in the machine and it is perfect. This blade is a broader tipped blade and works more like an Exacto knife. Let’s take a look at how it compares to other Silhouette blades.
In the photo above, on the left is the Premium blade, the middle is the Autoblade, and the right is the 3 mm Kraft blade. As you can see, the blade construction is very different.
The Premium blade & the Autoblade are smaller more concise blade tips, while the Kraft blade is a broader tipped blade.
What this means is that the Kraft blade cannot turn like the Premium or Autoblade. It does not turn sharp corners or change directions like the other blades.
As a comparison, think of using an Exacto knife by hand. Can you cut an intricate design or even a square without lifting the blade up to turn in a new direction or turning the material on your workspace? Can you cut completely around the design, by hand, in one continuous cut?
How the Kraft Blade Works
The Kraft blade works on a system called “Smart Cut” technology. But the basics of it are, the blade cannot cut in one continuous motion and change direction. It has to either lift and touch down somewhere to orient the blade for the next direction or it has to draw a loop to turn to get headed in the next direction. These are called “hooks” and “loops”.
These hooks and loops DO cut on the material. There is just no way around that. The blade has to turn somehow and since it is a broad tipped blade, it cannot just turn 90 degrees.
The Kraft blade NEEDS these “hooks” and “loops” to work in the best manner that it can. Turning the Kraft cut action off means that the blade is trying to make those corners and the blade can be sideways and trying to cut because it has not had the chance to orientate to the new direction.
Understanding how this blade is constructed and how it is designed to work, can help in your future projects. Does it eliminate the frustration you might have when working with it? No, but you will understand it better and why it might be acting the way it is.
I have spent many, many, many hours testing this blade over the past 2 years and I’ll say right out front – I’ve been frustrated, I’ve walked away, I’ve grumbled at it; BUT I have also had some success with it too!
This class is now available on my Teachable site HERE.
It has all taken a lot of time and testing with this specialty blade. Not everything has been successful. But, that’s why I’m here to share some tips to working with the Kraft blade.
Tips for the Silhouette Kraft Blade
I would suggest reading through all the tips before starting any project as they all work together in one way or another.
Tip #1 – Turn the blade all the way up and then back it down to what you need. Basically, I do not pay attention to the numbers. By exposing all the blade and turning it back down, you can set it to the depth you need according to tip 2.
Notice in the above photo that even when the blade is extended completely, the red number is not at a 30. The collar on the blade can be “off” either from use or if it’s been unscrewed and screwed back on. This is going to vary blade by blade. My Kraft blade is well used and I cannot even tell you what I’ve used it on or how much. When you open a new Kraft blade, look at it closely. Look and see where it is lined up. This is one reason that I do not use the number, but move on to #2. While technically, the numbers on the blade equal 0.10″ mm, if the collar is off even just a bit, the numbers are off too.
Tip #2 – Measure your blade depth against the material thickness.
This will show you the max depth that the blade can be. Turn the blade back down to the thickness of the material. You do not want the blade extended out more than the thickness of the material or it will get stuck in the mat or cause the cut to go wonky. The blade depth should be just barely out enough to make it through the material.
Measuring against the edge of leather
Tip #3 – Some materials need multiple passes at varying blade depths to cut through. Not all materials can be cut through in 1 pass. This requires testing and will vary depending on the material, the way it is constructed, and the density of the material.
For instance, I referenced above that I have cut this SPC Light Chipboard Sheets with the 3 mm Kraft blade.
This is heavier than the Silhouette brand chipboard, but is still classified as a “light” chipboard. (I have not had success with medium chipboard).
In order to cut this I used a brand new blade and had to make a series of passes on each shape. Pass #1 – Blade Depth – 3, Force – 15, Speed – 5 Pass #2 – Blade Depth – 6, Force – 15, Speed – 5 Pass #3 – Blade Depth – 6, Force – 15, Speed – 5 *Keep in mind Tip #1 and Tip #2 – make sure the blade is not out farther than the material thickness or it will just get stuck in the mat.
For materials that need variable blade depth and/or force, do not try to skip a pass and go from a lower blade depth or force to the max blade depth or force. It only resulted in the blade getting stuck for me and the material was eaten up.
Tip #4 – Simple shapes work best Not all designs will work! Simple shapes are best. No intricate cuts. No interior cuts.
Testing is the only way to know. If a design is too complex it will either just eat up the material or it can crash the software when the Kraft cut action is activated.
Tip #5 – Cut 1 design shape at a time. This is for several reasons. If something goes wrong such as the blade getting stuck or the cut doesn’t work. You only have wasted one section of the material instead of an entire sheet.
The hooks and loops change according to what is placed on the design mat and where the designs are in relation to each other. By placing 1 design on the mat at a time, the hooks and loops can adjust to give you the best cut on the design and you can measure and place your next design according to where those hooks and loops did cut. The more familiar you can be with your cutting mat and the virtual mat in the software, the better. The virtual mat matches up exactly to the Silhouette cutting mat. If you are familiar with it, you can get pretty darn accurate on placing your design and materials where needed. It all takes practice.
Check out this quick video on my YouTube channel showing the hooks and loops changing depending on where the design is placed on the cutting mat.
Tip #6 – Only send 1 pass at a time. Even if you are doing a series of passes, only send 1 at a time and do not increase the passes on the Send tab. This will allow the Silhouette machine to reset and start the cut from the beginning, instead of adjusting on the 2nd pass and possibly throwing the cut off.
Tip #7 – Get extra materials You will need them! The Kraft blade requires more room to work and more testing than the regular blades.
Tip #8 – Be patient! Maybe this should have been the #1 tip. Patience is probably the toughest part. Be patient with your computer, the software, and yourself. This is a new blade, new skill, new technique – it’s just new! It will take time to learn to use.
Tip #9 – Use high quality materials This can be very important! Low quality materials are just that – low quality and may not yield good results at all.
For instance, when developing the Cutting Leather class, I tested hundreds and hundreds of dollars of leather. Craft store leather, real leather, thick leather, thin leather – I tested A LOT!
High quality leather from a leather company worked the best. I used Badalassi Carlo – Minerva Smooth “Vacchetta” Veg Tanned Leather – Split to 2-2.5 oz or 2.5- 3 oz – 12” x 12” piece from Rocky Mountain Leather. Craft store “genuine” leather did not work well because it was soft, pliable, and mushy. Those are the best technical terms I can describe it as. The Kraft blade just pushes it around and gets stuck vs being able to cut clean through it.
For more details and information on this example, check out this Leather types video I have on my YouTube channel HERE.
Chipboard is another example. Because of the way chipboard is constructed, not all brands are equal. Chipboard is fibers pressed together. How that holds together while it’s cutting will affect your final result. Some are more fibrous and will just separate.
Tip #10 – Turn Carriage 1 (Tool 1) off before using Carriage 2 (Tool 2) Carriage 1 is the default tool for all machines. In order to activate only Carriage 2, you first have to select the design on the screen by clicking on it and then choose No Cut to turn it off. Bold red cut lines will turn off. Then go to Carriage 2 settings and set up the Kraft cut settings.
Tip #11 – Do not turn off hooks and loops These are important in how the Kraft blade can complete the shape. If you turn them off, the blade may not orient to move in the new direction and your blade may be sideways while trying to cut. This will result in the blade getting stuck in the material.
Tip #12 – Keep the design away from the edges of the material The Kraft blade does need more space and material to cut. Keep the design away from the edges of the material and give it a wide allowance. If the blade goes off the material while cutting, it may not be able to get back up on it again properly and the cut will be off.
Tip #13 – Check the blade for debris often This is especially important when cutting a fibrous material such as chipboard. I found that I had to check the blade between each pass while I was adjusting the depth. Fibers would build up on the blade and cover the sharp edge, which would cause the blade to get stuck in the material on the next pass.
Tip #14 – Design position matters Because of how the hooks and loops work, some designs cut better in certain areas than others.
As an example when I cut the SPC Light Chipboard Sheets, the pennant design would cut on the left side but it didn’t cut well on the right side.
I also found that if you can position the material at the bottom of the cutting mat, then you can check the cut easier to determine if it needs another pass. I used this method especially with more expensive materials. If you unload the cutting mat, you will not be able to get the mat lined up exactly perfect to cut in the same place if multiple passes are needed to cut through.
This is why in the Cutting Leather class, I start with the design in the bottom right corner of the cutting mat and not at the top. Through lots of testing, I determined that the shapes used in the class, cut the most successfully in that area and could be checked easier.
Tip #15 – Be patient! I know that I said this as tip #8, but I think it needs repeating. If you are looking for a quick project, you might want to try a different technique. If you have some time to test and see what can happen – give it a go!
I have had many failures with the Kraft blade, but as I said, I have also had success too!
Chipboard pennant shapes cut with 3 mm Kraft blade. Cardstock pennant shapes to match & letters cut with the Autoblade.
Now, I did mention that I’ve cut balsa and basswood as well. I do not have a tutorial on that and I am not sure if there will be one at this time. My best suggestion is to cut your templates with the Silhouette machine and grab an Exacto knife and cut them by hand. It will save you time, money, and lots of frustration. For a bit more information on that, check out this post on my Facebook group HERE where I shared my experience and results.
And in all honesty, if you want to cut wood, I would recommend either a laser cutter or a scroll saw. You can still use the Silhouette software to help in your creations and I have seen some amazing work with both. I know we would all like an all-in-one tool, but sometimes it’s all about the right tool for the job!
More Tips!!!
Extra Tip #1 – Software versions Earlier versions of the software tend to work better than the later releases of v4.4 for the Kraft blade and the Rotary blade. I have reported these issues and they are under investigation, but later versions of the software are adding in hooks and loops but not showing those on the screen. These additional hooks and loops do not always cause an issue, but sometimes can.
However, the biggest one I’ve found is the initial touchdown of the Kraft blade to orient to start, is taking a bite out of the actual design. The photo below shows one of those “bites”.
Cutting basswood with the 3 mm Kraft blade More details on that in my FB group HERE
If you do plan to start cutting projects with the Kraft blade, I would recommend using an earlier version of v4 software. Silhouette Studio v4.3.370 is the earliest version in the software that is currently available that supports the Kraft blade action and can be found under the Legacy section as you scroll down HERE. *Portrait 3 users will need to use higher than v4.4.259 *Cameo Pro users will need to use higher than v4.4.281 *Silhouette software can be found HERE
The only way to know how it is going to behave….. TEST IT! Grab a big cup of your favorite drink, an extra dose of patience, and try to have fun just playing.
Extra Tip #2 – Blade housing reset If the Kraft blade gets stuck in the material, it can throw off the housing alignment. Immediately, press the pause button. If it does not pause quick enough, press the power button. Do not let it continue! It won’t help anything. The cut is most likely out of it’s path now and it will not cut right. Time to start over, either by placing the design in a new area on the material or this is where tip #7 – extra materials – come into play.
After the blade gets stuck, it may need to be realigned. To reset the blade housing, I unplug the Silhouette machine. Then CAREFULLY, move the blade housing all the way to the right and all the way to the left. Do this 3 more times and leave it on the right side. Plug it back in and turn it on. The housing will reset to it’s proper location.
Extra Tip #3 – Don’t be afraid of it! As I’ve said, I’ve done lots of testing with a variety of materials. While my blade has gotten stuck a LOT, my machine is still going strong.
Extra Tip #4 – Custom settings You will most likely need to create a custom cut setting for the Kraft blade. Check out the video below or on YouTube on creating a custom setting.
I know that is a lot of information! I would suggest reading it through a couple times and then decide what you will do. Take the Cutting Leather class if you want step-by-step instruction and use the recommended supplies for the class for the best success.
I’d love see what you create with the Kraft blade if you do decide to try it out! Or if you have questions, feel free to post on the Silhouette Secrets+ Facebook Group.
Save this for future reference by pinning the image below.
Enjoy!
THANK YOU for your support! How can you help? Click HERE & buy a coffee. Every little bit helps with the cost of running the site.
Or if you are looking for more in-depth, step-by-step classes, check out all of my online Silhouette classes on my Teachable site HERE.
**This post may contain affiliate links. What that means is that I may receive compensation if you purchase through the links I have provided. The price you pay for the product or service is not higher but I may get compensated for sharing.
THANK YOU for your support! How can you help? Click the link to buy a coffee. Every little bit helps in the cost of running the site.