Let’s Explore v4 – Line Tools in Silhouette Studio
When it comes to creating stunning designs in Silhouette Studio, the Line Tools are your secret weapon for precision and creativity. From drawing simple straight lines to crafting intricate custom shapes, these tools open up endless possibilities for your crafting projects. Whether you’re a beginner exploring the basics or an experienced designer looking to refine your techniques, understanding how to use the Line Tools effectively can take your designs to the next level. In this guide, we’ll walk you through each Line Tool, share pro tips for maximizing their potential, and show you how to incorporate them into your next Silhouette masterpiece. Let’s dive in!
Sometimes, I think that the tools on the left side of the Silhouette Software get lonely. There is so much that you can do within the software in creating your own designs and I love seeing what everyone comes up with.
First, let’s take a look at the Design Tab. On the left side are the Tools in the software and on the right side are the Panels which control the properties of the objects created.
Check out the Let’s Explore v4 series (HERE) to see more information on the Panels on the right side and how they can be used.
And if you need a little more detailed diagram of the Design tab, don’t forget to grab the FREE PDF in this post – HERE.
Silhouette – Line Tools
Today, we are going to cover the Line Tools located on the left side of the Silhouette Studio software. This is available for all users, no matter if you have a software upgrade or not.
Here is a close up of the options available in the Line Tools menu – Draw a Line, Draw a Polygon, Draw a Curved shape, and Draw an Arc
Draw a Line
This will draw a simple line from Point A to Point B. Holding down the Shift key will make it a vertical, 45 diagonal, or horizontal line.
I often will draw a line if I have to separate designs when cutting without a mat to make it easier to weed.
Sometimes, I’ll use the Weeding Lines within the Silhouette software, but other times, it’s just as easy to draw my own line.
This tool will continue to draw lines until you connect the red dots together to close the shape or double click to end the line.
Holding down the Shift key will also make it a vertical, horizontal, or 45 degree angle line.
Have some fun and see what kinds of shapes you can draw. Turning on the Snap to Grid found under the Page Setup Panel – Tab 2, can also help in making sure that you get even spacing and help with drawing objects.
I’ll use this tool or the Draw Curve Shape to create my own weeding lines around a detailed design or when I’m cutting multiple designs on a page.
A combination of tools can make it easier to weed a detailed design or a page filled with designs like the one above by allowing you to weed smaller areas instead of having a full sheet of Oracal 651 stick back to itself.
Draw a Curve Shape
This tool will draw a line each time you click the mouse, but the point will be a curved point.
Continue clicking the mouse to add points and curves in the shape. Double click to end the line or connect back to the first red dot to complete the shape.
After the design is complete, double click on the line and the Edit Points will pop up and the design can be altered more.
Each point has 2 blue squares that are handles that can be adjusted. Or select an option from the Point Edit Panel on the right hand side.
Draw an Arc
Select this tool and click onto the design mat, this will be the starting point of the Arc line. Move the mouse and the next click completes the Arc.
In the center of the arc, there is a grab handle that can be moved in or out to alter the Arc even more.
Click off of the design and an arc line is left.
There are so many fun things that can be created with the tools in the software. You can create your own shapes, add weeding lines, or add Text to the Path you have created.
What will you use the Silhouette Line tools for?
Save this for future reference by pinning the image below.
Enjoy !
THANK YOU for your support! How can you help? Click HERE & buy a coffee. Every little bit helps with the cost of running the site.
Silhouette Classes
Never stop learning! Let me help you take the anxiety out of learning with Silhouette and get to creating faster! My Silhouette classes are heavily focused on software, so you can take the skills & techniques taught and apply them to many future projects!
**This post may contain affiliate links. What that means is that I may receive compensation if you purchase through the links I have provided. The price you pay for the product or service is not higher but I may get compensated for sharing.
I get an email from my husband asking if I can make him a phone cover out of some skull vinyl he has found online.
Well, of course, challenge accepted!
I order the vinyl and sat down to cross this off my to list. I wanted to get it done because sometimes the projects that are closest to us always seem to get pushed down the list. This time I wanted it to be first on my list.
Take some time, create something for yourself, a loved one, or a friend.
Enjoy what you can create!
Now on to the project!
I grabbed my Pixscan mat for the Cameo and took a photo using my old Iphone 6.
Next, I emailed myself the photo and when it asked what size I wanted to email, I chose “Actual Size”. If the photo is compressed when it’s sent, then it may not be read by the Silhouette Software.
After I download and save the file, I then clicked on the Pixscan Panel in the top right corner of the Silhouette Software.
Choose Load Pixscan Image from File and find the location the file was saved when downloaded.
Once the photo pops up, I get a notice about no Calibration Profile.
I just click on “Continue without calibration” and the photo will load onto the Silhouette Studio design mat. Now you should see the Pixscan mat on the screen.
Now that the Pixscan mat is in the software, there may be several ways to get the cut lines needed.
Trace
With a basic Trace, I can trace the outer edge of the phone case.
I increased the Threshold until the edges turned solid yellow and then chose “Trace Outer Edge”.
Now, in this photo I have increased the line thickness so you can see the cut line better. You will notice that the right side of the cut line is not perfectly aligned with the bottom edge of the phone. That is due to the shadow and it traced around the shadow. This can easily be moved to the edge of the phone.
If you double click on the cut line, the Edit Points will pop up and you can see that there are more than are really necessary. Anytime you have a trace you will find that it adds edit points. These can be simplified in the Edit Points Panel by either clicking on “Simplify” or deleting unnecessary ones.
For more information on Edit Points, check out this post HERE.
I mentioned above, that there may be several ways to get the cut lines needed. What works best is going to depend on what image you are working with. The Trace did a good job getting the outer edge of the shape I needed for the outer cut line of the case. However, I need to cut the 2 circles out of this for the back of the phone and the Drawing Tools will do the job here.
Drawing
On the left side are the Drawing Tools. I will need the Draw Ellipse Tool and will hold down the Shift key to draw a perfect circle for the 2 objects I need it for.
And I now have the cut lines for cutting vinyl to apply to my husband’s phone.
Since I am only needing the shape cut out and not cutting onto a specific media or stamped image, I can copy this shape and paste it onto a new design mat to cut it.
I do not need to cut directly on the Pixscan mat in this case. However, you could if you have an image such as a design on a scrapbook paper that you want to cut out or a stamped image and want to cut it directly on the mat, like in this post explaining the Pixscan Panel.
I use the Reveal option on the Page Setup Panel to measure where the design will fit on my cutting mat and then cut my materials down to size with a paper trimmer. Then I am only applying the material to that section of the cutting mat and I save the adhesive on the other areas that it is not applied. This is one way that I can get a Silhouette cutting mat to last a long time.
For other tips on Getting the Most out of the Silhouette cutting mat check out this post HERE.
It’s ready to cut! Click on the Send tab, choose my Vinyl Glossy Material and click on Send at the bottom.
And remember the old saying “Measure twice cut once” or you end up with a piece of vinyl that wasn’t quite long enough. But it’s just a little vinyl and I put a 2nd piece on the cutting mat and cut again. It happens to us all at one point or another.
Now it’s ready to apply the Oracal transfer tape and put it on the back of the phone.
Here is a quick video on how I apply the Oracal transfer tape. I have used this for years both personally and in my classes and my students have no issues with it.
And now by using the Pixscan mat, my husband has the custom phone cover he requested. He has a clear phone protective case on it, so that will protect the adhesive vinyl even more.
Keep in mind that each object or design that you are working with may be different in what is needed to accomplish the goal. I used the Trace Panel and drawing tools to get the shapes I needed for my cut lines. A different object may need another tool or a combination of tools too!
**This post may contain affiliate links. What that means is that I may receive compensation if you purchase through the links I have provided. The price you pay for the product or service is not higher but I may get compensated for sharing.
One of the new features in the Silhouette Studio v4.2 software is a Library Snapshot.
This takes a “Snapshot” of the library as it is right now and also allows you to revert back to this “snapshot” of the library if needed.
To access and setup the Library Snapshot, click on the Library tab in the top right corner.
Then click on your name in the top left corner.
You will need to be logged in to the Silhouette library.
Then choose Settings.
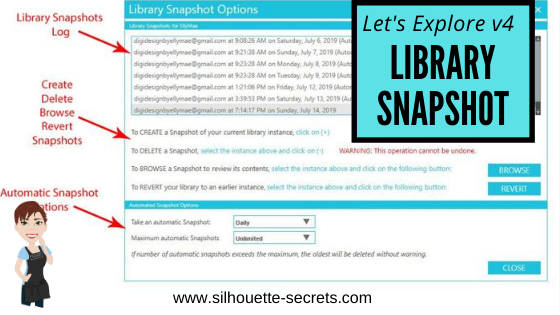
A Library Snapshot Options window will pop up.
At the top of the Library Snapshot Options box is the log of all the snapshots that are taken of the software.
The middle section gives you options to create, delete, browse, or revert snapshots manually.
The bottom section allows you to set up automatic snapshots of the Silhouette library.
I would recommend setting the Snapshot option to Daily.
It never hurts to have multiple copies.
The Library Snapshots are computer specific. Depending on how it is set up, the snapshot will occur when you open the software.
If I have my snapshots set to daily but I leave my software open on my computer overnight, it will not take a snapshot the next day until I have closed and reopened the software again.
These snapshots are only stored on the computer you are accessing at the moment. Each computer will create a snapshot when the software is opened on it. So if I access my software from my computer upstairs, that snapshot is saved on my upstairs computer only. It is not stored in the cloud and synced between computers.
Does this replace making a backup of the library? No!
I would still highly recommend making a backup of your library on a regular basis and I would also recommend having your personal files saved to an outside source, which is also backed up as well too. There is nothing that is 100% safe and just like a computer crash, you cannot predict when something will happen.
Do you remember years ago when typing in Word documents and we were taught to save often? It is still a great habit to get into.
Save & backup often and you will not regret it.
Exporting a Backup
To make a backup of your library in Silhouette Studio v4, open the Library tab.
Click on your name in the top left corner (must be logged in).
Choose Library Export.
A “Select Location” pop up window will come up.
Choose Browse and then select a safe location to save the backup file to.
This is a backup file only. It cannot be opened outside of the software and only can be imported back into the software if needed.
It does not contain individual files.
If you want the files saved individually, you will need to open each file and choose File > Save As > Save to Hard Drive.
I add the date to the file name and save in a Backup folder that I can find if needed.
I’d recommend making a backup of the library on a regular basis, just in case because you just never know.
If you ever need to import the backup back in, click on your name in the top left and choose Library Import.
The Library Snapshot is just one of the new features in the v4.2 software.
Hopefully, you will never need to use it, but it is great that it is there.
Now, it’s a great time to go make a backup of your Silhouette library, no matter what version you are using and if you are in v4.2, set up the snapshot to your specifications.
**This post may contain affiliate links. What that means is that I may receive compensation if you purchase through the links I have provided. The price you pay for the product or service is not higher but I may get compensated for sharing.
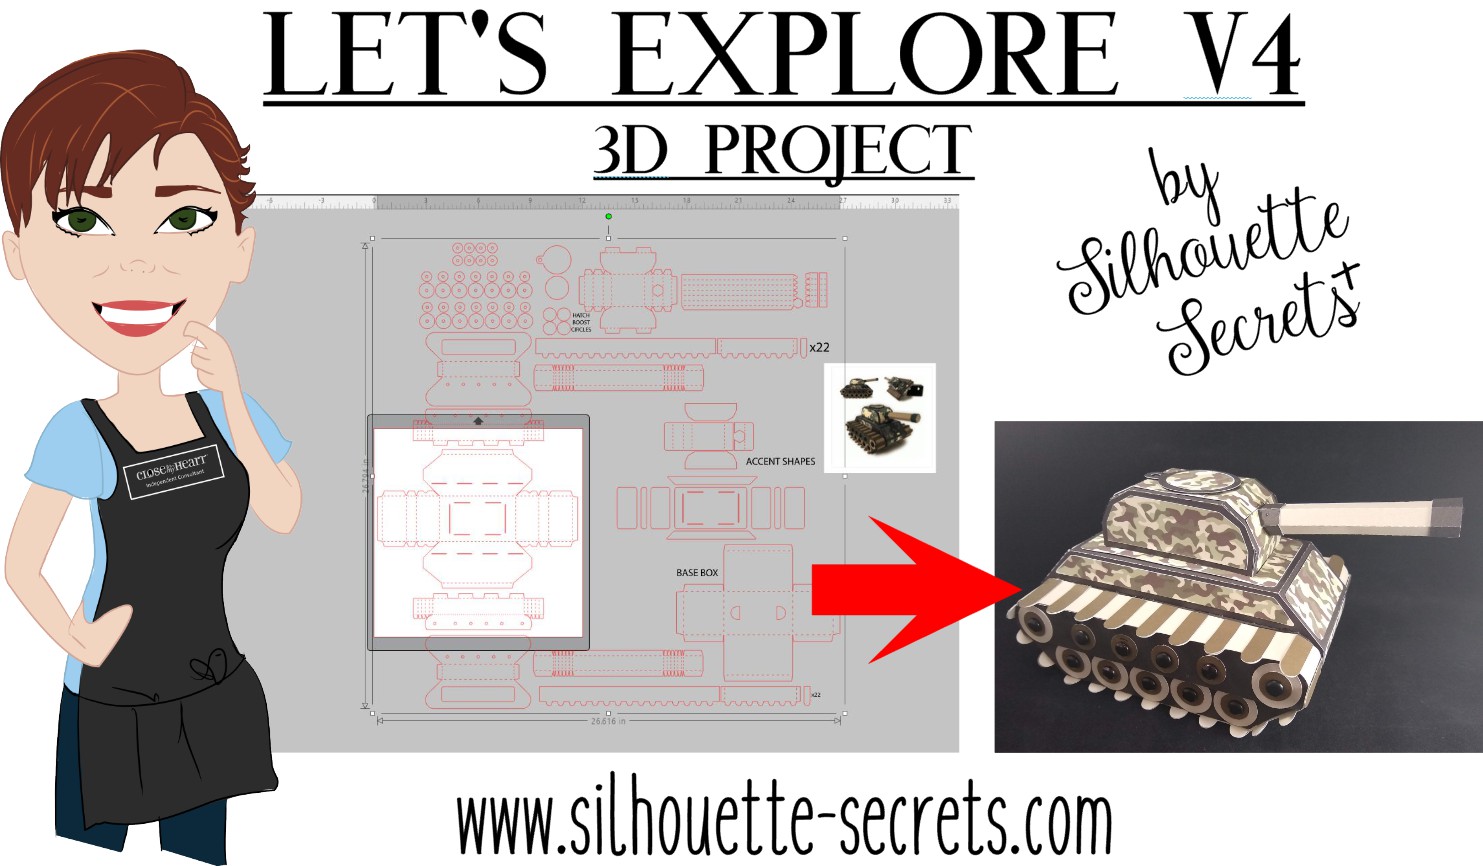
I love creating 3-D paper projects and my kids love to shop over my shoulder when I’m looking in the Silhouette Design Store. My son who loves army, tanks, and soldiers saw this Combat Tank 3D Box design in the store a few weeks back and has been asking me to build it ever since.
I think his idea of building it was a bit different than mine. He was glued to my side while cutting all the pieces. He even helped unload the mat and remove some of the pieces off the cutting mat. Then he ran off, like little boys do.
When I’m working with a file that has many pieces to it, the first thing I do is open it up and take a look. I have to tell you when I first purchased this file, I opened it and then closed it. I wasn’t going to cut it that night.
That is a lot of pieces, but it is a 3-D project after all and I love seeing it all come together.
The first thing I like to do when working with a 3-D file is to screen grab a photo of the design.
I am a PC gal, so I use the Snipping Tool. If you have a Windows computer, type Snipping Tool in the bottom left search bar and it will pop up.
I use this tool so often that I have it pinned to my bottom task bar for quick access.
When it pops up, it looks like this.
Click on New and then draw a box around the object you want to “snip” on the page. Then choose to save that “snip” to the computer or copy and paste it into the Silhouette Design mat.
(On a MAC – Hold down the Command button, Shift & 4 – then drag the cursor around the object)
This gives me a reference to look at when I’m working with the file.
Since I have the ability to cut 12″ wide, I scaled this file up to cut it as large as I could. I moved the largest piece that would be cut on top of the Silhouette virtual mat and used the bounding box in the corner to increase the size of the entire design.
Make sure if you resize a design, that you are resizing the entire design at the same time to keep it all at the same scale, or the pieces will not fit together.
Next, I ungroup the entire design if needed and then fill all the pieces with the color it will be cut out of. Then I move the same colors together to all be cut at the same time.
Now, you will see on the left side that those are not filled in. I did not have any Camouflage paper, so I went back to the Silhouette Design Store and found this Camouflaged Print Pattern by Nilmara Quintela.
By that time, my son had run back into the room and was excited to see how I was going to take this image on my screen and print it onto paper to cut out.
Now just like so many other things in the Silhouette software, there are a couple ways you can do this. Let’s Explore the difference between using the Modify Panel vs Pattern Fill.
Step 3 – Next, I scaled the paper down to fit on my 12 x 12 virtual design mat.
Step 4 – Copy the pieces from the 3-D design mat and paste them onto the new design file.
*note – line thickness has been increased on the tank pieces for visual reference
Step 5 – Select all of the objects on the virtual design mat.
Step 6 – Open the Modify Panel and choose Crop.
And I can still hear the gasp from my 7 year old son when he saw it change on the screen. That had to be the best part! I even had to do it over again and again for him to watch it.
Pattern Fill
Step 1 – Open a new Design mat.
Step 2 – Copy the 3-D file pieces and paste onto the new design mat.
Step 3 – Select all the pieces.
Step 4 – Open the Fill Color Panel and choose the 3rd tab = Fill Pattern.
Step 5 – Find the pattern in the fill pattern options and select it.
This method looks a bit different and you have more options to Scale & Pan the Pattern. It is really a matter of personal preference on how you want the objects to be filled.
For this tank & camouflage pattern, I used the Modify Panel.
I follow the same steps every single time to setting up a print and cut and it works great. Check out this Print & Cut – Part I blog post for step by step setup and troubleshooting tips too!
Then, I printed it on my Canon 9521C large format printer. I have to say, I was hesitant to add this to my craft studio because it was more than I wanted to spend on a printer, but I am so glad I did. I purchased it after the November 2018 All Things Silhouette Conference and I have not regretted it since. I have printed so many high quality images for blog posts, classes, gifts, and more.
Always double check that all the registration marks printed correctly and are not missing. For more tips on troubleshooting Print & Cut projects – click HERE.
Once all the pieces for the tank are cut, comes the assembly time.
The first thing I did was go look in the Silhouette Design Store and see if the designer had linked instructions in the description. This is a lot of pieces and having a tutorial is helpful in assembly.
The link did not take me directly there, but a quick search of the blog and it popped right up.
Why does this happen? It can be for many reasons. Sometimes a link just doesn’t code correctly, a page was moved or renamed, etc. This was an easy one to find and often I find a quick search is all that is needed. But, when I find these things, I do let Silhouette know so they are aware.
And I have to say, this was a was great tutorial to put this tank together.
**This post may contain affiliate links. What that means is that I may receive compensation if you purchase through the links I have provided. The price you pay for the product or service is not higher but I may get compensated for sharing.
Original post written in July 2019. Updated on May 21, 2020 with the current diagram link.Updated 5/31/25.
In January 2018, I started the “Let’s Explore v4” series with the intention of breaking down each of the panels on the right side of the Silhouette v4 software and explaining the parts of them. When I started, I had no idea how far it would go and it has grown to so much more than my original thought. I have learned so much by writing these posts and exploring other tools in the software that I have never used because I get stuck in the same old routines. It is so exciting to see something come to life in the Silhouette software and I love learning new things and being able to share those.
I do feel that the software is the key no matter what Silhouette machine you have. If you learn how to do something in the software, you can apply that to so many other projects that you create.
Today, I want to share a free PDF chart I created that maps out the Design tab of the Silhouette Studio v4 software.
Click HERE or on the image above to download this PDF diagram.
This can either be printed as a reference guide or opened on a computer. When the file is opened on a computer with a PDF viewer, all of the blue titles have been linked to the blog post in the Let’s Explore v4 series that it corresponds with it.
I have had such great feedback on this series and I hope that it has helped you learn a little bit more about this powerful software by Silhouette!
Now, keep in mind that Silhouette is always adding new things into the software and I think this is awesome! What that means is that this chart is good for today and for users who are using a version of the Silhouette software that contain these features.
Just like many things in life, things change. Change can be hard for most of us, but it can also be good. I will update this free PDF with future changes, once I know those changes will be sticking around.
If you are not using the Silhouette Studio v4.2 software yet, I would highly encourage you to do so. You can download the current version of the software direct from the Silhouette America website HERE. I am using v4.2.279, which can be found under the Legacy section and it is what I’d recommend today. As always with any software, they may be a “bug” or two in it. This happens with all software programs. There are 2 that are known in this version 4.2.279 I am recommending, but they are more just annoyances than anything. I explain those “bugs” and how you can work with them in this post – Let’s Explore v4 – Bugs.
And if you are considering updating or even if you are not, it is always a good time to backup the Silhouette library if you store personal files there – for more tips on the Silhouette Library prior to version 4.2 check out this post – Silhouette Library Tips.
While you are exporting a backup, don’t forget to export your custom cut settings if you have those in the Silhouette software too! This is an awesome feature.
Check out how to do that in this post – Add Cut Settings & Export.
Don’t forget to grab the free PDF diagram of the Design Tab in the Silhouette Studio v4 software and save it some place safe on your computer to refer back to when needed.
I’d love to hear your feedback or suggestions for things you would like to see in the future!
Enjoy !
THANK YOU for your support! How can you help? Click HERE & buy a coffee. Every little bit helps with the cost of running the site.
Silhouette Classes
Never stop learning! Let me help you take the anxiety out of learning with Silhouette and get to creating faster! My Silhouette classes are heavily focused on software, so you can take the skills & techniques taught and apply them to many future projects!
**This post may contain affiliate links. What that means is that I may receive compensation if you purchase through the links I have provided. The price you pay for the product or service is not higher but I may get compensated for sharing.
New with the Silhouette Studio v4.2 software is a feature called FlexiShapes.
What are they?
FlexiShapes are another Tool in the Silhouette Software to help you create or add to a design.
Let’s take a look at the Silhouette Studio v4 layout. There are 2 side menus in the Silhouette software. The left side menu is where the Tools in the software can be found. Drawing tools, edit points, lasso tool, line drawing tools, shape drawing tools, text tool, notes, eraser, knife, and transfer properties eye dropper tool.
The right side menu is composed of Panels which control the properties of an object. Using the Panels on the right side, an object can be customized and the properties of it altered. This includes things such as fill color, line color, rotation, scale, font style, cropping, rhinestones, sketch, warp, etc.
Check out the “Let’s Explore v4” series HERE or in the menu at the top of the blog to see a breakdown of the Panels on the right side.
FlexiShapes are available in the Silhouette Software v4.2 software version with the Designer Edition Plus or Business Edition upgrade.
The FlexiShapes can be found under the left side of the Silhouette software where all the Tools are found.
Look at all those new shapes that are now available with a few clicks of the mouse to start your own creations in the Silhouette software.
Each of the FlexiShapes will have different properties and ways that you can alter each one. Let’s take a look at a few FlexiShapes and how they can be adjusted.
On the left side I chose the flower FlexiShape, left clicked and moved my mouse out.
This creates the initial shape.
Next, you will notice that each FlexiShape will vary in the edit nodes that it may have.
White nodes adjust the size of the shape or rotate the shape from the point of the white node.
Red nodes adjust the definition of the shape. In this flower shape, moving the red node will adjust the petal definition of the flower.
The slider bar in the center of the design will adjust the edges of the shape. In this flower example, it will decrease or increase the number of petals on the flower.
*Note – I have increased the line thickness in the photos to make it easier to see.
Each FlexiShape that you choose will have different options that can be adjusted to change the outcome. Some shapes may have more nodes or less.
Want a star? Start with the star shape and it can quickly become something else.
Want a tear drop shape?
Create shapes and add them to your designs like these teardrops in the corners of this design created for the Curio Boot Camp for the June 2019 All Things Silhouette Conference.
Both the teardrops and the scalloped rectangle frame are created using the FlexiShapes.
With the FlexiShapes there are so many options that you can create in the software.
Create a frame by adjusting the FlexiShape nodes and then make an Internal Offset, next select both the original shape & the offset and Make a Compound Path. This will take the 2 shapes and compress them into 1, creating the frame.
Fill the shape with color using the Color Fill Panel to see how it will look.
Create arrows of all shapes and sizes or create a picket fence from adjusting the nodes and replicating the shape. This are all created from the same starting arrow shape.
And once you start playing, it’s hard to stop.
I am in no way a designer, but you never know what you might create by combining a few shapes or playing around with some FlexiShape nodes today.
What can you think to create using the new FlexiShapes available in the Silhouette Studio v4.2 software?
I would love to see it!
Feel free to post photos on my Facebook group – Silhouette Secrets+ by EllyMae.
Save this for future reference by pinning the image below.
Enjoy!
Check out all of my online Silhouette classes on my Teachable site HERE.
**This post may contain affiliate links. What that means is that I may receive compensation if you purchase through the links I have provided. The price you pay for the product or service is not higher but I may get compensated for sharing.
For the June 2019 All Things Silhouette Conference, I taught a class called “Let’s Explore Print & Cut with Printable Heat Transfer”. I had so much fun creating this class and want to share that with all of you. While I cannot pass around all the demos I made like I did in class, I hope a photo blog post will do.
When setting up a Print & Cut project, I follow the same steps each time. In this post – Print & Cut – Part 3 – Images, I go through every step I take to set up the file for the best success.
This is what I would also recommend for a beginner who is doing this for the first time or for anyone who is having issues with the Print and Cut not registering or not cutting accurately.
While you can adjust several things on a Print & Cut file, I find most users get the best results and have less headache if they first start with a baseline
For more troubleshooting tips, see this post – Print & Cut – Part 1.
This is exactly what I walked through in class step by step.
Now to the fun part, Show & Tell!
This class was sponsored by Specialty Materials and I used a product called Colorjet III Light and Dark Heat Transfer Paper. ColorJet III comes in packages of either 8-1/2″ x 11″ or 11″ x 17″ sheets. I loved the 11″ x 17″ sheets with my Canon TS9521C large format printer, then I could fit several print and cut projects on one page and do larger designs as well.
You can request a free sample on the website HERE.
First, I started with a few shirts.
As soon as this shirt came off the press, it was my 6 year old daughter’s favorite shirt.
I had to go searching for it in order to take it to the ATS Conference with me.
I used Colorject III Dark on this shirt with a design that is part of a print & cut sticker file called ML Unicorn Cute Stickers by MiniLou – Design #285420 from the Silhouette Design Store.
Now, if you read the directions on the Colorjet III it says “Care – Hand wash and air dry. Do not dry clean. No bleach or aggressive detergents” (Specialty Materials) but, I have 3 kids and “hand wash” does not really happen in my house. But, I am happy to report that it has been through the washer & dryer at least 3 times since I made it and it still looks great. And I brought it with me to Conference to show everyone how it held up.
What do I recommend? You have to test it yourself! The manufacturer gives you care instructions and for best results, I’d recommend those to get the most life out of it.
Me….. well, you guessed it. I throw everything in the washer & dryer with the thought that I can always remake it if I need to. That is probably not the best advice for everyone.
I used the Colorjet III Dark on this blue shirt with a design called Justice League by DC Justice League – Design #201137. *This is an older design that is no longer in the Silhouette Design Store.
This time, I used a framed canvas and the Colorject III Light. In order to get a good pressure on the framed canvas, I had a wood board cut to fit in the back side of the frame and placed it inside when I pressed the design. I’ve been eyeing these watercolor designs and love that I’ve found a way to use them. This was created with Multicolored Prism Heart by Rhonna Farrer – Design #248413 from the Silhouette Design Store.
This one should be hung on my wall for many years to come, memorializing that I managed to get all 3 of them smiling together without some crazy face.
I used the Colorjet III Light printed through the Silhouette software on a canvas panel, which I then put in a 8″ x 10″ frame. While these are not UV treated like others you get at a professional photo shop, you can change the photo out each year or several times a year if you like for a lot less expense. I love having options!
Now, did all of my test projects turn out? No, they did not. And that is what comes when developing a class for an event. There will be things that work and things that don’t. But, even the things that don’t turn out are all learning experiences.
Here are a couple of projects that didn’t turn out quite as I expected them to. I always recommend reading the instructions for any brand of product you are using. In those instructions for the Colorjet III it states “Be advised that dye migration has occurred with low energy dyes in polyester and poly-blend fabrics.” What does this mean?
This means to test it and that not all fabrics may work as you want them to. Not because of the product but because you cannot always predict how the dye in a material is going to react. For instance, if you have white HTV and press it on a red shirt, the white HTV may look pink. This is dye migration.
In the case of the apron and the sleeping mask above, the color of the fabric came through the Colorjet III Dark, even though I used the correct material. I tried, it didn’t work. I moved on to another project.
The zippered canvas bag on the right side, is an example of using the Colorjet III Light on a dark fabric. Complete user error on this one as I just wasn’t thinking when I grabbed my blank to press it on to. My daughter still loves it and now it’s her “money bag” she says.
I hope this post has given you some new ideas to use in your creations with Heat Transfer paper. It’s not just for shirts anymore!
**This post may contain affiliate links. What that means is that I may receive compensation if you purchase through the links I have provided. The price you pay for the product or service is not higher but I may get compensated for sharing.
Let’s talk software. The Silhouette Studio program is a software program that is installed directly on your computer.
What is software? Well, the most basic answer I can use to describe it is, it is code put together in a pattern that tells it what to do. We don’t see this side of things and I know I wouldn’t understand any of it if I did. It is numbers and letters arranged in a particular pattern to create what we see on the screen.
The Silhouette software has grown over the past 10 years from a basic cutting software to a powerful graphics program that can do much more than just send a design to be cut on a Silhouette machine.
Silhouette America puts out software updates on a regular basis. These updates are free of charge and are either released to correct a bug (coding) or to release new features in the software.
Recently (2019), the version 4.2 was released and this has many new features added into it such as flexi-shapes, color fonts, library updates, lasso selection, warp templates, puzzle generator, and more. But, any time a new feature is added it changes the “code” of the program. This is true for all software related devices – Iphones, Ipads, android devices, Silhouette Studio, etc.
There is a Silhouette Beta team, which I am a member of, and this team tests updates as they are created. At any point and time, there may be 1 or more Closed Beta versions that are released to us to test. Testers download and use these current “test” versions and report back on any unusual things we experience. There may also be a Public Beta version on the website, that any user can download and use. However, I do only suggest an experienced user download the Beta version as it is still in testing and may have unknown bugs in it.
There are many, many factors that play into how the software will react for a user. And even though the version is tested within the Beta group and Silhouette’s staff, there may still be things that pop up after it is released to the general public. This can be for many reasons, but the number 1 reason I see is that no user’s computer is the same as the next person. Some of us have computers built for multiple graphic program use, while others are built for surfing the internet. That means that a software program may react differently for one user vs the next.
And then you throw in another big factor – the big computer companies also have updates to their operating systems. And they don’t let anyone know prior to releasing the update what they are going to change. In this day and age, you may not even have a choice on whether to accept these updates to the Operating System or not, it just happens. You close your computer one night and then next morning open it back up and are faced with that spinning wheel that says, “Please wait while updates are installing.”
Now, I say all that to give you a little back story on my view of software updates as a Silhouette Studio user and Terri Johnson Creates Licensed Silhouette Instructor. I troubleshoot a lot on Facebook and when teaching classes at events, so I see a lot of things pop up. Not all the issues that come up can be blamed on the software.
Today, I’m going to touch on 2 “bugs” in the software that we experienced in my classes at the All Things Silhouette Conference this past weekend. I say “bugs” because they are not detrimental bugs but are changes that a user can still work with once they know why it is happening.
Today we will discuss 2 of the things that I saw during my classes – edit points & multiple machines recognized.
Both of these are workable “bugs” once you understand that they are happening.
Edit points
Edit points are the data points of a design that the software recognizes and relays to the Silhouette machine to make the cut happen.
For a more information on edit points and working with them check out this blog post HERE.
The typical behavior is if you double click on a design, they will appear. However, in the current public versions of the Silhouette software, they are more sensitive and like to come out to play much easier – sometimes with a single click of the mouse button. And sometimes they do not necessarily show up on the screen as the dots, especially if a design is grouped together.
There are a few ways you can tell if the object has entered point edit mode.
The first would be that the gray edit points appear on the edge of the design.
The next way to tell if the Edit points have come out to play is if you can see the Edit Points options in the top left corner of the QAT (Quick Access Toolbar) or if the Edit Points Panel opens on the right side. There may be times that you may not see the gray dots of the edit points so at first glance, you may not know that’s what happened, but check to see if the Point Edit mode panels come up.
So, what do you do if this happens? First, try not to get frustrated as that doesn’t make those little guys go away.
Two things you can do – click off the object and try to select it again or right click to bring up the menu and choose “Exit Point Edit Mode”.
Knowing why it is happening, what causes it to happen and how to get out of it – I believe helps with understanding how to work with it.
And of course, when you want to recreate the issue to show someone or demonstrate in class, those little guys keep on hiding. But, they love to come out to play when you aren’t try to get them to do it on purpose. I find this happens often when I find something I think might be a bug in the software & I try to recreate it to bring to the Beta teams attention – and it just laughs at me.
Multiple Machines Recognized
Now, this “bug” may not affect users as much as it did for those in attendance at the All Things Silhouette Conference, but you may notice that the software is now scanning continually for machines nearby.
On the Send tab in the top right corner, at the bottom right of the page is a machine icon. By selecting this icon you can switch between Silhouette machines, which is a Business Edition feature, or if the software is picking up multiple machines, you can choose the one that shows “Available”.
With the current Silhouette Studio v4 software, it is continually scanning and will pick up some other machines nearby. Sometimes, it may even recognize the same machine, but think it’s a new one that’s plugged in. We had both situations happen during class at the June 2019 All Things Silhouette Conference.
The good news on this is the connection between the Silhouette software is getting much stronger and it’s picking up more now. However, I did see more issues with a MAC vs a PC in class. Now, as a home user you may not have any issues with it picking up and placing more machine names in the machine list. But, if you are at an event or just returned from the All Things Silhouette Conference, you may see that you have a lot. The most that I saw on a users computer was 62. While we figured it out during class (Thank you to my Silhouette America staff helpers – Jesse & Ben!), it can still be there when you get home.
The Silhouette America website has a fix for this. While these are the instructions for a “Crash on initializing”, they are also the same instructions for many other issues & can clear out a lot of things that will help the software run a bit smoother as well.
On the other side of it, this operation does wipe out any Custom cut settings (User Defined Settings), so it is best to export those before you proceed. Check out this post on how to Export the User Defined Settings – HERE. It also will reset some of the Preferences to factory defaults, so keep that in mind. The Preferences in the software can be adjusted and which option you choose is a personal preference. But, we will get to that part in a bit.
Once you have exported those User Defined Settings, then you can proceed to clearing out the machine history.
These instructions are direct from the Silhouette America website HERE and I have verified these with Silhouette support.
Since I know that some are visual learners, I have created a video going through the steps of both exporting the User Defined Settings and Clearing out the Silhouette Studio software preferences.
Here are the written instructions from the Silhouette America website, if you are showing multiple machines in the Silhouette software and want to clear those out do the following:
“Please do the following to clear your Silhouette Studio software preferences. Please note that this procedure will result in the removal of user generated cut settings (blade/thickness/speed settings) and user option selections:
On a Mac:
Close the Silhouette Studio software
Open the Finder
Press CMD+SHIFT+G
Type in ~/Library/Preferences
Press Return
Delete the Folder com.aspexsoftware.Silhouette_Studio
Empty the Trash
Re-open the Silhouette Studio Software
On a PC:
Close the Silhouette Studio software
Press the Windows key (lower left, between CTRL and ALT) and the R key on your keyboard simultaneously
Type in %appdata%
Press Enter
Delete the Folder com.aspexsoftware.Silhouette_Studio
Empty the Recycle Bin
Re-open the Silhouette Studio software”
Now, the next step. Once you have cleared out all of the Silhouette Studio software preferences, there may be a few things that you want to go in and change back in the Preferences Panel.
While a few of these Preferences are personal preference, there are also a couple that will help the software run better if you do not need them.
The Preferences panel can be found under the Edit menu in the top left corner or by clicking on the gear icon in the bottom right corner of the Design tab.
Under the Preferences Panel, click on the Defaults tab at the top.
I choose to have the Default Fill Style as Outline Only and the Cut to Edge of Page checked. These are personal preferences only.
Under the Tools tab in the Preferences Panel, I change it to “Choose Select” on After Creating a Shape, After Drawing Freehand & After Using Zoom.
Next, click on the Advanced tab at the top of the Preferences Panel.
These are 2 options that will help the software run smoother by decreasing the data that is saved with each file. It does not affect the design but does affect how large the file is.
Change the Packet Size to 500
Uncheck the “Include Cut Data” – this is only needed if you are saving to a USB stick and want to use the USB stick directly in the Silhouette machine to cut the design with.
I hope this helps explain a little bit about the Silhouette software and how to work with some of these “bugs” that are showing in v4.2. As I said above, I don’t really find them to detrimental bugs, but things that can be worked with once you understand that they are there.
**This post may contain affiliate links. What that means is that I may receive compensation if you purchase through the links I have provided. The price you pay for the product or service is not higher but I may get compensated for sharing.
Today I am headed out to the June 2019 All Things Silhouette conference and I have to tell you while it may be a lot of work to prep and set up for the conference, I always come back knowing more than I did before & feeling inspired by all that I see at this conference.
So today, I’m going to share a few projects I’ve been working on and hope I can pass on some of this inspiration that I feel when I attend the conference.
First, here are a few acrylic etching projects that I’ve completed with my Silhouette Curio in preparation for the classes I’m teaching at the All Things Silhouette Conference & for display during classes.
This is an acrylic coaster from Craft Chameleon and I created a design and added text to it to be etched on the backside of the coaster. These come in a set of 4 coasters and it is the perfect gift to customize.
I love that Craft Chameleon has Curio templates that have been created to work specifically with their acrylic shapes. While the Curio is amazing in the fact that it can return to the exact spot & continue working even after the platform is unloaded (if the platform is loaded correctly), these templates are so helpful in being able to make sure the designs are in the same place the material is placed.
These are another great gift idea as pretty much everyone has a phone. And if any of you are like me, I will set my phone down on my desk and it is soon under some notebook or stack of papers. It even has a slot for the charging cord to keep your phone charging as it’s on the stand. And both pieces of the acrylic stand can be etched as the Curio template has a space to fit both pieces.
I love that there are so many possibilities and the ability to create custom items with the Silhouette machines.
This is a 5″ acrylic disc that is etched with a Beach Blessing by Deborah Stine – Design #62386 from the Silhouette Design Store.
Something to keep in mind when you are etching acrylic or any raised surface, is to keep the Silhouette tool away from the edges or any holes in the material. This 5″ disc has a hole in the top for adding a means to hang or attach it to an item. If the Silhouette tool comes near the hole or edge, it can hang up on it and cause the blade housing to move out of alignment, which can alter where the design etches. The more you design & work with the Curio, you will get a feel for what that safety zone is and how the tool housing moves.
Since I could not etch close to the edges and hole of the acrylic disc, I cut a Rope Frame from adhesive vinyl to add to the front of the disc. Once the vinyl was added, I took a little round file and poked out the hole so the disc could still be hung.
This is just another way you can mix and match different materials.
The Curio can accommodate thicker materials with it’s unique platform system. This means that not only can it etch on acrylic & metal but it can still cut paper, vinyl & HTV. The difference is in how you stack the platforms. For thin materials under 1 mm, all of the platforms must be stacked in order for the machine to cut properly. That means that a 2+2+1+cutting mat are all required to get a clean cut.
For more tips on getting started with the Silhouette Curio, check out this post HERE.
Here are a couple more items I created this week before packing my Curio up for the trip. It never fails that I want to get “just one more” project done before I have to pack.
This is a Honu Turtle design by Suzanne Cannon from the Design Store.
The Honu turtle is a symbol of wisdom and good luck. Who doesn’t need more of that?
I found this design while trying to decide what to put on my beach tote bag for my recent trip to the Silhouette Summit. I love that you can use the designs in many ways and for more than 1 project.
Check out all the neat things I experienced at the 2019 Silhouette Summit HERE.
Make sure to grab the Curio template for these discs too! It makes it so easy to line up the project.
There are so many fun things you can create. For anyone with a Silhouette Curio machine, I would suggest just getting it out and playing with it. It is the best way to learn.
Now while so far, most of the photos shown have all been created with the Curio, I love all my Silhouette machines equally (shhhhhh don’t tell them).
Another one of my favorite things to do is print and cut projects. I have had so much fun creating with Colorjet III printable Heat Transfer material by Specialty Materials in preparation for my class at the ATS conference.
I’ll be sharing more projects I created with this Colorjet III Heat Transfer next week after my class at the June 2019 All Things Silhouette Conference.
I hope that this post has inspired you in some way and you get time to create with your Silhouette machines soon!
**This post may contain affiliate links. What that means is that I may receive compensation if you purchase through the links I have provided. The price you pay for the product or service is not higher but I may get compensated for sharing.
Did you know that the Silhouette software has an Auto-save feature?
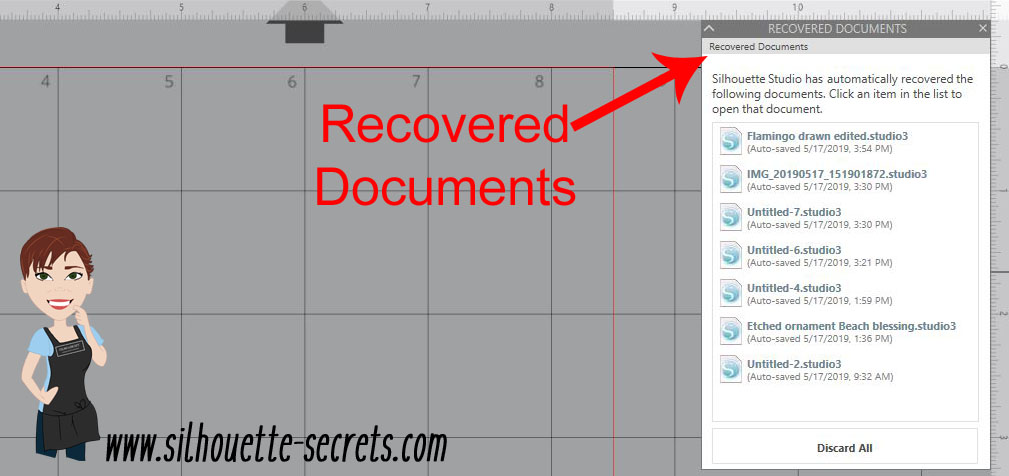
When you open the Silhouette Studio program, is there a Recovered Documents Panel that pops up?
This Panel can also be found under the File menu in the top left corner, then Open Recovered.
The Auto save feature will save a copy of the files you have open if for some reason the software closes unexpectedly or perhaps the computer decides to do an update and shuts everything down.
Windows updates have been getting me lately when I leave my computer on and I come back and notice that my Silhouette software is no longer open.
While this is a great feature, I would not rely on it to keep your files safe. It is a nice feature to have as a back up, but it may not save it exactly where you would want it to and some work may be lost. So it is recommended to save your work often.
But, this is something I see often when I’m in a lesson or teaching at an event. A student opens the software and has a lot of files in the Recovered Documents Panel.
This takes up precious computer power!
Every time that the software is opened, those files in the Recovered Documents Panel have to load. The software is remembering those files and that can eat up computer power and make the software run slower because it has all those files open.
Each of the files can be clicked on and opened. This way you can check to make sure that all the changes you’ve made have been saved before the software last closed.
Discard Recovered Documents
Discard those Recovered Documents and the software should run a lot smoother because it is not having to load those files each time.
I always recommend this to my students in our lessons and they are amazed at how much they notice a difference in how the Silhouette software reacts.
Just like making a library back up, this is a good habit to get into and help keep the software running smoothly.
A few clicks and you will be ready to create your next Silhouette project with the software all ready to go.
**This post may contain affiliate links. What that means is that I may receive compensation if you purchase through the links I have provided. The price you pay for the product or service is not higher but I may get compensated for sharing.
THANK YOU for your support! How can you help? Click the link to buy a coffee. Every little bit helps in the cost of running the site.


 *
*