Posted on 12 Comments

Print and Cut – Part 3 – Images

Print and cut with the Silhouette software has so many options available. The past 2 weeks we have explored using a print and cut file (Part 1) and creating text (Part 2) to use in print and cut. This week we will explore creating a print and cut file from a jpeg or png image.

Print and Cut with Images

Open the jpeg or png file.

A jpeg may have a white background around the image and a png file can have a transparent background. These file types are both flattened graphic images, so they are no cut files.

For more information on file types, check out this post –
Understanding File Type Extensions in Silhouette Studio
by Lycia Evanoff with Caught by Design.

jpeg vs png copy

Here I have opened both files to show the difference, but the same steps would be used for either file type.

Open the Trace Panel.

Step 1 – Click on Select Trace Area and draw a rectangle around the entire design.

Trace Panel copy

Step 2 – Increase the Threshold up until the entire design has turned yellow.

Step 3 – Click on Trace and Detach. The image will be detached from the background and there will now be cut lines around the image and you have . As long as you make sure your design is as yellow as possible, it will trace around the edge.

jpeg pieces copy

Keep in mind that each design will vary in how it reacts.

Step 4 – Delete the extra portion of design background, as it’s no longer needed.

Set up the file as a Print and Cut

Step 1 – Move the file onto the Silhouette virtual mat. I used

Step 2 – Open the Page Setup Panel.

Step 3 – Choose:
Page Size – Current Printer
Orientation – Portrait
Check the Show Print Border box
Check the Show Cut Border box

Page Setup Panel copy

Step 4 – Click on the Page Setup Panel – Registration Marks tab.

Step 5 – Choose Type 1 Registration Marks for the Cameo, Portrait or Curio machine.

Registration Marks copy

Step 6 – Click on the Restore Defaults button.
This will reset the registration marks and I would suggest using this as the starting point to get an accurate cut.

Step 7 – Move the design on the mat so it is not in the cross-hatched areas of the page. The optical eye on the Silhouette machine needs the cross-hatched area to read the registration marks accurately.
While the registration marks can be moved, I suggest for a new user to keep them on the defaults before it is sent to print. If the marks are moved, then I would suggest doing some test print and cuts on copy paper to make sure the cut is still accurate.
Check out more troubleshooting tips HERE on Part 1 of Print and Cut.
For more information on the Registration marks panel, check out the “Let’s Explore v4 – Registration marks” post HERE.

Step 8 – Next, click on the printer icon in the top left corner.
print icon copy
or
File > Print from the Menu
File Print
For more information on the Print Preview – check out Print and Cut – Part 1.

Step 9 – Double check that the page looks correct and that all 3 of the registration marks have printed.

IMG_8374 copy

Step 10 – Place the printed page on the cutting mat exactly as it shows on the screen, in the top left corner.

IMG_8376 copy

Step 11 – Click on the Send tab in the top right corner.

Send tab copy

Step 12 – Click on the image to select it and choose Cut. The bold red cut lines should appear around the design.

Step 13 – Load the Silhouette mat in the machine and choose Send.

Perfect print and cut!

IMG_8377 copy

For more information on print and cut, check out these posts:
Print and Cut – Part 1 – pre-designed Print and cut files
Troubleshooting Tips
Print and Cut – Part 2 – Text

I would love to see what you create – feel free to post on my Facebook group at
Silhouette Secrets+ with EllyMae.

Enjoy!

SS_Signature copySS Logo snip it

**This post may contain affiliate links. What that means is that I may receive compensation if you purchase through the links I have provided. The price you pay for the product or service is not higher but I may get compensated for sharing.

Posted on 7 Comments

Print and Cut – Part 2 – Text

Let’s Explore v4 – Print & Cut – Part 2

In Print and Cut – Part 1, I showed how to create a print and cut project from an already existing file that was set up for print and cut. In today’s post, we will create our own text and turn it into a print and cut file.

Print and Cut with Text

First, let’s go through how to set up a Print and Cut Project with text.

  1. Set up the Page Size on the Page Setup Panel to “Current Printer”.
  2. Choose Portrait Orientation.
  3. Check Show Print Border – a gray box turns on around the maximum print edge. This is set by the current printer that your computer recognizes.
  4. Show Cut Border – a red line turns on around the maximum cut edge of the page size. Anything outside this border will not cut.page size copy* Note: I choose the Portrait Orientation for Print and Cut projects because I  troubleshoot many users with the issue of the registration marks not reading accurately when printed in Landscape Orientation. I believe this varies by the printer it is printed with and how the paper is pulled in to the printer. I suggest printing in the Portrait Orientation for best results.
  5. Click the Page Setup Panel – Tab 3 – Registration Marks.
  6. Choose Type 1 Registration marks if you have a Cameo, Portrait or Curio machine.
  7. Click Restore Defaults. This will reset the registration marks to the default location.
    I recommend starting your print and cut projects here, especially for a beginner or if you have a new printer.registration marks copy*While the registration marks can be moved out (Registration Marks – Advanced Options), you will need to test how far you can move those and still get an accurate cut. I know may want to increase the area and squeeze as many designs into the print and cut area that they can, but it can come with some frustration. Do some test printing and then cut to see if the accuracy is affected on copy paper before using the more expensive materials. You will find out what the limits of your printer and Silhouette are.
  8. Type out the text using the Text tool on the left side. Weld the text if necessary. *Make a copy of the original text if you do and move it to the side, just in case you need to make changes to the design later.
    For more information on text and how it works, check out the Let’s Explore v4 – Text Style Panel post here.
  9. Fill the text with color using the Fill Color Panel.
  10. Choose the font type from the Text Style Panel on the right side of Silhouette Studio.type text copy
  11. Change the Line Style color of the text using the Line Style – Tab 2 – Line Color, so it is the same color as the filled text.
    The default line color is red. Since, this text will be printed the line color may show in the printed page. In the photo above, there is a faint red line around the black text, this can show if printed like this.
  12. Choose how you want the text to cut. Do you want just the text cut out or do you want it to have an outline?
    To create an outline around the text, use the Offset Panel and adjust the spacing to get the desired effect, then Click Apply.offset copyAfter the Apply button is selected, any overlapping pieces of the offset created, will weld together.
  13. Click on the Send tab to see how this will cut.send tab copyThe bold red lines indicate cut lines.
    If this was sent to cut, the top text would cut out around the text and the bottom text would cut both around the text and the Offset.
    For the example today, I only want the Offset to cut.

    On the Send tab, Select the text cut line and then choose “No cut”, this will turn the bold red cut lines off.

    send no cut copy

    *The key here is that the object you are turning the cut lines on or off for has to be selected. That means you have to click on it and a gray selection box will appear around it. If there is no object selected, the software has nothing to turn on or off.

  14. Click back on the Design tab. Select the entire design and move it to the location on the page you want it to print. The design cannot be in the cross- hatched area of the page. The Cameo optical eye needs the cross-hatched area of the page to read the registration marks accurately. If the design is in the cross-hatched area, you may get a registration error or an inaccurate cut.chemo day send copy
  15. Do any final adjustments to the text before you send it to print. Once the page is printed, you cannot move anything on the page or you will have either registration errors or get an inaccurate cut.On the Design tab, I selected the Offset, right clicked and chose Release Compound Path.release cp copyThen deleted the small inside pieces of the Offset that I didn’t need to cut.release cp delete copy
  16. Once the file is ready to go. Click on the Printer icon in the top left or File > Print.
    For tips on Print Preview – check out the Print and Cut – Part 1 post here.
    *Remember – do not move anything on the design mat after the page is printed.print icon copyimg_8224 copy
  17. Click on the Send tab. Select the Material.send tab cut settings copy
  18. Load the printed page on the Silhouette cutting mat exactly as it shows on the virtual design mat – in the top left corner.
    img_8227 copyYou will notice that I added several other items to my page. These are other print and cut images that I know will be used, so I added them to fill up the sticker paper area.
  19. Load the cutting mat next to the blue arrow on the left side of the Cameo machine.img_8228 copy
  20. Click on the Send button at the bottom of the Send tab.send button copy

Perfect print and cut!


I hope that helps get you started on your Print and Cut projects that use text.
Because there are so many details and ways you can use the print and cut feature, I am breaking it up in to several posts.

Print & Cut – Part 1 – Print and Cut with a pre-designed Print and Cut image
Includes Troubleshooting steps
Print & Cut – Part 2 – Print and Cut with Text
Print & Cut – Part 3 – Images

header photo copy

Troubles with print and cut?
Check out my tips for Troubleshooting in Print and Cut – Part 1 here.

I would love to see what you create – feel free to post on my Facebook group at
Silhouette Secrets+ with EllyMae.

Have a suggestion on possible Silhouette topic you would like covered? Add it to this Facebook post on my Silhouette Secrets by EllyMae group HERE or email it to me at silhouettesecretsplus@gmail.com

Enjoy!

SS_Signature copySS Logo snip it

**This post may contain affiliate links. What that means is that I may receive compensation if you purchase through the links I have provided. The price you pay for the product or service is not higher but I may get compensated for sharing.

Posted on 21 Comments

Print and Cut – Part 1

Let’s Explore v4 – Print & Cut – Part 1

I love the print and cut option on the Silhouette software!

I’ve used it for many years and in this 2 part series I will share some tips with you for getting a successful print and cut.

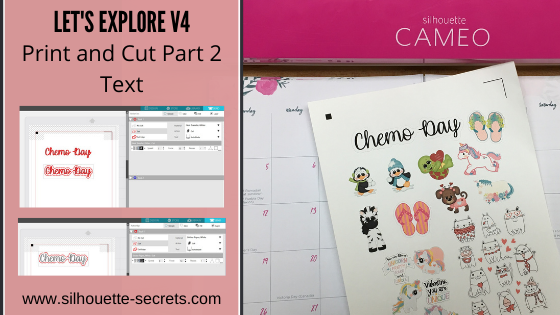
A few weeks back I made up special Chemo day gift bags for a friend of mine who is a Planner gal. I found a few print and cut files that I knew she would like on the Silhouette Design Store and then set up to print them all out in the Silhouette software, then I let the Cameo machine do it’s work and cut out around them. I will say that every single one turned out perfectly!

silhouettesecrets_pnc copy

I was asked so many questions, I thought I’d show you how I did it. I am going to break this up into 3 parts so you get the most out of it.
Part 1 – Setting up a pre-designed Print and Cut project
Part 2 – Print and Cut – Text
Part 3 – Print and Cut – Images

Pre-Designed Print and Cut Project

First, find a Print and Cut design that you like. I am using the ML Panda Love Stickers from the Silhouette Design Store (this file is no longer available in the store).
This can be used for any print and cut file available – click HERE to see more Print & Cut designs.
Search by file type and narrow the search down in the Filter on the left side.
For instance, in the photo below, I searched Print & Cut Design Type & Planner for the keyword.

Planner Sticker image

Open it in the Silhouette software.
Every file you open will be different in what it looks like when you open it and is based off how the Designer saved it.

open file

Next, on the Page Setup Panel, adjust the Page Size to Current Printer. Also, check the boxes next to the Show Print Border and Show Cut Border. These are guides that will help in lining things up so they print on the page and are not outside of the cut area.
With the Reveal set at 0% you will see a white page that is the size of the Page Size you have chosen.

page size copy

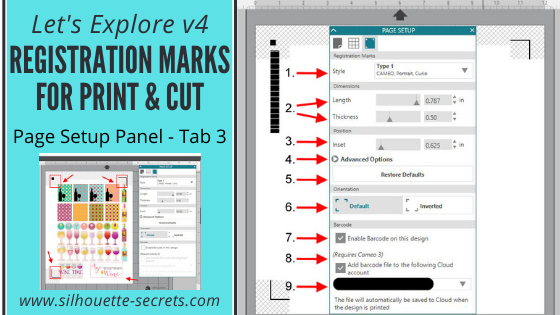
Now, in order for the Cameo to read where the design is on the printed page, we need to add Registration marks. Click on the Page Setup Panel – 3rd tab – Registration Marks.

registration marks panel copy

Then choose Type 1 Registration marks if you have a Cameo, Portrait or Curio.
If you have an older model machine before the Cameo 1, then you would use the Type 2 marks.

You will notice 3 marks appear on the Page. A square in the top left corner, a corner bracket in the top right corner and bottom left corner (this is with the Portrait Orientation – Page Setup chosen – this is the Orientation I recommend).

registration marks copy

Tip for a beginner or for print and cut issues.

  • Click on the Restore Defaults button. This will reset the Registration marks to the default and this is where I suggest you start from.
    While the registration marks can be moved, each printer will vary in how far they can be moved and still get an accurate cut. I suggest starting with the default registration marks and then you can test from there once you are familiar with the print and cut process.

Next, make sure that your Print and Cut design is inside of the Cut border. Notice that the Cut border has now moved in line with the 3 registration marks. Anything outside of that border will not cut and may interfere with the reading of the registration marks.

cut border copy

In the photo above, I need to move the design to the left because it is too close to the right cut line.

And the design cannot be in the cross hatched area of the print and cut. The optical eye of the Cameo needs this area to read those registration marks correctly. If the design is in the cross hatched areas, it can interfere with the optical eye reading and either give you an error or an inaccurate cut.

The cross hatched areas are across the top and the bottom left corner.

print and cut parts

As I mentioned above, each file you open will be different. With this file, there are 2 parts to the print and cut design. One part is the graphic of the pandas and the second is the cut lines. If the design needs to be moved, make sure to select & move both parts together.

print and cut to send

Once my design is moved away from the cut border and the cross hatched areas, it is ready to send to the printer.

There are 2 ways to do this.

Click on the Printer icon in the top left corner. This will send the print job directly to the printer that is set as the default printer connected to your computer.

Printer icon copy

In the top left corner, choose File > Print and you will get a pop up of Printer options. (Ctrl + P)

file print
The options vary by the printer you have connected to your computer.

Tip: If you have a Preferences button, click on that and look for a “Preview before Printing” option. This is a great feature to see if it is going to print how you want it to before actually committing to the print job.

print preferences copy

Check the Preview before Printing box.

preview before printing copy

Then click OK.

print copy

And choose Print.

A Printer menu will pop up and the design can be previewed before committing to printing.

print preview
Again, this will be dependent on the printer and what the printer setup settings are. Not every user will have this and it can vary, but never hurts to look for it.

Tip: Check to make sure that the bottom left registration mark will print completely. I see a lot of print and cut issues and one is the registration marks were outside the users printer margins and did not print. This means you will either get a registration error or it will cut inaccurately because it doesn’t have all the information to read it correctly.

Once you’ve verified the settings are correct, click on Print and it will send it to the current default printer.

silhouettesecrets_pnc_printer

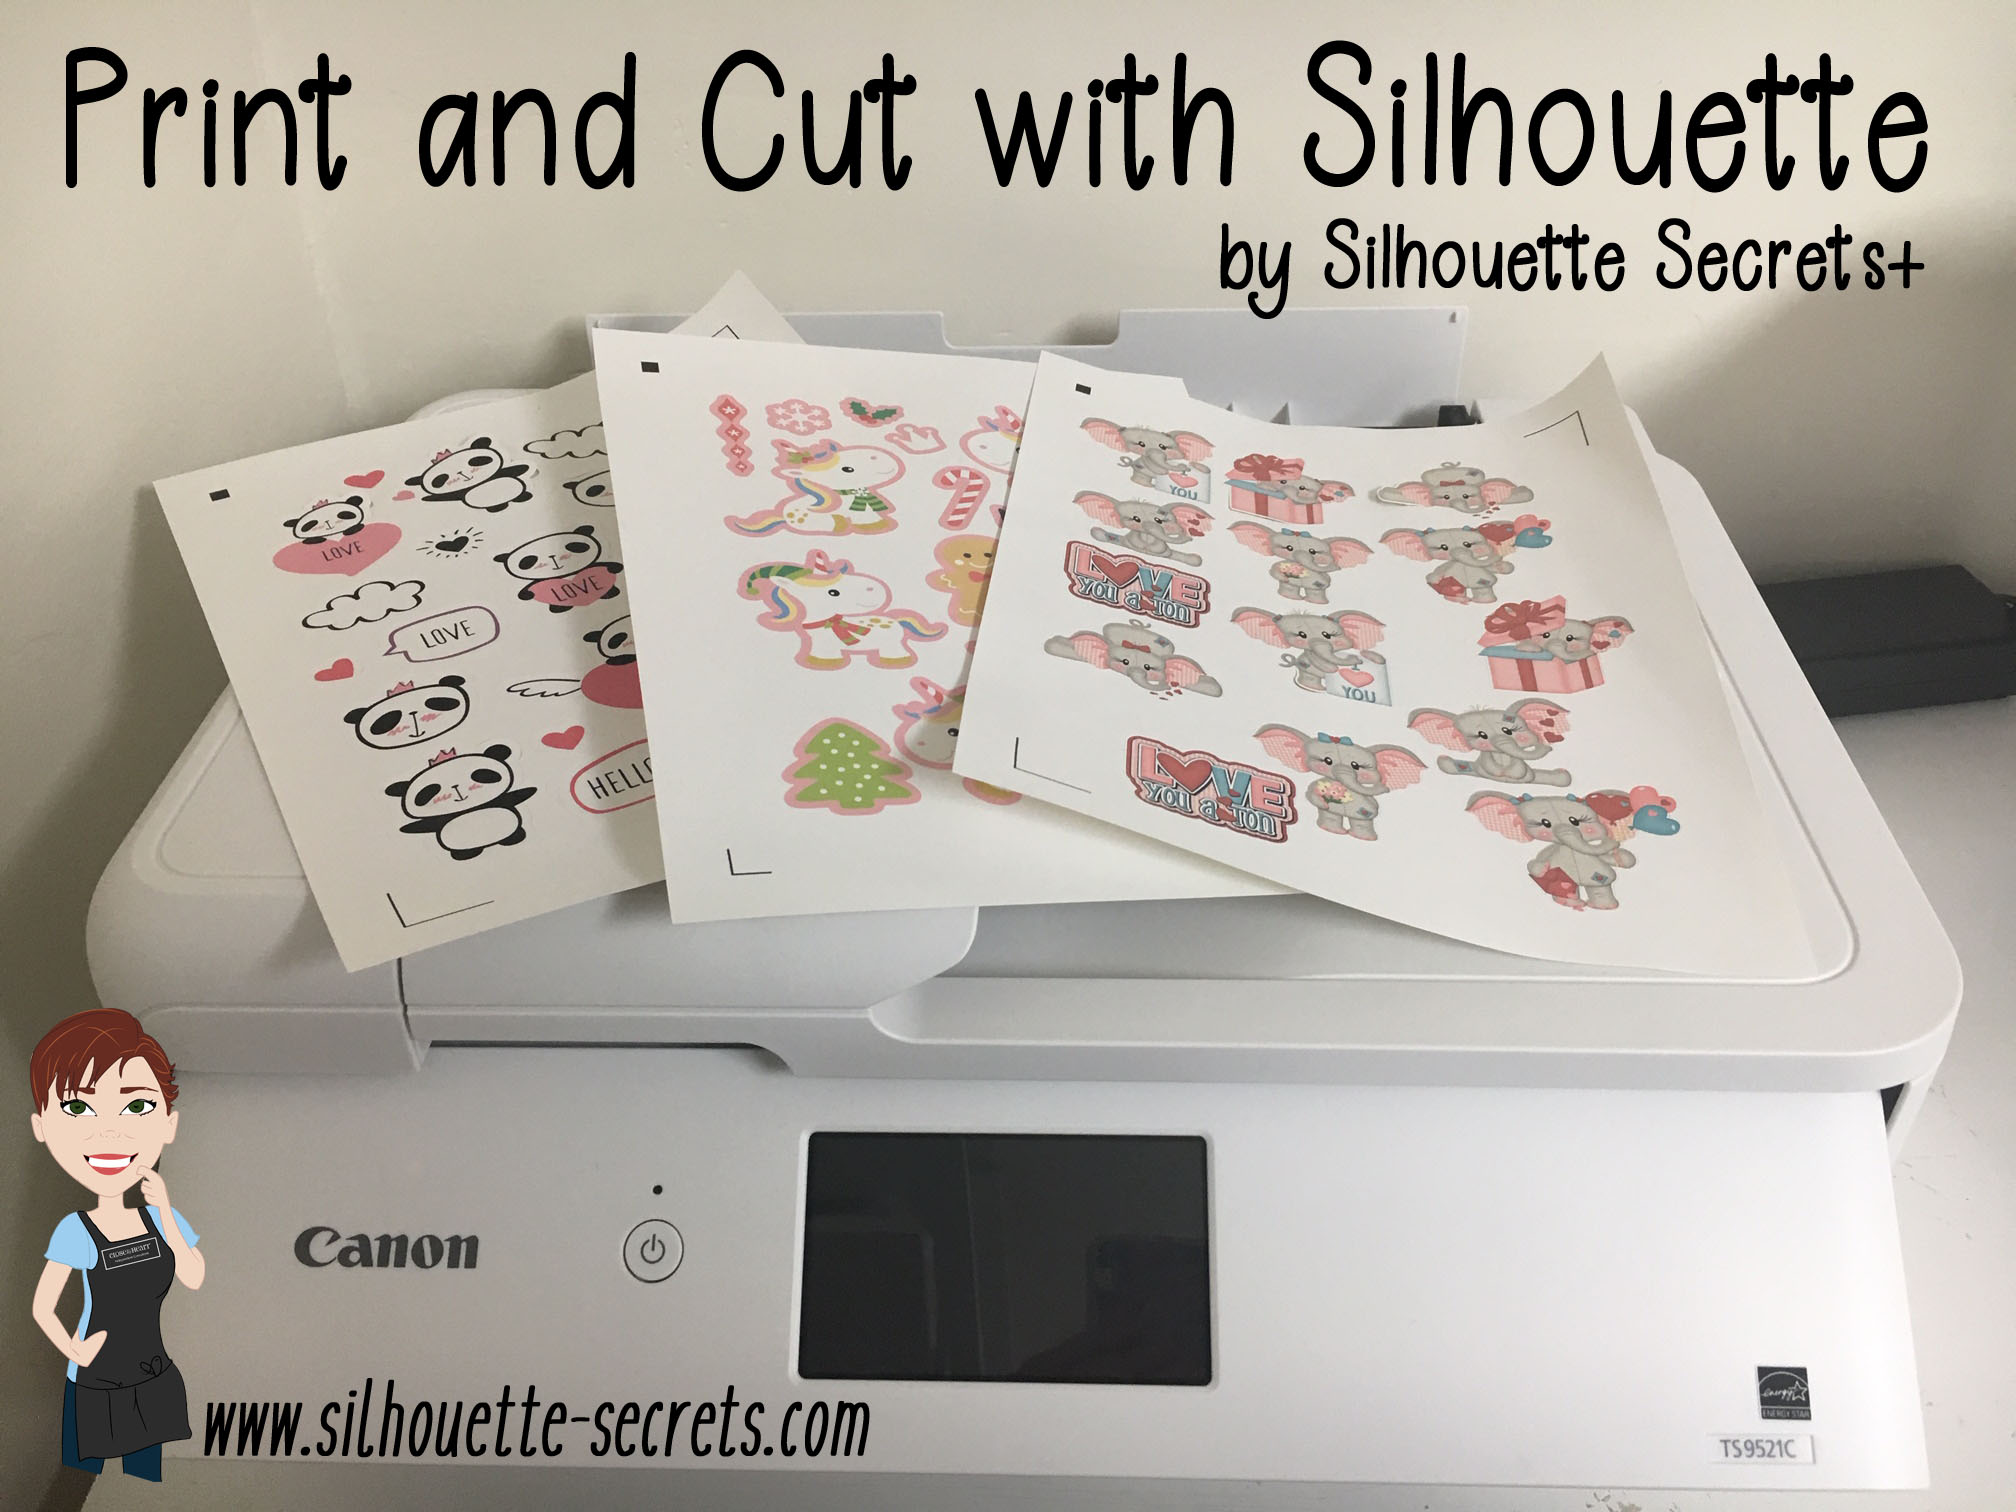
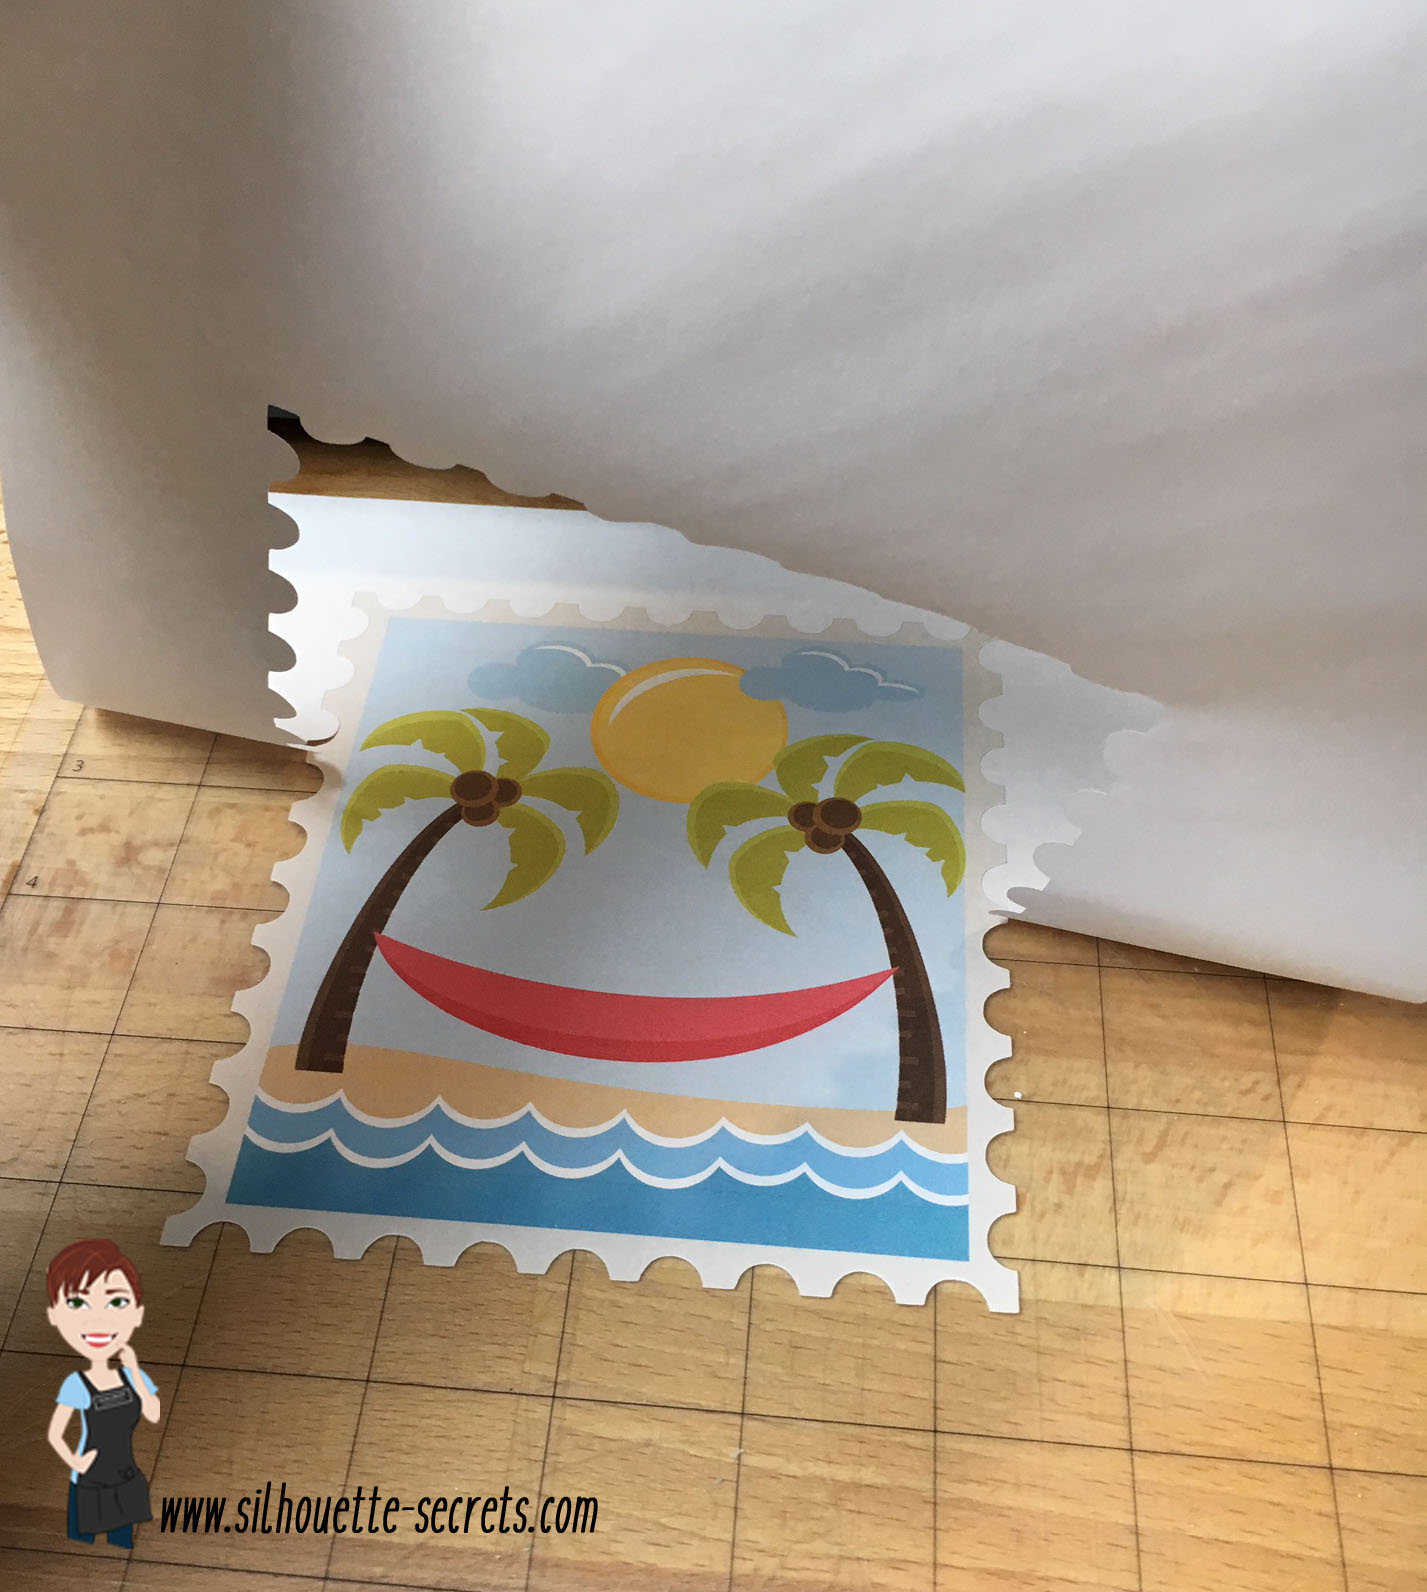
Grab it off the printer.

Place it on the Silhouette cutting mat exactly as it shows on the virtual design screen, in the top left corner of the cutting mat.

silhouettesecrets_printed

Then load the cutting mat next to the line on the left that the arrows point to.

silhouettesecrets_arrow copy

Click on the Send tab in the top right corner of the Silhouette software.

send tab top right copy

Choose the Material type.
I am using the Staples brand Sticker Paper and the preset for Sticker Paper – White works well for me.

send tab copy

Tip: If cutting a new material, use the test cut feature to test that material before you send the entire project. This can save you lots of headache on mis-cuts.

Once you click on the Send button on the bottom of the screen, the Cameo will then read the registration marks and begin the cut.

silhouettesecrets_sticker2

Perfect print and cut!

Save this to Pinterest for future reference

Print & Cut 1

Troubleshooting Print and Cut

Did it not cut accurately or did you get a registration error? Here are a few things to check when you do run into an issue.

  1. Do you have the correct registration marks chosen? Type 1 should be used for the Cameo, Portrait or Curio machines.
  2. Did the registration marks print on the page? Make sure on the Page Setup Panel – 3rd tab – Registration marks that they are turned on.
  3. Did the registration marks print completely? I often see the bottom left registration mark did not print completely because it was outside of the printer margins. Check to make sure it printed completely and if not, then either move the registration mark slightly up or increase the Printer margins under the Printer Setup.
  4. Is the design in the cross-hatched areas of the print and cut? This will interfere with the optical eye and can either result in a registration error or inaccurate cut around the design. Move the design away from the cross hatched area and reprint on copy paper until you get an accurate cut.
  5. Did the registration marks get moved? Each printer will vary in how far out the registration marks can be moved and still read accurately. Click the Restore to Defaults and use those as a test to get an accurate cut. As you become more familiar with the process and your printer capabilities, you can move them out and test how far the limit is.
  6. Were changes made to the file after the design was printed? This will result in inaccurate cuts because the design is no longer in the same place it was when it was printed. Re-print and do not move the design after printing.
  7. Did the printer feed multiple pages through at a time? Or did you print more than one copy at a time? For best results, I suggest feeding one sheet of material in the printer at a time. Multiple copies printed can result in the paper being pulled in too quickly and then the print is off on the page and not accurate.
  8. Is the printer low on ink? Ink quality can interfere with the optical eye reading the registration marks accurately.
  9. Was it printed at high quality? Printing at a low quality can also affect how the optical eye reads the registration marks.
  10. Still getting a registration error? Start over on a new design mat and go through each step again. Then print a test print on copy paper.

I hope these tips help you have a successful print and cut experience.

Pin this image to Pinterest to save for future reference

Troubleshooting PNC

Want to know more on Print and Cut?
Check out Part 2 – Print and Cut – Text & Part 3 – Print and Cut – Images

I would love to see what you create – feel free to post on my Facebook group at
Silhouette Secrets+ with EllyMae.

Enjoy!

SS_Signature copySS Logo snip it

**This post may contain affiliate links. What that means is that I may receive compensation if you purchase through the links I have provided. The price you pay for the product or service is not higher but I may get compensated for sharing.

Posted on 2 Comments

Silhouette Showcase

This year I am honored to be teaching several classes at the 2018 All Things Silhouette Conference hosted by Terri Johnson Creates. An option at the conference is participating in the Silhouette Showcase. This is a chance to show off things that you have made using your Silhouette machines or software and is open for all levels of users. Each person who enters gets an extra ticket to a prize drawing and while the staff is excluded from winning, we can display items in the hopes of inspiring others and showing all the possibilities with Silhouette.

I was so excited to be able to make up a few things to display during this event and wanted to share those with you.

Silhouette Showcase

Not sure what you start your day with, but mine is coffee.
So I started with this coffee inspired collection.

watermark_30-10-2018_05-07-37PM

Metal serving tray with Oracal 651 vinyl.
This design was created with Lori Whitlock’s Fresh Eggs fontDesign #263759 and Coffee Dingbats FontDesign #223050 using the Warp Feature in the Silhouette software. I use Oracal transfer tape for all my vinyl decal applications. Acrylic

Glass etched coffee mugs.
These glass mugs were purchased from Target and work well for etching. I used Oracal 651 vinyl for my etching stencil and Etchall cream for a great etch every time. For the mug on the left, I used Yay Coffee by Dawn Nicole Designs – Design #188578 and Coffee Pulse by Sophie Gallo – Design #149882. For the mug on the right, I used You Can Do This – Coffee by Jillibean Soup – Design #218802.

watermark_31-10-2018_10-58-37AM

Acrylic coasters etched with the Silhouette Curio machine.
I used the emboss panel in the Silhouette software to create the etched design.
These acrylic coasters can be found at Craft Chameleon and I would recommend purchasing the Curio template as well.
The designs used to create the coasters are:
Yes. Coffee by Kolette Hall – Design #171334
But First Coffee by Lilium Pixel SVG – Design #242962
Life Begins After Coffee Arrow Quote by Sarah Hurley – Design #258161
Relax and Enjoy the Coffee by Silhouette Secrets+ using History font by JumboDesign – Design #268580 and The Memories Sans Font Duo by Nursery Art – Design #276602.

watermark_31-10-2018_12-30-50PM

If you have followed me in my “Let’s Explore v4” series or on my Facebook page or group, you may know that I enjoy a glass of wine at the end of the day.
So of course, a wine collection set is right up my alley.

watermark_30-10-2018_05-07-06PM

Acrylic wine bottle caddy etched with the Silhouette Curio and the large Curio base.
This acrylic wine bottle caddy can be found at Craft Chameleon and the design file is included with the purchase of the acrylic blank. I would suggest the Curio large base template as well, it makes etching this blank so easy.

watermark_31-10-2018_11-00-00AM

Glass etched wine glasses.
For the etching stencil, I once again used the Oracal 651 vinyl and Etchall etching cream. The Monogram Wreath Font by Kristen Magee – Design #260225 was used to create these personalized glasses.

Wine cork collector.
This glass block was found in a craft store and Siser Easy PSV Merlot & black and Oracal 651 gray vinyl applied to the front.
The design is I Saved Some Wine Today Phrase by Kolette Hall – Design #131228 from the Silhouette Design Store.

watermark_31-10-2018_11-00-23AM

Acrylic wine charms etched with the Silhouette Curio.
These wine charms are 15/16″ clear acrylic circles and wine charm rings from Craft Chameleon.
Designs used to create the wine charms are:
Pour Me…. More Wine by Sophie Gallo – Design #203872
Live Love Wine by Kolette Hall – Design #158086
Drinks Well With Others by Kelly Lollar Design from SoFontsy
Screw It design – Freebie from Silhouette School
Got Wine design – created using the Buddy Mac font by Missy Meyer from SoFontsy

watermark_31-10-2018_10-59-39AM

Acrylic coaster etched with the Silhouette Curio machine.
These acrylic coasters from Craft Chameleon are a great way to personalize any gift.
The designs used on the coasters are:
Mom’s Fidget Spinner by Sweet Afton – Design #202772
Today’s Forecast 90% Chance of Wine by Jillibean Soup – Design #212800
Uncork and Unwind Arrow Quote by Sarah Hurley – Design #236620
Add More Wine by Megan Hardy Designs – Design #124514

For the Silhouette Showcase, a recipe is included with each display item.

I used the Silhouette Print and Cut feature to create recipes.

Print and Cut Coffee

Don’t forget when doing a print and cut, to select all the objects that you do not want to cut out and then choose the No Cut option on the Send Tab.
For instance, all I want is the outside edge to cut, so all the Cut lines except the outside edge need to be turned off.

Print and Cut coffee lines off

I started my Silhouette journey with paper crafting and continue to have a passion for it as well as all the other neat things you can do with it such as vinyl, glass etching & acrylic with the Curio, etc.

IMG_6482

I could have just left it at that, but of course, I didn’t. I added a little detail to the back that makes it stand up even more.

IMG_6483

This easel adds the perfect touch to my recipe, so I am easily able to transport it on the plane and display it at the Silhouette Showcase.
This is a file by Lori Whitlock called Easel for Back of CardDesign #76159 and I have used it many times when creating paper crafts.

SilhouetteShowcase

I hope you have enjoyed seeing the projects I created using my Silhouette software and machines for the Silhouette Showcase at the 2018 All Things Silhouette Conference.

Enjoy!

I love seeing what you are creating with your Silhouette machines!
Feel free to post on my Facebook group at Silhouette Secrets with EllyMae.

SS_Signature copySS Logo snip it

**This post may contain affiliate links. What that means is that I may receive compensation if you purchase through the links I have provided. The price you pay for the product or service is not higher but I may get compensated for sharing.

Posted on Leave a comment

Let’s Explore v 4 Recap

We are half-way through 2018 – can you believe that?

So it’s the perfect time to recap what the “Let’s Explore v4” series has covered so far since January.

Let's Explore Recap final 2copy

Let’s Explore v 4 series

Page Setup Panel – Tab 1 – Page Size & Cutting Mat

Page Setup copy

Page Setup Panel – Tab 2 – Grid Options & Spacing

Page Setup Tab 2 copy

Page Setup Panel – Tab 3 – Registration Marks – Print & Cut

Registration marks panel copy

Fill Color Panel

Fill Color Panel copy

Line Style Panel

Line Style Panel copy

Trace Panel – Tab 1 – Basic Trace

Tracing Panel copy

Trace Panel – Tab 2 – Trace By Color (Designer Edition feature)

Trace Panel copy

Trace Panel – Tab 3 – Magnet Trace (Designer Edition feature)

Magnet Trace Panel copy

Pixscan Panel

Pixscan copy

Text Style Panel – Tab 1 – Text Style

Text Style Panel main copy

Text Style Panel – Glyphs and Spell check

Glyph

Transform Panel – Tab 1 – Align Tab

Transform Panel copy

Transform Panel – Tab 2 – Scale Tab

Scale tab copy

Transform Panel – Tab 3 – Rotate Tab

Rotate main copy

Transform Panel – Tab 4 – Move by Tab

4-25 Transform -Move copy

Transform Panel – Tab 5 – Shear (Designer Edition feature)

Shear Panel copy

Replicate Panel – Tab 1 & 2 – Replicate & Number of Copies

Replicate panel copy

Replicate Panel – Tab 3 – Object to Path

Replicate Object on Path copy

Modify Panel – Part 1

Modify Panel copy

Modify Panel – Part 2 – Compound Paths

Modify Panel details copy

Offset Panel

6-5 Offset Panel copy

Pop Up Panel (Designer Edition feature)

Pop Up Panel copy

Stipple Panel (Curio option only)

Stipple panel copy

Nesting Panel (Designer Edition feature)

Nesting feature copy

There are so many things that the Silhouette Studio program can do. It is really an amazing program and I hope that you have learned something throughout the series. There is still so much more to explore!

Please let me know what is one thing you have learned that you did not know before by leaving a comment here or on my Facebook group.

Enjoy !

THANK YOU for your support! How can you help? Click HERE & buy a coffee. Every little bit helps with the cost of running the site.

Looking for more in-depth, step-by-step classes, check out all of my online Silhouette classes on my Teachable site HERE.

SS Logo snip it

**This post may contain affiliate links. What that means is that I may receive compensation if you purchase through the links I have provided. The price you pay for the product or service is not higher but I may get compensated for sharing.

Posted on 28 Comments

Let’s Explore v4 – Registration Marks

Welcome back! Today we are talking something that I love to do – Print & Cut.

We have explored Tab 1 – Page Setting and Tab 2 – Grid setting the last two weeks and now it’s time to talk Tab 3 – Registration Marks. On the Page Setting Panel, the 3rd tab over is your Registration marks tab and you only use these when doing a Print and Cut project.

Tutorial written in v4.1.206

For software version v4.3+ check out this post HERE for updated information.

Registration Marks

Affiliate links may be present in the following blog post and as an Amazon Associate I earn from qualifying purchases.

First you will need to set your page size. If you have a printer that will only print Letter Size, then you need to change your Page Size to “Current Printer” (check out the Page Settings post on changing Page Size). This will adjust your page size down to the exact area that you can print. Turn your Orientation to the Portrait Orientation and it also helps to check the box next to ‘Show Print border’ and ‘Show Cut Border’.

Page Setup page size copy

Now, we are ready to click on the 3rd tab on the Page Setup Panel.

I first want to start out with a warning. While you can change a lot of the options on the Print and Cut, I highly recommend that you try cutting at the Default settings first and get to know the Print and Cut features before you go changing too many things.
I have great success with just the default settings and find I don’t have to change them, even though it is possible.

1 – Style – Under Style you have 3 options: Off, Type 1 & Type 2. Almost all users will choose the Type 1 option. Type 2 is only used for the Original or SD machines which are rare, they do still exist and are still going strong, but only a few users.
Choose Type 1 – Cameo, Portrait, Curio.
Style copy

2 – Length & Thickness – You can change the length and thickness of the Registration marks. Below I have shown 2 examples of changing the measurements and you can see the marks in the bottom left & top right change.

3 – Inset – Here you can change the placement of the Registration marks. The higher the number, the closer it moves to the Center of your page.
Inset

4 – Advanced Options – If you click on this, it will open up more options for you to change the Inset dimensions.
Advanced copy

5 – Restore Defaults – This is probably my favorite. This will reset anything you have changed to the Defaults of the original Print and Cut. Length at 0.787 in, Thickness at 0.50 in and Inset at 0.625 in. So if you get a wild hair to change things, you can always go back to basics and click on ‘Restore Defaults’ to change it back.

6 – Default vs Inverted – This will change the direction of where the Print and Cut is placed on your mat. Notice the direction of the arrow on the cutting mat, Inverted places it on the opposite corner of the mat & moves the registration marks on the page.

7 – Enable Barcode on this Design – This adds a barcode to the side of your page and it stores all of the cut settings data in the bar code that the Cameo 3 will read.
This is a Business Edition upgrade feature only.
Barcode copy

8 – Add Barcode file to the following Cloud account – Check this and the information will be saved to your Cloud account.

9 – Email address – this is the cloud account email address that the file will be saved to when you print it.

Some tips for Print and Cut: 

Start with the default settings and print the file from there first.

The design cannot be in any of the cross hatched areas of the Print and Cut screen. This is the area that the Optical scanner needs to read on the paper and if the design is in that area, then you may get a registration error.

You only need the Registration marks on if you are doing a true Print and Cut project, by printing first through your printer and then cutting the image with your Cameo.

The ‘M’ key on the keyboard toggles the Registration marks on and off. You can turn them on very easily without realizing it.

Feed the paper into the printer one sheet at a time.
If you have a tray or feed multiple sheets into the printer and print multiple copies of the page at once, the printer can pull it in too early or too late compared to the first print and this can affect where the print is on the page. This can give you a registration mark error.

So let’s check out my example. This is a design I purchased from the Silhouette store called Wine Themed Planner Stickers by Sandi Idleman Design #205613.

I can tell right away that if I sent this to print there will be issues.

PNC Example copy

I opened the file and know that I have to turn my registration marks on.
As you can see the alignment is off. There are areas of the design that are in the cross-hatched areas of my print and cut and the entire design is a bit too large for my print and cut area. So I will need to Select All and resize everything.

Final PNC

I have some Silhouette Clear Sticker paper so I’m going to load that in my printer and then click on the Printer icon in the top left tool bar.

Printer icon copy

Here is my printed page.

PNC page

And I am ready to place my design on my mat and click on the Send tab. When you place your printed image on the cutting mat, you want to make sure that you place it in the exact same location that you have it on your Design screen, in the top left corner.
Choose Sticker paper – Clear in my Cut settings & double check that all my cut lines are how I want them. And then load my mat, do a test cut to make sure my settings are correct and then click Send.

PNC2

And it cut beautifully!

Sticker final

Now I have some wine sticker for my planner.

Have you used the Print and Cut feature?
Tell me what you have used it for below in the comments.

Hope you enjoyed today’s overview of the Page Settings – Registration Marks tab!

Check out the entire “Let’s Explore v4” series HERE.

I would love to see what you are creating! Feel free to post on my Facebook group at Silhouette Secrets with EllyMae.

Save this for future reference by pinning the image below.

Enjoy !

THANK YOU for your support! How can you help? Click HERE & buy a coffee.
Every little bit helps with the cost of running the site.

Looking for more in-depth, step-by-step classes, check out all of my online Silhouette classes on my Teachable site HERE.

SS Logo snip it
**This post may contain affiliate links. What that means is that I may receive compensation if you purchase through the links I have provided. The price you pay for the product or service is not higher but I may get compensated for sharing.