Join me in creating a custom pillowcase that sparkles and shines! With the Artesprix Sublimation Sequin Pillowcase and the Artesprix Heat Resistant Mask, this project is not only fun but also easy to personalize. Using the Silhouette Cameo 5, I cut out a design that bring a unique flair to the pillowcase.
Affiliate links may be present in the following blog post and as an Amazon Associate I earn from qualifying purchases.
Watch how you can make your own custom creation with the Artesprix Sublimation products in the new tutorial HERE on the Artesprix YouTube channel.
Supplies used for Sequin Sublimation Pillow Case:
Here is a list of the supplies I mentioned and demonstrated in the new YouTube video:
Other supplies: cardstock or copy paper, pencil, scissors, paper towels, paint brush(es), transfer tape, weeding tool, spatula
Find more ideas on creating with the Artesprix Sublimation Sequin Pillow Case HERE.
Let your imagination go and see what you could create to add some sparkle to your space! Find more projects I’ve created using the Artesprix sublimation products HERE.
THANK YOU for your support! How can you help? Click HERE & buy a coffee. Every little bit helps with the cost of running the site.
Silhouette Classes
Never stop learning! Let me help you take the anxiety out of learning with Silhouette and get to creating faster! My Silhouette classes are heavily focused on software, so you can take the skills & techniques taught and apply them to many future projects!
**This post may contain affiliate links. What that means is that I may receive compensation if you purchase through the links I have provided. The price you pay for the product or service is not higher but I may get compensated for sharing.
So much fun to create this custom water bottle! And I have more to share too! Find more projects I’ve created using the Artesprix sublimation products HERE.
THANK YOU for your support! How can you help? Click HERE & buy a coffee. Every little bit helps with the cost of running the site.
Silhouette Classes
Never stop learning! Let me help you take the anxiety out of learning with Silhouette and get to creating faster! My Silhouette classes are heavily focused on software, so you can take the skills & techniques taught and apply them to many future projects!
**This post may contain affiliate links. What that means is that I may receive compensation if you purchase through the links I have provided. The price you pay for the product or service is not higher but I may get compensated for sharing.
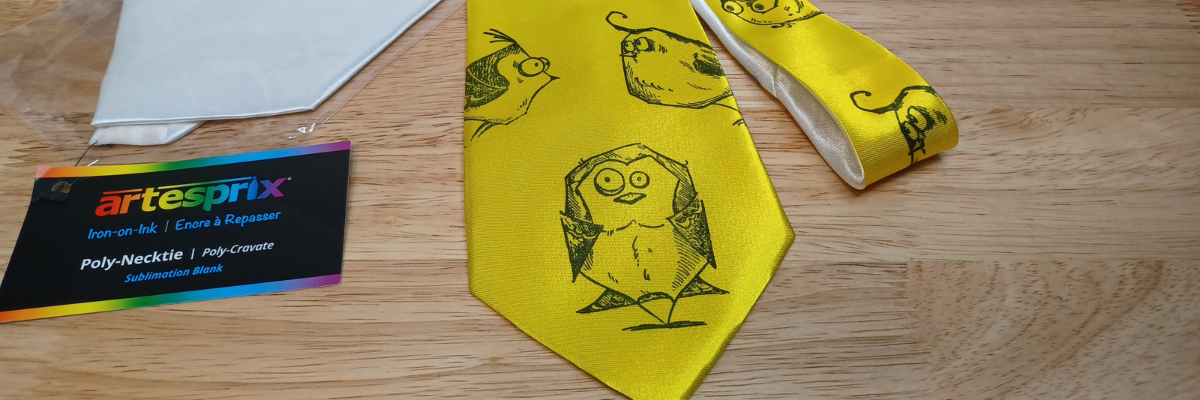
Want to create unique DIY items? This month I created this fun, bright colored DIY necktie that is definitely unique and a one-of-a-kind using the Artesprix sublimation paints, stamp ink, and a fun Tim Holtz – Crazy Birds stamp set. The best part is… you can do this too!
Affiliate links may be present in the following blog post and as an Amazon Associate I earn from qualifying purchases.
I went to ask my husband to tie this as I was trying to take the final photos and he had a friend over. The reaction I got was worth it all! They both loved it! A unique DIY necktie that is one-of-a-kind. I mentioned that it would take a special, fun event to wear this and his remark was, “Absolutely not.” I think he was ready to take it and prove me wrong. It was the perfect reaction to confirm I was on the right path with my unique creation.
Watch how you can make your own DIY creation with the Artesprix Sublimation products in the new tutorial HERE on the Artesprix YouTube channel.
I just love these fun spirited birds. They bring a smile to my face each time I see them.
Supplies used for DIY Necktie:
Here is a list of the supplies I mentioned and demonstrated in the new YouTube video:
So much fun to create! And I have more to share too! Find more projects I’ve created using the Artesprix sublimation products HERE. And stay tuned for other fun projects because I just couldn’t stop creating with the ribbon and inks!
THANK YOU for your support! How can you help? Click HERE & buy a coffee. Every little bit helps with the cost of running the site.
Silhouette Classes
Never stop learning! Let me help you take the anxiety out of learning with Silhouette and get to creating faster! My Silhouette classes are heavily focused on software, so you can take the skills & techniques taught and apply them to many future projects!
**This post may contain affiliate links. What that means is that I may receive compensation if you purchase through the links I have provided. The price you pay for the product or service is not higher but I may get compensated for sharing.
This months video for the Artesprix YouTube channel took a turn when I had too much ink leftover and I loved the end result of my “accident” better than my original idea. I used the Artesprix Sublimation Stamp Ink Refills, mixed media paper, and Artesprix Satin Ribbon to create some fun and awesome creations. For my original idea, I used a paint brush and painted brushstrokes for my design, but then when I went to clean up my excess ink, I found that I loved the pattern it created so much better!
Affiliate links may be present in the following blog post and as an Amazon Associate I earn from qualifying purchases.
Do you ever have that happen? Think you have a plan and then it all changes and turns out even better than your original idea?
Watch how I made these custom ribbons with the Artesprix Sublimation products and added it to make custom ribbon in the new tutorial HERE on the Artesprix YouTube channel.
Artesprix Sublimation Supplies
Here is a list of the supplies I mentioned and demonstrated in the new YouTube video:
THANK YOU for your support! How can you help? Click HERE & buy a coffee. Every little bit helps with the cost of running the site.
Silhouette Classes
Never stop learning! Let me help you take the anxiety out of learning with Silhouette and get to creating faster! My Silhouette classes are heavily focused on software, so you can take the skills & techniques taught and apply them to many future projects!
**This post may contain affiliate links. What that means is that I may receive compensation if you purchase through the links I have provided. The price you pay for the product or service is not higher but I may get compensated for sharing.
I’m playing with paint this month on the Artesprix YouTube channel. Specifically, the new colors of the Artesprix Sublimation Paints. I made a fun potholder for my craft room.
Yes, you read that right! Since I’m often playing with sublimation blanks, they get HOT! This will come in handy in my craft room and brighten up the place a bit. But, you can also create these to brighten up your kitchen. Function and fun all in one!
Affiliate links may be present in the following blog post and as an Amazon Associate I earn from qualifying purchases.
THANK YOU for your support! How can you help? Click HERE & buy a coffee. Every little bit helps with the cost of running the site.
Silhouette Classes
Never stop learning! Let me help you take the anxiety out of learning with Silhouette and get to creating faster! My Silhouette classes are heavily focused on software, so you can take the skills & techniques taught and apply them to many future projects!
**This post may contain affiliate links. What that means is that I may receive compensation if you purchase through the links I have provided. The price you pay for the product or service is not higher but I may get compensated for sharing.
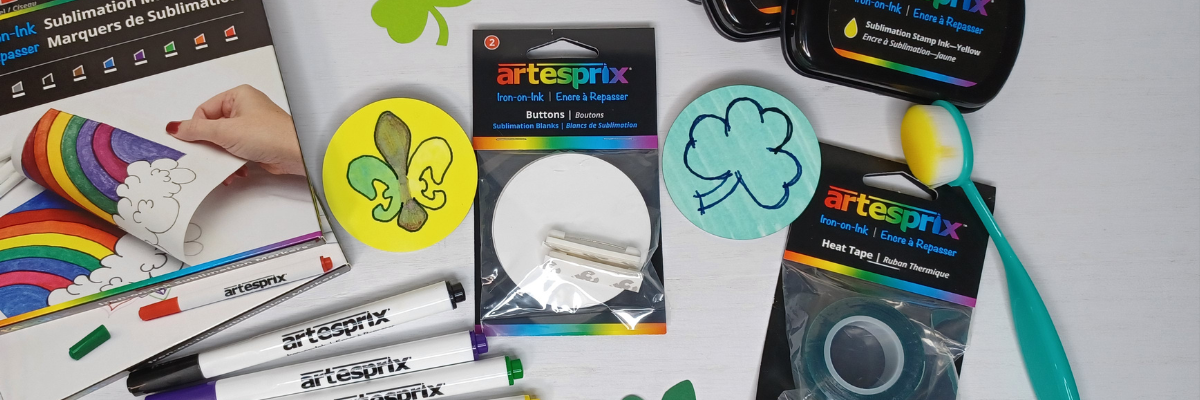
Buttons are back!!! I am seeing buttons and pins as a big souvenir item when I’m traveling and I’ve even invested in a pin board for my collection. This month I am sharing my button creations with the Artesprix Sublimation markers and inks.
Affiliate links may be present in the following blog post and as an Amazon Associate I earn from qualifying purchases.
I cut a few simple shapes with the Silhouette Cameo 5 using the new Electrostatic bed and some cardstock scraps for the button design creation.
You could use all kinds of objects to trace and create with. Start looking for things around the house or when you are out shopping and see what you might add to your craft stash.
THANK YOU for your support! How can you help? Click HERE & buy a coffee. Every little bit helps with the cost of running the site.
Silhouette Classes
Never stop learning! Let me help you take the anxiety out of learning with Silhouette and get to creating faster! My Silhouette classes are heavily focused on software, so you can take the skills & techniques taught and apply them to many future projects!
**This post may contain affiliate links. What that means is that I may receive compensation if you purchase through the links I have provided. The price you pay for the product or service is not higher but I may get compensated for sharing.
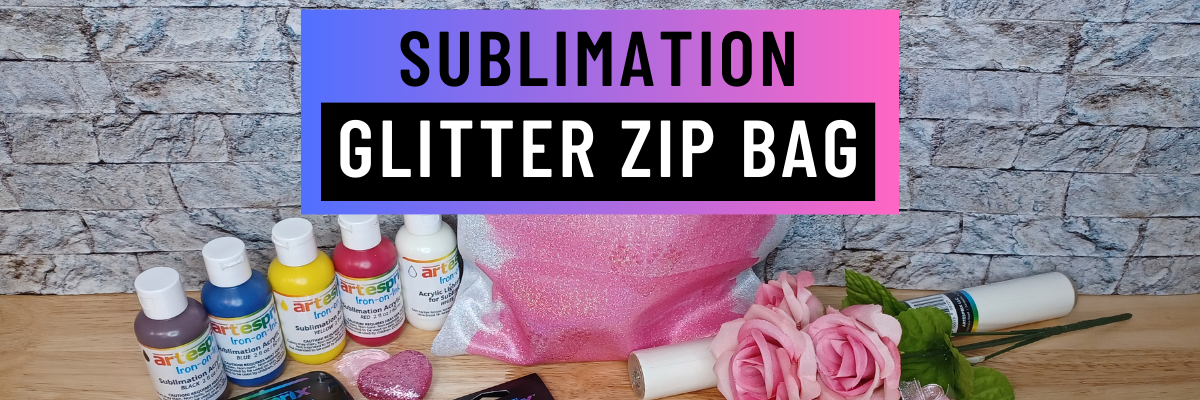
I love being able to take a blank and come up with new ideas for it. This month on the Artesprix YouTube channel I’m sharing how you can take a glitter zipper bag, mix Artesprix Sublimation Paints and create a custom gift bag. Fill it with goodies to give as a gift for a friend or holidays like Valentine’s Day!
Affiliate links may be present in the following blog post and as an Amazon Associate I earn from qualifying purchases.
Or fill it with your favorite Artesprix products to gift to a crafty friend.
For this project, I mixed colors with the Artesprix sublimation paints and the paint mixing color chart. Once the paint was dry on the copy paper, I stamped onto the paper for a subtle touch with a couple stamps I picked up at Michaels. Keep your eyes peeled when you are out shopping for little things you can add on to each project.
THANK YOU for your support! How can you help? Click HERE & buy a coffee. Every little bit helps with the cost of running the site.
Silhouette Classes
Never stop learning! Let me help you take the anxiety out of learning with Silhouette and get to creating faster! My Silhouette classes are heavily focused on software, so you can take the skills & techniques taught and apply them to many future projects!
**This post may contain affiliate links. What that means is that I may receive compensation if you purchase through the links I have provided. The price you pay for the product or service is not higher but I may get compensated for sharing.
I’m in love with these Layered Snowflake Arabesque Tile acrylic shapes from Craft Chameleon. They come in a wide variety of colors and I’ve been using them for testing. I want to share 3 methods I tested, my results with each, and which one is my favorite at the end – you might be surprised.
Affiliate links may be present in the following blog post and as an Amazon Associate, I earn from qualifying purchases.
I am calling these ornaments, but they can be so much more. Gift tags, ornaments, stand alone decor item, and more!
3 Ways to Customize Acrylic Shapes with Silhouette
Etching Acrylic with the Silhouette Curio 2 Power Engraver – Let It Snow Design
Etching Acrylic with the Silhouette Curio 2 Punch Tool – top left Snowflake saying (the Curio 1 and Silhouette etching tool can do this too – more info below)
Adhesive Vinyl Decal – any cutting machine can do this with good quality vinyl!
1 – Etching Acrylic with the Silhouette Curio 2 Power Engraver
I have had great results with the Silhouette Power Engraver. However, it is not a fine detail engraving tip. When you are working with it, you want to keep that in mind and may need to adjust the design to work with it.
I have a full step-by-step class the Silhouette Secrets+ Teachable site on setting up for etching/engraving on acrylic with the Silhouette Curio 2 including how to get exact placement on shapes. I share all the things that worked and those that did not in the class too! Find all the details and see more examples of my etching tests HERE.
The etch is pretty subtle on the colored acrylic. Acrylic blanks are also one of the most difficult things to photograph too! Right up there with glass objects.
I love the sparkle of the top layer of this acrylic shape.
For more details on etching with the Silhouette Cameo 5 and Punch Tool check out this post HERE. Note: etching on the Silhouette Cameo 5 is designed for Silhouette metal etching sheets and not for acrylics – more details in my blog post
The Silhouette Punch Tool is supposed to be the etching tool for finer details with the Silhouette Curio 2 and Cameo 5. While it does etch, it definitely is no where near the same quality of etch as the Silhouette Curio 1 was with the Silhouette etching tool.
If you have a Silhouette Curio 1, I would recommend hanging on to it and get that baby out to etch on acrylic. It does a fantastic job.
However, the Silhouette Curio 2 is here to stay. It is the new machine model and the Silhouette Curio 1 is no longer manufactured. Honestly, the Curio 1 had a really, really long lifespan for a machine model. I am surprised that it was manufactured for so long.
The Silhouette Curio 2 and the Silhouette Cameo 5 has a specialized Carriage 2 housing that allows not only for specialty tools, but also a higher force. While the Carriage 1 housing on Silhouette models is an up and down motor, the Carriage 2 housing on Silhouette model machines is a round and round motor. This means that it is different than the Silhouette Curio 1 machine that was designed over 10 years ago. Different machine, different results. I’ll have more details on the blog later about all of that.
I selected the Vinyl Glossy setting and increase the blade depth to a 2. Actual cut settings that will work for you will depend on your material, machine, and blade life. Test cuts are the only way you will know what works for you. Find more information on Perfect Cut Settings HERE.
One of the big key factors is you want high quality adhesive vinyl and good quality transfer tape for detail works. Low quality vinyl can just be a mess and more of a headache than the money it tricked you into saving. If you have ever cut low quality vinyl or old vinyl, you are nodding right now and know exactly what I mean!
Now, yes, I lost the dots to my i’s. But holy smokes! This is tiny details! At this size, I could care less about those little dots on the i’s. I can either cut more and add them or add in a different embellishment to the project.
One of the things that can help when cutting this small is adding Weeding Lines to the design and it definitely helped in this small detail cut. For more details on adding Weeding Lines click HERE. For designs like this, I prefer to draw my own weeding lines. It takes just a little more time in the setup and cutting process, but it can be 100% worth it to save you headache when weeding.
I have more tips on cutting small fonts & designs HERE too!
Out of all 3 methods, this one has to be my favorite because it really stands out. And the best part is, anyone with a cutting machine could do this method!
I hope that gives you some ideas how you can create and customize with acrylic shapes. You are not limited to Snowflake Arabesque Acrylics either! Craft Chameleon has a wide selection of acrylic blanks. The 3″ clear acrylic rounds are my favorite and I make sure to stock up each time I order.
Save this for future reference by pinning the image below.
Enjoy !
THANK YOU for your support! How can you help? Click HERE & buy a coffee. Every little bit helps with the cost of running the site.
Silhouette Classes
Never stop learning! Let me help you take the anxiety out of learning with Silhouette and get to creating faster! My Silhouette classes are heavily focused on software, so you can take the skills & techniques taught and apply them to many future projects!
**This post may contain affiliate links. What that means is that I may receive compensation if you purchase through the links I have provided. The price you pay for the product or service is not higher but I may get compensated for sharing.
In this tutorial, I’m going to share how I created what’s called an “Off the Edge” die cut card with my Silhouette machine. This can add an interesting element to any card design and is fun to create.
Affiliate links may be present in the following blog post and as an Amazon Associate, I earn from qualifying purchases.
I recently attended the Card Maker Success Challenge hosted by Brandi Mahon of Stamp Me Some Love and was so inspired by her card ideas. I took the card ideas she was sharing and modified them to be used with my Silhouette software and machine. If you are looking for card making inspiration, I recommend you check out her monthly Card Maker’s Success Subscription.
I have a Canon TS9521C that is a borderless printer, but you can do the same even without a borderless printer.
Then, I will use a paper trimmer to cut the page down to the size I need for my cards front. But, I won’t know the size until I have the other pieces cut out, so I just set this aside.
Designing in Silhouette Studio
Drawing the Card Pieces
Next, in the Silhouette software, using the Drawing Tools on the left side, draw out a rectangle and then scale it to 4.25″ x 5.5″ or whatever card size you are wanting. Unlock the lock to be able to change the height and width of the rectangle individually. Type the number and press Enter to set the dimension. Find more on the Scale Tools HERE.
Select the rectangle and then choose Align Left in the Alignment tools. With only 1 object selected it will align it to the left side of the page. This will help us in just a minute with our design.
Choosing a Sentiment
Next, open the sentiment design you want to use or with the Text Tool and type out the sentiment you want. If you type out the text, make sure to weld any overlapping pieces.
I used Hello by Diva Watts Designs found HERE for this card design.
Scale the hello down to fit within the card base and use the green dot at the top to rotate it to the desired angle. Or you can use the Rotate Panel and rotate to 45 degrees and adjust from there.
This is going to allow us to adjust the rectangle and maintain straight lines.
Double click on the red line of the rectangle to bring up the Edit Points. Drag the top left edit point (gray dot) down.
Grab the top right edit point and drag it down, so the top of the rectangle is angled as desired to run through the middle of the sentiment.
With the Snap to Grid tool activated, it snaps the edit points to specific locations and easily allows the design to be manipulated and maintain the straight lines of the card edges.
Once the edges are how we want, Show Grid and Snap to Grid can be toggled off on the Page Setup Panel – Tab 2 again. I find the grid lines distracting when designing, but they can easily be turned back on if needed.
Create a Copy for Future Templates
Make a copy of the card base and you can use it for future cards as a starting point.
Select both the card base and the sentiment and Align the Center in Silhouette. Depending on the design, center aligned may not look centered to the eye. Use the arrow keys to adjust if needed in small increments any direction.
Adding an Offset
Next, click on the sentiment to select it and open the Offset Panel on the right side. Click Offset and adjust the distance of the Offset as desired, then click Apply or press Enter. The distance of the offset will all depend on the sentiment and the size you are using. There is no magic number.
The offset should overlap the angled rectangle securely and not have too many tiny bits to be cut out.
Welding the Offset to the Card Front
After clicking on Apply, the offset will be selected. Hold the Shift key down and click on the angled rectangle so that both are selected, then right click and choose Weld.
This now combines the angled rectangle and the offset into 1 cut and creates the off-the-edge design. If there are any tiny bits like what the red arrow points to above, those are not needed in the design. Move the sentiment off of the design.
Then right click on the design and choose Release Compound path. Click off of it to deselect and click back on the little bit, press delete. When all the pieces you want are deleted, select the entire design again, right click and choose Make Compound Path.
Use the drag select method to select all the pieces at the same time. Left click the mouse and hold it down in the top left corner above the design and drag it all the way through the design to the bottom right corner. Anything that the selection box touches, should be selected.
Cutting the Card Pieces & Assembly
Now you have your pieces for the Off-the-Edge card design designed and ready to cut in Silhouette.
I cut the sentiments from Oracal 651 Black vinyl and applied it to the off-the-edge piece that I cut from white cardstock. I reused a piece of transfer tape to apply it and was careful that it didn’t stick to the cardstock too much. You could also cut from cardstock and glue to the front, but adhesive vinyl makes it a bit quicker to assemble and the glossy sentiment made it pop with the photo paper background too!
Then I took the printed sheet of the alcohol background paper and cut it to 4.25″ x approximately 3.5″ with my paper trimmer. This size depends on how far the left side of the off-the-edge cut comes down. I used a Scrapbook tape runner to adhered the alcohol background to the front of a card base at the top.
You can either buy ready made card bases or make your own. In this card tutorial HERE at 32:30, I show how I cut my own card bases from a letter size sheet of paper.
Then used foam tape to add the off-the-edge cut piece to the front of the card at the bottom.
Off-the-Edge Die Cut Cards with Silhouette
Once you have the basics of the card creation down, you can modify it for different sentiments. Save the angled rectangle as a template for future card cuts.
The first card will take the longest to design, but then you will have all the steps and if you save the files, you can easily open in the future and get to cutting.
You will also notice that a couple of mine got a bit close to the edge and really did go off-the-edge. For these I can just snip that part off before placing in the envelope, but in the future I’ll adjust the design a bit smaller so the offset doesn’t go outside the bounds. Something like that is easily corrected in the software when it happens to you.
Save this for future reference by pinning the image below.
Enjoy !
THANK YOU for your support! How can you help? Click HERE & buy a coffee. Every little bit helps with the cost of running the site.
Silhouette Classes
Never stop learning! Let me help you take the anxiety out of learning with Silhouette and get to creating faster! My Silhouette classes are heavily focused on software, so you can take the skills & techniques taught and apply them to many future projects!
**This post may contain affiliate links. What that means is that I may receive compensation if you purchase through the links I have provided. The price you pay for the product or service is not higher but I may get compensated for sharing.
THANK YOU for your support! How can you help? Click the link to buy a coffee. Every little bit helps in the cost of running the site.