Posted on 59 Comments

Let’s Explore v4 – Drawing Tools

Do you use the Silhouette software to draw your own designs? Or maybe you are like me and don’t feel you are creative enough to draw your own designs?
Today we are going to talk about the Drawing Tools and hopefully, you will feel a little differently by the end.

Drawing Tools Panel copy

As I’ve mentioned in previous posts, you will find the Tools on the left side of the Design Tab and the Panels that control the properties of those Tools on the right side.

Tools vs Panels copy

Understanding the different terms in the software can help in remembering where to access some of these features. Check out this FREE PDF file that diagrams the Design Tab out with each of the Icon names.

Let's Explore v4 diagram copy

Let’s Explore v4 – Drawing Tools

Drawing Tools close up copy

Draw a Rectangle Tool

Select the Rectangle Tool on the left side and the cursor will change to a cross-hair. Click the left mouse button and hold to draw a rectangle of any size.

Draw rectangle copy

To draw a perfect square, hold down the SHIFT key as you draw and it will draw a perfect square.

But, be careful not to let go of the SHIFT key before you release the mouse button or it will not be an equal sided square.
The undo option is your best friend in the software at times.

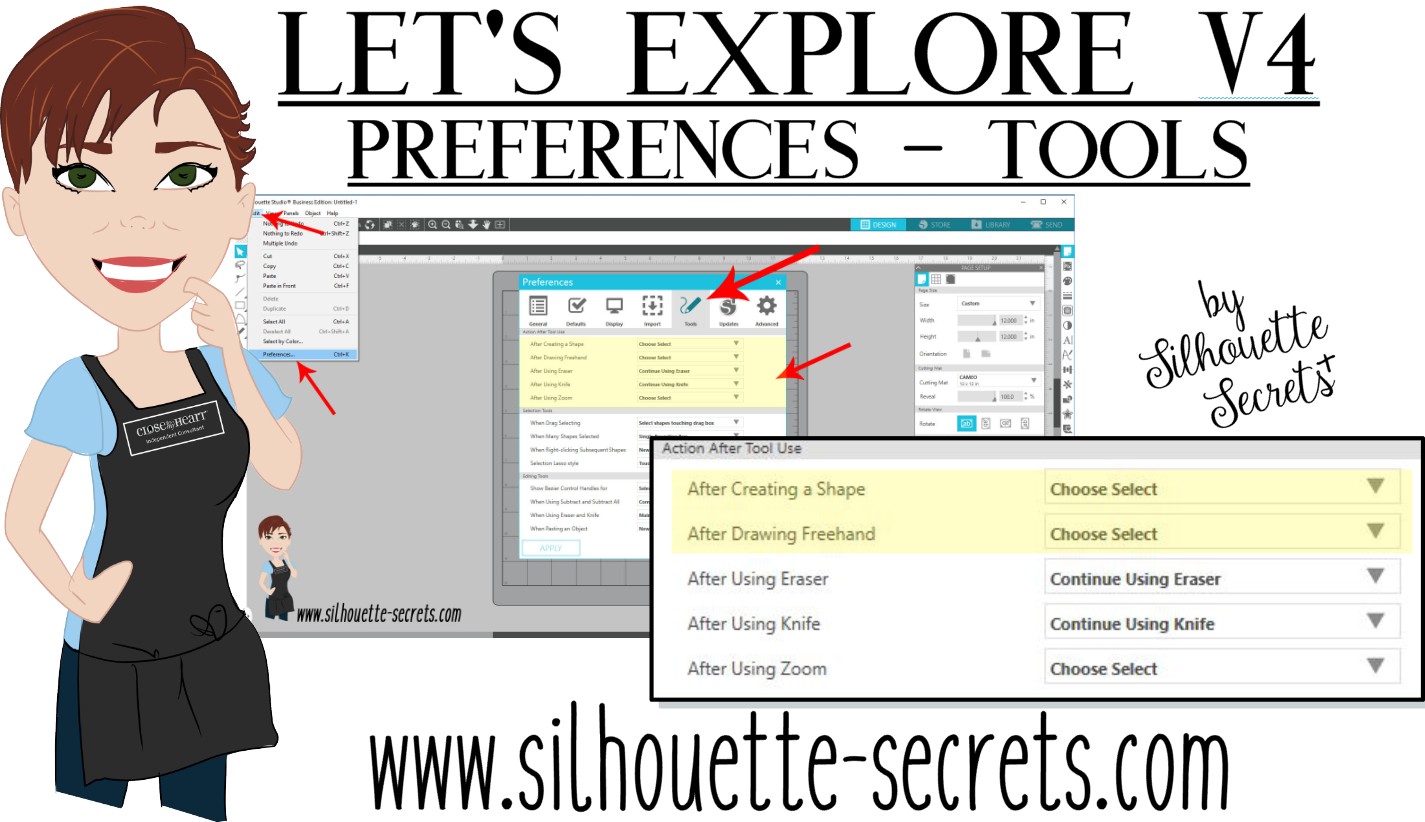
Now, after you draw that rectangle, does your mouse keep on drawing shapes?
You can change this under the Preferences in the software.
Check out this post on Preference – Tools to find out how.

Draw a Rounded Rectangle

The draw a rounded rectangle tool works the same as the rectangle tool, except the corners are rounded and you have the option to adjust the curve of the corners by moving the red dots that appear on the corner.

Rounded Rectangle copy

The red dots can be adjusted individually for each side of the corner or if the SHIFT key is held down when grabbing one, it will adjust them proportionally on all sides.

Draw an Ellipse

Select the draw an Ellipse tool to draw an oval or circle shape.

Draw an ellipse copy

Again, holding down the SHIFT key will allow a perfect circle to be drawn.
If the SHIFT key is released before the mouse button, it will revert back and not be a perfect circle.

Draw a Regular Polygon

Select this tool to draw a polygon. The polygon can be adjusted with the red dots or by using the slider bar in the middle of the shape to adjust the number of sides from 3 to 60.

Regular Polygon tool copy

Now, those are your basic shapes and can be used together to make all kinds of designs. What can you think to create?

I created this snowflake just by using a few of these basic shapes.
A rounded rectangle, a circle, and an oval.
Group or weld the ovals to create the leaf design.

Snowflake design copy

After drawing all the shapes, I used the Align tool to line them all up by the Align Center option. Then weld the shapes together.
Next, mirror the welded shape below from the Replicate Panel and then move the copy up a little so they are overlapped, then weld.

Snowflake welded copy

Now, use the Replicate Two Copies option and weld in the Replicate Panel to create 2 more copies. Then weld the copies together.

Snowflake Replicate copies copy

And then I repeated the same steps for the next part of the snowflake.

Snowflake 2nd arm copy

Once both parts of the snowflake are created, select the smaller snowflake piece and Rotate By 30 degrees, using the Transform Rotate Panel. Select both parts of the snowflake and use the Align Center option under the Transform Panel.

Snowflake welded final copy

Ta-Da! You have drawn a snowflake with basic shapes found in the Drawing Tools on the left side of the Silhouette Studio.

Drawing Tools Pinterest

Want to save this for later? Pin the photo above to Pinterest to refer back to later.
I love Pinterest – find me HERE!

What will you draw or create in the Silhouette software now?
Want another tip?
Check out basic drawing books to see how they combine shapes to make designs and objects.

Feel free to post your comments and questions below or on my Facebook group at Silhouette Secrets with EllyMae.

Enjoy!

SS_Signature copySS Logo snip it

**This post may contain affiliate links. What that means is that I may receive compensation if you purchase through the links I have provided. The price you pay for the product or service is not higher but I may get compensated for sharing.

Posted on 8 Comments

Let’s Explore v4 – Pattern Fill

In the past several weeks I have been using the Fill Pattern option in the Silhouette software to create my own papers for projects that I needed. While I have a large paper collection, there are just times I do run into a project, that I want a specific paper for and I don’t have it – like this 3D Tank project I complete a few weeks back.

Header Tank post

Last week, I started a project with my daughter and we only had wood patterned paper to make 1 of the project. So the Silhouette Design Store, my Silhouette software and my Canon printer came to the rescue.

IMG_20190731_205738918 copy

This Lath Decorative Board is created completely out of cardstock. Paper A is a retired patterned paper from my Close to My Heart collection and paper B is one that I filled with the pattern fill option and printed through my Canon printer onto white cardstock.

Pattern Fill header copy

I posted this on my Silhouette Secrets+ Facebook page  when I was working on the project and asked for guesses on which one was printed. Almost all the guesses were for A as the printed paper. This is a great option if you do not have the specific pattern in your stash that you need.

Sil_Secrets_PatternFill

If I don’t have the supplies on hand, it usually means that this project would have been put on hold for the time being, but now with the option to print and cut my own paper designs, I can get to crafting.
The project above is a Lath Board with Flowers Project by Nilmara Quintela from the Silhouette Design Store.

Let’s take a look at how you can use the Pattern Fill option to expand your options in Silhouette Projects.

The Fill Pattern tab is found on the right side under the Fill Color Panel – Tab 3.

Fill Pattern Panel2

This short video shows how easy it is to fill shapes with patterns from the Silhouette library.

Once you have your design set up with the pattern fill, you can use the Print and Cut feature to print the design out with your home printer and then cut on the Silhouette machine.
Check out this post Print & Cut – Part I for my tips for a successful Print and Cut.

I hope you learned something new today in the “Let’s Explore v4” series!
There are so many options in the Silhouette Software and the only way to learn is one thing at a time! I hope you get a chance to play around with this and more soon!

The designs used in this post can be found in the Silhouette Design Store:
Combat Tank 3D Box by Snapdragon Snippets
Lath Board with Flowers Project by Nilmara Quintela
Bracket Label Thank You Card by Lori Whitlock
Ink Splat Pattern by Loni Harris
Mermaid Scales Purple Pattern by Studio Illustrado
Hibiscus Paper by Miss Kate Cuttables
Canvas by Digital Pink Ink

I would love to see what projects you create! Feel free to post on my Facebook group at Silhouette Secrets with EllyMae.

Enjoy!

SS_Signature copySS Logo snip it

**This post may contain affiliate links. What that means is that I may receive compensation if you purchase through the links I have provided. The price you pay for the product or service is not higher but I may get compensated for sharing.
Posted on 6 Comments

Let’s Explore v4 – Preferences – Tools

When you use the drawing tools in the Silhouette Studio software, does every click of your mouse continue to draw another shape?

Did you know that you can change this behavior within the software?

Click on the Preferences icon in the bottom right corner of the Design Tab or click on the Edit option in the top left menu & choose Preferences.

Preferences copy

Then choose the Tools tab at the top of the Preferences window.

If the software continues to draw shapes with each click of the mouse, this preference can be found under the “Action After Tool Use” section of the Tools tab.

After drawing Tools

I change the After Creating a Shape and the After Drawing Freehand to “Choose Select” then choose Apply and Ok.

Choose Select

Now when you choose a Drawing Tool or the Line Drawing Tool, it will go back to the selection arrow instead of continuing to draw shapes.

Tip: I keep the Eraser and the Knife tool as “Continue Using” because typically I will continue using the eraser or knife. I have the After Using Zoom set to “Choose Select” because I don’t want each click of my mouse to keep zooming in on the design. I prefer to have my selection tool again and if I need to zoom in more, I will choose zoom again.

Sometimes these defaults can get reset in the software, but after you know what they are and how to adjust them, you can easily go in and change it to what you prefer.

Each user will have a preference on how they like to work in the software. I prefer to draw one shape and then have the selection arrow as my next option as I am rarely drawing more than 1 of an item at a time when I’m designing.

Feel free to post your comments and questions below or on my Facebook group at Silhouette Secrets with EllyMae.

Enjoy!

SS_Signature copySS Logo snip it

**This post may contain affiliate links. What that means is that I may receive compensation if you purchase through the links I have provided. The price you pay for the product or service is not higher but I may get compensated for sharing.

Posted on 14 Comments

Mastering the Line Tools in Silhouette Studio: Your Ultimate Guide to Precision Design

Silhouette Studio Line Tools
Silhouette Secrets+ with EllyMae

Let’s Explore v4 – Line Tools in Silhouette Studio

When it comes to creating stunning designs in Silhouette Studio, the Line Tools are your secret weapon for precision and creativity. From drawing simple straight lines to crafting intricate custom shapes, these tools open up endless possibilities for your crafting projects. Whether you’re a beginner exploring the basics or an experienced designer looking to refine your techniques, understanding how to use the Line Tools effectively can take your designs to the next level. In this guide, we’ll walk you through each Line Tool, share pro tips for maximizing their potential, and show you how to incorporate them into your next Silhouette masterpiece. Let’s dive in!

Sometimes, I think that the tools on the left side of the Silhouette Software get lonely. There is so much that you can do within the software in creating your own designs and I love seeing what everyone comes up with.

First, let’s take a look at the Design Tab. On the left side are the Tools in the software and on the right side are the Panels which control the properties of the objects created.

Silhouette Studio: Tools vs Panels copy

Check out the Let’s Explore v4 series (HERE) to see more information on the Panels on the right side and how they can be used.

And if you need a little more detailed diagram of the Design tab, don’t forget to grab the FREE PDF in this post – HERE.

Silhouette Studio: Let's Explore v4 diagram

Silhouette – Line Tools

Today, we are going to cover the Line Tools located on the left side of the Silhouette Studio software. This is available for all users, no matter if you have a software upgrade or not.

Silhouette Line Tools on left side

Here is a close up of the options available in the Line Tools menu – Draw a Line, Draw a Polygon, Draw a Curved shape, and Draw an Arc

Silhouette Line Tools Close Up

Draw a Line

This will draw a simple line from Point A to Point B. Holding down the Shift key will make it a vertical, 45 diagonal, or horizontal line.

Silhouette: Draw a Line

I often will draw a line if I have to separate designs when cutting without a mat to make it easier to weed.

Silhouette Line as Weeding Lines

Sometimes, I’ll use the Weeding Lines within the Silhouette software, but other times, it’s just as easy to draw my own line.

If you want to connect 2 separate lines together, check out this post on How to Connect Lines in Silhouette HERE.

Draw a Polygon

This tool will continue to draw lines until you connect the red dots together to close the shape or double click to end the line.
Holding down the Shift key will also make it a vertical, horizontal, or 45 degree angle line.

Silhouette Polygon Line Tool

Have some fun and see what kinds of shapes you can draw. Turning on the Snap to Grid found under the Page Setup Panel – Tab 2, can also help in making sure that you get even spacing and help with drawing objects.

I’ll use this tool or the Draw Curve Shape to create my own weeding lines around a detailed design or when I’m cutting multiple designs on a page.

Silhouette Polygon Line Tool as Weeding Lines

A combination of tools can make it easier to weed a detailed design or a page filled with designs like the one above by allowing you to weed smaller areas instead of having a full sheet of Oracal 651 stick back to itself.

Draw a Curve Shape

This tool will draw a line each time you click the mouse, but the point will be a curved point.

Silhouette Draw a Curved Shape

Continue clicking the mouse to add points and curves in the shape. Double click to end the line or connect back to the first red dot to complete the shape.

After the design is complete, double click on the line and the Edit Points will pop up and the design can be altered more.

Silhouette Edit Points

Each point has 2 blue squares that are handles that can be adjusted. Or select an option from the Point Edit Panel on the right hand side.

Silhouette Edit Point Demo

Draw an Arc

Select this tool and click onto the design mat, this will be the starting point of the Arc line. Move the mouse and the next click completes the Arc.

Silhouette Draw an Arc Tool

In the center of the arc, there is a grab handle that can be moved in or out to alter the Arc even more.

Click off of the design and an arc line is left.

Silhouette Arc Tool

There are so many fun things that can be created with the tools in the software. You can create your own shapes, add weeding lines, or add Text to the Path you have created.

Silhouette Line Tools Text to Path Demo

What will you use the Silhouette Line tools for?

Save this for future reference by pinning the image below.

Silhouette Line Tools Pinterest

Enjoy !

THANK YOU for your support! How can you help? Click HERE & buy a coffee.
Every little bit helps with the cost of running the site.

Silhouette Classes

Never stop learning! Let me help you take the anxiety out of learning with Silhouette and get to creating faster! My Silhouette classes are heavily focused on software, so you can take the skills & techniques taught and apply them to many future projects!

Silhouette step-by-step Classes by Silhouette Secrets+

Silhouette Secrets+ with EllyMae
**This post may contain affiliate links. What that means is that I may receive compensation if you purchase through the links I have provided. The price you pay for the product or service is not higher but I may get compensated for sharing.
Posted on 13 Comments

Let’s Explore v4 – Library Snapshot

Library Snapshot

One of the new features in the Silhouette Studio v4.2 software is a Library Snapshot.

Library Snapshot General copy

This takes a “Snapshot” of the library as it is right now and also allows you to revert back to this “snapshot” of the library if needed.

To access and setup the Library Snapshot, click on the Library tab in the top right corner.

Library tab copy

Then click on your name in the top left corner.
You will need to be logged in to the Silhouette library.
Then choose Settings.

Library Snapshot copy

A Library Snapshot Options window will pop up.

Snapshot details copy

At the top of the Library Snapshot Options box is the log of all the snapshots that are taken of the software.

Close up copy

The middle section gives you options to create, delete, browse, or revert snapshots manually.

The bottom section allows you to set up automatic snapshots of the Silhouette library.
I would recommend setting the Snapshot option to Daily.
It never hurts to have multiple copies.

The Library Snapshots are computer specific. Depending on how it is set up, the snapshot will occur when you open the software.
If I have my snapshots set to daily but I leave my software open on my computer overnight, it will not take a snapshot the next day until I have closed and reopened the software again.

These snapshots are only stored on the computer you are accessing at the moment. Each computer will create a snapshot when the software is opened on it. So if I access my software from my computer upstairs, that snapshot is saved on my upstairs computer only. It is not stored in the cloud and synced between computers.

Does this replace making a backup of the library? No!

I would still highly recommend making a backup of your library on a regular basis and I would also recommend having your personal files saved to an outside source, which is also backed up as well too. There is nothing that is 100% safe and just like a computer crash, you cannot predict when something will happen.

Do you remember years ago when typing in Word documents and we were taught to save often? It is still a great habit to get into.
Save & backup often and you will not regret it.

Exporting a Backup

To make a backup of your library in Silhouette Studio v4, open the Library tab.
Click on your name in the top left corner (must be logged in).
Choose Library Export.

Library Export copy

A “Select Location” pop up window will come up.

Library Backup copy.jpg

Choose Browse and then select a safe location to save the backup file to.

This is a backup file only. It cannot be opened outside of the software and only can be imported back into the software if needed.
It does not contain individual files.
If you want the files saved individually, you will need to open each file and choose File > Save As > Save to Hard Drive.

I add the date to the file name and save in a Backup folder that I can find if needed.
I’d recommend making a backup of the library on a regular basis, just in case because you just never know.

If you ever need to import the backup back in, click on your name in the top left and choose Library Import.

Library Import

The Library Snapshot is just one of the new features in the v4.2 software.
Hopefully, you will never need to use it, but it is great that it is there.

Now, it’s a great time to go make a backup of your Silhouette library, no matter what version you are using and if you are in v4.2, set up the snapshot to your specifications.

Have questions or comments feel free to post below or on my Facebook group at Silhouette Secrets with EllyMae.

Enjoy!

SS_Signature copySS Logo snip it

**This post may contain affiliate links. What that means is that I may receive compensation if you purchase through the links I have provided. The price you pay for the product or service is not higher but I may get compensated for sharing.

Posted on 5 Comments

Let’s Explore v4 – Silhouette Studio PDF Diagram

Silhouette Studio Design Tab Diagram

Original post written in July 2019. Updated on May 21, 2020 with the current diagram link. Updated 5/31/25.

In January 2018, I started the “Let’s Explore v4” series with the intention of breaking down each of the panels on the right side of the Silhouette v4 software and explaining the parts of them. When I started, I had no idea how far it would go and it has grown to so much more than my original thought. I have learned so much by writing these posts and exploring other tools in the software that I have never used because I get stuck in the same old routines. It is so exciting to see something come to life in the Silhouette software and I love learning new things and being able to share those.

I do feel that the software is the key no matter what Silhouette machine you have. If you learn how to do something in the software, you can apply that to so many other projects that you create.

Today, I want to share a free PDF chart I created that maps out the Design tab of the Silhouette Studio v4 software.

Diagram of the Design Tab in Silhouette Studio v4 software, featuring various tools and panels labeled for user reference.

Click HERE or on the image above to download this PDF diagram.

This can either be printed as a reference guide or opened on a computer. When the file is opened on a computer with a PDF viewer, all of the blue titles have been linked to the blog post in the Let’s Explore v4 series that it corresponds with it.

I have had such great feedback on this series and I hope that it has helped you learn a little bit more about this powerful software by Silhouette!

Now, keep in mind that Silhouette is always adding new things into the software and I think this is awesome! What that means is that this chart is good for today and for users who are using a version of the Silhouette software that contain these features.

Just like many things in life, things change. Change can be hard for most of us, but it can also be good. I will update this free PDF with future changes, once I know those changes will be sticking around.

If you are not using the Silhouette Studio v4.2 software yet, I would highly encourage you to do so. You can download the current version of the software direct from the Silhouette America website HERE. I am using v4.2.279, which can be found under the Legacy section and it is what I’d recommend today.
As always with any software, they may be a “bug” or two in it. This happens with all software programs. There are 2 that are known in this version 4.2.279 I am recommending, but they are more just annoyances than anything.

I explain those “bugs” and how you can work with them in this post –
Let’s Explore v4 – Bugs.

And if you are considering updating or even if you are not, it is always a good time to backup the Silhouette library if you store personal files there – for more tips on the Silhouette Library prior to version 4.2 check out this post – Silhouette Library Tips.

Shape up your Silhouette Library copy

While you are exporting a backup, don’t forget to export your custom cut settings if you have those in the Silhouette software too! This is an awesome feature.
Check out how to do that in this post –  Add Cut Settings & Export.

Export Header copy

Don’t forget to grab the free PDF diagram of the Design Tab in the Silhouette Studio v4 software and save it some place safe on your computer to refer back to when needed.

Design Tab diagram

I’d love to hear your feedback or suggestions for things you would like to see in the future!

Enjoy !

THANK YOU for your support! How can you help? Click HERE & buy a coffee.
Every little bit helps with the cost of running the site.

Silhouette Classes

Never stop learning! Let me help you take the anxiety out of learning with Silhouette and get to creating faster! My Silhouette classes are heavily focused on software, so you can take the skills & techniques taught and apply them to many future projects!

Silhouette step-by-step Classes by Silhouette Secrets+

Silhouette Secrets+ with EllyMae

**This post may contain affiliate links. What that means is that I may receive compensation if you purchase through the links I have provided. The price you pay for the product or service is not higher but I may get compensated for sharing.

Posted on 18 Comments

Let’s Explore v4 – Flexi Shapes

Flexishapes

*This post may contain affiliate links.

New with the Silhouette Studio v4.2 software is a feature called FlexiShapes.
What are they?

FlexiShapes are another Tool in the Silhouette Software to help you create or add to a design.

Let’s take a look at the Silhouette Studio v4 layout. There are 2 side menus in the Silhouette software. The left side menu is where the Tools in the software can be found. Drawing tools, edit points, lasso tool, line drawing tools, shape drawing tools, text tool, notes, eraser, knife, and transfer properties eye dropper tool.
The right side menu is composed of Panels which control the properties of an object. Using the Panels on the right side, an object can be customized and the properties of it altered. This includes things such as fill color, line color, rotation, scale, font style, cropping, rhinestones, sketch, warp, etc.

Tools vs Panels copy.jpg
Check out the “Let’s Explore v4” series HERE or in the menu at the top of the blog to see a breakdown of the Panels on the right side.

FlexiShapes are available in the Silhouette Software v4.2 software version with the Designer Edition Plus or Business Edition upgrade.
The FlexiShapes can be found under the left side of the Silhouette software where all the Tools are found.

FlexiShapes copy

Look at all those new shapes that are now available with a few clicks of the mouse to start your own creations in the Silhouette software.

Each of the FlexiShapes will have different properties and ways that you can alter each one. Let’s take a look at a few FlexiShapes and how they can be adjusted.

On the left side I chose the flower FlexiShape, left clicked and moved my mouse out.
This creates the initial shape.

FlexiShapes Flower copy.jpg

Next, you will notice that each FlexiShape will vary in the edit nodes that it may have.

Zoom in on Shape white node

White nodes adjust the size of the shape or rotate the shape from the point of the white node.

Zoom in on Shape red node 1

Red nodes adjust the definition of the shape. In this flower shape, moving the red node will adjust the petal definition of the flower.

Zoom in Shape red node 2 copy

The slider bar in the center of the design will adjust the edges of the shape. In this flower example, it will decrease or increase the number of petals on the flower.

Zoom in Shape center adjustment copy
*Note – I have increased the line thickness in the photos to make it easier to see.

Each FlexiShape that you choose will have different options that can be adjusted to change the outcome. Some shapes may have more nodes or less.

Want a star? Start with the star shape and it can quickly become something else.

Star shape copy.jpg

Want a tear drop shape?

Tear drop copy

Create shapes and add them to your designs like these teardrops in the corners of this design created for the Curio Boot Camp for the June 2019 All Things Silhouette Conference.

Flamingo design copy

Both the teardrops and the scalloped rectangle frame are created using the FlexiShapes.

With the FlexiShapes there are so many options that you can create in the software.

Frames copy

Create a frame by adjusting the FlexiShape nodes and then make an Internal Offset, next select both the original shape & the offset and Make a Compound Path. This will take the 2 shapes and compress them into 1, creating the frame.
Fill the shape with color using the Color Fill Panel to see how it will look.

Create arrows of all shapes and sizes or create a picket fence from adjusting the nodes and replicating the shape. This are all created from the same starting arrow shape.

Arrow design copy

And once you start playing, it’s hard to stop.

I am in no way a designer, but you never know what you might create by combining a few shapes or playing around with some FlexiShape nodes today.

What can you think to create using the new FlexiShapes available in the Silhouette Studio v4.2 software?
I would love to see it!
Feel free to post photos on my Facebook group – Silhouette Secrets+ by EllyMae.

Save this for future reference by pinning the image below.

Pinterest

Enjoy!

Check out all of my online Silhouette classes on my Teachable site HERE.

SS_Signature copySS Logo snip it

**This post may contain affiliate links. What that means is that I may receive compensation if you purchase through the links I have provided. The price you pay for the product or service is not higher but I may get compensated for sharing.

Posted on 15 Comments

Let’s Explore v4 – Recovered Documents

Recovered Documents

Did you know that the Silhouette software has an Auto-save feature?
When you open the Silhouette Studio program, is there a Recovered Documents Panel that pops up?
Recovered documents copy

This Panel can also be found under the File menu in the top left corner, then Open Recovered.

File Open Recovered copy

The Auto save feature will save a copy of the files you have open if for some reason the software closes unexpectedly or perhaps the computer decides to do an update and shuts everything down.
Windows updates have been getting me lately when I leave my computer on and I come back and notice that my Silhouette software is no longer open.

While this is a great feature, I would not rely on it to keep your files safe. It is a nice feature to have as a back up, but it may not save it exactly where you would want it to and some work may be lost. So it is recommended to save your work often.

But, this is something I see often when I’m in a lesson or teaching at an event. A student opens the software and has a lot of files in the Recovered Documents Panel.

This takes up precious computer power!

Every time that the software is opened, those files in the Recovered Documents Panel have to load. The software is remembering those files and that can eat up computer power and make the software run slower because it has all those files open.

Each of the files can be clicked on and opened. This way you can check to make sure that all the changes you’ve made have been saved before the software last closed.

Discard Recovered Documents

Discard those Recovered Documents and the software should run a lot smoother because it is not having to load those files each time.

Discard All copy

I always recommend this to my students in our lessons and they are amazed at how much they notice a difference in how the Silhouette software reacts.

Just like making a library back up, this is a good habit to get into and help keep the software running smoothly.
A few clicks and you will be ready to create your next Silhouette project with the software all ready to go.

Feel free to post your comments and questions below or on my Facebook group at Silhouette Secrets with EllyMae.

Enjoy!

SS_Signature copySS Logo snip it

**This post may contain affiliate links. What that means is that I may receive compensation if you purchase through the links I have provided. The price you pay for the product or service is not higher but I may get compensated for sharing.
Posted on 3 Comments

Let’s Explore v4 – Selection Preferences

Did you know that you can change your Selection Preferences in the Silhouette software?

To open the Preference Panel, click on the gear icon in the bottom right corner of the Design tab or click on the Edit menu in the top right corner and choose Preferences.

Selection Preferences copy

Selecting an Object

There are several ways to select objects on the Silhouette design mat.

1. Click on the object to select it.
To select multiple objects at the same time, hold down the Shift key and click on each object you want selected.

2. Click and hold the left mouse button, then drag a selection box around all the objects you want selected.

3. Use the Lasso tool (Designer Edition & v4.2 feature).
Click the Lasso Tool on the left side and lasso the objects you want to select.
Lasso Tool copy copy

Selection box

One way to know the object is selected is a selection box appears around the object.

Selection box copy

Measurements – on the left & bottom side of the object are the height & width of the object or selected designs as a whole.

Control Points – these points can be grabbed and adjust the scale of the design. Grabbing the corners of the design will scale it proportionally versus grabbing the middle control point which will only change one direction of the design.

Rotate – the green circle at the top of the design can be grabbed and the design can be rotated manually.

Preferences Panel Selections

Here are the different options under the Selection Tools in the Preferences Panel.

Selection Preferences1 copy

Selection Tools: When Drag Selecting
When Drag Selecting copy
When the left mouse button is held down and a drag box is drawn across the objects on the screen, you can choose to have them selected by the drag box only touching the object or being fully enclosed by the drag box.

Touching the object:
Drag Selection Touching copy

Enclosed:
Drag Selection Enclosed copy
Notice that the glove is not selected because the drag box has not fully enclosed it.

Selection Tools: When Many Shapes Selected
Many shapes copy

Single Bounding Box
Many Shapes Selected single selection box copy
Notice that there is one large selection box and the measurements are of all the objects selected as one.

Multiple Selection Boxes
If I want to size the glove and know exactly what size it is while still having all the objects selected, then choose Multiple Selection boxes as the option.
Many Shapes Selected multiple selection box copy
Now, each object has the individual selection boxes around it and each has the measurements of that object. So I could grab one of the control points and enlarge the design while knowing exactly how big the glove is. This way I could make a glove 8″ and still have all the other pieces sized at the same time to keep the proportions correct.

Selection Tools: When Right-clicking Subsequent Shapes

When Right clicking copy

New Shape becomes selected – the object that you right click on will be the selected object and the right click menu appears.
Right Click object selected copy

Original Shape Remains Selected – right clicking anywhere on the design mat, the original shape is still selected and the right click menu appears. So if the glove is the selected object, even if I right click on the stitches, the glove is still the selected object and the right click menu appears.
Right Click Original Shape selected copy
Notice how the menu appears on top of the stitches that I right clicked on, but the glove is still the selected object. This means that the features in the right click menu that are chosen will apply to the selected object – in this case, the glove.

Selection Tools: Selection Lasso style
Selection lasso tool copy.jpg

The Lasso Tool is a new v4.2 feature that is available with the Designer Edition upgrade or higher. It is found on the left tool bar in the Silhouette v4.2 software.
Lasso Tool copy copy

The options for the Lasso tool include: touches or enclosed. To use this tool, click on the Lasso tool on the left side and then hold down the left mouse button and move the mouse on the design mat. A dotted line will appear that shows where the Lasso is.

Touches – the lasso tool selects any object that it touches.
Lasso Tool touches copy

Enclosed – the lasso tool will only select the objects that are completely enclosed by the lasso dotted line.
Lasso Enclosed copy
The Lasso tool can be very helpful if you have a lot of pieces of a design on the screen and only want to select certain ones in an area.

For instance, on this Paw Print Mandala design, if I want to select only the pieces that make up the inner half circle of this shape, I would set the Lasso Tool to Touches and then draw the lasso around the inner circle.
Lasso Tool example copy

Instead of holding down the Shift key and then clicking on each piece, I can use the Lasso tool to select all those in the center very easily.
Lasso Tool Example selected copy

It is all a matter of personal preference and how you use the software.

What are my Selection preferences set at:
My Preferences copy
This is how I keep mine. I know I can change them at anytime by opening up the Preferences menu, choosing a new option, clicking Apply, and then OK.

I used it this week in sizing and cutting the glove for my Spring door decorations, as I wanted the glove to be close to real size.

I changed the Selection option of the When Many Shapes are Selected to Multiple Bounding Boxes & was able to see the size of the glove, instead of the size of all the objects selected together.

Many Shapes Selected multiple selection box copy

Spring flowers brings Solicitors and Softball in our neck of the woods.

IMG_20190429_144932346_HDR

Did you know the Preferences Panel existed? It is full of great choices and we will be exploring more of it in the future.

Designs used in this post are from the Silhouette Design Store:
Baseball Set by Studio Illustrado – Design #60502
Watering Can by Silhouette – Design #291326
No Soliciting by Jillibean Soup – Design #276179
Lori Whitlock Background Shapes – Design #42924
Baseball Hat by Snapdragon Snippets – Design #39347
Positionable Skeleton by Samantha Walker – Design #4828

Feel free to post your comments and questions below or on my Facebook group at Silhouette Secrets with EllyMae.

Enjoy!

SS_Signature copySS Logo snip it

**This post may contain affiliate links. What that means is that I may receive compensation if you purchase through the links I have provided. The price you pay for the product or service is not higher but I may get compensated for sharing.

Posted on 37 Comments

Mastering Edit Points in Silhouette Studio: A Guide

Silhouette Edit Points

Silhouette Secrets+ with EllyMae

Have you seen edit points pop up in Silhouette Studio before?
Do they intimidate you?
Well let’s see if we can change that.

Affiliate links may be present in the following blog post and as an Amazon Associate, I earn from qualifying purchases.

What are Edit points?

Edit points are basically the data points the Silhouette reads to make a particular shape of the object. Each edit point has qualities on how it is supposed to act such as straight line, corner, curved, etc. and this is how a shape is made up.

Edit Points copy

The edit points will come up on an object if you double click on the object or use the keyboard shortcut letter “A” with the object selected.

If you draw a circle, it is made up of 4 edit points.

Circle edit points copy

A square also has 4 edit points but the type of edit point are different than the above circle.

Square edit points copy

By clicking on an edit point, you can see what property it has in the Point Editing Panel.

Why Edit Points Might Not Show

In order for the edit points to appear, the object has to be a single object and an ungrouped object.

For instance, if I type out text, it is not treated as a design. So the edit points won’t appear.

If it is converted to a path, the edit points still will not appear because even though it’s acting as a design, it is still grouped together. If the design is ungrouped the edit points will appear because all the pieces are now separate.

Ungrouped copy

Or if the design is made into a Compound Path, then the edit points will appear.

Compound Path copy

Altering Edit Points

There are many ways to change the edit points.

By clicking on an existing point, it turns white, indicating that it is the point selected.

Selected point copy

It will tell you what kind of edit point it is. This one is a corner. Grab the blue squares on either end and this will adjust the outcome of this edit point.

Selected point moved copy

To select multiple edit points, hold down the Shift key & drag the selection box around all the points you would like to select. Then make changes to a group of edit points all at one time by moving or choosing a new property for those selected.

Select multiples copy

All edit points that are selected will show as white points.

Point Editing Panel

When the editing points are active, the Point Editing Panel should pop up or click on the Edit Points tool on the left side menu.

Point Edit Tool copy

This panel has many options for how you can alter an edit point(s). The name of each tells you exactly what behavior it will have.
Each design you work with will react differently to what is changed.

Edit Points Panel copy

Remember, edit points are the data points that your Silhouette software relays to your Silhouette machine to connect the cut.

The Cameo machine needs to hit every single one of those edit points in order to make the cut. Some files such as dxf files or traced images can have lots of edit points and this can make the Cameo sound odd when cutting. The Cameo is not broken, but has to connect each of those edit points to make the cut.

Simplifying Edit Points

Some files can have the edit points simplified without changing the look of the design.
For instance, this Leafy Mandala by Rhonna Farrer from the Silhouette Design Store has a lot of edit points when I first opened it.

Leafy Mandal edit points original copy

In the Edit Points Panel, select Simplify.

Simplify copy

You should notice less edit points in the design.

Leafy Mandal edit points simplified copy

In this case, the design did not change in the look at all, but the edit points are now much less.

Leafy Mandal comparison copy

The best way to learn how edit points act is to find a design and just play around with the different options.

While they can look intimidating when they pop up on the screen, once you understand their purpose and how they work, I think it makes it seems a lot less daunting when you see them.

Designs used in this post are from the Silhouette Design Store:
#MoreCoffee by Kolette Hall – Design #179647
Leafy Mandala by Rhonna Farrer – Design #215137

Feel free to post your comments and questions below or on my Facebook group at Silhouette Secrets with EllyMae.

Save this post for future reference by pinning the image below.

Enjoy !

THANK YOU for your support! How can you help? Click HERE & buy a coffee.
Every little bit helps with the cost of running the site.

Silhouette Classes

Never stop learning! Let me help you take the anxiety out of learning with Silhouette and get to creating faster! My Silhouette classes are heavily focused on software, so you can take the skills & techniques taught and apply them to many future projects!

Silhouette step-by-step Classes by Silhouette Secrets+

Silhouette Secrets+ with EllyMae
**This post may contain affiliate links. What that means is that I may receive compensation if you purchase through the links I have provided. The price you pay for the product or service is not higher but I may get compensated for sharing.