The Silhouette Cameo Pro MK II was announced for future release at the 2024 Silhouette Summit. I attended the Silhouette Summit and asked a lot of questions regarding this new machine model. In this blog post, I’ll be sharing details that we learned at Summit. We were able to see this new model in action on both the demo floor and also a close up look where we could ask specific questions in a classroom setting.
This blog post is part of series of my account at Silhouette Summit 2024 because it’s a lot of information on new products and information. Find more details on Silhouette Summit 2024 – Part 1 – cloChé Heat Press announcement HERE. And I’ll add additional links as I publish information too!
Affiliate links may be present in the following blog post and as an Amazon Associate, I earn from qualifying purchases.
The Silhouette Cameo Pro MK II is now available at Silhouette America HERE or at CrafterCuts HERE. *updated 12/12/24 Silhouette Stand released 3/26/25 – available HERE
Silhouette Cameo PRO MK II
Please note that the following information & photos are all directly from the Silhouette Summit 2024 and at the time of writing this the Cameo Pro MK II is not yet available for purchase. I will be updating the post when we receive more information.
First, this is NOT a Cameo 5 model. It is called a Cameo PRO MK II, which is a little bit to get used to saying as you’ll see me mention in the videos linked above.
Why is it not just called a Silhouette Cameo 5?
It is different and why it could not simply be called a 5. It is the Cameo Pro 4 body with all of the guts of the Cameo 5 model installed.
The Silhouette Cameo PRO MK II has:
Updated chassis system for improved carriage stability and new belt drive minimizes deviation and vibration
New design of the roller bar and rollers, which include the ability to move the right roller to more locations to be locked in securely
5 auxiliary rollers that are removable for additional support when cutting different widths of materials
Dual cross cut option – the user can choose to use the Auto cross cut or the rear cross cut option (more on the auto cross cut feature HERE)
Repeat Job now available – when a repeat job is enabled, the load button flashes. Press and hold the button for more than 3 seconds and it will repeat the last job sent.
Powered Carriage 2 tool housing for use with powered Silhouette accessories
NEW!!! 4 point registration mark for print and cut. There will now be registration marks on all 4 corners of a print and cut jobs. **This will be an addition to the Silhouette software in a future release.
Basically, the Silhouette Cameo 5 guts installed in the Cameo 4 Pro body. Some of the updates from the Cameo 5 12″ and 15″ Plus are now in the Cameo Pro MK II.
The Silhouette Cameo PRO MK II is NOT compatible with the Silhouette Electrostatic Bed accessory. It does not have the powered connection on the front of the machine to connect to an electrostatic bed.
So bottom line is, it is a Cameo 4 Pro body with the improved guts of the Silhouette Cameo 5 models installed inside.
We did see the Silhouette Cameo PRO MK II in action both in the Summit demo room and in smaller classroom settings where we were able to ask questions and get a closer look.
Here is a look at the machine in action cutting a large decal. There were 3 class session times and they demonstrated it for all who attended those sessions. In the above photo you can also see the demos from the previous sessions behind the machine against the wall.
In the classroom session, there were 4 Cameo PRO MK II machines all set up and providing a close up look at the machine. These are smaller breakout sessions where it was much easier to ask questions, touch and feel, and really see if it was doing what they said it was.
I did check the cut after it was completed and it was successfully cut and was able to be weeded. They did offer to let me keep one of the decals, but I had no easy way to get it home successfully on the airplane.
Now, let’s take a closer look at some of the specifics mentioned above.
Silhouette Cameo PRO MK II – Auxiliary Rollers
The Cameo PRO MK II now has 5 auxiliary rollers to help in keeping materials as flat as possible while it’s being cut. Each auxiliary roller can be moved left to right along the roller bar. For best results, space the auxiliar rollers out evenly across the width of a material.
The auxiliary rollers on the Cameo PRO MK II are removable. This is the only machine model that the rollers are removable. If the auxiliary roller is removed, make sure to keep it in a safe place so you can find it again. Or move it to the right side of the machine and install on the roller bar (I show this tip in the video HERE)
When cutting wider widths of materials, the material needs to be held securely and as flat as possible while it’s cut. Any bunching or bowing of materials between the left and right rollers can cause cut issues.
The auxiliary rollers of the Silhouette Cameo PRO MK II can be used on the Silhouette Cameo 5 models (12″ and Plus 15″) that have the redesigned roller bar. Note: the auxiliary rollers are NOT removable on the Silhouette Cameo 5 model machines.
NEW!!! 4 Point Registration Mark for Print and Cut
There will now be a 4th registration mark added to print and cut projects. This is designed for more accurate reading and to reduce the off-cuts in the bottom right corner.
Unfortunately, we did not get any really good photos of the examples shown on screen of this new feature and I only have the image from the media kit provided to me from Silhouette. It was not something that was demonstrated for us at Summit.
It will be something that is implemented into the Silhouette Studio software in a future release.
Silhouette Cameo PRO MK II Wrap Up
I am one of the original testers for the Silhouette Cameo 4 Pro model and have a lot of information out there on proper setup and usage (more details HERE). Most of the same information, tips, and recommendations will still apply to the Silhouette Cameo Pro MK II model.
I know there has been lots of users frustrated with the Cameo 4 Pro and the exact setup that it requires to function properly. I do feel the improvements to the Cameo Pro MK II will solve some of those user frustrations, however, it will still be very, very important to have the proper setup and space for a machine of this size to function properly. For all models of cutting machines, proper setup is important!
I did see many demonstrations of the Silhouette Cameo Pro MK II in action performing different functions and completing projects, but will not have real life experience with the machine until it is available for consumers. At the time of this publication we do not have a release date, but I will update with more information as I get it.
Save this for future reference by pinning the image below.
Enjoy !
THANK YOU for your support! How can you help? Click HERE & buy a coffee. Every little bit helps with the cost of running the site.
Silhouette Classes
Never stop learning! Let me help you take the anxiety out of learning with Silhouette and get to creating faster! My Silhouette classes are heavily focused on software, so you can take the skills & techniques taught and apply them to many future projects!
**This post may contain affiliate links. What that means is that I may receive compensation if you purchase through the links I have provided. The price you pay for the product or service is not higher but I may get compensated for sharing.
I’ve wanted to write a faux leather tutorial with tips for Silhouette for a long time, but other things seemed to jump in front of it on my to-do list. So when Amy announced her Faux Leather event, I made it a goal to really dive in and create with some faux leather.
Affiliate links may be present in the following blog post and as an Amazon Associate, I earn from qualifying purchases.
Amy Romeu, hailed as the Queen of Faux Leather by many, recently hosted an event that I attended. I had a great time crafting along with her videos and picked up a lot of great tips that can help in being successful in cutting faux leather with any cutting machine.
Before we get too far in, let’s cover a few things about faux leather that will help in the process.
Faux Leather Information
Can Silhouette machines cut faux leather? Yes! Can Silhouette machines cut ALL faux leather? NO! Can all cutting machines cut ALL faux leather? NO!
Faux leather is such a broad term, just like “genuine” leather is. Cutting some faux leathers is easy, some pose greater difficulty, and others simply do not cut well at all.
Factors influencing whether a Silhouette or another machine can cut faux leather include:
Color – Yes! Many users don’t know this, but color affects how materials cut. Different colors go through different processes in the production and that can affect how it cuts. Some can be tougher than others due to coloring.
Backing – Faux leathers can have a variety of backing on it. Some don’t have any and are soft and pliable. While others can have a mesh, woven backing which can be difficult to cut through.
Texture – Faux leathers can come in all kinds of textures such as embossed, glitter, sequins, etc. This will affect how it cuts. Just think of a blade trying to bounce over a texture material to cut a clean line. Texture affects it! The texture also influences the ease of cutting by hand. The same is true for a cutting machine.
Thickness – There is a wide array of thicknesses for faux leather. Super thin ones can be too pliable and just smoosh around on the cutting mat. Thicker ones may need multiple passes to cut through and a longer blade such as the Deep Cut blade.
Composition – Faux leather is such a broad term. The definition of “faux” is artificial or fake. So keep in mind that faux leather is fake leather. What it is made of? A wide variety of things. Plastic mostly. For instance, I ordered some leather on Amazon and it is PU Leather. It is by definition, artificial leather, crafted from a thermoplastic polymer commonly employed in the production of furniture or shoes. Faux leather = fake leather = plastic
Silhouette 2 mm Manual Blade (this is what I used – more info below), Premium blade or Deep Cut blade, Silhouette Autoblade, 1 mm Manual blade, Silhouette blade available at CrafterCuts (code SECRETS for 10% off) or Silhouette America (code 10OFF for 10% off)
So the first place to start is to gather your supplies for whatever you are working on. I was so excited for these projects and I knew I would be creating several, so I pulled out all my faux leathers and my scrap HTV. I have several boxes of scrap HTV and it’s a great way to use it by adding it to faux leather projects.
Keep it a secret, but I actually obtained more faux leather than shown because I needed to test several during these projects. And once I went down that rabbit hole, I found many patterns I wanted to collect.
Cut the faux leather down to size and give yourself some extra space for taping down the edges to the cutting mat.
Place the faux leather front facing down on the cutting mat, so you are cutting through the backside first. **NOTE: if cutting real leather, DO NOT place it face down or you can ruin the finish on the real leather. That can be a very expensive mistake!
Utilize a reliable sticky cutting mat to secure the materials in place during the cutting process. Using a brayer to smooth the materials down to secure it. If the materials shift during the cut, the cut may fail, or your blade might become stuck.
Securely tape down the material edges. I found that using longer pieces of tape not only ensured a better hold but also reduced the risk of it getting caught in the machine during cutting. You can also reuse painter’s tape if removed carefully at the end.
For best results, keep the painters tape away from the edges of the cutting mat so it is not going under the rollers. Any change in the surface area under the rollers and it can cause it to lose grip or the left and right roller to not move at the same rate, which can cause issues.
When using a Silhouette cutting mat, you can use the grid for exact placement for lining up your materials and your design. If you load the mat properly, the on-screen design will align with the Silhouette cutting mat. Third party cutting mats may not line up and it will be a guessing game for design placement and alignment.
Give yourself a good allowance and grace because you may still mess up, just like I did in the photo above. I would recommend that you cut a little bit excess of the faux leather and not try to cut through the painters tape as it can affect the cut results. The cut was ok in this instance, but it went off my faux leather, so I ended up cutting another truck piece.
For tips on lining things up check out this tutorial HERE. I use this method all the time and still make mistakes. Remember to “measure twice, cut once.” But, I find I make the most mistakes if I’m rushing or I tell myself it will be just a quick project.
Test cut, test cut, test cut!!!
I used a 2 mm Manual blade for all of my faux leather cuts. This blade is the equivalent of the older style Premium blade, it’s just redesigned to fit directly into the newer model machines housing without needing an adapter. The 2 mm Manual blade (or Deep Cut blade) allows you to go from 1-20 in the blade depth settings. All faux leather will vary and some can be cut with a regular blade that is 1-10 settings, while others may need a higher blade depth than 10. Test cuts are the way you will know.
Do not unload the mat after you cut!!! Check to see how well it cut. Having a thread or two is not a bad thing! Grab a sharp pair of scissors and simply snip it.
If it does not lift easily or has more than just a few threads hanging on, send the cut again. If you have not unloaded the cutting mat, it should cut again in the exact same place. If you unload the cutting mat, it will be a hope and a prayer trying to get it lined up perfectly again to cut in the same place.
Some faux leathers may take more than 1 pass and this is why test cutting is such an important step. I write down the settings that worked for each of the materials I test and keep a log so I can refer back to it. It is not a bad thing to use more than 1 pass with certain projects. I find with thicker materials, you can get a cleaner cut when you are not trying to force the machine to do it all at once time. However, for thinner materials such as adhesive vinyl or regular cardstock, multiple passes shouldn’t be necessary if the blade is installed properly.
This is white faux leather from Craft Chameleon. I used the 2 mm Manual blade (equivalent of the Deep Cut blade) . Blade depth – 9 Force – 30 Passes – 2
For more details on what blade depth and force are, check out this in-depth tutorial on the Silhouette Send tab HERE.
Once the cut is successful, unload the mat, remove the painter’s tape – it can be reused and carefully peel away the excess. Snip any threads as you carefully remove the excess so you do not stretch the design.
When cutting, check the blade regularly for debris stuck to it or inside the cap. The fibers of the faux leather can hinder the cut results.
It is perfectly normal to have to increase the settings of the blade as you cut materials. A blade cutting any material is going to dull with usage. Keep in mind that you are cutting through plastic and fibers. That will cause a blade to wear differently than other materials.
For this design I used the Red Truck Ornament file from Amy Romeu and there is a front and back layer cut from faux leather that will be glued together. The rest of the design is cut from HTV, so I swapped out my blade for my HTV blade and set up my cutting mat to cut different colors of scraps at the same time.
I used the Cut by Fill Color so I could set up different cut settings for my Smooth HTV versus my Glitter HTV. The Autoblade did all the work to change the settings once set up. Check out this tutorial HERE for tips on cutting by line or fill color – they are the same.
And then I set up my cutting mat to match exactly what I had set up on the Silhouette software. Check out tips on cutting multiple colors at the same time HERE.
Then I simply weeded the design and pressed the pieces on according to Amy’s instructions. I also cut this design out of cardstock and adhesive vinyl too! The faux leather ornament is on the left and the cardstock ornament is on the right.
Check out Amy Romeu’s YouTube video HERE for instructions on the assembly. Even though she is using a Cricut machine to cut, the process and tips are useful.
I was having so much fun cutting faux leather that I couldn’t stop and wanted to test more!
I followed the same tips as above and taped it securely to my cutting mat.
If you compare this photo to the first one, you’ll notice that the backing differs on the white versus this silver embossed piece. That can affect the cut settings and results. The woven backing texture can be a bit more difficult to cut and may require higher settings and more passes to cut cleanly.
I used the 2 mm Manual blade (equivalent of the Deep Cut blade). Blade depth – 9 Force – 30 Passes – 2-3 however, that was still not a clean cut, so I then increased the Blade depth to 11 and did 2 more passes.
In this case, the Embossed texture on the front is uneven and can affect the cut.
I did not have all the supplies to finish this out as Amy did, so I used what I had on hand and made my own holly berries and leaves. The holly leaves are drawn from scratch in Silhouette Studio. If you want to learn how, I show step-by-step in the Designing in Silhouette Studio – Creating Keepsake Ornaments class HERE. I cut the leaves from cardstock, painted some small craft balls, and then glued it all onto the ornament.
In both the designs shown above, the faux leather was cut for the front and the backside and then glued together so it had a finished look. But for this next project, I used Siser Metal HTV and adhered it to the backside of the white faux leather from Craft Chameleon before cutting.
I pressed it once with the carrier sheet on and then a second time without the carrier sheet for just a few seconds. The second press allows the texture of the faux leather to show through and it is gorgeous! Photos do not do it justice.
But keep in mind, anytime you add something to a material, that can change the cut settings.
I used the 2 mm Manual blade (equivalent to the Premium blade). Blade depth – 10 Force – 30 Passes – 1 And I probably could have done one more pass.
Now, what you’ll notice is that all of the pieces are still attached. However, they easily popped out and I only had a few threads to snip. This actually worked better for the next steps as I could keep it all organized in one place until I was ready to press.
I loved the finished look of the Siser Metal HTV on the backside! And I used up a few scraps of Glitter HTV, not much, but it is the perfect project for those scraps that you might have.
I had so much fun creating along with this event and now have faux leather for many more projects.
I hope those tips help you to be successful with cutting faux leather with your Silhouette machine.
You can still purchase the VIP package for the Faux-La-La Crafting Fun and join in on the fun. You get the files for all the projects, all the videos in one place, a printable guide, and more! Check it out HERE for all the details.
Save this for future reference by pinning the image below.
Enjoy !
THANK YOU for your support! How can you help? Click HERE & buy a coffee. Every little bit helps with the cost of running the site.
Silhouette Classes
Never stop learning! Let me help you take the anxiety out of learning with Silhouette and get to creating faster! My Silhouette classes are heavily focused on software, so you can take the skills & techniques taught and apply them to many future projects!
**This post may contain affiliate links. What that means is that I may receive compensation if you purchase through the links I have provided. The price you pay for the product or service is not higher but I may get compensated for sharing.
Have questions on the Silhouette software upgrades? Find out what my favorite, most used features are in each upgrade HERE.
Reconditioned Silhouette Machines
Did you know they have Reconditioned machines as well? Here is what “reconditioned” means. This is a tested, confirmed working, Cameo 4, with a new Autoblade and Cutting Mat. This machine is not returnable. Packaging may be damaged and minor scratches may exist on the machine.
It may be an option that you might look into if you are looking for a new machine at a lower price. After chatting with CrafterCuts, these are typically machines that they have had returned by customers (most times through an Amazon return) because they didn’t take the time to learn how to use the machine or follow instructions. It happens more than you can even imagine!!! Sometimes as quickly as overnight. We all know you cannot learn how to use a Silhouette machine overnight – lol. If only they would have found my website or Teachable classes first 😉
I also shared my new favorite tools a few months back from CrafterCuts too! Check that out HERE.
Now, you may be asking, who is CrafterCuts? Great question! CrafterCuts is a sponsor of the Silhouette Secrets+ step-by-step classes on my Teachable site HERE. They are an authorized reseller for Silhouette America and who I was referred to through my contacts at Silhouette America. When I started looking into them, I found I had ordered from them through Amazon years ago. They have been around a long time, but many users just have not heard about them. With their sponsorship, I have been able to continue providing classes through my Teachable site for users. A great big THANK YOU to them and watch for more classes coming!!! I’ll have more details to share soon!
————————-
I work with many great retailers and I order different things from them all! Check out the Recommended Retailers list at the top of the website or click HERE if you are looking for other supplies too!
And THANK YOU! Using links I share supports Silhouette Secrets+ and helps me to bring you more tutorials, classes, testing, and information! The cost of the products is not more for you and I may get credit for the referral as an affiliate. Sometimes the cost could even be less with special coupons I may be able to get through those retailers. So don’t forget to use your coupon code SECRETS at CrafterCuts to save even more!
Enjoy !
THANK YOU for your support! How can you help? Click HERE & buy a coffee. Every little bit helps with the cost of running the site.
Looking for more in-depth, step-by-step classes, check out all of my online Silhouette classes on my Teachable site HERE.
**This post may contain affiliate links. What that means is that I may receive compensation if you purchase through the links I have provided. The price you pay for the product or service is not higher but I may get compensated for sharing.
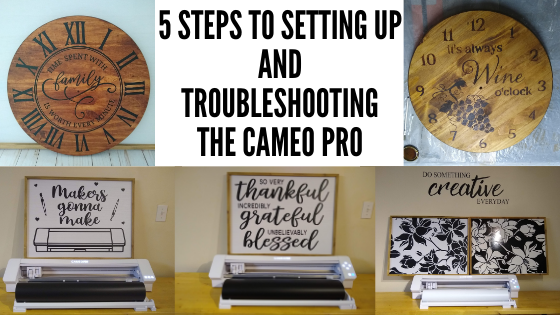
The CAMEO Pro was released almost 2 years ago. I am one of the original testers of the CAMEO Pro before it was released and have hundreds of cut hours into this machine. Since the release of the CAMEO Pro, we have troubleshot thousands of user’s cut issues.
Today I am releasing 2 new series for troubleshooting the CAMEO Pro.
The first series is a 5 part series that is on my Silhouette Secrets+ YouTube channel and it’s meant to be a quick view of the top 5 issues we have seen for cutting issues with the CAMEO Pro.
The second series is an in-depth look at the CAMEO Pro on my Teachable site.
Become a PRO at Troubleshooting Your CAMEO Pro
I want you to be the most successful you can be using your CAMEO Pro!
There are a lot of variable that can be the source of a cutting issue on the CAMEO Pro or any model Silhouette machine. If you do not find the exact issue that is causing the cut issue, you will most likely continue to experience inconsistent cuts until that is found.
Join me as we take an in-depth look at the CAMEO Pro!
This course is an in-depth look at the CAMEO Pro! I held nothing back. I’ll be honest, some of you won’t make it through. Some of you will give up! But those of you who make it completely through the YouTube series and this Teachable course WILL be Pros at your Silhouette CAMEO Pro AND You will be able to troubleshoot 99% of the issues you have with this machine!
I want you to be successful with your CAMEO Pro!
I would highly recommend that you watch both all the way through, especially if you are a new user or if you are having cutting issues!
You can be a PRO at troubleshooting on the Cameo Pro and save yourself time & frustration!
Most times in our troubleshooting we find that it is just a few small things that need to be adjusted for a user to correct a cut or feed issues.
I would love to see what you are creating with your Silhouette software or machines! Feel free to post on my Facebook group at Silhouette Secrets with EllyMae.
Save this for future reference by pinning the image below.
Enjoy !
THANK YOU for your support! How can you help? Click HERE & buy a coffee. Every little bit helps with the cost of running the site.
Or if you are looking for more in-depth, step-by-step classes, check out all of my online Silhouette classes on my Teachable site HERE.
**This post may contain affiliate links. What that means is that I may receive compensation if you purchase through the links I have provided. The price you pay for the product or service is not higher but I may get compensated for sharing.
This week I cut the pieces to make up 40 card kits for an event I’m teaching at. I set the video camera up to record a time lapse of the entire cutting process.
This was 3 hours of real time cutting. 23 – 12″ x 12″ sheets of cardstock cut on a 24″ x 24″ cutting mat with the Cameo Pro 40 card bases 80 daisy pieces 320 flower center pieces 80 leaves
I have added the video to my YouTube channel HERE. It is condensed down to 7 minutes for the 3 hours in real time it took.
I’m sharing more tips below too!
Tips for cutting 4 sheets of cardstock on the Cameo Pro at one time.
Guides
Use Guides in the Silhouette Studio software placed at the 12″ marks to show where your pages will meet. Keep the design away from the edges of the cardstock.
One of the biggest issues I see when troubleshooting issues on the Cameo Pro is not having an adequate workspace setup for it to function properly.
This machine is big and it needs a large workspace to function and feed properly. It cannot work against gravity or the cuts will not line up consistently.
If you are using the 24″ cutting mat, it should have a workspace of 38″- 40″ in width for the machine to be securely and stable on and 52″ of length that is absolutely flat. This allows for 22″ in front and 22″ behind the machine for it to feed the cutting mat as flat as possible in and out of the machine as it cuts.
Make sure the right roller is locked in position properly
The right roller should be rolling on the edge of the cutting mat and not across the adhesive on the cutting mat. The middle indent of the right roller should be lined up with the gray arrow on the machine at the 24″ mat mark.
The right roller can only be locked in place where the gray arrows point to on the machine roller bar. For the 24″ cutting mat, that is the far right gray arrow.
If you look at your machine closely, you will see that the right roller is directly under the indent on the white pinch bar. That is the only place that the roller makes contact with the surface underneath, so placement is very important for feeding properly.
If the right roller is not placed properly you may experience future cut issues which can include: – gumming up the roller and there is no easy way to clean this roller on the Pro – wearing a groove in the cutting mat which causes an uneven surface for cutting – mat can get stuck inside the machine – feed issues as the rollers do not roll at the same rate of speed because the right roller is either getting stuck or the roller is slipping on the material – affect print and cut accuracy if the rollers are rolling at different rates – cuts not connecting – mat can skew Note: the rollers rolling at different rates is not something you can usually see with the naked eye, even when studied closely. However, you can see it when the cuts do not connect completely.
Cutting Mat is loaded properly
The Cameo Pro is different than other machine models. It has 2 load lines. The line on the left side of the arrows is ONLY for the 24″ cutting mat.
The line on the right side of the arrows is for ALL other sizes of materials and cutting mats.
If the cutting mat is not loaded properly it can cause feed issues or it to skew in the machine as it’s cutting.
Above I shared a photo of the right roller, but where is the left one exactly? If you look closely at the left roller, it is directly below the dot on the roller bar. This is where the roller grips the mat or material.
The 24″ x 24″ mat is a monster of a cutting mat and it has heft to it. The load line and the right roller placement is very specifically designed to gripe each side of the mat so it can feed it in properly.
If the mat catches on something or does not load completely straight, unload it and load it again – as many times as needed. If it does not start off straight, it’s not going to cut in the properly locations and the cuts may be off. On my 1st set of daisies being cut, I did not notice that the mat was slightly off and it did affect a few of the flowers getting cut off a bit. It happens – plan for it! If in doubt, always reload the cutting mat.
Use the Autoload feature whenever possible
This will help to ensure that you are able to support the mat and hold it up to the rollers as even as possible. The monster mat can be difficult to get the hang of, but keep on practicing and you will get it. It is much easier to load if you have the proper clearance in front of the machine to help keep the mat flat and not hanging down over the edge.
Any debris on the cutting mat can interfere with the cut being clean as it creates an uneven cutting surface. Clean off any previous bits of debris left behind by the materials.
In the video I shared above, when I load the 2nd set of white cardstock, you can see me smoothing it down to secure it to the mat. When I did, I noticed uneven areas under the cardstock and I lifted it to clean it and placed it back down. Any debris can affect your cuts.
Weed carefully.
Sure you see videos of people all the time that seem to just rip off the excess of the material whether it’s for cardstock or vinyl. But, it is not always the case.
Go slow when weeding and you will find you can save your design most times. My Autoblade is very well used and it’s still cutting well, but the design I was using had interior corners and cuts. It cut, but by carefully removing the excess cardstock, I didn’t rip off any petals from the flowers or pieces of the centers.
I hope these tips have helped to show you a few things about the Cameo Pro! For more tips and troubleshooting on the Cameo Pro – check out the header on the blog HERE.
I would love to see what you are creating with your Silhouette software or machines! Feel free to post on my Facebook group at Silhouette Secrets with EllyMae.
Save this for future reference by pinning the image below.
Enjoy !
THANK YOU for your support! How can you help? Click HERE & buy a coffee. Every little bit helps with the cost of running the site.
**This post may contain affiliate links. What that means is that I may receive compensation if you purchase through the links I have provided. The price you pay for the product or service is not higher but I may get compensated for sharing.
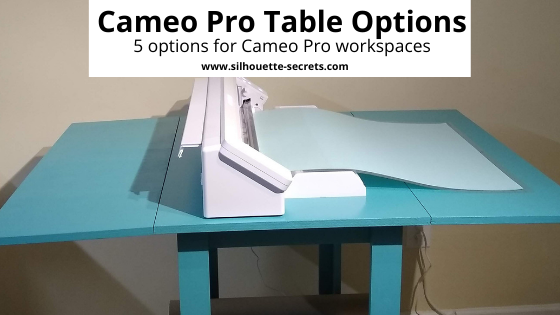
The Cameo Pro is Silhouette’s 24 inch wide cutting machine that was released in November 2020. It is a big machine!
In order to have the ability to cut 24″ wide, it has to have a wide footprint.
One of the biggest things we see with cut issues on the Cameo Pro is not having it fully supported in order to cut properly.
Since it is a big machine, it HAS to have a big workspace. It is NOT a machine that can work against gravity.
If you are using a 24″ cutting mat or cutting long lengths of vinyl with the machine I recommend your table surface be at least 40″ wide by 52″ long. The machine CANNOT work against gravity, so the mat or materials have to be fully support in the FRONT and the BACK of the machine or you can experience cut issues.
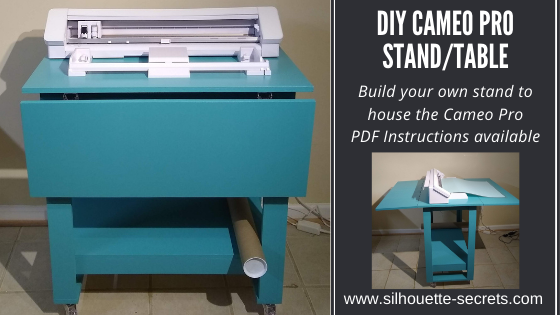
When I received my Cameo Pro to test it for Silhouette, my husband immediately thought that we should build a custom stand/table for it and set to work on planning it. (It may have been motivated by the fact that I took over his gaming table.) We completed the DIY Cameo Pro Stand and have shared those instructions for free HERE.
However, we also understand that not everyone has the ability to get the wood or pieces cut and assemble themselves, so I am also going to provide a few suggestions of work surfaces that could be alternatives for you.
Cameo Pro Workspace
Let me start by explaining what is needed and why I recommend this.
Keep in mind that any workspace for the Cameo Pro should be at least 40″ wide and I recommend 58″ long.
Why do I recommend this?
The Pro machine itself is 34.5″ wide, so you could probably get away with 36″, but the extra little bit means it’s more secure. I recommend 40″ wide for stability. I have seen many, many photos where a user does not have it fully on a table and each end is hanging off. This is not fully supported and the Cameo Pro is too big of an investment to risk something happening to it. If the Pro is not fully supported, it can cause cut or feed issues.
For best cut results, the Pro should be used with the roll feeder/mat support set up at all times.
Why?
These roll feeder/mat support parts provide support for the cutting mat or vinyl to roll as flat as possible into the machine. If materials are hanging down in front (or behind) it can affect how the machine feeds, which will affect the cuts.
And the roll feeder/mat support NEEDS to be fully flat on a table. It should NOT be hanging off the table as it can cause stress on the points where the roll feeder/mat support attaches to the machine and can decrease the lifespan on the parts. The roll feeder parts are not replaceable parts.
With the Cameo Pro set up properly with the roll feeder/mat support and stability bar installed, it is 14″ from front to back. So you will need a workspace that is one solid piece and I would suggest at least 15-17″ front to back. We built our stand 22″ front to back so it is stable and set up full time in that stable position.
Now, if you are planning to use the 24″ cutting mat or long lengths of vinyl, I recommend that you have at least 22″ of flat surface in front and behind the machine. This means that a flat, secure workspace of 58″ is necessary for the machine to function properly with a 24″ x 24″ cutting mat. If the cutting mat is not fully supported, you can experience feed issues as the rollers cannot work against gravity to pull the weight of the mat into the machine.
If you are experiencing feed issues or cuts overlapping and you do not have this large workspace, I suggest placing it on the floor to cut with and see if that solves it. If not, then there may be other factors at play and I would suggest taking a close look at this post 5 Steps to Setting Up & Troubleshooting the Cameo Pro
If the Pro is not set up properly, it will not cut properly and consistently. These are the 2 biggest things we see when troubleshooting issues: – workspace too small – machine not set up properly
Affiliate links may be present in the following blog post and as an Amazon Associate I earn from qualifying purchases.
Cameo Pro Table Options
Make sure first off that you have the space to be able to expand the table as needed for the full workspace necessary.
Option 1 – Large table
Any large table such as a kitchen table or a large piece of plywood securely on top of a table would work as long as it is 36″- 40″ wide x 58″ long.
This is actually what I started with when I was testing the Pro. Well, to be honest, I first had it on my video table that you can see in this unboxing video. https://youtu.be/Qb6CsliXSlA And I quickly found that it was not sufficient enough to use the 24″ cutting mat or long lengths of vinyl.
All of my recommendations are based on my real-time mis-cuts and feed issues during testing and my own cutting, due to the machine not being able to pull it in against gravity.
This plywood tabletop worked well for me during the hundreds of testing hours I performed from September – November 2020 before the machine was released to the public. It is not a smooth surface, so I did have to be careful not to get splinters. However, while not fancy, it got the job done.
This table would work with the dimensions of 58.75″ W x 36″ D x 30.25″-39.25″ tall with the Cameo Pro machine fully supported in the center panel. In order to have the roll feeder/mat support installed, one side would need to be extended at all times.
The wheels are smaller, so be careful if you have any uneven surfaces such as tile floors or plan to move this around often.
It also has a couple baskets and shelf that could be used for storage.
The table dimensions are 36″ L x 59″ W x 35″ H (open) and 36″ L x 13″ W x 35″ H (closed).
It is very similar to Option 2 and would need to have one side extended to have the setup correct. It also has smaller wheels as well. Only something to note to be careful with from someone who has broken wheels off furniture moving it around my tile floors.
This table measures 59″ L x 35.8 W x 29″-39″ H (open) or 17.5″ L x 35.8 W (closed). According to the description dimensions, the top is just barely large enough to have the Pro with the roll feeder/mat support setup without a side extended. The Pro width is 34.5″ wide, so while I say I recommend 36″-40″, I think this would be stable enough.
This table also has 2 shelves below that could be used for storage. The wheel size looks the same as previous options.
Option 5 – Drop leaf table
You can find these in used furniture shops, but they are also making a comeback. It is the idea we used for the design of our DIY Cameo Pro stand.
I have seen recommendations on one from Ikea, but in my search, the ones I found we not quite wide enough. Again, my recommendations is 36″-40″ wide so the Cameo Pro can sit securely without hanging over the edge of the table.
—–
Now, are these the only options? No.
But, they are a few that might work for you or at least give you some idea of what you are looking for.
If I were to choose between the options above, I would choose either Option 4 or Option 5. But, it really just depends on what will work best for you. For me, I will probably be using our DIY stand forever, but one of these other tables may find their way into my craft studio in the near future for another workspace.
The biggest thing that I want to emphasize is that you need an adequate workspace to have the Cameo Pro function properly. If the machine is not set up properly and on a large work space, it is NOT the machine’s fault if it’s not working right. It HAS to be set up properly to cut properly.
We troubleshoot a lot of Silhouette issues each week. Hundreds into the thousands and in most cases we can get the user up and cutting again, no matter their Silhouette machine model, IF they are willing to troubleshoot with us.
If you have hung in there and are still reading, I hope you have gathered some tips and things to think about.
Save this for future reference by pinning the image below.
Enjoy!
THANK YOU for your support! How can you help? Click HERE & buy a coffee. Every little bit helps with the cost of running the site.
Or if you are looking for more in-depth, step-by-step classes, check out all of my online Silhouette classes on my Teachable site HERE.
**This post may contain affiliate links. What that means is that I may receive compensation if you purchase through the links I have provided. The price you pay for the product or service is not higher but I may get compensated for sharing.
All of the Silhouette machines can do print and cut projects. This is where you can set up a graphic image to be printed through the printer connected to your computer and then have the Silhouette cut around that shape. It uses a process called registration marks to find where the design is on the page.
This tutorial is written in v4.4.476 of the Silhouette Studio software.
No matter if you are an experienced user or brand new to the Cameo Pro, I would suggest starting with all the basics, using all the defaults, and doing a test print and cut project to see how the new Cameo Pro is going to work. This will save you hours of frustration and materials.
What I find most often when I am troubleshooting with a user is that they have been setting things up so far away from the defaults for so long and have been lucky that it’s worked on the older model machines. However, with a new machine, I would highly recommend starting at all the defaults and basics and then once you have a successful cut, then start playing with things and seeing how far you can adjust them.
I use the basic setup and default setting for all my print and cut projects and rarely ever have an issue with a mis-read or mis-cut.
Affiliate links may be present in the following blog post and as an Amazon Associate I earn from qualifying purchases.
Note: this post contains both photos and videos
Let’s take a look at the different options for the Cameo Pro.
Print and Cut with the 24″ mat
The Cameo Pro comes with a monster of a cutting mat. This is great news for bigger projects! Since this is the mat that comes with the machine, we will start there, but I would highly recommend that you get a smaller cutting mat to use if your print and cut project will fit on it. It is much easier to use the smaller mat for these smaller projects than the 24″ mat.
Print and Cut Setup for 24″ mat – letter size media
On the Page Setup Panel choose #1 – Machine = Cameo Pro #2 – Mat = 24″ #3 – Media Size = Letter (whatever page size you are printing on)
Notice how the software places the media size in the top left corner, but with a 24″ mat it is a very specific location. This will be important when we place the material on the cutting mat.
On the Page Setup Panel, check the box next to Show Print border and Show Cut border. Print border = gray line Cut border = red line
On the Page Setup Panel, click on the 3rd tab for the Registration Marks. Click the circle next to On. Then click on the Restore Defaults button.
When the registration marks are turned On, you will see 3 marks appear on the media size. This is how the Silhouette machine “reads” where the design is placed on the page. Click on the Restore Defaults button. This is going to be where the Silhouette machine gives the most accurate read and cut.
Since the Show Print border is on, the gray border will show what the printer margins are with the current printer that is connected to the computer for the media size set under the printer setup. The biggest thing you want to look for here is that the bottom left registration mark is not outside of this Print border (gray line). If it is, you will need to click on the Advanced Options on the Registration Marks Panel and bump up the bottom registration mark until it will print completely. All 3 of the Registration Marks have to be on the printed page in order for it to read accurately. I only suggest this if the mark is showing outside of the print border.
If this is the first time doing a print and cut or the first time doing this process on the new Cameo Pro, I would suggest doing a test print on cardstock first. All this means is to pick a print and cut design, place it on the design mat within the boundaries, and then print on cardstock as a test. This will save you from using more expensive materials and having something go wrong.
With a print and cut project, you want to make sure to keep the design out of the cross-hatched areas on the page and within the red cut border. The cross-hatched areas do not print on your final page, however, this is the clearance that the optical eye under the blade housing of the Cameo needs in order to read the registration mark accurately. If there is a design in the cross-hatched area or dark colors near the area, it can interfere with the reading of the marks and either give a registration error or an inaccurate cut.
In some cases, the optical eye does not like any design between the 2 cross-hatched areas at the top of the page. It can interfere with reading accurately.
Once the page is all setup and ready to print. Click on File > Print in the top left corner.
In the v4.4 software, a “print preview” will pop up (unless you’ve turned it off). You can review this for any things that look out of place and to get to the printer preferences will click Print in the bottom right corner.
Now, the printer window will come up. This may look a bit different for each user because of the different printers being used. Choose the printer the job will be sent to.
Then I choose Preferences on my printer panel. Under this selection I can change my page size, media type, and have the option for an additional print preview. I highly suggest this as it has saved my butt a few times and I’ve caught things before wasting ink and paper.
Click Ok. And then click Print.
Note: If you changed the page size that will be printed on, click on the Apply button and then cancel. Then choose cancel again on the Print Preview and start over at File > Print. This will ensure that the printer margins are showing accurately on the page size you changed to.
Since I enabled the additional Print Preview, I get a new Preview window that pops up where I can verify that it all looks correct and that all 3 registration marks will print completely on the page. This may seem like an extra step, but it has saved me more times than I can count.
Once it’s all good, click on Print. Make sure to let the printer ink dry before handling the page. If the registration marks get smeared on the page, it can affect the reading of the marks.
Place the printed page on the 24″ cutting mat exactly as it shows on the software screen. This will be 1/2″ to the right of the outside grid line on the left edge of the cutting mat. Make sure that the top of the page is covering the grid lines or the Cameo can pick up the black of the grid lines as it reads.
With the Cameo 4 and the 24″ mat, you will need to have the mat fully supported in the front and behind the machine. This means that you will need 22″ of clearance and support in the front and in the back. The cutting mat needs to roll in and out of the machine as flat as possible. It cannot hang down on either the front or backside as it cannot work against gravity. If the mat is hanging down, it can affect both the reading of the registration marks and the cut accuracy of any project. (This is another reason I’d recommend a smaller mat if the project allows)
I would recommend using the roll feeder supports with the additional mat support at all times for best results with the 24″ mat.
Load the 24″ cutting mat in the Cameo. The left edge of the cutting mat should be next to the line on the left side. The rollers should be rolling across the edges of the cutting mat and not across the adhesive on the mat.
One of the neat features of the Cameo 4 models now is the Autoload feature. Press the load button and it will start to flash. The Cameo will automatically load the mat/material 6 seconds after the sensor is covered. The mat /material needs to be held up to the rollers securely (not pushed under) and the rollers will grab it and pull it in after 6 seconds.
Note: If the mat/material does not load straight, press unload and try again. If the machine “loads” before you are ready with the material up to the rollers, press unload and try again. The machine will think it’s loaded if you do not press unload.
Check out this quick video showing the Autoload feature.
Back in the software, click on the Send tab in the top right corner. Verify that the design has cut lines around it. Bold red lines = cut lines.
Note: it is very important that nothing be moved on the design page after the page has been printed or it can affect the cut accuracy.
Choose the Material that is being cut. Verify that all the settings are correct.
Note: if this is the first time cutting this material, a test cut is always recommended. However, you do not want to test cut in the top left corner of a print and cut project or it can interfere with the reading of the registration marks. I like to use a capital B and place that in a blank area on the design page to perform the test cuts. Turn the cut lines off for the full design and then cut only the capital B. Or use a scrap piece of the same material to perform the test cuts.
Once everything has been set and verified, (cross your fingers) click on the Send button in the bottom right corner.
The Cameo will now begin to look for the Registration Marks. It starts at the top left square, then moves down to the bottom left corner, and then moves up to the top right corner.
By following these same steps each time, I have great success with print and cut.
Print and Cut Setup for 24″ mat – large format media sizes
How large can you print and cut on the Silhouette machines?
This is determined more by the size of your printer capabilities than the limits of the Silhouette machine. I have a Canon TS9521C printer and love it! I love the ability to print on 12″ x 12″ cardstock for projects, especially when creating multiples of a design.
If you have a large format printer, then you can set up print and cut projects with the same size you can print. However, keep in mind, print and cut is most accurate when using a cutting mat. While it can be done without a mat, there is greater chance of feeding errors and mis-reads, so especially for a beginner, I would highly recommend practicing with a cutting mat first.
The setup steps will be the same for any size you can print.
Here are 2 examples:
12″ x 12″ media size setup in the Silhouette software
12″ x 12″ page on the 24″ cutting mat
11″ x 17″ media size setup in the Silhouette software
Like I said at the start, I highly recommend getting a smaller cutting mat to use if your project will fit on it. Not only will it be easier to manage, but it will save a few dollars in the long run since you are not having to replace the 24″ mat when it’s no longer sticky.
The setup for Print and Cut is the same no matter what size cutting mat you are using. The same steps apply as outlined above with a 24″ mat, you will just adjust according to the smaller mat in the software and loading the mat.
On the Page Setup Panel choose #1 – Machine = Cameo Pro #2 – Mat = 12″ #3 – Media Size = Letter
Notice how the software places the media size in the top left corner. The media is covering the grid lines in the top and on the left side. This exactly how you should place the material on the cutting mat.
On the Page Setup Panel, check the box next to Show Print border and Show Cut border. Print border = gray line Cut border = red line
On the Page Setup Panel, click on the 3rd tab for the Registration Marks. Click the circle next to On. Then click on the Restore Defaults button.
When the registration marks are turned On, you will see 3 marks appear on the media size. This is how the Silhouette machine “reads” where the design is placed on the page. The machine reads best with the default settings. While the software allows the marks to be moved or changed, the defaults are the most accurate and where they can guarantee the best results. I suggest starting with all the defaults to test and then you can adjust things to see what will still work for you after you’ve had successful registration and cuts. Changing things too much and too fast can lead to frustration, registration errors, and inaccurate cuts.
Since the Show Print border is on, the gray border will show what the printer margins are with the current printer that is connected to the computer for the media size set under the printer setup. The biggest thing you want to look for here is that the bottom left registration mark is not outside of this Print border. If it is, you will need to click on the Advanced Options on the Registration Marks Panel and bump up the bottom registration mark until it will print completely. (see above for examples) All 3 of the Registration Marks have to be on the printed page in order for it to read accurately. I only suggest this if the mark is showing outside of the print border.
Like I mentioned above with the 24″ mat, if this is the first time doing a print and cut or the first time doing this process on the new Cameo Pro, I would suggest doing a test print on cardstock first. All this means is to pick a print and cut design, place it on the design mat within the boundaries, and then print on cardstock as a test using all the defaults. This will save you from using more expensive materials and having something go wrong.
Make sure to keep the design out of the cross-hatched areas on the page and within the red cut border. The cross-hatched areas do not print on your final page, however, this is the clearance that the optical eye under the blade housing of the Cameo needs in order to read the registration mark accurately. If there is a design in the cross-hatched area or dark colors near the area, it can interfere with the reading of the marks and either give a registration error or an inaccurate cut.
In some cases, the optical eye does not like any design between the 2 cross-hatched areas at the top of the page. It can interfere with reading accurately.
Once the page is all setup and ready to print. Click on File > Print in the top left corner.
The steps to print are the same as directed under the 24″ cutting mat section above. I follow the same steps each time I print a job.
Here is a quick video screen grab of the Print Process that follows the same steps as written directions above.
Keep in mind that each printer may vary in the menus that it brings up and your printer menu and preferences may not match mine exactly. But, the steps will be the same no matter what your printer menu looks like.
Once the page is printed and completely dry, place it on the 12″ cutting mat exactly as it shows on the software screen. Make sure that the top of the page is covering the grid lines or the Cameo can pick up the black of the grid lines as it reads.
Adjust the rollers so they are securely locked in place to roll across the edges of the cutting mat and not across the adhesive. Something to keep in mind with the Cameo Pro is that the rollers are now under the square roller bar. There is no easy way to clean these rollers if they get gummed up from rolling across the adhesive on the cutting mat.
Roller is directly under the embossed rectangle on the white piece.
Here is an example of where the right roller should be for the 12″ cutting mat.
Load the 12″ cutting mat in the Cameo Pro. The left edge of the cutting mat should be next to the line on the right side.
Back in the software, click on the Send tab in the top right corner. Verify that the design has cut lines around it. Bold red lines = cut lines. Choose the material and verify it all looks good. Then click the Send button in the bottom right.
The Silhouette machine will begin looking for the marks starting in the top left corner with the square, then move down to the bottom left corner, and then up to the top right corner. Keep in mind that if there is any part of the design in the cross-hatched area it can interfere with the accurate reading of the marks and can cause a registration error or a mis-cut.
I follow the same basic steps for Print and Cut each time no matter which machine I am using and rarely have an issue with registration errors or inaccurate cuts. I would recommend setting it up exactly as the tutorial shows above for the most accurate read and cut. If you are still experiencing issues, here are a few tips to try.
Troubleshooting Print and Cut with the Cameo Pro
Tip #1 – Use the default settings I cannot stress this enough! Not only for new users or new to the Cameo Pro users, but in general – start with the defaults to eliminate a lot of the things that could be the issue and then continue troubleshooting from there.
Tip #2 – Use the mat supports. No matter what size mat you are using, the mat needs to roll in and out of the machine as flat as possible. The mat support with the roll feeder set up properly can make a big difference.
Tip #3 – Make sure the mat is fully supported. The cutting mat has to be fully supported and not hanging down in the front or in the back at all. The machine needs the proper clearance, proper support, and stability in order to function well.
Tip #4 – Make sure the mat is loaded correctly. This will vary depending on the size of the cutting mat you are using.
24″ cutting mat Load the left edge next to the line on the left side.
12″, 15″, 8″ cutting mats all get loaded with the left edge next to the line on the right side
Tip #5 – Make sure the registration marks on the page printed correctly. The marks should match on the printed page exactly as they show in the Silhouette software on the media page.
Tip #6 – Hold the mat up a bit higher than level If you still encounter a registration mark or cut issue, try holding the cutting mat up a bit higher than flat as it reads the marks.
Tip #7 – Use a smaller cutting mat when possible. While you can use a 24″ mat for projects, it is a large mat and can take practice to get the hang of handling. A smaller cutting mat can be easier to complete those smaller projects with.
Print and Cut is one of my favorite things and I do have many other resources as well if you are still having issues.
Resources:
Print and Cut Basics to Design to Troubleshooting Course HERE
Save this for future reference by pinning the image below.
Enjoy!
THANK YOU for your support! How can you help? Click HERE & buy a coffee. Every little bit helps with the cost of running the site.
Or if you are looking for more in-depth, step-by-step classes, check out all of my online Silhouette classes on my Teachable site HERE.
**This post may contain affiliate links. What that means is that I may receive compensation if you purchase through the links I have provided. The price you pay for the product or service is not higher but I may get compensated for sharing.
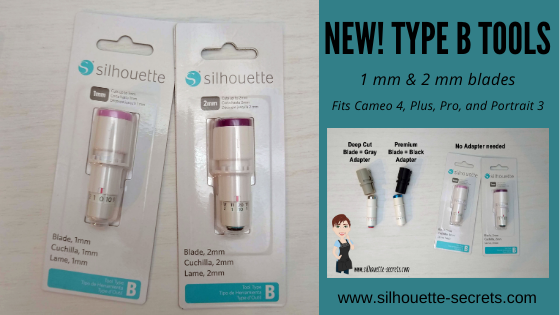
New Type B Tools – 1 mm and 2 mm blades releasing! Coming Soon!
You asked and Silhouette America listened! Many said they didn’t like having to use the adapters with the Cameo 4 models or Portrait 3 machines. Well, they heard that and created a new 1mm Manual Blade and 2 mm Manual Blade. These are equivalent to the Premium blade (1 mm) and the Deep Cut Blade (2 mm) blades that currently are out, except the new ones fit directly in the housing.
Let’s take a closer look.
Affiliate links may be present in the following blog post and as an Amazon Associate I earn from qualifying purchases.
Ok, so first, as I write this post, these blades have been released in some International areas right now (February 2021). They are estimated to be released in the U.S. in March of 2021. Keep in mind that this is an estimated time and things are crazy right now as they have been this past year.
I am lucky enough to have International contacts and a big shout out to my FB group Admin (Teresa P.) who was able to order and ship them to me! Yay! So I get to share this information with all of you! Thank you Teresa P.!
Again, I want to make sure that for all my U.S. readers – these blades are coming, but have not been released in the U.S. yet. Estimated release of March 2021.
Here are the new Tool Type B tools. On the left is the 1 mm Blade, which is the equivalent to the Premium blade. And on the right is the new 2 mm Blade, which is the equivalent to the Deep Cut blade.
So, let’s talk about the differences between these blades and the older style. The main difference is that the new Tool Type B tools will fit directly in the Tool 1 housing of the Cameo 4, Cameo Plus, Cameo Pro, or Portrait 3.
Tool Type B 1 mm Blade = older style Premium Tool Type B 2 mm Blade = older style Deep Cut Blade
All of these blades are “manual” blades, which means that you will have to adjust the blade depth “manually” by turning the bottom of the blade to the correct blade depth. But, the best part is that with this manual style blade, you can actually go in between on the numbers if you want. For example, to do a 1.5 blade depth if needed.
Note: in the older software these blades will be called “ratchet” blades because of the manual setting. In the newer software versions being released, starting with v4.4.472, they will be called “manual” blades in the Tool Type on the Send tab. Both designations still mean the same thing. You have to “manually” adjust the blade depth, the machine does not do it for you.
Since you set the blade depth manually, there is no need to wait or watch to see if the blade adjusted to the correct depth like you do with the Autoblade. You set the blade depth and the software knows it’s a “ratchet” or “manual” blade and it gets to cutting.
How do you adjust these “manual” blades?
Here is a video explanation of adjusting the blades and the adapters that are needed with the older style blades.
What types of materials can these blades be used for?
The Premium blade and Tool Type B 1 mm blade can generally be used for any material that is under 1 mm in thickness. However, keep in mind that material density can play a factor into all materials that you cut. Even if something is thin, it may be dense and therefore more difficult to cut.
The most common materials that the blade is used for are: paper, cardstock, adhesive vinyl, heat transfer vinyl, sticker sheets, and other specialty materials.
The Deep Cut blade and Tool Type B 2 mm blade are generally used for any material under 2 mm in thickness. However, keep in mind that blade depth 1-10 is the same as a regular blade, the difference comes with the depths of 11-20. Again keep in mind that with all blades and materials, the material density is going to play a factor.
The most common materials cut with this blade are: craft foam, thicker faux leather, thick cardstock, chipboard, coverstock, and other specialty materials. If a regular blade set at a 10 and force of 33 is not cutting through a material, then I will give the Deep Cut blade a try and see if it will get the job done.
Note: Swing Design does have these listed under the blades section on their website. They are showing Sold Out, however did not miss out. They have not been released in the U.S and that is just how they show on the site at the moment.
And I know everyone is going to ask – What do they cost?
At the moment since they have not been released in the U.S., I do not know the U.S. retail value that retailers will be listing. Once released, I will update the post with more information.
Testing these new blades out
Now, I couldn’t just leave these new blades in the package. Time for testing!
Testing the 1 mm Tool Type B blade
I first tested in the v4.4.463 software and it was recognized as soon as I put the blade in.
Now, I just grabbed some of my kid’s craft foam. I have no idea how long I’ve had it or where I got it.
I used the recommended settings for Craft Foam in the software.
I am now using the v4.4.472 software where the new “manual” blade is listed under the Tool section.
Always check the cut before you unload the mat. This way if it didn’t cut completely through, you can send it again. I did have to send the craft foam again to cut, but on the 2nd pass through, it cut completely and cleanly through.
Now, I have not cut a lot of craft foam, so I will be looking for more ideas. But, why not test this a bit more. I chose a smaller design, just to see what it could do.
This was a little bit more intricate of a design and after sending the design through to cut twice, so a total of 4 passes, I still had to “pop it out” a bit. But, I am thrilled with the results. I’ve only cut craft foam a couple of times and it definitely didn’t cut like this before. Again, the craft foam brand can make a big difference to. I have no idea what I grabbed from the stash.
My son asked for a frog when I asked him what I should cut from craft foam. I was not sure how this card would turn out, but it works!
I always recommend having extra blades and mats on hand. Through experience, there is nothing worse than being in the middle of a big project and not having cuts turn out. A new blade or cutting mat can make a big difference!
Grab some extra mats and supplies at Silhouette America with my code SILSECRETS and save 30% right now through February 14, 2021. Enter the code SILSECRETS at checkout and the savings will show. I grabbed a few extra Strong hold cutting mats this month for an upcoming class Cutting Leather with the Cameo 4 & Kraft blade. Stay tuned for more details on that!
Save this for future reference by pinning the image below.
Enjoy!
THANK YOU for your support! How can you help? Click HERE & buy a coffee. Every little bit helps with the cost of running the site.
Or if you are looking for more in-depth, step-by-step classes, check out all of my online Silhouette classes on my Teachable site HERE.
**This post may contain affiliate links. What that means is that I may receive compensation if you purchase through the links I have provided. The price you pay for the product or service is not higher but I may get compensated for sharing.
The Cameo Pro is the newest cutting machine released by Silhouette and I have loved creating larger projects with mine.
Today I have 5 tips for setting up the Cameo Pro. These steps can also be used for troubleshooting any cutting or feed issues you may be having with the Cameo Pro.
If you are new to the Cameo Pro and just taking it out of the box, I would highly recommend watching the Unboxing video HERE to get started with the setup.
This post has a lot of information and is photo heavy. I am also making this available as a printable PDF download exclusively for confirmed newsletter subscribers.
I would suggest starting at Tip #1 and working through the list every single time. If one of the first 2 things is the cause of the problems, no matter what else you change, you will continue to have an issue until those are corrected.
Affiliate links may be present in the following blog post and as an Amazon Associate I earn from qualifying purchases.
Tips for the Cameo Pro
Tip #1
Make sure the Autoblade is installed properly.
The Autoblade has to be installed with absolutely no gap at all between the lip of the blade and the housing.
The locking tab on the front of the blade housing should be pushed all the way in so the hooks grab the blade and hold it in securely.
If the blade does not look like this, take it out and reinstall it and lock it in place.
If you still cannot get the blade installed with no gap, please check out this video by Silhouette America on properly installing the blade in the machine. 4 Things to Remember About Your Silhouette Cameo 4 This installation video applies to all Cameo 4 models and the Portrait 3.
This is the #1 most important factor in getting the machine up and cutting properly. If the blade is not installed properly, it will not adjust or cut consistently and the issues you experience may just compound on each other.
The Cameo Pro comes with an Autoblade and a blue sketch pen adapter only. If you want to use other older model blades in the Cameo Pro, you will need to purchase the blade adapter set or the new soon to be released Premium blade or Deep Cut blade that will fit directly in Tool 1 housing (estimated March 2021 release for the U.S).
Tip #2
Loading the cutting mat or vinyl properly.
The first feature we should discuss is the Autoload feature. This is awesome since the cutting width is now 24″ and it is really hard to grow another arm/hand to help push the load button while holding the material up to the rollers.
The Autoload feature works by pressing the Load button which will start flashing. You have 6 seconds to hold the mat/material up to the rollers and it will pull it in. If it does not load straight or you do not feel it loaded securely. Press the unload button and load it again for best results.
Here is a demo of loading a 12″ roll of vinyl. The Autoload option has a little sensor on the left side of the machine that I point at in the video. Make sure this sensor is clear of debris or it may not work properly.
There are several options of media/mat sizes here so we will go through each.
Loading lined material in the Cameo Pro such as adhesive vinyl or HTV without a mat
In the video above, you see how I loaded a 12″ roll of vinyl. Let’s take a closer look at the details.
When cutting a smaller roll than 24″, the roller bar will need to be unlocked and the right roller moved over to the left so it is on the edge of the material to securely grip it.
The roller bar is locked when the lever points up, release the right side of the roller bar by turning it to the front as the arrow shows on the machine.
Do not force the roller lever release or turn it backwards. Doing so can damage the internal mechanisms.
Once the roller bar is released, the right side of the roller bar will raise and you can slide the right roller along the bar to the correct position. Note: the left roller is stationary and the bar does not lift on the left side. The roller can be moved to any of the gray arrows (circled below) on the Cameo and then rolls from 9″-24″ can be utilized. Move the “guides” along as you move the right roller and position them evenly across the material being cut. These help to prevent the materials from bubbling up in the middle.
There is a rectangle directly in the middle of the right roller and this should be lined up with the gray arrow on the machine for best results. If you look closely, you can see the right roller is directly under this rectangle in the middle of the white bar.
Once the right roller is lined up with the gray arrow that is on the edge of the width of the material you are cutting, carefully turn the roller bar lever back up to the locked position.
When cutting from a roll of material, you will adjust the roll feeder to fit the material as needed. Move the right side of the roll feeder in so it will be snug against the right edge of the material roll.
Then adjust the slides on both sides depending on the size of the material roll.
For a small roll the slides need to be moved out. Loosen the placement screw and then slide it out and tighten the placement screw again.
For the larger rolls adjust as needed, following the same steps.
Note: bulk rolls of vinyl may have issues with feeding properly. If you experience cut issues and you are using a bulk roll of vinyl, try making a smaller roll out of the larger bulk roll. It is a lot of weight to pull against a bulk roll of vinyl. If the vinyl is rolled too tight, you may also experience issues.
The left edge of the material when cutting without a mat, should be lined up with the line on the right side.
Press the Load button and then carefully hold the vinyl up to the rollers with the left edge of the material next to the line and the right side at the right roller. Make sure that the material loads straight. If it does not, hit the unload button and try again. Both sides of the vinyl should be held securely under the rollers or it can slip out during the cut.
The material should be smooth and not bubbled in the middle. You want it to roll in and out of the machine as straight as possible.
Now, let’s take a look at a 24″ roll.
The right roller will be moved to the far right gray arrow and the roller bar lever locked back in place. Spread the guides out evenly between the 2 rollers. The right sliding piece of the roll feeder should be on the edge of the right side of the roll of the material.
The load line stays the same for all widths of material that is cut without a mat.
Loading materials with a cutting mat
The Cameo Pro comes with a 24″ cutting mat. This sucker is a monster and will take some practice to get the hang of maneuvering, but I love having this option!
First, remove the protective cover sheet off of the cutting mat.
The load line is the far left line on the left side of the machine for the 24″ cutting mat.
The roll feeder should still be set up and make sure you are using the middle mat support.
The right roller should be lined up with the far right arrow.
Now, here is probably the biggest thing you will need to keep in mind when using a 24″ cutting mat. The full length of the cutting mat has to be fully supported on the front and the backside. The machine cannot work against gravity to pull the mat into the machine. It is just not possible with the weight of the mat. That is a lot of excess weight working against gravity. This means that you will need to have a work surface that has approximately 22″ on the front and backside of the machine that is flat and allows the mat to roll in and out flat the entire time.
Again, this is BIG! Not only the mat, but you will need to have it supported or the cuts will be off if it has to work against gravity. We built a table with extension for my Cameo Pro so that I am able to use it with the roll feeder as is, but if I need to use the 24″ cutting mat, I can use the extensions so it’s all fully supported.
Check out this video on the Cameo Pro stand with more tips HERE. We have made these plans available for confirmed newsletter subscribers HERE.
Once you are all set up on the machine and ready to load the cutting mat, press the load button and then hold the mat up to the rollers as straight and level as you can. The Autoload starts after 6 seconds.
If the mat did not load straight or you were not ready in time. The machine will still think it is loaded, press the unload button and try again. This is where the Autoload feature comes in handy to make it easier to just focus on loading the mat and not pressing the button at the same time. However, it may take a bit of practice to get used to loading a mat this size.
If you are working with a material that fits on a smaller size cutting mat, I would highly suggest using a smaller size. It will be easier to manage and extend the life on the 24″ cutting mat as well.
Other size cutting mats: 8″ Portrait, 12″ Cameo, or 15″ Cameo Plus mats
When using any cutting mat that is smaller than 24″, the load line is the line on the right side. The left edge of the cutting mat should be next to this line but not over top of it.
Make sure to adjust the right roller in the same manner as listed above when using smaller rolls of materials.
The right roller should always roll across the edge of the cutting mat and not across the adhesive part of the cutting mat. If the rollers are moving across the adhesive on the cutting mat, they can pick up the adhesive and start sticking. With the new design of the Cameo Pro, the rollers are underneath the roller bar and not accessible to clean easily. So I would highly recommend being mindful of where the rollers are placed on the cutting mat. Adhesive build up on the rollers can cause future cutting issues.
The mat support should be attached and moved over to support under the cutting mat as it rolls through the machine according to which size cutting mat you are using. This will help in feeding the mat in as straight as possible.
Tip #3 – Cut settings
The Silhouette Studio software does have a list of preset settings. These are just a suggestion of what to start out with. It is not a full comprehensive list and all material types or brands may vary.
With any machine, you will want to test the settings and see what might work best for the design, the material, and the blade.
For instance, on my Cameo 4 models for Oracal 651, I choose the Vinyl – Glossy setting and then increase my blade depth to a 2. This cuts well for me and my machine.
Or for Oramask 813, I use a bit different setting.
Since I was cutting Oramask quite a bit, I created my own custom setting by clicking on the More button and adding in a new User Defined Setting.
Will my settings work for you, there is no guarantee? Like I said, the preset settings are just a starting point. There are many factors that will play into it.
How do you know what will work? For that we move to #4.
Tip #4 – Test cut! Test cut! Test cut!
I almost feel like repeating that again. Test cut is a great habit to get into!
There is nothing like sending the full cut through only to find out that it did not cut right. And if you are using the automatic feed option on the Cameo Pro, there is no sending it back through to cut again since you have already fed the material out the back to the cross-cutter. Yes, speaking from experience! Even I do it because I think it will all work out. And I kick myself when it doesn’t turn out. It isn’t the Silhouette machines fault I didn’t use the test cut option.
There are 2 ways you can do a test cut.
1 – Use the Test Cut feature in the Silhouette software on the Send tab.
The default test cut option is in the upper left corner of either the mat or the material loaded.
Note: If using a 24″ cutting mat, you will notice that there is a 1/2″ of space on the left and right sides that does not have adhesive on it. That is because this is where the rollers roll and you do not want your material cemented to your cutting mat. This is cuttable space. However, if you are using a material that is less than 24″ wide, you will line up the material 1/2″ to the right of the grid edge, this is where the adhesive starts. Place the material on the cutting mat exactly as it shows on the design screen on the mat. There is also a new pop up that will show up in some versions of the Silhouette software when you go to Send a cut, as a reminder.
However, currently in the software (I am using v4.4.463 & in prior versions), the test cut will cut in the top left corner of the 24″ cutting mat in the default position and does not adjust if your material is less than 24″ wide.
You will need to move the test cut to the exact location you want it to cut on your material. To do this, use the arrows keys next to the test cut button on the Send tab in the software or the arrows on the Cameo touch panel on the right side.
To move the housing, you will need to move it both over to the right and down. The housing will perform the test cut in the exact location it is placed. If it is only moved over to the right, it will cut the top of the cutting mat.
Or the second way to do a test cut is use a shape or object.
I use a capital B that I type out and then I will place it on my virtual mat where my design is not located at. I love this way because it is faster than adjusting the housing and a bit more accurate since you place it where you want.
Click on the Send tab, click exactly on the design to select it and choose No Cut to turn the cut lines off on the design and only cut the capital B.
Select the material you are cutting and click the Send button at the bottom of the Send tab to cut the B. Did it cut? If not, adjust the settings, move the B and send it to cut again.
It is much better to use a small section of material to make sure the settings will work versus sending a full 20″ design and it didn’t cut well. This will save you both time and headache.
Note: if doing a print and cut project, you do not want the test cut to cut from the top left of the printed page or it can interfere with the reading of the registration marks.
You can also either change the Line Color or the Fill Color of the B and then use the Cut by Line or Cut by Fill color options to turn the cut lines on or off.
Tip #5 – Start small
Whether you are a new user or an experienced user, it is a new machine. Start by cutting out a small design versus sending a large design.
I know it’s tempting and I will fully admit I sent a full 22″ design to cut the first time I cut with the Cameo Pro. And guess what? I still have that 22″ design sitting behind me in a pile of excess material because it didn’t cut completely through and I couldn’t send it again.
It may not be the thing you want to hear and most experienced users will say “I got this.”, but if it does not cut right, all you can do is laugh at the choice to “go big” and start a pile like I have.
5 Tips
Those are the 5 main tips that I would suggest to anyone starting on the Cameo Pro or if you are having issues with cuts, feeding, etc. start at #1 and work your way down. But there is more!
If you are a beginner and the Cameo Pro is the first cutting machine for you, I would highly recommend the Beginner First Cuts & Setup class to get started and get the first cuts under your belt.
Those first cuts and getting the machine set up properly are the most important steps you can start with. As a beginner it is hard to know if it’s something not working properly on the machine setup or if it’s something that you are doing. This class can help eliminate some of the anxiety you may feel about getting started.
The video class shows a Cameo 4 – 12″ model, but the same steps will apply to the Cameo Pro as well.
Now, I know it’s a long post, but I can’t just leave it at that. Here are 5 additional tips:
Bonus Tip #1 – When cutting long vinyl designs, you can use the arrow keys on the right touch panel on the Cameo Pro (or other models) to roll the material through prior to cutting to see how it will track. This will help you to see if the rollers are gripping the vinyl securely.
The down arrow will not only move the housing down, but advances the materials through the machine.
Bonus Tip #2 – Make sure the cross cutter is securely on the left or right side and the cross cutter flipped up. This is the cutting mechanism on the backside of the machine.
If the cross cutter-blade is left in the middle or the cross-cutter bar has not been flipped back up, it will hinder the movement of the cutting mat or vinyl the next time you go to cut. Usually if this is the cause, you will hear some very odd noises as the material or mat is hitting the cross-cutter blade or bar.
Another indicator is that the design is cutting over top of itself and not cutting correctly.
Bonus Tip #3 – Reload the vinyl or the cutting mat until it is loaded straight. If it loads crooked, it may cut crooked or come out from under the rollers. The extra time to load it smooth and straight is well worth it.
Bonus Tip #4 – If the edge of the vinyl is curled from being rolled, try to flatten it out or advance the vinyl farther in the machine by pressing the down arrow on the right side panel before sending it to cut. This will help in that curled edge not getting hung up on the working parts in the machine and roll as flat as possible through.
Bonus Tip #5 – Make sure you have the adequate space needed for this machine. It is a large machine and needs to be fully supported.
I would highly suggest that you have it placed securely on a work space that fits the entire width of the cutting machine and allows for the roll feeder to be completely on the table as well.
If you are using a cutting mat, remember that the full length of the cutting mat needs to be supported on both the front and the backside in order for the machine to work properly and cut.
Hopefully with those steps above, you will be well on your way to cutting like a Pro with your Cameo Pro!
If you are up and cutting again after reading this with the Cameo Pro, let us know it helped you by commenting below.
Like what you see, buy us a “coffee” on Ko-fi. Your support of Silhouette Secrets+ is greatly appreciated.
I have also made this available as a downloadable for confirmed newsletter subscribers HERE.
Save this for future reference by pinning the image below.
Enjoy !
THANK YOU for your support! How can you help? Click HERE & buy a coffee. Every little bit helps with the cost of running the site.
Silhouette Classes
Never stop learning! Let me help you take the anxiety out of learning with Silhouette and get to creating faster! My Silhouette classes are heavily focused on software, so you can take the skills & techniques taught and apply them to many future projects!
**This post may contain affiliate links. What that means is that I may receive compensation if you purchase through the links I have provided. The price you pay for the product or service is not higher but I may get compensated for sharing.
I’ve shared a few glimpses of this DIY stand/table that we’ve been in the process of creating for the Cameo Pro. And it’s now finished – whew! Let me tell you, writing the instructions, filming the video, and writing the blog post took twice as long as actually building the stand.
Whether you are considering building your own stand/table for a machine or not, I hope you’ll continue reading and watching as all Silhouette users can pick up some tips from the information in the video below. And maybe share a laugh too!
The photos on the wall aren’t really crooked, just the angle of the photo – lol.
If you are a Cameo Pro owner then you know how large this machine is and if you have been considering it, this is great information to know about so you can plan for it.
Since the machine has a cutting width of 24″ it is much larger than the average Silhouette machine. The machine is approximately 35″ wide and you really want the entire width of the machine to be securely supported.
You also want to consider whether you will be using a cutting mat with the machine or not. If you will be, the full length of that cutting mat needs to be fully supported and rolling in and out of the machine as flat as possible. The Pro simply cannot work against gravity and keep in mind that the mat and material on the mat is weight. If it is hanging down in front of the machine the cuts may not line up properly. And keep in mind that you need the clearance in the back of the machine whether you are using vinyl or a cutting mat. There has to be somewhere for the material to go.
I just have to say that after filming the video above, there is never a dull moment in our house. If I get everything set up to record, then it never fails the microphone dies, I forget to push record, the camera is full and shuts off, I misspeak and say 12″ vinyl instead of 24″ vinyl, or you find something unusual where it shouldn’t be. It’s life! And sometimes you just have to laugh it off!
Note: the sock is gone but new things appear. It’s like the Easter bunny or Santa leaving presents. You just never know what I’ll find.
It’s life…. lol.
Affiliate links may be present in the following blog post and as an Amazon Associate, I earn from qualifying purchases.
Here are the supplies we used to create this DIY Cameo Pro stand:
Supplies: – 1 – 4’ x 8’ sheet of 3/4 inch Sandeply (Home Depot/Lowes) *$40.98 – 5 – 1 x 3 x 8’ (Home Depot/Lowes) *$36.05 – 1 – 1 x 4 x 6’ (Home Depot/Lowes) – *$5.15 – 100 – #8 x 1¼” Phillips wood screws (Home Depot/Lowes/Amazon) *$9.01 – 100 – #8 x 3/4” Phillips wood screws (Home Depot/Lowes/Amazon) *$7.28 – 4 – Drop Leaf Hinges (Amazon) or similar *$15.97 – 4 – 3” Urethane Casters (Harbor Freight) *$15.96
*Our cost – note prices may vary by location. Total cost of base table supplies = $130.40
Both of the signs were creating using the Cameo Pro and the wider cutting space.
This Cameo Pro stand was designed so that a crafter could complete the construction using basic tools. My biggest concern for any new Cameo Pro owner is that the machine is fully supported and stable so you can get the best use and most consistent cuts.
The one thing I would highly suggest is reading the instructions and viewing the photos a couple of times before starting. Even though I was right in the middle of the build process, I still re-read the written instructions several times.
We have written a step-by-step 27-page PDF document that is complete with photos and detailed instructions for the construction of this DIY Cameo Pro Stand. These instructions are available to confirmed newsletter subscribers.
Like what you see, buy us a coffee. We thank you for your support!
Whether you build your own Cameo Pro stand or not, I hope that the video and photos have given you some tips and ideas to think about when setting up your own Cameo Pro.
It is amazing how my to-do list for the Cameo Pro has grown. Just like everything else, it seems like a never ending list of projects I want to complete.
What are you creating with your Silhouette machine?
Save this for future reference by pinning the image below.
Enjoy !
THANK YOU for your support! How can you help? Click HERE & buy a coffee. Every little bit helps with the cost of running the site.
Silhouette Classes
Never stop learning! Let me help you take the anxiety out of learning with Silhouette and get to creating faster! My Silhouette classes are heavily focused on software, so you can take the skills & techniques taught and apply them to many future projects!
**This post may contain affiliate links. What that means is that I may receive compensation if you purchase through the links I have provided. The price you pay for the product or service is not higher but I may get compensated for sharing.
THANK YOU for your support! How can you help? Click the link to buy a coffee. Every little bit helps in the cost of running the site.