Posted on Leave a comment

After Christmas crafting

On Christmas morning I quickly realized that I needed Santa sacks, so no one could “peek” at what Santa brought before everyone else got out of bed. While shopping in the Target Christmas clearance the day after Christmas, I happened on these burlap sacks.

img_5368-2

I quickly sprang into action….

Grabbed 3 of them and headed home. There was some HTV that would be great on these. I found some gold foil HTV in my sample stash and set to creating the names in the Studio.

img_5380-3

img_5382-1

Just as a reminder…. always mirror your image when using HTV or you will end up wasting a bit of vinyl. Eventually, I will get a heat press, but for now, my iron works with my teflon sheet.

img_5379-1

The kids all enjoyed modeling their new Santa sacks for next year.

Do Something Creative Everyday!

Enjoy !

THANK YOU for your support! How can you help? Click HERE & buy a coffee. Every little bit helps with the cost of running the site.

Looking for more in-depth, step-by-step classes, check out all of my online Silhouette classes on my Teachable site HERE.

SS Logo snip it

**This post may contain affiliate links. What that means is that I may receive compensation if you purchase through the links I have provided. The price you pay for the product or service is not higher but I may get compensated for sharing.

Posted on Leave a comment

New Year – New Mat!!!

I was cutting a few designs out of vinyl and it just seemed to keep tearing….. I powered through and cut a second time & then carefully coaxed it while weeding the design….

You can find that previous blog post with image HERE.

A few days later I sit down to cut a few more and think to myself, “Let’s try a new mat and see if it makes a difference.”

Oh my gosh! I don’t know why I always forget to try this….. It’s probably because I feel that my old mat is still sticky, but it just must not be sticky enough. A new mat, the vinyl doesn’t slip at all and I think that makes all the difference in clear cut lines…. This design below was so easy to weed and on 651, which I seem to have more issues with weeding.

img_5327

New mat = problem solved!

img_5328 I found this design in the Silhouette store and it said “Buy Me”…. well – click… and now I can just place it on my mat, resize it and cut. So simple!

 I wish you all a very Happy New Year & wish you many blessings in 2017!!

Enjoy !

THANK YOU for your support! How can you help? Click HERE & buy a coffee. Every little bit helps with the cost of running the site.

Looking for more in-depth, step-by-step classes, check out all of my online Silhouette classes on my Teachable site HERE.

SS Logo snip it
**This post may contain affiliate links. What that means is that I may receive compensation if you purchase through the links I have provided. The price you pay for the product or service is not higher but I may get compensated for sharing.
Posted on Leave a comment

My little mermaid 

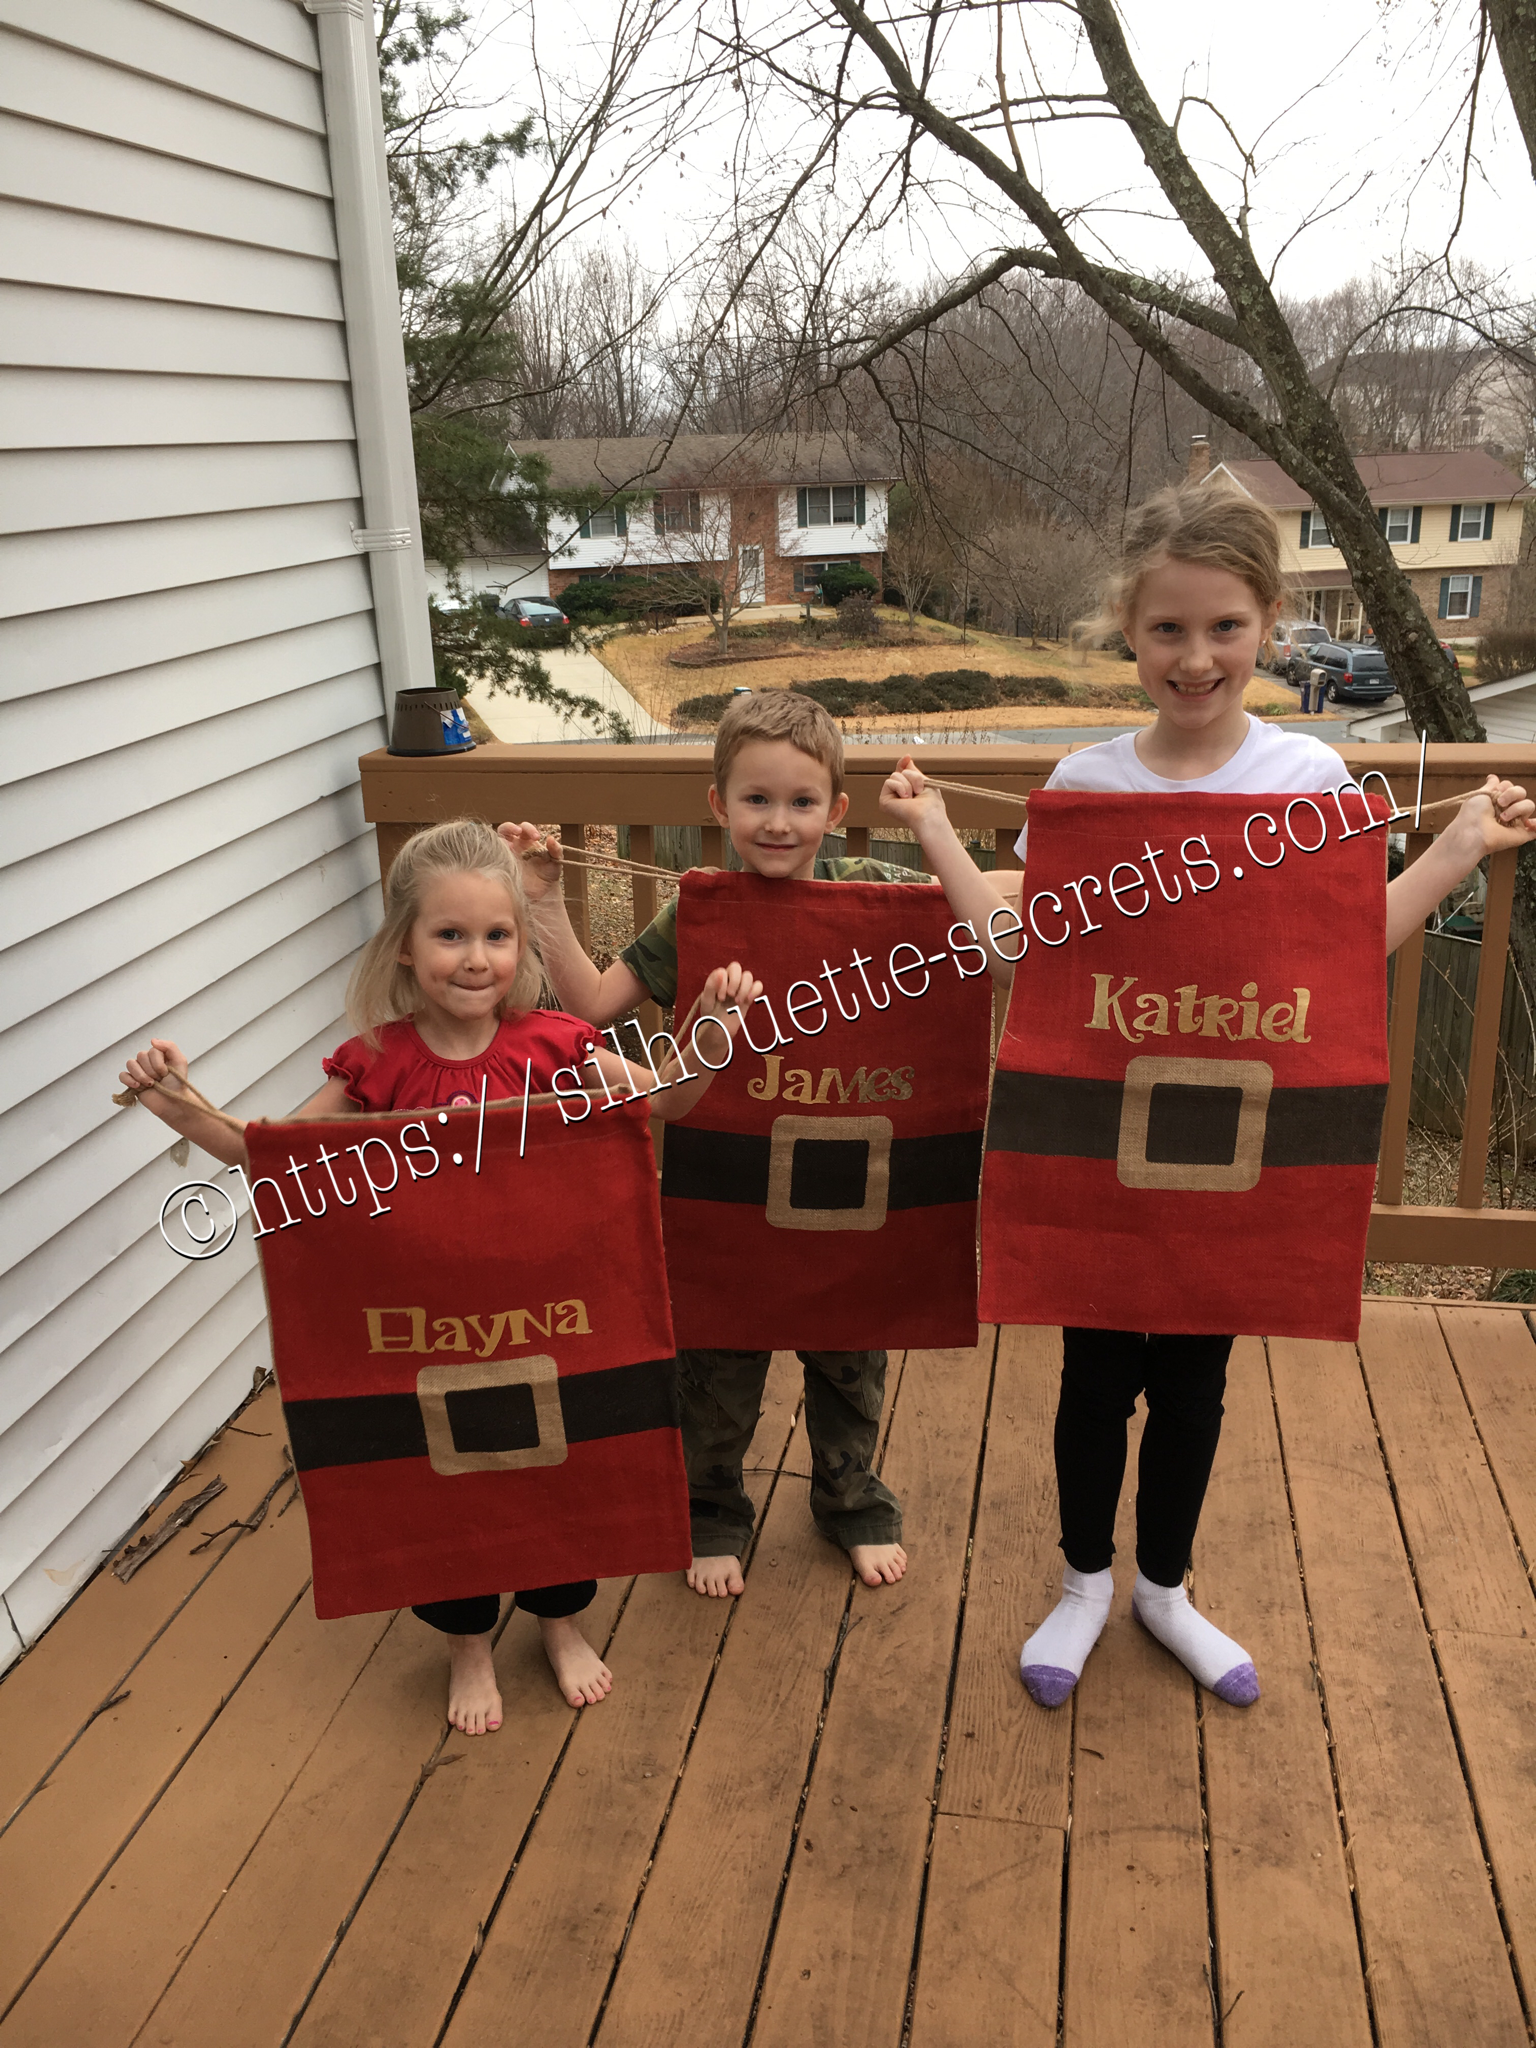
So a few weeks ago I shared this photo on my Silhouette Secrets Group page and it sparked a lot of interest to what I was making…. Well, it is actually several projects and I’m here today to show you the project I used my Silhouette to help me create.

img_4761-1

I found this tutorial for Princess dress up aprons on Pinterest and thought it would be perfect for my kids. We have very tall kids so the store bought Princess dresses do not always fit well or for very long. This is perfect for them to use for a long time to come. I actually made these Little Mermaid ones for my nieces as a Christmas gift.

img_5264

If I actually could sit down and go from start to finish on the project, it would only take a couple hours. But, I have 3 little interruptions, I was making 2 of them at the same time and everyone seems to want dinner… every single night…. So I worked on them a little here and a little there….

img_5265 
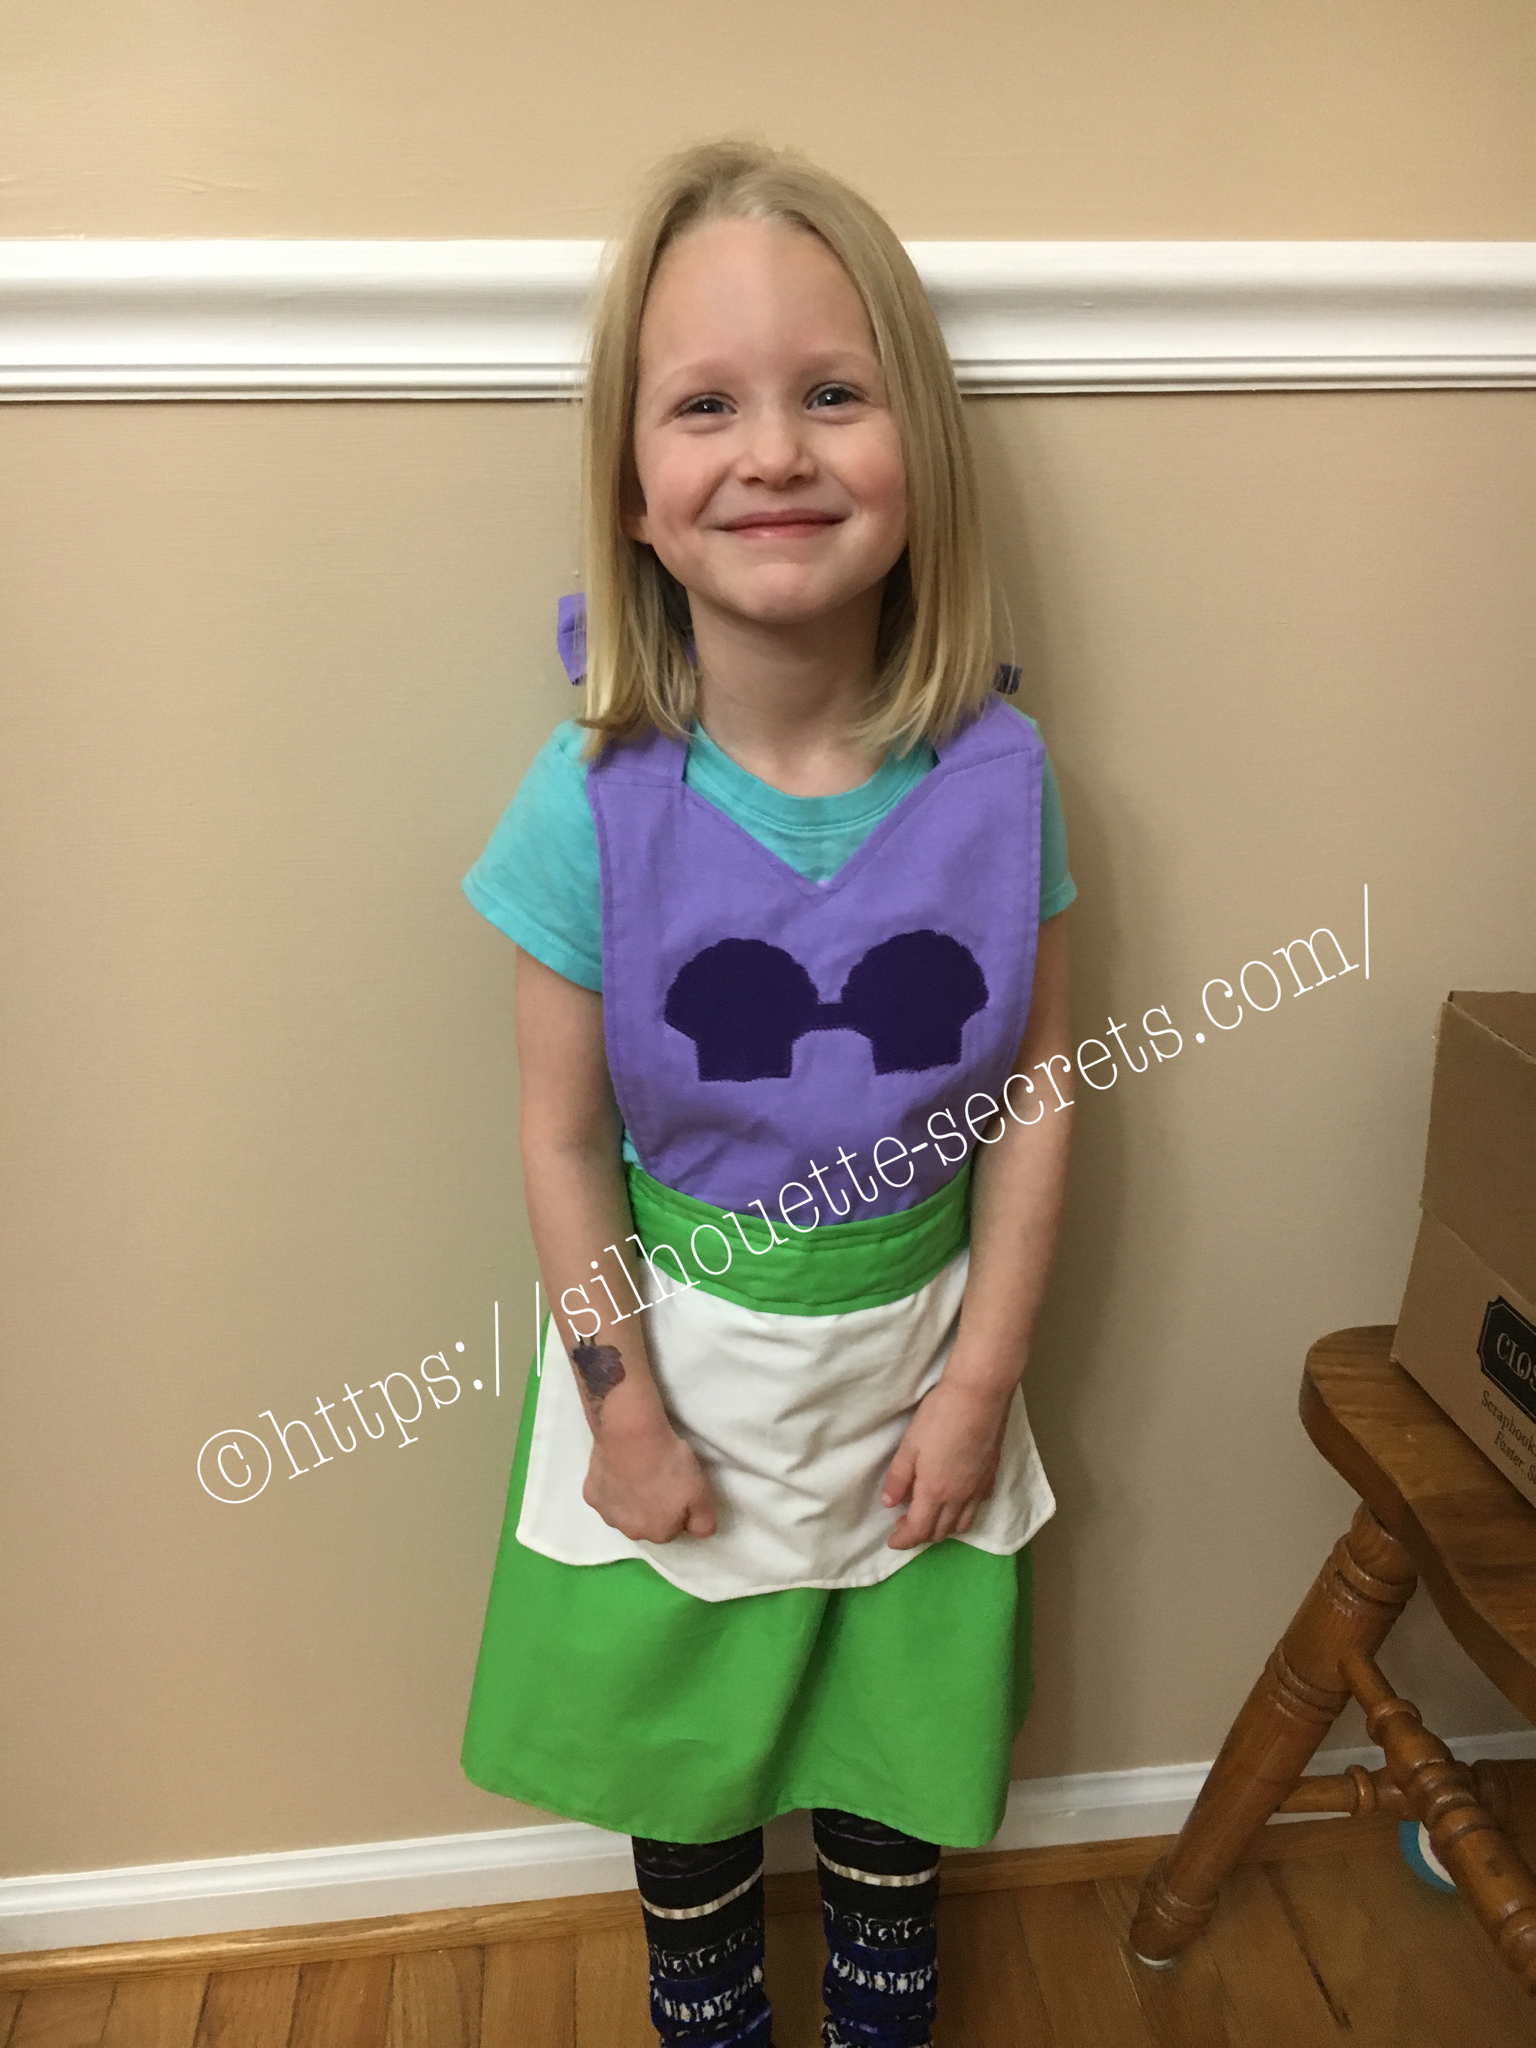
I used my Silhouette machine to cut the seashells on the bodice. First I sprayed them with Terial Magic, let them dry a bit and heat set that with my iron. terial-magic Then, I added some sew-able interface backing to the fabric and put it on my Silhouette mat. This helps to stabilize the material even more and make it easier for the Silhouette blade to cut it. I then found my seashell I wanted from a design I had purchased in the Silhouette store. I duplicated the shell and aligned them next to each other. I added a rectangle between them and then welded the 3 shapes together. And changed my cut settings to Fabric and hit the cut button in Design Studio.

Tip: I keep separate blades for each type of material I am cutting, such as – Vinyl, cardstock, fabric, etc.

img_5266

And what a joy to see my nieces open up their gifts on Christmas morning!

I asked my youngest if she would like a Little Mermaid apron & she says “I want Tinkerbell!”. So off to the craft store we go again for green & yellow fabric. So I’m sure you will see me back again showing off her Tinkerbell apron, just as soon as I find the time to start that project.

Crafting with your Cameo = So many possibilities….. So little time!

Enjoy !

THANK YOU for your support! How can you help? Click HERE & buy a coffee. Every little bit helps with the cost of running the site.

Looking for more in-depth, step-by-step classes, check out all of my online Silhouette classes on my Teachable site HERE.

SS Logo snip it

**This post may contain affiliate links. What that means is that I may receive compensation if you purchase through the links I have provided. The price you pay for the product or service is not higher but I may get compensated for sharing.

Posted on Leave a comment

Personalizing scrapbook album covers 

I love to give these mini albums as gifts, especially to grandparents. But, I like to make them even better by giving it a personal touch and what better way than….. vinyl!!!

To get it centered on the front I used my CTMH mat for measurements & some painters tape to hold my vinyl in place. I am using a method referred to the “hinged” method for applying my vinyl.

This way I can peel the backing off one side, cut the backing off & then smooth one side of the vinyl decal in place. Then I remove the painters tape & backing paper and carefully smooth the rest of the decal down into place. This helps get your design placed exactly where you want it.

img_5345-1

img_5349-1
img_5348-1

I found these cute designs in the Silhouette store and knew they would be perfect to personalize the covers of my gifts!
I love how these turned out!

Enjoy !

THANK YOU for your support! How can you help? Click HERE & buy a coffee.
Every little bit helps with the cost of running the site.

Looking for more in-depth, step-by-step classes, check out all of my online Silhouette classes on my Teachable site HERE.

SS Logo snip it
**This post may contain affiliate links. What that means is that I may receive compensation if you purchase through the links I have provided. The price you pay for the product or service is not higher but I may get compensated for sharing.
Posted on Leave a comment

‘Twas the Night before Christmas

I’ve seen variations of this all over and I just had to try it.

This was a bit difficult to weed the vinyl but I was determined. I wanted this image on my charger plate. I ended up cutting it twice and then coaxing it along while weeding & applying it, but I love the end result.

img_5308 I decided I needed to cut up the words a bit & applied in pieces. It seemed to lay on the charger & go on better with less bubbles.

img_5312 And done….. another Christmas decoration off my to- do list.

I hope you enjoy your Christmas Eve!

Enjoy !

THANK YOU for your support! How can you help? Click HERE & buy a coffee. Every little bit helps with the cost of running the site.

Looking for more in-depth, step-by-step classes, check out all of my online Silhouette classes on my Teachable site HERE.

SS Logo snip it

**This post may contain affiliate links. What that means is that I may receive compensation if you purchase through the links I have provided. The price you pay for the product or service is not higher but I may get compensated for sharing.

Posted on Leave a comment

Personalized Christmas gifts

After one of my retreats with Terri Johnson Creates this summer, I brought home my finished glass etching ornaments and my husband asked if I could make something for a few of his co-workers. It started as a personalized ornament, but then we changed it to beer glasses….. I love that I can personalize an item with my Silhouette and a few basic supplies.

He thought of the individualization he wanted on each and that is what I worked with.
I found images of what he wanted and traced them and then worked with a font that would be bold and readable.

Here are the designs I came up with:
christmas-glasses

I cut these out of vinyl and then we applied them to the glasses. Hubby wanted to help with the project and remembered to grab a couple photos of the process.

img_5165

Hubby is applying the vinyl to the glass above and smoothing it out to make sure it has a tight seal around the edges where we want to apply the etching cream.

img_5166

Then we apply painters tape around the edges of the design, just in case the etching cream goes outside the area of the vinyl.

img_5188

And I am amazed each time I rinse that etching cream off and peel back my stencil. I love this etched glass look and it really adds to these plain ole glasses.
Now, I wish I had remembered to take photos of the rest of them before he took them with him to work.
There’s always something I forget!!!

Another Christmas gift complete!

Enjoy !

THANK YOU for your support! How can you help? Click HERE & buy a coffee.
Every little bit helps with the cost of running the site.

Looking for more in-depth, step-by-step classes, check out all of my online Silhouette classes on my Teachable site HERE.

SS Logo snip it
**This post may contain affiliate links. What that means is that I may receive compensation if you purchase through the links I have provided. The price you pay for the product or service is not higher but I may get compensated for sharing.
Posted on 1 Comment

Vinyl on glass cutting boards

I have seen so many of these glass cutting boards pop up on my newsfeed. Such a nice little touch to make a personalized gift.

I found a design I liked in the Silhouette store & grabbed it before I could convince myself I could design it myself. One thing I’ve realize is, yes – I can design pretty much anything myself. I’ve worked with the software program & I know I can do it, but I can also just buy the design & get to cutting. If I was making these to sell I would either buy the CU (Commercial Use) license or design something myself, but just for my personal use or a gift, the option of purchasing through the Silhouette store saves me time.

img_4068

I reversed the design & cut it from black 651 viny. Then I attached to the backside of this glass cutting board. It turned out great & was the perfect addition to a gift bag I was giving to a friend.

img_4070

 I can see creating many more of these in the future. Next, I’m going to try etching using the vinyl as a stencil. I’m addicted to the glass etching.

You can find this design HERE.

I love that I can personalize an item to make it that much more special!

Enjoy!

Posted on Leave a comment

Simple Santa Ornament

Here is another simple ornament made using basic shapes within the Silhouette Studio program.
I created a long rectangle belt after measuring the circumference of my square ornament, which I then cut out of black 651 vinyl.
Then I made 2 squares and used the Subtract all feature to make the belt, which I cut out of silver 651 vinyl. santa-ornament-copy

I then used transfer tape to place the images onto my ornament.

img_4059-1

And added a few clear rhinestones with some E6000 glue and you have a simple Santa belt ornament.

img_4062-2

Hope you are able to create something today1


Enjoy !

THANK YOU for your support! How can you help? Click HERE & buy a coffee.
Every little bit helps with the cost of running the site.

Looking for more in-depth, step-by-step classes, check out all of my online Silhouette classes on my Teachable site HERE.

SS Logo snip it
**This post may contain affiliate links. What that means is that I may receive compensation if you purchase through the links I have provided. The price you pay for the product or servic
Posted on 3 Comments

Personalizing items

As I approached my first instruction class, I wanted to create a Demo book to show interested Silhouette customers projects that I had completed with my Silhouette Cameo.

img_4033

I took the new Sea Glass photo album from Close to My Heart and decided to add some vinyl to the front cover to personalize it a bit.

img_4043

I took some Oracal 631 Black vinyl, even though it’s temporary, I have great luck with it sticking and if I want to re-design it, I can just peel it off and stick a new one on.
I used the hinge method to apply it to get it positioned where I wanted on the album.
By doing this, you apply a piece of painter’s tape across the center to secure it on the album. Then, lift one half of the vinyl up & peel the backing off and cut the extra backing off.
Then you can lay the vinyl down on the album and burnish to your album.

img_4045

Then you can remove the painter’s tape and are able to work with the other half of the design.

img_4047

Remove the rest of the backing and you can smooth down the vinyl to your album.

img_4048

Burnish it down really well and slowly peel back the transfer tape. This one did take a little bit of finesse to get it off the transfer tape.

img_4049

I ended up applying this design in two pieces as my first cut of my logo was a bit too delicate and didn’t cut correctly. I just changed the font style and cut it again.

img_4050

The finished project turned out great and it shows customers…. the Possibilities really are endless!!!

img_4051

What can you create with a little bit of vinyl?

ss_signature-copy

Posted on Leave a comment

On to the holidays….

I have seen these ornaments all over Pinterest and I wanted to give them a shot, but I wanted to create the entire image myself, so I was not limited on the options I have to use it.

This was a pretty basic design to complete, since it uses basic shapes and fonts.
Make sure if you are going to reproduce these items for sale or to sell the cut file as an svg, that you are using a font that has a Commercial Use license, so everything is legal.

img_4054

I positioned the design on one mat, then placed my vinyl on each space of my mat in the same position as in the Design Software.

img_4055

The ornaments were purchased at Hobby Lobby and I used Polycrylic on the inside, let it drain well and then used extra fine glitter on the inside.
I cut all of my pieces and then pieced it together

Now to get these in the mail & make sure my little ones don’t see it before our elf Jingles brings it to them.

Enjoy!
ss_signature-copy