There’s still time to grab the Glassboard Studio Black Friday deals and get free products too!
Affiliate links may be present in the following blog post and as an Amazon Associate, I earn from qualifying purchases.
Here is the Holiday Sale Schedule for Glassboard Studio and there are still 2 freebies left on the schedule. Make sure to use my affiliate code SILHOUETTESECRETS to save 20% during their Black Friday sale and 15% any time after that – shop at this link HERE.
I was asked what freebies would be the best and I think that depends on each user’s preference. I use both the pawn magnets and the craft catchers. If you want to have matching colors for the pawn magnets, then I’d recommend ordering those in the color you want.
The Craft Catcher’s are new and so useful! I store everything from tools, Silhouette blades, earring hardware, project pieces, and more in mine.
I shared a video on Instagram and Facebook when the new magnetic ink pad holders and the craft catcher’s were released. Check that out here on Instagram or on Facebook.
Here is a look how I was using them while creating in October.
I have now added several new tools from Glassboard Studio to my craft room this year. It took me a bit to talk myself into investing in it, but I’m so glad I did.
Check out this video HERE where I’m using the Glassboard mat as a palette while painting my Halloween 3-D busted canvas elements. Such easy cleanup.
I love that I can use this as a palette with many different medias. I made my mom a custom zipper bag and drew a design on it using Sharpie Creative Markers. I even used it to practice my initials that I sign because I was having a “moment” and had forgotten exactly how I’ve been signing things.
I pulled out some of the creations I’ve been working on this year since taking a class with artist Tracy Weinzapfel for inspiration and reference as I drew on the black zipper bag. Since it was a black bag, I did need to use several layers of the markers to get the colors I wanted. If a marker picked up color from another section, I could easily scribble it a bit to get it back to it’s original color. I left the scribbles on there for a couple weeks as I was out of my studio and it still cleaned up easily when I got back to it.
And then Glassboard Studio released a new Scrapbook Magnetic Glassboard Craft Mat! This one fits 2 – 12″ x 12″ Scrapbook layouts completely on top of it. Something you may not know is that my crafting journey started with scrapbooking. One craft leads to another and here we are. Paper crafting is one of my favorite and when I was asked if I’d be interested in this size mat, I knew it was meant to live in my studio.
After I purchased my first Magnetic Glassboard mat, Pinterest showed me a photo of a gorgeous pattern called Oceanside, which was no longer available. I told myself if it ever became available again, that I would jump on ordering it simply because it makes me happy to look at. And wouldn’t you know, after they released the new Scrapbook Craft Mat, they also announced several special edition mats were coming back for a limited time. I guess, be careful what you tell yourself!
The ocean is calling and if I can’t go to it, why not bring it to me. I may have to play some ocean sounds and just stare at it and pretend I’m really there. My shipping information says it will arrive later today after this is published, but watch the Silhouette Secrets+ social channels and I’ll share an unboxing on there (YouTube, Facebook, Instagram).
I know, I know… how many magnetic Glassboard mats does one person need? I started the year with 0 and now own 3. But, I do have several work spaces in my craft studio, so I know they will be used.
Want to see more on how I’m using this in my studio & some project inspiration too? Check out this blog post HERE and see how I’ve put it to use.
Make sure if you do invest in some new tools for your craft room that you use code SILHOUETTESECRETS to save at this link HERE. During the Glassboard Black Friday sale save 20% and after Black Friday is over, you can still save 15% on your order any time with my code.
I know these new tools may not be for everyone and it did take me time to talk myself into getting one. I just kept seeing their awesome patterns and something tugged at me that it was right for my craft space. Timing is everything. It may not be the right time for you, but maybe you picked up some inspiration by the projects I shared above.
Thanks so much for reading!
Save this for future reference by pinning the image below.
Enjoy !
THANK YOU for your support! How can you help? Click HERE & buy a coffee. Every little bit helps with the cost of running the site.
Silhouette Classes
Never stop learning! Let me help you take the anxiety out of learning with Silhouette and get to creating faster! My Silhouette classes are heavily focused on software, so you can take the skills & techniques taught and apply them to many future projects!
**This post may contain affiliate links. What that means is that I may receive compensation if you purchase through the links I have provided. The price you pay for the product or service is not higher but I may get compensated for sharing.
Creating custom card designs in Silhouette Studio is easier than you might think, and today I’m excited to share a step-by-step Tri-Fold Shaped Edge Card tutorial now live on the Silhouette Secrets+ YouTube channel! This project is perfect for any occasion, and once you learn the process, you can customize it with your own text, images, and themes. You’ll find the full supply list conveniently located right below the video link, so you can gather everything you need and craft along with me.
Affiliate links may be present in the following blog post and as an Amazon Associate, I earn from qualifying purchases.
Head over to the Silhouette Secrets+ YouTube channel to watch the full step-by-step tutorial. I walk you through each part of creating a Tri-Fold Shaped Edge Card so you can follow along at your own pace and customize it to match any theme or occasion. And while you’re there, I’d love your support—click the Like button, leave a comment to share what design you plan to create, and make sure to subscribe for more Silhouette tips and project inspiration. Don’t forget to tap the bell so you’re notified as soon as new tutorials are released!
Ready to design your own? Once you’ve watched the tutorial and are inspired to start creating, here are the supplies I used for my Tri-Fold Shaped Edge Card. Feel free to follow along with the same materials or customize your project with what you have on hand—either way, you’ll be crafting a unique card in no time!
This is a card design that can be used all year long and for many different situations.
Here are a couple more designs that I created too!
Mix and match different paper patterns with the same designs to create different looks.
This is a great way to use up scraps papers or smaller sheets too!
Save this for future reference by pinning the image below.
Enjoy !
THANK YOU for your support! How can you help? Click HERE & buy a coffee. Every little bit helps with the cost of running the site.
Silhouette Classes
Never stop learning! Let me help you take the anxiety out of learning with Silhouette and get to creating faster! My Silhouette classes are heavily focused on software, so you can take the skills & techniques taught and apply them to many future projects!
**This post may contain affiliate links. What that means is that I may receive compensation if you purchase through the links I have provided. The price you pay for the product or service is not higher but I may get compensated for sharing.
Does anyone else get total brain freeze when someone asks what gifts you want? Whether it’s for a birthday or the holidays, I instantly get that deer-in-the-headlights look. Even if I had a list going, it somehow flies right out the coop the moment someone actually asks.
So this year, I decided to create a Holiday Gift Guide not just for those shopping for the creative makers in their life—but also for anyone like me who needs a little help remembering what we actually love. Inside, you’ll find my go-to crafting tools, creative kits, and favorite supplies that I use all year long in my own craft room. Whether you’re a Silhouette or Siser fan, a paper crafter, or just dipping your toes into DIY, these gift ideas are practical, inspiring, and perfect for any skill level.
Let’s dive into the top crafting gifts for creative makers this holiday season!
Here’s a list of my favorite tools, supplies, and crafty goodies that I use all year long, and they make perfect gifts for makers at any skill level.
Affiliate links may be present in the following blog post and as an Amazon Associate, I earn from qualifying purchases.
Now before I share more, keep in mind that you do not need ALL of these items and that it’s taken me years to collect the craft supplies and tools that I currently use and recommend. I will also be adding to this list as new light bulb moments pop up with new ideas.
*prices subject to change & what is shown below are at the time of publication as of 11/21/25
A new tool kit was announced at the 2025 Silhouette Summit – originally it was stated it would be available in November. I asked for an update and was told they didn’t have a date on when it would be available.
Glassboard Magnetic Craft Mat – select your favorite pattern Use code SILHOUETTESECRETS to save 20% from November 21-December 1, 2026 or 15% any other time – Shop HERE
I just ordered the Oceanside Pattern because it makes me happy to look at and I told myself if it was every available again, I would get it for myself just because. The little voice in my head won and it’s on it’s way to live in my studio. They have brought back a few of the Special Edition patterns for a limited time only. Their patterns are beautiful and some don’t last long.
I love these and turn to them when I get stuck or need color inspiration. I’ve used them for several projects from cardstock matching, designing in Silhouette, or beading projects.
Check out more on how I’ve used these for inspiration HERE.
And she just released an updated version – Volume 3 & 4. I wonder how much Santa can carry for me this year.
More details on the Silhouette cloChé HERE Watch for an unboxing and additional information coming soon too! I have been testing with several projects and just need to get all my thoughts compiled into written words.
I have had this heat press for 5-7 years. I’ve lost track of time and I love that it has the slide out drawer. This is my go to when pressing shirts and other larger projects.
I’ve had this one for a couple years now and I use it for smaller projects or when I’m recording videos. It’s smaller size makes it easier to move around and fit in the video frame too.
Follow more information on Siser Juliet & Romeo HERE Follow along on the Swift Creek Customs channels to see more about these machines too!
Now you may be thinking, how many cutting machines does one person need? I know it may seem crazy! But, I love learning new things and I love sharing that with others. And here we are… If you are interested in expanding your cutting machine knowledge or system of machine, let me know if you have questions.
*****
I also have an Amazon Storefront where I add craft & project supplies when I make a new project, blog post, or video tutorial. Check out that list HERE.
I could not possibly include everything I have in my craft studio. Remember I said I’ve been collecting for many years. But, I do get asked often about my supplies & tools, which is why I have a header at the top of the website for EllyMae’s Craft Supplies – find that HERE.
I hope those ideas have sparked some creative thinking about what you might find useful to either receive as a gift or give someone else.
Save this for future reference by pinning the image below.
Enjoy !
THANK YOU for your support! How can you help? Click HERE & buy a coffee. Every little bit helps with the cost of running the site.
Silhouette Classes
Never stop learning! Let me help you take the anxiety out of learning with Silhouette and get to creating faster! My Silhouette classes are heavily focused on software, so you can take the skills & techniques taught and apply them to many future projects!
**This post may contain affiliate links. What that means is that I may receive compensation if you purchase through the links I have provided. The price you pay for the product or service is not higher but I may get compensated for sharing.
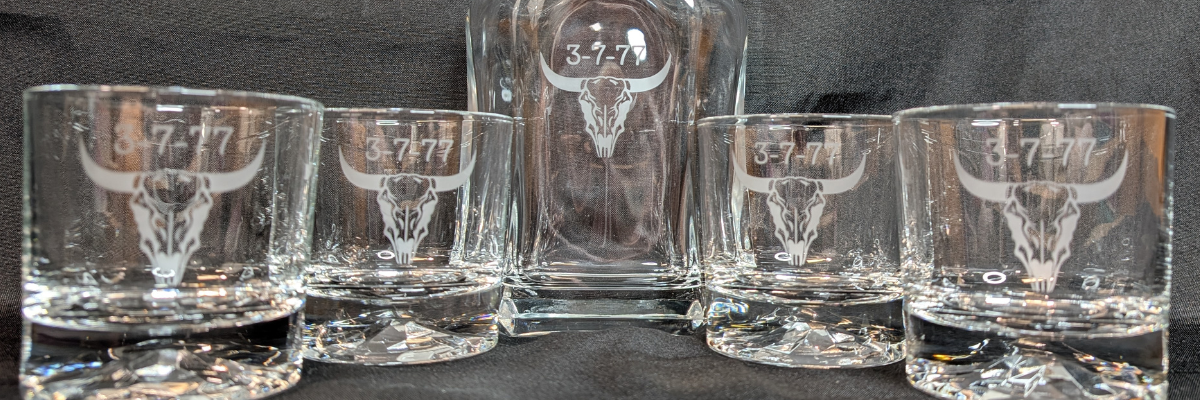
Looking for a unique and elegant gift idea? This custom glass etched decanter set is the perfect project to showcase both creativity and craftsmanship! Using Silhouette Studio to design the stencil and cutting it from Oracal 651 adhesive vinyl with the Silhouette Cameo 5, I created crisp, intricate, and detailed stencils that made the etching process a breeze. With a little help from Etchall etching creme, each piece transformed into a beautifully personalized set — perfect for gifting or adding a touch of class to your own home bar. Keep reading for a full supply list, a look at the step-by-step process, and plenty of inspiration photos of the finished project!
Affiliate links may be present in the following blog post and as an Amazon Associate, I earn from qualifying purchases.
The best part about this project is that it came together for less than $20! I found the perfect glassware and decanter set during a quick trip to Goodwill, and I couldn’t pass it up. It was a very successful shopping trip to Goodwill for glassware.
After a good cleaning, the glass pieces were like new and ready for a makeover. My husband had the idea to create our own custom etched decanter set, and it turned out even better than we imagined. It just goes to show — with a little creativity (and a great thrift store find!), you can create something beautiful, personal, and completely unique without spending a fortune.
Ready to make your own custom etched decanter set? Here’s a look at the supplies and tools I used to bring this project to life — from the thrifted glassware to the vinyl stencil and etching cream that made the magic happen!
Now that you’ve got your supplies ready, let’s take a look at how this custom etched decanter set came together! I snapped a few photos along the way to show each step — from creating the stencil in Silhouette Studio to applying the Etchall etching creme and revealing the final design.
I started by using a file I purchased on Etsy and then did some clean up on the file to make it more suitable for the glass etching project. I did not need all of the fine, intricate details of the original design at the size I was creating with. On the left is the original design I purchased, and on the right is the file I used for my stencil.
Creating a clean cutting stencil can take some test cut attempts just to make sure that the details you want will remain and you won’t have any cutting issues. I started with one stencil, adjusted my design a bit after seeing how it cut, and then cut the rest of the stencils I needed.
I used scraps of Oracal 651 adhesive vinyl for this project. Or if you have a color in your stash that isn’t your favorite, this is the perfect project for it!
I applied the stencils using AT65 Transfer Tape and then I highly recommend adding painters tape around the edges of your stencil design, especially on a curved object. Etching cream is awesome and can work super quick, especially if it gets onto a spot of the glassware that you do not want to be etched. It seems like those mistakes always seem to etch the fastest.
The next step I took is optional, but since I knew my stencils were detailed, I thought it was worth the extra step to apply a bit of heat to the adhesive vinyl and make sure it had a really good adhesion. I grabbed my Heat It Gun by Ranger and applied it for a few seconds all around. Be careful as hot glass looks like cold glass. I let it cool completely so the adhesive vinyl would be well stuck.
I really like this Heat Gun by Ranger as it has more of a direct heat towards your project and doesn’t blow the hot air out around as much. I know that sounds odd, but it’s one of those things that you don’t really “get” until you have used the tool. I used it in a class at Creativation 2025 and came home and bought myself one even though I have several embossing guns already in my tool box.
Here is a close up look at the etching cream as it sneaked off my stencil and why I highly recommend using the painters tape. With curved objects, it’s not always easy to simply make the stencil bigger. That can be more difficult to get a smooth application on the glass object, so the painters tape is a great way to help add an additional barrier.
I leave the etching cream on for 20 minutes and then this is IMPORTANT! Scrape off any excess etching cream and put it back in the bottle!!! It can be reused over and over again. I’ve had bottles of Etchall Etching Creme for many years, and it is still good to use, no matter what color it turns into.
Then I take a paper towel and wipe off any excess etching cream before rinsing it thoroughly in the sink.
They turned out FANTASTIC! And I was doing a happy dance. I do believe that taking the extra time to heat the adhesive vinyl and let it cool before applying the etching cream helped to seal the edges of the stencil to prevent any seepage of the etching cream and give it crisp, smooth lines.
The next step – put them to the test & enjoy our new custom decanter set.
For our project, we thought that Buffalo Trace fit it perfectly and filled the decanter well. (*not sponsored or a promotion for Buffalo Trace – please enjoy responsibly)
Whether you’re creating a special gift or adding a custom touch to your own space, glass etching is a simple way to make something truly unforgettable. With your cutting machine, Oracal 651 vinyl, and a little Etchall etching creme, you can personalize glassware, mirrors, and so much more! I hope this project inspires you to give etching a try and see just how easy it is to get professional-looking results at home. Check out more information for even more creative ideas and tips to take your crafting to the next level HERE!
Save this for future reference by pinning the image below.
Enjoy !
THANK YOU for your support! How can you help? Click HERE & buy a coffee. Every little bit helps with the cost of running the site.
Silhouette Classes
Never stop learning! Let me help you take the anxiety out of learning with Silhouette and get to creating faster! My Silhouette classes are heavily focused on software, so you can take the skills & techniques taught and apply them to many future projects!
**This post may contain affiliate links. What that means is that I may receive compensation if you purchase through the links I have provided. The price you pay for the product or service is not higher but I may get compensated for sharing.
This edition of Crafting Creativity is full of heartwarming inspiration straight from the Hundred Acre Wood! Using the Classic Pooh: Friend Like You digital stamp set by Katie Pertiet Designs, I created several sweet and timeless projects featuring Pooh and his friends. From layered cards to charming home décor, each piece highlights how versatile digital stamps can be when paired with your Silhouette. Get ready to see how these delightful designs can bring warmth, friendship, and nostalgia to your craft table.
Affiliate links may be present in the following blog post and as an Amazon Associate, I earn from qualifying purchases.
Did you know that the Classic Pooh is now in the public domain in the U.S.? Classic Pooh entered the public domain on January 1, 2022. The Disney version is not in public domain. *Outside of the U.S., please refer to trademark laws & regulations for your area.
Each month in the Crafting Creativity series, I dive into a single design file and transform it into a variety of unique projects to inspire your own creativity. From cards and stickers to home décor and custom tags, I love exploring all the possibilities one file can offer. These posts are designed to show you how versatile a single design can be and to spark ideas for using your Silhouette in new and exciting ways. Whether you’re a seasoned crafter or just starting out, Crafting Creativity is full of tips, tricks, and inspiration to help you make the most of every design!
Crafting Creativity – Classic Pooh Projects
Digital stamps are incredibly versatile and perfect for creating a wide range of projects. Pair them with your Silhouette for precise print-and-cut projects, and suddenly one file becomes the foundation for endless creative possibilities. Whether you’re crafting for holidays, birthdays, or everyday inspiration, digital stamps make it easy to bring your ideas to life!
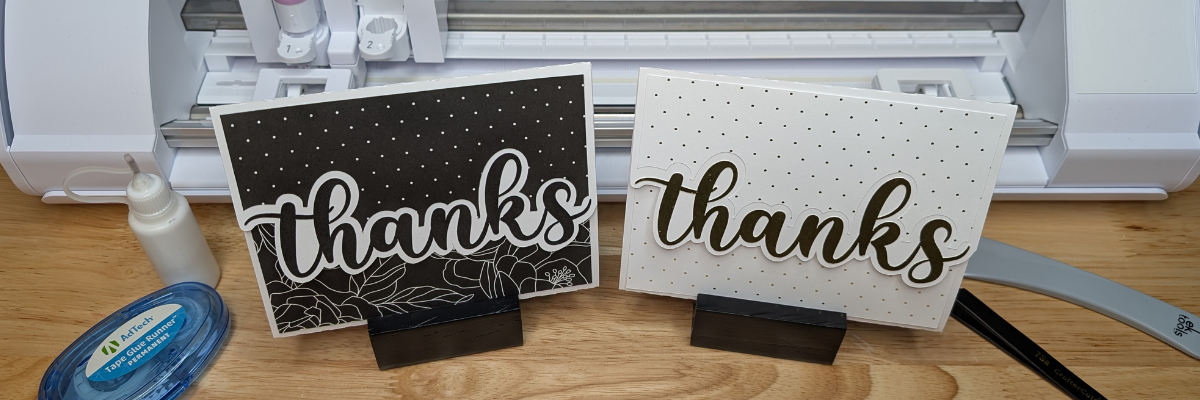
Project #1 – Flip Action Interactive Cards
These came together so easily and I was able to fit the print and cut designs for 6 cards onto one letter size sheet of paper. Here is a look at my print and cut page setup.
I posted a quick video of cutting the pieces for this project using the Electrostatic Mat. Check out the video on Instagram or Facebook.
And I used these designs in this video tutorial to show how to match colors in the Silhouette Studio software with the eyedropper too!
Digital stamps are perfect for creating custom stickers — you can size them exactly how you want, print them on your favorite sticker paper, and even cut them out perfectly with your Silhouette! They’re a fantastic way to bring digital designs into the physical world for planners, journals, cards, and more.
I received several questions about how to use digital stamps inside Silhouette Studio, so I created a step-by-step tutorial showing exactly how I set up, trace, and print and cut these adorable Classic Pooh images. It’s easier than you might think, and once you try it, you’ll be hooked on making your own personalized sticker sheets!
The first set I created using the Silhouette Super Fine Heat Pen with silver foil. I had a couple issues with the foil tearing which smeared a few parts, but otherwise they turned out great! They are a bit more work to set up with extra steps for the foiling, but if you are looking for a WOW factor! This can do it!
I used a different sketch font on each one and one I drew a balloon using the Flexishapes and the line drawing tool.
But I couldn’t stop there! I also went ahead and simply changed the line color on all the sketch fonts to black and then did the tags as a print and cut. This does not have the shine to it, but it was less steps to set up to have it all printed.
When working with sketch fonts, make sure to click on the Send tab and look at the bold red lines. That is exactly how it would sketch or print through a printer. Text defaults to “cut edge”, which can make sketch fonts act a bit goofy if they are close to single line fonts. They may not look complete and that is exactly how they would sketch or print.
Take the steps and tips I shared and create your own unique custom digital background too! Have you seen the shirts where the husband takes a photo of the wife or vice versa and puts it onto a shirt for special occasions like birthdays? I just had to do it! So I made my husband custom gift wrap for his birthday.
All of these projects were completed using just 1 digital stamp set by Katie Pertiet. She has a store full of amazing digital supplies and also produces physical products as well, such as stamps and more!
This year I started offering a free file each month for Silhouette Secrets+ newsletter subscribers. I love designing in the Silhouette Studio software and have shared some of my creations as well as look forward to collaborating with more artists in the future too!
Silhouette Secrets+ Newsletter
Never miss out on the news, tips, “secrets”, deals, classes, and more that I share on Silhouette Secrets+. Sign up for the newsletter and get information delivered to your inbox every Friday. Unsubscribe at anytime.
Sign up for the weekly newsletter HERE to have information delivered direct to your inbox and grab each month’s new freebie.
Did this spark some creative ideas for you? It’s amazing how one digital stamp set can be transformed into so many unique projects! I had such a wonderful time brainstorming, designing, and bringing each of these Classic Pooh creations to life. You can find even more inspiration and project ideas in the Crafting Creativity section on the Silhouette Secrets+ website — click HERE to explore!
Save this for future reference by pinning the image below.
Enjoy !
THANK YOU for your support! How can you help? Click HERE & buy a coffee. Every little bit helps with the cost of running the site.
Silhouette Classes
Never stop learning! Let me help you take the anxiety out of learning with Silhouette and get to creating faster! My Silhouette classes are heavily focused on software, so you can take the skills & techniques taught and apply them to many future projects!
**This post may contain affiliate links. What that means is that I may receive compensation if you purchase through the links I have provided. The price you pay for the product or service is not higher but I may get compensated for sharing.
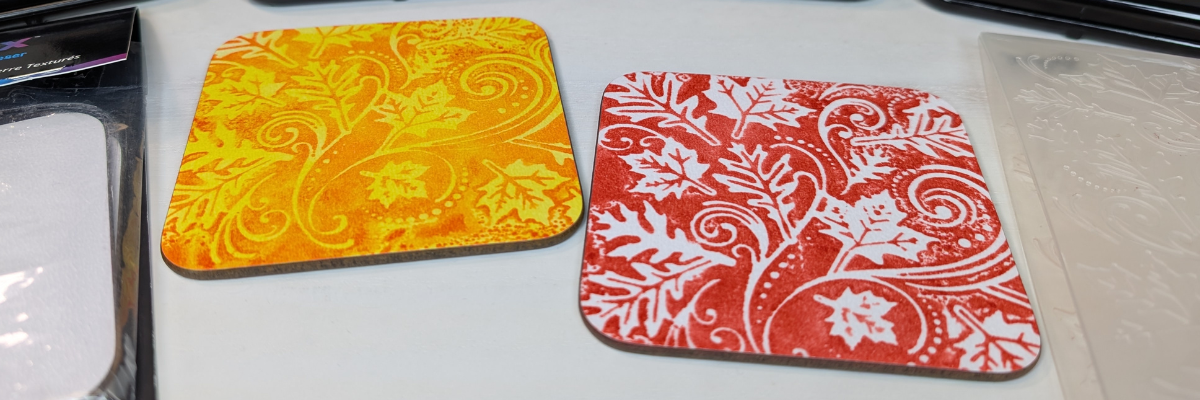
Looking for a fun and creative way to take your sublimation projects to the next level? In this tutorial, I’m sharing how to combine Artesprix Sublimation Inks with embossing folders to create beautiful, designs on textured sublimation coasters! 🎨 This unique technique adds incredible depth and dimension to your projects—perfect for gifts, décor, or one-of-a-kind keepsakes. I’ll walk you through the full process step-by-step in the video below, along with a complete list of the supplies you’ll need to get started. Grab your favorite embossing folders, your Artesprix inks, and let’s create something truly unique!
Affiliate links may be present in the following blog post and as an Amazon Associate I earn from qualifying purchases.
My favorite is the single color with the white of the textured coaster coming through. I think it really makes it pop, but there are so many different color options that you could do.
THANK YOU for your support! How can you help? Click HERE & buy a coffee. Every little bit helps with the cost of running the site.
Silhouette Classes
Never stop learning! Let me help you take the anxiety out of learning with Silhouette and get to creating faster! My Silhouette classes are heavily focused on software, so you can take the skills & techniques taught and apply them to many future projects!
**This post may contain affiliate links. What that means is that I may receive compensation if you purchase through the links I have provided. The price you pay for the product or service is not higher but I may get compensated for sharing.
Looking for stencil craft ideas to spark your creativity? This week, I’m sharing how one stencil design can be transformed in six fun and unique ways! Using the Hand Carved Flower Stencil by Kassy’s Parlour, created by artist Kassandra Louise Designs, I turned this single file into a home décor sign, cup decal, jewelry pendants, painted canvas, and more. It’s incredible how one design can inspire so many creative projects.
Affiliate links may be present in the following blog post and as an Amazon Associate, I earn from qualifying purchases.
When you look at a design file, do you see one project idea, or can you envision it on multiple projects? I started the Crafting Creativity series to help spark ideas and inspiration to do more with your files.
These are cut from 6 mil stencil material and it cut beautifully.
Here is a look at the stencil before I unloaded it from the machine. For harder to cut materials, checking the cut before unloading the machine is a great habit to get into. If the cut did not complete, you can send it again and it should cut in the same place. This is great for materials such as stencil materials that dull blades quicker and may need extra passes to cut through.
Once the stencil is cut, it can be used for many different projects and mediums.
One thing to keep in mind is that stencil material is plastic and plastic will dull the blade quicker than other materials. It is perfectly normal to have to increase the blade settings or passes the more that is cut. And if you are cutting this material a lot, you may go through more blades than other thinner, easier to cut materials.
I cut this 6 mil stencil material using the preset for Stencil Material in the Silhouette Studio software. All I changed was to increase the passes to 2 and then when that started having a few hang ups, I increased it to 3 passes.
Have you ever used a Gel Press or Gelli Plate before? This is such a fun technique!
Basically, a gel press is a jelly plate that you can add paint or other mediums on top of and then you press a piece of paper over top of it and pull the paint off. You can layer colors, add textures, and have lots of options.
Here are a couple of pulls that I did using the stencil on top of the Gel Press.
These can turn out so neat and each one is unique. Once dry the pages can be used for many projects such as cards, mixed media pages, tags, backgrounds and more!
I used two of the gel prints to make this card and then stamped with black ink directly on top of the print. It turned out pretty neat with the paint showing through the black ink.
For this project, I opened the stencil design, changed the fill color to transparent and then right clicked and chose “Release Compound Path”. This will break up the design into pieces. I then deleted all the pieces around the full flower design. Then selected all of the flower pieces, right click and choose “Make Compound Path”.
I am using a 8″ frame, so drew a square and sized it to 8″ x 8″. I selected the flower design and filled it with black, just to see it better. Then started playing around with patterns. I filled the flower design with a pattern and decreased the transparency in the Fill Color panel. Then I started filling the background square with patterns and testing them out.
Here is a look at my working file where you can see the different pattern options I was playing around with.
Then I printed the design onto Epson Presentation Paper – Matte and cut it with my paper trimmer.
When there are straight lines and a larger image as shown above, an old school paper trimmer does the trick versus trying to set up for a print and cut. I use Silhouette Studio to do the design work and printing and then with 4 swipes, my paper trimmer has the project ready to go.
And the best part about this is, you can change it out whenever you feel like. Print a new image and swap it out to coordinate with the season, your decor, or your mood.
I cut several flower decals from patterned adhesive vinyl to decorate my new travel coffee cup. I used the same technique as described above to separate the flower design from the stencil and cut individual flower decals.
After I weeded the decals, I cut them apart and then applied transfer tape and placed each one individually around the cup, so I could control where they were and how they fit together.
Here is a close up of the decal where I hope you can see a bit of it’s sparkle & shine.
Tips for Creating Cup Decals with Adhesive Vinyl
Surface Area
When applying adhesive vinyl to a surface that may be handled often, you want to keep in mind the size of the pieces of the design. The smaller the piece, the less adhesive there is to stick to the surface of the blank. So thin letters, intricate flourishes, delicate designs may not stick well to the surface of an object that’s handled or washed.
Even if using “permanent” adhesive vinyl, that doesn’t mean it will never come off or lift. Permanent adhesive vinyl simply means it has a stronger adhesive on the backside than “temporary” vinyl once cured. You can still peel it off, pick it off, scrape it off, etc.
The greater the surface area of the solid pieces of the design, the more adhesive there is to stick to the object.
There are a couple things you can do to help with a decal staying put longer.
thicken fonts or enlarge small areas of the design
eliminate the smaller or tiny sections of a design if possible
clean the surface of the cup with an alcohol swab & let it dry completely – this cleans off any dust or oils off the surface that can repel the adhesive
after applying the decal, let it sit for 48-72 hours for the adhesive to set up
apply a bit of heat to help the adhesive vinyl stick – not too much, you don’t want to melt it
Surface of the Cup
Stain resistant, nonstick, or silicone surfaces are designed to repel anything from sticking to it. Even if you are able to get a decal to stick initially, it usually does not for long.
It doesn’t just apply to cups though. There are a lot more stain resistant paints on the market and being used to paint interior walls of homes. Stain resistant is designed so things don’t stick to it, so even a “permanent” adhesive vinyl decal may not stick.
Textured surfaces can also be more difficult for a decal to stick to or it may not last long on a texture surface.
Placement of the Decal
When placing decals onto a cup, keep in mind where it is placed. I purposely placed my designs higher up on the cup knowing that it would be set into a car cup holder.
The more a cup is handled, the greater chance there is that the decal can catch, lift, or come off. This would include things like someone picking at the design, washing the cup, scrubbing the cup, sliding in and out of a car cup holder, being tossed around in a bag, etc.
And…
Sometimes things just happen and it won’t last. The best part about having a cutting machine is that you can cut another one. Or you can take the current one off, clean the cup, and apply a new decal to fit your mood.
I tried several different things with these and they are still a work in progress. Some things didn’t turn out such as using the stencil with white sharpies or sponging on white texture paste. I had too much bleed, so I ended up painting another layer to cover it up.
When the white Sharpie and texture paint didn’t work out on this one, I switched gears and cut a stencil from Silhouette adhesive backed stencil material and started filling it in with TCW Stencil Butter. OH MY! I have to say that the Silhouette adhesive backed stencil material worked AWESOME! Even with the texture of the canvas, it worked great! I will definitely be using this more in the future. The only drawback is that it is letter size and I would have loved to create a larger stencil.
But I made it work. I had to let the first flower dry and then I added more.
All I need now is the perfect saying to add to it. Let me know if you have any ideas that jump out at you when you see the project!
The next one has several layers of paint on it, but ultimately, I ended up with a solid pink background. I had cut a 12″ x 12″ stencil to use with this, but then I started looking at all of those negative pieces that were left over from the stencil and wondered if I could use those in some way.
I ended up applying transfer tape and picking up all of those pieces that I then used as a negative stencil on the wet paint. It was really just a “let’s see what happens moment”. I just laid the transfer tape on top of the wet paint with the negative pieces attached and smoothed it down to see what would happen.
It gave it an interesting pattern. Once the paint was dry, I then simply traced around with the white Sharpie Creative Maker and then I added a layer of Mod Podge Sparkle on top of it.
I am not sure if it’s finished yet or if I will add more to it. Just waiting a bit to see where the art goes.
A great big thank you to Kassy for contributing the free file for the Silhouette Secrets+ newsletter for the month of August! If you missed grabbing the free design in August, it is available in the HERE.
This year I started offering a free file each month for Silhouette Secrets+ newsletter subscribers. I love designing in the Silhouette Studio software and have shared some of my creations as well as look forward to collaborating with more artists in the future too!
Silhouette Secrets+ Newsletter
Never miss out on the news, tips, “secrets”, deals, classes, and more that I share on Silhouette Secrets+. Sign up for the newsletter and get information delivered to your inbox every Friday. Unsubscribe at anytime.
Sign up for the weekly newsletter HERE to have information delivered direct to your inbox and grab each month new freebie.
Did this spark your imagination? ✨ It’s amazing how one single file can be transformed into so many unique projects! I loved exploring all the creative possibilities with this design. You can find even more inspiration and project ideas in the Crafting Creativity section on the website — check it out HERE.
Save this for future reference by pinning the image below.
Enjoy !
THANK YOU for your support! How can you help? Click HERE & buy a coffee. Every little bit helps with the cost of running the site.
Silhouette Classes
Never stop learning! Let me help you take the anxiety out of learning with Silhouette and get to creating faster! My Silhouette classes are heavily focused on software, so you can take the skills & techniques taught and apply them to many future projects!
**This post may contain affiliate links. What that means is that I may receive compensation if you purchase through the links I have provided. The price you pay for the product or service is not higher but I may get compensated for sharing.
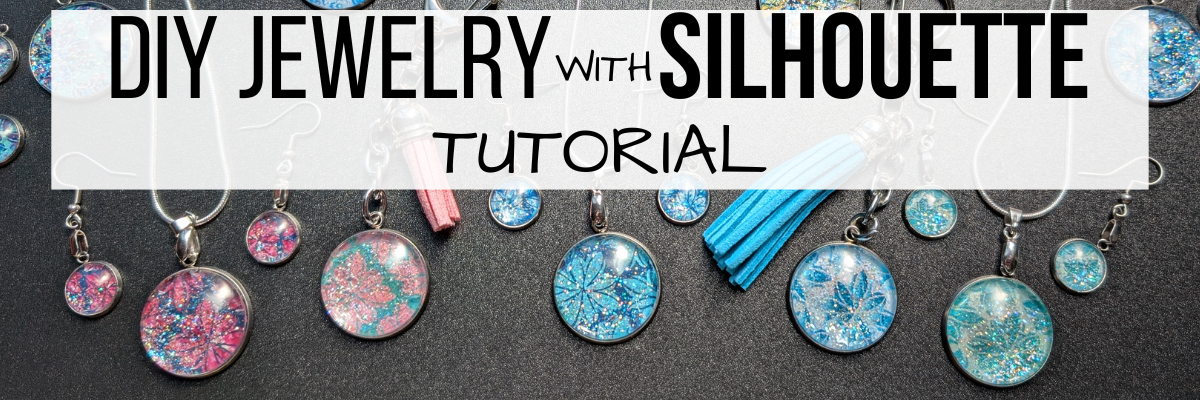
Jewelry making just got a whole lot more creative! In this tutorial, I’ll show you how to design and create dazzling custom jewelry pieces — perfect for pendants, earrings, bag tags, keychains, and more — using Silhouette with stencil designs and a variety of patterns. From selecting your supplies to following step-by-step instructions, you’ll learn how to turn simple materials into stunning, personalized accessories that sparkle. Whether you’re making gifts or adding a touch of charm to your own style, this project is a fun way to blend creativity, craftsmanship, and a little bit of shimmer.
Scroll down for the full tutorial, or check out the video version for a closer look! You can also download the printable supply list and step-by-step instructions PDF to craft along at your own pace.
Sparkle and Shine: DIY Custom Jewelry with Silhouette | Make Custom Pendants, Earrings & Bag Tags Video Tutorial available HERE
Affiliate links may be present in the following blog post and as an Amazon Associate, I earn from qualifying purchases.
*Tutorial written in Silhouette Studio version 4.5.812 Blog post is photo heavy
Open the Silhouette Studio software and set the page size/media size to Letter or whatever size you are printing on.
Open the Registration Marks Panel and turn on the registration marks for print and cut. Click the Restore Defaults button to reset the defaults for your most accurate print and cut results.
Save the file using File > Save and select a location on your hard drive to keep your work safe.
Measure the jewelry blanks to know what size to create the design at.
In Silhouette Studio, using the Drawing Tools on the left, select the Draw Ellipse tool, hold down the Shift key and draw a circle. This will create a perfect circle.
Using the Scale Tools, adjust the size of the circle to the size of the jewelry measurement. I adjusted the circle to 1″.
Since I am filling the circle with a pattern and colors, I made an offset to create a manual print bleed. This ensures that exact size I need for the pendant is cut, it will not have white edges on it. I have no issues with print and cut using Silhouette as I follow the same steps every single time. However, it is one of the most common issues we see with troubleshooting with users and it’s usually due to something in the setup.
Silhouette has a 1/16″ off cut that is within the normal range of accuracy with the machines. Adding your own “print bleed” is just another way you can ensure success with your project turning out how you like it. There is also an automatic print bleed option in the Silhouette software, but it doesn’t always yield the look you want.
Open the Offset Panel. Select Offset and adjust the distance of the offset as desired. Set yourself up for success with this keeping in mind that 1/16″ off cut possibility. I used an offset of 0.110″. There is no magic number here and it can vary for all projects.
In order to fill the design with color, the design needs to be a cut file. If using an image file such as a png or jpeg, then you would need to trace the design to get “cut” lines to fill in certain areas with color.
For this design, first change the fill color to transparent. This makes the next steps easier to work with.
Right click and choose Release Compound Path.
Move the outer line away.
Left click and drag across all the remaining pieces to select all, then right click, and choose Make Compound Path.
Add a fill color back to the design to see how it looks.
Again, these steps may vary depending on the design you are working with. If you want to follow my exact steps, I’d recommend grabbing the Hand Carved flower stencil by Kassy’s Parlour so you are working with the exact file I’m using.
Copy and paste the stencil file to the print and cut project mat. Using the corner bounding box, scale the design down to fit within the circle offset and position as desired. Right click on the stencil design and choose Send to Back. Select everything and make a copy. Then save the file.
I actually made 2 copies and pulled the stencil design away so you could see it on the left side. The copies will come in handy in the next steps.
On the original design, hold the Shift key down and select the circle offset and the stencil design by clicking on them. Open the Modify Panel on the right side and select Crop. Now the design is cropped to the offset circle.
Once Crop is selected, it will break all the pieces of the stencil design apart. Make sure to Group the pieces back together. I use Ctrl+G to group as the keyboard shortcut.
Also, when using the Crop tool, the outer offset circle is now gone. This is where the copies come in handy. Make a copy of the offset circle from the left side and move it onto the design mat. Select the new offset circle, the cropped stencil design and the original circle; then use the Align tools to Center it together.
Make a copy of this completed design and pull it off to the left side. Then save the file.
If the wrong circle was selected when using Crop, simply use the Undo feature and go back to start again.
For this design, since we created our own print bleed, we only need to cut the inside circle and not the offset or the stencil design. Hold the Shift key down and click on the offset circle and stencil design to select them, then click on the Send tab and choose No Cut. This will turn the cut line off for the offset & stencil design. You can do this step at the end of the process too, however, if you remember before you make copies, then it can be a little bit easier.
Now it is ready to start filling it with a pattern and colors. If you want to use different patterns and background colors, make additional copies and space across the page.
I am using patterns from the Silhouette library. These are mostly files I’ve purchased from the Silhouette Design Store over the years and I have quite the collection. You can add your own patterns to the Silhouette library Patterns folder, however, I do caution users on doing so as patterns can be large files and quickly eat up storage space in your Silhouette cloud storage. I typically use the drag and drop method for bringing in patterns from an outside location. More details on Pattern Fill HERE.
Select the stencil design on the first one. Then either open the Library tab or click on the Show/Hide Library icon in the bottom left corner. Show/Hide Library will do a split screen of the Silhouette Library which can sometimes be easier when designing and less flipping back and forth on the screen.
Select the Patterns Folder in the Silhouette library on the left side and then choose a pattern. This will fill the selected object on the design mat with that pattern.
When working in the split screen, you can adjust the sections on the library if needed. This will depend on the computer screen size you are working on. Move the mouse cursor over the line the arrow points to above and then you will see a slider double arrow cursor to adjust the sections to see more of the pattern fill library. To go back to the full screen Design tab, simply click on the Show/Hide Library icon again and it will close.
Repeat this process for all the additional designs. I used a variety of different patterns for my pendants. Sometimes you really don’t know how it will print out and you may like some better than others once printed.
If you want to adjust the patterns further, open the Fill Color Panel – Tab 3 and you have additional options to Scale, Pan, Rotate, etc.
For the backgrounds, I chose to pull a color from each pattern and use that as the background color. Select the offset circle, then open the Fill Color Panel – Tab 1 and using the eyedropper tool, select a color from within the pattern. It may help to zoom in on the design to select the color you want.
If the colored circle covers the design, as shown above, right click and choose Send to Back. This happens because we made a copy of the offset and added it on top of the design and we need to reorder it.
If you don’t like the color, simply repeat the steps and select another color until you find one you like. Repeat these steps for all of the designs.
You can also use the Custom Color slider in the bottom of the Fill Color Panel to move the dot around to change the color to different shades of the color palette or even enter a HEX code at the bottom too.
I chose to print 2 copies of each pattern so I could make different projects with each or if I messed one up, I had a spare.
Continue to fill the page as desired. When the page is full, click File > Print and print the page. I printed onto Epson Presentation Paper – Matte and used the high quality photo matte settings.
Here is a look at one of my design pages before I printed it.
When doing a print and cut, set yourself up for success! Here are a couple tips that can help eliminate a lot of the issues we see users have with print and cut.
Use the default registration marks. This is where the most accurate print and cut results will occur consistently. Adjusting the marks or making them smaller increases the chance of a misread and off cut.
Keep the design out of the crosshatched area of the design screen. This is the safety zone for the optical eye to read the registration marks. Any colors or design aspects within that crosshatched area can interfere with an accurate reading.
Use a Silhouette cutting mat. The Silhouette machines are calibrated specifically for a Silhouette cutting mat. 3rd party mats are not typically the same page margins around the outer edges of the adhesive area and can cause issues with print and cut.
Place the printed page in the top left corner of the adhesive area on the grid exactly as it shows on the Silhouette software screen.
Hold the mat level or slightly elevated so the mat remains level as the registration marks are read. If the mat is hanging down in front of the machine it can cause it to bubble up in the middle between the rollers and this can affect how the registration marks are read. You can easily test this by simply loading your cutting mat and let it fall, then lift it up. You should be able to see the mat will flatten out in between the rollers when supported.
Have good lighting and not variable lighting or shadows. We have seen users have issues with print and cut simply by the amount of light from morning to afternoon. If your room lighting changes throughout the day, it can affect print and cut results. Avoid harsh shadows as well. Shining a bright light directly at the machine can also interfere with the optical eye reading the marks correctly. Shiny materials such as glossy surfaces or holographic can also interfere with an accurate reading as well as the light bounces off the material. Keep in mind that the optical eye is not a high level of intelligence. It is simply a laser eye that turns on and is looking for black registration marks in a very, very specific location on the page. The machine creates it’s own light, so technically it should be able to read the marks even with the lid closed.
The Epson Presentation Paper – Matte is a lighter weight paper and I love the print quality of images on it. I will use a slightly older cutting mat for this paper and used the Copy Paper settings with a blade depth of 2.
Once the machine has done it’s magic, then I like to remove the main paper first and I can carefully go back and remove all the circles. To help with any curling on materials, I will flip my mat over and peel the mat away from the material. I have to tell myself to slow down so I don’t tear the designs sometimes too! It’s not the machines fault if I tear it getting it off the cutting mat.
Next, it’s time to add the sparkle with the Mod Podge Sparkle and a foam brush. On a safe surface, give each of the designs a good coating of the Mod Podge Sparkle and let that dry. I use a silicone mat for easy clean up.
The first ones I made, I only used one layer of Mod Podge Sparkle. The second round, I added a second layer and let that dry completely before the next step. The double layer added even more sparkle and I felt it just added a bit more to the pendants. The design on the left has one layer of Mod Podge Sparkle on it versus 2 layers as shown on the right side.
Once it’s completely dry, then I applied a thin layer of E6000 to the inside of the jewelry pendant and carefully added the design on top and spun it around a bit. This helps to spread out the adhesive evenly. Make sure all areas are secure and let the E6000 dry completely before the next steps.
Once it’s dry completely, then add a thin layer of E6000 on the top of the design and a thin layer on the backside of the pendant glass. Then apply the glass on top of the design and spin it around to spread the adhesive evenly. Press to secure it completely. If you add too much glue, then it can seep out the edges and blur on the glass globe, but you want enough to have an even thin layer between the globe and design.
Let this dry completely before adding jewelry hardware and then admire your projects.
Here are a couple close up photos of the completed projects.
Once you get started, it’s hard to stop creating.
I had so much fun creating this mess… I mean these projects! They turned out fabulous! Sometimes you just need to allow yourself to get started and see where the project will take you.
Additional Resources on the Silhouette Tools Used in this Tutorial:
Save this for future reference by pinning the image below.
Enjoy !
THANK YOU for your support! How can you help? Click HERE & buy a coffee. Every little bit helps with the cost of running the site.
Silhouette Classes
Never stop learning! Let me help you take the anxiety out of learning with Silhouette and get to creating faster! My Silhouette classes are heavily focused on software, so you can take the skills & techniques taught and apply them to many future projects!
**This post may contain affiliate links. What that means is that I may receive compensation if you purchase through the links I have provided. The price you pay for the product or service is not higher but I may get compensated for sharing.
If you’ve ever wanted to bring digital stamps into Silhouette Studio, this tutorial is for you! In this video, I’ll walk you through the process of opening PNG files, using Autotrace, and using Print and Cut so you can create beautiful cards, scrapbook pages, and custom projects with ease. Whether you’re brand-new to Silhouette or looking to sharpen your skills, these step-by-step tips will help you get the most out of your digital stamp files and unlock even more creative possibilities.
Affiliate links may be present in the following blog post and as an Amazon Associate, I earn from qualifying purchases.
Ready to give it a try? Watch the full video tutorial below and see how easy it is to turn digital stamps into cut-ready designs in Silhouette Studio. Don’t forget to pin this post for later inspiration, share it with a crafty friend, and subscribe to my YouTube channel so you never miss a new tutorial. I can’t wait to see what you create with your own digital stamps—be sure to tag me when you share your projects!
Save this for future reference by pinning the image below.
Enjoy !
THANK YOU for your support! How can you help? Click HERE & buy a coffee. Every little bit helps with the cost of running the site.
Silhouette Classes
Never stop learning! Let me help you take the anxiety out of learning with Silhouette and get to creating faster! My Silhouette classes are heavily focused on software, so you can take the skills & techniques taught and apply them to many future projects!
**This post may contain affiliate links. What that means is that I may receive compensation if you purchase through the links I have provided. The price you pay for the product or service is not higher but I may get compensated for sharing.
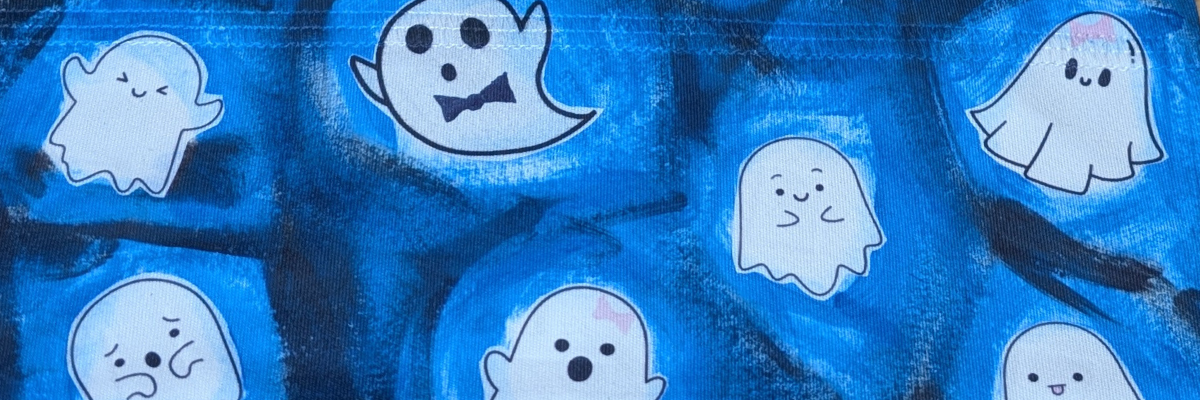
Halloween crafts are some of my absolute favorites, and this year I couldn’t resist making a Boo-tiful DIY Ghost Headband 👻 using Artesprix Sublimation Paints and Markers. Sublimation isn’t just for mugs and coasters—it’s a fun way to customize wearable accessories too! With just a few supplies, I transformed a plain Artesprix sublimation headband into a spooky-cute Halloween accessory that’s perfect for parties, trick-or-treating, or just getting into the festive spirit. Create your own ghostly design so you can rock a one-of-a-kind headband this Halloween.
Affiliate links may be present in the following blog post and as an Amazon Associate I earn from qualifying purchases.
In this video tutorial I shared how to use the new Artesprix Sublimation Coloring Books. These sublimation coloring books are available in 2 formats – a printed copy ($4.99) that you can order to be shipped to you or you can download the digital copy (free) and print with a sublimation printer at home.
While brainstorming for this video, I asked my youngest her thoughts and that is how the ghosts were chosen. This headband literally walked out the door this morning and I may never get it back.
Now she has requested one in orange for “Halloween” colors. I love all the options that can be created using the Artesprix sublimation paints, markers, and inks! So many possibilities to create unique creations.
THANK YOU for your support! How can you help? Click HERE & buy a coffee. Every little bit helps with the cost of running the site.
Silhouette Classes
Never stop learning! Let me help you take the anxiety out of learning with Silhouette and get to creating faster! My Silhouette classes are heavily focused on software, so you can take the skills & techniques taught and apply them to many future projects!
**This post may contain affiliate links. What that means is that I may receive compensation if you purchase through the links I have provided. The price you pay for the product or service is not higher but I may get compensated for sharing.
THANK YOU for your support! How can you help? Click the link to buy a coffee. Every little bit helps in the cost of running the site.