Posted on 14 Comments

Let’s Explore v4 – Knife Tool

The Silhouette Studio software is jam-packed with Tools and features that can be used to design with. One of those is the Knife Tool.

In the Silhouette software, Tools are located on the left side panel and Panels are located on the right side.

Tools vs Panels copy

The Knife Tool is located on the left side of the Silhouette v4 software.

Knife Tool copy

Keep in mind that the knife and eraser tool are changing a lot of data when they are in use. There are many factors that will affect what a user sees when using these tools. These could be the design being changed, the computer processing power, the version of software a user has, etc.

A user may need to be patient with their computer when they are using these tools as the computer processes the change in data. If a design is “complex”, then there may be other options to alter the design versus the knife or eraser tools, such as Releasing the Compound Path and deleting. Keep in mind, that each design might react differently.

Knife Tool

Tutorial written in v4.3.372

Let’s take a look at a circle shape and how the knife options work with it. I used the drawing tools on the left side to draw a circle and then replicated it on the right side and filled it with color using the Fill Color Panel.

Tip: holding down the Shift key on the keyboard will make the Knife (or line drawing tools) cut in a straight line either vertically, horizontally, or at a 45 degree angle.

Solid Option

Knife Solid copy

With the Solid option chosen, the shape will be cut and create 2 solid images.

Knife Solid2 copy

Each piece is now independent of the other and can be moved.

Outline Option

Knife Outline copy

With the Outline option selected notice that the unfilled shape reacts differently than the color filled shape.

A shape with no fill, will cut apart the design and leave the shape open. It is cutting a closed shape apart and making it 2 open paths.

Open Paths copy

Open paths react differently than a closed path. Open paths can be found by double clicking on the line of the design and bringing up the Edit Points.
If there are any red dots, that means it is an Open Path.

What you see above, is 2 semi-circle lines that have been cut from a circle. Open Paths cannot be filled with color and will only cut from 1 red dot to the next red dot.
It will not connect the cut.

Knife Outline closed path copy

If a shape is filled with color, then it reacts differently when the Knife – Outline option is used. It will result in 2 closed shapes.

Knife Set Tools

Each user with the basic (free) Silhouette software has access to the basic knife function as shown above.
If a user has a software upgrade such as Designer Edition, Designer Plus, or Business Edition there are more knife options available.

Knife Options copy

With the software upgrades, there are several more fun options for the knife tool.

Knife Options zoomed copy

Let’s take a look at a couple of these options.

Knife Options 2 copy

Notice that the unfilled shape behaves differently than the color filled shape. There are open paths on the unfilled shape and you do not see the knife design. But, the filled shape the knife tool creates the shape according to the design option you have chosen.

Auto Apply or Apply

Auto apply vs Apply copy

Next on the knife tool bar is the options to either Auto Apply the knife option when the mouse button is clicked or to manually choose Apply to have the knife finish. This gives the user the chance to decide whether they want the knife selection before it starts the process of changing the data.

This is all a matter of personal preference. However, if Auto Apply is chosen, then you do not get the chance to adjust the knife selection before it applies to the design.

Some of the knife tool options have an additional slider that appears when you draw with it that can adjust the shape of the chosen knife.
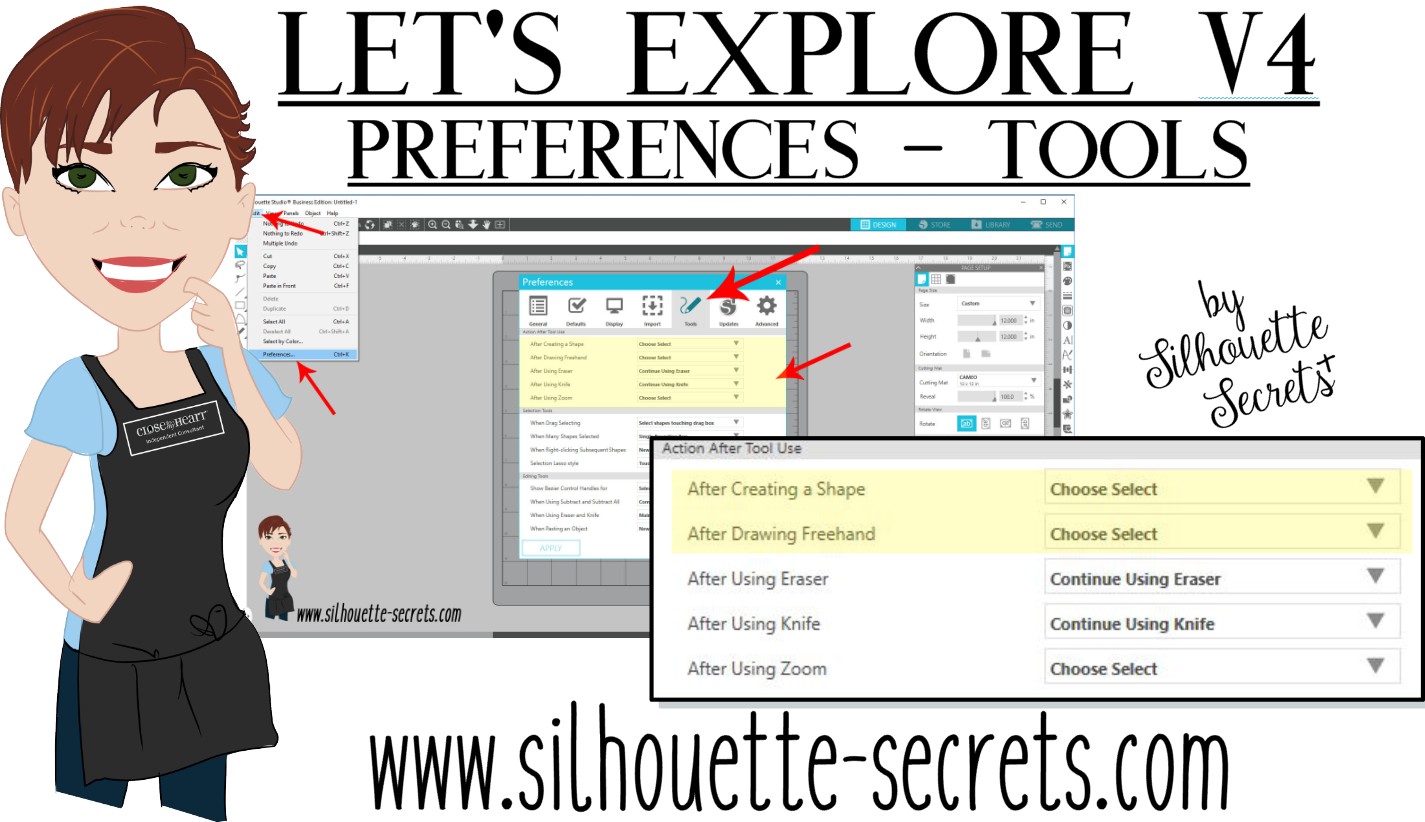
Preferences

Under the Preferences, there are options for how a user wants the Knife Tool to act. After Using the Knife can be set to “Continue Using Knife” or “Choose Select“.

Preferences copy

If it is set to “Continue Using Knife“, then you will need to click on the Select Arrow in the top left corner when done with the knife to turn it off.

Select Arrow copy

Check out more Preference options in this post
Let’s Explore v4 – Preferences – Tools

Do you use the knife tool?

Save this for future reference by pinning the image below.

Pinterest

I would love to see what you create!
Feel free to post on my Facebook group at Silhouette Secrets with EllyMae.

Enjoy!

Signature

SS Logo snip it

**This post may contain affiliate links. What that means is that I may receive compensation if you purchase through the links I have provided. The price you pay for the product or service is not higher but I may get compensated for sharing.

Posted on 1 Comment

Let’s Explore v4 – Etching photos with the Curio

Etching photos with the Silhouette Curio

I love my Curio! So much that I now have 2 of them, just in case.
This little machine amazes me all the time!

Check out this post – Silhouette Inspiration – to see a few more Curio etched projects.

Today I am going to share my “secret” to etching photos with the Silhouette Curio.

IMG_20200216_140337580 copy

How is this possible? Just taking the photo by itself and trying to etch it doesn’t turn out well. Photos are made up of so many different aspects that you can’t just fill it with an emboss fill and call it good. It would just turn out like a big etched blob. It might work for a silhouette of a person, but not to capture the essence of the photo itself.

Well, it’s really not a “secret” at all. But, this is what I do.
I followed a technique that Kay Hall with Clever Someday composed and put into an eBook – Etching Photos on Acrylic with the Silhouette Curio.

Ebook

This past week I had a lesson with a student and she asked me about etching photos.
This is what I told her, “While I can teach you all about etching acrylic on your Curio, I highly recommend you grab this eBook and read it. In fact, I recommend that you read it 2-3 times before you even try to follow it.”
And that is what I would recommend to all of you reading this. I can etch acrylic with the emboss fills pretty much in my sleep – in fact, there are nights that is all I “think” about when I’m sleeping. But, this etching photos technique uses the sketch fills and gives an amazing finished project. It is a technique that has many steps, but if you follow it exactly, you will end up with a stunning project.

Now, keep in mind each photo you etch is going to turn out differently. I know it’s not the answer my students want to hear when I say, “Each design is going to act differently.” This is true for fonts, designs, photos, tracing, etc.
Why?
Because they are all made up of different elements. There is rarely a 1 click button to have something magically turn into something amazing. It is a process and it takes some time to go through that process. Skipping steps rarely leads to a good result.

How do I do it?

Blog post written in v4.3.370
Affiliate links may be present in the following blog post and as an Amazon Associate I earn from qualifying purchases.

I open the eBook every single time and follow it step-by-step. If I don’t, I know that I will miss a step and it won’t turn out.

So let’s take a look at the photo first. I opened the photo in Silhouette Studio and then scaled it down to fit on the Curio mat.

Original Photo copy

Like I said above, each photo is going to be different. In this photo, I don’t want the extra background to be etched, just the people in it. So I used the Magnet Trace feature to draw around the people and “extract” them out of the photo.

Magnet Trace copy

Magnet Trace is a Designer Edition upgrade feature in the Silhouette Software. As you can see in the photo above, the edges are not smooth around the photo. But, we can change that. I love the Magnet trace for extracting photo because even after I delete the background, it retains the memory of the photo. So I can use the Edit Points feature and adjust the edges around the part of the photo that I want to clean up.
If the tool has traced or placed an edit point too far in on the photo, I can move it out and it still “remembers” what the photo looked like. It is very forgiving and I highly encourage you to play around with it. It takes some practice but can come in quite handy.

Point Edit Magnet Trace copy

Each of the little gray dots is an Edit Point. I can delete or adjust the points until I have the desired edge around my photo.

After I have “extracted” my photo, I then cropped it down by drawing a square around the section of the photo I wanted & used the Modify – Crop feature to capture only the section I want etched. Then I enlarged that section of the photo to fill the acrylic blank area.

Crop copy

Now that my photo is ready, I open the Etching Photos onto Acrylic eBook and follow the directions. I do highly recommend that you read the book from start to finish 2-3 times before you even try to follow along in the software. While it may not make sense completely when you are reading it those first few times, it will make a whole lot more sense when you sit down and try to follow the technique in the software.

The more you do it, the more comfortable you will get.

Once you click on the Send button, a timer shows up in the bottom right corner of the Send tab. However, it is rarely accurate, especially with etching projects. Sometimes it’s less, but more often than not, it’s more time. This project said it would take 20 minutes & 59 seconds to etch and it actually took 32 minutes.

IMG_20200216_140744157 copy

The top of this is the etched photo and the bottom is etched into a Silhouette metal etching sheet using the Emboss fills.

I think the longest etching project I’ve done is around 3 hours. This is why I love that with the Business Edition upgrade to the software I can use multiple machines at a time. So I can set up a project to etch and still cut with my Cameo or start another project on my 2nd Curio.

Multiple machines copy

For more information on how to use multiple machines at the same time, check out this post – How to Use Multiple Silhouette machines.

IMG_20190520_162605898 copy

Don’t have a Curio? Here are a few places you will find them:
Amazon
Silhouette America
Swing Design

Want to get started etching with the Silhouette Curio?

First grab some acrylic blanks from Craft Chameleon and then a Silhouette etching tool.

Then, if you are a beginner with the Curio here is what I recommend to start:

1. Let’s Explore the Silhouette Curio
Header image copy

2. Beginner Curio Etching Metal
beginner curio Etching metal header copy

3. Want an online etching class? Check out the 1 hour Basic Acrylic Etching with the Silhouette Curio class on my Teachable site – HERE.

SilSecrets Curio Etching copy copy

I show you the steps I use to set up an acrylic etch from beginning to end.
Here is the course curriculum from the design file to the full etching video course.

Teachable course copy

and then once you feel comfortable with the etching process and your Curio

4. Grab the Etching Photos onto Acrylic with the Silhouette Curio by Kay Hall
Ebook

5. Want personalized lessons? To be able to ask questions in real time to an instructor? Set up an in-person or online lesson.
More information HEREOnline Lessons & Classes.

6. Join us at the All Things Silhouette Conference in November to learn more about All Things Silhouette – from software to machines to hand-on project classes.

ATS-logo-slider-11-2020

7. Check out the “Let’s Explore v4” series HERE for more in-depth software information including all about the Emboss Panel, which is the key to the Curio and etch fills for more projects. Etching on photos is the only thing I use the sketch fills for, otherwise the Emboss Panel is the main focus with the Curio.

I really feel that the software is the key to it all. You learn how to do things in the software that will translate over to all kinds of projects in the future.

I would love to see what you create!
Feel free to post on my Facebook group at Silhouette Secrets with EllyMae.

Save this for future reference by pinning the image below.

Photo Etching Curio

Enjoy!

SS_Signature copySS Logo snip it

**This post may contain affiliate links. What that means is that I may receive compensation if you purchase through the links I have provided. The price you pay for the product or service is not higher but I may get compensated for sharing.

Posted on 10 Comments

Let’s Explore v4.3+ – Glyphs

If you have downloaded a v4.3 software version or higher, then you may see a few changes that have been made to a couple screens. A few icons, a few new options, etc.
We discussed the new Page Setup Panel look in this post a few weeks back – Let’s Explore v4.3 – Page Setup Panel and today let’s look at another change.

While this is not a big, big change. You may notice in some tutorials that the when referencing the glyphs panel, the icon has changed. That’s it – just the icon.

Glyphs icon comparing copy

If you are using a version of Silhouette that has the fancy A as the icon, check out this post – Let’s Explore v4 – Glyphs and Spellcheck.

Glyphs with Updated Icon

Tutorial written using Silhouette Studio v4.3.356
Affiliate links may be present in the following blog post.

Glyphs are any special characters that are an addition to a font file. These can include swirls, fancy letters, or shapes.

The Glyphs Panel is a Designer Edition upgrade feature. With the Designer Edition upgrade active on the Silhouette software you should see it as the 2nd tab at the top of the Text Style Panel.

The glyphs icon is the only thing that has changed in this panel at the moment. As we all know, changes happen. It’s better to know they are there than to be surprised someday in the future.

Glyphs Panel copy

1 – Text Search bar – Just like on Tab 1,  the name of the font that is selected will appear in this box or you can highlight it and type a name in the box and it will select that font.

2 – Glyphs – This area is where you will see the glyphs of the font that you are using show up.
Note: sometimes not all the glyphs will show up here and you will need to access those through Character Map (PC) or Fontbook (Mac).
It just depends on how the font was created.

3 – Recently Used Glyphs – This handy feature shows the ones you have recently accessed.

4 – Icon size – Those little icons can be hard to see.  Change the size of how the Icons appear in the glyphs panel. And when you hover over a glyph it magnifies it as well.

How do you use glyphs?

There are 2 ways I use glyphs.

1 – Type out the word you are using. Highlight the letter you want to replace and then click on the glyph icon one time to replace that letter with the new glyph.

2 – Double click on the glyph icon and it will add it to the top left corner of the design mat as an individual “letter”. You can continue to click on the glyph icons to add more or just click off of it to keep the design as a separate text box.

I use this second way most often when I am using Dingbat fonts that are a bunch of designs all in one font file or if I want to add a swirl onto the end of a letter.

Glyphs can be so fun to play with and add a little extra creative flair to your designs. Each font file will vary in the glyphs it may have. Some have just a few and others have lots.

I used the font called Bohemian Script by Typia Nesia – Design #296014 and it has a glyph count of 213.

Bohemian Script

Keep in mind the larger the number of glyphs, the longer it will take to load that font in the text style panel. Be patient with your computer as it processes the data.

I’d love to see how you are using glyphs in your projects!
Feel free to post on my Facebook group at Silhouette Secrets with EllyMae.

To save this for later reference pin the image below to Pinterest

Pinterest

Enjoy!

SS_Signature copySS Logo snip it

**This post may contain affiliate links. What that means is that I may receive compensation if you purchase through the links I have provided. The price you pay for the product or service is not higher but I may get compensated for sharing.
Posted on 6 Comments

Scanning & Tracing in Silhouette Studio

Silhouette & School Projects

*this post was created using v4.3.353 of the Silhouette Studio software

My daughter came home from school and said, “Mom, I have homework and it says to do it as a family.”

Gingerbread homework copy

Permission granted. Silhouette to the rescue!
Note: affiliate links may be present in this post

The hardest part of this project was getting my 6 year old to decide what she wanted to disguise the gingerbread man as.

We went shopping in the Silhouette Design Store for disguises. She thought about a reindeer, an elf, Santa, a boy elf, a girl elf, and about a hundred other options. Guess what she settled on? A reindeer – the very first choice. Of course!

Of all the designs we viewed in the store, she chose one that I had already collected in my library. Santa & Friends Photo Props by Kolette Hall – Design #35760 was perfect.

Santa props file.JPG

Sometimes picking out the design is the longest part of a project.

But, once she settled on the reindeer she said, “But he won’t have a costume on the rest of his body.”

Well, we can fix that.

I took the Gingerbread man page, slipped it into my scanner and clicked scan. This saved the file to my computer as a PDF document. Then my little one was amazed when I used File > Open and found the PDF file and it opened up in my Silhouette software.
To open a PDF file, the Designer Edition upgrade or higher is required.

Gingerbread Scan copy.jpg

Once the design was in my Silhouette Software, I used the Basic Trace feature to trace around the outer edge of the Gingerbread man.

Basic Trace copy

I increased the threshold on the trace to get the design to show as much yellow on the outer edge of the design and keep it as smooth as possible.

Keep in mind that each design you work with will be different and there is no magic number for the threshold or adjustments to the features under the Trace Panel. Adjust it until you feel you have the best yellow around the area you want to trace as you can get.

Then, I clicked on the Trace Outer Edge because I only needed the outside edge of the Gingerbread Man.

Trace copy

Now you may notice a few extra things traced. This will depend on the image you are tracing. These artifacts should be removed or they will cut with your image. Again, each design you trace is going to react a little different. This image is a photocopy of a design, so it picks up the little shadows and such on the paper.

Right click on the design and choose Release Compound Path. Now, you will see each artifact in this design is now broken into separate objects.

Release Compound Path copy

While all of the pieces are selected, hold down the Shift key on the keyboard and click on the main part of the Gingerbread Man. This will deselect him and all the other artifacts will remain selected. Press the Delete key on the keyboard and the artifacts will be no more.

Delete artifacts copy.jpg

Next, I told my daughter I was going to cut his head off. She gasped and then started laughing.

I double clicked on the Gingerbread Man to bring up the Edit Points. These little gray dots may look intimidating when they show up, but they are very useful.
Check out the “Let’s Explore v4 – Edit Points” post for more information HERE.

The first thing I noticed is that there are a lot of edit points. This can happen on any object you trace. In the Edit Points Panel, click on the Simplify option and see if it helps decrease the edit points without changing the shape of the design too much.

Edit Points Simplify copy

Again, each design is going to vary in how it reacts.

Simplified copy.jpg

Keep in mind a few things when you trace. First, it traces each design around the edges of the yellow that you have on the screen when you do a trace. This means if the image is pixelated, then will trace all those pixels.
And, each of those edit points is a data point that the Silhouette machine has to hit when it is cutting. It is how it tells the machine how to cut around the design you send to it. If there are a lot of edit points, it can sound odd cutting and take a long time as it makes it’s way connecting all those dots.

Now, that I have fewer edit points, I can move the edit points, delete the ones not needed, and adjust their directional nodes to bring the neckline down on the reindeer costume.

Reindeer neckline copy

And there is our reindeer/gingerbread man body.

Next, we discussed that reindeer have a white stomach. I tried using the Line Drawing tool – Draw a Polygon to draw my own ruffly white belly, but I just wasn’t feeling it.

But, the Santa beard from the Santa & Friends Photo Props was ruffly. I copied it from my other file and pasted it into this design.

Knife tool copy.jpg

I then held the Shift key down and drew my knife across the beard to cut the mustache off. I selected the mustache and deleted it. Then I double clicked on the beard to bring up the edit points and deleted the ones in the center as those are not necessary.

To select multiple edit points at the same time, hold down the Shift key and drag the mouse across all the ones you want to select. This will select multiples at a time and you can then adjust or delete them.

Santa beard edited copy

Now, let’s add this to our reindeer.

Reindeer white copy

I used the bottom middle bounding box to elongate the white of the belly.

Next, I wanted the neckline to match with the brown reindeer part of the costume. Select both the brown and the white of the reindeer and make a copy. Drag this copy off the design mat. Select the brown and white reindeer on the design mat again and open the Modify Panel and choose Crop.

Modify - Crop copy.jpg

The new shape has taken on the color of the bottom layer. Change the color back to white using the Fill Color Panel and you have 2 pieces that will fit back together.

Reindeer body copy

Want to see how it will look as a finished design?

This is what is commonly referred to as a “mock up”. Taking the design you have creating and layering it on top of the original photo.

Mock Up copy

We cut all the pieces out of cardstock and my 6 year old helped with each part. She enjoyed taking the mat off the cardstock.
Tip: To help the cardstock to release from the mat, flip the mat over and peel the mat away from the cardstock. This will help the adhesive release, keep the paper from curling, and keep the adhesive on the mat.
Check out this post “Tips to Get the Most out of the Silhouette Mat” for more tips.

IMG_20191205_102446498 copy

Then my daughter used her scissor skills to cut out the gingerbread man and I asked if she wanted to go find a glue stick to attach the pieces and she says, “Mom, can you just use your good glue?” I had to laugh at that as I pulled out my Scrapbook Adhesives EZ Tape Runner. Of course, I’d much rather use that than a glue stick.

Check out this video below to go through the same steps I have walked through above.

And we had our cleverly disguised Gingerbread Man that we created together. I am amazed at the Silhouette software all the time. While I am no designer, once in awhile I may have an idea or two. And you never known when you will want to take a Santa beard and turn it into reindeer fur.

So for a recap of the tools used in the Silhouette software:
Basic Trace
Release Compound Path
Edit Points
Line Drawing Tool – Draw Polygon
– Knife Tool
Modify Panel – Crop
Fill Color Panel

It didn’t seem like that many as we worked through the project, but we covered a lot. The best way to learn is to continue to create and do things in the software.
All of the above features are linked to detailed posts in the “Let’s Explore v4” series. When you get a chance take a look and then play with something new that you learned.

I would love to see what you create, feel free to post on my Facebook group at Silhouette Secrets with EllyMae.

Enjoy!

SS_Signature copySS Logo snip it

**This post may contain affiliate links. What that means is that I may receive compensation if you purchase through the links I have provided. The price you pay for the product or service is not higher but I may get compensated for sharing.

Posted on Leave a comment

Designing in Silhouette – Split Name Shirts

Today I’m going to share some shirts I made a few weeks back.

Sil_Secrets_softball5 copy

Some times it just feels good to sit down and make a few projects just because.

My daughter started on a new softball team this Fall season and I needed a few shirts. Red is not usually in my wardrobe, so new shirts were in need of some sprucing up. Libby Ashcraft with Libby’s Loft had just posted a Retro Words tutorial and it was one of those must-do projects. It is also extremely popular right now and the method she shows can be done with any bold font that you choose.

Sil_Secrets_softball1 copy

Check out Libby’s tutorial HERE on how to create this Retro Words.

I love that it uses several tools in the software such as: Offset, Guides, Knife tool, Align tool, Replicate Panel, Cut by Fill Color, and more.
Click on each of the words above for more information on that tool.

Sil_Secrets_softball6 copy

And I couldn’t just create my coaches shirts that were naked on the back, so it was perfect timing that these designs hit the Silhouette Design Store at the same time I was creating this project.

Sil_Secrets_softball4 copy

Don’t Stop When You’re Tired by Lori Whitlock – Design #302756
I did change the #Football to #Softball and it worked perfectly!

Sil_Secrets_softball3 copy

It’s How Big You Play by Lori Whitlock – Design #302758

And the favorite by everyone this season was this one.

Sil_Secrets_softball2 copy

If At First You Don’t Succeed by Lori Whitlock – Design #302764

The coaches and parents sure loved these shirts and I received a lot of compliments on them.

Sometimes, you just have to put everything else aside and just make a few projects for yourself! I hope that you have some time to play with your Silhouette machine soon!

Have you created this effect for yourself or others?

I would love to see your projects feel free to post on my Facebook group at Silhouette Secrets with EllyMae.

Enjoy!

SS_Signature copySS Logo snip it

**This post may contain affiliate links. What that means is that I may receive compensation if you purchase through the links I have provided. The price you pay for the product or service is not higher but I may get compensated for sharing.

Posted on 59 Comments

Let’s Explore v4 – Drawing Tools

Do you use the Silhouette software to draw your own designs? Or maybe you are like me and don’t feel you are creative enough to draw your own designs?
Today we are going to talk about the Drawing Tools and hopefully, you will feel a little differently by the end.

Drawing Tools Panel copy

As I’ve mentioned in previous posts, you will find the Tools on the left side of the Design Tab and the Panels that control the properties of those Tools on the right side.

Tools vs Panels copy

Understanding the different terms in the software can help in remembering where to access some of these features. Check out this FREE PDF file that diagrams the Design Tab out with each of the Icon names.

Let's Explore v4 diagram copy

Let’s Explore v4 – Drawing Tools

Drawing Tools close up copy

Draw a Rectangle Tool

Select the Rectangle Tool on the left side and the cursor will change to a cross-hair. Click the left mouse button and hold to draw a rectangle of any size.

Draw rectangle copy

To draw a perfect square, hold down the SHIFT key as you draw and it will draw a perfect square.

But, be careful not to let go of the SHIFT key before you release the mouse button or it will not be an equal sided square.
The undo option is your best friend in the software at times.

Now, after you draw that rectangle, does your mouse keep on drawing shapes?
You can change this under the Preferences in the software.
Check out this post on Preference – Tools to find out how.

Draw a Rounded Rectangle

The draw a rounded rectangle tool works the same as the rectangle tool, except the corners are rounded and you have the option to adjust the curve of the corners by moving the red dots that appear on the corner.

Rounded Rectangle copy

The red dots can be adjusted individually for each side of the corner or if the SHIFT key is held down when grabbing one, it will adjust them proportionally on all sides.

Draw an Ellipse

Select the draw an Ellipse tool to draw an oval or circle shape.

Draw an ellipse copy

Again, holding down the SHIFT key will allow a perfect circle to be drawn.
If the SHIFT key is released before the mouse button, it will revert back and not be a perfect circle.

Draw a Regular Polygon

Select this tool to draw a polygon. The polygon can be adjusted with the red dots or by using the slider bar in the middle of the shape to adjust the number of sides from 3 to 60.

Regular Polygon tool copy

Now, those are your basic shapes and can be used together to make all kinds of designs. What can you think to create?

I created this snowflake just by using a few of these basic shapes.
A rounded rectangle, a circle, and an oval.
Group or weld the ovals to create the leaf design.

Snowflake design copy

After drawing all the shapes, I used the Align tool to line them all up by the Align Center option. Then weld the shapes together.
Next, mirror the welded shape below from the Replicate Panel and then move the copy up a little so they are overlapped, then weld.

Snowflake welded copy

Now, use the Replicate Two Copies option and weld in the Replicate Panel to create 2 more copies. Then weld the copies together.

Snowflake Replicate copies copy

And then I repeated the same steps for the next part of the snowflake.

Snowflake 2nd arm copy

Once both parts of the snowflake are created, select the smaller snowflake piece and Rotate By 30 degrees, using the Transform Rotate Panel. Select both parts of the snowflake and use the Align Center option under the Transform Panel.

Snowflake welded final copy

Ta-Da! You have drawn a snowflake with basic shapes found in the Drawing Tools on the left side of the Silhouette Studio.

Drawing Tools Pinterest

Want to save this for later? Pin the photo above to Pinterest to refer back to later.
I love Pinterest – find me HERE!

What will you draw or create in the Silhouette software now?
Want another tip?
Check out basic drawing books to see how they combine shapes to make designs and objects.

Feel free to post your comments and questions below or on my Facebook group at Silhouette Secrets with EllyMae.

Enjoy!

SS_Signature copySS Logo snip it

**This post may contain affiliate links. What that means is that I may receive compensation if you purchase through the links I have provided. The price you pay for the product or service is not higher but I may get compensated for sharing.

Posted on 8 Comments

Let’s Explore v4 – Pattern Fill

In the past several weeks I have been using the Fill Pattern option in the Silhouette software to create my own papers for projects that I needed. While I have a large paper collection, there are just times I do run into a project, that I want a specific paper for and I don’t have it – like this 3D Tank project I complete a few weeks back.

Header Tank post

Last week, I started a project with my daughter and we only had wood patterned paper to make 1 of the project. So the Silhouette Design Store, my Silhouette software and my Canon printer came to the rescue.

IMG_20190731_205738918 copy

This Lath Decorative Board is created completely out of cardstock. Paper A is a retired patterned paper from my Close to My Heart collection and paper B is one that I filled with the pattern fill option and printed through my Canon printer onto white cardstock.

Pattern Fill header copy

I posted this on my Silhouette Secrets+ Facebook page  when I was working on the project and asked for guesses on which one was printed. Almost all the guesses were for A as the printed paper. This is a great option if you do not have the specific pattern in your stash that you need.

Sil_Secrets_PatternFill

If I don’t have the supplies on hand, it usually means that this project would have been put on hold for the time being, but now with the option to print and cut my own paper designs, I can get to crafting.
The project above is a Lath Board with Flowers Project by Nilmara Quintela from the Silhouette Design Store.

Let’s take a look at how you can use the Pattern Fill option to expand your options in Silhouette Projects.

The Fill Pattern tab is found on the right side under the Fill Color Panel – Tab 3.

Fill Pattern Panel2

This short video shows how easy it is to fill shapes with patterns from the Silhouette library.

Once you have your design set up with the pattern fill, you can use the Print and Cut feature to print the design out with your home printer and then cut on the Silhouette machine.
Check out this post Print & Cut – Part I for my tips for a successful Print and Cut.

I hope you learned something new today in the “Let’s Explore v4” series!
There are so many options in the Silhouette Software and the only way to learn is one thing at a time! I hope you get a chance to play around with this and more soon!

The designs used in this post can be found in the Silhouette Design Store:
Combat Tank 3D Box by Snapdragon Snippets
Lath Board with Flowers Project by Nilmara Quintela
Bracket Label Thank You Card by Lori Whitlock
Ink Splat Pattern by Loni Harris
Mermaid Scales Purple Pattern by Studio Illustrado
Hibiscus Paper by Miss Kate Cuttables
Canvas by Digital Pink Ink

I would love to see what projects you create! Feel free to post on my Facebook group at Silhouette Secrets with EllyMae.

Enjoy!

SS_Signature copySS Logo snip it

**This post may contain affiliate links. What that means is that I may receive compensation if you purchase through the links I have provided. The price you pay for the product or service is not higher but I may get compensated for sharing.
Posted on 6 Comments

Let’s Explore v4 – Preferences – Tools

When you use the drawing tools in the Silhouette Studio software, does every click of your mouse continue to draw another shape?

Did you know that you can change this behavior within the software?

Click on the Preferences icon in the bottom right corner of the Design Tab or click on the Edit option in the top left menu & choose Preferences.

Preferences copy

Then choose the Tools tab at the top of the Preferences window.

If the software continues to draw shapes with each click of the mouse, this preference can be found under the “Action After Tool Use” section of the Tools tab.

After drawing Tools

I change the After Creating a Shape and the After Drawing Freehand to “Choose Select” then choose Apply and Ok.

Choose Select

Now when you choose a Drawing Tool or the Line Drawing Tool, it will go back to the selection arrow instead of continuing to draw shapes.

Tip: I keep the Eraser and the Knife tool as “Continue Using” because typically I will continue using the eraser or knife. I have the After Using Zoom set to “Choose Select” because I don’t want each click of my mouse to keep zooming in on the design. I prefer to have my selection tool again and if I need to zoom in more, I will choose zoom again.

Sometimes these defaults can get reset in the software, but after you know what they are and how to adjust them, you can easily go in and change it to what you prefer.

Each user will have a preference on how they like to work in the software. I prefer to draw one shape and then have the selection arrow as my next option as I am rarely drawing more than 1 of an item at a time when I’m designing.

Feel free to post your comments and questions below or on my Facebook group at Silhouette Secrets with EllyMae.

Enjoy!

SS_Signature copySS Logo snip it

**This post may contain affiliate links. What that means is that I may receive compensation if you purchase through the links I have provided. The price you pay for the product or service is not higher but I may get compensated for sharing.

Posted on 14 Comments

Mastering the Line Tools in Silhouette Studio: Your Ultimate Guide to Precision Design

Silhouette Studio Line Tools
Silhouette Secrets+ with EllyMae

Let’s Explore v4 – Line Tools in Silhouette Studio

When it comes to creating stunning designs in Silhouette Studio, the Line Tools are your secret weapon for precision and creativity. From drawing simple straight lines to crafting intricate custom shapes, these tools open up endless possibilities for your crafting projects. Whether you’re a beginner exploring the basics or an experienced designer looking to refine your techniques, understanding how to use the Line Tools effectively can take your designs to the next level. In this guide, we’ll walk you through each Line Tool, share pro tips for maximizing their potential, and show you how to incorporate them into your next Silhouette masterpiece. Let’s dive in!

Sometimes, I think that the tools on the left side of the Silhouette Software get lonely. There is so much that you can do within the software in creating your own designs and I love seeing what everyone comes up with.

First, let’s take a look at the Design Tab. On the left side are the Tools in the software and on the right side are the Panels which control the properties of the objects created.

Silhouette Studio: Tools vs Panels copy

Check out the Let’s Explore v4 series (HERE) to see more information on the Panels on the right side and how they can be used.

And if you need a little more detailed diagram of the Design tab, don’t forget to grab the FREE PDF in this post – HERE.

Silhouette Studio: Let's Explore v4 diagram

Silhouette – Line Tools

Today, we are going to cover the Line Tools located on the left side of the Silhouette Studio software. This is available for all users, no matter if you have a software upgrade or not.

Silhouette Line Tools on left side

Here is a close up of the options available in the Line Tools menu – Draw a Line, Draw a Polygon, Draw a Curved shape, and Draw an Arc

Silhouette Line Tools Close Up

Draw a Line

This will draw a simple line from Point A to Point B. Holding down the Shift key will make it a vertical, 45 diagonal, or horizontal line.

Silhouette: Draw a Line

I often will draw a line if I have to separate designs when cutting without a mat to make it easier to weed.

Silhouette Line as Weeding Lines

Sometimes, I’ll use the Weeding Lines within the Silhouette software, but other times, it’s just as easy to draw my own line.

If you want to connect 2 separate lines together, check out this post on How to Connect Lines in Silhouette HERE.

Draw a Polygon

This tool will continue to draw lines until you connect the red dots together to close the shape or double click to end the line.
Holding down the Shift key will also make it a vertical, horizontal, or 45 degree angle line.

Silhouette Polygon Line Tool

Have some fun and see what kinds of shapes you can draw. Turning on the Snap to Grid found under the Page Setup Panel – Tab 2, can also help in making sure that you get even spacing and help with drawing objects.

I’ll use this tool or the Draw Curve Shape to create my own weeding lines around a detailed design or when I’m cutting multiple designs on a page.

Silhouette Polygon Line Tool as Weeding Lines

A combination of tools can make it easier to weed a detailed design or a page filled with designs like the one above by allowing you to weed smaller areas instead of having a full sheet of Oracal 651 stick back to itself.

Draw a Curve Shape

This tool will draw a line each time you click the mouse, but the point will be a curved point.

Silhouette Draw a Curved Shape

Continue clicking the mouse to add points and curves in the shape. Double click to end the line or connect back to the first red dot to complete the shape.

After the design is complete, double click on the line and the Edit Points will pop up and the design can be altered more.

Silhouette Edit Points

Each point has 2 blue squares that are handles that can be adjusted. Or select an option from the Point Edit Panel on the right hand side.

Silhouette Edit Point Demo

Draw an Arc

Select this tool and click onto the design mat, this will be the starting point of the Arc line. Move the mouse and the next click completes the Arc.

Silhouette Draw an Arc Tool

In the center of the arc, there is a grab handle that can be moved in or out to alter the Arc even more.

Click off of the design and an arc line is left.

Silhouette Arc Tool

There are so many fun things that can be created with the tools in the software. You can create your own shapes, add weeding lines, or add Text to the Path you have created.

Silhouette Line Tools Text to Path Demo

What will you use the Silhouette Line tools for?

Save this for future reference by pinning the image below.

Silhouette Line Tools Pinterest

Enjoy !

THANK YOU for your support! How can you help? Click HERE & buy a coffee.
Every little bit helps with the cost of running the site.

Silhouette Classes

Never stop learning! Let me help you take the anxiety out of learning with Silhouette and get to creating faster! My Silhouette classes are heavily focused on software, so you can take the skills & techniques taught and apply them to many future projects!

Silhouette step-by-step Classes by Silhouette Secrets+

Silhouette Secrets+ with EllyMae
**This post may contain affiliate links. What that means is that I may receive compensation if you purchase through the links I have provided. The price you pay for the product or service is not higher but I may get compensated for sharing.
Posted on 13 Comments

Let’s Explore v4 – Library Snapshot

Library Snapshot

One of the new features in the Silhouette Studio v4.2 software is a Library Snapshot.

Library Snapshot General copy

This takes a “Snapshot” of the library as it is right now and also allows you to revert back to this “snapshot” of the library if needed.

To access and setup the Library Snapshot, click on the Library tab in the top right corner.

Library tab copy

Then click on your name in the top left corner.
You will need to be logged in to the Silhouette library.
Then choose Settings.

Library Snapshot copy

A Library Snapshot Options window will pop up.

Snapshot details copy

At the top of the Library Snapshot Options box is the log of all the snapshots that are taken of the software.

Close up copy

The middle section gives you options to create, delete, browse, or revert snapshots manually.

The bottom section allows you to set up automatic snapshots of the Silhouette library.
I would recommend setting the Snapshot option to Daily.
It never hurts to have multiple copies.

The Library Snapshots are computer specific. Depending on how it is set up, the snapshot will occur when you open the software.
If I have my snapshots set to daily but I leave my software open on my computer overnight, it will not take a snapshot the next day until I have closed and reopened the software again.

These snapshots are only stored on the computer you are accessing at the moment. Each computer will create a snapshot when the software is opened on it. So if I access my software from my computer upstairs, that snapshot is saved on my upstairs computer only. It is not stored in the cloud and synced between computers.

Does this replace making a backup of the library? No!

I would still highly recommend making a backup of your library on a regular basis and I would also recommend having your personal files saved to an outside source, which is also backed up as well too. There is nothing that is 100% safe and just like a computer crash, you cannot predict when something will happen.

Do you remember years ago when typing in Word documents and we were taught to save often? It is still a great habit to get into.
Save & backup often and you will not regret it.

Exporting a Backup

To make a backup of your library in Silhouette Studio v4, open the Library tab.
Click on your name in the top left corner (must be logged in).
Choose Library Export.

Library Export copy

A “Select Location” pop up window will come up.

Library Backup copy.jpg

Choose Browse and then select a safe location to save the backup file to.

This is a backup file only. It cannot be opened outside of the software and only can be imported back into the software if needed.
It does not contain individual files.
If you want the files saved individually, you will need to open each file and choose File > Save As > Save to Hard Drive.

I add the date to the file name and save in a Backup folder that I can find if needed.
I’d recommend making a backup of the library on a regular basis, just in case because you just never know.

If you ever need to import the backup back in, click on your name in the top left and choose Library Import.

Library Import

The Library Snapshot is just one of the new features in the v4.2 software.
Hopefully, you will never need to use it, but it is great that it is there.

Now, it’s a great time to go make a backup of your Silhouette library, no matter what version you are using and if you are in v4.2, set up the snapshot to your specifications.

Have questions or comments feel free to post below or on my Facebook group at Silhouette Secrets with EllyMae.

Enjoy!

SS_Signature copySS Logo snip it

**This post may contain affiliate links. What that means is that I may receive compensation if you purchase through the links I have provided. The price you pay for the product or service is not higher but I may get compensated for sharing.