Posted on 28 Comments

Perfect Cut Settings for Silhouette

Silhouette Secrets+ with EllyMae

I know everyone is always looking for the “perfect cut settings” with Silhouette.
Well, let’s just start with

That is a myth!

What you will see is many “suggested settings”.
Even in the Silhouette software, there are “preset settings“.
These are just a starting point.

Why?

Well, the first reason is
Not all materials are created the same.
You may have variances in products even within the same brand, colors, style, etc. There is no magic one size fits all cut setting.
This is why you will see so many “suggestions” from user’s when someone asks on a Facebook post. It is also why you will see each different retailer have their own “suggested settings.”

Materials pictured: Leather, Cardstock, Felt, Faux Leather, Crepe Paper, Fabric, Vinyl

The next reason is
There are many other factors that play into it.
The settings that might work for one user may not work for another because the factors may not all be the same.

The biggest of these factors is whether the blade is installed properly and adjusting correctly.
This is still the #1 cutting error issue and it affects ALL Silhouette machines.

Cameo 3 Autoblade and Silhouette black “ratchet” blade installation

This is one of the best things you can learn to do for yourself & to save yourself headache in the future. It doesn’t matter if you are an experienced user or a beginner. If the blade is not installed properly with no gap and adjusting properly, you WILL have cut issues.
This is an important step no matter what blade type you are using. If you have a gap between the lip of the blade and the housing, you will most likely experience inconsistent cut results.

This is how the blade should be installed on a Cameo 4, Cameo Plus, Cameo Pro, or Portrait 3.

There should be absolutely no gap between the lip of the blade and the housing.
AND the lock on the front of the blade needs to be pushed in completely.

For those using the Autoblade watch as the machine does it’s “tap dance” at the beginning of the cut, does the red line inside the blade adjust properly and to the correct number?

If it does not, we can start troubleshooting it with a photo of the blade installed with the cutting mat or vinyl loaded if you post on the Silhouette Secrets+ Facebook group or check out this video by Silhouette America on Cutting Machine Maintenance and how to Reset the Motor at 4:38 in the video. This should reset the housing so that it is properly aligned to hit the adjustment holes correctly.

After the blade installation other factors that play into a cut are:

Blade life? How old is the blade? Or more importantly, how much as it been used.

What else has the blade cut? I would recommend keeping dedicated blades for each material you do cut. This can increase the lifespan of the blades and get you better cuts. For instance, glitter eats a blade and can sometimes even take chunks out of it. If you’ve cut glitter and then go back to cutting vinyl, it may not cut well again. Or another examples is cutting cardstock. Paper dulls a blade at a different rate than vinyl.
This is one reason that fabric people & people who sew have separate scissors for cutting fabric vs paper scissors.
Also keep in mind that thicker, denser materials are going to dull a blade faster than thin materials.

Cutting with a 3rd party mat? Third party mats can be different sizes and thicknesses. This can affect the cut quality. It is not recommended to use 3rd party mats for many reasons. It can affect not only the cut quality but also the lifespan of the machine’s rollers as well.

Is the cutting strip damaged? This is a rubber strip under the blade housing that provides the pressure from the bottom of the mat/material. Any nicks, dings, holes, slices in it can affect the cut.
Find more details on the cutting strip HERE.

Are you re-sticking your mats? Re-sticking mat can cause all kinds of cutting issues. It can gum up the machine or blades. It can cause the rollers to not function properly. It is not advised.

Cheap materials? Sometimes it’s a get what you pay for situation. Cheap vinyl/htv, etc. can be a headache and it may not be that you are doing anything wrong, it’s just difficult to work with.

Silhouette machine model? Yes, each machine can vary because they are different.

All of these are factors that can affect the cut quality.

Affiliate links may be present in the following blog post and as an Amazon Associate I earn from qualifying purchases.

So what do you do?

TEST CUT

Test cuts are going to be your BEST FRIEND!

I start with the preset in the software that is the closest material to what I’m using.

For instance, if I’m cutting a solid color Heat Transfer, I select Heat Transfer Smooth and do a test cut with the recommended settings. If I’m cutting Oracal 651, I start with the Vinyl – Glossy setting. If it doesn’t cut, adjust the cut settings and do another test cut. I recommend only changing 1 thing at a time and doing a new test cut. If you change too many things at once, you don’t really know what worked.

As you do this more and more, you will start to see patterns. For instance, on the Cameo 4 models I find I have to increase the blade depth up 1 on almost all materials.

There are 2 ways you can do a test cut.

1 – Use the Test Cut feature in the Silhouette software on the Send tab.

The default test cut option is in the upper left corner of either the mat or the material loaded.

If you need to move the test cut to do it again, you can do so in 2 ways. You will need to move the test cut to the exact location you want it to cut on your material.

To do this, use the arrows keys next to the test cut button on the Send tab in the software or the arrows on the Cameo touch panel on the right side.

To move the housing, you will need to move it both over to the right and down. The housing will perform the test cut in the exact location it is placed. If it is only moved over to the right, it will cut the top of the cutting mat.

Or the second way to do a test cut is use a shape or object.

I use a capital B that I type out and then I will place it on my virtual mat where my design is not located at. I love this way because it is faster than adjusting the housing and a bit more accurate since you place it where you want.

Click on the Send tab, click exactly on the design to select it and choose No Cut to turn the cut lines off on the design and only cut the capital B.

Select the material you are cutting and click the Send button at the bottom of the Send tab to cut the B. Did it cut? If not, adjust the settings, move the B and send it to cut again.

It is much better to use a small section of material to make sure the settings will work versus sending a full 20″ design and it didn’t cut well. This will save you both time and headache.

Note: if doing a print and cut project, you do not want the test cut to cut from the top left of the printed page or it can interfere with the reading of the registration marks.

You can also either change the Line Color or the Fill Color of the B and then use the Cut by Line or Cut by Fill color options to turn the cut lines on or off.

This was one of the habits that I found the hardest to get into. I was a Silhouette user for many years before I knew about the test cut feature. But, if you think about it, it makes complete sense and it will save you time, materials, and headache in the long run!

While there are NO one size fits all “cut settings”, the more you cut, you will get familiar with what you are working with.

Once you have found those “perfect” cut settings for your material, you can create a custom setting in Silhouette for your materials. Find out more on Custom Cut Settings HERE.
And if you do use custom cut settings, make sure you are backing those up or writing them down somewhere too!

Now the next question I see all the time is “How long should a blade last?

Again, there is no “perfect” answer to this!

As a beginner I do feel you will go through blades and cutting mats faster than an experienced user.
Why?

Because you are learning!
Learning how this work, learning how things cut, learning what works and what doesn’t.
As you continue to cut things, you will find tips and tricks that work for you!

Many of the same factors go into the blade life as the cut settings, such as materials you are cutting or settings you are using.

While I know that may not be the news you want to hear – that there is no “magic” button to cut all materials, I hope that it will help save you some frustration and headache in the long run.
Test cut, test cut, test cut. Now repeat it to yourself!

Whether you are a new user or an experienced user, I would love to see what you create with your Silhouette machines & software.
Feel free to post photos or questions on my Facebook group at 
Silhouette Secrets with EllyMae.

Save this for future reference by pinning the image below.

Enjoy !

THANK YOU for your support! How can you help? Click HERE & buy a coffee.
Every little bit helps with the cost of running the site.

Silhouette Classes

Never stop learning! Let me help you take the anxiety out of learning with Silhouette and get to creating faster! My Silhouette classes are heavily focused on software, so you can take the skills & techniques taught and apply them to many future projects!

Silhouette step-by-step Classes by Silhouette Secrets+

Silhouette Secrets+ with EllyMae
**This post may contain affiliate links. What that means is that I may receive compensation if you purchase through the links I have provided. The price you pay for the product or service is not higher but I may get compensated for sharing.

Posted on 4 Comments

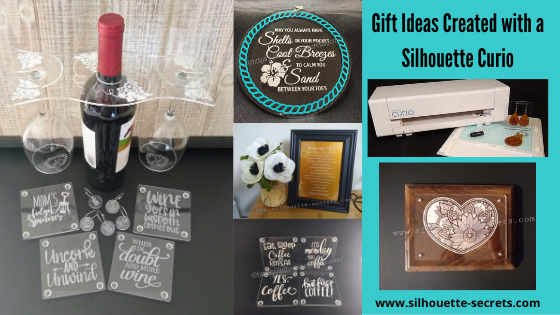
Gift ideas with your Silhouette Curio machine

I love that with the Silhouette machines you can create custom gifts that are unique to be given out. Or if you end up really liking it, keeping if for yourself – shhhhh!

A few weeks back I did a post on gift ideas you can create with your Silhouette Cameo or Portrait. Well the great news is, all of those ideas could also be completed with a Curio as well, since the Curio can cut all the same materials that the Cameo or Portrait can.
Check out that post here:
5 Gift ideas created with Your Silhouette

Today, I have more gift ideas that can be created with your Silhouette Curio machine.
These gift ideas are specific to the Curio as the Cameo and the Portrait are not designed for etching. For a little bit more information on that check out this post here:
Etching with your Silhouette machine

Instead of rushing at the end of the year, let’s start thinking about it, making lists, gathering supplies, and getting things done now.
Then we can enjoy the time later!
Just make a list of the gifts you have already done and put the list & gifts in a safe place.
Just remember where that “safe” place is.

Affiliate links may be present in the following blog post and as an Amazon Associate I earn from qualifying purchases.

Gifts with the Silhouette Curio

1 – Acrylic etched ornament or decor

Noel Design by Sweet Afton – Design #334940

Supplies used:
Silhouette Etching tool
3″ round Acrylic disc from Craft Chameleon found HERE
3″ round Curio Template from Craft Chameleon found HERE
Oracal 651 Green adhesive Vinyl
Oracal 651 Red adhesive Vinyl
Vinyl retailers:
Expressions Vinyl, Heat Press Nation, Swing Design,
U.S. Cutter, The Vinyl Spectrum

Beach Blessing by Deborah Stine – Design #62386
Snowflake Wonder Circle Poem by Snapdragon Snippets – Design #72245

Supplies used:
Silhouette Etching tool
5″ Round acrylic disc from Craft Chameleon found HERE
5″ Circle Curio Template from Craft Chameleon found HERE
Oracal 651 Teal adhesive Vinyl for Beach Blessing decor
Etched Vinyl for Snowflake decor
Vinyl retailers:
Expressions Vinyl, Heat Press Nation, Swing Design,
U.S. Cutter, The Vinyl Spectrum

Acrylic Etching classes:
Basic Acrylic Etching Class
Basic Acrylic Etching & Design Class

Supplies used:
Silhouette etching tool
4″ x 6″ acrylic photo panel from Craft Chameleon found HERE
Wood blank
Screws
Paint or stain

Class:
Heart Mandala Acrylic Etched Silhouette video course

2 – Acrylic etched light base

Supplies used:
Silhouette Etching tool
Lighted base for Curio with round insert by Craft Chameleon found HERE
Curio Template by Craft Chameleon found HERE

Acrylic Etching classes:
Basic Acrylic Etching Class
Basic Acrylic Etching & Design Class

3 – Acrylic etched coasters

Supplies used:
Silhouette Etching Tool
Acrylic coaster from Craft Chameleon found HERE
Coaster Curio template from Craft Chameleon found HERE
Eat, Sleep, Coffee Repeat by Sophie Gallo – Design #230872
Less Monday More Coffee by Tanya Batrak – Design #209927
Yes. Coffee by Kolette Hall – Design #171334
But first Coffee by Lilium Pixel Svg – Design #242962

4 – Wine themed set

Supplies used:
Silhouette Etching Tool
Wine Caddy
Acrylic Wine Caddy from Craft Chameleon – found HERE
Curio wine caddy template from Craft Chameleon – found HERE
Silhouette Curio Large Base – Silhouette America, Swing Design, or Amazon
Wine Charms
15/16″ acrylic disc from Craft Chameleon – found HERE
Wine Charm Rings from Craft Chameleon – found HERE
15/16″ Curio Template from Craft Chameleon – found HERE
Wine themed coasters
Acrylic Coaster from Craft Chameleon – found HERE
Coaster Curio template from Craft Chameleon found HERE
Mom’s Fidget Spinner by Sweet Afton – Design #202772
Uncork & Unwind by Sarah Hurley- Design #236620
Wine Goes in Wisdom Comes Out by Sarah Hurley- Design #279372
When in Doubt Add More Wine by Megan Hardy Designs – Design #124514

Acrylic Etching classes:
Basic Acrylic Etching Class
Basic Acrylic Etching & Design Class

5 – Embossed key fob & earrings

Flower by Wild Pilot – Design #274519

Supplies used:
ReaLeather Tooling Leather – Hobby Lobby
Silhouette Fine Embossing Tool – comes with the Curio
Key ring
Rivets – screw rivet or hammer set rivets by Tandy (I do not recommend cheap ones)
Rivet Setter if needed – Amazon
Leather Punch – Michaels or Amazon – highly recommend if working with leather
Jump rings
Fishhook earrings
Bent Nose pliers (2)
Eco Flo Gel Antique – Tan
Wool Dauber
Sponge – Michaels or Amazon

Class:
Leather Embossing class with Silhouette Curio

6. Personalized etched metal sheet in a frame

Anniversary gift

Supplies used:
Silhouette etching tool
Silhouette metal etching sheets
5″ x 7″ black frame

Metal Etching classes:
Beginner Metal Etching class
Advanced Beginner Metal Etching with placement

7. Etched Metal Bottle Openers

Supplies used:
Silhouette Etching Tool
Stainless Steel Bottle Openers from Craft Chameleon – found HERE
Curio Bottle Opener template from Craft Chameleon – found HERE

Hopefully this have given you some ideas of things you can create with your Silhouette Curio and give as gifts and the resources to find the supplies. These are things that you could personalize with all kinds of ideas and give through out the year for all occassions.
I love that I can make custom creations with my Silhouette machines!

I love to see what you are creating with your Silhouette machines! Feel free post on the
Silhouette Secrets+ Facebook Group.
We love to see what you are doing and creating with your Silhouette machines!

Save this for future reference by pinning the image below.

Enjoy!

This image has an empty alt attribute; its file name is logo.jpg

THANK YOU for your support! How can you help? Click HERE & buy a coffee.
Every little bit helps with the cost of running the site.

Or if you are looking for more in-depth, step-by-step classes, check out all of my online Silhouette classes on my Teachable site HERE.

SS Logo snip it
**This post may contain affiliate links. What that means is that I may receive compensation if you purchase through the links I have provided. The price you pay for the product or service is not higher but I may get compensated for sharing.
Posted on 2 Comments

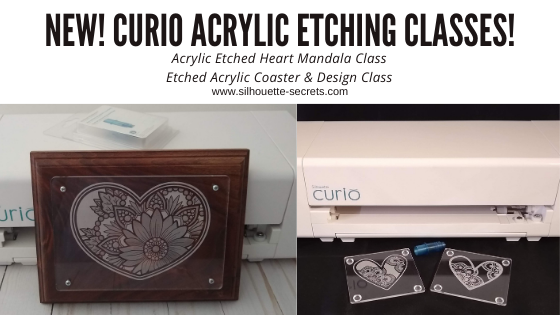
New! Curio Etching Classes released!

Just a quick note to share 2 new Curio acrylic etching classes that I’ve released on my Teachable site.

Acrylic Etched Coasters & Design with the Curio – found HERE

In this 1 hour 18 minute video class we will go through the step-by-step process of setting up an etch design in the Silhouette Studio software, setting up the Silhouette Curio machine to etch, and etching an acrylic blank. We will etch this coaster design 2 ways and work through the design process to get a different look for each coaster.
This class goes beyond just the basics of etching and dives into changing a design up and filling it with different emboss fills to achieve a different end result.

Curio Etched Heart Mandala Class – Advanced Beginner – found HERE

In this 1 hour 50 minute video class we will go through the step-by-step process of setting up a heart mandala etch design in the Silhouette Studio software, setting up the Silhouette Curio machine to etch, etching on an acrylic panel, and mounting it to a backing board.

All of my online Silhouette classes can be found HERE.
These are step-by-step classes taught exactly the same as if we were face-to-face.

I would love to see what you create with your Silhouette!
Feel free to post on my Facebook group
Silhouette Secrets with EllyMae.
If you have questions feel free to post below or on the Facebook group too!

Save this for future reference by pinning the image below.

Enjoy!

This image has an empty alt attribute; its file name is logo.jpg

THANK YOU for your support! How can you help? Click HERE & buy a coffee.
Every little bit helps with the cost of running the site.

Or if you are looking for more in-depth, step-by-step classes, check out all of my online Silhouette classes on my Teachable site HERE.

SS Logo snip it
**This post may contain affiliate links. What that means is that I may receive compensation if you purchase through the links I have provided. The price you pay for the product or service is not higher but I may get compensated for sharing.
Posted on 2 Comments

New! Curio cover file created

It’s here! I finally was able to create the cover file and cut vinyl to decorate one of my Curio machines!

Affiliate links may be present in the following blog post and as an Amazon Associate I earn from qualifying purchases.

I used a Sparkleberry Ink pattern called Sea Glass Watercolor to create this cover.

And if you look really close you can you can see the sparkle from the Glitter Laminate that I applied on top of it before I cut it.

Grab this free cut file
HERE

This is the Curio machine I take when I teach classes at events, so I’ll definitely be able to tell which one is mine.
Note: I did not cover the inside of the lid as it has instructions on it, but you could measure and create your own if you wanted to cut that too!

I will be 100% honest in that I wasn’t sure if I was going to like it. I debated on the pattern to use on it and asked my kids and my husband for their thoughts. In the end, I chose one and just did it. And I love it! It was the perfect pattern.

Check out the cover files I’ve created for the Cameo 3 and Cameo 4 too!

Check out how I created these files in this post HERE and then grab the cut files here:
Cameo 3 cover cut file
Cameo 4 cover cut file

I would love to see what you do with your Silhouette!
Feel free to post on my Facebook group
Silhouette Secrets with EllyMae.
If you have questions feel free to post below or on the Facebook group too!

Save this for future reference by pinning the image below.

Enjoy!

This image has an empty alt attribute; its file name is logo.jpg

THANK YOU for your support! How can you help? Click HERE & buy a coffee.
Every little bit helps with the cost of running the site.

Or if you are looking for more in-depth, step-by-step classes, check out all of my online Silhouette classes on my Teachable site HERE.

SS Logo snip it
**This post may contain affiliate links. What that means is that I may receive compensation if you purchase through the links I have provided. The price you pay for the product or service is not higher but I may get compensated for sharing.
Posted on 4 Comments

Etching with your Silhouette machine

Today we are going to talk about etching with the Silhouette machines.

I am seeing a lot of questions regarding which Silhouette machines can etch and we are going to get into some of the nitty gritty details about it.

Updated 1/1/9/2024
New machine models with etching abilities
The Silhouette Curio 2 – more information HERE.
The Silhouette Cameo 5 can etch on Silhouette metal etching sheets. It is limited in etching capabilities due to the clearance on the machine.
More details on Etching with a Cameo 5 HERE.


Which Silhouette machine is designed for etching?

The Silhouette Curio is designed for etching.
It is the only machine that is designed by Silhouette for etching.

We will go into more details farther down on why.

Can I etch with my Silhouette Cameo or Portrait?

First, the Cameo or Portrait machines were not designed for etching.
This means that if you do decide to etch with the machine it can void the warranty on the machine and my biggest concern for you is it may decrease the lifespan on the machine.

How will it decrease the lifespan of my machine if I etch?

Etching is much more taxing on the housing than if you were just cutting.
Why? When you are etching, you are scratching away the surface of a harder material such as metal or acrylic. This is more taxing on the machine as it moves back and forth.

As an example, let’s take a look at this heart design. On the left side you can see the cut lines of a regular cut file. On the right side is the same file that I have etched on my Curio.

Now, I’ll zoom in on the etch file and you will see that this file has hundreds or thousands more lines in it that need to “etch” to fill the design in. Again, keep in mind that etching takes more force to scrap away the surface of the harder material vs just cutting through a material such as vinyl or cardstock.
It is a completely different action.

While some users will say they tried it and it worked, the Cameo or Portrait machines were not designed for this purpose. Which means that the machines were not tested for etching and the additional wear and tear it may have on your machine.

Yes, while it may work ok. What are the long term effects of that etching on your machine?
Let’s take a look at the Cameo 4 as an example.

Tools
To etch with it, users are squishing a 3rd-party tool into the adapter (if needed) and then squishing the tool into the housing. Over time, if you stretch that housing or put additional force on the tool holder, it could break or stretch. Third-party tools are often heavier than a normal Silhouette blade and could affect the tool housing with long term use.
Silhouette does not have an etching tool designed for the Cameo or Portrait because it is not something the machine was designed or tested for.
Click HERE for official information on 3rd-party tools in the Silhouette machine.

The clearance of the machine.
This will all depend on the machine you are using and how much clearance it has.
Most often I see tool marks in the materials that are etched on a Cameo 4 or a Portrait because it just does not have the proper clearance needed to not only fit the blank under the roller bar and under the tool tip once it’s installed.
A Cameo 4 has a clearance of 3 mm.

Bottom line – the lifespan of your machine.
How is the etching going to affect the lifespan of your machine?
On the Cameo 4, Tool 1 housing is the only housing for using a regular cutting blade in it and Tool 2 housing is for specialty blades. This is due to the 2 different motor types in the machine. They are designed for different purposes.
If your Tool 1 housing gets broken or is not functioning properly, you are toast!
You now have a Cameo 4 machine that can only utilize Tool 2 tools.
This is my biggest concern for users who are seeing that etching can be done with a Cameo or Portrait! I don’t want you to decrease the lifespan on your machine or encounter future issues because you have chosen to etch with it.

If something happens to your machine, who is responsible for replacing it? You!
Not the person who encouraged you to etch with it.
Not Silhouette because the machine was not designed for etching in the first place.

I know this is not what you want to hear, but my biggest concern is for YOU, your machine, and your success!
If you etch with your Cameo or Portrait it is a DO AT YOUR OWN RISK.
What I don’t want is someone doing it without knowing the risks and then being totally devastated when their machine no longer works properly.

For more details on the warranty on a Silhouette machine, click HERE.

The Silhouette Curio

Now, let’s talk about the Silhouette Curio and why it is the machine designed for etching.

Update: The Silhouette Curio 1 is no longer manufactured, however, it is still a great machine and you may still find it available used. The Silhouette Curio 2 was released in September 2023.

Stable base
The Curio has a solid, stable base that must be used when cutting or etching. There are 2 sizes. A small base which has a cutting mat space of 6″ x 8.5″ and a large base which has a cutting mat space of 8.5″ x 12″. The Curio cannot be used without a base and you cannot “trick” the Curio to use a large cutting mat on a small base or vice versa.

Adjustable platforms to accommodate thicker materials
The Curio base comes with several adjustable platforms which allow for up to 5 mm clearance. The platforms are stacked on the base and the embossed number plus the material thickness should add up to a 6, which is equal to 6 mm.

This platform system is what enables you to be able to place a 3 mm acrylic blank or a piece of tooling leather in the Curio and still have the clearance to work with the material.

Silhouette etching tool

The Silhouette etching tool is the only one designed by Silhouette for the Curio machine. I have used other 3rd party tools to test and I find that I get the best, most consistent etch with the Silhouette etching tool.

Yes, you do have to replace it as it wears down. Keep in mind you are scratching away at a hard surface when you are etching. It is just like replacing a blade. For me, the results are better with the Silhouette etching tool than any other, so it is well worth the cost of a replacement versus blanks with areas missing an etch.

Emboss Panel unlocked
When a Curio is plugged in and recognized by the software, the Emboss Panel is unlocked.
I feel this is the best method for the etch fills.

Each user will vary in what they prefer, but I like a tight cross-hatched etch fill to give me the best filled in look. Each design will vary in what is going to look the best and often you do not know how it will look until you’ve tested it.

Etch Action
In the Silhouette software, there are different “actions” for the different functions.
For instance, cut vs sketch vs etch vs Kraft cut vs Rotary cut, etc.

Each of these actions tells the software/machine to send the data in a different way.
When you choose the etch action you are telling the software exactly what you are doing with the tool and machine.
In my experience, the Emboss Panel with the etch action is much less data intensive on the Silhouette software and takes less time to etch vs using the Sketch Action or the Line Effects Panel.

Exact placement due to tool orientation to the same location
One of the best features of the Silhouette Curio is that if you have loaded the base properly, the tool housing aligns to the EXACT same place every single time!
This is awesome for placing your blanks on the cutting mat as the Silhouette design screen matches the cutting mat exactly.
Yes, on a Silhouette or Portrait the cutting mat on screen and physically match as well, but you also have user input when you load the cutting mat that can throw the alignment off.
That is less likely to happen with the Curio as long as the base is properly loaded.

For more information on how to set up and load the base in the Curio check out this post
The Curio – Getting Started.

Now, will the machine eventually wear out. Yes!
My original Curio is starting to see some wear and tear on it. However, I etch more than the “average” user. Since I teach classes at events, online, and private lessons – I have thousands of more machine hours into my Curio than most users would have. When I am preparing for a class, I will etch or emboss the same design over and over again to test the settings, time the design, and to write/create the class. For instance, for my Leather Embossing class, I have hundreds of hours into this class from researching to recording the class and here are just a few of the samples I created during the entire 6 month process of creating the class.

When I create an acrylic etching class, I may have a stack of acrylics 30 high that I’ve done testing on. It is all a process and I test the settings over and over to get the best etch results that are reproducible by a student who would be taking or viewing the class.

I etch way more than the “average” user and my machine is still etching 2+ years later.
I do wish there was a machine hours counter on it, so I could share with you how many real machine hours I have invested in it.
Again, I am seeing a bit of wear and tear on it, but I purchased a back up Curio machine because I do use it so much.

The average user should be able to see years of etching with their Silhouette Curio machine if it’s used and cared for properly.

You have heard the saying “The right tool for the job.”, right?
Well, in this case, I could not agree more.
Again my biggest concern for you is your machine, the machine’s life-span, and your success.

The Curio is a fantastic machine!

Need help getting started with the Curio?
Check out this post
Silhouette Curio Get Started Creating Fabulous Projects
for resources no getting started with the Curio

Want to see more projects created with the Silhouette Curio?
Check out this YouTube video collection of a “demo table” I created for a Curio event this past year.

Click the video above to open in YouTube if viewing in your email.

None of these can be completed on the Cameo or Portrait due to the clearance.

Interested in getting a Curio?
Check out Silhouette America, or Swing Design for Curio machines.

Now the Curio is a bit different to set up and get started with and the number one thing you will need time. This machine can do fabulous things, but you will need to learn how to set it up properly. I do believe that anyone can do these same types of projects!
Check out all of my Silhouette classes on the Curio on my Teachable site HERE.

I would love to see and hear about what you are creating on my Facebook group at 
Silhouette Secrets with EllyMae. If you have questions feel free to post below or on the Facebook group too!

Save this for future reference by pinning the image below.

Enjoy!

This image has an empty alt attribute; its file name is logo.jpg

THANK YOU for your support! How can you help? Click HERE & buy a coffee.
Every little bit helps with the cost of running the site.

Or if you are looking for more in-depth, step-by-step classes, check out all of my online Silhouette classes on my Teachable site HERE.

SS Logo snip it
**This post may contain affiliate links. What that means is that I may receive compensation if you purchase through the links I have provided. The price you pay for the product or service is not higher but I may get compensated for sharing.
Posted on 1 Comment

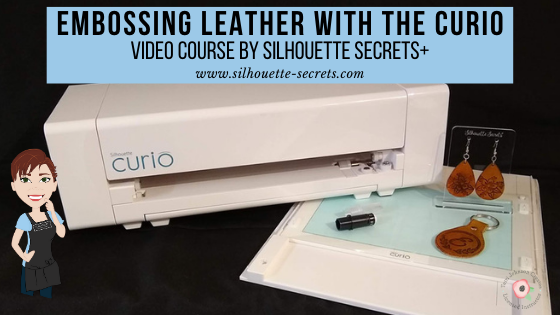
Embossing Leather with the Silhouette Curio

I am so excited to be able to release this new video course on embossing leather with the Silhouette Curio!

We have held 2 Curio virtual retreats in 2020 and it has been a big hit for Curio projects!
Click HERE to go directly to the class or keep on reading for more information.

I have to say, while this has to be the class that has taken the most time to research, write, record, and produce; it is also one of my favorites too!

These are just a few of the test subjects that were made during the creation of this Curio course.

And now you can join me in creating fabulous embossed leather projects with your Curio too! I share all my tips and tricks in how I created these leather embossing projects in the Silhouette software step-by-step in this Embossing Leather with the Silhouette Curio.

What does the video course include?

This is a 1 hour and 56 minute video course that goes step-by-step through the process of creating the embossing design in the Silhouette software, embossing and cutting the leather, finishing and dying the leather, and assembly of the earrings and key fob.

In addition to the Embossing Leather course, I have also added a Basics of the Curio Video (38 minutes) at the beginning of the course for those who are just getting started with the Curio or need a refresher.

Here is the full course content:

Class Extras (at the beginning to get you started):
Curio Unboxing video – viewable on YouTube here: https://youtu.be/bYllH6Inl3M
Class Supplies List – complete list of supplies used in the video course
Basics of the Curio video – 38 minutes

Leather Embossing with the Silhouette Curio Video Course – 1 hour 56 minutes
Part 1 – Setup of the design in the Silhouette software using the Emboss Panel for the earrings & key fob design
Part 1.1 – Embossing & cutting the design on tooling leather with the Curio
Part 2 – Final cuts and burnish of the leather key fob and earrings
Part 3 – Leather dying & final assembly of hardware
Additional Resources
Class Conclusion
Terms of Use

Click HERE to access the
Embossing Leather with the Curio course!

Check out this brief video on the Curio in action embossing on leather to see what you will be doing in the video class.

Are you excited?
I hope this video course opens up new ideas and sparks that creative energy to create fabulous things with your Curio!

Check out all of my Silhouette classes available on my Teachable site
HERE!

I cannot wait to see what you create with your Silhouette Curio!
Feel free to post photos or questions on my Facebook group at 
Silhouette Secrets with EllyMae.

Save this for future reference by pinning the image below.

Enjoy!

SS Logo snip it
**This post may contain affiliate links. What that means is that I may receive compensation if you purchase through the links I have provided. The price you pay for the product or service is not higher but I may get compensated for sharing.
Posted on 1 Comment

Silhouette Curio Get Started Creating Fabulous Projects

The hardest part of creating something is choosing the design that I want to commit to.
I was searching for a 50th Anniversary card to create and nothing looked right to me.

Then I saw a project on my Silhouette Secrets+ with EllyMae Facebook group that a member was creating and it was an inspiration
(Thank you Patti!).

Sometimes that is all it takes. Seeing a project that someone else is creating and it sparks that creative energy and all the pieces just fall into place.

Today, I am here to share the finished project and how you can get started creating amazing things with the Silhouette Curio.

Affiliate links may be present in the following blog post and as an Amazon Associate I earn from qualifying purchases.

I always like to create gifts that are unique and with the Curio that is possible. With the ability to etch on metal or acrylic, I can create a customized gift in no time. But, sometimes I still need a creative jump-start. I know many of my Facebook group members love and can’t wait to see what is posted in the Show and Tell on Saturdays.
It is a great place to share your Silhouette creations, projects in-progress, or see what others might be creating with their machines.

The above metal etching project was created with the Silhouette Curio, Silhouette Etching tool, and the Silhouette metal etching sheets. These Silhouette metal etching sheets are what I recommend for any new user to start with when wanting to learn etching with the Curio.

How can you learn the Curio?

There are a couple ways you can get started with this awesome little machine.

1 – Check out this Unboxing video on Youtube to see how to set up the machine – HERE.

2 – Curio Beginner Setup & First Cuts with Cardstock & Vinyl video course HERE

3 – Let’s Explore the Curio – Getting Started blog post HERE

4 – Beginner Curio Etching Metal written tutorial found HERE

5 – Beginner Curio Metal Etching Video Course HERE

6 – Basic Acrylic Etching with the Curio video course HERE

7 – Etching Photos with the Curio found HERE

8 – Curio Advanced Beginner – Metal Etching placement video course HERE

8 – Embossing Leather with the Curio can be found HERE

The Curio is a fantastic machine and takes some time to learn.
But it is so worth it when you do!

I would love to see what you are creating with your Silhouette machines.
Feel free to post photos or questions on my Facebook group at 
Silhouette Secrets with EllyMae.

Don’t have a Curio machine yet, but want to add it to your tools?
Find it here:
Silhouette America
Amazon

Save this for future reference by pinning the image below.

Enjoy!

SS Logo snip it
**This post may contain affiliate links. What that means is that I may receive compensation if you purchase through the links I have provided. The price you pay for the product or service is not higher but I may get compensated for sharing.
Posted on Leave a comment

Curio Virtual Retreat – Round 2

The first Curio Virtual Retreat was such a success and we had so many requests to do it again, that it is now scheduled for August 14-16, 2020.

This event is limited to 40 attendees and the best part is no travel!
Right from your own computer, tv, or other viewing source.
You work at your own pace to follow all of the step-by-step video courses.
Join us on the weekend of August 14-16 for Zoom calls and online support.
Class kits will be mailed to you and include written handouts too!

Check out this Curio Retreat Highlights post to see a little bit about what happened at our last event.

I loved seeing all the projects that the attendees created and shared with us after going through the step-by-step classes.
These include:
– Curio Basics & Setup
– Curio Tips
– Metal Etching
– Acrylic Etching
– Leather Embossing
– Sketching on Wood

And the projects keep rolling in that they are creating since attending the event!
I love seeing them all!

The weekend includes:
– Class kits mailed to you to complete all the projects
– Instructional step-by-step video classes that are available for you to watch for 30 days following the event
– Online support through scheduled Zoom calls and a private Facebook group

Student Testimonies

Here are a few reviews from the previous weekend:

“The event exceeded my expectations. The prerecorded segments were excellent. Really far better than anything I have found in the internet.” Doug B.

“The virtual retreat was very educational. The ability to be able to follow along with notes, pause the video, take my own notes, at my own pace was amazing and increased my comfort level and education experience.” Charlee R.

“I appreciated all the experience and effort that went into the written materials and the instructional videos – so thorough yet easy to follow! It was great to be able to re-watch portions of the videos while working through the projects. The Zoom chats and the Facebook group were fun and perfectly rounded out this virtual retreat. I will definitely attend in the future!” – Linda M

“Learned a ton from the virtual Curio retreat this weekend and had so much fun completing the projects! EllyMae is a fabulous teacher and we had a lot of great support throughout the weekend. Thank you TJC for this wonderful event!” Kathy S.

“At first I wondered how this would work. Worried about not having the hands on mostly. But I will have to say that it turned out better than I could have ever imagined. Loved that I could watch the video, pause and rewind, and repeat. The notes were great and I believe they will help me in re-creating new projects.” Nancy C

Curio Demos

Want to see a virtual demo table of things I’ve created using my Curio?
Check out this video on my YouTube channel HERE.

And here is a little demo of the Curio in action embossing on leather.

Registration

Register HERE for this event!
Attendance is limited to 40 attendees.

I always love to see what you are creating!
Feel free to post photos or questions on my Facebook group at 
Silhouette Secrets with EllyMae.

Enjoy!

SS Logo snip it

**This post may contain affiliate links. What that means is that I may receive compensation if you purchase through the links I have provided. The price you pay for the product or service is not higher but I may get compensated for sharing.

Posted on 1 Comment

Let’s Explore v4 – Etching photos with the Curio

Etching photos with the Silhouette Curio

I love my Curio! So much that I now have 2 of them, just in case.
This little machine amazes me all the time!

Check out this post – Silhouette Inspiration – to see a few more Curio etched projects.

Today I am going to share my “secret” to etching photos with the Silhouette Curio.

IMG_20200216_140337580 copy

How is this possible? Just taking the photo by itself and trying to etch it doesn’t turn out well. Photos are made up of so many different aspects that you can’t just fill it with an emboss fill and call it good. It would just turn out like a big etched blob. It might work for a silhouette of a person, but not to capture the essence of the photo itself.

Well, it’s really not a “secret” at all. But, this is what I do.
I followed a technique that Kay Hall with Clever Someday composed and put into an eBook – Etching Photos on Acrylic with the Silhouette Curio.

Ebook

This past week I had a lesson with a student and she asked me about etching photos.
This is what I told her, “While I can teach you all about etching acrylic on your Curio, I highly recommend you grab this eBook and read it. In fact, I recommend that you read it 2-3 times before you even try to follow it.”
And that is what I would recommend to all of you reading this. I can etch acrylic with the emboss fills pretty much in my sleep – in fact, there are nights that is all I “think” about when I’m sleeping. But, this etching photos technique uses the sketch fills and gives an amazing finished project. It is a technique that has many steps, but if you follow it exactly, you will end up with a stunning project.

Now, keep in mind each photo you etch is going to turn out differently. I know it’s not the answer my students want to hear when I say, “Each design is going to act differently.” This is true for fonts, designs, photos, tracing, etc.
Why?
Because they are all made up of different elements. There is rarely a 1 click button to have something magically turn into something amazing. It is a process and it takes some time to go through that process. Skipping steps rarely leads to a good result.

How do I do it?

Blog post written in v4.3.370
Affiliate links may be present in the following blog post and as an Amazon Associate I earn from qualifying purchases.

I open the eBook every single time and follow it step-by-step. If I don’t, I know that I will miss a step and it won’t turn out.

So let’s take a look at the photo first. I opened the photo in Silhouette Studio and then scaled it down to fit on the Curio mat.

Original Photo copy

Like I said above, each photo is going to be different. In this photo, I don’t want the extra background to be etched, just the people in it. So I used the Magnet Trace feature to draw around the people and “extract” them out of the photo.

Magnet Trace copy

Magnet Trace is a Designer Edition upgrade feature in the Silhouette Software. As you can see in the photo above, the edges are not smooth around the photo. But, we can change that. I love the Magnet trace for extracting photo because even after I delete the background, it retains the memory of the photo. So I can use the Edit Points feature and adjust the edges around the part of the photo that I want to clean up.
If the tool has traced or placed an edit point too far in on the photo, I can move it out and it still “remembers” what the photo looked like. It is very forgiving and I highly encourage you to play around with it. It takes some practice but can come in quite handy.

Point Edit Magnet Trace copy

Each of the little gray dots is an Edit Point. I can delete or adjust the points until I have the desired edge around my photo.

After I have “extracted” my photo, I then cropped it down by drawing a square around the section of the photo I wanted & used the Modify – Crop feature to capture only the section I want etched. Then I enlarged that section of the photo to fill the acrylic blank area.

Crop copy

Now that my photo is ready, I open the Etching Photos onto Acrylic eBook and follow the directions. I do highly recommend that you read the book from start to finish 2-3 times before you even try to follow along in the software. While it may not make sense completely when you are reading it those first few times, it will make a whole lot more sense when you sit down and try to follow the technique in the software.

The more you do it, the more comfortable you will get.

Once you click on the Send button, a timer shows up in the bottom right corner of the Send tab. However, it is rarely accurate, especially with etching projects. Sometimes it’s less, but more often than not, it’s more time. This project said it would take 20 minutes & 59 seconds to etch and it actually took 32 minutes.

IMG_20200216_140744157 copy

The top of this is the etched photo and the bottom is etched into a Silhouette metal etching sheet using the Emboss fills.

I think the longest etching project I’ve done is around 3 hours. This is why I love that with the Business Edition upgrade to the software I can use multiple machines at a time. So I can set up a project to etch and still cut with my Cameo or start another project on my 2nd Curio.

Multiple machines copy

For more information on how to use multiple machines at the same time, check out this post – How to Use Multiple Silhouette machines.

IMG_20190520_162605898 copy

Don’t have a Curio? Here are a few places you will find them:
Amazon
Silhouette America
Swing Design

Want to get started etching with the Silhouette Curio?

First grab some acrylic blanks from Craft Chameleon and then a Silhouette etching tool.

Then, if you are a beginner with the Curio here is what I recommend to start:

1. Let’s Explore the Silhouette Curio
Header image copy

2. Beginner Curio Etching Metal
beginner curio Etching metal header copy

3. Want an online etching class? Check out the 1 hour Basic Acrylic Etching with the Silhouette Curio class on my Teachable site – HERE.

SilSecrets Curio Etching copy copy

I show you the steps I use to set up an acrylic etch from beginning to end.
Here is the course curriculum from the design file to the full etching video course.

Teachable course copy

and then once you feel comfortable with the etching process and your Curio

4. Grab the Etching Photos onto Acrylic with the Silhouette Curio by Kay Hall
Ebook

5. Want personalized lessons? To be able to ask questions in real time to an instructor? Set up an in-person or online lesson.
More information HEREOnline Lessons & Classes.

6. Join us at the All Things Silhouette Conference in November to learn more about All Things Silhouette – from software to machines to hand-on project classes.

ATS-logo-slider-11-2020

7. Check out the “Let’s Explore v4” series HERE for more in-depth software information including all about the Emboss Panel, which is the key to the Curio and etch fills for more projects. Etching on photos is the only thing I use the sketch fills for, otherwise the Emboss Panel is the main focus with the Curio.

I really feel that the software is the key to it all. You learn how to do things in the software that will translate over to all kinds of projects in the future.

I would love to see what you create!
Feel free to post on my Facebook group at Silhouette Secrets with EllyMae.

Save this for future reference by pinning the image below.

Photo Etching Curio

Enjoy!

SS_Signature copySS Logo snip it

**This post may contain affiliate links. What that means is that I may receive compensation if you purchase through the links I have provided. The price you pay for the product or service is not higher but I may get compensated for sharing.

Posted on 3 Comments

Let’s Explore v4 – Overcut

The Overcut feature can be a great help in some difficult to cut designs.

This tutorial is written using version v4.3.353 of the Silhouette Studio software.

Overcut v4.jpg

If you are using a version prior to v4.3, then the Send tab will look just a little bit different and you will find the Overcut option on the right side of the cut settings as shown in this photo.

Overcut v4

What is Line Segment Overcut?

It is often just referred to as Overcut. This is a feature that when turned on, takes the blade a little bit past the end of a corner and then lifts the blade, changes directions and sets it back down a little before the start of the cut to make the corner.

If you look at the Overcut icon, you will see that the triangle shows the cut lines of the corners overlapping and this is exactly what it does with the blade.

Overcut zoom copy

The normal movement of the blade is to make one long continuous cut on a design with a solid line, however, for some designs or materials this doesn’t always result in a good cut. Corners get bunched up, the cut lines do not meet up, etc.
Each user may experience something different and each design can be different.

The Overcut option can allow for cleaner corners on a design.

For this example I used a Palm Tree by Silhouette – Design #1410 because there are many corners to this design.

Test Cut 1 - Overcut copy

On the left side you can see how the corners lifted or bunched up.
On the right side, it is a much cleaner cut.

Overcut demo copy

A couple things to note about the Overcut feature:
– Overcut sounds different than cutting without it on. This is because the blade is lifting and setting down again with each corner.
– Overcut will take longer to cut than without it turned on. This is again because the blade is lifting, moving, and setting down again.
And it will vary, depending on the design.
– Does it always work? No, sometimes you may find it doesn’t work well at all. For instance, sometimes when cutting vinyl, you may find that it will cause the corners to come up and stick to the blade more. But, this is going to vary depending on your design. If you are not getting clean corners it’s worth a shot and the best way to know is to test it out.

Line Segment Overcut Options

The default for the Line Segment Overcut feature is 0.10 mm. This means that it will go 0.10 mm past the point of the corner, lift the blade and move it to set back down at 0.10 mm before the start of the corner it is cutting.

If this is not enough of an overcut for the project, you can adjust this up to 0.90 mm.

Click on the More button on the Send tab (or the 3 dots on the Send tab in older versions)

Overcut Options copy

This will open up the Advanced Materials Panel and the distance can be increased for the Overcut.

Advanced Materials Panel copy

Hopefully this information will help you get a smoother cut on your projects in the future.

I would love to hear if you use this feature and see the projects you have created. Feel free to post on my Facebook group at Silhouette Secrets with EllyMae.

Save this post for future reference by pinning the image below.

Enjoy!

SS Logo snip it

**This post may contain affiliate links. What that means is that I may receive compensation if you purchase through the links I have provided. The price you pay for the product or service is not higher but I may get compensated for sharing.