Posted on 2 Comments

Silhouette Secrets+ Behind the Scenes Look – Project Creation

Affiliate links may be present in the following blog post and as an Amazon Associate I earn from qualifying purchases.

This month I am participating in a project challenge hosted by Heat Transfer Warehouse.

We received a box with some supplies inside and are tasked with creating a project.
The rules were simple. We could only use products from the package we received, we had to use at least 3 products from the package, and our theme was Mental Health.

So first, here is my challenge submission.

Everyone approaches a project differently and I thought I’d share how I tackled this one.
Keep in mind there is more than one way to get things done, so my process might not be the same as yours.
You do what works for you!

Supplies I used:

Every Day is a New Beginning by Jillibean Soup – Design #392220
Hibiscus Flower Bunch by Samantha Walker – Design #10873
Honu Turtle by Suzanne Cannon – Design #291495
Waves by Tanya Batrak – Design #301458
– Bella Canvas Fleece Shorts
Port Authority Outdoor UV Bucket Hat
*this might be my new favorite – it is UV and bug repellent so maybe the mosquitos will leave me alone
Siser Glitter HTV Ember Orange
WALAKut White HTV
WALAKut Black
WALAKut Yellow
Siser Heat Press

My Project Design Process

Step 1 – Assess the Materials

These are the items we received in our challenge package and the only ones we could use for the challenge.

Step 2 – Brainstorm Ideas

I do most of my brainstorming sitting in front of the TV with my Ipad in hand and browsing Pinterest and design websites. And then I start a list of possibilities and any idea I think of goes on the list.
Most times, my list will not make much sense to anyone but me and sometimes even I can’t remember what I was thinking when I wrote it.

I had to think about this one a bit with the theme of mental health.
I searched and searched for designs with this theme and as I did, I found I was drawn to things that speak to me. And this may not make sense to anyone but me, but isn’t that what it is all about?
You can’t pour from an empty cup and each person has to find what fills them back up.
All of these items speak to me in one way or another. I settled on the Honu turtle, hibiscus flowers, and I felt the Turtle New Day new Beginning saying fit perfectly with this category – for me.

Your design may be something completely different or maybe it isn’t even craft related at all.

Step 3 – Create a Mock Up

When I’m designing I will use shapes or images of the actual blank I’m working with to see how it will look.

In this case, it helped me to get an idea of how the designs would look on the Bella Canvas Fleece Shorts and also a little bit of an idea on how the colors might look too!

Check out this post Creating a Mock Up in Silhouette Studio for how I do this.

And I wanted to decorate the Port Authority Outdoor UV Bucket Hat but I instead of getting a photo of the item, I needed measurements.

I took measurements of the brim of the hat on the outer edge and the inner edge. Then drew 2 circles that size and center aligned them.
Then I could design around the brim of the hat with the waves and turtle design.

Next I measured the width of the bucket part of the hat and the diameter so I could draw a long rectangle and use that to design within.

This gave me a pretty good idea of what would fit and how many I needed to cut.

Step 4 – Get Started Cutting

Once I have settled on a design – which can be the longest part of the process for me – it’s time to start cutting!

And then it’s time to weed the designs.

And then time to press it all and see how it comes together!

Pressing on the hat was interesting and I just continued to work around the hat in small sections using a pressing pillow.

Step 5 – Final Photos

And then taking the photos of the finished projects!

This may be the part I struggle with the most and I just continue taking photos until I get some with good lighting. That could be setting up in my studio with photo lights or using natural lighting outside.

Now I’ve shared a behind-the-scenes look at how I work when I’m creating a project!
Do you have a method in how you approach a project?
Let us know in the comments below.

Save this for future reference by pinning the image below.

Enjoy !

THANK YOU for your support! How can you help? Click HERE & buy a coffee.
Every little bit helps with the cost of running the site.

Looking for more in-depth, step-by-step classes, check out all of my online Silhouette classes on my Teachable site HERE.

SS Logo snip it
**This post may contain affiliate links. What that means is that I may receive compensation if you purchase through the links I have provided. The price you pay for the product or service is not higher but I may get compensated for sharing.
Posted on Leave a comment

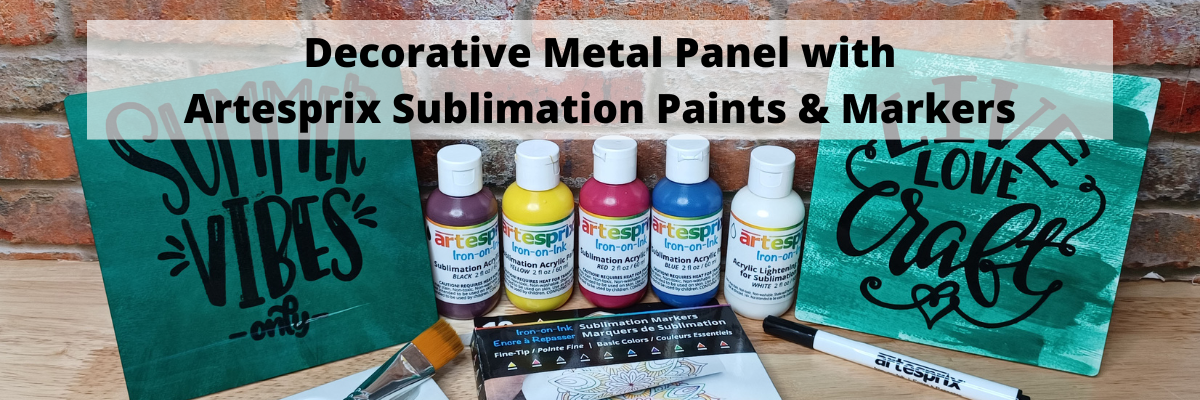
Decorative Metal Panel with Silhouette & Artesprix Paints & Markers

In this month’s new video on the Artesprix YouTube channel, I used the help of my Silhouette Cameo 4 to create a decorative metal panel.

I cannot hand letter worth a darn.
So I called on my sweet Cameo 4 and let it do the work for me.

I am having so much fun just being creative and brainstorming what kinds of projects to create with the Artesprix products! Each month is a new creative burst of “let’s see what happens”.

Check out the new video HERE on the Artesprix YouTube channel.

Affiliate links may be present in the following blog post and as an Amazon Associate I earn from qualifying purchases.

Artesprix Sublimation Supplies

Here is a list of the supplies I mentioned and demonstrated in the new YouTube video:
Live Love Craft by Cali Arroyo – Design #223176
Summer Vibes Only by Graphic House Design – Design #292836
Artesprix Sublimation Markers
Artesprix Sublimation Paints
Artesprix Sublimation Decorative Metal Panel
Artesprix Siliconized Protective Paper
Artesprix Heat Tape
Artesprix Protective Mat
– Artesprix Color Mixing Chart can be found HERE
Siser Heat Press or another heat source to reaches 400 degrees F

– Other supplies: paper towels, copy paper, pencil, scissors
Optional for additional demos:
Silhouette Cameo 4 (or other cutting machine that sketches)
Silhouette Type B Pen Holder

I’ll be sharing more so make sure to follow Artesprix on social media to see more projects!
Artesprix YouTube channel
Artesprix Blog
Artesprix Facebook Page
Artesprix Iron-on-Ink Inspirational Group

Save this for future reference by pinning the image below.

Enjoy !

THANK YOU for your support! How can you help? Click HERE & buy a coffee.
Every little bit helps with the cost of running the site.

Looking for more in-depth, step-by-step classes, check out all of my online Silhouette classes on my Teachable site HERE.

SS Logo snip it
**This post may contain affiliate links. What that means is that I may receive compensation if you purchase through the links I have provided. The price you pay for the product or service is not higher but I may get compensated for sharing.
Posted on 4 Comments

Creating 4 Eclipse Cards in Silhouette Studio

Silhouette Secrets+ with EllyMae

Eclipse cards – have you seen them?
This is a technique that has been around the card making community for quite some time and seems to be making a comeback lately.

In April, I released a video tutorial on the Swift Creek Customs YouTube channel sharing how you can create these cards in the Siser Leonardo Design Studio software and now am sharing the new video tutorial showing step-by-step in the Silhouette Studio software. Not just 1 card though, I have 4 (well, actually I made more than that) eclipse cards to share with you.
You’ll see in the video why I ended up with more.

I have to say that these cards are definitely better in person than a photo can capture, so I recommend you give it a try and see what you think.

Let’s take a closer look at some photos and I’ll share the supply list below too!

Affiliate links may be present in the following blog post and as an Amazon Associate I earn from qualifying purchases.

Supplies for Eclipse Cards

Designs used:
Spring Watercolor Roses Arrangement by Clikchic Designs – Design #439787
Watercolor Spring Flowers Arrangement by Clikchic Design – Design #408256
Spring Watercolor Greeting Card by Graphic House Design – Design #398289
Painted Tropical Drinks by Sarah Bailey – Design #325607

3-D Foam Tape
Recollections Cardstock
Scrapbook Adhesive Tape Runner
Scissors
Paper Trimmer
Score board
– Optional: Combination trimmer and score board or Mini Score Board

This is the first style of eclipse cards I share how to create in the tutorial. I share some tips for working with print and cut graphic files in Silhouette too!

Photographing the cards from an angle gives you an idea of the dimension of the card. Some cards can be difficult to see the effect when looking straight at the card.

In this card, I used circles to give it a new dimensional look. You could use any shape you want. I’ve seen many variations out there and it gives it a unique look.
My husband saw this one and said, “That would look good with a bubble pattern.” So guess what I bought? Watch for some new cards coming soon!

And you can also use text. In the tutorial, I show how you can use text in 2 ways to give each card a different look. Again, photos do not do these justice, especially looking straight on.

But coming at it from the side, you can see the dimension in the card. I share some tips and tricks to working with the text to create these 2 opposite effects of the cards with text.

I think this one might photograph the best from this angle, so you can really see the dimension.

Check out the new step-by-step video tutorial on the Silhouette Secrets+ YouTube channel HERE

Check out the video tutorial HERE.

Make sure to like, subscribe, and click that bell for notifications of future content on the
Silhouette Secrets+ YouTube channel!
Thanks for your support!
I’d love to hear what you thought in the comments on the video tutorial too!
Thanks for your feedback and engagement on the video!

Find more resources and tutorials in the A to Z tab on the Silhouette Secrets+ website HERE.

Save this for future reference by pinning the image below.

Enjoy !

THANK YOU for your support! How can you help? Click HERE & buy a coffee.
Every little bit helps with the cost of running the site.

Silhouette Classes

Never stop learning! Let me help you take the anxiety out of learning with Silhouette and get to creating faster! My Silhouette classes are heavily focused on software, so you can take the skills & techniques taught and apply them to many future projects!

Silhouette step-by-step Classes by Silhouette Secrets+

Silhouette Secrets+ with EllyMae
**This post may contain affiliate links. What that means is that I may receive compensation if you purchase through the links I have provided. The price you pay for the product or service is not higher but I may get compensated for sharing.

Posted on Leave a comment

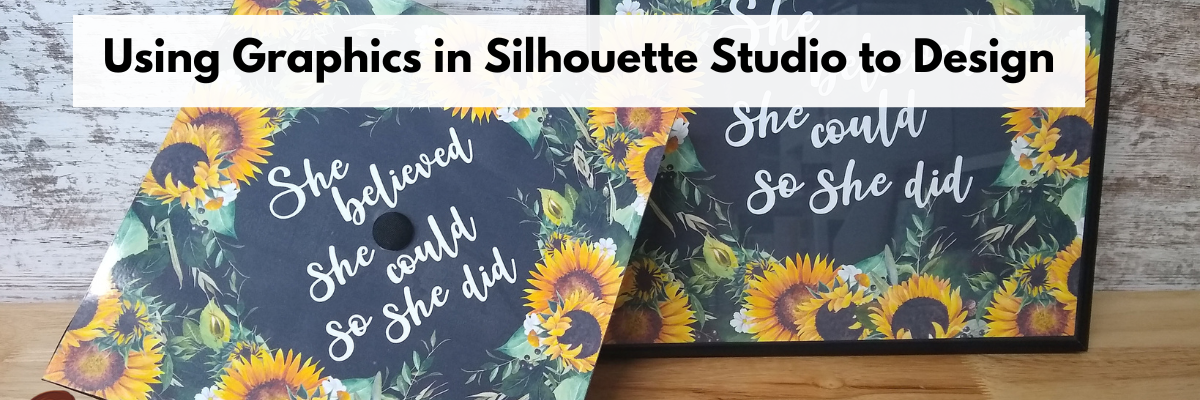
Using Graphics in Silhouette Studio to Design With – Graduation Cap & Framed Décor

Join me in the new video tutorial on the Silhouette Secrets YouTube channel as I share how I created a graduation cap topper using graphic images in Silhouette.

But I couldn’t stop there and I loved the image so much that I had to make myself a framed décor piece too!

I share this process step-by-step in this new video HERE.

Affiliate links may be present in the following blog post and as an Amazon Associate I earn from qualifying purchases.

Supplies Used:

Watercolor Sunflower Bundle
Beauty Dina Font
Graduation cap

More information on the tools used in the Silhouette software:
Let’s Explore v4 – Make Compound Path
Crop
Print and Cut

What will you try today?

Save this for future reference by pinning the image below.

Enjoy !

THANK YOU for your support! How can you help? Click HERE & buy a coffee.
Every little bit helps with the cost of running the site.

Looking for more in-depth, step-by-step classes, check out all of my online Silhouette classes on my Teachable site HERE.
SS Logo snip it
**This post may contain affiliate links. What that means is that I may receive compensation if you purchase through the links I have provided. The price you pay for the product or service is not higher but I may get compensated for sharing.
Posted on 9 Comments

Leatherette Earrings & Earring Card Projects

Affiliate links may be present in the following blog post and as an Amazon Associate, I earn from qualifying purchases.

Who doesn’t love a surprise? And that is just what I received when Silhouette America asked if I wanted to check out their new Mystery box.

When I opened the box, look what I saw:

IMG_5534

Plus a pack of the Kraft Adhesive paper that arrived on my doorstep, it must have forgotten to jump in the box and was just another bonus to the mystery box.

Kraft Paper

And now the fun part of playing with these materials.

I grabbed some designs from the Silhouette Design Store and tackled something I’ve had on my project list.

IMG_5560_edited

I used the Leatherette package and the sketch pens to create these earrings and earring cards.

First, I started off making the earring holders.
I cut several different styles but I ended up really liking Design #14057 by Loni Stevens.

Earring holder file

But, I knew I could add to the earring holder, so I decided to dress them up a bit with the Silhouette sketch pens. I received the Metallic set in my mystery box and after testing several, the silver was my favorite.
I could have told you that before I tested, but I still gave all the colors a chance.

Zoom on stitches and name

To make the dashed sketch line:
– Make a copy of the outer edge of the earring holder design
Resize the copy a little smaller – either by the Scale panel or by dragging the corner bounding box
– Use the Line Style Panel and change the style of the line to a dashed line
– Also under the Line Style Panel change the color of the line to black.
– Select the dashed line, click on the Send Tab and then click on the
Action by: Line at the top –
this means the Cameo will perform the actions we tell it to by the Line Color
Cut by Line color

– Grab the black color option and move it to the top spot –
this action will be performed first
– Change the Tool No. to the blue circle (blue circle = Tool 2)
– Select your Material – Cardstock
– Change the Action to Sketch
– Check & set up the Cut settings for the red line

Now when the design is Sent, it will first sketch the design that has been changed to a black Line color – the dashed line and then after will cut the lines that are red.

Next, I used the Nouradilla Script Font and added my name and Silhouette Secrets to the earring holder as well. Change the line color to black under the Line Style Panel and it will sketch at the same time as the dashed line.

Once I started cutting, it was hard to stop. I do love how this Leatherette cut so smoothly. I started with brand new blade and mat and I believe it made a big difference in how cleanly it cut. In fact, the more I cut and the less sticky my mat became, the cuts weren’t as crisp. A sticky mat makes a big difference.

IMG_5566

This was the first set I cut and might be my favorite. It is Leaf Earring design by Lilium Pixel SVG – Design #266977. The only thing I changed on this file was I released the Compound Path and deleted the top circle for the hardware. After I deleted the circle in each, I selected the entire design and then chose Make a Compound Path again.

I then made a copy of the earring design and right clicked and Flipped horizontally. This made a 2nd copy that I could glue together and make the back have a finished look. I used a Xyron Sticker Maker permanent adhesive to do this.

IMG_5568_resized

Lined Leaf Earrings by Amanda McGee – Design #275057
Leaves Earrings by Amanda McGee – Design #275058
This design was modified to take out the top circles like the first file and then cut & glued together with the Xyron Permanent Adhesive.

IMG_5561_resized

Tear Drop Earrings by Sweet Elsie – Design #273510
– Ungroup the design
– Release the Compound Path and deleted the hardware circle at the top.
– Make a copy and Scale the copy down a little
– Make another copy and Scale it down a little more
– Cut each out of a different color and layer on the earring hardware

You could also use glue and adhere the layers down to each other but I chose to let them hang loose.

Rather than try to get each design to match, I deleted one of the original designs, made my copies and resized how I liked and then make a copy of the entire design before I cut. Then both earrings matched exactly.

IMG_5562

Leaf Earrings by Lori Whitlock – Design #268363
I once again ungrouped the design, released the compound path and then deleted the top circle. You might see a pattern here.
It is nothing to do with the Designer’s file, but for the Double J Earwire hardware I had from Craft Chameleon, it was easier to make my own hardware hole.

IMG_5567_resized

Drop Earrings by Sweet Elsie – Design #273506
I did the same technique with making copies and resizing as I did with the Tear Drop earrings above.

IMG_5565_resized

Layered Feather Earrings by Amanda McGee – Design #275059
This file was cut exactly as it opened.
Again, you could glue the layers down if that is your desired look.

IMG_5563_resized

For this set, I took the Tear Drop Earrings by Sweet Elsie – Design #273510 and then added a dingbat from the Valentine Dingbats Font by Lori Whitlock – Design #243211.
– Make a copy of the Tear Drop design
– Add the dingbat shape from the font to one of the designs
– Select both the earring shape and the dingbat shape, then make a compound path
– Cut each shape out of the colors
– Glue the layers together

All of the earrings above were cut from the Silhouette Leatherette using the Leatherette cut settings in the program and it worked beautifully.
Leatherette cut settings

Again, I did start with a brand new blade and mat, which I believe was very helpful.

The Silhouette cutting mat is very important and the material sticking to the mat for the entire cut is key to getting crisp, clean cuts for all materials.
If the material moves as the blade is going around, it cannot connect exactly and you end up with crunched corners, cuts not connected, frustration and possibly a mess.

I’d suggest always having an extra Silhouette mat & blade on hand for any projects you are doing.

Save this for future reference by pinning the image below.

Leatherette (Pinterest Pin)

Enjoy !

THANK YOU for your support! How can you help? Click HERE & buy a coffee. Every little bit helps with the cost of running the site.

Silhouette Classes

Never stop learning! Let me help you take the anxiety out of learning with Silhouette and get to creating faster! My Silhouette classes are heavily focused on software, so you can take the skills & techniques taught and apply them to many future projects!

Silhouette step-by-step Classes by Silhouette Secrets+

**This post may contain affiliate links. What that means is that I may receive compensation if you purchase through the links I have provided. The price you pay for the product or service is not higher but I may get compensated for sharing.

Posted on Leave a comment

Beach Home decor

Sometimes you just can’t pass by something in the craft store. I really don’t need any more paper in my craft stash but beach themed was calling my name…… and it jumped in my cart.

img_6106 These images were all part of 12 x 12 sheet of paper and I cut it apart to make 4 – 6 x 6 squares. I found canvas blanks that were the same size and used Mod Podge to add the paper onto the canvas. Once the Mod Podge was dry, I sponged some ink on the edges of each one to match the background colors.

These canvas squares do not have backing on them so I will just add a 3M hanger to the back to hang on our walls. img_6107Now that these are dry, it’s time to find a place for them in our house.

I only used one sheet of paper and now have the entire pack to use for other projects. A very low cost home decor item that I can change out at any time that came together very quickly. img_6130

Enjoy !

THANK YOU for your support! How can you help? Click HERE & buy a coffee. Every little bit helps with the cost of running the site.

Looking for more in-depth, step-by-step classes, check out all of my online Silhouette classes on my Teachable site HERE.

SS Logo snip it

**This post may contain affiliate links. What that means is that I may receive compensation if you purchase through the links I have provided. The price you pay for the product or service is not higher but I may get compensated for sharing.