Posted on 2 Comments

Silhouette Electrostatic (ES) Bed Tips

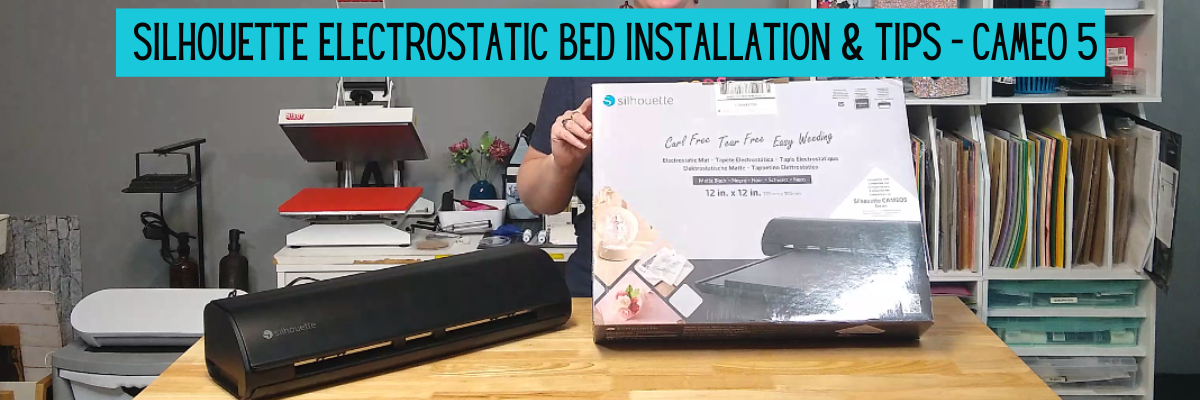
The new Silhouette Electrostatic (ES) Bed for the Silhouette Cameo 5, Curio 2, and Portrait 4 model machines was announced and demonstrated at the Silhouette Summit in September 2023. It was pretty cool to see this new technology in action.

Silhouette Cameo 5 Electrostatic Bed Tips

Affiliate links may be present in the following blog post and as an Amazon Associate, I earn from qualifying purchases.

I recorded the Electrostatic Bed demo from Silhouette Summit and shared it on the Silhouette Secrets+ YouTube channel HERE. I loved seeing everything first hand and in action at the Silhouette Summit!

But, until you get the equipment in hand and start to use it, you never really know how it’s going to go. This is new technology and it does have to be set up properly. It is designed to work with thin, smooth materials that can maintain a charge between the ES bed and the material while it’s being cut.

This was the first time in Silhouette’s history that they released the new machines and features at Silhouette Summit. Usually, in the past, there has been a 4-6 month gap between the announcement and when the new items are released.

The Silhouette Curio 2 was available first and it comes with the Electrostatic (ES) Bed in the box. For the Silhouette Cameo 5 and Portrait 4 models, the Electrostatic (ES) Bed is an additional accessory that can be purchased separately.

I received my Silhouette Curio 2 and immediately started testing and seeing what it could do. I have cut vellum, 65 lb. cardstock, 110 lb. cardstock, sticker paper, adhesive vinyl, and copy paper with the Electrostatic (ES) bed so far.

Check out the video – Tips for Success with the New Silhouette Electrostatic (ES) Bed – Cameo 5, Curio 2, and Portrait 4 HERE.

I share how you can be successful with the Electrostatic (ES) Bed. These tips will work for the Electrostatic (ES) Bed no matter which Silhouette machine model you are using it with. I’ve also included a few more tips down below this video in this post as well.

Electrostatic (ES) Bed Tips

  1. The Electrostatic (ES) Bed is powered by the Silhouette machine.
    This is one reason that the Electrostatic (ES) bed is not compatible with older model Silhouette machines. The older machines do not have the technology in them to send power to the ES bed.
  2. The electrostatic charge has to be built up.
    The ES bed needs to be turned on to start building up the charge. It takes time, usually less than a minute for the electrostatic charge to build. It is not a slap it and go. You have to set it up properly for success!
    Place Electrostatic (ES) Protective Sheet on the Bed and smooth out any air bubbles. Make sure that the Electrostatic (ES) Bed has not turned off.
    In early versions of the software with the Silhouette Curio 2, the ES Bed automatically turns off after the cut and the user will need to turn it back on each time.
  3. Not all materials work with the Electrostatic Bed.
    Materials need to be completely flat and smooth to be able to hold and maintain the electrostatic charge. Textured materials will not work or maintain that charge to hold it in place while it’s being cut.
    Smooth materials down on top of the ES Protective Sheet and allow time to build the charge.
  4. Test the materials with your fingertips to see if the materials move. If it moves, it’s not ready. Start again & take the time to build the charge.
    If the charge is broken at any time while it’s being cut, it will be a lost cut.
  5. Keep the design away from the edges of the materials.
    If the cut goes over the edge of the material, it can break the electrostatic charge and the material may move.
  6. Not all designs will work well with this new technology.
    Keep in mind that the smaller the cut pieces are, the less surface area there is for the material to maintain the electrostatic charge. Pieces that are completely cut may move out of place. This may or may not affect the entire cut. If a loose piece of material gets stuck on the blade as it’s cutting, it may hinder the cutting of the blade.
  7. Get extra materials! It is going to take time and practice to learn a new skill and new equipment.

Supplies used or mentioned in the video:

And I have more tips!!!!

Check out this video HERE to see how to install the Silhouette Electrostatic (ES) Bed on the Silhouette Cameo 5. The installation for the Silhouette Portrait 4 will be the same once the electrostatic bed is available.

I will admit, this is pretty cool technology and not having to remove delicate materials from the adhesive cutting mat is pretty darn awesome!

Will it work for every project? No!

But it is definitely fun to play around with and see what can be done with it!

Here are a few examples of projects I’ve done with the Silhouette Electrostatic (ES) Bed.

Silhouette Curio 2 Electrostatic Bed Tips

Koala sticker paper cut using the Silhouette Electrostatic bed. You can find the Silhouette Curio 2 Print and Cut with the ES (electrostatic) Bed HERE on the Silhouette Secrets+ YouTube channel.

Silhouette Curio 2 Electrostatic Bed Cutting Cardstock

Recollections 65 lb. cardstock 12″ x 12″ print and cut using the Electrostatic (ES) Bed. See this in action on this video Silhouette Curio 2 Print and Cut 12″ x 12″ with the ES Bed HERE.

Vellum Flowers cut with the Silhouette Curio 2 Electrostatic Bed

I cut & created these vellum paper flowers for the Silhouette Curio 2 – Out of the Box class where I share 3+ projects you can complete with the Curio 2 right out of the box. Find more details on that HERE.

Silhouette Tips for Cutting Small Fonts & Designs

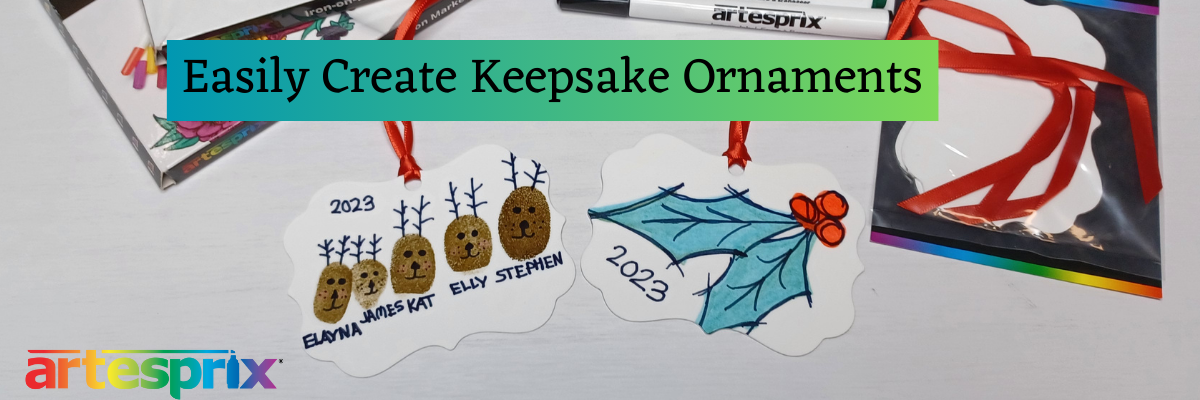
This is an example of adhesive vinyl from a class I released called Easily Create Custom Gift Tags & Keepsake Ornaments in Silhouette found HERE. In the class I share a demonstration of cutting adhesive vinyl with the Curio 2 on the Electrostatic Bed.

I also released a tutorial on Silhouette Tips to Cutting Small Fonts and Designs found HERE that can be applied to any Silhouette model machine you are using.

Silhouette Curio 2 Electrostatic Bed cutting copy paper

And here is one that I just completed this week cutting copy paper using the new IPT technology to cut 2 sheets that are stacked on top of each other. Yes, you read that right! Stacked materials cut at the same time with the Electrostatic Bed.
I’ll be sharing more on that soon!

I’ll be adding more information to the blog and Silhouette Secrets+ YouTube channel as I create projects and play with this new technology. Stay tuned for more!

I hope those tips help you get started and creating with your new Silhouette model machines and the Electrostatic (ES) Bed.

Save this for future reference by pinning the image below.

Silhouette Electrostatic Bed Tips

Enjoy !

THANK YOU for your support! How can you help? Click HERE & buy a coffee.
Every little bit helps with the cost of running the site.

Silhouette Classes

Never stop learning! Let me help you take the anxiety out of learning with Silhouette and get to creating faster! My Silhouette classes are heavily focused on software, so you can take the skills & techniques taught and apply them to many future projects!

Silhouette step-by-step Classes by Silhouette Secrets+

Silhouette Secrets+ with EllyMae
**This post may contain affiliate links. What that means is that I may receive compensation if you purchase through the links I have provided. The price you pay for the product or service is not higher but I may get compensated for sharing.
Posted on 1 Comment

Silhouette Auto Crosscut Feature – Cameo 5 & Portrait 4

New!!! Auto Crosscut Feature

Check out the new video on the Silhouette Secrets+ YouTube channel HERE showing how to set up in the Silhouette Studio software for the auto crosscut and watch the machine in action and continue reading below for more information below the video link.

Affiliate links may be present in the following blog post and as an Amazon Associate, I earn from qualifying purchases.

The Silhouette Portrait 4 and Silhouette Cameo 5 models are now equipped to cut the vinyl off using the Autoblade after a cut has been completed for certain materials when set up properly.

The setup for the Auto Crosscut is very specific. It is for use with the Autoblade and when cutting off of a material roll such as adhesive vinyl or HTV.

Note: you should never cut completely through a material such as cardstock, etc. without the proper setup for pop-out cutting or when using the Auto Crosscut feature. Cutting through a material without the proper setup can damage your machine. The reason you can cut matless with adhesive vinyl, HTV, and kiss-cut sticker sheets is because you are only cutting through the top layer and not completely through.

On the Page Setup Panel – Tab 1, choose No Mat under #3 and set the custom media height size to the length of the roll you are cutting from on #4.

Silhouette Studio Software Auto Crosscut Setup

Click on the Send tab in the top right corner.

Silhouette Send Tab Auto Crosscut Setup

Then the following will need to be set up in order for this feature to show up:

  • Silhouette Portrait 4 turned on and recognized by the software
  • Silhouette Autoblade Type B recognized
  • Compatible material selected such as Vinyl – Glossy or Heat Transfer Vinyl

Once those things are completed, you will see a Cross Cut window show up below the cut settings on the Simple Tab where this feature can be enabled and adjusted.

Note: if a custom cut setting is used, the Crosscut option will show under the Cut Settings area when setup to cut without a mat.

After the cut is complete, the Silhouette Autoblade will adjust the blade depth for a complete cut through. The Crosscut action will be performed in several cuts so it can keep the material in place while it cuts through. Once complete, the cut vinyl can be pulled from the backside of the machine.

The Silhouette Portrait 4 is then set up for the next cut to be sent.

Silhouette Portrait 4

The Crosscut feature is performed in the channel that runs underneath the blade housing, so it does not damage the machine when it cuts completely through.

More Silhouette Portrait 4 resources:

Save this for future reference by pinning the image below.

Silhouette Auto Crosscut Pinterest

Enjoy !

THANK YOU for your support! How can you help? Click HERE & buy a coffee.
Every little bit helps with the cost of running the site.

Silhouette Classes

Never stop learning! Let me help you take the anxiety out of learning with Silhouette and get to creating faster! My Silhouette classes are heavily focused on software, so you can take the skills & techniques taught and apply them to many future projects!

Silhouette step-by-step Classes by Silhouette Secrets+

Silhouette Secrets+ by EllyMae
**This post may contain affiliate links. What that means is that I may receive compensation if you purchase through the links I have provided. The price you pay for the product or service is not higher but I may get compensated for sharing.
Posted on Leave a comment

Handmade Keepsake Ornaments with Artesprix

I have so much fun creating with the Artesprix sublimation products! This month I had a few helpers and that can always make things interesting. We had some good laughs as I enlisted their thumbs to make a Keepsake Ornament using the Artesprix sublimation supplies!

Affiliate links may be present in the following blog post and as an Amazon Associate I earn from qualifying purchases.

Artesprix Sublimation Ornament

I love how this turned out! The best part is – anyone can do it!
Yes! YOU!

Check out the video tutorial HERE on the Artesprix YouTube channel.

Artesprix Sublimation Supplies

Here is a list of the supplies I mentioned and demonstrated in the new YouTube video:

Artesprix Sublimation Supplies

I’ll be sharing more so make sure to follow Artesprix on social media to see more projects!
Artesprix YouTube channel
Artesprix Blog
Artesprix Facebook Page
Artesprix Iron-on-Ink Inspirational Group

Save this for future reference by pinning the image below.

Artesprix Sublimation Markers & Inks

Find more Artesprix inspiration HERE and grab some Artesprix sublimation products and get to creating today!

Enjoy !

THANK YOU for your support! How can you help? Click HERE & buy a coffee.
Every little bit helps with the cost of running the site.

Silhouette Classes

Never stop learning! Let me help you take the anxiety out of learning with Silhouette and get to creating faster! My Silhouette classes are heavily focused on software, so you can take the skills & techniques taught and apply them to many future projects!

Silhouette step-by-step Classes by Silhouette Secrets+

Silhouette Secrets+ by EllyMae
Silhouette Secrets+ with EllyMae
**This post may contain affiliate links. What that means is that I may receive compensation if you purchase through the links I have provided. The price you pay for the product or service is not higher but I may get compensated for sharing.
Posted on 4 Comments

Silhouette Electrostatic Bed Installation & Tips – Cameo 5

Affiliate links may be present in the following blog post and as an Amazon Associate, I earn from qualifying purchases.

Silhouette Electrostatic Bed Installation & Tips

New equipment is always fun to get to know and play around with. I will admit that when I opened the box for the Silhouette Electrostatic Bed, I had a bit of a questionable moment as I saw something in the box I didn’t know about.

I had no idea what the “guard tape” was. There is an instruction sheet in the box. Make sure to keep the instructions, your box, and this guard tape for future use.

I shared more information in the Silhouette Electrostatic Bed Installation & Tips – Cameo 5 video on the Silhouette Secrets+ YouTube channel found HERE.

In this video I am using the following supplies:

Find additional tips on using the Silhouette Electrostatic Bed HERE in the Tips for Success with the New Electrostatic (ES) Bed – Cameo 5, Curio 2, and Portrait 4 video on the YouTube channel.

The Electrostatic Bed is awesome! I have loved creating with some delicate materials using it and can’t wait to share more!

If you are a Silhouette Curio 2 owner, the Electrostatic Bed comes with the machine. Check out additional information on the Silhouette Curio 2 HERE.

Save this for future reference by pinning the image below.

Enjoy !

THANK YOU for your support! How can you help? Click HERE & buy a coffee.
Every little bit helps with the cost of running the site.

Silhouette Classes

Never stop learning! Let me help you take the anxiety out of learning with Silhouette and get to creating faster! My Silhouette classes are heavily focused on software, so you can take the skills & techniques taught and apply them to many future projects!

Silhouette step-by-step Classes by Silhouette Secrets+

**This post may contain affiliate links. What that means is that I may receive compensation if you purchase through the links I have provided. The price you pay for the product or service is not higher but I may get compensated for sharing.
Posted on Leave a comment

Sketch by Color with the Silhouette Cameo 5

Affiliate links may be present in the following blog post and as an Amazon Associate I earn from qualifying purchases.

Have you sketched with your Silhouette machine?
Sketching with the Silhouette machines is so much fun! I love it!

Today I have a quick video tutorial on how I set up 2 designs to sketch with the Artesprix sublimation markers and how I let my Silhouette Cameo 5 do the work for me.

Check out the latest video on the Silhouette Secrets+ YouTube channel HERE.

Supplies Used in This Project

Silhouette Cameo 5
– Silhouette Type B Pen Holder – Bundle HERE or separate HERE
Mom of Monsters by Sweet Afton – Design #225585
Little Monster by Sophie Gallo – Design #278113
Artesprix Sublimation Markers
Artesprix Sublimation Shirt
Artesprix Protective Mat
Artesprix Protective Paper
Artesprix Heat Tape
Siser 9″ x 12″ Heat Press
– Other supplies: copy paper, pencil, scissors

Want more tips on sketching with your Silhouette machines?
Click HERE

Check out the Artesprix video tutorial on the Artesprix YouTube channel here too!

Save this for future reference by pinning the image below.

Grab some Artesprix sublimation products and get to creating today!

Enjoy !

THANK YOU for your support! How can you help? Click HERE & buy a coffee.
Every little bit helps with the cost of running the site.

Silhouette Classes

Never stop learning! Let me help you take the anxiety out of learning with Silhouette and get to creating faster! My Silhouette classes are heavily focused on software, so you can take the skills & techniques taught and apply them to many future projects!

Silhouette step-by-step Classes by Silhouette Secrets+

SS Logo snip it
**This post may contain affiliate links. What that means is that I may receive compensation if you purchase through the links I have provided. The price you pay for the product or service is not higher but I may get compensated for sharing.
Posted on Leave a comment

Halloween Sign Decor with Silhouette

Affiliate links may be present in the following blog post and as an Amazon Associate, I earn from qualifying purchases.

Just popping in to share a couple Halloween signs I finished up this week. I mean, there is nothing like decorating 2 days before Halloween right?

I have been collecting round door hangers designs by Diva Watts Designs for a long time and finally just told myself to stop everything else and get it done! She has so many different design styles available, make sure you go check out her store HERE. I’ve already got a list started for Fall and Christmas.

Here are the first 3 I made.

Supply list

I started by painting the boards. I painted both sides and let it dry overnight.

While the boards were drying, I cut all of the Oracal adhesive vinyl for each sign with the Silhouette Cameo 5 and organized them into piles. This way it was ready for when the boards were completely dry.

And then I started adding each piece to transfer tape and applying to each sign. It went pretty quick, since I had it all cut and organized by sign.

I thought this one was appropriate for my son’s room.

I just loved the look of this one with the eyeballs.

But this one I think is my favorite. I think it just may be because it has so many pieces to puzzle together and it wasn’t that hard.

And this one was just dying to come out….

Hinge Method

Have you ever used the hinge method?

This allows you to apply a small section of the design and get it placed without committing everything at once.

I removed all of the backing off of the vinyl and then cut the backing into sections.
Then removed only the top section and lined it up.

This allowed for easier positioning and I didn’t have to commit the entire design all at one time.

Then I removed each section and smoothed it down to the wood round.

So fun! Can’t wait to make more! I may need to buy another package of wood rounds as I keep seeing more doors in my house that need a sign.

Save this for future reference by pinning the image below.

Enjoy !

THANK YOU for your support! How can you help? Click HERE & buy a coffee.
Every little bit helps with the cost of running the site.

Silhouette Classes

Never stop learning! Let me help you take the anxiety out of learning with Silhouette and get to creating faster! My Silhouette classes are heavily focused on software, so you can take the skills & techniques taught and apply them to many future projects!

Silhouette step-by-step Classes by Silhouette Secrets+

**This post may contain affiliate links. What that means is that I may receive compensation if you purchase through the links I have provided. The price you pay for the product or service is not higher but I may get compensated for sharing.
Posted on 4 Comments

New! Silhouette Heat Pen Setup & Foiling

The Silhouette Heat Pen is compatible with the new Cameo 5, Curio 2, and Portrait 4 (with adapter included with machine).

Affiliate links may be present in the following blog post and as an Amazon Associate, I earn from qualifying purchases.

I’ve been testing out the new heat pen and wanted to share how to set it up in the Silhouette software. I will be demonstrating on the Curio 2, but the setup process is the same in the Silhouette software no matter which machine you are using that is compatible.

This written tutorial will be photo heavy.
I also have a video tutorial on the Silhouette Secrets+ YouTube channel HERE
and a printable PDF available as a free download exclusively for confirmed newsletter subscribers.

Join the Newsletter

Subscribe to get our latest content by email.
    We respect your privacy. Unsubscribe at any time.

    Supplies Used in This Tutorial

    Optional supplies:

    How to Set Up the Silhouette Heat Pen for Foiling

    Step 1 – Set up cutting mat by placing cardstock on the cutting mat.

    For Curio 2 users only – tape Silhouette cutting mat to debris tray securely.
    It is NOT recommended to use the heat pen on top of the electrostatic bed. You do not want to damage the electrostatic bed or it will not function properly and will need to be replaced.

    Silhouette Heat Pen Setup Curio 2

    Step 2 – Unpack the Silhouette Heat Pen set and select the items you want to use.

    Silhouette Heat Pen Unpacking

    The Silhouette Heat Pen set includes a 1 mm heat pen, 2.5 mm heat pen, roll of Silhouette masking tape, roll of gold foil, and roll of silver foil. 0.5 mm, 1 mm, and 2.5 mm heat pen, roll of Silhouette masking tape, roll of gold foil, and a roll of silver foil.

    I used the 2.5 mm heat pen and the gold foil for this tutorial.

    Step 3 – Install the Silhouette heat pen in the Tool 2 carriage and a Silhouette blade in the Tool 1 carriage of the machine.

    Silhouette Heat Pen Installation

    The Portrait 4 only has 1 tool housing and will need the power adapter installed prior to installing the Silhouette heat pen (power adapter is included with the Portrait 4 – do not throw it away or lose it). Check out the Portrait 4 unboxing HERE for more information.

    Do not worry if the light does not turn on immediately on the front of the Heat Pen. It will come on as the project is set up.

    Step 4 – Set up design in the Silhouette software to foil & then cut.
    You do not want to cut the foil. Silhouette makes it easy for us to set it up for one action and then the other.

    First, set up the Page Setup Panel for the machine you are using, the cardstock size and orientation.

    Silhouette Studio Heat Pen Setup

    I selected the design I wanted – Hi by Diva Watts DesignDesign #399489 and drew a rounded rectangle around the design with the Drawing Tools on the left side.
    Then with both the design and the rectangle selected, I used the Center Align tool in the top Quick Access Toolbar (QAT).

    Placing the design at the bottom of the sheet of material can make it easier to set up the foiling process and you don’t have to work around the housing. With the Cameo and Portrait machines, it will also make it easier to remove the foil as you do not want to unload the mat between the foiling and cut process.

    Silhouette Studio Hot Foil Design Setup

    Select the design and open the Specialty Tools Panel in the top right corner, directly below the Page Setup Panel. Choose the Heat Pen Panel and choose your fill pattern and spacing. I used the cross-hatched pattern and the default fill which showed as 0.016″.

    Then I changed the line color of my foiling design to blue using the QAT Line Color option in the top left corner. This is going to allow us to use the Send by Line Color option and set up the design for foiling first and the cut second.

    Click the Send button in the top right corner.

    Silhouette Send by Line Color

    Choose the Line option at the top right of the Send tab. Uncheck the red color. Keep the blue color checked and select the “2” option for Tool 2.

    *Tip – I do not use the pause option between foiling and cutting as pause does not always work properly.

    When the Silhouette Heat Pen is recognized in the software, a pop up will come up and ask if you want to start heating the Heat Pen.

    Silhouette Heat Pen Message

    There is no default material setting for the Silhouette Heat Pen currently in the software, but that is no problem. We can create one simply by clicking on the More button in the bottom right of the Send tab. This opens up the Advanced Material Settings and we can set up a material for our foiling.

    Silhouette Custom Setting Setup

    Click the plus sign on the right side to create a new material. Name the new material to designate what you want. Choose the machine model when asked and then select Carriage 2.

    Silhouette Custom Setting Setup Foil Action

    Next, select the larger + sign and select Add Foil Action.

    Silhouette Foil Action Setup

    With Carriage 2 still selected, click on the Sketch Action and choose Remove Action.

    Silhouette Custom Setting Save

    Adjust the settings for the foil, choose Save, and click the X in the top right corner.

    I started with a Force of 10. The only way to know what will work for your material, foil, design, and heat pen is to test it. Start with a small design and test, test, test!

    Silhouette Heat Pen Test

    Next, select the new material you created. The setting will be at the bottom of the materials list as a user defined setting.

    Verify that the correct color is the one you are changing and that the blue is the color that will be sent to foil.

    Step 5 – While the pen is heating, add foil on top of the cardstock in the exact location of the design.

    Start by taping the diagonal corners and pulling it as smooth as possible.

    Silhouette Foil Setup

    Then tape the other 2 corners. Adjust as needed until it is securely held and as smooth as possible. Any movement in the foil can cause the heat pen to catch and the project to be lost.

    Silhouette Foil Setup Cardstock

    Step 6 – When the Silhouette Heat Pen shows as Ready, click the Send button to send the job to foil.

    If using the Silhouette Curio 2, you will need to do the manual height detection. The height detection does not work accurately on clear or shiny surfaces, so you want to follow the directions to manually detect the height in the software. Check out the video tutorial for a visual on how I do this HERE.

    With the Heat Pen set up properly, the auto height detection is automatically disabled to allow for you to set the height manually. This is important to get an accurate reading of the thickness of the material with the Curio 2.

    Silhouette Foil Check

    Peek at foiling job when complete. Sometimes if it didn’t foil properly, you could send again if you don’t move the foil too much.

    Silhouette Heat pen Foil

    If it’s successful, remove the tape, save and reuse it.

    If using a Silhouette Cameo 5 or Portrait 4 , do NOT unload the cutting mat.

    Step 7 – Send the job to cut.

    Silhouette Heat Pen Cut

    Uncheck the blue cut line and check the red cut line. The blue lines will turn off and the bold red cut line should turn on. Select the appropriate cut setting for your material. Then click Send.

    Step 8 – Carefully remove the cut piece.

    Silhouette Heat Pen Project

    Keep in mind that if you have the force too high, it can cement the cardstock down to the cutting mat. Be careful removing it and a Silhouette spatula works nicely to help lift it without damaging it.

    Silhouette Heat Pen Project Removal with Spatula

    I also tested with Spellbinders hot foil and We R Makers Foil Quill Foil and both worked well.

    Silhouette Hot Foil Testing

    If cardstock does stick to the cutting mat, carefully remove it with a scraper, but don’t press too hard and remove the adhesive on the mat.

    Silhouette cleaning mat with scraper

    Just be careful and do not dig into the cutting mat with it.

    Silhouette clean mat

    Ta-da! Clean mat!

    This little scraper tool is also amazing at removing little bits of a cut design quickly and easily. Check out this video where I show that HERE.

    Silhouette Heat Pen Projects and Testing

    Have fun and just play!!!

    Check out the video tutorial on the Silhouette Secrets+ YouTube channel HERE
    and grab the printable PDF available when you confirm the newsletter subscription HERE.

    Save this for future reference by pinning the image below.

    Silhouette Heat Pen Pinterest

    Enjoy !

    THANK YOU for your support! How can you help? Click HERE & buy a coffee.
    Every little bit helps with the cost of running the site.

    Silhouette Classes

    Never stop learning! Let me help you take the anxiety out of learning with Silhouette and get to creating faster! My Silhouette classes are heavily focused on software, so you can take the skills & techniques taught and apply them to many future projects!

    Silhouette step-by-step Classes by Silhouette Secrets+

    **This post may contain affiliate links. What that means is that I may receive compensation if you purchase through the links I have provided. The price you pay for the product or service is not higher but I may get compensated for sharing.
    Posted on 2 Comments

    Silhouette Cameo 5 Unboxing & Setup

    Affiliate links may be present in the following blog post and as an Amazon Associate I earn from qualifying purchases.

    This video – whew! If it was going to go wrong, it was going to happen on video! Not just the video but in the editing process too! I had to edit this one twice because my editing software deleted the beginning and I didn’t notice until I was at the end.

    Some weeks go smoothly and others not so much – but I got there in the end!

    And I’ve been successfully using my Silhouette Cameo 5 since this video was recorded. I have cut more Siser Glow HTV and even used it to sketch out some Halloween shirts in an Artesprix Sublimation Marker video I did this month! It worked beautifully!

    Check out the new Silhouette Cameo 5 Unboxing video on the
    Silhouette Secrets+ YouTube channel HERE.

    Here is a look at my successful cut – the 2nd go around. I decided to keep it all in the video and show you the reality of what happens. It does not always go 100% perfect all the time! I mess up, my machine doesn’t cut right, firmware doesn’t update by Bluetooth – everything that happens to users that we troubleshoot, we encounter too!

    The new Silhouette Cameo 5 has some new features:
    – newly designed roller bar
    – new rollers
    – new places the rollers can be locked in place
    – repeat job (highly requested!!!)
    – quieter operation
    – new powered housing in Tool 2 new tools!
    – front crosscutter option (more on that in the future)
    – emergency stop (which I’ve already used several times on all my new machines)
    and more!!!
    I cannot wait to share more!!!

    Another new thing that Silhouette has been working on is that the firmware updates for the Cameo 5, Portrait 4, and Curio 2 will be able to update through the Bluetooth connection. On previous Silhouette model machines, it had to be done through a USB connection and was the only way it would update. An internet connection is required to complete a firmware update.

    This is great news!
    However, I do want to note as you’ll see in the video, the current version of the software is not always successful in this and we have reported that. I did have to connect by USB cable in order to complete that. But, it is great that it will be an option moving forward.

    The Silhouette Cameo 5 black is available for shipping now – HERE.

    Make sure to follow along on the Silhouette Secrets+ YouTube channel HERE. Like, subscribe, and click that bell for notifications of future content.

    Save this for future reference by pinning the image below.

    Enjoy !

    THANK YOU for your support! How can you help? Click HERE & buy a coffee.
    Every little bit helps with the cost of running the site.

    Silhouette Classes

    Never stop learning! Let me help you take the anxiety out of learning with Silhouette and get to creating faster! My Silhouette classes are heavily focused on software, so you can take the skills & techniques taught and apply them to many future projects!

    Silhouette step-by-step Classes by Silhouette Secrets+

    **This post may contain affiliate links. What that means is that I may receive compensation if you purchase through the links I have provided. The price you pay for the product or service is not higher but I may get compensated for sharing.
    Posted on Leave a comment

    Quick Halloween Shirts with Artesprix Sublimation Markers

    Affiliate links may be present in the following blog post and as an Amazon Associate I earn from qualifying purchases.

    This month I had a little bit of fun creating Mommy and Me shirts with the Artesprix Sublimation Markers and using my Silhouette Cameo 5 to sketch out the designs!

    And I grabbed one of my little monsters to do a little photo shoot with. This little monster also helped me in the brainstorming behind the project this month as well.

    Such a good little monster.

    She even tried to bring in the model from last months Artesprix video but he wasn’t feeling like a photo shoot today.

    I’ve had so much fun creating and thinking of new ideas to make with the Artesprix sublimation products!

    Check out the new video HERE on the Artesprix YouTube channel.

    Artesprix Sublimation Supplies

    Here is a list of the supplies I mentioned and demonstrated in the new YouTube video:
    Artesprix Sublimation Markers
    Artesprix Sublimation Shirt
    Artesprix Protective Mat
    Artesprix Protective Paper
    Artesprix Heat Tape
    – Heat Source that reaches 400 degrees
    I used a Siser 9″ x 12″ Heat Press
    – Silhouette machine or other cutting machine that can sketch – Cameo 5
    – Silhouette Type B Pen Holder – Bundle HERE or separate HERE
    – Other supplies: copy paper, pencil, scissors

    Check out the new YouTube video HERE.

    I’ll be sharing more so make sure to follow Artesprix on social media to see more projects!
    Artesprix YouTube channel
    Artesprix Blog
    Artesprix Facebook Page
    Artesprix Iron-on-Ink Inspirational Group

    Save this for future reference by pinning the image below.

    Grab some Artesprix sublimation products and get to creating today!

    Enjoy !

    THANK YOU for your support! How can you help? Click HERE & buy a coffee.
    Every little bit helps with the cost of running the site.

    Silhouette Classes

    Never stop learning! Let me help you take the anxiety out of learning with Silhouette and get to creating faster! My Silhouette classes are heavily focused on software, so you can take the skills & techniques taught and apply them to many future projects!

    Silhouette step-by-step Classes by Silhouette Secrets+

    SS Logo snip it
    **This post may contain affiliate links. What that means is that I may receive compensation if you purchase through the links I have provided. The price you pay for the product or service is not higher but I may get compensated for sharing.
    Posted on 13 Comments

    New!!! Curio 2, Cameo 5, and Portrait 4

    Are you ready for this? I am!

    Just announced at Silhouette Summit in Hawaii (September 2023)!!!
    Silhouette will be releasing 3 new machine models!
    Curio 2, Cameo 5, and a Portrait 4.

    All of these models have been redesigned and I’ll be sharing new tutorials and classes for each of them. Make sure to read to the end as I have a couple additional tips as well!

    Follow me on social media on Facebook, YouTube, Instagram, and Teachable for lots more information coming out as I get these machines and learn the ins and outs.

    Let’s take a quick look at each of these models and I’ll share a bit on some of the new features with each model.

    Affiliate links may be present in the following blog post and as an Amazon Associate I earn from qualifying purchases.

    Curio 2

    If you have followed me in the past, you’ll know the Curio 1 was amazing and I have quite a few classes where I show how to make fabulous things available on Teachable. All of those classes will still apply to the Curio 1.

    The Curio 2 is updated and completely redesigned! Now available at CrafterCuts HERE!

    New Curio 2 Features:

    • Flatbed cutting machine
    • Material stays stationary instead of rolling through machine
    • Clearance of thicker materials – up to 20 mm
    • Autodetection of material thickness
    • 12″ cutting area
    • 12″ Silhouette cutting mats can be used
    • 12″ Embossing mat available
    • Electrostatic bed and cutting mat – holds material in place without an adhesive mat. Additional accessories needed.
    • Curio Debris Tray – for use with Power Engraver, cutting mat, or Embossing mat
    • Tool 1 housing utilizes current Auto detection tools such as Type B Autoblade (see below)
    • Powered Carriage 2 housing
    • Carriage 2 has higher cutting force – max 5 kgf
    • New Tools for Tool 2: Heat Pen, Power engraver, and Leather Punch Tool (cannot be used for genuine leather), Embossing Tool, and Pen Holder
    • Emergency Stop to quickly stop a job without turning power off or disconnecting
    • Bluetooth

    Things to note:

    • Limited quantities as it rolls out, but more on the way
    • Accessories are not yet available at release but are coming!
    • Compatible Tools for Curio 2
      Carriage 1 – Autoblade Type B, Manual blade 1 mm, Manual blade 2 mm, 2 mm Kraft blade, Pen Holder Type B
      Carriage 2 – Rotary Blade, Punch Tool, 3 mm Kraft blade, Power Engraver, Leather Punch Tool, Heat Pen Set, Embossing Tool Type C, Pen Holder Type C

    Available at CrafterCuts HERE – $429.99

    Search Curio

    I am so excited to open the box on this new Curio 2 model! I love the challenge of learning a new machine and this is no different. I think this is going to be great with the ability to accommodate up to 20 mm in material thickness. Now, keep in mind, that does NOT mean a cutting depth of 20 mm. The cutting depth is still going to be only what the blade maximum length is, with test cuts and practice.

    As with any new machine model, it will take time to learn! Rome was not built in a day. You will need to take some time to get the feel for any new machine!

    Cameo 5

    New Cameo 5 features:

    • New sleek design including sliding lid
    • Easy Adjust Rollers – can adjust down to utilize 5″ wide materials
    • Autoblade adjustment area updated for efficiency
    • Adaptive Sensor – automatically adjusts the sensitivity of scanning sensor to properly scan materials for scanning on shiny or glossy surfaces
    • Electrostatic 12″ x 12″ mat for use with Electrostatic Protection Sheet
    • Attachable Roll Holder – included with machine
    • Auto Crosscutter – on front of machine
    • Repeat Job available on touchscreen
    • 12″ cutting width
    • Powered Carriage 2 housing
    • Carriage 2 has higher cutting force – max 5 kgf
    • New Tools for Tool 2: Heat Pen, Embossing Tools, and Pen Holder
    • Can utilize 12″ x 12″ Embossing mat
    • Emergency Stop to quickly stop a job without turning power off or disconnecting
    • Bluetooth
    • Colors being released: matte black, white, matte pink, bianco carrara (marbled)
    • Also available in Cameo 5 Plus – white – cutting width of 14.6″ like current Cameo 4 Plus

    Things to note:

    • Limited availability as it is released, but more on the way! New releases always take time.
    • Accessories are not yet available at release but are coming!
    • Compatible Tools for Cameo 5
      Carriage 1 – Autoblade Type B, Manual blade 1 mm, Manual blade 2 mm, 2 mm Kraft blade, Pen Holder Type B
      Carriage 2 – Rotary Blade, Punch Tool, 3 mm Kraft Blade, Heat Pen Set, Embossing Tool Type C, Pen Holder Type C

    Available at CrafterCuts HERE – $329.99

    Search Cameo 5

    Black machines will be the first available
    Cameo Plus will be available in white
    Please note the shipping notices and be aware that machines are in transit. This means that there could be delays. We all know that shipping delays are unpredictable, especially the past 3 years. Nothing as changed in that area or can be predicted.

    Many of the items that users were asking for on the Cameo 4 are now available on the Cameo 5. This includes the ability to move the rollers easier and in more places, repeat job, additional tools, embossing, cut and sketching ability without swapping tools, and more!

    I look forward to testing this out! Watch for more details on the Silhouette Secrets+ social channels I linked at the beginning.

    Portrait 4

    New Portrait 4 features:

    • Easy Adjust Rollers – can adjust roller down for smaller widths
    • Adaptive Sensor – automatically adjusts the sensitivity of scanning sensor to properly scan materials for scanning on shiny or glossy surfaces
    • Electrostatic mat for use with Electrostatic Protection Sheet
    • Auto Crosscutter – on front of machine
    • Repeat Job button
    • 8.5″ cutting width
    • Powered housing
    • New Tools: Heat Pen Set
    • Emergency Stop to quickly stop a job without turning power off or disconnecting
    • Bluetooth

    Things to note:

    • Limited availability as it is released, but more on the way! New releases always take time.
    • Accessories are not yet available at release but are coming!
    • Compatible Tools for Portrait 4
      Carriage 1 – Autoblade Type B, Manual blade 1 mm, Manual blade 2 mm, 2 mm Kraft blade, Pen Holder Type B

    Will be available at CrafterCuts HERE – $199.99

    Search Portrait
    Please note the shipping notices and be aware that machines are in transit. This means that there could be delays. We all know that shipping delays are unpredictable, especially the past 3 years. Nothing as changed in that area or can be predicted.

    The Portrait model is great for those who travel, sticker makers, quick cuts, or those who do not need to cut wider than 8.5″. It is easily portable at 4.41 lbs (2.0 kg). While lightweight and the smallest machine that Silhouette manufacturers, it is a powerful machine that can utilize the Silhouette Studio software offline, just like the larger Silhouette models.

    —————————

    Whew! That is a lot of information to throw out at you!
    I am excited! I love to learn new things and to share them!

    This news is fresh out of the Silhouette Summit September 2023, which means that things announced are not always available immediately. You will see these new things rolling out over the next few months.

    Now, the bigger question is….. Do you need any of these machines?

    Only you can answer that! Will you use them? Do you have a need (or want) for the new features on the Curio 2, Cameo 5, or Portrait 4?

    If the answer is yes – grab it CrafterCuts HERE or wait and follow along on my journey with the new machines. I will be sharing new things as I unbox and start to test the machines and see what they can really do!

    One of the biggest things I can tell you is all new machines take time to learn! It really does not matter your experience level and often we find that “experienced” users have a harder time adjusting to a new machine because they think it should work like the older model. New machine = new cut settings = new ways of doing things = new tools = new learning curve = new possibilities!

    The next biggest tip I can give is, if you do get it, GET IT OUT OF THE BOX! If it’s just going to sit in the box, then there is no rush to get a new machine. These are brand new, freshly released machines and will be around for awhile. There is no need to rush into anything.

    See, I don’t make a great salesperson. I am not a salesperson at all. I want you to be successful and I want to see you make fabulous things! That is why I share and teach!

    I hope you will join me on my journey of learning! Make sure to follow on my social media channels Facebook, YouTube, Instagram, and Teachable as I share more!

    Sign up for the Silhouette Secrets+ Newsletter too! Tips, “secrets”, announcements, tutorials, classes, and more delivered to your inbox each Friday.

    Silhouette Secrets+ Newsletter

    Never miss out on the news, tips, “secrets”, deals, classes, and more that I share on Silhouette Secrets+. Sign up for the newsletter and get information delivered to your inbox every Friday.
    Unsubscribe at anytime.

    Save this for future reference by pinning the image below.

    Enjoy !

    THANK YOU for your support! How can you help? Click HERE & buy a coffee.
    Every little bit helps with the cost of running the site.

    Silhouette Classes

    Never stop learning! Let me help you take the anxiety out of learning with Silhouette and get to creating faster! My Silhouette classes are heavily focused on software, so you can take the skills & techniques taught and apply them to many future projects!

    Silhouette step-by-step Classes by Silhouette Secrets+

    SS Logo snip it
    **This post may contain affiliate links. What that means is that I may receive compensation if you purchase through the links I have provided. The price you pay for the product or service is not higher but I may get compensated for sharing.