This month’s project with Artesprix is all about adding a personal touch with a custom sublimation door hanger! For this design, I decided to go the extra creative mile by hand-drawing the artwork, giving it a unique and personal feel. Using Artesprix sublimation markers and my own creativity, I transformed a simple blank door hanger into a vibrant, one-of-a-kind piece of home decor. From the initial sketch to the final heat press reveal, this project showcases just how versatile and fun sublimation crafting can be!
Affiliate links may be present in the following blog post and as an Amazon Associate I earn from qualifying purchases.
For this design I was experimenting a bit along the way and I already have ideas for another one too!
I used the Artesprix Sublimation Ink mixed with a bit of water for the background and painted that onto mixed media paper. In the future, I will add a little more water to the ink to make it a little bit lighter. With sublimation colors, you don’t see the final color until after it has been heat pressed. This turned out with a very vibrant, bright yellow.
Then I hand lettered the text using the Artesprix sublimation markers. The key about text with sublimation is that it has to be mirrored. I am not great at writing backwards, so I shared some tricks I used in the video below.
Next, I drew the leaves using a pencil. Pencil does not transfer to the sublimation blank so it’s great to draw around your blank for a template or sketch in designs. And then used more ink colors to color in the leaves and finished those off by outlining with the sublimation markers in several colors.
Anyone can do this and you do NOT have to be an artist to create with the Artesprix Sublimation products. You also do NOT need a sublimation printer, so it is a great way to dip your toe in the water to test sublimation before investing in a bunch of equipment.
Other supplies: pencil, scissors, paper towels, paint brush(es)
Watch how this all came together with the Artesprix Sublimation products in the new tutorial HERE on the Artesprix YouTube channel.
Check out additional ideas created with the Artesprix Door Hanger HERE.
I love creating with the Artesprix products and find it really stretches my creative soul often leaving me with more ideas for future projects. Find more projects I’ve created using the Artesprix sublimation products HERE.
THANK YOU for your support! How can you help? Click HERE & buy a coffee. Every little bit helps with the cost of running the site.
Silhouette Classes
Never stop learning! Let me help you take the anxiety out of learning with Silhouette and get to creating faster! My Silhouette classes are heavily focused on software, so you can take the skills & techniques taught and apply them to many future projects!
**This post may contain affiliate links. What that means is that I may receive compensation if you purchase through the links I have provided. The price you pay for the product or service is not higher but I may get compensated for sharing.
The Silhouette Studio software allows you to print directly from the program to any printer that is setup on your computer. This action can be performed easily by going to File > Print and selecting the printer you are using once the design is ready to print. However, the colors you see on the computer screen may not be the actual results that print out from your printer.
Affiliate links may be present in the following blog post and as an Amazon Associate, I earn from qualifying purchases.
Factors That Can Affect Printed Colors
A computer monitor is not calibrated to print colors. Each brand of computer monitor can vary in the visual representative that you see. If you were sitting next to someone else using the exact same Silhouette Studio software version, your colors may not appear the same on screen as that person next to you simply because you are using different computers.
Computer monitors display in RGB (Red Green Blue) versus printers that are CYMK (Cyan, Yellow, Magenta, black) – this can affect the actual printed results versus what is seen on the screen.
There are many different brands and models of printers out there on the market being used worldwide. Different brands and models of printers can yield different results.
Printer ink can vary by brand and yield different results.
The material being printed on can affect the colors. Different materials absorb the ink and the final color you see can vary depending on the material. For instance, plain cardstock will absorb more ink into the paper versus a glossy photo paper. This can make the color appear muted on the cardstock versus a more vibrant print on a shiny gloss of photo paper.
The printer settings selected when printing can affect color outcome. Each printer model has different settings it can print at and what you select for the print job sent can affect the final outcome of colors. For example, draft settings versus normal versus photo quality.
Printer drivers can affect the outcome of colors and other options available, such as print page size, etc. For best results, install the full printer drivers direct from the printer manufacturer’s website for your specific printer model. Simply plugging in a printer or connecting it to your computer does not usually install the full printer drivers. While it may print, it may not have all the options of the full print driver as it’s using a default driver that’s in the computer operating system to perform basic print functions.
Computer operating systems (OS) and updates. Print quality can vary by Windows versus MAC and also by the OS updates on those computer systems. We have seen print color output change overnight with a computer OS update.
Different software programs can have different print color results.
Now that we’ve covered a few things that can make the difference, how can you test what colors you see versus what colors you get when printing?
Silhouette Studio: Color Test Print
Draw out 1-inch squares (or larger if needed) and replicate to fill the page
Open the Fill Color Panel and fill each square with a color that you want to test print.
The full Fill Color Panel on the right side of the Silhouette software has several options for adding colors. Use the preset colors, add your own custom color, or add in colors by HEX, HSL, or RGB codes. Create your own custom color palettes too for easy access on future projects.
I used the Color Cubes by Sarah Renae Clark to fill in a page of color combinations that I want to test print. The color cards give 5 colors with the HEX code for each color and also have shades of that color shown on the card.
In the Silhouette Studio software, at the bottom of the Fill Color Panel, you can adjust the color to another shade easily by moving the custom color dot around on the color palette.
Once page is filled as desired, then select File > Print in top left corner.
Verify on the Print Preview that everything will be printed as desired. The print preview is where you can catch errors before you waste ink printing. For instance, if the design is not showing completely and is cut off, that can indicate the wrong printer is selected or the page size is incorrect. There is still time to make changes before you commit to printing and using ink. If you are doing a print and cut project, verify that all 3 registration marks show as printing completely on the page before you click print.
When ready, click Print. The printer menu will pop up and you can select what options you would like to print at and where to print from. I use the rear tray on my printer when printing any specialty materials or cardstock.
If you make any changes such as the actual printer being used or the page size, you will need to apply those changes and then cancel out to the main design screen to reset those settings completely.
Once printed, you can see how the colors will print on that particular material. It’s always best to test on the actual material you will be using to know for sure.
I printed this on higher quality copy paper using the regular print settings from my printer. I was also notified that one ink cartridge was low on ink, so I know that will affect the colors that are printed as well.
Additional Tips for Printing:
Objects or designs need to be filled with color to print.
Silhouette Studio is designed as a cutting software. That means the red lines you see on the design mat are cut lines for a Silhouette machine to follow. When a shape is drawn or text typed out, it is generally not filled with any color and the software sees it as empty. Which is exactly how it will print to a printer if sent. This is one great thing about utilizing print preview, you can catch issues before you’ve actually tried to print the project.
Cut lines do not print unless told to do so.
There are 2 options if you want the line of an object to print.
1 – Increase line thickness above 0. Any line thickness above 0 will print on the material.
Here is what the text above will show on the Print Preview when the top text line is set to 0 line width and the bottom is set to 1.75.
2 – Select the objects you want the lines to print on and check the Print Lines of Selected Shapes box on the bottom of the Line Style Panel.
Here is what the text above will show on the Print Preview when the top text has the print lines of selected shapes chosen.
There is also an italic note stating: This will display your 0 pt cut lines as 0.1 pt lines in prints and in SVG and PDF exports.
Sublimation prints need to be pressed to show true color.
If you are printing using sublimation inks, the true colors will not show until the design has been pressed. A sublimation print will always look dull or muted prior to pressing. For best results and the most accurate colors, press onto 100% polyester. This will show the final colors
New equipment may not function the same as old equipment.
Getting a new, updated printer model can be a great thing! However, users can be quickly frustrated when things do not work the same or the new printer doesn’t print the same colors the same as the old one did. It can take some getting used to for all new equipment.
Low ink of any cartridge or tank can affect the color outcome.
Most home printers have a set of color cartridges or tanks, for instance, my Canon TS9521C has 3 colors and 2 black cartridges. To make up the colors you are asking it to print, the printer combines those inks in order to make the color output. If a color cartridge or tank is low on ink, it may not yield the desired results.
The results that each user sees and has when printed can vary simply because we all have different equipment we are using.
Save this for future reference by pinning the image below.
Enjoy !
THANK YOU for your support! How can you help? Click HERE & buy a coffee. Every little bit helps with the cost of running the site.
Silhouette Classes
Never stop learning! Let me help you take the anxiety out of learning with Silhouette and get to creating faster! My Silhouette classes are heavily focused on software, so you can take the skills & techniques taught and apply them to many future projects!
**This post may contain affiliate links. What that means is that I may receive compensation if you purchase through the links I have provided. The price you pay for the product or service is not higher but I may get compensated for sharing.
There are so many possibilities when you have a cutting machine and can cut any design that you want. Combine that with the Grafix Frisket Film and wow! Endless card designs and projects you can create. I’m sharing a few cards I created below and I hope it sparks some ideas of projects you could create too!
Affiliate links may be present in the following blog post and as an Amazon Associate, I earn from qualifying purchases.
For this project I used several flower designs in Silhouette Studio and cut those from the Grafix Frisket Film on the Silhouette Cameo 5. You could use any brand of cutting machine or a die cut machine as well to cut the Grafix Frisket Film.
Cut settings for materials can vary by machine, blade life, material, and more! Test cuts are the only way you will know for sure what will work best and not waste materials.
For the Grafix Frisket Film, I used Silhouette settings of: Blade Depth – 2, Force – 10, and Speed – 5
Take a look at these stunning cards—yes, you can create them too! I am sharing the video tutorial and supply list below to start crafting your own beautiful designs today!
Find the new video on the Grafix Arts YouTube channel where I share how I did this HERE and I’ve included a supply list below too!
Supplies used for Creating Cards with Grafix Frisket Film:
Every card you create can be unique and you can use the Grafix Frisket Film over and over again or cut new designs to use too!
Save this for future reference by pinning the image below.
Enjoy !
THANK YOU for your support! How can you help? Click HERE & buy a coffee. Every little bit helps with the cost of running the site.
Silhouette Classes
Never stop learning! Let me help you take the anxiety out of learning with Silhouette and get to creating faster! My Silhouette classes are heavily focused on software, so you can take the skills & techniques taught and apply them to many future projects!
**This post may contain affiliate links. What that means is that I may receive compensation if you purchase through the links I have provided. The price you pay for the product or service is not higher but I may get compensated for sharing.
In this edition of Crafting Creativity I’ll be sharing the projects I created through the month with an arrow background/stencil design. So many great options from one file! A great big thank you to Sarah Hurley for providing the free file for the Silhouette Secrets+ August newsletter!
Affiliate links may be present in the following blog post and as an Amazon Associate, I earn from qualifying purchases.
What is Crafting Creativity?
I started sharing a blog post each month where I’m sharing the projects I’ve created with 1 file from an artist I have collaborated with. This is a file that the designer has provided for the Silhouette Secrets+ Newsletter subscribers and each month is something new! My goal is to share how you can take 1 design and think about different projects use it in to make your designs go farther! In each blog post, I’m sharing the projects created, the supply list, and additional resources that can help you learn more and advance your skills!
Crafting Creativity with Sarah Hurley
Project #1 – Fun Card with Bosh Cat and Arrow Background
I knew the moment I saw the Bosh cat design that I wanted to use him on a project. In following Sarah Hurley on social media and saw that she had adopted him, so I watch for his appearances. I always wonder what he’s thinking and feel like many of her designs would fit right in with Bosh’s thoughts.
Projects seem to take on a life of their own and I am getting better about just going with the flow of things and the direction it takes me. I knew I wanted to start with something bigger with this project and it developed along the way.
This fun sign is magnetic and the saying can be swapped out depending on what mood strikes you. Feeling snarky? Add a snarky saying. Sarah Hurley has some good ones in the Silhouette Design Store and sometimes I just enjoy scrolling through them for a laugh. Need a pick-me-up? Add an inspiration saying…. or – leave them guessing at what will be up next.
Watch the video on the Silhouette Secrets+ YouTube channel and learn how to create your own interchangeable sign. Find it out HERE or click the image below.
Video tutorial on the Silhouette Secrets+ YouTube channel HERE
Project #3 – This Side Up T-Shirt Using Text to Path
This was a fun way to use up scraps and create a fun shirt for myself. Anyone who’s ever traveled with me knows that I can trip over thin air. It’s genetic or that’s what we joke about because I get it from my Mom. If you ever see me on the ground, you’ll know why.
Project #4 – Sublimation Journal Cover with a Stencil
I love being able to create my own projects and modify them as needed. That is exactly what I did in creating this stencil with the Grafix Stencil Film. The arrow background/stencil design came in as a square, but I was able to modify it with a few simple steps to make it for what I needed.
Or use with any inks or paints to create amazing projects!
Project #5 – Bookmarks with Print and Cut
I used the arrow background/stencil design to create these bookmarks and then added my own custom color to it with the help of the Color Cubes by Sarah Renae Clark to select a color palette for the 2 different designs.
I hope this edition of Crafting Creativity with Sarah Hurley has sparked a few ideas about what you can create. Write those ideas down and see where they take you!!!
A great big thank you to Sarah Hurley for contributing the free file for the Silhouette Secrets+ newsletter for the month of August! If you missed grabbing the free Arrow Background/Stencil, it is available in the Silhouette Design Store HERE.
Sign up for the weekly newsletter HERE to have information delivered direct to your inbox and grab the new freebie each month.
Silhouette Secrets+ Newsletter
Never miss out on the news, tips, “secrets”, deals, classes, and more that I share on Silhouette Secrets+. Sign up for the newsletter and get information delivered to your inbox every Friday. Unsubscribe at anytime.
I hope this has given you some ideas on how one file can lead to many different projects!
Save this for future reference by pinning the image below.
Enjoy !
THANK YOU for your support! How can you help? Click HERE & buy a coffee. Every little bit helps with the cost of running the site.
Silhouette Classes
Never stop learning! Let me help you take the anxiety out of learning with Silhouette and get to creating faster! My Silhouette classes are heavily focused on software, so you can take the skills & techniques taught and apply them to many future projects!
**This post may contain affiliate links. What that means is that I may receive compensation if you purchase through the links I have provided. The price you pay for the product or service is not higher but I may get compensated for sharing.
I love creating with the Artesprix Sublimation products! It has really helped me to just let go of my perfectionist tendencies and just create. These custom drawstring bags turned out FANTASTIC! I used the Artesprix mirror stamp plate for the text and then used it again as a color palette to pick up ink and paint the flowers. I wasn’t quite sure how the colors would show up on the background of the drawstring bag, but it was so bright and vibrant.
Affiliate links may be present in the following blog post and as an Amazon Associate I earn from qualifying purchases.
Anyone can do this and you do NOT have to be an artist to create with the Artesprix Sublimation products. You also do NOT need a sublimation printer, so it is a great way to dip your toe in the water to test sublimation before investing in a bunch of equipment.
I am sharing the supplies I used to create the custom sublimation bag in the video that is linked below too!
Other supplies: cardstock or copy paper, pencil, scissors, paper towels, paint brush(es), silicone mat
Watch how I made these custom drawstring bags with the Artesprix Sublimation products in the new tutorial HERE on the Artesprix YouTube channel.
Find more ideas on creating with the Artesprix Drawstring Bag HERE.
You never know what you can create until you just do it and there are times I have to give myself a little pep talk and say “Just Do It!”… Just get started and see where it might take you! Find more projects I’ve created using the Artesprix sublimation products HERE.
THANK YOU for your support! How can you help? Click HERE & buy a coffee. Every little bit helps with the cost of running the site.
Silhouette Classes
Never stop learning! Let me help you take the anxiety out of learning with Silhouette and get to creating faster! My Silhouette classes are heavily focused on software, so you can take the skills & techniques taught and apply them to many future projects!
**This post may contain affiliate links. What that means is that I may receive compensation if you purchase through the links I have provided. The price you pay for the product or service is not higher but I may get compensated for sharing.
Have you ever made your own custom stencils? Combining Grafix Stencil Film with a Silhouette cutting machine opens up endless possibilities for creative projects and designs. You can easily create a wide variety of customized pieces! Using the Silhouette, a design by Sarah Hurley, and Grafix Stencil Film, I created a custom stencil that can be used over and over again.
Affiliate links may be present in the following blog post and as an Amazon Associate, I earn from qualifying purchases.
I would recommend having a dedicated blade for cutting different materials. This will help to increase the lifespan on the blades, as well as help with future cut issues. Each material will dull the blade differently and stencil material is plastic, so that does affect it differently than say cutting a much thinner material such as adhesive vinyl.
The best thing you can do is test cut to determine what settings are going to work for your blade, machine model, and the materials being used.
After the cut is finished, check the cut to see if it cut completely through before unloading the mat from the machine. I have to tell myself this constantly because I’m so quick to press that unload button, but it can save you time and materials if you get in the habit of checking the cut first and if it did not cut through, then you can send it again and it should cut in the same exact location.
Or use with any inks or paints to create amazing projects!
What kind of projects would you create with your own custom stencils? Let us know in the comments below, we would love to hear from you!
Save this for future reference by pinning the image below.
Enjoy !
THANK YOU for your support! How can you help? Click HERE & buy a coffee. Every little bit helps with the cost of running the site.
Silhouette Classes
Never stop learning! Let me help you take the anxiety out of learning with Silhouette and get to creating faster! My Silhouette classes are heavily focused on software, so you can take the skills & techniques taught and apply them to many future projects!
**This post may contain affiliate links. What that means is that I may receive compensation if you purchase through the links I have provided. The price you pay for the product or service is not higher but I may get compensated for sharing.
In this edition of Crafting Creativity I’ll be sharing the projects I created through the month with a watercolor background pattern. Patterns can really make your project unique and be used in creative ways with Silhouette. A great big thank you to Clikchic Designs for providing the free file for the Silhouette Secrets+ July newsletter!
Affiliate links may be present in the following blog post and as an Amazon Associate, I earn from qualifying purchases.
Silhouette Background Patterns Projects
This past month I have had so much fun designing and creating with the Watercolor Background design by Clikchic Designs.
I even went LIVE on YouTube – which for me is a big step, especially with all the issues Silhouette has been having. In the live video tutorial I shared all about pattern fill and how you can use it.
I’ve been collaborating with designers this year and each week I am sharing new projects that can be created from 1 file. This is a file that the designer has provided for the Silhouette Secrets+ Newsletter subscribers. I want to share how you can take 1 design and think about different projects you can use it in to make your designs go farther!
Project #1 – Card Design with Watercolor Background
I used the Watercolor Grunge background and printed it on a 12″ x 12″ sheet of cardstock. Don’t worry if you don’t have the capability to print on 12″ x 12″ cardstock, the same technique can be done with letter size paper too!
I participated in a card swap and signed up to exchange 20 cards, so this was a perfect way to create 6 cards from one sheet of paper. And every one of these cards was different because of the unique watercolor grunge background.
Here is another set I made with a vertical layout.
What started out as a sublimation tumbler idea, morphed into a sublimation journal cover project instead. I could not think of what I wanted to put as a saying onto a tumbler and while I was stumbling over that, I kept walking by these sublimation journals that I had ordered several weeks back.
Sometimes when the original project does not turn out, the next one is even better than you could imagine. I love these journal covers!
Project #4 – T-shirt Design using Siser EasyColor DTV
Printable patterns can be used for all kinds of projects, including printable HTV. Siser EasyColor DTV is real HTV that can be used with an inkjet printer.
I have had great success with the Siser EasyColor DTV and I would contribute that to following the printing and care instructions exactly. I have shirts that still look fantastic that I made when it was first released in August 2022.
I had a misprint when I first did the sublimation print for the journal and I had a line of “tiling”, which is a sharp distinct line in the actual printout and would not look good on my finished project. I explained about this and showed exactly what it looks like in the YouTube video HERE.
But, I wasn’t just going to throw away the printed sublimation page. I can use it for other projects! So I started digging in my sublimation blanks to see what the design would fit completely on. The coaster was the perfect fit and now sits on my desk too!
For the photo, I paired it with a tumbler that I use all the time from a previous class on creating your own custom designs.
Sometimes mistakes can be a good thing!
Next, I took a few more sublimation blanks and made some earrings and a necklace pendant from the extra pieces of the mistake sublimation print.
I don’t even want to admit how many pieces of sublimation printed designs I have just hanging out waiting for the perfect blank. Shhhh…. we won’t talk about it.
A great big thank you to Clikchic Designs for contributing the free file for the Silhouette Secrets+ newsletter for the month of July! If you missed grabbing the free Watercolor Grunge Background, it is available in the Silhouette Design Store HERE.
This year I started offering a free file each month for Silhouette Secrets+ newsletter subscribers. I love designing in the Silhouette Studio software and have shared some of my creations as well as look forward to collaborating with more artists in the future too!
Silhouette Secrets+ Newsletter
Never miss out on the news, tips, “secrets”, deals, classes, and more that I share on Silhouette Secrets+. Sign up for the newsletter and get information delivered to your inbox every Friday. Unsubscribe at anytime.
Sign up for the weekly newsletter HERE to have information delivered direct to your inbox and grab each month new freebie.
I hope this has given you some ideas on how one file can lead to many different projects!
Save this for future reference by pinning the image below.
Enjoy !
THANK YOU for your support! How can you help? Click HERE & buy a coffee. Every little bit helps with the cost of running the site.
Silhouette Classes
Never stop learning! Let me help you take the anxiety out of learning with Silhouette and get to creating faster! My Silhouette classes are heavily focused on software, so you can take the skills & techniques taught and apply them to many future projects!
**This post may contain affiliate links. What that means is that I may receive compensation if you purchase through the links I have provided. The price you pay for the product or service is not higher but I may get compensated for sharing.
Join me in creating a custom pillowcase that sparkles and shines! With the Artesprix Sublimation Sequin Pillowcase and the Artesprix Heat Resistant Mask, this project is not only fun but also easy to personalize. Using the Silhouette Cameo 5, I cut out a design that bring a unique flair to the pillowcase.
Affiliate links may be present in the following blog post and as an Amazon Associate I earn from qualifying purchases.
Watch how you can make your own custom creation with the Artesprix Sublimation products in the new tutorial HERE on the Artesprix YouTube channel.
Supplies used for Sequin Sublimation Pillow Case:
Here is a list of the supplies I mentioned and demonstrated in the new YouTube video:
Other supplies: cardstock or copy paper, pencil, scissors, paper towels, paint brush(es), transfer tape, weeding tool, spatula
Find more ideas on creating with the Artesprix Sublimation Sequin Pillow Case HERE.
Let your imagination go and see what you could create to add some sparkle to your space! Find more projects I’ve created using the Artesprix sublimation products HERE.
THANK YOU for your support! How can you help? Click HERE & buy a coffee. Every little bit helps with the cost of running the site.
Silhouette Classes
Never stop learning! Let me help you take the anxiety out of learning with Silhouette and get to creating faster! My Silhouette classes are heavily focused on software, so you can take the skills & techniques taught and apply them to many future projects!
**This post may contain affiliate links. What that means is that I may receive compensation if you purchase through the links I have provided. The price you pay for the product or service is not higher but I may get compensated for sharing.
So much fun to create this custom water bottle! And I have more to share too! Find more projects I’ve created using the Artesprix sublimation products HERE.
THANK YOU for your support! How can you help? Click HERE & buy a coffee. Every little bit helps with the cost of running the site.
Silhouette Classes
Never stop learning! Let me help you take the anxiety out of learning with Silhouette and get to creating faster! My Silhouette classes are heavily focused on software, so you can take the skills & techniques taught and apply them to many future projects!
**This post may contain affiliate links. What that means is that I may receive compensation if you purchase through the links I have provided. The price you pay for the product or service is not higher but I may get compensated for sharing.
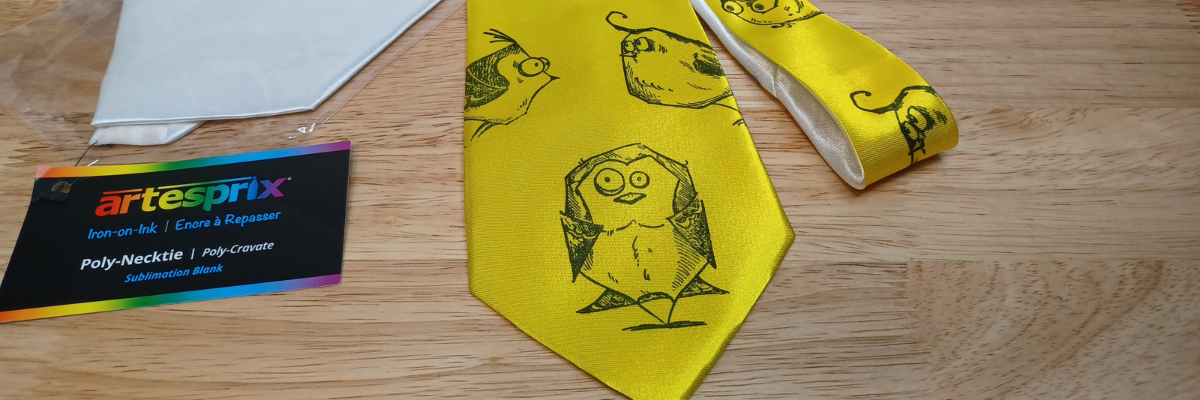
Want to create unique DIY items? This month I created this fun, bright colored DIY necktie that is definitely unique and a one-of-a-kind using the Artesprix sublimation paints, stamp ink, and a fun Tim Holtz – Crazy Birds stamp set. The best part is… you can do this too!
Affiliate links may be present in the following blog post and as an Amazon Associate I earn from qualifying purchases.
I went to ask my husband to tie this as I was trying to take the final photos and he had a friend over. The reaction I got was worth it all! They both loved it! A unique DIY necktie that is one-of-a-kind. I mentioned that it would take a special, fun event to wear this and his remark was, “Absolutely not.” I think he was ready to take it and prove me wrong. It was the perfect reaction to confirm I was on the right path with my unique creation.
Watch how you can make your own DIY creation with the Artesprix Sublimation products in the new tutorial HERE on the Artesprix YouTube channel.
I just love these fun spirited birds. They bring a smile to my face each time I see them.
Supplies used for DIY Necktie:
Here is a list of the supplies I mentioned and demonstrated in the new YouTube video:
So much fun to create! And I have more to share too! Find more projects I’ve created using the Artesprix sublimation products HERE. And stay tuned for other fun projects because I just couldn’t stop creating with the ribbon and inks!
THANK YOU for your support! How can you help? Click HERE & buy a coffee. Every little bit helps with the cost of running the site.
Silhouette Classes
Never stop learning! Let me help you take the anxiety out of learning with Silhouette and get to creating faster! My Silhouette classes are heavily focused on software, so you can take the skills & techniques taught and apply them to many future projects!
**This post may contain affiliate links. What that means is that I may receive compensation if you purchase through the links I have provided. The price you pay for the product or service is not higher but I may get compensated for sharing.
THANK YOU for your support! How can you help? Click the link to buy a coffee. Every little bit helps in the cost of running the site.