Posted on 1 Comment

Fall Decor with Oracal 651

Affiliate links may be present in the below and as an Amazon Associate I earn from qualifying purchases. What that means is that I may receive compensation if you purchase through the links I have provided. The price you pay for the product or service is not higher but I may get compensated for sharing.

First, a great big THANK YOU is in order!

There are many aspects of teaching classes or hosting events that many followers do not realize or think about. Costs is one of those. It is a wide range from venue rental fees, food, taxes, resort fees, transportation, shipping, class supplies… and the list could go on and on!

In September I taught at an in-person workshop organized by Marjorie with Atlanta Stylish Point in Atlanta. This was the first in-person workshop we have been able to organize since 2020 and just like everything else worldwide, costs have gone up.

Sponsors are a big part of teaching classes and hosting events. A BIG PART!
I want to give a great BIG SHOUT OUT to my class sponsor for that event!!!
Thank you H & H Sign Supply!

They sponsored my Acrylic Decor class and sent extra goodies for the students too!

Without sponsors like H & H Sign Supply, I could not do classes and events.
I greatly appreciate the support and the students loved all the goodies!

Here is a photo of the class project I taught at the event.

This was a project that the attendees designed completely from scratch using several fonts styles.

Here is a list of the supplies used to create this project:
Oracal 651 adhesive vinyl in the following colors:
Brown, Golden Yello, Purple Red, Dark Red, Light Orange

Oratape MT80P application tape
Acrylic Panel or sign
Wood stand (optional for panel)
Spiced Pumpkin DecoArt Americana Acrylic Paint
Saffron Yellow DecoArt Americana Acrylic Paint
Paint brush with bristles
Paint palette (optional)
alcohol wipe
weeding tool

Fonts used in design creation:
Maxwell font by Silhouette – Design #259151
BFC Magical Writing Handwriting Font by Blush Fonts – Design #387314
Fall Leaf Dingbats by Lori Whitlock – Design #222723

Need help installing fonts? Check out this tutorial HERELet’s Explore v4 – Installing Fonts

In this class, I taught attendees how to create their own design using shapes as templates and designing within that to create a project. They were in charge of the design from start to finish.

Here are few of the students creations


Some created the exact same design I developed the class with and others took off on their own, using different fonts and phrases!

It was so neat to see what everyone at the event did!

The best part of creating your own designs is that they can turn out a bit different each time!

Thank you to H & H Sign Supply for being a sponsor for our Silhouette events!

Stay tuned as I have another acrylic sign project coming your way soon sharing some of the techniques we used in class!

For a few more ideas of how you can create different seasonal décor projects with acrylic signs and adhesive vinyl, check out these 10 other examples in this Acrylic Sign Decor post from last year found HERE.

Save this for future reference by pinning the image below.

Enjoy !

This image has an empty alt attribute; its file name is logo.jpg

THANK YOU for your support! How can you help? Click HERE & buy a coffee.
Every little bit helps with the cost of running the site.

Or if you are looking for more in-depth, step-by-step classes, check out all of my online Silhouette classes on my Teachable site HERE.

SS Logo snip it
**This post may contain affiliate links. What that means is that I may receive compensation if you purchase through the links I have provided. The price you pay for the product or service is not higher but I may get compensated for sharing.
Posted on 1 Comment

Unboxing a StarCraft 8 in 1 Heat Press

Today I’m excited to share a new tool I’ve received in my studio.
I will be unboxing a StarCraft 8-in-1 Heat Press but in a little bit different fashion.

First, let’s get all the disclaimers out of the way.

Affiliate links may be present in the below and as an Amazon Associate I earn from qualifying purchases. What that means is that I may receive compensation if you purchase through the links I have provided. The price you pay for the product or service is not higher but I may get compensated for sharing.

143 Vinyl did send me this heat press to test as an affiliate.
I am excited about this StarCraft 8-in-1 heat press because it includes several attachments that I do not have in my studio, such as a cup press and hat press.
All my opinions are my own.

I know the first question most will ask is….
Do I recommend this heat press?
And I want to start off with, so far so good.
I have done my first press with the cup press as you will see below and I was impressed with the results. I will be using it more and more in the future and will update things as I do.

StarCraft 8-in-1 Heat Press Unboxing

I did a time lapse video of my unboxing and first test with the StarCraft Heat Press which can be viewed on the Silhouette Secrets+ YouTube channel HERE

And I also took photos along the way to share the unboxing in this blog post.
Note: this post below will be photo heavy.

So let’s get started.

The StarCraft 8-in-1 Heat Press Photo Unboxing

This is a StarCraft 8-in-1 12″ x 15″ Swing Away Heat Press – Silver in color.

It is packed very well.

Remove everything from the box and remove all bubble wrapping.
One of the cup attachments is in the backside of the cup press, so make sure to check there too.

This StarCraft 8-in-1 Heat Press includes a hat attachment, Plate (8″ and 10″) attachment, Mug (9 oz, 11 oz, and 12oz) attachment, and Tumbler attachment (fits 20 oz and 30 oz)*
*Tumbler attachment is not for a full wrap
And heat safe gloves.

To attach the cup press, unhook the main platen electric cord on the front and the display cord on the bottom of the main press circuit board.
Plug the cup press main electric cord and the display cord in to the main circuit board.
This is how the cup press gets the information for time and temperature from the main press display.

Tip: test the object you are pressing on in the press before it’s heated up so you can make any adjustments for pressure prior to the press being hot.

Set the temperature and time on the press according to the blank you are using.
Consult the instructions from the manufacturer for the specific blank you are using for time & temperature.

With this StarCraft 8-in-1 Heat Press, it has 3 different modes that you can preset with settings to choose from. This is an awesome feature!

I found the mug press heated up very quickly.

First Test Press

I had a sublimation print from a few weeks back that I hadn’t used, so I just grabbed it to test with.
This sublimation print was designed in Silhouette Studio and printed direct from Silhouette Studio to my Epson F-170 Sublimation printer.

For hard surfaces, clean the blank with alcohol and let it dry.
This will get rid of any oils, dust, or debris that is on the blank.
Try not to touch the sublimation surface again.

Use a lint roller on the dry cup and roll it a few times. This will pick up any lint or fiber debris that is often unseen by the naked eye. Any fibers or specks on the sublimation blank can cause the ink to adhere to it and leave spots on the finished product.

Wrap the sublimation print to the object tightly and tape it securely using heat tape.
Sublimation works with both heat and pressure.

If the sublimation paper is not tight on the object it can cause ghosting of the ink.

I love this Multi-Roll Heat Tape Dispenser in the photo above. It rolls the heat tape through & then cuts small sections that are the perfect size to tape down areas of a project.
This way I don’t need a third hand to cut tape off.

When the heat press has come to the correct temperature, slide the mug carefully into the press.
If not using a full sheet of paper, make sure to use parchment paper to protect the press around your mug to prevent “ink blow-out” getting on your press platen.

I was so excited to do this test that I did not get my print centered on my mug as you can see in the photo above and following. But, it’s all a learning process!

Once the press time is done, using the heat safe gloves, carefully remove the cup and place on a heat safe surface. It will be VERY hot!

I am using an Artesprix Protective Project Mat that withstands up to 400 degrees Fahrenheit.
This protects my table tops and gives it a safe place to cool off.

Once cooled, carefully remove the sublimation paper and heat tape.
My cup was still pretty warm so I used my heat safe gloves and the Siser EasyWeeder tool to remove the paper and tape.

Once it was fully cooled, I could snap a few photos.

As this is my first practice press, I learned a lot!
But I am so excited with how it turned out because my previous attempts with my convection oven did not turn out as well as this.

On this side of the cup, there is some color fading at the bottom and along the edge.

This indicates to me that I needed greater pressure in that area.
So I will make sure to get my mug perfectly centered in the press and look at increasing the pressure on that side of the press.

This side turned out with just a bit of fading at the bottom of the mug. So I’ll look to increase the pressure on the bottom side of the press for next time.

But the side was perfect and a nice edge.

Now, this was just a test print I had lying around. I may not do a full-ish wrap in the future or I’ll make the print to fade out more on the edges on purpose, so it gradually lightens on purpose.
If you were just sublimating a design on each side, you wouldn’t have edges that close to the handle in most cases.

You can see the difference here in the edges. Complete and 100% user error on my part.
I know it and I know I was excited to test it. So that is completely on me.

Overall, I am very pleased with my first test on the StarCraft Heat Press and how it worked out.
I am excited with having these new tools in my studio and seeing what I can create with it in the future.

The next biggest challenge was finding a home for this new StarCraft 8-in-1 Heat Press.
I knew I wanted a dedicated space for it and it needs clearance to move as it swings out.

We have added several Husky Workbenches and an Adjustable Height Workbench to my studio area this past year and I really like how they are built and the wood tops. So I started looking for something that would work for this heat press station.

This Husky 4 drawer Rolling Tool Cabinet was perfect!
I also added the Hardwood Tool Cabinet Top for the toolbox and it fits perfectly! Plus I have dedicated storage space for the attachments, parchment paper, heat gloves, Teflon sheets, heat tape, and more.
And I can move it any where in the studio to use it, which works great if I’m making videos!

Now the ideas are flowing with more projects that I can complete with these new tools!

Make sure to check out the video time lapse of the entire unboxing process as well on the Silhouette Secrets+ YouTube channel HERE.

Thank you 143 Vinyl for letting me test this new-to-me tool!
I look forward to sharing more!

If you are looking for sublimation tutorials or using Silhouette Studio for sublimation, check out the Sublimation header on the blog HERE.

Save this for future reference by pinning the image below.

Enjoy !

This image has an empty alt attribute; its file name is logo.jpg

THANK YOU for your support! How can you help? Click HERE & buy a coffee.
Every little bit helps with the cost of running the site.

Or if you are looking for more in-depth, step-by-step classes, check out all of my online Silhouette classes on my Teachable site HERE.

SS Logo snip it
**This post may contain affiliate links. What that means is that I may receive compensation if you purchase through the links I have provided. The price you pay for the product or service is not higher but I may get compensated for sharing.
Posted on Leave a comment

Silhouette Studio v4.5 Updates – SVG Files Opening Blank

Recently there has been a new update rolled out by Silhouette America for the Silhouette Studio software. This is version 4.5 of the software and if your program is set to check for updates, you may have already received a little notification that a new update is available to install.

The great part is that you have a choice on if you install the update or not. Silhouette never forces you to update the software. However, there are times that you may need to update in order to access new features – like the new Silhouette Auto Sheet Feeder for instance.

I did a quick video this week to share one of the current changes in the software. I have reported this issue and stressed to them how big of a change this is. They are investigating it and I will update this post and my video description if/when it is changed.

In the v4.5 software, unfilled svg files are saving with a transparent line color. This means when you open them back up in Silhouette Studio and a few other programs such as Google Chrome, Siser Leonardo Design Studio, Affinity, etc. that it looks like it is a blank file.
I understand that this is not ideal and is more steps when you save as a svg.
But, for now, I am providing 3 ways you can work with this issue.

Find this video on my Silhouette Secrets+ YouTube channel HERE or click the photo below.

If you do not want to deal with any of these steps, you can install a Legacy version of v4.4.554 and it will work as we’ve been used to.

HERE is how to install a Legacy Version of the Silhouette Studio software

This change only affects users who have updated to a v4.5 version of the software or higher. I wanted to bring it to your attention in case you have noticed when you test your own files or if a customer were to mention it to you after a purchase.

If this changes in future updates to the Silhouette Studio software I will update this post and the description on my YouTube video.

If you do not know how to save as a svg file, check out this post
Let’s Explore v4 – Save As a SVG

Hope it helps!

This image has an empty alt attribute; its file name is logo.jpg

THANK YOU for your support! How can you help? Click HERE & buy a coffee.
Every little bit helps with the cost of running the site.

Or if you are looking for more in-depth, step-by-step classes, check out all of my online Silhouette classes on my Teachable site HERE.

SS Logo snip it
**This post may contain affiliate links. What that means is that I may receive compensation if you purchase through the links I have provided. The price you pay for the product or service is not higher but I may get compensated for sharing.
Posted on Leave a comment

Layered Mandala with Silhouette

Paper crafting is how I started using cutting machines over 17 years ago. Today I am sharing a project I posted about in 2020 that is still one of my favorites.

Affiliate links may be present in the following blog post and as an Amazon Associate I earn from qualifying purchases.

This Wine Scene Vineyard Multi Layer Mandala design by Doesjie and can be found at Design Bundles or Creative Fabrica.
When my youngest came downstairs to see what I was doing, she said “That is so you!”.
They know me so well!

This layered mandala is cut from 8 pieces of cardstock and is 11″ wide.

I used 3-D foam tape to stick the layers together to give it dimension.

Here is the pile of backing off the tape after I finished.

I have been using this Double Sided Foam Tape for the past couple years and I love it. I’ve had to order more a few times. Find it HERE on Amazon. There are several sizes available but I think it works great for large projects like this that require a lot of dimension.

For more 3D Designs by Doesjie check out their store at:
Design Bundles
Creative Fabrica

I am off to shop their store as I see new things have been added.

For more tips on cutting and assembling layered mandalas check out this post HERE.

Save this for future reference by pinning the image below.

Enjoy !

This image has an empty alt attribute; its file name is logo.jpg

THANK YOU for your support! How can you help? Click HERE & buy a coffee.
Every little bit helps with the cost of running the site.

Or if you are looking for more in-depth, step-by-step classes, check out all of my online Silhouette classes on my Teachable site HERE.

SS Logo snip it
**This post may contain affiliate links. What that means is that I may receive compensation if you purchase through the links I have provided. The price you pay for the product or service is not higher but I may get compensated for sharing.
Posted on 2 Comments

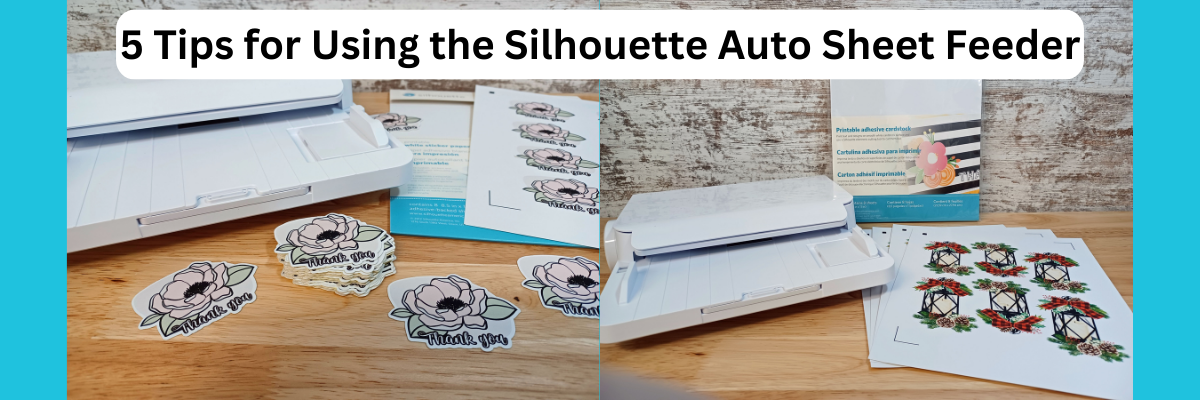
5 Tips for the Silhouette Auto Sheet Feeder

Silhouette Auto Sheet Feeder

Affiliate links may be present in the below and as an Amazon Associate I earn from qualifying purchases. What that means is that I may receive compensation if you purchase through the links I have provided. The price you pay for the product or service is not higher but I may get compensated for sharing.

Silhouette America recently released a new product called the Auto Sheet Feeder.

Thank You to CrafterCuts who sent me a Silhouette Auto Sheet Feeder in order to test and provide feedback on.

The Auto Sheet Feeders only work with the Portrait 3 or Cameo 4, Cameo Plus, or Cameo Pro Silhouette machine models.

There are 2 Sheet Feeders available.
1. Silhouette Auto Sheet Feeder for the Cameo 4 and Portrait 3 machine models.
2. Silhouette Auto Sheet Feeder for the Cameo Plus and Cameo Pro models.
Make sure you are buying the correct one for the machine model that you are using. The Auto Sheet Feeder is specific for the machine model.

Can the Auto Sheet Feeder Be Used with Older Model Silhouette Machines?

No.

While this may be a disappointment to those who own an older machine model, this is new technology and it is not possible to program that into the older Silhouette models for it to function properly.

Today, I’m sharing 5 tips for using the Auto Sheet Feeder.
Setup information and links are provided at the end of this post.

Check out the video of these tips on my Silhouette Secrets+ YouTube Channel HERE.
Both the written tutorial and video may contain a few different tips and I would recommend looking at both.

5 Tips for the Silhouette Auto Sheet Feeder

1 – Silhouette Studio Software Version & Firmware

In order to have access to the Silhouette Auto Sheet Feeder, you will need to be using a software version of v4.5.152 or higher.
However, I am recommending that you use version v4.5.155 in order to skip some bugs that are in the .152 version.

Depending on when you are reading this, will depend on what is the current software version or Beta version. Currently, the v4.5.155 is the Beta version as I write this. I normally do not recommend for users to use the Beta version as it’s a test version and there can be unknown bugs in it, however, in this case the bugs introduced in .152 are a pain in the butt.

Download the current Silhouette Studio Software version HERE.
Download the Legacy (older) or Beta software versions HERE.

The most important factor is that you HAVE to use a version of v4.5.152 or higher in order for the Auto Sheet Feeder to be available as a feature.

Firmware

If you do need to update the software, you will also most likely have to do a firmware update before you can use the Auto Sheet Feeder. The Cameo 4 and the Portrait 3 models check for firmware updates automatically on the Send tab.

In the bottom right corner of the Send tab, the software will notify you in orange if there is a firmware update available. This update HAS to be done before it will let you send a job to the machine to cut.

Firmware updates HAVE to be done by the usb cord and cannot be done by bluetooth.

2 – Silhouette Auto Sheet Feeder Connects by USB Only

In order to use the Silhouette Auto Sheet Feeder, you will need to connect it by the USB cords. There is one short cord with the Auto Sheet Feeder that connects between the Sheet Feeder and the Silhouette machine and then use the longer USB cord to connect from the Auto Sheet Feeder to the computer.

It cannot be used by Bluetooth.
If your computer does not have a usb port, you will need an adapter.

Please refer to the setup videos linked at the end of this post for more specific details.

3 – The Silhouette Auto Sheet Feeder Needs Space to Function Properly

The Silhouette Auto Sheet Feeder needs to be securely on a flat surface and fully supported.

When using the Auto Sheet Feeder with a Cameo 4, Cameo Plus, or Cameo Pro model machine, the feet under the front of the Sheet Feeder need to be extended and on a fully stable surface.

If the Auto Sheet Feeder is not set up properly, it will not feed properly.

Not only does the Auto Sheet Feeder need to have clearance in front of the machine for the feeder to sit securely, but it also needs to have clearance behind the machine that is the full length of the material that is being used.
The material cannot be hindered by hitting a wall, cords, or any other object or it can cause the media to jam in the machine or the cut to be off.

The Auto Sheet Feeder for the Cameo 4, Cameo Plus, and Cameo Pro ejects the material to a tray on the bottom of the Sheet Feeder when finished.

If using a Portrait 3 model machine, it ejects the material out the backside of the machine.

4 – Page Setup for the Auto Sheet Feeder & Registration Marks

When using the Auto Sheet Feeder, the Page Setup is very important and the registration marks CANNOT be expanded.

On the Page Setup Panel – Tab 1 make sure the Auto Sheet Feeder is selected and the correct page size that you are printing on.

Turn on the Registration Marks on the Page Setup Panel – Tab 3.
With the Auto Sheet Feeder, the registration marks are in a set location and you will notice that the options are grayed out and you cannot select or change this.

The only options you can change are the thickness and the length, which I do not recommend if you are just starting out or if you’ve had issues. The default registration marks are always the most accurate cut and eliminate things that would cause off-cuts.

The reason you cannot adjust the registration marks is because when you cut without a cutting mat, the machine has to have space on the material that is dedicated to being held securely in the machine.

It needs space on the left and right sides and 1″ of space at the bottom in order to securely hold the sheet of paper in the machine as it’s being cut.
When cutting without a mat, you cannot cut to the edge of the page or the machine cannot hold onto that material securely as it rolls back and forth.

When using the Auto Sheet Feeder, this is not an option you can change. It is set with these defaults for the best success for an accurate reading and cut.

You will need to design within this space and have the design within the red cut border on the page in order for success with your print and cut projects.

Check out the 5 Tips for the Auto Sheet Feeder video on the
Silhouette Secrets+ YouTube channel for a visual on this and how it differs from using a cutting mat.

What About Files Already Designed for Print and Cut?

If you have files that you currently use for print and cut and plan to use the Auto Sheet Feeder, you may want to test your files within the borders of the print and cut with the Auto Sheet Feeder selected.

You may need to redesign your files to fit within the confines of this new print and cut area with the Auto Sheet Feeder.

5 – Material Thickness, Curled Edges, or Static Affects

If the material is too thick, it will not feed through the Auto Sheet Feeder properly and either jam inside or not be successful in finishing the cut job.
I tested Oracal printable vinyl with the laminate overlay, it was too thick to feed through the Auto Sheet Feeder.

This would also affect sticker makers who add a laminate layer on top of their sticker paper before cutting. The only way to know if it will work with the products you are using is to test it.

If the material is too thin, it can also cause issues as well. When the material rolls through the Auto Sheet Feeder and touches the Silhouette machine rollers, if it is too thin and bends, it may not be successful. I tested a brand of sticker paper called iLabel off Amazon and it was too thin to feed properly.

In order to feed through the Auto Sheet Feeder correctly, the paper has to be completely flat and not static cling to the sheet below it.

If the printer curls the edges or causes the paper to curl after it’s printed, that can affect whether it will feed through the machine properly and have success.

What Materials Work With the Auto Sheet Feeder?

First, I am going to share links to the specs listed on the Silhouette America website that show what paper sizes will work for each size of the Auto Sheet Feeder.

Auto Sheet Feeder for Cameo 4 & Portrait 3 Specs – click HERE
Auto Sheet Feeder for Cameo Plus & Cameo Pro – click HERE

But, I also want to share the materials that I did test and had success with as well.
Check out the list below.

Silhouette White Sticker Paper
Silhouette Clear Sticker Paper
Silhouette Printable Adhesive Cardstock
*I really liked how this printed & plan to use it more.
Silhouette Brushed Metal Sticker Sheets
Silhouette Holographic Dots Sheets
*cuts were off a bit as it went down the page. I’d recommend testing the cut settings
Silhouette Printable Kraft Adhesive

*Find the Silhouette America products at CraftCuts or Silhouette America

Recollections White Cardstock 65 lb – I’m not a fan of the pop out cut, but it worked
Staples Sticker Paper – this has been my go to for years for personal use stickers
HTVRont Sticker Paper – the edges of the pages are sticky and it picked up ink as it went through the printer. Corners were more likely to curl
Online Labels Sticker Paper – worked well

I tested a lot of materials and some of them several times as I tested how many pages it would feed through in one job successfully, tested pop-out cutting with cardstock, and other factors that might affect a user’s success.

Overall, I have to say I am impressed with the Silhouette Auto Sheet Feeder.
It exceeded my expectations.

Personally, I think it’s application is limited to those who are cutting multiple sheets and that not all users will benefit from it. But, each user varies and there are some who may find they use it a lot. I do not have a sticker business or cut multiples of sticker sheets often, so it probably will not be one of my most used tools. However, I am very glad that I was able to test it and understand how it works better.

Additional Tips

How long does it take to cut?

There is no specific answer to this question.
Cutting time will depend on how detailed the cuts are and how many pages you are cutting. Each project can vary.
I did test using 5 sheets of the same sticker design and I think it was faster than manually doing it only because you do not have to load, unload, and mess with a cutting mat if you cut that way.

Do not leave the room while it’s cutting

I mention this one because if the material jams in the machine or there is an issue with feeding, the project can completely be derailed in seconds.

As most of use have experienced in one project or another, if you leave the room, something will surely go wrong.

Test Cut, Test Cut, Test Cut

Test your cut settings before sending a job through with the materials you are currently using for the print and cut. If the cut is too deep and cuts completely through, that can cause issues from feeding properly, jamming in the machine, or damage to the cutting strip.

Buy extra cutting strips!!!

The cutting strip is an important part of the Cameo models and if there is any damage to the cutting strip, it can affect your success with the cuts.

Cutting strip for the Cameo 4 HERE
Cutting strip for the Cameo Plus HERE
Cutting strip for the Cameo Pro HERE
Use code 10OFF to save 10% with the links above

There is no cutting strip on the Portrait 3 model.

For more information on the cutting strip and how to change it, check out this post
Silhouette Machine Cutting Strip

Barcode Scanning

There is the ability to cut different projects at the same time if the file has been set up & printed with the barcode option. The barcode contains the cut data and settings in order to read each printed page that is sent through.

I did test this and will have more details on it in the future.
Check out the Barcode Scanning video by Silhouette America HERE for more details.

Note: the barcode feature has been an option in the Silhouette Studio software for many years. However, it did not function properly in many versions. If you want to test the barcode feature even without an Auto Sheet Feeder, I would recommend updating to v4.5.155 or higher in order to have the best success with it.

More Resources on the Silhouette Auto Sheet Feeder

Here are some additional resources on the setup and function of the Silhouette Auto Sheet Feeder from Silhouette America

Everything You Need to know about the New Auto Sheet Feeder post

YouTube videos found at Silhouette America’s YouTube channel
Meet the Silhouette Auto Sheet Feeder
Auto Sheet Feeder – Getting Started
Silhouette Auto Sheet Feeder Quick Setup

————

I did a lot of testing and will have more coming out soon with the Silhouette Auto Sheet Feeder on the Silhouette Secrets+ YouTube channel.
Make sure to Like & Subscribe and ring the bell on YouTube if you’d like to be notified when there is new content posted.

If you’d like to grab the Silhouette Auto Sheet Feeder grab it HERE.
CrafterCuts offers free shipping on orders over $35

If for some reason they are out of stock, please check out the other Silhouette retailers in my Recommended Retailers tab HERE or at the top of the website.
Or check out my Amazon Store HERE where I have the links for both the Auto Sheet Feeders as well.

I would love to see what you are creating with your Silhouette software or machines!
Feel free to post on my Facebook group at 
Silhouette Secrets with EllyMae.

Save this for future reference by pinning the image below.

Enjoy !

This image has an empty alt attribute; its file name is logo.jpg

THANK YOU for your support! How can you help? Click HERE & buy a coffee.
Every little bit helps with the cost of running the site.

Or if you are looking for more in-depth, step-by-step classes, check out all of my online Silhouette classes on my Teachable site HERE.

SS Logo snip it
**This post may contain affiliate links. What that means is that I may receive compensation if you purchase through the links I have provided. The price you pay for the product or service is not higher but I may get compensated for sharing.

Posted on Leave a comment

Silhouette Print and Cut with Waterslide

Do you try new things? At some point, you must have!
No one starts something and knows it from the beginning. At some point, you are a beginner at everything.

It’s that way with Silhouette, designing, cutting, new materials, and pretty much life!

At some point in it, you are a beginner and have never used a product before.

Affiliate links may be present in the below and as an Amazon Associate I earn from qualifying purchases. What that means is that I may receive compensation if you purchase through the links I have provided. The price you pay for the product or service is not higher but I may get compensated for sharing.

FAILURE OR SUCCESS?

Waterslide paper is new to me.

What do you do when something is new?
Practice and get extras because in my experience, things do not always work the first time!

I was asked if I wanted to test some products and this Koala Waterslide Decal Paper was in the list. So, why not?
Time to try something new!

And guess what? My first ones were a FAIL! A BIG FAT FAIL!
I tried on a plastic water bottle and it just flaked off. Since it was a plastic water bottle, I could not put it in the oven to cure, so I tried using a heat gun.

What happens when you fail at something? You try again and that is exactly what I did.

I grabbed some coffee mugs and tried again.

First, the Silhouette makes it so nice to get the designs a clean cut.
I set up the print and cut for the page and printed some extras too.

And then I let my Silhouette machine do the work.

I love print and cut, for more tutorials on setting up Print and Cut check out this section on the blog – HERE. I rarely have an issue with print and cut and that is because I follow the same steps every single time!

For me, that was the easy part! Now comes the stuff I am new at and need to practice!

For waterslide, you soak the image a bit to get it to release from the backing and then carefully slide it off the backing and on to the object.
This is the part that takes practice, at least for me. If you are too rough, the decal will tear. Also, if the design is round and you are placing on a conical shaped object, it increases the level of complexity a bit too.
And guess what I did? Round decals to go on a slightly conical shape.
Yep! I always choose the more difficult path!

In this case, I refer to the instructions. Over and over again because I want to get it right.

I did record my application process and you can watch that video on my YouTube channel HERE.

After I applied the decals I placed the mugs in the oven at the recommended time and temperature.

The results are….. SUCCESS!

Two of the decals I put on looks good, no rips, tears, or flaking.

But not all were successful – there were a couple FAILURES!

This one failed because I didn’t get it completely smooth. Again, round object on a slightly concave mug. Circular decals are some of the most difficult to work with on a conical shaped surface and you need to make sure it’s either small enough to be easier to work with or that you get it completely smooth before baking.

This failure could be affected by many different factors. I was testing to see if I could reuse a sublimation mug that didn’t turn out.
Factors that could have affected this one are the sublimation coating, the sublimation ink that is already on, and most likely also…. my technique and it wasn’t completely flat with all the air out of it.

The most important part is I learned a lot. And this is just going to take practice.

I have not given up on waterslide and I would encourage you to try it!
Always keep trying new things and testing.
You may not get it perfect the first or even the second time!
And that is OK!

If you are feeling adventurous to try new things, grab some of this Koala Waterslide paper and give it a go!

Waterslides are used often in modeling and in situations where you need some wiggle room in application when applying. With a sticker, you are pretty well committed once you stick the adhesive down, but with a waterslide, you have a little bit more forgiveness to position that decal.

You can also seal a waterslide with several methods after applying. That is beyond my expertise on this day and will be something new for me to learn in the future!

Here is a list of the designs I used in testing with this print and cut project:
Coffee Doesn’t Ask Silly Questions It Understands by Grace Lynn Designs – Design #395783
Coffee, Coffee, and more Coffee by Dawn Nicole Designs – Design #195664
Dead Without Coffee by Sophie Gallo – Design #420243
Not Without My Coffee by Sophie Gallo – Design #420297
This Good Mood Sponsored by Coffee by Sophie Gallo – Design #377578

I would love to see what you are creating with your Silhouette software or machines!
Feel free to post on my Facebook group at 
Silhouette Secrets with EllyMae.

Save this for future reference by pinning the image below.

Enjoy !

This image has an empty alt attribute; its file name is logo.jpg

THANK YOU for your support! How can you help? Click HERE & buy a coffee.
Every little bit helps with the cost of running the site.

Or if you are looking for more in-depth, step-by-step classes, check out all of my online Silhouette classes on my Teachable site HERE.

SS Logo snip it
**This post may contain affiliate links. What that means is that I may receive compensation if you purchase through the links I have provided. The price you pay for the product or service is not higher but I may get compensated for sharing.
Posted on 2 Comments

How to Install a Legacy Version of Silhouette Studio

Silhouette Studio Legacy Version? Say What?

What does “legacy” version mean?
It means an older version of the Silhouette Studio software.

There are multiple reasons that a user may do this for instance, a software bug that is detrimental to their workflow, their computer cannot handle a new update, or many other reasons that we find in troubleshooting user issues.

One of the great features about Silhouette is that they do not force you to update the software and they have the legacy versions available to go back to if needed.

Today, I have a quick video on how you can uninstall the current version on your computer and find and install a Legacy version of Silhouette.
The Silhouette America website had some changes a few months back and it is a bit more difficult to find where those Legacy versions are.
I share all that and more in the video below.

Check out this new video on my Silhouette Secrets+ YouTube channel HERE

For written instructions on the new Silhouette America website updates, check out this blog tutorial HERE.

Enjoy !

This image has an empty alt attribute; its file name is logo.jpg

THANK YOU for your support! How can you help? Click HERE & buy a coffee.
Every little bit helps with the cost of running the site.

Or if you are looking for more in-depth, step-by-step classes, check out all of my online Silhouette classes on my Teachable site HERE.

SS Logo snip it
**This post may contain affiliate links. What that means is that I may receive compensation if you purchase through the links I have provided. The price you pay for the product or service is not higher but I may get compensated for sharing.
Posted on Leave a comment

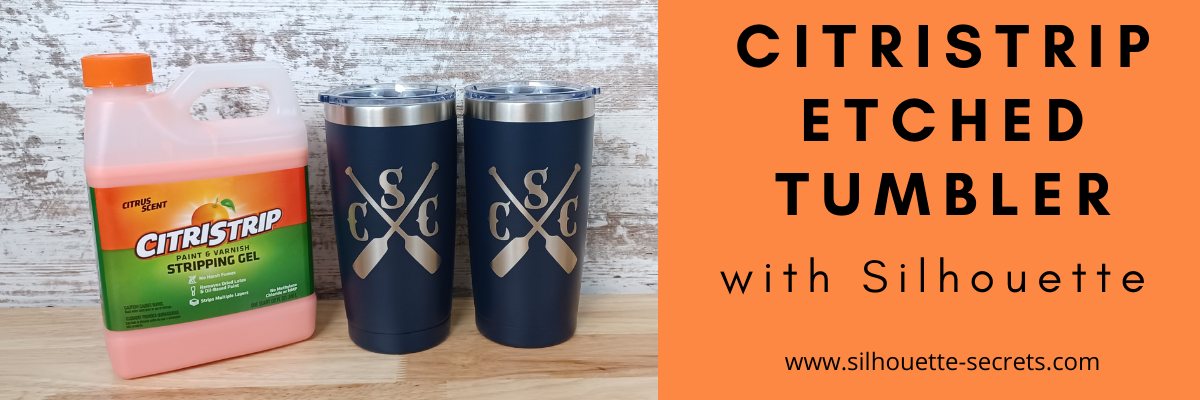
Etched (Engraved) Tumbler with Silhouette

Have you seen the etched powder coated tumblers using CitriStrip?

I’ve seen it popping up on social media and we always like to try something new!

It turned out fantastic!

I bought all the supplies needed and then set up to record how we did it, whether it was going to turn out or not, we were going to share.
We had so many microphone issues it took us several attempts to get it recorded.
All we could do was laugh!

Check out the full video HERE on the Swift Creek Customs YouTube channel.

We had a bit of fun while making the video!
You never know what you might see or hear in our videos.
We hope to bring you more project videos in the near future.
Make sure to Like and Subscribe to the Swift Creek Customs and Silhouette Secrets+ YouTube channels to be notified of new content!

Having a Silhouette machine makes it so easy to do custom things!

I cut a stencil using the Silhouette Cameo and Oracal 651 scraps.

When cutting a stencil vs a decal, you weed out the design so you are left with the negative space open, instead of weeding around the design.

Affiliate links may be present in the below and as an Amazon Associate I earn from qualifying purchases. What that means is that I may receive compensation if you purchase through the links I have provided. The price you pay for the product or service is not higher but I may get compensated for sharing.

Want to try it out?
Here are the supplies we used in the project:
4 Pack Travel Tumblers from Amazon
CitriStrip paint stripper – found at Lowe’s or Amazon
EK Tools Reverse Tweezers
– Cameo 4 cutting machine found at Silhouette retailers:
Silhouette America
Michaels
The Vinyl Spectrum

I love finding new ways to etch!

This process is the same as etching on glass with Etchall etching cream. Just a different product used for the etch process.

Check out more details on etching glass or slate here:
Glass Etching Silhouette Class

Love trying new things and testing!

I would love to see what you are creating with your Silhouette software or machines!
Feel free to post on my Facebook group at 
Silhouette Secrets with EllyMae.

Save this for future reference by pinning the image below.

Enjoy !

This image has an empty alt attribute; its file name is logo.jpg

THANK YOU for your support! How can you help? Click HERE & buy a coffee.
Every little bit helps with the cost of running the site.

Or if you are looking for more in-depth, step-by-step classes, check out all of my online Silhouette classes on my Teachable site HERE.

SS Logo snip it
**This post may contain affiliate links. What that means is that I may receive compensation if you purchase through the links I have provided. The price you pay for the product or service is not higher but I may get compensated for sharing.
Posted on 3 Comments

Become a Pro Troubleshooting Your Cameo Pro

The CAMEO Pro was released almost 2 years ago. I am one of the original testers of the CAMEO Pro before it was released and have hundreds of cut hours into this machine.
Since the release of the CAMEO Pro, we have troubleshot thousands of user’s cut issues.

Today I am releasing 2 new series for troubleshooting the CAMEO Pro.

The first series is a 5 part series that is on my Silhouette Secrets+ YouTube channel and it’s meant to be a quick view of the top 5 issues we have seen for cutting issues with the CAMEO Pro.

The second series is an in-depth look at the CAMEO Pro on my Teachable site.

Become a PRO at Troubleshooting Your CAMEO Pro

I want you to be the most successful you can be using your CAMEO Pro!

There are a lot of variable that can be the source of a cutting issue on the CAMEO Pro or any model Silhouette machine. If you do not find the exact issue that is causing the cut issue, you will most likely continue to experience inconsistent cuts until that is found.

Join me as we take an in-depth look at the CAMEO Pro!

Find the Cameo Pro 5 Tips for Cuttings Issues series on the
Silhouette Secrets+ YouTube channel

HERE

Make sure to Like and Subscribe on YouTube to be notified of future content!

Find the Cameo Pro In-Depth Troubleshooting Class on my Teachable site

HERE

This course is an in-depth look at the CAMEO Pro! I held nothing back.
I’ll be honest, some of you won’t make it through.
Some of you will give up!
But those of you who make it completely through the YouTube series and this Teachable course WILL be Pros at your Silhouette CAMEO Pro
AND
You will be able to troubleshoot 99% of the issues you have with this machine!

I want you to be successful with your CAMEO Pro!

I would highly recommend that you watch both all the way through, especially if you are a new user or if you are having cutting issues!

You can be a PRO at troubleshooting on the Cameo Pro and save yourself time & frustration!

Most times in our troubleshooting we find that it is just a few small things that need to be adjusted for a user to correct a cut or feed issues.

I would love to see what you are creating with your Silhouette software or machines!
Feel free to post on my Facebook group at 
Silhouette Secrets with EllyMae.

Save this for future reference by pinning the image below.

Enjoy !

This image has an empty alt attribute; its file name is logo.jpg

THANK YOU for your support! How can you help? Click HERE & buy a coffee.
Every little bit helps with the cost of running the site.

Or if you are looking for more in-depth, step-by-step classes, check out all of my online Silhouette classes on my Teachable site HERE.

SS Logo snip it
**This post may contain affiliate links. What that means is that I may receive compensation if you purchase through the links I have provided. The price you pay for the product or service is not higher but I may get compensated for sharing.
Posted on 3 Comments

FREE Tool Chart for Cameo 4, Cameo Plus, and Cameo Pro

Have you ever wanted a handy chart that shows what blades are what?
What is each blade used for?
Does it need an adapter or does it fit with no adapter?
What materials is each designed to cut?

Today I wanted to share a free resource that I’ve created that gives information on the current blades and tools available for the Cameo 4 , Cameo Plus, and Cameo Pro.

Cameo 4 , Cameo Plus, and Cameo Pro Tool Chart

This free PDF chart is is available as a free download exclusively for confirmed newsletter subscribers.

Join the Newsletter

Subscribe to get our latest content by email.
    We respect your privacy. Unsubscribe at any time.

    Download this to your computer and open it.
    Click the blue links in the chart for more resources on that particular tool.

    Print the PDF file out for visual reference as well.

    Don’t forget to check out the Silhouette classes on my Teachable site while you are there!
    Step-by-step classes taught for many Silhouette projects and software techniques.
    And the best part – once registered, you can access any time and as many times as you need to take the class!
    Never stop learning & creating!

    I also have more blog tutorials that I’ve published regarding specific Tool information.
    Check those out here
    Let’s Explore Cameo 4 – Tools
    New Tools for Cameo 4 models & Portrait 3
    15+ Tips for the Silhouette Kraft blades
    Cameo 4 Rotary Blade – First Cuts

    **Please note that these may be affiliate links which means that by using these links and/or codes, I may received a small compensation for sharing the links with you. The price you pay for the product or service is not higher. Thank you for using affiliate links as it provides a way for me to continue doing what I do as an Instructor, blogger, and event organizer.

    These Silhouette supplies can be found at Silhouette retailers in the U.S.
    Here are a few:
    Silhouette America
    The Vinyl Spectrum
    Heat Press Nation
    Michaels Crafts 
    Or outside the U.S. here are a couple Silhouette retailers
    – Graphtec GB https://www.graphtecgb.co.uk/
    – MDP Vinyl Supplier https://www.mdpsupplies.co.uk/

    I hope this helps you get to know your Silhouette Cameo machine a little bit better!

    I have lots more things on my project list to share in the future!

    I would love to see what you are creating with your Silhouette software or machines!
    Feel free to post on my Facebook group at 
    Silhouette Secrets with EllyMae.

    Save this for future reference by pinning the image below.

    Enjoy !

    THANK YOU for your support! How can you help? Click HERE & buy a coffee.
    Every little bit helps with the cost of running the site.

    Silhouette Classes

    Never stop learning! Let me help you take the anxiety out of learning with Silhouette and get to creating faster! My Silhouette classes are heavily focused on software, so you can take the skills & techniques taught and apply them to many future projects!

    Silhouette step-by-step Classes by Silhouette Secrets+

    **This post may contain affiliate links. What that means is that I may receive compensation if you purchase through the links I have provided. The price you pay for the product or service is not higher but I may get compensated for sharing.