Posted on 10 Comments

Subtracting Text for HTV in Silhouette Studio v4

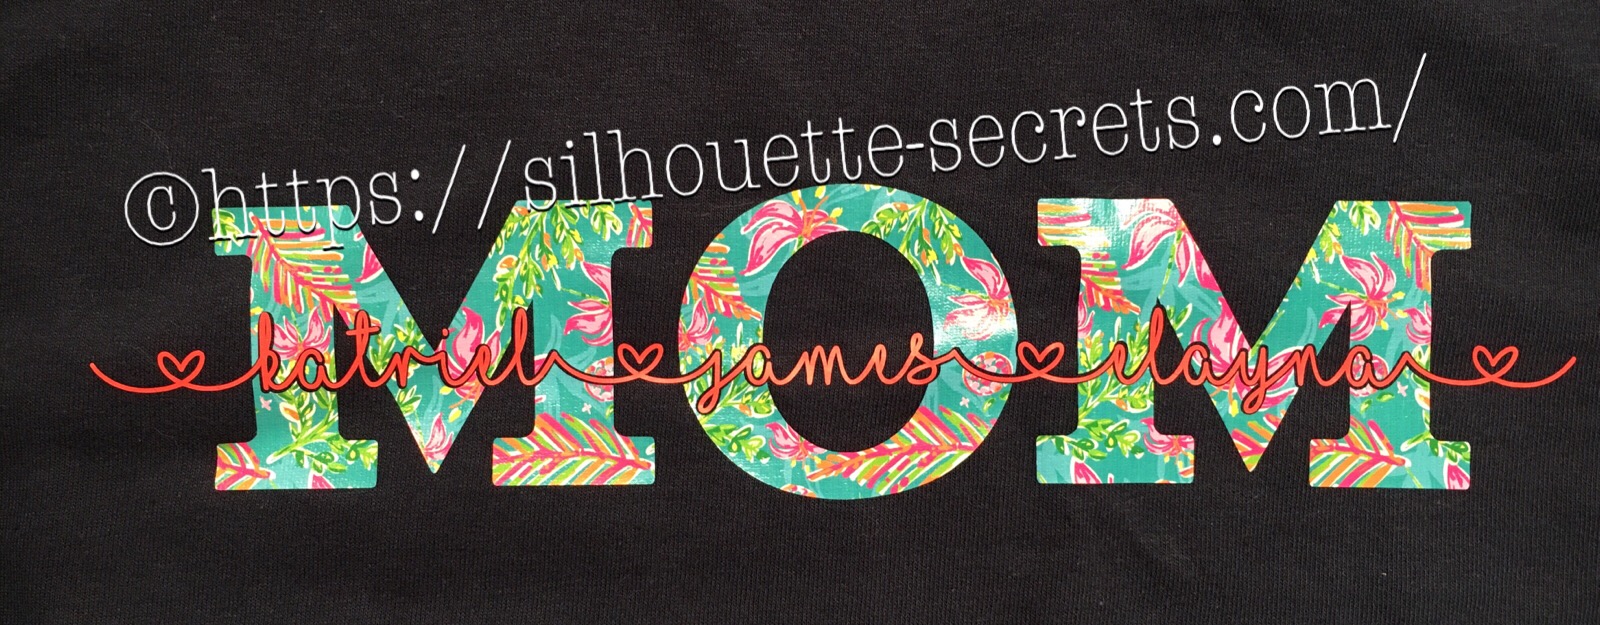
These designs have been a big hit for Mother’s Day and we will walk through how to created one.

temp_1

First click on the Text Tool on the left side of the Silhouette Software. Click on the design mat & type out the words. Click off of the words to deselect it and then click back on the text once to select it. Fill the text with color to make it easier to see & work with. Click on the Text Style Panel on the right side.

Text Style copy

Now, click on a Font Style Name, the text will change to that font style. You can then either click on each font, use the text search bar if you know what you are looking for or use the arrow keys to scroll through the text list and as you do the words will change to each font – this is my favorite method if I don’t know what font I want.

Text Style Panel copy

For Mom, I chose a font called Gulana – I chose this one by just scrolling through my font list and seeing what I liked best. Now, resize it how you like it.

Next using the same text tools, type out your second layer.

Names text.JPG

I used the font MF I Love Glitter by Misti Fonts in this example. The swirl hearts are called Glyphs and are special characters within the font that you can add. Check out this post for more on the Glyphs feature HERE.

Since this font overlaps make sure to weld the letters together before you cut.

Now position your name design over the top of the Mom design and align it how you want it.

Mom aligned

We are going to Subtract the top layer (names) from the bottom layer (Mom).

First, I’d suggest creating an offset. When you are using HTV and pressing individual layers, the HTV can shrink as it’s applied with heat. To help with that we will create an offset, so we don’t have unwanted gaps in our design.

First, make a copy of your design and pull it off to the side in the holding area of the design space. Any time you are working with text, it’s a good idea to make a copy and pull the original off, just in case you need to go back. Once you edit text, it is no longer text and is now treated as a vector image – so the text is no longer editable.

Next, select your name text and click on the Offset Panel on the right side of Silhouette Studio v4.

Offset copy

Then next to the Distance highlight the numbers and type in 0.040, then click on Apply or hit Enter. The Distance of the offset will vary depending on the design you are using. Enter some larger or smaller offsets and see what you like – the Undo button will be your best friend.

The offset option gives you an outline around your text. It can also be used to make text thicker when you are using a very fine line font.

Offset zoom

Once you Apply the offset, it will weld any parts that are overlapping. Parts of the design that are not overlapping (like dots of an i) will not be welded together, so you will need to group the offset before you move it, so it all moves as one.

Now move your original text off of the Mom design.

Offset2.JPG

To create this design, we are going to use the Mom and the offset of our name text.

Select both Mom and the offset and under the Modify Panel, choose Subtract.

Mom knock out copy

This will Subtract the top layer (offset) from the bottom layer (Mom) and any pieces that are not connected will now be individual. I would group these together before anything gets moved.

Offset group copy

The Group option can be found in the QAT (Quick Access Toolbar) at the top of the software, right click and choose Group or under the Object menu at the top left of the software.

Now, we can move our original text back on top of our Mom design.

Knockout

You can see when we zoom in that we have created a gap in our layering. This is done with the purpose of allowing for the shrinkage of the HTV and not getting unwanted gaps in our design.

Knockout zoom

Do you have to do an offset before you use the Subtract option? No, but it can save some frustration when the HTV does shrink.

Now, you are ready to set it up to cut out the material.

I used this awesome Sparkleberry Vaca HTV by Sparkleberry Ink on the Mom design. This is a patterned vinyl and you do not have to mirror or flip your image when you cut their patterned vinyl.

For the name text, I am using Siser Easyweed HTV in Hibiscus from Swing Design. Since this is regular HTV, I will flip (mirror) the text prior to cutting.

Flip name text copy

Next, prepare your materials. Cut them down to the size you need or place each one on the mat individually, however you like to cut.

Click on the Send tab in the top right corner. Select your Material. Heat Transfer – Smooth is what I used for both the pieces I cut.

Send tab copy

Once your mat is loaded, I always suggest doing a Test Cut before cutting the full design. This can save you a lot of frustration in the long run.

Click on the Send button at the bottom and once it’s cut you can weed your designs.

Layer & press the designs on your t-shirt or tote bag and you have a custom made design.

temp_2

Subtracting text

What will you create with this technique today?

Enjoy !

THANK YOU for your support! How can you help? Click HERE & buy a coffee. Every little bit helps with the cost of running the site.

Looking for more in-depth, step-by-step classes, check out all of my online Silhouette classes on my Teachable site HERE.

SS Logo snip it

**This post may contain affiliate links. What that means is that I may receive compensation if you purchase through the links I have provided. The price you pay for the product or service is not higher but I may get compensated for sharing.

Posted on 2 Comments

Layered vinyl decal for a teacher gift

Today I am creating a vinyl decal that could be applied to a variety of items that would be great for a teacher.

Vinyl decal

For this decal, I am combining 2 files found in the May Bundle at SoFontsyApple Monogram Frames and A-Z Hand lettered Initials.

Measure and create your design to the size you want. I added an apple layer of white behind the red, so that gives this design 4 colors to layer.

The mat is revealed at 50% here so I can see where on the cutting mat my decal would fit.

Vinyl decal demo copy

Since there are 4 colors to this decal, replicate the design with the registration marks so there are 4 copies on your design mat.

Replicate copy

Check out more information on the Replicate Panel HERE.

Move the copies to separate areas on your design mat, then un-group the design and delete the color on each copy that you do not want to cut. Make sure you do not move the design in any way when you are deleting the layers, as it is lined up properly with those registration marks.

It’s also helpful to pull off another copy of the original to the side of the mat, just in case you need to go back.

Vinyl decal copies

Now, you have all the layers of your decal ready to cut on one cutting mat. Cut your material or grab your scraps of vinyl and place them in the same location on the cutting mat as they are on the design screen. I am using Oracal 651 vinyl for my decal.

You’ll notice that I did not weed the bottom black layer. Since it had some small dots in the design I chose to apply the Oracal transfer tape first and use the Reverse weeding technique on it to keep those pieces in place.

IMG_3165

The first time I used the reverse weeding I did not like it as the vinyl stuck to me. But, it definitely has it’s uses and works great for those detailed images. With a little practice, you get the hang of it.

When you are layering the vinyl, you want to start with the top layer first and then work your way down. I started with the black, then green, then red and then white.

IMG_3167

I love how this decal turned out.

What would you apply it to? A coffee mug? An acrylic blank?

Enjoy !

THANK YOU for your support! How can you help? Click HERE & buy a coffee. Every little bit helps with the cost of running the site.

Looking for more in-depth, step-by-step classes, check out all of my online Silhouette classes on my Teachable site HERE.

SS Logo snip it

**This post may contain affiliate links. What that means is that I may receive compensation if you purchase through the links I have provided. The price you pay for the product or service is not higher but I may get compensated for sharing.

Posted on 4 Comments

Bus Driver Appreciation gift

Over on the Silhouette School blog today I showed how to use the Cut by Fill Color option to create a layered vinyl decal for perfect placement.

 IMG_2823

Now I’m going to show you how I took that design, shrunk it down and used the same technique to create a bag tag for our Bus Driver.

I started with a 3″ clear acrylic circle blank from Craft Chameleon.

IMG_2824

I love that Craft Chameleon acrylics come with a cut file included. I opened up the template for this shape and copied and pasted it to a new design mat to use as my base. Or you could draw a perfect circle by holding down the Shift key and then resizing the circle to the exact dimensions under the Transform Panel – Scale tab.

Base Template

Now, I can use this to create my design in.

I took the School bus design by Kelly Lollar Designs that I used as an example in my guest post, and shrunk it down with the registration (layering) marks. I wanted to make sure that the bus fit in the center of the acrylic shape with space around the edges for text.

 Bus centered

Now, I duplicated my circle and made it a little bit smaller. This is so the text will fit down inside of the acrylic shape better. Move the original 3″ circle off the mat as it’s not needed any longer or you can delete it.

Then select just the bus and the circle and use the Align Tab in the Transform Panel to Align Center or from the QAT (Quick Access Toolbar). Do not include the registration (layering) marks in this, as it is just the bus and circle we want to center together.

Align center copy

Now, type out the text, select the font style and size. Double click back on the text to get the circle in the bottom left corner. Grab that circle and drag it to your circle shape.

Typing text copy

As you drag it to the circle you will notice it attaches to the circle. Play around with the alignment of the text to your liking and then use the slider bar to increase the distance from the circle either inside or outside of the circle.

Text to shape copy

Now, I decided to increase the Character Spacing under the Text Style Panel, just a bit on my letters to spread it out a bit. And then readjust your words around the circle. Each Font style that you choose will give you different looks, so you will need to adjust for whatever you choose.

Character spacing copy

Now, once the text is modified, it will no longer be editable text. This is a good time to make a copy of the text & circle and pull it off the mat, just in case you want to edit it later. If you select only the text to pull it off, it will release from the shape, so you want to select both the text and the shape and make a copy.

In order to separate the text from the circle, right click on the text and choose Convert to Path.

Convert to Path copy

And now, move the circle off the mat as we do not want it to cut.

Circle released

Now, we are ready to cut out decal just as I detailed in the Silhouette School guest post.

Once we have our decal cut out and layered together, we are ready to apply to the acrylic shape.

I went ahead and placed the shape on my Silhouette cutting mat on the sticky side, so it wouldn’t move while I applied the decal. The acrylic blanks come with a protective covering on them to prevent scratching before use, so make sure to peel that off before you add your decal.

IMG_2814

And then I lined the decal up and placed it down, burnishing it well and took the transfer tape off.

IMG_2815_edited

And with any project there’s always 1 piece that may not work just right. As you can see I’m missing the School bus title on it. This did not weed well when I was layering the decal and after messing with it, I decided I’d just re-cut it and apply.

I duplicated the design and then un-grouped everything and deleted all but the School Bus. Then I duplicated the School bus 3 times just in case…. if I had only cut it once you know it wouldn’t have weeded correctly, but since I cut it 3 times….. all 3 weeded beautifully with reverse weeding.

IMG_2817_edited2

Then I gathered the rest of the tools to attach the pieces of the bag tag.

IMG_2819

I just received these bent nose pliers from Craft Chameleon and using them 1 time, I’m in love with them. They are one of those tools like my Close to My Heart nonstick scissors that will be my go to tools. Now, I could have just gone to the garage and “borrowed” a couple pairs of pliers from there, but these were the perfect size for my hands and worked wonderfully. I am so glad I ordered them after watching Craft Chameleon’s live FB video a few weeks ago.

And now I have a little gift to give to the bus driver.

temp

Can you think of things you might layer with adhesive vinyl? Those first few times you attempt it can seem daunting, but it is another project that takes practice and the layering (registration) marks make it much more manageable to layer a design. What will you design and cut?

Enjoy !

THANK YOU for your support! How can you help? Click HERE & buy a coffee. Every little bit helps with the cost of running the site.

Looking for more in-depth, step-by-step classes, check out all of my online Silhouette classes on my Teachable site HERE.

SS Logo snip it

**This post may contain affiliate links. What that means is that I may receive compensation if you purchase through the links I have provided. The price you pay for the product or service is not higher but I may get compensated for sharing.

Posted on 1 Comment

Hot Mess with your Silhouette Cameo

While the title could mean many things, this week it’s in reference to Spring Break at my house. I thought it would be a fun idea to try out this “Hot Mess” technique with the kids for a crafting project on Spring Break….

Now, I don’t know if it was a good idea to do this on Day 1 of Spring Break or not – would it have been better on Day 5? Who knows…. but I’m going to show you our results.

First, what is a Hot Mess? On some days, that could be my title but today I’m talking about a new crafting project that has everyone rushing out to pick up canvas from the craft store.

IMG_2483

How do you create these pieces of art?

  1. Grab a canvas and the paints you want to use. IMG_2446
  2. Paint any sort of pattern you so desire onto your canvas. Let it dry thoroughly.
  3. Cut a stencil using your Silhouette machine and some vinyl – I used Oracal 631 and 651. As you can see, this is what you get when you let an 8, 6 and almost 5 year old pick out their own stencil. IMG_2452
  4. Apply the stencil using transfer tape – I recommend Oracal transfer tape. You may need to help the vinyl stick to the canvas at first. Just be patient and go slow. IMG_2453
  5. And now paint your top layer of paint. You can choose any color you’d like, but we stuck with white on top. IMG_2456_edited
  6. Let that dry for a bit and then carefully peel off the vinyl stencil. You don’t want it to be too wet when you peel it and you don’t want the vinyl to sit on the canvas too long either as it may start to cure to the canvas.
  7. Let your works of art dry completely.

And there you have the “Hot Mess” technique.

I am so glad I did not start with the 12″ x 24″ canvas that jumped into my cart at Michael’s, as the kids were done after the first 30-40 minutes. And I can say it is a one and done crafting project for Spring Break 2018.

If you have any desire to use these same designs in your works of art, here is where I found them: – Enjoy this Moment by Kolette Hall Design #36196 from the Silhouette Design Store – Oh Poop! Quote by Sarah Hurley Design #209510 from the Silhouette Design Store – Cat by Basic Grey Design #65180 from the Silhouette Design Store – Other poo design created using tracing and point editing.

Next week we will be back to our “Let’s Explore v4” series, continuing through the different tools available to you in the Silhouette Studio v4 software.

In the meantime, check out the other posts in the Let’s Explore v4 Series HERE.

I would love to see what projects you create! Feel free to post on my Facebook group at Silhouette Secrets with EllyMae.

Enjoy !

THANK YOU for your support! How can you help? Click HERE & buy a coffee. Every little bit helps with the cost of running the site.

Looking for more in-depth, step-by-step classes, check out all of my online Silhouette classes on my Teachable site HERE.

SS Logo snip it

**This post may contain affiliate links. What that means is that I may receive compensation if you purchase through the links I have provided. The price you pay for the product or service is not higher but I may get compensated for sharing.

Posted on 6 Comments

Layering vinyl with Silhouette

Well, this week has been such a crazy week. Snow days, 2 hour delays and just life has gotten in the mix – I am sure I’m not the only one out there who has these weeks.

I will have the Let’s Explore v4 – Tracing Panel post out next week, make sure to check out the previous posts in the Let’s Explore series.

I thought I would pop in here today and show you the projects we used last night on a webinar that I co-hosted.

The first one we created was a 2 layer decal.

2-8 Layered vinyl decal copy

So how did I create this?

  1. Type out the text and weld. I used the Mystical Wood Smooth Script font found at SoFontsy – you get 4 fonts all in one file when you purchase this.
  2. Create an Offset. The size of the offset is a matter of personal preference – I used the default of 0.125.
  3. Create the registration marks. Draw a rectangle, make a copy & move it to the right. Align the marks and group together.
  4. Click on the Send tab in top right corner, choose Cut by Fill Color, checking the boxes next to each color to select it to cut & uncheck the colors you do not want to cut. Cut by fill color -create
  5. Line up the registration marks to layer the decal. Always start with the top layer of a decal.

Here is my finished decal & I loved where Barbara placed her’s so I copied her and placed it on my Iris tote that holds my Oracal 651 sheets.

IMG_1896

Next, we created a 3 color vinyl decal.

3 layer decal

To create this design:

  1. Start by drawing a large circle using the Circle tool from the left side of v4.
  2. Download the circle heart frame HERE.
  3. Open the heart circle frame and resize to fit inside the circle you drew.
  4. Purchase the It’s Ok to Wine a Little by Dawn Nicole Designs – Design #227534 from the Silhouette Store. Open the design from your Silhouette library by double clicking the design.
  5. Choose the Fill Color Panel and fill the design with black.
  6. Resize the Wine a Little design to fit in the center of the white circle.
  7. Right click on the Wine a Little design and choose Ungroup. While holding down the Shift key, click on the 3 hearts – this will deselect them. Then right click and choose Group. Now your text is all Grouped back together.
  8. Hold the Shift key down and click on the 3 hearts. When they are all selected, right click and Group.
  9. Choose the Fill Color Panel on the right and fill the hearts with the same red that the heart circle frame is.
  10. Select all the layers and choose the center Align tool. Right click and Group those layers together.
  11. Create the registration marks. Draw a rectangle, make a copy & move it to the right. Align the marks and group together.
  12. Click on the Send tab in the top right corner, then Cut by Fill Color, checking the boxes next to each color to select it to cut & uncheck the colors you do not want to cut. Cut by fill color -3 layer
  13. Line up the registration marks to layer the decal. Always start with the top layer of a decal.

And there you go, a 3 color vinyl decal that is aligned perfectly.

IMG_1901

And all those little hearts will work perfect as nail decals, just in time for Valentine’s Day!

I also wanted to note that I used an Autoblade on my Cameo 3 to cut this out and as you can see, it has some pretty thin details. It cut beautifully!

IMG_1898

I hope you enjoyed seeing how I create a layered vinyl decal.

I would love to see what projects you create! Feel free to post on my Facebook group at Silhouette Secrets with EllyMae.

Enjoy !

THANK YOU for your support! How can you help? Click HERE & buy a coffee. Every little bit helps with the cost of running the site.

Looking for more in-depth, step-by-step classes, check out all of my online Silhouette classes on my Teachable site HERE.

SS Logo snip it
**This post may contain affiliate links. What that means is that I may receive compensation if you purchase through the links I have provided. The price you pay for the product or service is not higher but I may get compensated for sharing.

Posted on Leave a comment

Ornament boxes with Silhouette

Today I took down the ornaments on our Christmas tree and as I was packing away some of the ones my children had made in school, I had a thought to use a file I purchased in the Silhouette Design store called an ornament box. So as soon as the rest of the ornaments were packed up, I headed into the Studio to create these boxes.

Now, I will say these were probably designed with the idea of using them as a gift box and not to be used as a secure storage container. However, for my purpose I think they will be great…..

Scalloped ornament box

Above is the Scallop Ornament box by Samantha Walker. The Silhouette Design Store has many different styles of ornament boxes – find more HERE.

Now, what did I do….. I moved my design up a bit on my page & then go to my Send tab panel and select my Cut settings. That’s it – so simple!!!

Scalloped ornament box-cut settings

I chose Textured cardstock as my material (I cut almost all cardstock on this setting with great results), set my blade depth and click Test Cut. Yes, Test Cut!…. this cuts a small square with a triangle out of the center of it and let me tell you, it will save you so much material!!! If it doesn’t cut correctly, you can make adjustments to your settings or blade depth before you cut the entire design.

IMG_1358

After you have cut your design out, flip your mat over and peel your mat away from your material. This is a good practice to get in to for many reasons. I find that it helps my paper not to curl as bad and it also helps keep the adhesive on the mat longer. If you pull your paper or vinyl off the mat, it can bring up some of that adhesive with it.

Cutting comparison copy

On my second box, shown on the left, I noticed that my blade was not getting a crisp cut. Normally, I would recut this, but since I’m cutting for the purpose of my own storage box, I left it. However, I knew exactly how to fix it. A new cutting mat! Yes, as easy as that. The mat I was using with the one on the left (green) was well used and even though it felt sticky enough, if that cardstock moves even just a little bit, it can make your blade tear the cardstock. So when I went to cut my 3rd box, I pulled out a new mat and look at the difference on the right side (red). I changed nothing else, except using a new mat and it made such a better crisp cut. If you are having cutting issues and your mat is well used, even if you think it’s sticky enough, just try it – get a new mat out and see what the difference is. I do de-stick my mat a bit when I first open it by applying it to a clean cotton t-shirt a time or two before I stick my cardstock down on it.

If you are looking for a new mat or other Silhouette supplies, check out the prices at Swing Design – I always price check there first and they usually have the best prices. Plus, free shipping on orders over $35.

IMG_1359

Above are all the pieces of this box….. 3 – yes 3! And do you know what is even better? There is only 1 tab that needs to be glued together. It’s so simple and a great project for a beginner.

IMG_1361

I am a big fan of this liquid adhesive called Liquid Glass for any 3-D project. It is made by a company called Close to My Heart who is a papercraft & stamping company. I find just a little amount of the glue goes a long way and then I hold it together for the count of 10 and it’s stuck pretty good. You can find it HERE on my website.

Now, I purchased both the Scalloped box and the Snowflake box and here are my completed boxes cut with the same double sided paper. I used the Beary Christmas paper from the Close to My Heart Holiday Expressions catalog. This expired tonight at midnight, so grab it quick – available while supplies last!

Ornament box altered -cut settings

And then I needed a 3rd box, so I decided to ungroup the original design, draw a rectangle that was the same dimensions as the snowflake and put that in for my 3rd box. This could be done with any shape that you would like to use. You can mix and match designs to your liking, but do keep in mind that it is the original creators file that you have used as your base.

And there you have it….. 1 cut, 1 tab glued and fold the box together. So simple!

There is a big sale going on in the Silhouette Design store right now, so pop on other there to grab this and so many others for 50% off.

IMG_1381_wm copy

I hope you enjoy your last evening in 2017 and I look forward to bringing you lots of new things in 2018!

Enjoy !

THANK YOU for your support! How can you help? Click HERE & buy a coffee. Every little bit helps with the cost of running the site.

Looking for more in-depth, step-by-step classes, check out all of my online Silhouette classes on my Teachable site HERE.

SS Logo snip it

**This post may contain affiliate links. What that means is that I may receive compensation if you purchase through the links I have provided. The price you pay for the product or service is not higher but I may get compensated for sharing.

Posted on 1 Comment

3D Lantern

As we are all thinking of packing away that Christmas decor, I thought I would share a 3-D project I made to add to my Christmas decor this year. I love working with paper crafts and 3-D items.

Affiliate links may be present in the following blog post and as an Amazon Associate I earn from qualifying purchases.

This 3-D Nativity Scene Lantern is from the Silhouette design store.

I have to say this file was pretty easy to work with. When you first open this or any layered design up, it may look a bit intimidating but I promise the more you play with them, the easier it becomes to turn it into a masterpiece.

Nativity Lantern copy

This design has 2 colors – the black for the entire 3-D box and the vellum papers for the “glass” of the lantern, so very easy to cut. First, you right click on the entire design and ungroup. This will separate all your pieces of the lantern out and you can move them around. Then, I will select the like items and group them back together. In this design, I grouped the bottom 3 rectangles back together because they will all be cut from the vellum.  Then I move my other parts around on my 12 x 12 design mat to get as many to fit in the space as I can. In this case, you can move the circle hangers to the middle of your cutout, as shown below, to get a little more use out of your cardstock or position where ever you want on the mat. It is really a personal preference how much you move them around to cut. I like to get as much on one page as possible to send it through the Cameo one time.

Nativity Lantern 2 copy

I then choose the Textured Cardstock setting and Send to cut on my Cameo. After it’s cut, I flip my mat over and peel it away from the cardstock. This helps with the paper not curling as much, keeps the adhesive on your mat and helps it release a bit better. Your Silhouette cutting mat is very flexible and can be rolled back quite a ways. That doesn’t mean they won’t crack, because they can – yep I’ve done that… but it’s was an old mat too…. so it had a lot of miles on it.

In the Silhouette Studio, I move the pieces I’ve cut off my Design mat and then move the other pieces on to the mat to cut them. Or you can copy and paste the designs that are off the Design mat to a new Design mat and cut that way. Either way works and I use both methods depending on what I’m cutting.

Now comes the assembly. These are all scored where you need to fold and then you glue into place. I use a liquid glue called Liquid Glass by Close to My Heart for most of my 3-D projects. You place a small amount along the length of where you are gluing and then I hold for 10 seconds. As long as you didn’t use too much glue, it has a pretty good hold after that 10 seconds. And then you want to allow the entire project to dry completely before using. You work you way around the design until it is all assembled together.

The designer, Jennifer Rush, has also included a link to assembly instructions in the description of the design. You can find those instructions HERE as well.

And now, here are a couple images of the finished project….

IMG_9953_cropped

There are so many cool projects and so little time to make them.

I encourage you to take a design for a spin. Try it out, play and learn as you go.

Now, these neat decorations will get packed away in a shoe box for safe keeping when the Christmas decor comes down this week.

I hope you enjoyed this project! Let me know what you have created below in the comments.

Enjoy !

THANK YOU for your support! How can you help? Click HERE & buy a coffee. Every little bit helps with the cost of running the site.

Looking for more in-depth, step-by-step classes, check out all of my online Silhouette classes on my Teachable site HERE.

SS Logo snip it

**This post may contain affiliate links. What that means is that I may receive compensation if you purchase through the links I have provided. The price you pay for the product or service is not higher but I may get compensated for sharing.

Posted on Leave a comment

Butcher print painted sign

I do not usually get in to the painted sign projects, but I needed a bit of kitchen decor and thought I would make one. You may be asking…. “Well, why doesn’t she paint signs?”

Well, I know I can do it and my hubby has a shop full of woodworking tools. But, honestly, it takes too long for me…. I like to slap a vinyl decal on something & call it good. That is what works for me.

I found the images here at The Mountain View Cottage’s blog.

I do want to note that these files are for personal use only and using them to sell items you make is illegal. The designer has provided the free printable files for personal use only and I ask that you keep that in mind when using. You can find out more information on Personal Use vs Commercial Use licenses on Cutting For Business‘ blog, which is a great resource.

Now on to how I did it. First, I pulled the printable file in to the Silhouette Studio program. It was a PDF file and in order to open that file type you need to have the Designer Edition Upgrade or higher of the Studio program. When I opened the PDF, I chose the option to import “As an image”.Next, was to trace my images. Since these were black printable files, they traced really nicely. I am using Silhouette Studio v4.1.201 and chose the Trace Panel on the right side of the Studio.

  Trace Panel copy

Then you choose “Select Trace Area” and draw a rectangle around your object. Your object will then turn yellow and you want it to be as solid yellow where ever you want it to trace.  For some objects, you may need to play with the settings in the Trace Panel to get the highest level possible for a good trace. I then clicked on the Trace option at the bottom of the Trace Panel.

Trace options copy

There are 3 Trace options at the bottom and the one I use the most is the top trace button that has the inner & outer butterfly shape. It will trace around the areas that have yellow on them, inside and outside of the object.

Once I had all of my objects traced, I then click on them to Select and use the Fill Color Panel to fill them all with color. This helps to visualize your design and makes it easier to move them around the software. I then measured my board and decided how big I wanted to make the design.

Silhouettesecrets_Fridgesign

I decide to give it a go cutting my vinyl without a mat. This is one of the perks of using a Silhouette machine, you do not have to use a mat if you are cutting a material that has a backing attached, such as adhesive vinyl or HTV. One thing to note when you are cutting without a mat is that you cannot cut as wide as you can with a mat. If you look at my photo above you can make out my red cut border around the edge of the white area, this is the software telling me it will not cut outside of that range. If you have a piece of 12″ vinyl, then it will take about 1/2″ of cutting area off of each side. You will also notice that it starts the cutting area on the edge of the vinyl on the left where the arrow is, this means it will start cutting almost immediately on your vinyl if that is where your image is. This differs from using a mat because the machine has to account for the edges around the grid area on the mat. So it makes a big difference if you tell the software you are cutting with or without a mat. You will also notice the Cut border on the right side of the design ends about an inch before my page size ends. This is the software telling me that it will stop cutting before it reaches the end of my material because the machine needs the space to grip the material & keep it in the machine.

Now, I will tell you that I highly recommend using a mat when you can for several reasons. The mat provides support for your material and gives it a solid surface to use when cutting. It also helps to hold your vinyl in place and there is less of a chance that it will move around and ruin your cut. However, the Silhouette does give you the ability to cut without a mat and it is a great feature, especially if you are cutting a lot of decals at once or one long decal. This ability to cut up to 10′ long sets it apart from other cutting machines.

On my Cameo 3, I needed to move my right roller in to the left just a bit to grip the vinyl. To do this, you unlock your roller and move it and then make sure to lock it back in place. The lock on the roller is very hard to see and is right next to the white roller, you twist to lock it back in. If you do not, then your vinyl will slide all over the place. You then line your vinyl up with the blue line & arrows on the left side and press load. After it cut, I then weeded out the parts of my design that would be my stencil and applied transfer paper.

Silhouettesecretsplus_vinylnomat

I painted my board with Black Chalkboard paint from my stash and let it dry a full 24 hours…. again, this is why I say I don’t paint boards often….. time involved.. watching paint dry. While it dried, I gathered my supplies and worked on other projects.

Silhouette-secrets001

I then applied my stencil using the hinged method, so I could get it as straight as I possibly could and not have it shift during application since it was so large.

Silhouette-secrets002

After I applied my stencil, it occurred to me that using black vinyl as a stencil on a black board was probably not the best idea. But, you go with it at this point. I then added a border of painters tape around the edges of my vinyl and board, so I would not accidentally paint an area I didn’t want to.

Silhouette-secrets003

I then sponged on my DecoArt Chalky Finish white paint. And let it dry for a couple hours. I had read a lot of posts that said to peel your stencil off while it was still wet, so I just kept coming back to check on it. You don’t want to do it while it’s too wet or it will smear and if you wait too long, then the vinyl could peel up more paint than you want.

Silhouette-secrets004

Now, after removing my big piece of stencil, came the task of weeding out all the little pieces inside of each animal……

Silhouette-secrets005

After I finished weeding out the inner pieces of vinyl, I let the entire piece dry for a good 48 hours. Once dry, I took a white piece of chalk and turned it sideways and “seasoned” the entire board to make it look more realistic.

Silhouette-secrets006

And here is my finished kitchen decor board… well, almost finished. It still needs a frame, which will require more time.

Silhouette-secrets007

The supplies I used for this project are:

Silhouette Studio Designer Edition software Cameo 3 cutting machine Oracal vinyl Transfer paper a board from my husband’s woodshop Craftsmart Black chalkboard paint from craft store DecoArt White Americana Decor Chalky Finish in white from craft store White Chalk

I am happy with how this sign turned out for my kitchen. The end result was exactly what I wanted, but it was no simple, quick project.

While I know that painting wood signs is not my preferred method…… I still encourage you to try a project out at least once. I may not paint a new sign every week, but I may have a few more in my future.

Enjoy !

THANK YOU for your support! How can you help? Click HERE & buy a coffee. Every little bit helps with the cost of running the site.

Looking for more in-depth, step-by-step classes, check out all of my online Silhouette classes on my Teachable site HERE.

SS Logo snip it

**This post may contain affiliate links. What that means is that I may receive compensation if you purchase through the links I have provided. The price you pay for the product or service is not higher but I may get compensated for sharing.

Posted on Leave a comment

Sparkly Unicorn

September happens to be my Mom’s birthday month and I wanted to make her a special card.

Affiliate links may be present in the following blog post and as an Amazon Associate I earn from qualifying purchases.

I found this Unicorn Hug Gift Card holder from the Silhouette Design store that I had acquired at some time and I thought it would be perfect. I had purchased a couple pairs of earrings from Mags Bonham at our TJC Curio Intensive Retreat last weekend and thought I could slip them inside the gift card pocket.

IMG_9585

IMG_9584 copy

I created this card using the following supplies:
Unicorn Hug Gift Card Holder by Jennifer Rush from the Silhouette Design Store
CTMH Cardstock – White & Pixie
CTMH Pink Glitter Cardstock – retired (but they have other new colors)
CTMH Dual Action Glue Pen Z553
CTMH Stamp sets: Birthday Sparkles (B1537) and Happy Heart (A1192)
CTMH Bitty Sparkles Z1263
CTMH Archival Black Ink, Bashful Ink, Raspberry Ink, Blossom Ink
CTMH Clear Shimmer Brush Z3293

This was a very simple card to cut & put together. You can read more of the instructions on how to put it together on the designer, Jennifer Rush’s blog HERE.

This is definitely a card that I could create again!


Enjoy !

THANK YOU for your support! How can you help? Click HERE & buy a coffee. Every little bit helps with the cost of running the site.

Looking for more in-depth, step-by-step classes, check out all of my online Silhouette classes on my Teachable site HERE.

SS Logo snip it
**This post may contain affiliate links. What that means is that I may receive compensation if you purchase through the links I have provided. The price you pay for the product or service is not higher but I may get compensated for sharing.

Posted on Leave a comment

Quick gifts

I love being able to whip up a quick gift to send to a friend.

I had a towel in my stash & it seemed to be whispering my name. So I went shopping in the Silhouette Design store to find a cut file I liked.

After a measurement error & my 2nd scrap of black HTV, I ended up with a nice, simple gift I could throw in my care package.

Yes, even seasoned Silhouette users make mistakes. And do you know, often times you learn more from making a mistake than not. At least in my experience, I remember things better the next time when I’ve made a mistake or had to research how to do something. Does that mean I won’t make the same mistake again? No! But I may laugh at myself more the next time!

How do you learn to use the machine? You play, you practice, you research, you create!

I love learning what new technique or new project I can do with my Silhouette Cameo.

Enjoy !

THANK YOU for your support! How can you help? Click HERE & buy a coffee. Every little bit helps with the cost of running the site.

Looking for more in-depth, step-by-step classes, check out all of my online Silhouette classes on my Teachable site HERE.

SS Logo snip it

**This post may contain affiliate links. What that means is that I may receive compensation if you purchase through the links I have provided. The price you pay for the product or service is not higher but I may get compensated for sharing.