Posted on 19 Comments

Let’s Explore v4 – Conical Warp Panel

Conical Warp – What is it?

Conical warp shapes your design given the dimensions that you enter to fit the conical object you are trying to place a design on.

A conical shape is one that is smaller at one end than the other, like a cup.

Cup

Have you ever tried to place a vinyl decal on a cup only to find that it doesn’t lay flat or line up? This is where the Conical Warp Panel will come in handy.

Conical Warp is a Designer Edition Plus feature or higher upgrade feature and can be found on the bottom right of the Silhouette Studio v4 software.

Conical Warp copy

So let’s take a look at what this panel means.

Conical warp detail copy.jpg

  1. Conical Warp Selected Shapes – Select the design to warp and then click on this to start warping the design.Conical Warp Selected Shapes
    *Be Your Own Crazy Self Phrase by Kolette Hall – Design #169936
    *Romantic Flourish Set by Sarah Bailey Design #75427

    When the design is being warped you will see the red box with curved lines on the top and bottom appear around the design.

  2. Diagram – Shows a diagram of the object you are entering the measurements for. As you add measurements the shape will change.
  3. Top Measurement – Measure and enter the top measurement of the object.IMG_6159
  4. Bottom Measurement – Measure and enter the bottom measurement of the object.IMG_6160
  5. Top to Bottom Measurement – Measure and enter the measurements from the top to the bottom.
    IMG_6161
  6. Size of Design – Increase or decrease the size of the design. Depending on the design you have, it not be a big difference you see on the screen. it will depend on the curvature of the object to be warped. As you enter the measurements, you should see it change on the screen.Size of Design
  7. Placement of design – Adjust the placement of the design from the top or bottom of the curvatures of the cup. As you can see, in this design it curves the arrows and that is noticeable.Placement of design
  8. Cancel or Apply – Choose to cancel or to keep the warp.Cancel will undo everything chosen.Apply will release the warp and the design will be ungrouped. Make sure to group it back together so it will move as one item.When you click on Apply, you may get a Processing pop up. This is a lot of data that it is changing, just be patient and it will depend on the computer processing power on how long it takes to finish.

    Apply design

Now, it is ready to cut with the warp that will help it apply straight onto the cup.

Decal.jpg

I used Black Oracal 651 for this decal and it cut beautifully. And then I used Oracal Transfer tape to apply it to the cup.

Finished cup

This feature makes it so much easier to apply a decal straight onto a conical object.

Now, I will let this decal sit for 72 hours for the adhesive to cure on the cup for best results.

I used Be Your Own Crazy Self by Kolette Hall Design #169936 and Romantic Flourish Set by Sarah Bailey Design #75427 from the Silhouette Design Store to create this.

I hope this helps you understand the Conical Warp Panel in the Silhouette Studio v4 software! It is such a fun feature to play with and I encourage you to just try it!

Enjoy!

SS_Signature copySS Logo snip it

**This post may contain affiliate links. What that means is that I may receive compensation if you purchase through the links I have provided. The price you pay for the product or service is not higher but I may get compensated for sharing.

Posted on 9 Comments

Leatherette Earrings & Earring Card Projects

Affiliate links may be present in the following blog post and as an Amazon Associate, I earn from qualifying purchases.

Who doesn’t love a surprise? And that is just what I received when Silhouette America asked if I wanted to check out their new Mystery box.

When I opened the box, look what I saw:

IMG_5534

Plus a pack of the Kraft Adhesive paper that arrived on my doorstep, it must have forgotten to jump in the box and was just another bonus to the mystery box.

Kraft Paper

And now the fun part of playing with these materials.

I grabbed some designs from the Silhouette Design Store and tackled something I’ve had on my project list.

IMG_5560_edited

I used the Leatherette package and the sketch pens to create these earrings and earring cards.

First, I started off making the earring holders.
I cut several different styles but I ended up really liking Design #14057 by Loni Stevens.

Earring holder file

But, I knew I could add to the earring holder, so I decided to dress them up a bit with the Silhouette sketch pens. I received the Metallic set in my mystery box and after testing several, the silver was my favorite.
I could have told you that before I tested, but I still gave all the colors a chance.

Zoom on stitches and name

To make the dashed sketch line:
– Make a copy of the outer edge of the earring holder design
Resize the copy a little smaller – either by the Scale panel or by dragging the corner bounding box
– Use the Line Style Panel and change the style of the line to a dashed line
– Also under the Line Style Panel change the color of the line to black.
– Select the dashed line, click on the Send Tab and then click on the
Action by: Line at the top –
this means the Cameo will perform the actions we tell it to by the Line Color
Cut by Line color

– Grab the black color option and move it to the top spot –
this action will be performed first
– Change the Tool No. to the blue circle (blue circle = Tool 2)
– Select your Material – Cardstock
– Change the Action to Sketch
– Check & set up the Cut settings for the red line

Now when the design is Sent, it will first sketch the design that has been changed to a black Line color – the dashed line and then after will cut the lines that are red.

Next, I used the Nouradilla Script Font and added my name and Silhouette Secrets to the earring holder as well. Change the line color to black under the Line Style Panel and it will sketch at the same time as the dashed line.

Once I started cutting, it was hard to stop. I do love how this Leatherette cut so smoothly. I started with brand new blade and mat and I believe it made a big difference in how cleanly it cut. In fact, the more I cut and the less sticky my mat became, the cuts weren’t as crisp. A sticky mat makes a big difference.

IMG_5566

This was the first set I cut and might be my favorite. It is Leaf Earring design by Lilium Pixel SVG – Design #266977. The only thing I changed on this file was I released the Compound Path and deleted the top circle for the hardware. After I deleted the circle in each, I selected the entire design and then chose Make a Compound Path again.

I then made a copy of the earring design and right clicked and Flipped horizontally. This made a 2nd copy that I could glue together and make the back have a finished look. I used a Xyron Sticker Maker permanent adhesive to do this.

IMG_5568_resized

Lined Leaf Earrings by Amanda McGee – Design #275057
Leaves Earrings by Amanda McGee – Design #275058
This design was modified to take out the top circles like the first file and then cut & glued together with the Xyron Permanent Adhesive.

IMG_5561_resized

Tear Drop Earrings by Sweet Elsie – Design #273510
– Ungroup the design
– Release the Compound Path and deleted the hardware circle at the top.
– Make a copy and Scale the copy down a little
– Make another copy and Scale it down a little more
– Cut each out of a different color and layer on the earring hardware

You could also use glue and adhere the layers down to each other but I chose to let them hang loose.

Rather than try to get each design to match, I deleted one of the original designs, made my copies and resized how I liked and then make a copy of the entire design before I cut. Then both earrings matched exactly.

IMG_5562

Leaf Earrings by Lori Whitlock – Design #268363
I once again ungrouped the design, released the compound path and then deleted the top circle. You might see a pattern here.
It is nothing to do with the Designer’s file, but for the Double J Earwire hardware I had from Craft Chameleon, it was easier to make my own hardware hole.

IMG_5567_resized

Drop Earrings by Sweet Elsie – Design #273506
I did the same technique with making copies and resizing as I did with the Tear Drop earrings above.

IMG_5565_resized

Layered Feather Earrings by Amanda McGee – Design #275059
This file was cut exactly as it opened.
Again, you could glue the layers down if that is your desired look.

IMG_5563_resized

For this set, I took the Tear Drop Earrings by Sweet Elsie – Design #273510 and then added a dingbat from the Valentine Dingbats Font by Lori Whitlock – Design #243211.
– Make a copy of the Tear Drop design
– Add the dingbat shape from the font to one of the designs
– Select both the earring shape and the dingbat shape, then make a compound path
– Cut each shape out of the colors
– Glue the layers together

All of the earrings above were cut from the Silhouette Leatherette using the Leatherette cut settings in the program and it worked beautifully.
Leatherette cut settings

Again, I did start with a brand new blade and mat, which I believe was very helpful.

The Silhouette cutting mat is very important and the material sticking to the mat for the entire cut is key to getting crisp, clean cuts for all materials.
If the material moves as the blade is going around, it cannot connect exactly and you end up with crunched corners, cuts not connected, frustration and possibly a mess.

I’d suggest always having an extra Silhouette mat & blade on hand for any projects you are doing.

Save this for future reference by pinning the image below.

Leatherette (Pinterest Pin)

Enjoy !

THANK YOU for your support! How can you help? Click HERE & buy a coffee. Every little bit helps with the cost of running the site.

Silhouette Classes

Never stop learning! Let me help you take the anxiety out of learning with Silhouette and get to creating faster! My Silhouette classes are heavily focused on software, so you can take the skills & techniques taught and apply them to many future projects!

Silhouette step-by-step Classes by Silhouette Secrets+

**This post may contain affiliate links. What that means is that I may receive compensation if you purchase through the links I have provided. The price you pay for the product or service is not higher but I may get compensated for sharing.

Posted on 1 Comment

Adhesive Vinyl on Acrylic Blanks

It is Back to School here for us and I made a little something to add to my kid’s backpacks. These bag tags are 3″ in size and with the lobster claw, perfect to clip onto their backpack zipper.

DYQL3512_resized

Our school colors are blue and white, so this little paw print acrylic from Craft Chameleon works great. There are many options for colors both solid and glitter, just click on the drop down box for more options.
For the girl’s tags I used the white glitter with Siser PSV in blue and the boy’s are solid white with Oracal 651 blue.

It came with a cut file that is sized perfectly for the acrylic blank, so all you have to do is customize it if needed and set it up to cut.

CC cut file

*Line color added and thickened for visual

How to make the bag tag design

For these bag tags, I wanted to add the first initial into the design. I typed the first initial using the Text Style Tool and then changed the font using the Text Style Panel.
I used Lori Whitlock’s School Font Design #273761 from the Silhouette Design Store because it was a nice bold font.

Girls paws

Once the properties (color, font style, etc) of the first letter is set, then make a copy of the letter and change the text to the next letter. I find this saves time when you are using multiple text designs that are similar. In this case, all of the initials would be the same font, so I just copied and pasted the letter and then changed it for the next one.

Place the letter in the design where you want and you are ready to cut.

Girls paws send tab

The Cameo will cut exactly where you see the bold red cut lines when you click on the Send tab. I chose to Send mine to cut this way with weeding lines between the designs.

If you are creating a design to show to someone, you can make the design look more realistic and having the letter “cut out” or subtracted from the paw print by making it a Compound Path.

Compound path

Both designs will cut the exact same way as you can see from the bold red cut lines on the Send tab.

Compound path send tab

I can’t wait to show the kids when they get home from school.

FZET7724

Here are the supplies I used to create these bag tags:
– 3″ acrylic paw print
– Swivel Lobster Clasp
– 1 inch Silver Tone Links
– Triangle bail (small)
– Bent Nose pliers
Siser PSV adhesive glitter vinyl (blue)
Siser PSV transfer tape
Oracal 651 adhesive vinyl

And here is a quick video on how I applied the vinyl to the acrylic blanks.

I love that with my Silhouette, I can make so many different custom projects.


Enjoy !

THANK YOU for your support! How can you help? Click HERE & buy a coffee. Every little bit helps with the cost of running the site.

Looking for more in-depth, step-by-step classes, check out all of my online Silhouette classes on my Teachable site HERE.

SS Logo snip it
**This post may contain affiliate links. What that means is that I may receive compensation if you purchase through the links I have provided. The price you pay for the product or service is not higher but I may get compensated for sharing.

Posted on 8 Comments

Let’s Explore v4 – Rhinestones

Bling, sparkle and wow!

Exploring the Rhinestone panel today!

This is a Designer Edition upgrade feature, so if you have the Basic software, you will not see this icon on the screen.

Rhinestone Panel copy

If you only have the Basic software, you can still cut rhinestone designs, but you cannot create rhinestone designs. The Silhouette Design store has many rhinestone designs that can be opened and cut with the Basic software.

The diamond icon is what how you can tell at a glance that it is a rhinestone design or you can use the search box and type in “rhinestone” and it will bring designs up.

Design Store Rhinestone files copy

With a rhinestone design, it comes it at a specific size to use with certain stone sizes, so they cannot be resized if you are using stones.

The description of the design will also tell you more information about the design, such as size, number of rhinestones, and rhinestone sizes needed.

Design Store description copy

With the Designer Edition upgrade to the Silhouette Studio software, you can create your own rhinestone designs in just a few clicks.

There are so many options in creating your own designs in this panel, let’s take a look.

*Please note – throughout the entire post I have filled the rhinestone design in with color so it can be seen better. When a rhinestone design it is not filled with a color.
Check out more information on the Fill Color Panel HERE.

Rhinestone Panel detail copy

  1. Rhinestone Effect – 3 options for rhinestone placement
    Edge Effect – places rhinestones around the edge of the designEffect Edge copyLinear Effect – this fills the design in a linear formationEffect Linear copy

    Here is another example of the linear effect

    Effect Linear demo2 copy

    Radial Effect – fills the design in a radial pattern

    Effect Radial copy

    Here is another example of the radial effect

    Effect Radial demo2 copy

  2. Rhinestone Size – 4 options: 6 ss, 10 ss, 16 ss, 20 ss
    ss stands for Stone SizeStone SizeChoose from the most popular stone sizes or adjust it to a custom size.Adjustable size copy
  3. Rhinestone Spacing – further customize the design by adjusting the spacing between the rhinestonesSpacing
  4. Draw Rhinestones – left click and hold the mouse button down and draw a design. The rhinestone pattern will follow your drawing and the stone size will be what is chosen above in Rhinestone size.Freehand copyHere is a the Freehand rhinestone in action:https://youtu.be/DopgVUlOshQ
  5. Release Rhinestones – releases all the rhinestone circles into individual design pieces. This allows you to manipulate the design even further by moving the rhinestone holes, adding more or deleting some. A selection box will appear around each rhinestone circle.Release RhinestonesZoomed in to see the selection boxes.Release Rhinestones zoomedHere I have moved some and added more to fill in the blank spaces.Freehand finish

    Something to keep in mind when you do release the rhinestones is you are breaking the file up from 1 object to LOTS of objects – each of those boxes around the hole is a new object. This means that it is a lot of data for your computer to process. Do not be surprised if you experience a little lag or it doesn’t react as fast as you’d like. This is normal and depends on the processing speed of your computer and how much data it can process at once.

    After adjusting the design, select the entire image and then Group it back together, so the file will move as 1 object.

    Rhinestone grouped

  6. Totals (all Shapes) – this tells how many rhinestones are either on the mat or if 1 object is selected, how many are in the design.When no objects are selected, it totals all the rhinestones on the mat file.Totals copyWhen 1 object is selected, it totals the rhinestone count for that 1 object.Totals selected copy

Rhinestone designs can be so much fun to create and design!

The design is then cut out of a rhinestone template material that can be reused over and over again to create fabulous rhinestone designs.

IMG_3996

And you have another customized project that you have created with the Silhouette machine.

temp

For a full online video course going step-by-step through the rhinestone process, check out the class on Designing with Rhinestones and Silhouette – Creating 4 projects

Supplies used in this post:
Love design by Silhouette Design #9651
Magic Flock rhinestone material, Hot Fix Transfer tape, and Rhinestones
from The Rhinestone World
Canvas Zipper bag from Craft Chameleon

Feel free to share your sparkly rhinestone projects on my Facebook group at
Silhouette Secrets+ with EllyMae.

Enjoy !

THANK YOU for your support! How can you help? Click HERE & buy a coffee. Every little bit helps with the cost of running the site.

Silhouette Classes

Never stop learning! Let me help you take the anxiety out of learning with Silhouette and get to creating faster! My Silhouette classes are heavily focused on software, so you can take the skills & techniques taught and apply them to many future projects!

SS Logo snip it
**This post may contain affiliate links. What that means is that I may receive compensation if you purchase through the links I have provided. The price you pay for the product or service is not higher but I may get compensated for sharing.

Posted on 8 Comments

Let’s Explore v4 – Sketch Panel

One of the options with the Silhouette machine is using pens in the tool holder and then the Silhouette will draw the design you choose. There are sketch designs that you can find in the Silhouette Design store and are all ready to use with your sketch pens. This is one of my favorites I did while preparing for a class.

IMG_2944

But, did you know that you can turn images into sketched designs? If you have the Designer Edition upgrade to the Silhouette software, you have the Sketch Panel available to you.

Sketch Panel copy

This is so fun to play around with and you never know what you may like until you try it.

Sketch Settings

Sketch Panel detail copy

  1. Edge Sketch – 7 different edge style sketchesEdge SketchAs you can see, each one gives it a little different look. Keep in mind that the more lines you see or the darker the sketch is, the longer it will take to sketch out that design.
  2. Fill Sketch –  8 different fill option for the sketch design.Fill SketchIn the above example, an outer edge sketch line was chosen to help show the design better and then each one is a Fill option.
  3. Release Sketch – This opens up a whole new world of possibilities in editing your sketch design. Once the sketch is released, then you can access individual point editing on the sketched design and can manipulate it how you like. On the left is before the sketch is released. Each of the gray points is an edit point that can be manipulated in this design. On the right is after the sketch has been released. Now, not only do you have the gray edit points, but the sketch fill lines have been released so you can move those as well. Keep in mind that a red dot means that it is an open point and not a closed object, so you will not be able to fill this with color. You can move the red dots towards each other and connect the dots to change the sketch fill.

And there are even more options

Advanced Sketch Settings

Advanced Sketch copy

  1. Edge Effect – 4 options for Edge Effect. These look the same when you first click on them, but with each one there may be more options for you to adjust the design.Plain – there are no further options given. AS Plain Continuous – Option for width, density & waver. AS Continuous I have made a few adjustments from the photo above to show you the difference. AS Continuous2 Rough – Option for stroke length, width, density, splay, curvature. AS Rough 1 And this photo below shows a few adjustments and how it can change the look of the sketched design. AS Rough 2 Scribble – Options for loop separation, loop size, randomness, and density. AS Scribble 1 And here is an example of adjustments made to the Scribble options. AS Scribble 2
  2. Fill Type – 3 additional options for Fill type – none, zigzag, and hatchZigzag – Options for spacing, angle, offset FT Zigzag And here is adjusting those options. FT Zigzag2 Hatch – Options for spacing, angle, sweep, offset. FT Hatch1 And more adjustments made to the Hatch fill. FT Hatch2
  3. Options – As shown in the examples above, these options change for each type of sketch fill you choose.
  4. Fill Effect – 2 advanced OptionsRough – options for stroke length, width, density, splay, curvature. FE Rough1 And changing the options up a bit, yields a different sketched look. FE Rough2 Scribble – Options are loop separation, loop size, randomness, and density FE Scribble 1.JPG And more adjustments to the options. FE Scribble 2

Now, did you know there were so many options? You could play with this feature for a long time and make many different designs with it, just by changing a few things.

Sketch pens are so fun to play with and can make very unique designs.

Keep in mind that that the Sketch Panel is available for those that have the Designer Edition upgrade to the Silhouette software.

Check out this video showing how to turn a design into a sketched design using this Sketch Panel.

Enjoy !

THANK YOU for your support! How can you help? Click HERE & buy a coffee. Every little bit helps with the cost of running the site.

Looking for more in-depth, step-by-step classes, check out all of my online Silhouette classes on my Teachable site HERE.

SS Logo snip it

**This post may contain affiliate links. What that means is that I may receive compensation if you purchase through the links I have provided. The price you pay for the product or service is not higher but I may get compensated for sharing.

Posted on 1 Comment

Creating a shadow box with Silhouette

Everyone starts out with one material or another, mine was paper. I started with my Silhouette as a paper-crafter and it has grown from there.

A while back I was visiting friends in Kansas and playing with the Silhouette and my friend asked if I could trace a photo for her that a friend took. Now, photo tracing can be tricky. Each photo can yield different results tracing in the Silhouette Studio and you just never know until you try to see what will happen.

In this case, it was a great photo to trace.

Bobbi's photo

Here is how the trace came out. I used Basic Trace panel to achieve this. Check out the Trace Panel HERE.

Photo trace

Then I released the compound path and deleted the water areas and used the point editing and deleting points to clean up edges and take out the skyline.

Cleaned up

Now, like I said above, each photo is going to vary in how it traces and this one turned out to be pretty simple with a little time for editing.

Then when I saw this Canoe at Sunrise shadow box in the Silhouette Design Store, I knew it was perfect for a gift that I could incorporate this trace into.

Design Store file

Instead of adding the canoe, I cut and added my traced image of my friend on her kayak. It was perfect!

Shadow box

I am one of those people who has to do a project pretty much exactly like the demo, at least the first time. So I did go to the designer’s website and purchase the file again – yes, sounds crazy – but I wanted the backgrounds for this particular project. However, you can use any background that you want and add it to your project.

What are you creating today? Feel free to post your project photos & questions on my Facebook group at Silhouette Secrets+ with EllyMae.

Shadow box

Enjoy !

THANK YOU for your support! How can you help? Click HERE & buy a coffee. Every little bit helps with the cost of running the site.

Looking for more in-depth, step-by-step classes, check out all of my online Silhouette classes on my Teachable site HERE.

SS Logo snip it

**This post may contain affiliate links. What that means is that I may receive compensation if you purchase through the links I have provided. The price you pay for the product or service is not higher but I may get compensated for sharing.

Posted on 2 Comments

“Tank” top

I created this shirt for my son to wear on vacation. He is all about Army and tanks at 6 years old and picked out this Military Set by Studio Ilustrado – Design #83790 in the Silhouette Design Store.

Design Store file

When this file is opened there are multiple designs so I had to right click on it then chose  ungroup and deleted the designs I did not want.

Design file ungroup copy

Then I always fill my design with color, so I can see how it will look when it’s cut.

Fill with color

And now came time to add this Camo Sparkleberry Ink HTV my cutting mat.

Sparkleberry ink camo

It turned out perfect.

temp

And as you can see, he loved it.

He told everyone the entire weekend of camping “Look at my Tank Top – get it? Tank Top”

IMG_4733

Feel free to share the creations you make on my Facebook group at Silhouette Secrets+ with EllyMae.

Enjoy !

THANK YOU for your support! How can you help? Click HERE & buy a coffee. Every little bit helps with the cost of running the site.

Looking for more in-depth, step-by-step classes, check out all of my online Silhouette classes on my Teachable site HERE.

SS Logo snip it

**This post may contain affiliate links. What that means is that I may receive compensation if you purchase through the links I have provided. The price you pay for the product or service is not higher but I may get compensated for sharing.

Posted on 2 Comments

Using multiple files to create a design

Where do you find your ideas?

I am a big Pinterest lover. I pin a lot of things of all categories and sometimes just sit and pin ideas for hours. I find it relaxing. Do I make all the pins I save? No – but I have made quite a few.

Check out my Pinterest boards HERE and maybe you’ll get some ideas.

My son was looking for something to put on a shirt and he found one he really liked. I realized I could re-create it with designs from the Silhouette Design Store. My son loves Legos. He will wake up and create something before his eyes are fully opened. And he is good! I have to have directions to follow to make something and that goes for anything – I just don’t have that engineering mind. He can just imagine something and then create it out of Legos. It’s amazing and love that at 6 years old, he is doing that.

While creating this shirt, I used many of the features we have already reviewed in the “Let’s Explore v4” series. Watch for links throughout this post that will explain more about each function I used in designing the shirt.

temp_1

First, I went shopping in the Silhouette Design Store and here are the designs I picked up:

Sleep Icon by Rhonna Farrer – Design #200750 Sleep photo DS

ZP Brick Blocks Print by ScrapNFonts – Design #120497 ZP Brick Blocks Print

Building Block by Snapdragon Snippets – Design #34936 Building Block DS

Kitchen Dingbats by Lori Whitlock – Design #215176 Kitchen Dingbats by LW

Now, I am ready to create my design. I opened each of the designs from my Silhouette library and have them on my mat.

Designs on page1

Now I can start editing them to delete the pieces I do not need.

By releasing and making compound paths, I was able to alter both of these designs to ones that I could use in with HTV on the shirt.

Designs on page1

You can find more information on Compound Paths HERE.

Altered designs

I like to fill all my designs with color as it makes it easier to work with the design and you can see it better. Check out more information on the Fill Color Panel HERE.

Next, I took the drawing tools on the left side and drew a rounded rectangle.

Rounded Rectangle copy

Then I right clicked on the rectangle and chose “Convert to Path”.

Convert to Path copy

This will set the design as a solid rectangle. Before convert to path is chosen, the red dots can still be moved in the top left corner and this will change the angle of the rounded rectangle corners.

Now, make an offset of the rounded rectangle. Find more information on creating an Offset HERE.

Offset

Then select both rectangles, right click and choose “Make Compound Path“. Then fill with color and now there is a rectangle outline.

Rectangle outline

Then the rectangle can be replicated 2 more times for design. Check out more information on the Replicate Panel HERE.

Replicate rectangle

Next, I used the Lori Whitlock Kitchen Dingbats for my fork and knife.

I accessed the Dingbat font in the Text Style Panel under the Glyphs panel and double clicked on the character I wanted.

For more information on accessing glyphs directly in the software click HERE.

LW Dingbats copy

Then I right clicked and chose “Release Compound Path“, deleted the spoon, moved the fork to the right side, selected both and grouped them back together.

Now I have all my designs and just need to resize them to fit inside the rectangles.

Transform Panel - Align

Now that the designs are sized how I like, I can use the Transform Panel – Align tools to make sure they are centered and the spacing between each section is the same. Check out more information on using the Align tools HERE.

All that is left is to create my text. For this, I used the ZP Brick Blocks Print by ScrapNFonts from the Silhouette Design Store.

Block font

I used the Text Style Panel to choose the font that I wanted and then used the Transform -Align Panel to center the words to each rectangle.

Once I have everything centered and aligned how I want it, I select it all and then Group it together, so it moves as one object.

Flip Horizontal

Then I right clicked on the design and chose “Flip Horizontal”, since I am cutting this from Heat Transfer Vinyl. I prefer to flip the image myself and then tell the software to “Send As Is” when it gives me the pop up after clicking on Send, so there is no issue with it flipping it to the wrong side of my mat.

Flip copy

And now you are ready to send this to cut after making sure you blade is installed right and choosing the correct material.

This design is cut out of Siser Easyweed Black HTV and I applied it using my heat press with a Siser Pressing pillow to help raise the design area above the seams.

IMG_4003_edited

My son loved his shirt and I loved creating it by combining several designs.

temp

Are you not finding the exact design that you envision for a project? Why not create your own? Combine designs that you buy, create your own or a combination of both.

Feel free to share the creations you make on my Facebook group at Silhouette Secrets+ with EllyMae.

Enjoy !

THANK YOU for your support! How can you help? Click HERE & buy a coffee. Every little bit helps with the cost of running the site.

Looking for more in-depth, step-by-step classes, check out all of my online Silhouette classes on my Teachable site HERE.

SS Logo snip it

**This post may contain affiliate links. What that means is that I may receive compensation if you purchase through the links I have provided. The price you pay for the product or service is not higher but I may get compensated for sharing.

Posted on 2 Comments

Let’s Explore v4 – Pop Up Panel

Today we are exploring the Pop Up Panel. Did you know there was such a thing? If you have v4.1.197 or higher of the Silhouette software, then this is available to you.

This is a neat feature that you can take a design and make it pop out of base shape, such as a card.

Pop Up Panel copy

Let’s take a look at how we can go from this

Pop Up Card1

to this

temp

First, I started with my Page Size set at 5.5″ x 8.5″ for my card base and turned it to a Portrait Orientation.

Page Setup copy

Next, I drew a 5.25″ x 8.25″ rectangle to fit inside my card base. I used the Scale Tab to get the exact dimensions I wanted for my inner rectangle.

Scale tab copy Then, I used the Align Tool to Center the design to my Page.

Transform Panel copy

Then, I pulled down a vertical Guide (blue line) from the top to line it up with the center fold line of my card at 4.25″. Guides are a Designer Edition upgrade feature and you can turn them on and off under the Page Setup Panel – Tab 2.

Guide

Now, open the design you want to use for the Pop up card.

Pop Up Card 2

We are now ready to take a look at the Pop Up Panel features.

Pop Up Panel detail copy.jpg

  1. Convert Selected Shapes to Popup – Select the Design and click this to create your Popup shape on your base. Lines will show up on the design at the top and towards the bottom.Pop Up Card4The bottom line is the score line for the center of the card. Match the score line up with the Guide created at 4.25″When the design is selected, a directional arrow in the center appears & that can be used to move and adjust the design and pop up features and vary the length of the design to pop out of the base.Pop Up Card5.JPGThe farther down you pull the arrow, the more the features adjust. Pop Up Card6 Pull the red dots on either side of the score line out to the edges of the card, so it will score a fold line to the edge of the card. Score line extension
  2. Restore Original Shapes – This will restore the shape to the original design. This is great if you decide you don’t like it and want to start fresh.
  3. Release Popup – This releases the design into individual cut lines, which can be used to further manipulate the design how you like it.Pop Up Card7 Each line will now become it’s own separate piece and can be moved or deleted, as you see fit.
  4. Base Width – This will adjust the base width of the score line on the bottom edge of your design where it meets the card.Base widthHere I increased it to 57% to show you how it looks. Each design will vary in how it looks and the look you want to achieve.
  5. Min. Strut Width – This adjusts the Popup tabs at the top of the design. As the number increases the number of tabs goes down.Min Strut WidthI increased the Min. Strut Width to 0.269″ and it changes so there are only 5 tabs at the top of my design.
  6. Dash Pitch – Dash pitch adjusts the score line width and how far each line will cut before skipping to the next one.Dash pitch copy

And here is the final view on the Send tab before you go to cut the Popup design.

Send tab

Send your design to cut and assemble the card.

temp

This PopUp feature is amazing! So many options & so much fun to create with.

What is the best way to learn? Play, play, play!!! Will you make mistakes? YES! Everyone makes mistakes! But you learn as you go!

Now, set aside some time and play, play, play!

PopUp Panel

This card was created with Happy Face One Design #147176 by Sarah Bailey from the Silhouette Design Store, Close to My Heart cardstock, and Oracal 651 vinyl.

Yes, you read that right. I used Oracal 651 vinyl on a card. This would not work with all cardstock as it will depend on the fibers of the cardstock but a high quality, smooth cardstock you should have no issues using transfer tape to apply your design.

I would love to see what you create – feel free to post on my Facebook group at Silhouette Secrets+ with EllyMae.

Enjoy !

THANK YOU for your support! How can you help? Click HERE & buy a coffee. Every little bit helps with the cost of running the site.

Looking for more in-depth, step-by-step classes, check out all of my online Silhouette classes on my Teachable site HERE.

SS Logo snip it
**This post may contain affiliate links. What that means is that I may receive compensation if you purchase through the links I have provided. The price you pay for the product or service is not higher but I may get compensated for sharing.

Posted on 37 Comments

Let’s Explore v4 – Offset Panel

Offset Panel – Silhouette Studio v4

We are moving down the right side of the Silhouette Studio v4 software and going through the Panels in detail.

Let’s take a look at the Offset Panel.

6-5 Offset Panel copy

This tool can be very useful for many things such as creating a background layer for a decal, creating a shadow, thickening fonts, making frames, etc.

6-5 Offset Panel Detail copy

  1. Offset – This tool creates a copy of the design on the outside edge of the original shape. The default distance is 0.125 inches and that is what shows when Offset button is chosen, it can then be adjusted.Select your design and click on the Offset button.Offset demo *
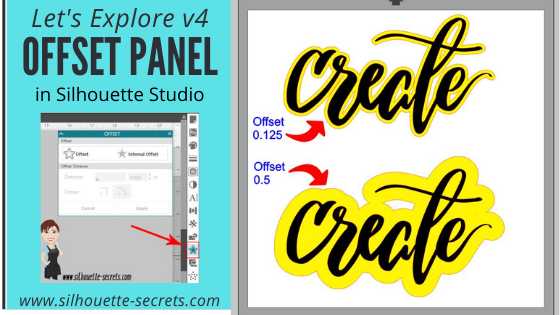
the offset is filled with yellow for you to see it better *Create by Cali Arroyo – Design #215617 Once the Offset is applied, it will automatically weld together and any parts that are overlapping will now be welded. Keep in mind that if there is a part of the design, such as a dot of an i, that is not overlapping, it will not be welded and it will need to be grouped after you create your Offset.
  2. Internal Offset – This will apply the offset inside of the design. The default is set for 0.125 inches here too and most likely you won’t see any offset created, if that is left. Once you decrease the offset distance, you can see a change happen.Internal Offset demoThis is one way to fill a font that you want to use the sketch pens with. By creating multiple internal offsets, the sketch pen will “fill” the font in by drawing all the internal offsets.Here is an example of creating multiple internal offsets to “fill” in a font to sketch. Offset multiples This was many internal offsets, so many I lost track of how many I created. First, I will say that it took a lot of ink to fill this in. I was using the Silhouette sketch pens and your results will vary depending on the pen you use and the tip it has on it. Sketch pen collage copy2 You can see above that even with multiple internal offsets, it did not fill in completely with the Silhouette sketch pen. In some cases, it is not worth the ink or the time to use the sketch pens like this and would be easier to use the Print and Cut feature instead.
  3. Offset Distance – Change the Distance of the offset to achieve the look you want.Offset Distance demo
  4. Offset Corner – Change the look of the offset created by changing the corner shape.Corner demo
  5. Cancel or Apply – Choose whether to Apply the Offset (can also hit Enter key) or Cancel.

Let’s take a look at some examples of using Offsets.

Creating an offset as a background to layer a decal:

Offset 2 layer decal

Check out how I created this and then used layering marks to line up the decal exactly HERE.

IMG_1896

Using a Offset to create a space when subtracting and layering HTV:

Knockout zoom copy

Mom Offset final

See details on how I created this shirt HERE.

temp_1

Using an Offset to thicken fonts for cleaner cutting:

Offset font

The Samantha font is very popular but it can sometimes be a pain to cut for small projects, a small offset can make a big difference without changing the look too much.

Using an Offset to make a frame:

Offset Frame

Make an Offset of the original design, select the offset & original, then right click and choose Make Compound path or use the Modify Panel and choose Make Compound path. Now, you have a frame.

There are many ways to use the Offset and these are just a few examples. How do you use the Offset feature? I would love seeing what you are creating – feel free to post on my Facebook group at Silhouette Secrets+ with EllyMae.

Save this for future reference by pinning the image below.

Offset Pin 2

Enjoy !

THANK YOU for your support! How can you help? Click HERE & buy a coffee. Every little bit helps with the cost of running the site.

Looking for more in-depth, step-by-step classes, check out all of my online Silhouette classes on my Teachable site HERE.

SS Logo snip it

**This post may contain affiliate links. What that means is that I may receive compensation if you purchase through the links I have provided. The price you pay for the product or service is not higher but I may get compensated for sharing.