Posted on Leave a comment

Let’s Explore v4 – Advanced Rhinestones

There are so many neat features of the Silhouette Studio software as you move up in the software upgrades. The Advanced Rhinestone Panel is an option if you have the Designer Edition Plus or Business Edition upgrade.

Rhinestone Panel copy

At first glance or if you read the standard description, it may not seem like much of a feature, but let’s take a look at it more in depth.

Rhinestone Panel Detail copy

  1. Rhinestone Library – Contains images of rhinestone designs – 2 sectionsPre-set Images and Sizes – Choose which color and size that you would like to add to your design

    Rhinestone options

    User Rhinestones – designs can be added to the Rhinestone library by either drawing a shape or importing a photo

    Rhinestone Library - User section copy

  2. Size – Designates the size of the rhinestone chosen or the size of the rhinestone design you are creatingSize copy
    This will show grayed out if using a pre-set shape & size.

    If a shape is added to the rhinestone library, then a size can be designated and it is no longer grayed out.

    Size User created copy

  3. Add Selected Shape to Rhinestone Library – Add shape designs to the library for creating a new rhinestone option. Shapes can be drawn or imported from a photoAdd Selected Shape copy

    The default measurement can also be changed under the Preferences in the software. It can be set to inches (default), millimeters, centimeters, meters, inches or feet.

    Change measurement preference copy

    And then it will reflect in the panels that use measurements.

    Change measurement copy

    If the shape drawn is bigger than what is allowed, a pop up will appear stating this.

    Error size

  4. Draw Rhinestones – Single vs Multiple – Choose to draw one style of rhinestone designs or a multiple of designs from the library.Single – drawing rhinestone in repeat of 1 shape with a click of the mouse

    Draw Rhinestone Single click

    Multiple – Draw Rhinestone from a chosen list of varied designs pulled from rhinestone library.

    By clicking on the multiple option, a new option window expands and you can add or delete the order of the designs in the selection window.

    Draw Multiple pattern
    This would come in handy if you are trying to create a rhinestone pattern with different sizes.

    Or you can use the pre-set rhinestone designs and create a pattern too.

    Draw Multiple pattern on shape

  5. Angle – Change the angle of how the rhinestone design follows a shape.Standard = Rhinestones upright
    Center = Rhinestones point to center
    Perpendicular = Rhinestone align to contour

    Angle

  6. Spacing – Change the spacing between the rhinestones when applied to a shape.Spacing.JPG
  7. Angle Offset – Choose what angle the rhinestones are placed along a shape.Angle Offset.JPG
  8. Rhinestone placement – Choose how the rhinestones are placed – options are: Outer edge, perpendicular, or from center.Rhinestone Placement
  9. Draw Rhinestone – Single Click vs Replace – Add a rhinestone with a single mouse click or replace a rhinestone with a different rhinestone.Single = place 1 rhinestone with each click of the mouse
    Replace = Once a rhinestone is placed it can then be swapped out with a different rhinestone for another size or color
  10. Totals (All Shapes) – Gives a count of all the rhinestones on the mat or the image selected.Totals copy

 Now that we have explored the entire panel – what would you use this for?

Here I’ve created what is called a mock up and the design is laid on top of the photo of the tote bag.

Mock up photo

Now I may actually have to make the rhinestone decal for real.
Find out more information on creating a rhinestone template in the Let’s Explore v4 – Rhinestones post.

Have you played with the Rhinestone feature yet?
I would love to see your Silhouette projects! Feel free to post on my Facebook group at
Silhouette Secrets+ with EllyMae.

Enjoy!

SS_Signature copySS Logo snip it

**This post may contain affiliate links. What that means is that I may receive compensation if you purchase through the links I have provided. The price you pay for the product or service is not higher but I may get compensated for sharing.

Posted on 8 Comments

Let’s Explore v4 – Sketch Panel

One of the options with the Silhouette machine is using pens in the tool holder and then the Silhouette will draw the design you choose. There are sketch designs that you can find in the Silhouette Design store and are all ready to use with your sketch pens. This is one of my favorites I did while preparing for a class.

IMG_2944

But, did you know that you can turn images into sketched designs? If you have the Designer Edition upgrade to the Silhouette software, you have the Sketch Panel available to you.

Sketch Panel copy

This is so fun to play around with and you never know what you may like until you try it.

Sketch Settings

Sketch Panel detail copy

  1. Edge Sketch – 7 different edge style sketchesEdge SketchAs you can see, each one gives it a little different look. Keep in mind that the more lines you see or the darker the sketch is, the longer it will take to sketch out that design.
  2. Fill Sketch –  8 different fill option for the sketch design.Fill SketchIn the above example, an outer edge sketch line was chosen to help show the design better and then each one is a Fill option.
  3. Release Sketch – This opens up a whole new world of possibilities in editing your sketch design. Once the sketch is released, then you can access individual point editing on the sketched design and can manipulate it how you like. On the left is before the sketch is released. Each of the gray points is an edit point that can be manipulated in this design. On the right is after the sketch has been released. Now, not only do you have the gray edit points, but the sketch fill lines have been released so you can move those as well. Keep in mind that a red dot means that it is an open point and not a closed object, so you will not be able to fill this with color. You can move the red dots towards each other and connect the dots to change the sketch fill.

And there are even more options

Advanced Sketch Settings

Advanced Sketch copy

  1. Edge Effect – 4 options for Edge Effect. These look the same when you first click on them, but with each one there may be more options for you to adjust the design.Plain – there are no further options given. AS Plain Continuous – Option for width, density & waver. AS Continuous I have made a few adjustments from the photo above to show you the difference. AS Continuous2 Rough – Option for stroke length, width, density, splay, curvature. AS Rough 1 And this photo below shows a few adjustments and how it can change the look of the sketched design. AS Rough 2 Scribble – Options for loop separation, loop size, randomness, and density. AS Scribble 1 And here is an example of adjustments made to the Scribble options. AS Scribble 2
  2. Fill Type – 3 additional options for Fill type – none, zigzag, and hatchZigzag – Options for spacing, angle, offset FT Zigzag And here is adjusting those options. FT Zigzag2 Hatch – Options for spacing, angle, sweep, offset. FT Hatch1 And more adjustments made to the Hatch fill. FT Hatch2
  3. Options – As shown in the examples above, these options change for each type of sketch fill you choose.
  4. Fill Effect – 2 advanced OptionsRough – options for stroke length, width, density, splay, curvature. FE Rough1 And changing the options up a bit, yields a different sketched look. FE Rough2 Scribble – Options are loop separation, loop size, randomness, and density FE Scribble 1.JPG And more adjustments to the options. FE Scribble 2

Now, did you know there were so many options? You could play with this feature for a long time and make many different designs with it, just by changing a few things.

Sketch pens are so fun to play with and can make very unique designs.

Keep in mind that that the Sketch Panel is available for those that have the Designer Edition upgrade to the Silhouette software.

Check out this video showing how to turn a design into a sketched design using this Sketch Panel.

Enjoy !

THANK YOU for your support! How can you help? Click HERE & buy a coffee. Every little bit helps with the cost of running the site.

Looking for more in-depth, step-by-step classes, check out all of my online Silhouette classes on my Teachable site HERE.

SS Logo snip it

**This post may contain affiliate links. What that means is that I may receive compensation if you purchase through the links I have provided. The price you pay for the product or service is not higher but I may get compensated for sharing.

Posted on 2 Comments

Layered vinyl decal for a teacher gift

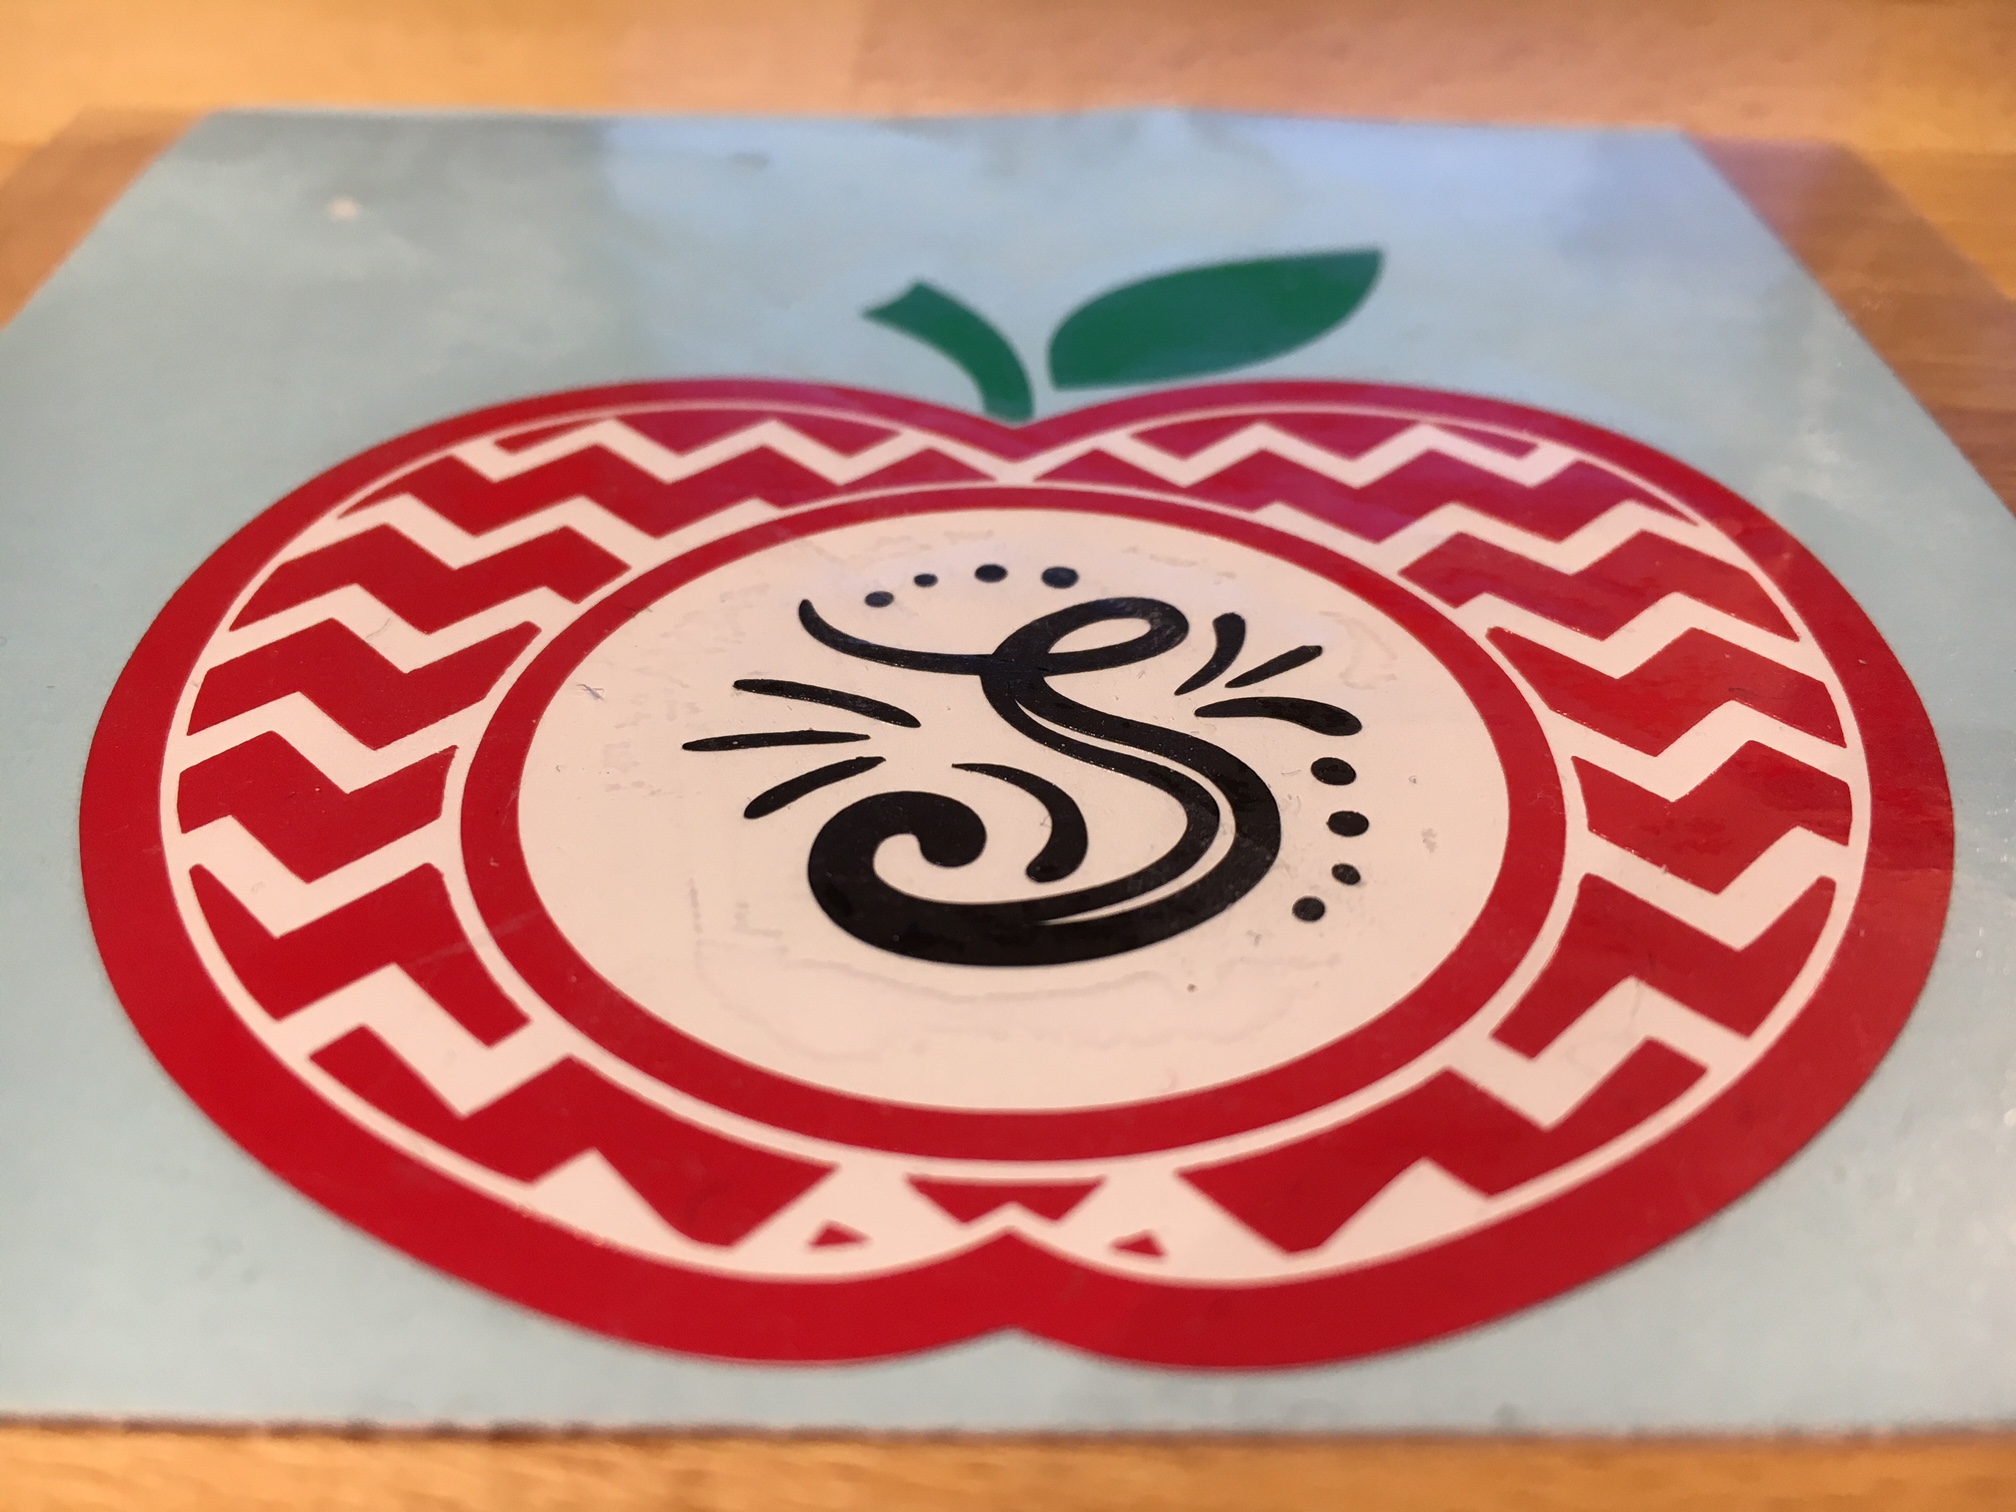
Today I am creating a vinyl decal that could be applied to a variety of items that would be great for a teacher.

Vinyl decal

For this decal, I am combining 2 files found in the May Bundle at SoFontsyApple Monogram Frames and A-Z Hand lettered Initials.

Measure and create your design to the size you want. I added an apple layer of white behind the red, so that gives this design 4 colors to layer.

The mat is revealed at 50% here so I can see where on the cutting mat my decal would fit.

Vinyl decal demo copy

Since there are 4 colors to this decal, replicate the design with the registration marks so there are 4 copies on your design mat.

Replicate copy

Check out more information on the Replicate Panel HERE.

Move the copies to separate areas on your design mat, then un-group the design and delete the color on each copy that you do not want to cut. Make sure you do not move the design in any way when you are deleting the layers, as it is lined up properly with those registration marks.

It’s also helpful to pull off another copy of the original to the side of the mat, just in case you need to go back.

Vinyl decal copies

Now, you have all the layers of your decal ready to cut on one cutting mat. Cut your material or grab your scraps of vinyl and place them in the same location on the cutting mat as they are on the design screen. I am using Oracal 651 vinyl for my decal.

You’ll notice that I did not weed the bottom black layer. Since it had some small dots in the design I chose to apply the Oracal transfer tape first and use the Reverse weeding technique on it to keep those pieces in place.

IMG_3165

The first time I used the reverse weeding I did not like it as the vinyl stuck to me. But, it definitely has it’s uses and works great for those detailed images. With a little practice, you get the hang of it.

When you are layering the vinyl, you want to start with the top layer first and then work your way down. I started with the black, then green, then red and then white.

IMG_3167

I love how this decal turned out.

What would you apply it to? A coffee mug? An acrylic blank?

Enjoy !

THANK YOU for your support! How can you help? Click HERE & buy a coffee. Every little bit helps with the cost of running the site.

Looking for more in-depth, step-by-step classes, check out all of my online Silhouette classes on my Teachable site HERE.

SS Logo snip it

**This post may contain affiliate links. What that means is that I may receive compensation if you purchase through the links I have provided. The price you pay for the product or service is not higher but I may get compensated for sharing.

Posted on 18 Comments

Let’s Explore v4 – Replicate Panel

Want to make a copy of your design, font or an object? Then the Replicate Panel can be very helpful!

This is found on the right side of the Silhouette Studio v4.

Replicate panel copy

This tool works great if you are wanting to replicate several copies of your design. Let’s Explore the Replicate panel!

Replicate panel detailed copy

  1. Duplicate – Choose which way you want 1 copy of your design to replicate left, right, down or up.
  2. Rows or Columns – Choose to Replicate 2 copies right, 3 copies right, 2 copies down or 3 copies down.Replicate rows columns copy
  3. Fill Page – Choose to Replicate the design as many times as it takes to fill the page.Fill Page copy
  4. Mirror – Choose to Mirror 1 copy of the design down, up, left or right.MirrorSomething to note about the Replicate and Mirror tools above is that it may look like the designs are overlapped, however, they are placed just perfect so when you cut, it will cut both lines.Replicate placement As you can see in the photo above, there is no overlap in the cut lines and both copies will cut just fine.
  5. Rotate Copies – Choose to Replicate and rotate 1 copy, 2 copies, 3 copies or 5 copies.Rotate copies

The second tab under the Replicate Panel gives you even more options on choosing how many and where to replicate the design to.

Number of Copies tab copy

Number of Copies detailed copy

  1. Number of copies – Choose how many copies you would like to replicate of your design.
  2. Position of each Copy – Choose what direction you would like the copies to replicate in.
  3. Rotate each Copy – Choose a certain degree to replicate those copies to.Rotate number copies copyIn the photo above, I chose to make 3 copies, rotated to the right at 30 degrees. So each copy will rotate 30 degrees from the previous one.

There is so much that you can do with this Silhouette software and every time I open it, I love seeing what it can do.

The design I used in my example can be found in the May bundle at SoFontsy – it’s called Sports Ball Love/Mom Hearts by Svg Cuttables.

Web

I hope you have fun playing with the Replicate Panel – it can really come in handy when you are designing.

Enjoy !

THANK YOU for your support! How can you help? Click HERE & buy a coffee. Every little bit helps with the cost of running the site.

Looking for more in-depth, step-by-step classes, check out all of my online Silhouette classes on my Teachable site HERE.

SS Logo snip it

**This post may contain affiliate links. What that means is that I may receive compensation if you purchase through the links I have provided. The price you pay for the product or service is not higher but I may get compensated for sharing.

Posted on 7 Comments

Let’s Explore v4 – Transform = Move

Did you know that you can Move objects on your Silhouette Design mat specifically into place?

Pretty neat when you start to look at it.

Under the Transform Panel on the right side, then the 4th tab at the top of the Panel is the “Move By” tab.

4-25 Transform -Move copy

This allows you to move an object to an exact location on the Design mat.

4-25 Transform -Move detail copy

  1. Directional arrows – Move left, move right, move up, move down – choose which direction you want to move your design.
  2. Distance – Set the exact distance you want your design to move.
    Here is the original design placed on my design mat:
    Distance before
    *Running Out Wine Cardio design #222003 by Megan Hardy Design

    Now see how it moved exactly 3.25″ when I select the design and click on the Move right directional arrow.

    Distance after

  3. X and Y coordinates – Set the exact X and Y location of your design on your mat.
    If you look in my above photo, when I moved it 3.25″ to the right, it also added in the X and Y coordinates. This means that I can also move something by changing those numbers. Here I entered my X as 5, so it moved it 5″ from the left side and my Y as 3″, so it moved it 3″ down from the top.X and Y

    You can also choose how it applies the X and Y coordinates by selecting the position on the square that you want it to apply from.
    My photo above has it applied in the top left corner.X Y position copy
    But you can choose what position works best for you, whether it’s the Center of the design or another location as well.

  4. Apply – Click here to apply the Move or hit Enter.

And that is how you can move things on your design screen to the exact location you want.
Can you move it manually? Yes, you sure can!
Drag and move it where you want.
Or you can use the Move tools and place it exactly.
Just like so many other functions in the Silhouette software – there are multiple ways to do things!

Enjoy !

THANK YOU for your support! How can you help? Click HERE & buy a coffee. Every little bit helps with the cost of running the site.

Looking for more in-depth, step-by-step classes, check out all of my online Silhouette classes on my Teachable site HERE.

SS Logo snip it
**This post may contain affiliate links. What that means is that I may receive compensation if you purchase through the links I have provided. The price you pay for the product or service is not higher but I may get compensated for sharing.

Posted on 35 Comments

Let’s Explore v4 – Text Style Panel

Let’s talk about text – the Text Style Panel!

Silhouette Studio software will pull in any font that you have installed on your computer. Once it’s installed, a text style name should show up in the Text Style Panel.

Let’s take a look.

Text Style Panel copy

  1. Text Search bar – The name of the font that is selected will appear in this box or you can highlight it and type a name in the box and it will select that font.Text Search bar copy
  2. Text Size – Use the drop down box to change the text size smaller or larger here or highlight and type in a new number to change the pt size.
  3. Text Style Panel – The first 2 sections to appear in the Panel are the “Frequently Used” and “Recently Used” sections. You may have other sections in the Panel because you’ve created folders in your Fonts folder in the Silhouette cloud library. When you choose a font style for your text, the font style name will be highlighted.
  4. Text Properties – If a font has the options, choose Bold, Italic or Underlined here. Some text styles may have additional options available and the drop down box next to U will be available to select.
  5. Text Alignment – Choose your text to be align left (default), align centered, align right or Full. Text Properties copy
  6. Horizontal/Vertical Text – Choose whether your text runs horizontally or vertically on your design mat.
  7. Line Spacing – Increase or decrease the space between each line of text. This will affect text created in the same text box.
  8. Character Spacing – Increase or decrease the spacing between each character. This can come in handy when you are trying to weld something and the letters do not overlap.
  9. Kerning – This feature adjusts the spacing between letters to make them look better, such as AW or AV. Instead of having such a wide space between then, you can turn the Kern on and they move closer together.Character Spacing

Now, let’s talk a little about how to create with Text.

First click on the Text Tool on the left side of the Silhouette Software. Click on the design mat & type out the words. Click off of the words to deselect it and then click back on the text once to select it. Fill the text with color to make it easier to see & work with. Click on the Text Style Panel on the right side.

Working with text copy

Now, click on a Font Style Name, the text will change to that font style. You can then either click on each font, use the text search bar if you know what you are looking for or use the arrow keys to scroll through the text list and as you do the words will change to each font – this is my favorite method if I don’t know what font I want.

Font Style copy

You will notice that I have red lines still going through my letters. Because my letters are overlapping, I want to weld this before I cut so that it will cut anything part that overlaps as one piece. Right click on the design and choose Weld.

Weld copy

This will change the text from editable text to a vector image, so you might want to make a copy and pull it off your mat before welding. Once it’s welded, you will see that any piece that was not overlapping will have now become it’s own separate section with a bounding box around it.

Weld separate pieces

To keep the pieces together, we want to Group. There are several ways to Group – right click & choose Group, Ctrl (Cmd) + G, Object tab at top & Group or use the QAT (Quick Access Toolbar) at the top and select the Group icon. Group QAT copy

And now your font is ready to cut.

Final Font

I hope that helps to explain the different parts of the Text Style Panel and how to create text designs.

If you want to learn even more about text and how to get accurate text sizes, check out my guest post on Silhouette School’s blog about Forcing Accurate Text Size.

Check out the other posts in the Let’s Explore v4 Series HERE.

Enjoy !

THANK YOU for your support! How can you help? Click HERE & buy a coffee. Every little bit helps with the cost of running the site.

Looking for more in-depth, step-by-step classes, check out all of my online Silhouette classes on my Teachable site HERE.

SS Logo snip it

**This post may contain affiliate links. What that means is that I may receive compensation if you purchase through the links I have provided. The price you pay for the product or service is not higher but I may get compensated for sharing.

Posted on 3 Comments

Let’s Explore v4 – Pixscan Panel

Now you may have noticed I skipped an icon as we were going down the right side of the Silhouette software. I wanted to get through the Tracing panel before we explored the Pixscan, since we will be using that feature here.

The Pixscan Panel can be very useful if you are scanning an object such as a stamped image or design off of a piece of scrapbook paper.

Here is how the Pixscan works:

  1. Gather your images you want to scan and place them on your Pixscan mat inside of the rectangle border.
  2. Take a photo of your Pixscan mat or use your Scanner to gather your image.IMG_1837
  3. Click on the Pixscan icon in the top right corner of the software.Pixscan copy
  4. Then you will choose Import PixScan Image from File and select your photo from where you have saved it. Pixscan no calibration copyMy software gave me the notice that “No Calibration Profile could be found….” and I tried to create a calibration file, but was unable to. I have an iphone 6s and it was not recognizing that, but I’ve still been able to get successful cuts even with this notice. This may not work for everyone.
  5. Click on Continue without Calibration and then be patient as it loads up the image onto your software mat.Continue with Calibration
  6. Next, trace or draw shapes around the images on the design mat.Pixscan demo
  7. Once there are cut lines, either by tracing or drawing shapes, click on the Send tab  and set the cut settings by choosing your material. You will notice above, there is one image on my mat that has no cut lines. When I did the trace on the monkey, while he is cute, he was not a very good image to trace around as he had edges that were not closed. He could still be used, however, would require a bit of extra manipulation of edit points in order to do so.
  8. Now, load the mat. Make sure that your rollers are on the edges of the mat and you have lined up the left edge with the blue line on the left.IMG_1838
  9. Now, cross your fingers and Click on the Send button. The Cameo will begin by reading the registration marks on the mat with the Optical eye, this is how it can line up the design and cut lines. And….. Success!!!IMG_1839 I see a few things are a bit off such as the Toscana Vigneto circle is not quite centered and the coffee stamps are a tad off….. but, all the others cut exactly how they showed on my screen.

Now, what I would suggest is practice. Is every one going to turn out perfect? No, probably not. But, with practice you will get the hang of what works and what does not.

Check out the “Let’s Explore v4” series HERE or at the top of the blog.

Check out my Silhouette Instructions and Events tab for more information on Personalized Silhouette Instruction.

Enjoy !

THANK YOU for your support! How can you help? Click HERE & buy a coffee. Every little bit helps with the cost of running the site.

Looking for more in-depth, step-by-step classes, check out all of my online Silhouette classes on my Teachable site HERE.

SS Logo snip it

**This post may contain affiliate links. What that means is that I may receive compensation if you purchase through the links I have provided. The price you pay for the product or service is not higher but I may get compensated for sharing.

Posted on 22 Comments

Let’s Explore v4 – Magnet Trace

We are finishing up the Trace panel today by exploring the options of Magnet Trace. The Magnet trace is a feature that is unlocked when you have the Designer Edition upgrade to the software.

You will find this feature on the 3rd tab of the Tracing Panel, that is found on the right side of v4.

Magnet Trace Panel copy

While there are not many options on this Panel, it still has so much potential. Let’s take a look.

Magnetic Trace Panel copy

  1. Magnet Trace – Select your object to trace & then “Magnet Trace” is available. Click on it and you will get a red circle with a red dot in it. This is your trace tool.Magnet Trace Demo copy
  2. Size – Change the size of your Magnet Trace tool by using the slider bar, the arrow up or down keys or highlighting the numbers and typing new numbers in.Size copy
  3. Trace – After your Magnet trace is complete, click here to create your cut lines. You can see the red cut lines around my flower below. Trace option Note: this photo is on the Send tab, to get the bold red cut lines to show up. Trace
  4. Trace & Detach – Choose this option if you want your design to be detached from the background. This works great if you are wanting to do a Print and Cut project with your design.Trace and detach

This is a really neat feature and it took me a bit to think of what I would do with it. You can see that the edges of my design are not perfect and I would do some clean up on this image. So let’s do a little bit of point editing to clean it up.

First, check out these edit points, double click on the image to bring up the Point Editing window. All those little dots, those are edit points. Now, edit points can be intimidating but they can also be fun to play with. If we were to cut this as it is, it will sound funny as it cuts because the Silhouette machine has to hit every single one of those edit points when it cuts.

Edit points

Let’s zoom in and check out the edges.

Edit point zoom

As you can see there are some edges that can be cleaned up.

You are able to move and delete edit points to your desired effect. I can say that this cleanup took only a few minutes. The more you play with the edit points, the better you will understand what they do. Just by moving the edit points in towards the flower, I eliminated the excess background that the trace grabbed.

Edit point zoom cleanup

You can select multiple edit points by holding down the Shift key and dragging your mouse over the ones you want to highlight and then you can move them all at once or delete them all at once.

Cleaned up

What a difference a little edit point clean up makes.

Now here are all the edit points after I’ve cleaned it up. Since this is a flower with lots of curves, it will still have many edit points so you can keep the realistic look of the flower.

Cleaned up edit points

But, it has a lot less than the original trace.

Now, I’m sure as you read this you have asked yourself, what would you do with this? I’ll be honest, I did the same when I started looking into it because I have never played with this before. And now ideas are hitting me about all the possibilities.

If you do not have Photoshop or access to photo editing software, you can use the Silhouette software and this is one way to grab something from a photo.

Or you could use your own photos that you’ve taken and make Print and Cut stickers. These are photos of flowers I took at a friend’s poolside last summer. I think they would make gorgeous stickers that you could add to your planner or calendar to enjoy everyday.

Magnet Trace Demo final

To learn more on how to set up a Print and Cut check out the Page Setup Panel – Registration Marks post.

You can find all of the Let’s Explore v4 post HERE.

I hope you enjoyed exploring the Magnet Trace feature in the Silhouette Studio v4 software. This program is amazing and I learn new things every day!

Enjoy !

THANK YOU for your support! How can you help? Click HERE & buy a coffee. Every little bit helps with the cost of running the site.

Looking for more in-depth, step-by-step classes, check out all of my online Silhouette classes on my Teachable site HERE.

SS Logo snip it

**This post may contain affiliate links. What that means is that I may receive compensation if you purchase through the links I have provided. The price you pay for the product or service is not higher but I may get compensated for sharing.

Posted on 14 Comments

Let’s Explore v4 – Trace by Color

Last week, we started with the Trace Panel – Tab 1 which covers the Basic Tracing options. Now, we are moving on to Trace Panel – Tab 2: Trace by Color. This option is available if you have the Designer Edition upgrade (DE+ or BE).

Trace Panel copy

While the Silhouette Studio Basic software is available for free, I do feel the Designer Edition upgrade is a great investment and will save you so much time in the long run. Silhouette America has provided a chart that lists out what features are unlocked with each upgrade and you can find it HERE.

Some of the biggest features for me that Designer Edition unlocks are: opening svg & pdf files, rulers, trace by color, rhinestone conversion and glyph access.  Even if you do not know what all of those do at this time, you will learn more as you utilize the software.

Now, let’s explore the Trace by Color Panel.

First, open a design to be traced such as a png or jpeg file. For this example, I am using a png file from Scout and Rose Design Co called Too Cute to Pinch.

Demo design

Trace by Color Panel copy

  1. Trace by color – Click on Trace by color and then choose the color you want to trace. I clicked on the pink color and it highlighted all the pink of the design in yellow. This is what it will trace.Trace by Color 1
  2. Solid Fill vs Outline fill – Solid Fill is shown in the photo above. Outline fill is shown below. This is a matter of personal preference on how you want it to show.Outline Fill
  3. Single Area or All Areas – In my original photo in #1, All Areas was chosen and that highlights all of the pink areas of the design. Single Area will allow you to pick & choose a certain area, such as individual letters,  that you want to trace.Single Area
  4. Tolerance – This can be adjusted to increase or decrease the area that is picked up in a trace color. In my example, when I click on the light green, it picks up the dark green as well in my trace.Tolerance 50 percentHere you can see that the Trace picks up all shades of green with a 50% tolerance. Tolerance 6 percentAnd when the tolerance is lowered to 6% it deselects the dark green shamrock and only picks up the light green color in the trace. You would trace the shamrock and change the tolerance to get it to trace as well.
  5. Trace – After you have the design highlighted that you want to trace, click on trace and it will change to red cut lines around the object selected. You can then move the cut lines off the design and I fill with color to see the design better.Trace option
  6. Trace & Detach – This will trace & detach the image from the background. If you are using a jpeg, this is a great feature.

Now, I have my final pieces that I’ve filled with color and can move them around on my mat to cut them and then place them on to my project.

Final trace copy

And now you can go play with the Trace by Color Panel. This can be a great option if you only have the graphic file for a design.

Check out all the other posts in the Let’s Explore v4 series HERE.

Enjoy !

THANK YOU for your support! How can you help? Click HERE & buy a coffee. Every little bit helps with the cost of running the site.

Looking for more in-depth, step-by-step classes, check out all of my online Silhouette classes on my Teachable site HERE.

SS Logo snip it

**This post may contain affiliate links. What that means is that I may receive compensation if you purchase through the links I have provided. The price you pay for the product or service is not higher but I may get compensated for sharing.

Posted on 39 Comments

Let’s Explore v4 – Line Style Panel

Did you know you can change the line style of your designs in the Silhouette Studio? Today we are going to Explore the Line Style Panel which you can find on the right side of your v4 Silhouette Software program.

Line Style Panel copy

First, I want to mention that you can change the default that your software Outlines in under the Preferences Panel. Preferences can be found by clicking on the gear icon in the bottom right corner of the Design Tab or in the top left corner under the Edit tab.

Preferences Edit tab copy

Open the Preferences Panel and Click on the Default tab at the top. You can then change whether the Default Fill Style is ‘Solid Fill’ or ‘Outline only’ and whether the line color is Black or Red.

Preferences copy

My program is set for outline only and red meaning that when I draw a shape it will show a red outline of my shape. This is a personal preference and you can change it at any time.

Now, let’s take a look at the Line Style Panel. Tutorial written in version 4.1.206

Line Style Panel diagram copy

  1. Style – Choose from a variety of dashed lines.Style drop down copyKeep in mind that changing the line style also changes how it will cut. If you have a dashed line, that is exactly what it will cut. This works good if you are trying to make a score line for a card or template, but it doesn’t work well to cut a design out.
  2. Thickness – Line thickness is defaulted to 0. That means if you were to print this design on your printer right now, it would not actually print anything because there is no line thickness. If you want to print the outline of a design, then you need to increase the line thickness.Thickness
  3. Corner – When using the line thickness, this determines if the corners of the design are round, flat or sharp. Corner copy
  4. End caps – This option has flat, adds a square on the ends or rounds off the ends of your line. End Caps copy
  5. Position – When using thick lines, you can choose to have the outline in front of the design or behind the design.Shape Outline in frontThe photo above has the Line Style Position in front of the design.Shape Outline in back And this photo shows the Line Style Position behind the design.
  6. Line Options – Print Lines of Selected Shapes – When your design is selected and you check this box, your Line will print with a line weight. Keep in mind,  it will print in whatever color you have set up on the design screen. I changed mine to black for this example. Here is my design: Print Lines of Selected Shapes And here is my printed page: IMG_1792 This is an awesome feature as you don’t have to change the line thickness to get a design to print unless that is the look you want.
  7. Line Style Panel – Tab 2: Line Color – change the line color to any of those in the Color Palette, change the transparency of the line color or click on the Advanced Options and open up a lot more color options.

    Line Color

    And that is the Line Style Panel! This can be very useful when you are printing designs, sending images to people, saving your designs as .jpegs (Business Edition feature) and so many more reasons. Take some time and play around with the Line Style options, you never know what you will learn!

    For this tutorial I used a file from the Silhouette Design store called Mom’s Fidget Spinner by Sweet Afron #202772 – find it HERE.

    Check out the entire “Let’s Explore v4” series HERE.

    Check out my Silhouette Instructions and Events tab for more information on Personalized Silhouette Instruction.

    Enjoy !

    THANK YOU for your support! How can you help? Click HERE & buy a coffee. Every little bit helps with the cost of running the site.

    Looking for more in-depth, step-by-step classes, check out all of my online Silhouette classes on my Teachable site HERE.

    SS Logo snip it

    **This post may contain affiliate links. What that means is that I may receive compensation if you purchase through the links I have provided. The price you pay for the product