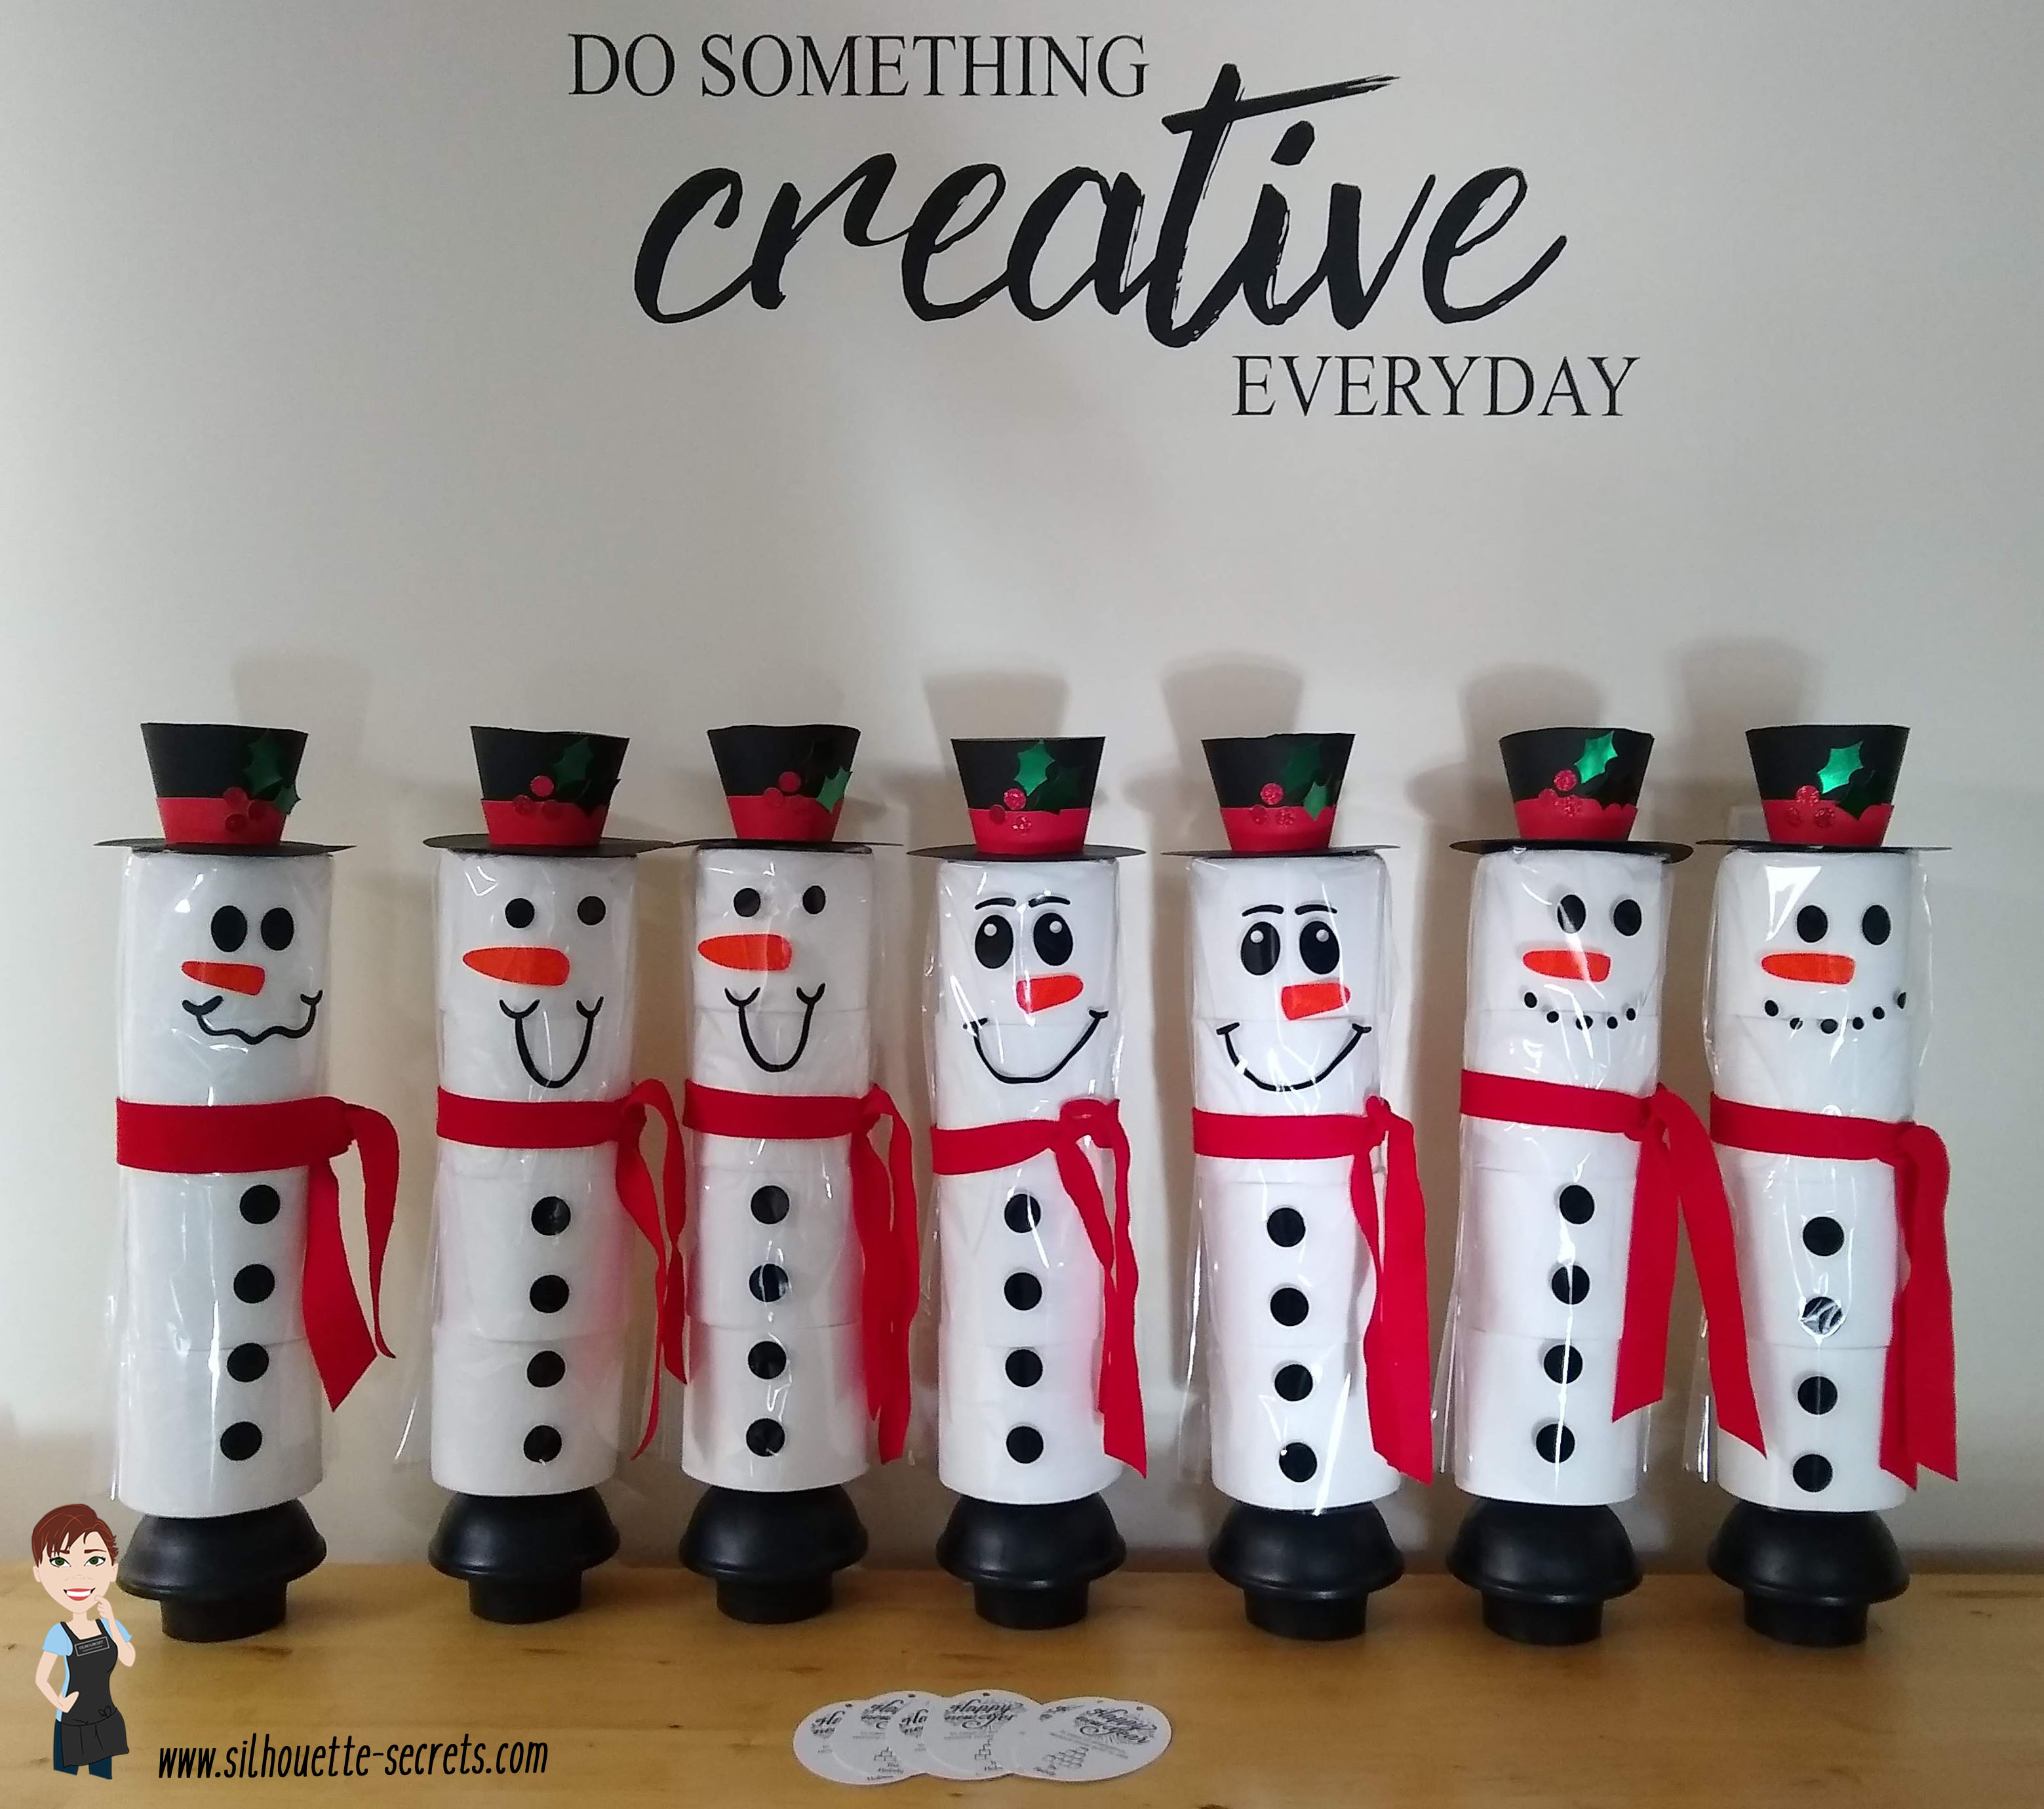
At the beginning of this year I did a a couple blog posts on how to create these TP Snowman. These were such a fun neighbor gift to create! And they were a big hit!
In the first post I published – Designing in Silhouette, I show how you create your own snowman using the tools in the Silhouette Studio software. This is a great way to learn how to use your software and the tools available. I shared the steps in both written and video format for the post.
A group member requested the file I created, so I have made it available to download If you would like to use the exact file I created for your own TP Snowman, you can download that file HERE
In the second blog post tutorial – Building a TP Snowman, I shared how I embellished my TP snowman with a 3-D top hat, different snowman faces, and added a custom print and cut tag to the backside.
I’d love seeing what you are creating with your Silhouette machines or software. Feel free to post photos or questions on my Facebook group at Silhouette Secrets with EllyMae.
Save this for future reference by pinning the image below.
Enjoy!
THANK YOU for your support! How can you help? Click HERE & buy a coffee. Every little bit helps with the cost of running the site.
Or if you are looking for more in-depth, step-by-step classes, check out all of my online Silhouette classes on my Teachable site HERE.
**This post may contain affiliate links. What that means is that I may receive compensation if you purchase through the links I have provided. The price you pay for the product or service is not higher but I may get compensated for sharing.
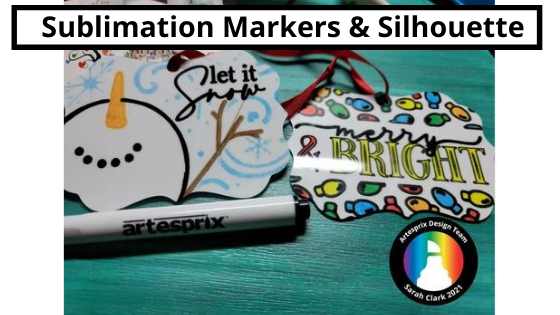
The great part is that you can use your Silhouette to help draw with these markers.
Today I wanted to share some awesome ornaments my friend Sarah with Silhouette Made has created with the Artesprix blank of the month & Artesprix sublimation markers. I love these ornaments!
If you have never sketched with your Silhouette machine, it can be a lot of fun. I have sketched on cardstock, faux leather paper, wood (with a Curio). Basically anything that a pen will write on, you can use if it fits in the Silhouette machine.
Grab the pen holder and some pens and just start to play. Then take it to the next level with the Artesprix sublimation markers.
In May I released a step-by-step sketch pen class and shared on the blog all of the supplies to get started with sketching.
Check out the post HERE to see what supplies you will need for your specific Silhouette model.
This class covers all about sketch pens & creating sketch designs. We discuss different pen styles, adapters, sketch designs, fonts, filling designs, and trouble-shooting too. We do some testing, demos, and finished projects. At the end of the class, you will have a better understanding of what works and doesn’t work for sketching with your Silhouette machine. This class can be completed with a Portrait, Cameo, or Curio machine.
Whether you take the class to get started or not, just start! Play with the sketch features and you will be able to create fabulous things like Sarah at Silhouette Made has done.
And the best part is, anyone can do this! It just takes a bit of practice. Grab some paper, a Silhouette pen holder, pens, and get to sketching today.
Check out more of the awesome creations on the Artesprix blog HERE.
I’d love seeing what you are creating with your Silhouette machines or software. Feel free to post photos or questions on my Facebook group at Silhouette Secrets with EllyMae.
Save this for future reference by pinning the image below.
Enjoy!
THANK YOU for your support! How can you help? Click HERE & buy a coffee. Every little bit helps with the cost of running the site.
Or if you are looking for more in-depth, step-by-step classes, check out all of my online Silhouette classes on my Teachable site HERE.
**This post may contain affiliate links. What that means is that I may receive compensation if you purchase through the links I have provided. The price you pay for the product or service is not higher but I may get compensated for sharing.
Getting started with HTV can be overwhelming, but it doesn’t have to be.
One of the questions I see asked most often is, “What size should I cut the design for my shirt?”
Affiliate links may be present in the following blog post and as an Amazon Associate I earn from qualifying purchases.
Basically, you can do any size you want since you can cut it on the Silhouette machine and adjust it as needed.
But there are a few things to keep in mind when you are doing it. For instance, the design itself. Each design can vary in what might look good. Another is, the size of the shirt you are adding the design too. Larger is not always better.
Today I wanted to share a chart from Expressions Vinyl that can help in giving you an idea of what might look good.
Expressions Vinyl is an awesome company that offers a great selection of adhesive and HTV products. I’ve worked with them in the past at the All Things Silhouette Conference and have had great success with my orders through them.
Today, I thought I’d share the HTV sizing chart that I am often referring to my students when they ask. This will give you an idea of what to start with.
Now, a few things to keep in mind. This is a general idea to start with. The design itself can make a difference in what might look good or not. Every design can vary because it is made up of different aspects.
You may also notice that this sizing chart only goes up to a Large. What about bigger than that?
For shirts size of XL and up, I really do not go much larger. The largest design I tend to use is just under 12″ x 12″, if it looks ok. Why? I was regularly making 3XL to 5XL shirts for my husband and most times I would ask him what he thought before I cut it. In our discussion he mentioned that for those larger size shirts, think of the person who is wearing it. He said he wanted the design to be front and center. He didn’t want people to have to walk around him to see the full design. When explained like this, it made complete sense. The design should be completely visible when looking straight at the person who is wearing it.
Just something to keep in mind when making your own personal shirts.
Another thing to keep in mind when placing designs is busty women or in general a women’s bust area. I’ve seen some designs popping up in the past year or two that are very specific to a bust area such as this Hey Check Out My Pumpkins by Petra Studio Art – Design #384455.
In this design, the placement is very specific and on purpose. However, what if that is not what you are going for.
I made this shirt with design Wine Tasting Team Captain by Megan Hardy Designs – Design #322093 but I was not thinking about the placement of the design aspects when I made it.
Now I just laugh about it when I wear it.
One other thing that I just purchased to hopefully help me get better placement of HTV is this T-shirt Ruler Placement guide.
Note: you do not press this in the heat press, it is only used for lining things up.
I was in the Craft Chameleon store for an event and thought it might be worth giving a try to see if it helps me get the design on straighter. It is a hard acrylic ruler and I’m hoping it helps me. It never fails that I eyeball it and my design is just a little bit crooked, even if I press the center of the shirt. The ruler will hopefully give me that straight edge to line up the design with. Or I’ll just continue standing a little bit off center so no one notices. Things happen to us all! Practice, practice, practice! And have fun!
I hope those tips have helped in getting started with HTV cutting and your Silhouette! Here are a few more posts with information and tips on cutting HTV:
I’d love seeing what you are creating with your Silhouette machines or software. Feel free to post photos or questions on my Facebook group at Silhouette Secrets with EllyMae.
Save this for future reference by pinning the image below.
Enjoy!
THANK YOU for your support! How can you help? Click HERE & buy a coffee. Every little bit helps with the cost of running the site.
Or if you are looking for more in-depth, step-by-step classes, check out all of my online Silhouette classes on my Teachable site HERE.
**This post may contain affiliate links. What that means is that I may receive compensation if you purchase through the links I have provided. The price you pay for the product or service is not higher but I may get compensated for sharing.
And I was hooked. Seeing her projects inspired me!
Q: How long have you had your Silhouette machine?
Adria.Crafts: I have owned a Silhouette for about 8 years. I started with the original Cameo and currently use a Cameo 3. When I first bought it, I did a lot of paper crafting. Party decorations, banners, flowers, and Christmas cards are my favorite! Once I realized I could use the Cameo to cut vinyl stencils, I knew I wanted to make wood signs for my front porch. I took off with that and made signs for all holidays and anything else I though was fun. As I got farther into sign making, I really wanted to figure out how to make shaped signs. My husband’s grandpa gifted us an old bandsaw which allowed me to start cutting the wood backers into shapes. This Halloween cauldron is one of these.
This is actually a Pot of Gold design that she created a double sided wood sign with for multi-use decoration.
Q: Can you explain how you use your Silhouette machine to create these wood projects?
Adria.Crafts: I use my Cameo to cut/sketch giant shapes of card stock.
From the Silhouette software to the Silhouette machine.
Then I trace or glue them to the wood to use as a stencil.
When I do big shapes I use the Tiling feature in the Silhouette Studio. If it’s a smaller item (the gingerbread house) I will use the sketch feature and cardstock to create the pattern/stencil.
The stencil is used as a guide to cut the pieces out with a scroll saw.
Q: What is your favorite part about these projects?
Adria.Crafts: My favorite part of doing these projects is seeing how everything comes out in the end. I love finding designs in the Silhouette Design Store and other websites and turning them into real life 3-D art pieces. It is so rewarding turning a picture on the computer into something in real life.
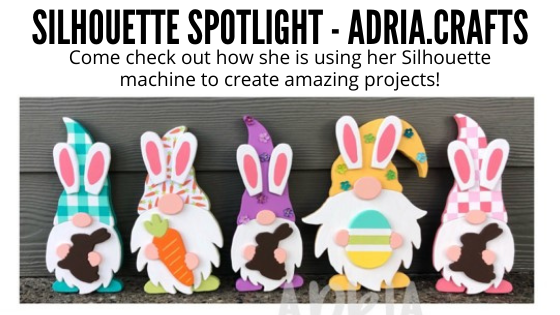
Check out Adria.Crafts for more amazing creations. There are even Valentine’s and Easter Gnomes too!
And she recently put up a video of the cutting process on her Instagram too. I watched several times in awe. Check it out HERE.
Every single week, I am blown away by creations that Silhouette users are doing. I love seeing the projects they are making. While I’ve been a Silhouette user for over 9 years, there are just some projects that are outside my area of expertise. I love being able to share with you one of those Silhouette Spotlight followers that stood out to me.
There are so many things you can do with the Silhouette machines! Whether you are creating cards, party decorations, or using them in conjunction with other tools like a scroll saw – keep on creating!
I hope this has inspired you to be creative!
Thank you to Adria.Crafts for sharing your amazing creations with us!
I’d love seeing what you are creating with your Silhouette machines or software. Feel free to post photos or questions on my Facebook group at Silhouette Secrets with EllyMae.
Save this for future reference by pinning the image below.
Enjoy!
THANK YOU for your support! How can you help? Click HERE & buy a coffee. Every little bit helps with the cost of running the site.
Or if you are looking for more in-depth, step-by-step classes, check out all of my online Silhouette classes on my Teachable site HERE.
**This post may contain affiliate links. What that means is that I may receive compensation if you purchase through the links I have provided. The price you pay for the product or service is not higher but I may get compensated for sharing.
Looking for a unique décor or gift idea? Acrylic etched items can be just the thing.
Etched Acrylic Ornaments with the Silhouette Curio
Affiliate links may be present in the following blog post and as an Amazon Associate I earn from qualifying purchases.
Take a 3″ acrylic circle and customize it however you like. Add a simple saying with the date or jazz it up even more. These acrylic circles could be used for tree ornaments, gift tags, bag tags, and more!
Here are a couple that I created for a Curio demonstration at the Craft Chameleon Fall Open House. Check out the replay of this demo HERE.
But, you can also take a design and size it down to fit in the 3″ circle to etch with as well. My only caution is to give yourself clearance around the edges of the acrylic and the hole at the top. If the tool catches on the edge or the hole, it will throw the etch off and you have a dud.
Here are a few examples of ornaments I’ve created and I’ll share the links to the designs I used.
This design is one I created for a Silhouette Curio etching class that is available on my Teachable site. Keep in mind that designs you have can be used on many different blanks from ornaments to coasters, etc.
There are so many gift ideas that you can create with your Silhouette machine and even more options when you have a Silhouette Curio.
Check out more gift ideas created with the Curio machine HERE.
At the time of writing this, Swing Design still has Curio machines available. Find those HERE.
You will also need a Silhouette Etching Tool for etching projects. These are a little difficult to come by right now because of manufacturing and shipping delays worldwide, but keep on checking. Once you have the machine, you have the biggest part. Find Silhouette etching tools here: Silhouette America Amazon
I do not recommend 3rd party etching tools as they can void the machine warranty and I had more blank spots in the etch when I used them. The Silhouette etching tool has given me the best results and I etch a lot when I’m developing classes.
The worldwide shortage on supplies, manufacturing, and shipping delays affect so many things including but not limited to Silhouette products. They are coming, but there is nothing that can be done but wait as we all work through these times we are in.
This little machine is a fantastic machine and will make fabulous projects for years to come. Check out more Curio projects in my virtual demo table on YouTube HERE
I currently have 8 Curio classes on my Teachable site that will take you from Beginner to more advanced projects. Find those HERE
I would love to see what you are creating with your Silhouette machines or software. Feel free to post photos or questions on my Facebook group at Silhouette Secrets with EllyMae.
Save this for future reference by pinning the image below.
Enjoy!
THANK YOU for your support! How can you help? Click HERE & buy a coffee. Every little bit helps with the cost of running the site.
If you are looking for more in-depth, step-by-step classes, check out all of my online Silhouette classes on my Teachable site HERE.
**This post may contain affiliate links. What that means is that I may receive compensation if you purchase through the links I have provided. The price you pay for the product or service is not higher but I may get compensated for sharing.
I hope I will see what you are creating with your Silhouette software & machines soon! Feel free to post photos or questions on my Facebook group at Silhouette Secrets with EllyMae.
Save this for future reference by pinning the image below.
Enjoy!
THANK YOU for your support! How can you help? Click HERE & buy a coffee. Every little bit helps with the cost of running the site.
Or if you are looking for more in-depth, step-by-step classes, check out all of my online Silhouette classes on my Teachable site HERE.
**This post may contain affiliate links. What that means is that I may receive compensation if you purchase through the links I have provided. The price you pay for the product or service is not higher but I may get compensated for sharing.
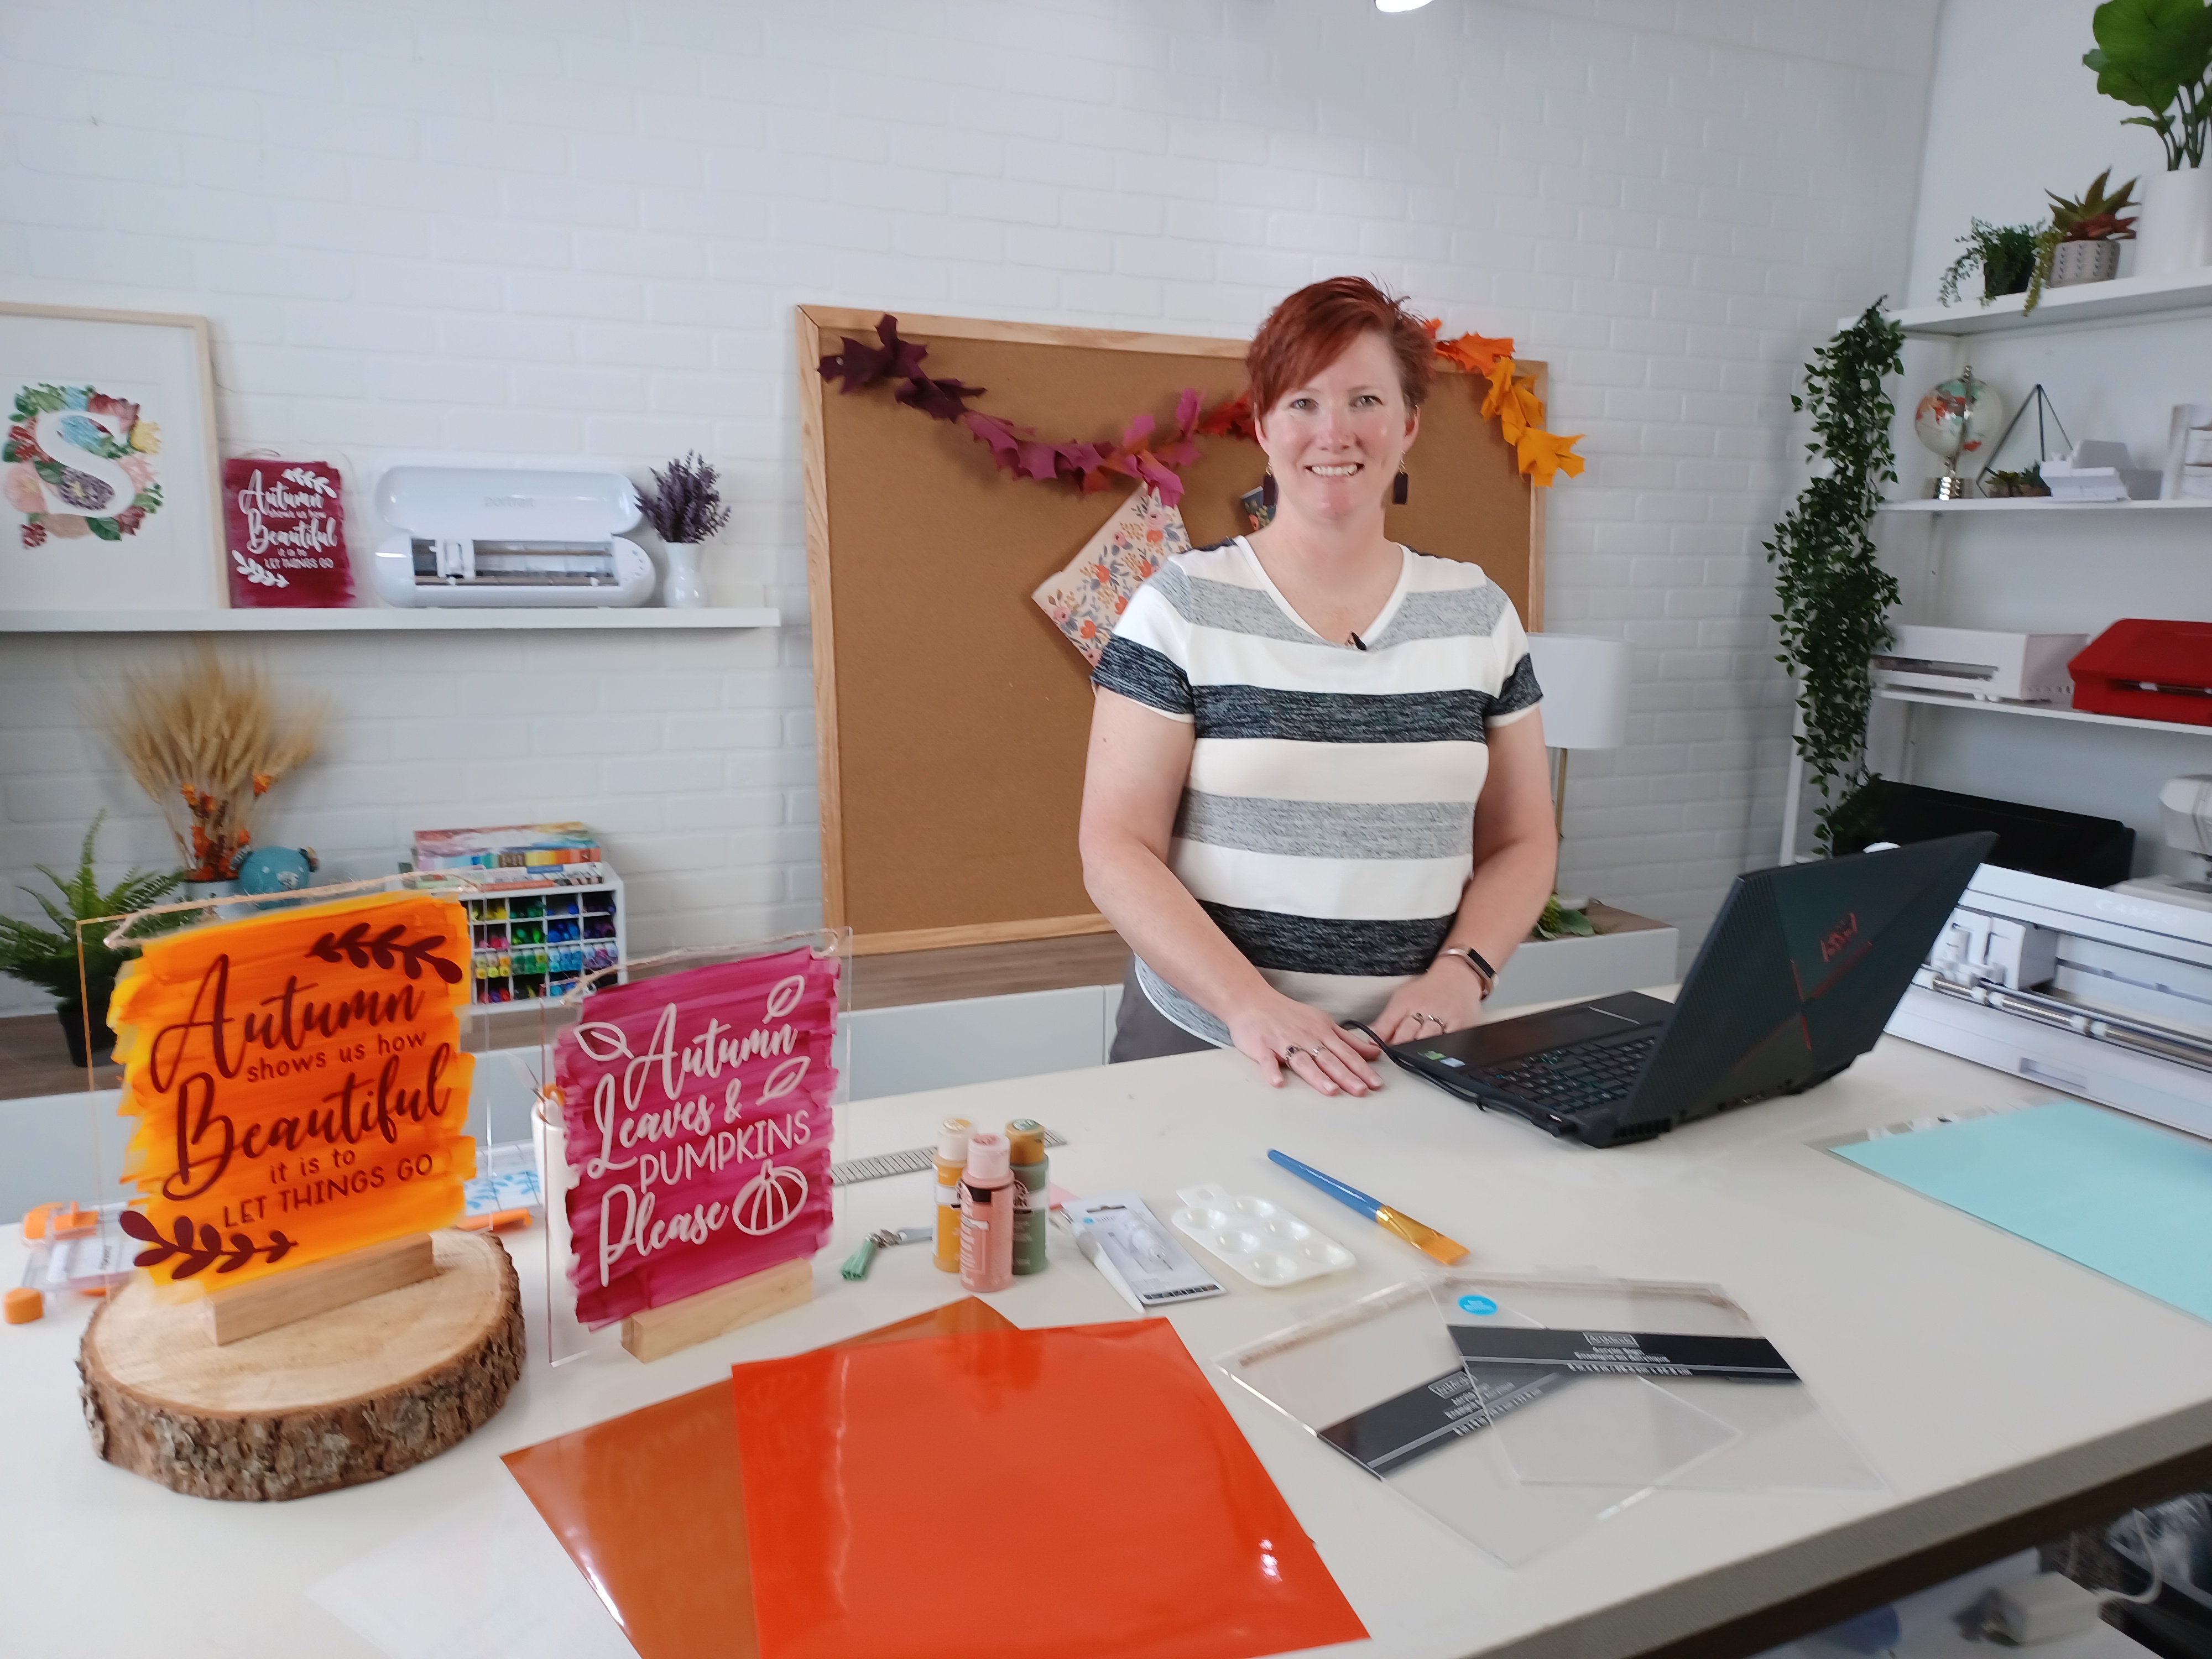
Acrylic sign decor is a versatile and stylish way to enhance any space, whether you’re sprucing up your home for the holidays or adding a personal touch to your everyday surroundings. With endless design possibilities, acrylic signs offer the perfect blend of elegance and creativity for seasonal and year-round decor. In this post, we’ll showcase 10 creative acrylic sign decor ideas that are easy to make and guaranteed to inspire, whether you’re a seasoned crafter or just starting with your Silhouette cutting machine. Get ready to elevate your decor game with these stunning designs!
10 examples of acrylic sign décor for seasonal or everyday décor
Affiliate links may be present in the following blog post and as an Amazon Associate I earn from qualifying purchases.
Paint the backside of the design with acrylic paint in the color(s) of your choice. Let this completely dry before moving on to the next step.
Measure the size of your acrylic sign. Draw a rectangle the same size as the sign. If using an odd shape, make sure to measure inside of the narrowest part of the sign.
Red rectangle shows narrow part of an odd shaped sign. Draw your design template that size to make sure your design fits within the sign space.
Select your design and size it inside of your drawn rectangle to best fit the shape you are working with. Some designs will work better within a certain shape or portrait vs landscape orientation.
Cut adhesive vinyl in the color(s) of your choice. Weed away the excess vinyl around the cut design. Apply to the front side of the acrylic sign using transfer tape.
Hang your sign by the twine attached (if applicable) or use a wood stand. Note: test your acrylic thickness with your wood stands – this may vary depending on the acrylic purchased and stands used.
Create signs to change out seasonally with your decor or just for general home decor purposes to enjoy all year long!
Store acrylic signs in page protectors when not in use to minimize any scratching on the acrylic sign or acrylic paints used. I will also wrap them in bubble wrap when storing as well.
I’ve created a few more signs to share with you and hopefully spark your creative thought process in how you can use this technique to fit your style.
Hopefully those have given you some ideas to start creating your own acrylic decor!
I had the incredible opportunity to teach this class at Silhouette HQ for a Michaels Live YouTube tutorial, where I shared tips, techniques, and inspiration for creating stunning acrylic sign decor using a Silhouette cutting machine. You can catch the full tutorial and learn along with me by watching it HERE.
Find more Silhouette tutorials on the website HERE.
Save this for future reference by pinning the image below.
Enjoy !
THANK YOU for your support! How can you help? Click HERE & buy a coffee. Every little bit helps with the cost of running the site.
Silhouette Classes
Never stop learning! Let me help you take the anxiety out of learning with Silhouette and get to creating faster! My Silhouette classes are heavily focused on software, so you can take the skills & techniques taught and apply them to many future projects!
**This post may contain affiliate links. What that means is that I may receive compensation if you purchase through the links I have provided. The price you pay for the product or service is not higher but I may get compensated for sharing.
Are you a Silhouette owner and just got a new computer? Not sure where to go from there?
It is pretty easy to get setup and running with a new computer and I’m going to share a few tips.
First when you get a new computer, be prepared that it will take a little bit for it to be ready for you to start using. There will be some computer setup instructions for you to follow. And if you are a PC owner, you may find that you have a lot of Windows updates that need to install in order to get it ready for use. Be patient and let it setup correctly. I know you are excited, believe me, I was too when I got my new computer last year. But, there really is no rushing it. The updates will finish when they finish.
Silhouette Studio Software Installation
When you get a new computer, you will first need to download the software on to the new computer. This can be found on the Silhouette America website. Click on Software & then Get Software
Next, you will see a web page that will show all the software from Silhouette that’s available.
For the Silhouette cutting machines, you will select the Silhouette Studio option.
You will need to start with the Basic software. The current version is listed at the top.
For Legacy versions, continue scrolling down the page.
Choose the current version and then click on the either the Mac or the Windows option. This will download the installer to your computer and you will open that to start the installation.
Click HERE to go directly to the Software download page.
There may be some pop ups that come up that need approval in order to proceed. Watch the bottom task bar for any flashing shields if the pop up doesn’t actually pop up.
If a flashing shield appears, click on it and then approve all the pop ups.
Once the installation is complete, you can open the Silhouette Software.
If by chance you have a new Windows PC and it is running in S mode, it will not let any program that is outside of the Microsoft Store install on the computer. You will need to take it out of S mode in order to install any programs, including the Silhouette software. For more information on how to take it out of Windows S mode click HERE.
Silhouette Studio Upgrades
Affiliate links may be present in the following blog post and as an Amazon Associate I earn from qualifying purchases.
If you are using a software version of v4.4.554 or higher, you do not need to enter your upgrade codes in the software. Click on Help – Apply Upgrade Edition and enter your log in information. Do NOT enter your upgrade codes. Once you log in with your Silhouette account info, your upgrade should be active on any computer you log in to.
This is a new feature and is only available in software versions of v4.4.554 or higher. The upgrade can only be active on 3 computers at a time. If you log into a 4th computer, it will deactivate on the oldest computer that has not been active.
For older software, software upgrades do not automatically activate when you download the Silhouette software to a new computer. If you have ever entered an upgrade code, you will need enter the upgrade codes in the order that you purchased them for it to activate on the new computer. So if you purchased the Designer Edition and then the Business Edition later, you would need to enter the code for Designer first and then Business next. If you try to enter Business Edition first, you will get an error and it will not activate.
If you are a brand new user, there is a new system that is in process and you can activate the upgrade on the Silhouette America website to be used on any computer you log into. This is still very new and only available for those that are brand new and have never entered an upgrade code as of 10/15/21.
If you do not remember what the codes were, you can easily access them under your Silhouette account information in the Silhouette Design Store. Open the Silhouette Design Store, make sure you are signed in, move the mouse over the person icon in the top right corner, and then choose Account Settings.
Then click on the License Keys section.
Log into the Silhouette Library
Once the software is open, click in the top right corner on the Library tab.
Enter your Silhouette Account information and all of the files that are in the Silhouette Cloud should Sync up. It will depend on how many files you have in your Silhouette library on how long it will take to fully sync. Another hurry up and wait moment.
Plug in Silhouette machines to computer & turn on
If you have an older model Silhouette machine of a Cameo 3 or older, the free files download to the library once the machine is recognized. Plug in the Silhouette machine, turn it on, and click on the Send tab. Once it has recognized the machine, then the files will download to the library. You will need to do this for ALL machines that you have had plugged into your software to get those free files to download.
If you have multiple machines, click on the little machine icon in the bottom right corner of the Send tab to choose the machine you want active.
This will also unlock any panels that are associated with a particular machine such as the Emboss Panel for the Curio or the Stipple Panel for the Cameo 4, Cameo 3, Portrait 2, and Curio machines.
Exporting files on old computer
Note: this is only needed if files cannot be recovered in another way
If there are files that did not show up when you logged in and the library synced, the first reason would be they are the free with machine and I would suggest looking at the above information again. If you have done that, then it could be because those files were only stored on the Local User section of the old computer. This will be dependent on the Silhouette software version you were using before. If you were using a version prior to v4.1, you will find more tips on exporting the library in this post – Library Tips (v4.1).
If you have a library backup file, it can then be imported into the Silhouette library by clicking on your name in the top left of the Library and choose Library Import, then select the location of the file backup.
Screenshot from v4.4.892
But this only needs to be done if files are missing and you cannot get them to sync up any other way.
Install fonts on the new computer
Keep in mind that when you set up a new computer, you are starting from scratch. That means you will need to install any program or file that you were using on the old computer, if you want it on the new computer. This includes fonts. The new computer comes loaded with the default fonts only and these can vary by computer.
While I have heard of others being able to copy and paste the entire font file from their computer programs folders on the old computer and then pasting it into the new computer fonts folder, I was unable to do this on my new computer. I had to right click on the font and choose “Install for All Users”.
Luckily, I had saved all my font files that I’ve collected onto a folder in my external hard drive, so I could access them direct from the external drive. While I still had to install over 500 fonts, I did get to also pick and choose which ones I really “needed” on the new computer.
I have had 2 new computers in the last several years and on one I had to install each font and on the other, some worked by copy and paste.
Keep in mind that if you created designs using certain fonts, when you open the design file, if that font is not installed on the computer you are using to open the file, the font will revert to the default font style on that computer.
Export User Designs from Silhouette Library – New Feature!
If you have downloaded the current version or a version higher than v4.4.552, there is also a new feature that allows you to export all User Designs from the library as individual files.
Click on your name in the top left corner of the library tab and choose Export User Created Designs.
While I do NOT recommend storing your personal files in the Silhouette library, there are times that it is handy when you are accessing files on multiple computers or using Pattern Fills in the Silhouette software.
One big thing to note
when exporting these User Designs is that it will export the entire library folder structure. However, any designs from the Silhouette Design Store, the folders will be empty. Only the user created designs will be exported. This is due to the proprietary nature of the .studio files and to protect the designers of those files from theft.
I would HIGHLY recommend using this export feature when you update to the software of v4.4.552 or higher because it is a really nice feature. However, as a general note, I do not recommend that all users update to this version or higher. There are many factors that I consider before advising a user on whether they should update. It really comes down to the user’s choice, however, before I make a recommendation I do ask for more information. If you would like to know what I’d recommend for your situation, feel free to post on the Silhouette Secrets+ with EllyMae Facebook group and we can take a look at the factors.
Keep in mind that the Silhouette library is not designed as an all inclusive storage area but as a syncing device. This is one reason the Silhouette cloud storage is limited in size. All users get 1 GB of storage space, but if you are a Silhouette Club Member or a Silhouette Design Store Subscriber, you get 5 GB of storage.
I hope this helps you start enjoying that new computer and your Silhouette software a little bit quicker! The biggest tip I can say is to be patient! I am not the most patient person when it comes to setting up a new computer, but if I tell myself that in the beginning sometimes it helps.
We love seeing what you are creating with your Silhouette machines or software. Feel free to post photos or questions on my Facebook group at Silhouette Secrets with EllyMae.
Save this for future reference by pinning the image below.
Enjoy!
THANK YOU for your support! How can you help? Click HERE & buy a coffee. Every little bit helps with the cost of running the site.
Or if you are looking for more in-depth, step-by-step classes, check out all of my online Silhouette classes on my Teachable site HERE.
**This post may contain affiliate links. What that means is that I may receive compensation if you purchase through the links I have provided. The price you pay for the product or service is not higher but I may get compensated for sharing.
RUN! – Silhouette etching tools are in stock at Silhouette America, but they are limited…. grab them now! Use code MAKER to save 25% off Vinyl, Blades, Heat Transfer, Tools, and Totes too!
Hurry as they are limited in supply and with the shipping delays we aren’t sure when the next shipment will be.
Do you have a Curio but don’t know what to do with it? Grab an etching tool or two or three and let’s get to creating! I have 8 Curio classes available that are step-by-step to get you up and creating fantastic projects.
We love seeing what you are creating with your Silhouette machines or software. Feel free to post photos or questions on my Facebook group at Silhouette Secrets with EllyMae.
Enjoy!
THANK YOU for your support! How can you help? Click HERE & buy a coffee. Every little bit helps with the cost of running the site.
Or if you are looking for more in-depth, step-by-step classes, check out all of my online Silhouette classes on my Teachable site HERE.
**This post may contain affiliate links. What that means is that I may receive compensation if you purchase through the links I have provided. The price you pay for the product or service is not higher but I may get compensated for sharing.
LIVE Silhouette class with Michaels and Silhouette America!
Just a quick heads up to join me at 11 am MT on Wednesday, October 20, 2021 as I will be teaching a live class from Silhouette Headquarters in Salt Lake City, UT. This class is hosted by Michaels and Silhouette America and is an online class so all can join.
This class is designed for all Silhouette users from beginner to advanced. I will share some tips in the Silhouette software that can make your projects easier to work with. Join me as we create this custom acrylic sign and stay tuned on the blog for more ideas of how you can customize your own signs for home decor or seasonal use too!
Check out the full class details and supply list HERE. This class is happening live at 11 am MT on October 20, 2021.
I have loved watching these Silhouette classes online and pick up new tips each time I do from all the instructors.
I would recommend gathering your supplies, watch the live class with me (or the recording after it’s posted), and then start making your own creations. The classes are only an hour long, so sit back and soak up the information shared so you are not rushed to create along with me. For those that cannot join us at the live event time, the class will also be uploaded to Michaels YouTube channel once the video is processed. Usually within 24-48 hours.
Following the Zoom class, I will be joining Silhouette on their Facebook page live to answer your questions and share a few of my favorite projects! Make sure to tune in live if you can to ask any questions your may have for me. If you cannot join in live, I will answer any questions posted after as soon as I am near a computer.
And since I’ve got your attention, I also want to let you know where you can find past classes that Silhouette has done with Michaels.
Check out the Michaels YouTube channel and scroll through the videos to find more Silhouette videos.
Each month of classes are posted on the Silhouette 101 blog as well. Make sure to sign up for notifications there too!
I hope to “see” you there!
I love seeing what you are creating with your Silhouette machines or software. Feel free to post photos or questions on my Facebook group at Silhouette Secrets with EllyMae.
Enjoy!
THANK YOU for your support! How can you help? Click HERE & buy a coffee. Every little bit helps with the cost of running the site.
Or if you are looking for more in-depth, step-by-step classes, check out all of my online Silhouette classes on my Teachable site HERE.
**This post may contain affiliate links. What that means is that I may receive compensation if you purchase through the links I have provided. The price you pay for the product or service is not higher but I may get compensated for sharing.
THANK YOU for your support! How can you help? Click the link to buy a coffee. Every little bit helps in the cost of running the site.