The hardest part of creating something is choosing the design that I want to commit to. I was searching for a 50th Anniversary card to create and nothing looked right to me.
Then I saw a project on my Silhouette Secrets+ with EllyMae Facebook group that a member was creating and it was an inspiration (Thank you Patti!).
Sometimes that is all it takes. Seeing a project that someone else is creating and it sparks that creative energy and all the pieces just fall into place.
Today, I am here to share the finished project and how you can get started creating amazing things with the Silhouette Curio.
Affiliate links may be present in the following blog post and as an Amazon Associate I earn from qualifying purchases.
I always like to create gifts that are unique and with the Curio that is possible. With the ability to etch on metal or acrylic, I can create a customized gift in no time. But, sometimes I still need a creative jump-start. I know many of my Facebook group members love and can’t wait to see what is posted in the Show and Tell on Saturdays. It is a great place to share your Silhouette creations, projects in-progress, or see what others might be creating with their machines.
8 – Curio Advanced Beginner – Metal Etching placement video course HERE
8 – Embossing Leather with the Curio can be found HERE
The Curio is a fantastic machine and takes some time to learn. But it is so worth it when you do!
I would love to see what you are creating with your Silhouette machines. Feel free to post photos or questions on my Facebook group at Silhouette Secrets with EllyMae.
Don’t have a Curio machine yet, but want to add it to your tools? Find it here: Silhouette America Amazon
Save this for future reference by pinning the image below.
Enjoy!
**This post may contain affiliate links. What that means is that I may receive compensation if you purchase through the links I have provided. The price you pay for the product or service is not higher but I may get compensated for sharing.
I love creating 3-D design with Silhouette! However, taking a 2 dimensional cut file and then assembling it into a 3-D project can be a bit intimidating. And I’ll tell you that for anyone, even experienced users, not all projects work the same each time. But, I’ll show you a few tips on how I assemble a design today.
Affiliate links may be present in the following blog post and as an Amazon Associate I earn from qualifying purchases.
First, let’s start with the design. I needed a small pinecone for a project, so I chose this Pinecone 3D Miniature file by Snapdragon Snippets – Design #279267.
The first thing I do is look to see if the designer has included a link to instructions for the file. Not all designers do, but in this case, there is an instructions button to click on. Find those instructions HERE. The link includes instructions for several of the 3D files that can be combined to make up a whole decor project. Today, I am just using the pinecone, so I scrolled down to those instructions.
I assembled the original pinecone exactly as those instructions showed.
But, I need my pinecone to be a LOT smaller. At first, I was feeling bummed that it wasn’t going to work for my project. Even though this design turned out exactly as it was supposed to, it didn’t work for my purpose. I just wasn’t sure that I could make it smaller and still get it assembled properly.
What did it take to change my mind? A quick discussion with my husband, 1 comment from a member of my Facebook group, and a nights sleep – where all I did was think about this project. By the next morning, I was itching to try it again.
One of the great features of the Silhouette software is the possibilities are pretty much endless! Want a smaller design, no problem!
Using the Scale option, I can take the original design and decrease the size. I knew I needed small scale, so I tried 33% of the original size. This is found under the Transform Panel – Scale Tab or at the top of the software in the Quick Access Toolbar.
For the “baby” miniature pinecones, the center stem and the spacers were not going to work or be needed at that size. I right clicked on the design and ungrouped it, then deleted the pieces I did not need to cut. Make sure to delete the numbers and text that is not needing to be cut.
With all the numbers and text removed, I moved the pieces around on the cutting mat to cut out of cardstock.
Then I cut this out of a brown cardstock using the Cardstock Textured setting. I find this works well for me on almost all cardstock. I do prefer to cut smooth cardstock as textured can be a bit of a headache.
Check out this video on cutting and then assembly of the pinecone at 33% of the original size. Note the video speed has been increased for cutting and assembly. More tips following the video.
Tips for cutting & assembly
Cut the cardstock down to size. I use a paper trimmer to cut all my materials down to size, so then I am only using the adhesive under the area of my design and not peeling a full sheet of material from the cutting mat. I find that this saves my adhesive on the cutting mat and makes my mats last longer. More tips to getting the most out of your cutting mats HERE.
Adhesive The right adhesive can make all the difference! For the original 3-D Pinecone Miniature Design, I used a clear, liquid glue called Liquid Glass. But, for the file reduced to 33% of the original size, I used hot glue. This helped for both adding a little bit of space between the layers to give the “baby” pinecone dimension as well as gluing it together. When using the hot glue, thread the piece onto the wire first before applying the glue or it can cool before you get it in place. I bought this fine tipped SureBonder hot glue gun and love it.
Sticky cutting mat If your finding that cuts are not connecting or pieces are peeling up, you might want to try a new cutting mat after desticking it a bit. You will notice in the video above, that I had 2 spacers that did not cut right and it was because my mat was very well used and the cardstock did not stay stuck down. I find that this can be a big issue when cutting lots of cardstock. While my mat may “feel” sticky to me, it may not be good enough to hold down all the pieces of the cardstock while it’s being cut, in order to connect the cuts. If that cardstock moves at all, it may lead to a mis-cut.
Recut pieces as needed To follow the sticky mat, you may need to re-cut a piece or two here and there. That is not a bad thing. I just copied what I needed and moved it to a new area on my cutting mat and re-cut it. I did cut a couple extra… just in case!
Don’t give up! If you have never done a 3-D design before – try it out! If you have tried one and it didn’t work out – try again! I will fully admit that the first one I made, turned out great, but it was too large for what I needed. It took a little advice & rethinking to reduce the size and alter the design for my purpose.
Here are the babies. This is the original 3-D Miniature Pinecone file reduced to 33% of the original size.
I have a very special project for this coming up and cannot wait to show you. Stay tuned for that!
The Silhouette Design Store has an entire section dedicated to 3-D designs. Keep in mind, just like any site you get files from, some are more complex than others. There are some that even as an experienced paper crafter, I have yet to tackle. One of these days I will conquer this LowPoly Paperman, but for now, he will stay on my future to-do list. The biggest thing that these designs take is … time.
Want a few suggestions to get started on 3-D files?
Check out this tutorial on Lori Whitlock’s site for tips on assembly HERE. I find the first time you do this, you may not think you like it, but the more you do it, the better it gets.
Another flower type is one that the petal layers are stacked on each other, like this Poppy Flower by Echo Park – Design #249937.
Whatever you choose to get started, just get started! And I would love to see what you create. Feel free to post photos or questions on my Facebook group at Silhouette Secrets with EllyMae.
Save this for future reference by pinning the image below.
Enjoy!
**This post may contain affiliate links. What that means is that I may receive compensation if you purchase through the links I have provided. The price you pay for the product or service is not higher but I may get compensated for sharing.
The first Curio Virtual Retreat was such a success and we had so many requests to do it again, that it is now scheduled for August 14-16, 2020.
This event is limited to 40 attendees and the best part is no travel! Right from your own computer, tv, or other viewing source. You work at your own pace to follow all of the step-by-step video courses. Join us on the weekend of August 14-16 for Zoom calls and online support. Class kits will be mailed to you and include written handouts too!
Check out this Curio Retreat Highlights post to see a little bit about what happened at our last event.
I loved seeing all the projects that the attendees created and shared with us after going through the step-by-step classes. These include: – Curio Basics & Setup – Curio Tips – Metal Etching – Acrylic Etching – Leather Embossing – Sketching on Wood
And the projects keep rolling in that they are creating since attending the event! I love seeing them all!
The weekend includes: – Class kits mailed to you to complete all the projects – Instructional step-by-step video classes that are available for you to watch for 30 days following the event – Online support through scheduled Zoom calls and a private Facebook group
Student Testimonies
Here are a few reviews from the previous weekend:
“The event exceeded my expectations. The prerecorded segments were excellent. Really far better than anything I have found in the internet.” Doug B.
“The virtual retreat was very educational. The ability to be able to follow along with notes, pause the video, take my own notes, at my own pace was amazing and increased my comfort level and education experience.” Charlee R.
“I appreciated all the experience and effort that went into the written materials and the instructional videos – so thorough yet easy to follow! It was great to be able to re-watch portions of the videos while working through the projects. The Zoom chats and the Facebook group were fun and perfectly rounded out this virtual retreat. I will definitely attend in the future!” – Linda M
“Learned a ton from the virtual Curio retreat this weekend and had so much fun completing the projects! EllyMae is a fabulous teacher and we had a lot of great support throughout the weekend. Thank you TJC for this wonderful event!” Kathy S.
“At first I wondered how this would work. Worried about not having the hands on mostly. But I will have to say that it turned out better than I could have ever imagined. Loved that I could watch the video, pause and rewind, and repeat. The notes were great and I believe they will help me in re-creating new projects.” Nancy C
Curio Demos
Want to see a virtual demo table of things I’ve created using my Curio? Check out this video on my YouTube channel HERE.
And here is a little demo of the Curio in action embossing on leather.
Registration
Register HERE for this event! Attendance is limited to 40 attendees.
I always love to see what you are creating! Feel free to post photos or questions on my Facebook group at Silhouette Secrets with EllyMae.
Enjoy!
**This post may contain affiliate links. What that means is that I may receive compensation if you purchase through the links I have provided. The price you pay for the product or service is not higher but I may get compensated for sharing.
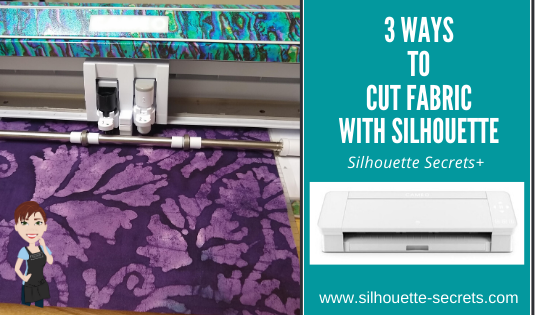
Today we are going to look at 3 different ways you can cut fabric using your Silhouette machine. The technique that you use may vary depending on the easiest to use and also which Silhouette machine you currently are using.
Affiliate links may be present in the following blog post and as an Amazon Associate I earn from qualifying purchases.
For this post, I am a face mask file that was in the Silhouette Design Store.
Once you have the file, open it in the Silhouette software.
Use the Transform – Scale Panel to size the pattern to what you need by entering the exact percentage to size the pattern up or down.
Now, let’s take a look at 3 different options you have for using the Silhouette to make these fabric masks.
Option #1 – Cut a template with the Silhouette.
I used the Face Mask Sewing Pattern file to cut a template out of cardstock. I then labeled each panel for future use.
I was cutting several of the same fabric, so I could layer the fabric and cut through multiple layers with a hand held rotary blade.
If you are using this method, you only need to cut 1 of each panel for the template. I folded the fabric over several times to get both sides and then pinned the template to the fabric. I was able to cut the outer panel for 2 masks of each size. You could cut more at the same time depending on how much fabric you have and how many masks you want.
I did the same with the Liner fabric.
I found this way to be the fastest way as you could cut multiple layers of fabric at the same time. You could also cut with scissors around the template if you don’t have a hand-held rotary blade.
Option #2 – The Cameo 4 with the rotary blade
If you have a Cameo 4, Cameo 5, or Curio 2 you have the option of using the Rotary blade in the Tool 2 housing. The Rotary blade is only compatible in the Cameo 4 machine. *Updated to include new Silhouette machine models compatible with rotary blade.
You will want to use a super sticky cutting mat to hold the fabric in place. A strong grip matwill work well or grab a brand new regular cutting mat. A brayer is also a good idea to roll over your material to make sure it is good and stuck to the cutting mat. In order for it to complete the cut, the fabric needs to stay stuck to the mat.
Stabilized fabric means that you have applied something to it to help “stabilize” it or make it stiffer.
My favorite method is using Terial Magic and this is what I used in this tutorial.
To use Terial Magic, spray the entire fabric down with the solution.
Let it dry for 20-40 minutes. Don’t get rid of those hangers from clothes you buy – they work perfect for projects like this or hanging swim suits to dry. Then press it with an iron to dry completely.
This makes the fabric stiff and almost like paper. Now, with a sharp Silhouette blade, it will cut like butter.
I used the Fabric, Cotton Print setting with a Black Silhouette blade, also called a “ratchet” blade. The pattern above is enlarged 115% for the Large size.
Look at those nice, crisp cut edges.
Perfect cuts each time!
I do have to say, this is my favorite way to cut fabric with the Silhouette machines. It will work on all Silhouette machines with a regular, sharp blade.
It does require pre-treatment, but it is so worth it for the end result!
The other awesome thing about Terial Magic, is that it washes out, so it is perfect for applique, quilting, or these fabric masks.
You do not want to use a product like starch or other stabilizers that are not sewable, or you may gum up the cutting blade.
For this design, once it was cut, I followed the step-by-step tutorial on the Silhouette 101 blog for assembling this face mask.
I am not an expert at sewing. Basically, I can sew a straight line. And I used a basic Brother sewing machine to finish these masks out while following the tutorial on my ipad.
So grab your favorite fabric and create something!
Go MSU Bobcats!
And then try to get a photo where your kids aren’t acting up.
See that sideways Momma look? This was not the first take on the photo – lol.
What will you create with your Silhouette machine? My kids are already requesting more masks in other fabric patterns and shirts too! Stay tuned for more on that!
Save this for future reference by pinning the image below.
Enjoy !
THANK YOU for your support! How can you help? Click HERE & buy a coffee. Every little bit helps with the cost of running the site.
Silhouette Classes
Never stop learning! Let me help you take the anxiety out of learning with Silhouette and get to creating faster! My Silhouette classes are heavily focused on software, so you can take the skills & techniques taught and apply them to many future projects!
**This post may contain affiliate links. What that means is that I may receive compensation if you purchase through the links I have provided. The price you pay for the product or service is not higher but I may get compensated for sharing.
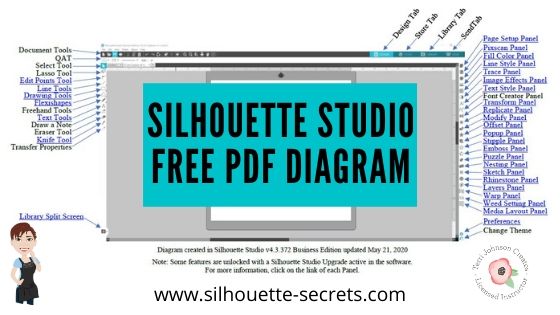
Last year I created a free PDF document that is a diagram of the Design Tab in the Silhouette Studio software. Each of the tools and features is labeled and links back to more information on that feature or tool.
I have just updated this PDF file, so if you grabbed it before make sure to delete the old one and download this new one for future reference.
Save this for future reference by pinning the image below.
I would love to see what you are creating with your Silhouette! Feel free to post photos or questions on my Facebook group at Silhouette Secrets with EllyMae.
Enjoy!
**This post may contain affiliate links. What that means is that I may receive compensation if you purchase through the links I have provided. The price you pay for the product or service is not higher but I may get compensated for sharing.
We just wrapped up the first Silhouette Curio Virtual retreat this past weekend that was hosted by Terri Johnson Creates and it was a success! 3 days of diving into Curio projects that included metal etching, acrylic etching, leather embossing, more acrylic etching, and sketching on wood.
This event was originally scheduled as a hands-on retreat, but due to the current situation we made the decision not to cancel it but to move it to a virtual online retreat. Students received class supply kits, written instructions, access to recorded video lessons for each project, video conference calls for discussion & questions, and support through our private Facebook group during the event.
Let me tell you, I have been testing these class projects for months, over and over. And by the end of an event, I will admit I sometimes feel that I just don’t need another project with my initial on it.
But, these attendees blew me away. They watched the video classes and created some fabulous projects! I hope these project photos will inspire you just like they have me!
Silhouette Metal Etching
Affiliate links may be present in the following blog post and as an Amazon Associate I earn from qualifying purchases.
Thank you to Silver Creek Leather Co. for sponsoring this class. We used ReaLeather tooling leather in this project with the Silhouette Embossing Tool.
Check out this short video showing the Curio in action on the leather.
We used the Pine Cone sketch design by Tanya Batrak – Design #236611 for the main sketching design and then the attendees got creative and branched out.
While we could not meet in person due to the circumstances, we had a great time meeting together in the first Virtual Curio retreat.
The feedback we received from the event was amazing! Here are just a few of the reviews from this weekend.
“I was glad when it was announced that this would be a virtual class. I wasn’t going to be able to attend otherwise. I was a little skeptical of taking a virtual class like this since I am not self motivated to watch online videos. But I found that I was very motivated to keep up with the class schedule and projects. Loved being able to watch the classes and stop, back up, and go over a technique several times if I needed to. Would love to take more classes like this with Terri and Elly. Fantastic instructional classes and awesome instructors. Thank you for taking us to another level of learning.” Carol R
“A truly wonderful virtual experience. It was so relaxing to go at your own pace and rewind the videos when you “didn’t quite get it” as many times as you needed or refer back to the written instructions when that worked better. Terri and EllyMae were always there for you when you needed to reach out and the ZOOM calls opened you to questions and answers you might not have thought about. I would definitely take another virtual class. You can see just how much time and detail was put in to these classes. Thank you Terri and EllyMae for a fantastic experience and loving all the knowledge I gained.” Jean S
“Thanks so much for offering this virtually. We had contact with other participants through Zoom, the projects were varied and fun, and the instruction was superb!. The videos were well-organized, thorough, and well paced. It was helpful to be able to go back and repeat sections. The workbook is an excellent resource going forward. I hope you continue to offer virtual retreats. “ Boo M.
“This retreat was a blast! Everything – from materials to instruction sheets to instructional videos – was so thought out down to the tiniest detail. Terri and EllyMae, as well as the retreat helpers, are experts in all things Curio – how it works, how to troubleshoot, about the materials, cut/etch settings, Silhouette software, etc. They are genuine, professional, personable, and very patient. I learned some new techniques and how to use some materials I had never thought of. My mind is now in overdrive thinking of all the projects and possibilities. I would so do this again – either in person or virtual.” Leigh W
“This was an outstanding weekend. I would definitely take another class in this format. I had all my materials available to me in my space, I was able to go at my own pace & could rewind if I needed to listen to something again. I loved it!! Judy A.”
Those are just a few and I’ll share more in the future.
We are all finding ourselves in a new time with the current events happening and this virtual retreat was definitely a new experience for us all.
I’d love to see what you are creating with your Silhouette! Feel free to post photos or questions on my Facebook group at Silhouette Secrets with EllyMae.
Enjoy!
**This post may contain affiliate links. What that means is that I may receive compensation if you purchase through the links I have provided. The price you pay for the product or service is not higher but I may get compensated for sharing.
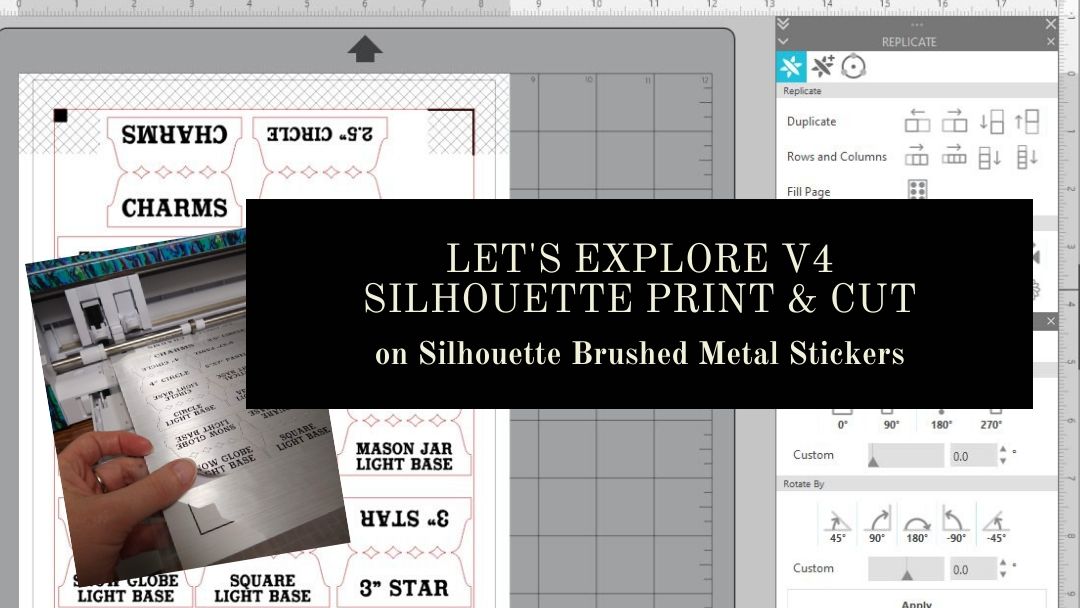
I first set up the design for print and cut, using all the defaults for the registration marks. For a step-by-step tutorial on setting up print and cut, check out this post Let’s Explore v4 – Print and Cut Basic.
Something to note for these specialty materials is that the instructions are very specific in saying to use the default settings for the registration marks. That is due to how the sticker sheets are set up. For the best results and printing quality, the corners of the sticker sheets are cut out so the marks can be read with more accuracy.
The corners are a matte finish vs the glossy finish of the sticker sheet area. This is not something that you notice until the package is opened.
I needed some labels for organizing my collection of Curio templates. I used a tab from the file 3 Tabs by Lori Whitlock – Design #6387 and added text to each of the tab sides using Vintage Sign Font by Lori Whitlock – Design #252472.
Using the Replicate Panel and the Rotate Panel, I could duplicate the text to add to the other side of the tabs.
I am using a Canon TS9521C printer and found that it needed to be printed using the Photo Paper Glossy setting with the print quality as High. Printing at the higher quality settings slows the rate that the image is printed which allows the ink to dry on the media longer before it is finished.
After the design is printed, click on the Send tab and I don’t want the text to cut out. All of the text needs to be selected, by clicking on it, and then choosing the No Cut option to turn the cut lines off.
You may notice that the text looks fuzzy. This is something that has changed in the v4 software. Text now defaults to Cut Edge on and why it is showing up as fuzzy. It will still cut and there is nothing wrong with the text or cut lines. However, by having the text default to Cut Edge, you no longer have to weld fonts that overlap. It will cut the edge of all the text that is connected versus cutting out each individual letter.
In this case, I don’t want the text to cut. But, it is something that has changed in the software and I see many questions on why it’s now fuzzy. If you want the text to show “normal”, then select all of it and choose “Cut” on the Send tab and the lines will clear up a bit. Just keep in mind that you will need to weld the text manually if you do that.
Since I only want the tabs to cut, I turned off all the Cut lines on the text.
The bold red cut lines will turn off on each object that is selected when the “no cut” option is chosen.
After it’s printed, place it on the Silhouette cutting mat, exactly as it shows on the Silhouette design screen. The page should be lined up in the top left corner of the cutting mat and on top of the cutting grid. For best results, you want it to be lined up exactly as it shows on the screen. This means that the page should be covering the grid lines on the left side and along the top edge in the top left corner.
Lining it up properly will help in getting an accurate reading on the registration marks. If the cutting grid is showing, then it can sometimes try to read the cutting grid instead of the printed registration marks and give you a registration error.
Make sure to load the cutting mat properly in the machine with the left edge of the mat next to the line on the left that the arrows point to.
A good habit to get into is to check the cut before pressing the Unload button. If the design did not cut well, then you could send it back through for a second pass.
I added the tabs onto sheet protector that I can easily slide the Curio Templates in and out of. This is just a portion of the templates I have, so it is going to be great that the ones I use the most are now labeled and organized.
Here is an example of these Curio Templates. These are designed to fit the Craft Chameleon acrylic blanks and help to hold the blank in place and line up the design to the template space.
These plastic Curio templates line up with the pegs on the Curio cutting base and then the acrylic blank sits down in it while etching. I still like to add a layer of double sided tape to my acrylic blank as well, just for another layer of security in holding it in place. The etch is permanent, so if that blank moves at all, it may not line up and etch in the correct location.
Now, I added these all in one location. I picked this accordion folder up a few months back when I first was brainstorming this idea and now I can find them a little easier.
Now, that is one more thing crossed off my to do list. Back to more Silhouette projects!
From now until April 15th, you can get 40% off materials at Silhouette when you use my code SILSECRETS and FREE shipping on orders over $50.
Check out more information on all the April sales happening at Silhouette in this post HERE.
Save this for future reference by pinning the image below.
**This post may contain affiliate links. What that means is that I may receive compensation if you purchase through the links I have provided. The price you pay for the product or service is not higher but I may get compensated for sharing.
Today I am going to share my “secret” to etching photos with the Silhouette Curio.
How is this possible? Just taking the photo by itself and trying to etch it doesn’t turn out well. Photos are made up of so many different aspects that you can’t just fill it with an emboss fill and call it good. It would just turn out like a big etched blob. It might work for a silhouette of a person, but not to capture the essence of the photo itself.
This past week I had a lesson with a student and she asked me about etching photos.
This is what I told her, “While I can teach you all about etching acrylic on your Curio, I highly recommend you grab this eBook and read it. In fact, I recommend that you read it 2-3 times before you even try to follow it.”
And that is what I would recommend to all of you reading this. I can etch acrylic with the emboss fills pretty much in my sleep – in fact, there are nights that is all I “think” about when I’m sleeping. But, this etching photos technique uses the sketch fills and gives an amazing finished project. It is a technique that has many steps, but if you follow it exactly, you will end up with a stunning project.
Now, keep in mind each photo you etch is going to turn out differently. I know it’s not the answer my students want to hear when I say, “Each design is going to act differently.” This is true for fonts, designs, photos, tracing, etc.
Why?
Because they are all made up of different elements. There is rarely a 1 click button to have something magically turn into something amazing. It is a process and it takes some time to go through that process. Skipping steps rarely leads to a good result.
How do I do it?
Blog post written in v4.3.370
Affiliate links may be present in the following blog post and as an Amazon Associate I earn from qualifying purchases.
I open the eBook every single time and follow it step-by-step. If I don’t, I know that I will miss a step and it won’t turn out.
So let’s take a look at the photo first. I opened the photo in Silhouette Studio and then scaled it down to fit on the Curio mat.
Like I said above, each photo is going to be different. In this photo, I don’t want the extra background to be etched, just the people in it. So I used the Magnet Trace feature to draw around the people and “extract” them out of the photo.
Magnet Trace is a Designer Edition upgrade feature in the Silhouette Software. As you can see in the photo above, the edges are not smooth around the photo. But, we can change that. I love the Magnet trace for extracting photo because even after I delete the background, it retains the memory of the photo. So I can use the Edit Points feature and adjust the edges around the part of the photo that I want to clean up.
If the tool has traced or placed an edit point too far in on the photo, I can move it out and it still “remembers” what the photo looked like. It is very forgiving and I highly encourage you to play around with it. It takes some practice but can come in quite handy.
Each of the little gray dots is an Edit Point. I can delete or adjust the points until I have the desired edge around my photo.
After I have “extracted” my photo, I then cropped it down by drawing a square around the section of the photo I wanted & used the Modify – Crop feature to capture only the section I want etched. Then I enlarged that section of the photo to fill the acrylic blank area.
Now that my photo is ready, I open the Etching Photos onto Acrylic eBook and follow the directions. I do highly recommend that you read the book from start to finish 2-3 times before you even try to follow along in the software. While it may not make sense completely when you are reading it those first few times, it will make a whole lot more sense when you sit down and try to follow the technique in the software.
The more you do it, the more comfortable you will get.
Once you click on the Send button, a timer shows up in the bottom right corner of the Send tab. However, it is rarely accurate, especially with etching projects. Sometimes it’s less, but more often than not, it’s more time. This project said it would take 20 minutes & 59 seconds to etch and it actually took 32 minutes.
I think the longest etching project I’ve done is around 3 hours. This is why I love that with the Business Edition upgrade to the software I can use multiple machines at a time. So I can set up a project to etch and still cut with my Cameo or start another project on my 2nd Curio.
I show you the steps I use to set up an acrylic etch from beginning to end.
Here is the course curriculum from the design file to the full etching video course.
and then once you feel comfortable with the etching process and your Curio
5. Want personalized lessons? To be able to ask questions in real time to an instructor? Set up an in-person or online lesson.
More information HERE – Online Lessons & Classes.
6. Join us at the All Things Silhouette Conference in November to learn more about All Things Silhouette – from software to machines to hand-on project classes.
7. Check out the “Let’s Explore v4” series HERE for more in-depth software information including all about the Emboss Panel, which is the key to the Curio and etch fills for more projects. Etching on photos is the only thing I use the sketch fills for, otherwise the Emboss Panel is the main focus with the Curio.
I really feel that the software is the key to it all. You learn how to do things in the software that will translate over to all kinds of projects in the future.
Save this for future reference by pinning the image below.
Enjoy!
**This post may contain affiliate links. What that means is that I may receive compensation if you purchase through the links I have provided. The price you pay for the product or service is not higher but I may get compensated for sharing.
It is always a bittersweet feeling after a weekend teaching at an event. We just wrapped up the All Things Silhouette November 2019 Conference and it was fantastic!
What is the All Things Silhouette Conference about?
It’s about the people! The people who are all gathered together with the common interest of “Silhouette” in common.
We come together, we laugh, we learn, we connect, we share, and we laugh some more!
We all work hard for months before the conference, during the conference, and yes even after the conference! It takes a great team to make all the pieces of the puzzle fit into place.
While I have worked side-by-side with her for a couple years now, it is rare that we remember to take a photo during the event. That has to be the hardest thing for me to remember to do at an event is to take photos.
The All Things Silhouette Conference brings together the top of the Silhouette Industry leaders who share their knowledge, techniques, testing, and skills with the conference attendees. Here are a few of us at the end of the conference. Again, photos of the entire group are rare.We are rarely in the same place at the same time the entire weekend.
The connections that are made at the Silhouette events are priceless!
During this ATS event, I taught several classes using the Silhouette Curio.
If you are a Curio owner, you may have realized by now that it can create really cool projects. However, it can take some time to create those and those projects are not always possible to achieve in the hour & 15 minute class time during the regular ATS weekend. From feedback provided by the attendees, a Friday pre-ATS event has been added. This is an add-on to the regular ATS package called the Ultimate Experience.
This is the 2nd time I’ve taught a Curio Boot Camp session. It is very popular and sells out quickly once it’s posted. While it is posted as a 3 hour class, you just never know what will pop up in class and we did go over in time, but everyone was so involved in creating their own designs that you could hear a pin drop in the class. I don’t think they wanted to leave even after their project finished etching.
During the regular ATS weekend I taught the Basic Acrylic Etching class and I showed them how to set up the design to be etched. This design was created in the Silhouette software using basic shapes – check out this post on Drawing Tools to see how you can create your own snowflake too.
And then a little change of pace. We used the Foil Quill on a faux leather Traveler’s Notebook using the Silhouette Curio. I love the Curio because when you load the base properly, the cutting mat lines up exactly with the cutting mat on your Silhouette software screen. This means that you can place the design on your design screen and then place your materials in the same place on the cutting mat and it will line up.
Check out this The Curio – Getting Started for more information on the Curio.
Thank you to Lori Whitlock for providing the Compass design for this class.
It was a big hit!
And then the final class I taught was a 2 hour class on Saturday evening. We created an etched snowflake home decor project on a 5″ acrylic disc using the Silhouette Curio.
Unfortunately, due to some computer issues and things out of our control, we did not get to etch these ornaments in the Basic Acrylic Etching class. While we never like to see it happen, sometimes it does. And, I did not want them to leave empty handed, so I told them all to stop at the registration desk and pick up an etched ornament the next day.
After my last class of the day on Saturday night, I utilized the Curio classroom and connected to 6 machines to etch the 30 ornaments. With the Silhouette Studio Business Edition upgrade, you can use multiple machines at a time. I really was not sure how many machines I would be able to use at once, especially when you are using an etch design as it can be a larger data file. It was either going to be a success or a fail. But, my computer easily ran the 6 Curios etching at the same time. Check out this post on Using Multiple Machines to see how to switch between machines in the software.
Next time, I’ll see how many I can really hook up to my computer and run. There is no limit to the number of machines that can be used with the Business Edition upgrade, except what your computer can handle. This will be dependent on your computer specifications and the number of usb ports you have available to connect to. If you have too many machines going it could max out your computer processing power and that could mean anything from a lag to a crash. But, you never know until you try something out.
And when I wasn’t teaching the class, I was helping out in the classes and every single one I learn something new in. I wish I could clone myself to be in them all.
I had a moment to jump on a Curio machine and complete this design on a Embossable Foil that Kelly Wayment with Finding Time to Create was teaching in the Basic Curio class. I had never used Embossable Foil before & I love it!
I’ve added this to my Black Friday shopping list – stay tuned for that announcement!
It is absolutely amazing what these Silhouette machines are capable of! And I am so grateful for all the blessings that being a Silhouette owner has brought into my life. Now, that may sound odd but, as I started this post out – it is all about the people. Through the commonality of Silhouette I have met so many people who mean so much to me.
My biggest fault at these events is not getting enough photos, especially when I’m teaching. But here are a few I was able to snap.
Courtesy of Cindy Chapko a fellow TJC Licensed Instructor in Arkansas
A shirt made by Jane McClure. This reminds me of our recent trip to Salt Lake City, UT for the Cameo 4 launch except we were all in a mini van. Check out this post on the Silhouette Home Office Tour HERE.
Here is the backside of the shirts that Jane and her group made. These are amazing!
Dee and I had to do a couple retakes to show off her newly etched bracelet that she created in a Curio class with Mags Bonham. By the 3rd photo, no one looked like they were getting punched. We had some good laughs though!
And my hair made it on another shirt! Looks like it’s time for a little color for me.
It was a fabulous weekend and each All Things Silhouette Conference keeps getting better and better! I was writing down class ideas before the weekend was even over!
Make sure to get signed up for the November 2020 All Things Silhouette Conference as soon as registration opens. It will fill quickly with only 1 conference next year. Sign up to be notified on Terri Johnson Creates blog HERE.
While the weekend is always physically exhausting because we are on the go, it is also creatively renewing. All the creative energy, the Silhouette love, the knowledge floating around, the ideas & techniques shared…. it renews & refreshes you in a way that is so hard to put into words.
It gets your wheels spinning and ideas flowing. And I typically hit the ground running or most times while the airplane wheels are still in the air, I’m typing away on my phone jotting down more ideas.
While I tell myself I am going to take a break after each event, I feel recharged after and don’t want those ideas to run away.
On with the research and testing for the next event.
Can’t wait to share the final projects with you all!
Now, while we have to wait a whole year for the next All Things Silhouette Conference, that doesn’t mean you cannot get inspired or spread inspiration to others.
I would love to see your projects & I know others in my group do too! Feel free to post on my Facebook group at Silhouette Secrets with EllyMae.
Enjoy!
**This post may contain affiliate links. What that means is that I may receive compensation if you purchase through the links I have provided. The price you pay for the product or service is not higher but I may get compensated for sharing.
I’ve just arrived home from the November All Things Silhouette Conference for 2019 and so many ideas are hitting me. I am making notes for when I get a chance to start creating again.
I wanted to share a project I created and put in the Silhouette Showcase room at the conference.
This is an acrylic etched with the Silhouette Curio. It is a lighted base that can be found at Craft Chameleon and the acrylic is specifically sized for the base.
This is one of my favorite ones that I have etched for the base.
There are several different acrylic shapes that fit in the lighted bases and also Curio Templates for all those shapes.
I LOVE the Curio templates to help hold my blanks in place!
Thank you to Craft Chameleon for allowing me “test” this one out for them to share with everyone at the ATS – Showcase.
I couldn’t stop there though. I etched 150 of the 15/16″ acrylic discs and gave those out to the attendees of all the Ultimate ATS attendees for the Friday classes in their goody bags.
For these I added a wine charm to the bag but they could also add it to a key chain or other type of hardware too!
I had a few extras and turned mine into a pair of earrings that I wore this weekend too!
And yes, there is a Curio template for these charms too! I was able to etch 10 charms at a time.
And I want to share this with all of you because I think it is so neat.
I was able to use my Business Edition software to connect to 6 different Curio machines to etch 30 snowflake ornaments during the conference.
It’s a long story on why but where else do you get access to a room full of Curios.
Next time, I’ll try even more!
Are you just getting started with the Curio? I recommend starting with the Silhouette metal etching sheets and practicing first.
Here is a step by step tutorial on how I do that – Beginner Curio Etching Metal.
Want to learn how to etch on acrylic? I just recently launched an online class on my Teachable site to show you how.
Check it out HERE along with my other classes that are available.
Or if that is not enough, come join us for a full weekend of Curio projects on May 1-3, 2020 at the Curio Retreat in Woodbridge, VA!
Grab your seat quick as we are already over 50% full!
**This post may contain affiliate links. What that means is that I may receive compensation if you purchase through the links I have provided. The price you pay for the product or service is not higher but I may get compensated for sharing.
THANK YOU for your support! How can you help? Click the link to buy a coffee. Every little bit helps in the cost of running the site.