Affiliate links may be present in the below and as an Amazon Associate I earn from qualifying purchases.What that means is that I may receive compensation if you purchase through the links I have provided. The price you pay for the product or service is not higher but I may get compensated for sharing.
In Part 2, I am sharing how you can use a print and cut file and use it as a pattern fill.
I hope you get into the Silhouette software and play today!
I would love to see what you are creating with your Silhouette software or machines! Feel free to post on my Facebook group at Silhouette Secrets with EllyMae.
Save this for future reference by pinning the image below.
Enjoy !
THANK YOU for your support! How can you help? Click HERE & buy a coffee. Every little bit helps with the cost of running the site.
Or if you are looking for more in-depth, step-by-step classes, check out all of my online Silhouette classes on my Teachable site HERE.
**This post may contain affiliate links. What that means is that I may receive compensation if you purchase through the links I have provided. The price you pay for the product or service is not higher but I may get compensated for sharing.
This week I cut the pieces to make up 40 card kits for an event I’m teaching at. I set the video camera up to record a time lapse of the entire cutting process.
This was 3 hours of real time cutting. 23 – 12″ x 12″ sheets of cardstock cut on a 24″ x 24″ cutting mat with the Cameo Pro 40 card bases 80 daisy pieces 320 flower center pieces 80 leaves
I have added the video to my YouTube channel HERE. It is condensed down to 7 minutes for the 3 hours in real time it took.
I’m sharing more tips below too!
Tips for cutting 4 sheets of cardstock on the Cameo Pro at one time.
Guides
Use Guides in the Silhouette Studio software placed at the 12″ marks to show where your pages will meet. Keep the design away from the edges of the cardstock.
One of the biggest issues I see when troubleshooting issues on the Cameo Pro is not having an adequate workspace setup for it to function properly.
This machine is big and it needs a large workspace to function and feed properly. It cannot work against gravity or the cuts will not line up consistently.
If you are using the 24″ cutting mat, it should have a workspace of 38″- 40″ in width for the machine to be securely and stable on and 52″ of length that is absolutely flat. This allows for 22″ in front and 22″ behind the machine for it to feed the cutting mat as flat as possible in and out of the machine as it cuts.
Make sure the right roller is locked in position properly
The right roller should be rolling on the edge of the cutting mat and not across the adhesive on the cutting mat. The middle indent of the right roller should be lined up with the gray arrow on the machine at the 24″ mat mark.
The right roller can only be locked in place where the gray arrows point to on the machine roller bar. For the 24″ cutting mat, that is the far right gray arrow.
If you look at your machine closely, you will see that the right roller is directly under the indent on the white pinch bar. That is the only place that the roller makes contact with the surface underneath, so placement is very important for feeding properly.
If the right roller is not placed properly you may experience future cut issues which can include: – gumming up the roller and there is no easy way to clean this roller on the Pro – wearing a groove in the cutting mat which causes an uneven surface for cutting – mat can get stuck inside the machine – feed issues as the rollers do not roll at the same rate of speed because the right roller is either getting stuck or the roller is slipping on the material – affect print and cut accuracy if the rollers are rolling at different rates – cuts not connecting – mat can skew Note: the rollers rolling at different rates is not something you can usually see with the naked eye, even when studied closely. However, you can see it when the cuts do not connect completely.
Cutting Mat is loaded properly
The Cameo Pro is different than other machine models. It has 2 load lines. The line on the left side of the arrows is ONLY for the 24″ cutting mat.
The line on the right side of the arrows is for ALL other sizes of materials and cutting mats.
If the cutting mat is not loaded properly it can cause feed issues or it to skew in the machine as it’s cutting.
Above I shared a photo of the right roller, but where is the left one exactly? If you look closely at the left roller, it is directly below the dot on the roller bar. This is where the roller grips the mat or material.
The 24″ x 24″ mat is a monster of a cutting mat and it has heft to it. The load line and the right roller placement is very specifically designed to gripe each side of the mat so it can feed it in properly.
If the mat catches on something or does not load completely straight, unload it and load it again – as many times as needed. If it does not start off straight, it’s not going to cut in the properly locations and the cuts may be off. On my 1st set of daisies being cut, I did not notice that the mat was slightly off and it did affect a few of the flowers getting cut off a bit. It happens – plan for it! If in doubt, always reload the cutting mat.
Use the Autoload feature whenever possible
This will help to ensure that you are able to support the mat and hold it up to the rollers as even as possible. The monster mat can be difficult to get the hang of, but keep on practicing and you will get it. It is much easier to load if you have the proper clearance in front of the machine to help keep the mat flat and not hanging down over the edge.
Any debris on the cutting mat can interfere with the cut being clean as it creates an uneven cutting surface. Clean off any previous bits of debris left behind by the materials.
In the video I shared above, when I load the 2nd set of white cardstock, you can see me smoothing it down to secure it to the mat. When I did, I noticed uneven areas under the cardstock and I lifted it to clean it and placed it back down. Any debris can affect your cuts.
Weed carefully.
Sure you see videos of people all the time that seem to just rip off the excess of the material whether it’s for cardstock or vinyl. But, it is not always the case.
Go slow when weeding and you will find you can save your design most times. My Autoblade is very well used and it’s still cutting well, but the design I was using had interior corners and cuts. It cut, but by carefully removing the excess cardstock, I didn’t rip off any petals from the flowers or pieces of the centers.
I hope these tips have helped to show you a few things about the Cameo Pro! For more tips and troubleshooting on the Cameo Pro – check out the header on the blog HERE.
I would love to see what you are creating with your Silhouette software or machines! Feel free to post on my Facebook group at Silhouette Secrets with EllyMae.
Save this for future reference by pinning the image below.
Enjoy !
THANK YOU for your support! How can you help? Click HERE & buy a coffee. Every little bit helps with the cost of running the site.
**This post may contain affiliate links. What that means is that I may receive compensation if you purchase through the links I have provided. The price you pay for the product or service is not higher but I may get compensated for sharing.
Have you seen the layered mandala files that have started circulating?
They are becoming extremely popular and I’m hooked! Coming into the Silhouette world, I was a papercrafter. What am I saying? I still am a papercrafter, but now I have so many other materials I use as well.
These layered mandalas are pretty simple to cut and assemble. Of course, that is designer dependent.
While I was browsing Pinterest one night, I pinned this to my future Silhouette projects and it came up in my Facebook group this past week. So that means it was time to grab these files and create!
Now, there are 2 things I want you to do. 1. Click HERE to go to Pinterest & pin this file so you don’t lose it. 2. Go grab these FREE svg files directly on the Special Heart Studio website.
Now, that you have the files. Let’s take a look at how to use them in the Silhouette software. Like I said above, it’s pretty easy with these files the way they are created.
Make sure to download the files HERE and then open the svg file. Don’t know how to open the svg file? Click HERE for the detailed instructions on how to unzip and open downloaded svg files.
When the file opens, all of the layers are ungrouped. Select the entire design and you will see the selection box around each of the layers.
If the file is grouped together, right click on it and then choose Ungroup to separate the layers.
Draw a rectangle on the left side of the cutting mat in the gray holding area. I am working with a frame that is for a 8″ x 10″ photo. Using the Transform Panel – Scale Tab, change the dimensions to 8″ wide by 10″ high.
I am using this 8″ x 10″ rectangle to size my design so I know it will fit in the space I have in my frame.
Next, select all the of the layers of the design. Left click in the top left above the design, hold the left mouse button down, and drag it across the entire design to the bottom right. This will select any object that the mouse cursor touches.
Move the design into the drawn rectangle on the left side. With the entire design still selected, use the corner bounding box to scale the design down to fit inside the rectangle as you chose.
Once you have the size you want, you are ready to start cutting the layers.
I started with the bottom layer and worked my way up. Grab the layer you want to cut and move it to the top left corner of the cutting mat.
I use the Transparency (reveal) option on the Page Setup Panel to see the grid lines of my cutting mat so I know how much material that I need for the design.
I grabbed some Recollections Paper packs from Michaels that work great for these projects and the different shades of color for the mandalas. Great quality cardstock and takes the guessing game out of me trying to match colors up.
Then I cut my material down using my paper trimmer to the size I need. I find that this helps to save the adhesive on my cutting mat, which makes it last longer and gives me scraps of material that are even sizes for future projects. More tips on getting the most out of the cutting mats HERE.
Load the cutting mat into the Silhouette machine.
Click on the Send tab in the top right corner.
Choose Cardstock Textured as the material. I use this setting for cutting almost all cardstock and it works well. While the Silhouette can cut textured cardstock, I prefer to cut smooth as it is much less of a headache. Depending on the textured nature, it can be a bit more finicky to get clean cuts on.
Click Send in the bottom right corner and watch it work. After the cut is complete, unload the cutting mat, flip it over and peel the cutting mat from the cardstock. This will help it to release from the adhesive.
Click back on the Design tab. Move the first layer off to the right side and grab the next layer to cut and place in the top left corner of the design mat.
Click back on the Send tab and verify that the Material has not changed. Place the next color cardstock on the cutting mat and load it into the machine. Then click on the Send button in the bottom right corner of the Send tab.
Repeat this process until all layers have been cut.
*Note: as you cut a lot of cardstock, you may find that your not getting as clean of cuts. This can be due to the blade getting duller. As the blade dulls, you can increase the blade depth or force if necessary to get a clean cut. I have used this blade to cut lots of cardstock and during these cuts, I did increase the blade depth by 1 to get a cleaner cut.
When you get to the top layer. Notice that it is a bit more intricate of a design. I turned on the Overcut feature to help with this. To learn more about what the overcut feature does click HERE.
I found that this gave it a bit cleaner cut on the corners for the top layer of this design. With the top white layer, be gentle with it getting it off the cutting mat and take the time to carefully remove the cut pieces from the design. I promise it will be worth it.
Once all the pieces are cut, you are ready to assemble. Since the top layer was rather intricate, I used a Broad Tip Glue pen from Close to My Heart to add adhesive to the backside. Then I glued it down to the first color.
Then I used foam tape to add dimension between the layers. I used the Thin 3-D Foam Tape by Close to My Heart since I was putting it in a regular frame, I didn’t want to add too much thickness to it, but I still wanted it to have some dimension.
And then sometimes, even when you think you have the right size and you use a rectangle to draw out the size of space you have, don’t always assume the frame/mat is the size it says. Turns out that my K was just a bit too wide. I should have measured to double check and after cutting the first layer, looked to see if it would fit.
But, I turned it and it fit perfectly the other direction in this frame. If it had not, it wouldn’t have been a lost cause. I would have just reassessed the game plan.
I love the dimension on this!
Once you start, it is hard to stop. I grabbed another layered file from Special Heart Studio for a layered floral heart mandala and started cutting using the same steps as above.
I am loving all the detail and dimension on these layered mandalas.
These layered mandala designs are picking up in popularity and I am seeing them all over Pinterest and Facebook group. Grab one and play today!
If this is a little too much to get you started with cardstock, check out the free card cut file I shared last week on the blog HERE – Fancy Fold Flip Card.
I would love to see your Silhouette projects! Feel free to post photos or questions on my Facebook group at Silhouette Secrets with EllyMae.
Save this for future reference by pinning the image below.
Enjoy!
**This post may contain affiliate links. What that means is that I may receive compensation if you purchase through the links I have provided. The price you pay for the product or service is not higher but I may get compensated for sharing.
This past weekend I had the opportunity to teach at the Terri Johnson Creates Silhouette Spring Retreat. This was an intermediate level retreat and not only did the attendees learn lots of new things, but I learned from both the attendees and my colleagues as well.
But, do you know what the most important part about the entire weekend was?
The people!
We had a fabulous time learning, creating, and laughing through the entire weekend!
The time goes so fast and the hardest part for me is getting photos of things.
But, here are a few I managed to snap before it was over.
Every single time I tell myself that we need to take photos on the first day when we are all refreshed and every time it is always on that last day after we have been learning new things and staying up late chatting.
The first day there are many new faces, but by the 3rd day so many new friendships have been formed. I almost think, even if we look tired, those are still our best photos and there are finished projects to show as well.
The first class I taught was how to create a Faux Rhinestone scatter with Siser Holographic HTV & Siser Red Glitter HTV that was applied to a black apron.
The next project I taught was a card in a box project. Every user comes from a different background, so for many cutting paper was something new for them.
I started as a papercrafter with the Silhouette, so I always love to pass on my tips and tricks for working with paper to others.
For this project, I showed the attendees how to open and work with a paper piecing file from the Silhouette Design Store. We used the Happy Birthday Balloons Card in a Box by Suzanne Cannon – Design #256894.
I use this method for almost all projects whether it is cardstock or vinyl. I find that it saves time and also saves the adhesive on my mat. Since I am not putting down a full sheet of material on top of the mat and then peeling it off, the adhesive remains sticky longer in the areas not used as much.
For more tips on extending the life of your cutting mat, check out this blog post HERE.
This was the first pieces that we cut.
And this is how it was set up on the Silhouette virtual cutting mat in the software.
After cutting the white and blue pieces of the design, we moved those off the mat and positioned the other pieces onto the mat, using the grid revealed on the Page Setup Panel.
Then we placed the colored cardstock on the mat in the same locations as it shows on the software and sent a second mat through to cut.
Now, all the pieces are cut in only 2 times loading into the machine and this fabulous card is ready to assemble.
We used Close to My Heart cardstock and patterned papers to complete this project. When cutting cardstock, the quality of the cardstock makes a big difference. I love using the Close to My Heart brand or the Michael’s Recollection cardstock. They both cut very well.
I started working with the Silhouette silk screen kit when it was first released in Fall of 2018 and just like anything else, it takes practice. I encourage you to try it out and keep on trying with it. I love that the screen is HTV and is reusable, just wash and let it dry. Then when needed, assemble it back in the frame and apply your paint.
I am making a list of ideas for Christmas gifts this year.
And finally, I do have to share with you the shirt I made to wear on the first day of the event. If you have followed me for any time or see me post on Facebook, I troubleshoot a lot when users post an issue and the first question I ask is
“Can I see a photo of your blade installed in the machine?”.
While that might be annoying to some, it is one of the most important things to start with any time there is a cutting issue. I was talking with Terri at Terri Johnson Creates one day and she said, “You need a shirt.”, so I create one and used the Silhouette Printable Heat Transfer for Dark Fabrics.
It turned out great! I’ve made several more shirts with this product and am loving it!
And this photo is taken after it was washed and dried, no special treatment.
And guess what, I fixed a few gaps in blades this weekend too!
So a tip for any user, always start with the blade. No matter which Silhouette blade you are using, if there is a gap in it, it can create cutting issues.
All blades need to sit with the lip of the blade flush with the housing.
The weekend was fabulous and even though you may feel tired by the end of the weekend, it is a refreshing tired and I get a sense of renewed energy being around other Silhouette users.
To keep up with events by Terri Johnson Creates, make sure to follow her blog HERE. There are still spaces left at the moment (it has sold out every time – so don’t wait too long) for the All Things Silhouette Conference in June in Peachtree City, GA outside of Atlanta, GA. It is the largest Silhouette conference in the U.S. and a great opportunity to learn from so many in the Silhouette Industry!
Find out all the details here – June All Things Silhouette Conference.
And new this year, there is a Pre-Day event with more hands on classes!
Join us for the Ultimate ATS Package!
Here is a short video showing a glimpse of the ATS conference – I get excited every time I see it.
**This post may contain affiliate links. What that means is that I may receive compensation if you purchase through the links I have provided. The price you pay for the product or service is not higher but I may get compensated for sharing.
Grab that cardstock and an easy cut file from the Silhouette Design Store.
I used Lori Whitlock’s Sympathy Card Thinking of You – Design #258278. While the card says Sympathy, it could be used for a lot more than that. This was a pretty easy card to cut.
Open the Design and right click to ungroup the pieces.
Next, move the pieces around on the mat and place the cardstock in the same location of the mat.
To see how I did this with Oracal vinyl as well, check out this post on the Acrylic ornaments – HERE.
Tips
– I use the Reveal Mat and increase it to 100% to see the grid lines of my cutting mat, so I can line up the material in the exact location and cut it down to the size needed with my paper trimmer.
– A sticky mat is important to hold down the entire piece of cardstock so it does not move while it’s being cut. A mat that is too sticky will hold the paper too tight and make it harder to get it off after it’s cut. De-stick your mat a few times on a clean cotton t-shirt or towel. I usually use my t-shirt I have one, as that is the quickest.
A mat that is not sticky enough and the paper is not held down for a crisp cut.
– I use the textured cardstock setting for almost all cardstock and it works well. It will lightly score the mat, but that is normal as you are cutting completely through a material.
– I like the cardstock packs from Michael’s to test and play with cutting cardstock. It cuts well and is inexpensive to play around with. I do prefer to cut smooth cardstock versus textured. I just found that there was more chance for a cut to not connect with the textured – again a really sticky mat will help with this and holding that textured cardstock in place.
– Play, play, play and you will pick up tricks and tips. Even experienced users still have issues, so if you do, it is all part of the process.
Keep on trying!
And use a bit of adhesive and you are finished.
You can get as detailed in card making as you want or as simple.
**This post may contain affiliate links. What that means is that I may receive compensation if you purchase through the links I have provided. The price you pay for the product or service is not higher but I may get compensated for sharing.
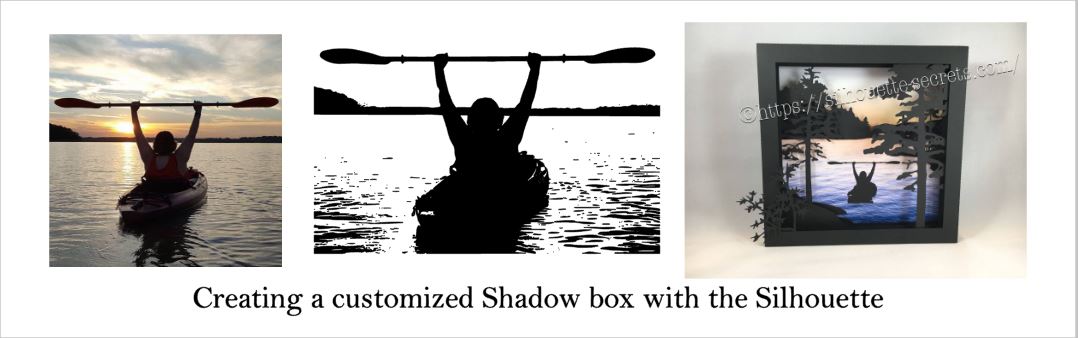
Everyone starts out with one material or another, mine was paper. I started with my Silhouette as a paper-crafter and it has grown from there.
A while back I was visiting friends in Kansas and playing with the Silhouette and my friend asked if I could trace a photo for her that a friend took.
Now, photo tracing can be tricky. Each photo can yield different results tracing in the Silhouette Studio and you just never know until you try to see what will happen.
In this case, it was a great photo to trace.
Here is how the trace came out.
I used Basic Trace panel to achieve this.
Check out the Trace Panel HERE.
Then I released the compound path and deleted the water areas and used the point editing and deleting points to clean up edges and take out the skyline.
Now, like I said above, each photo is going to vary in how it traces and this one turned out to be pretty simple with a little time for editing.
Instead of adding the canoe, I cut and added my traced image of my friend on her kayak. It was perfect!
I am one of those people who has to do a project pretty much exactly like the demo, at least the first time. So I did go to the designer’s website and purchase the file again – yes, sounds crazy – but I wanted the backgrounds for this particular project.
However, you can use any background that you want and add it to your project.
What are you creating today?
Feel free to post your project photos & questions on my Facebook group at
Silhouette Secrets+ with EllyMae.
Enjoy !
THANK YOU for your support! How can you help? Click HERE & buy a coffee.
Every little bit helps with the cost of running the site.
Looking for more in-depth, step-by-step classes, check out all of my online Silhouette classes on my Teachable site HERE.
**This post may contain affiliate links. What that means is that I may receive compensation if you purchase through the links I have provided. The price you pay for the product or service is not higher but I may get compensated for sharing.
Today we are exploring the Pop Up Panel. Did you know there was such a thing? If you have v4.1.197 or higher of the Silhouette software, then this is available to you.
This is a neat feature that you can take a design and make it pop out of base shape, such as a card.
Let’s take a look at how we can go from this
to this
First, I started with my Page Size set at 5.5″ x 8.5″ for my card base and turned it to a Portrait Orientation.
Next, I drew a 5.25″ x 8.25″ rectangle to fit inside my card base. I used the Scale Tab to get the exact dimensions I wanted for my inner rectangle.
Then, I used the Align Tool to Center the design to my Page.
Then, I pulled down a vertical Guide (blue line) from the top to line it up with the center fold line of my card at 4.25″. Guides are a Designer Edition upgrade feature and you can turn them on and off under the Page Setup Panel – Tab 2.
Now, open the design you want to use for the Pop up card.
We are now ready to take a look at the Pop Up Panel features.
Convert Selected Shapes to Popup – Select the Design and click this to create your Popup shape on your base. Lines will show up on the design at the top and towards the bottom.The bottom line is the score line for the center of the card. Match the score line up with the Guide created at 4.25″When the design is selected, a directional arrow in the center appears & that can be used to move and adjust the design and pop up features and vary the length of the design to pop out of the base.The farther down you pull the arrow, the more the features adjust.
Pull the red dots on either side of the score line out to the edges of the card, so it will score a fold line to the edge of the card.
Restore Original Shapes – This will restore the shape to the original design. This is great if you decide you don’t like it and want to start fresh.
Release Popup – This releases the design into individual cut lines, which can be used to further manipulate the design how you like it.
Each line will now become it’s own separate piece and can be moved or deleted, as you see fit.
Base Width – This will adjust the base width of the score line on the bottom edge of your design where it meets the card.Here I increased it to 57% to show you how it looks. Each design will vary in how it looks and the look you want to achieve.
Min. Strut Width – This adjusts the Popup tabs at the top of the design. As the number increases the number of tabs goes down.I increased the Min. Strut Width to 0.269″ and it changes so there are only 5 tabs at the top of my design.
Dash Pitch – Dash pitch adjusts the score line width and how far each line will cut before skipping to the next one.
And here is the final view on the Send tab before you go to cut the Popup design.
Send your design to cut and assemble the card.
This PopUp feature is amazing!
So many options & so much fun to create with.
What is the best way to learn? Play, play, play!!!
Will you make mistakes? YES! Everyone makes mistakes!
But you learn as you go!
Yes, you read that right. I used Oracal 651 vinyl on a card. This would not work with all cardstock as it will depend on the fibers of the cardstock but a high quality, smooth cardstock you should have no issues using transfer tape to apply your design.
THANK YOU for your support! How can you help? Click HERE & buy a coffee.
Every little bit helps with the cost of running the site.
Looking for more in-depth, step-by-step classes, check out all of my online Silhouette classes on my Teachable site HERE.
**This post may contain affiliate links. What that means is that I may receive compensation if you purchase through the links I have provided. The price you pay for the product or service is not higher but I may get compensated for sharing.
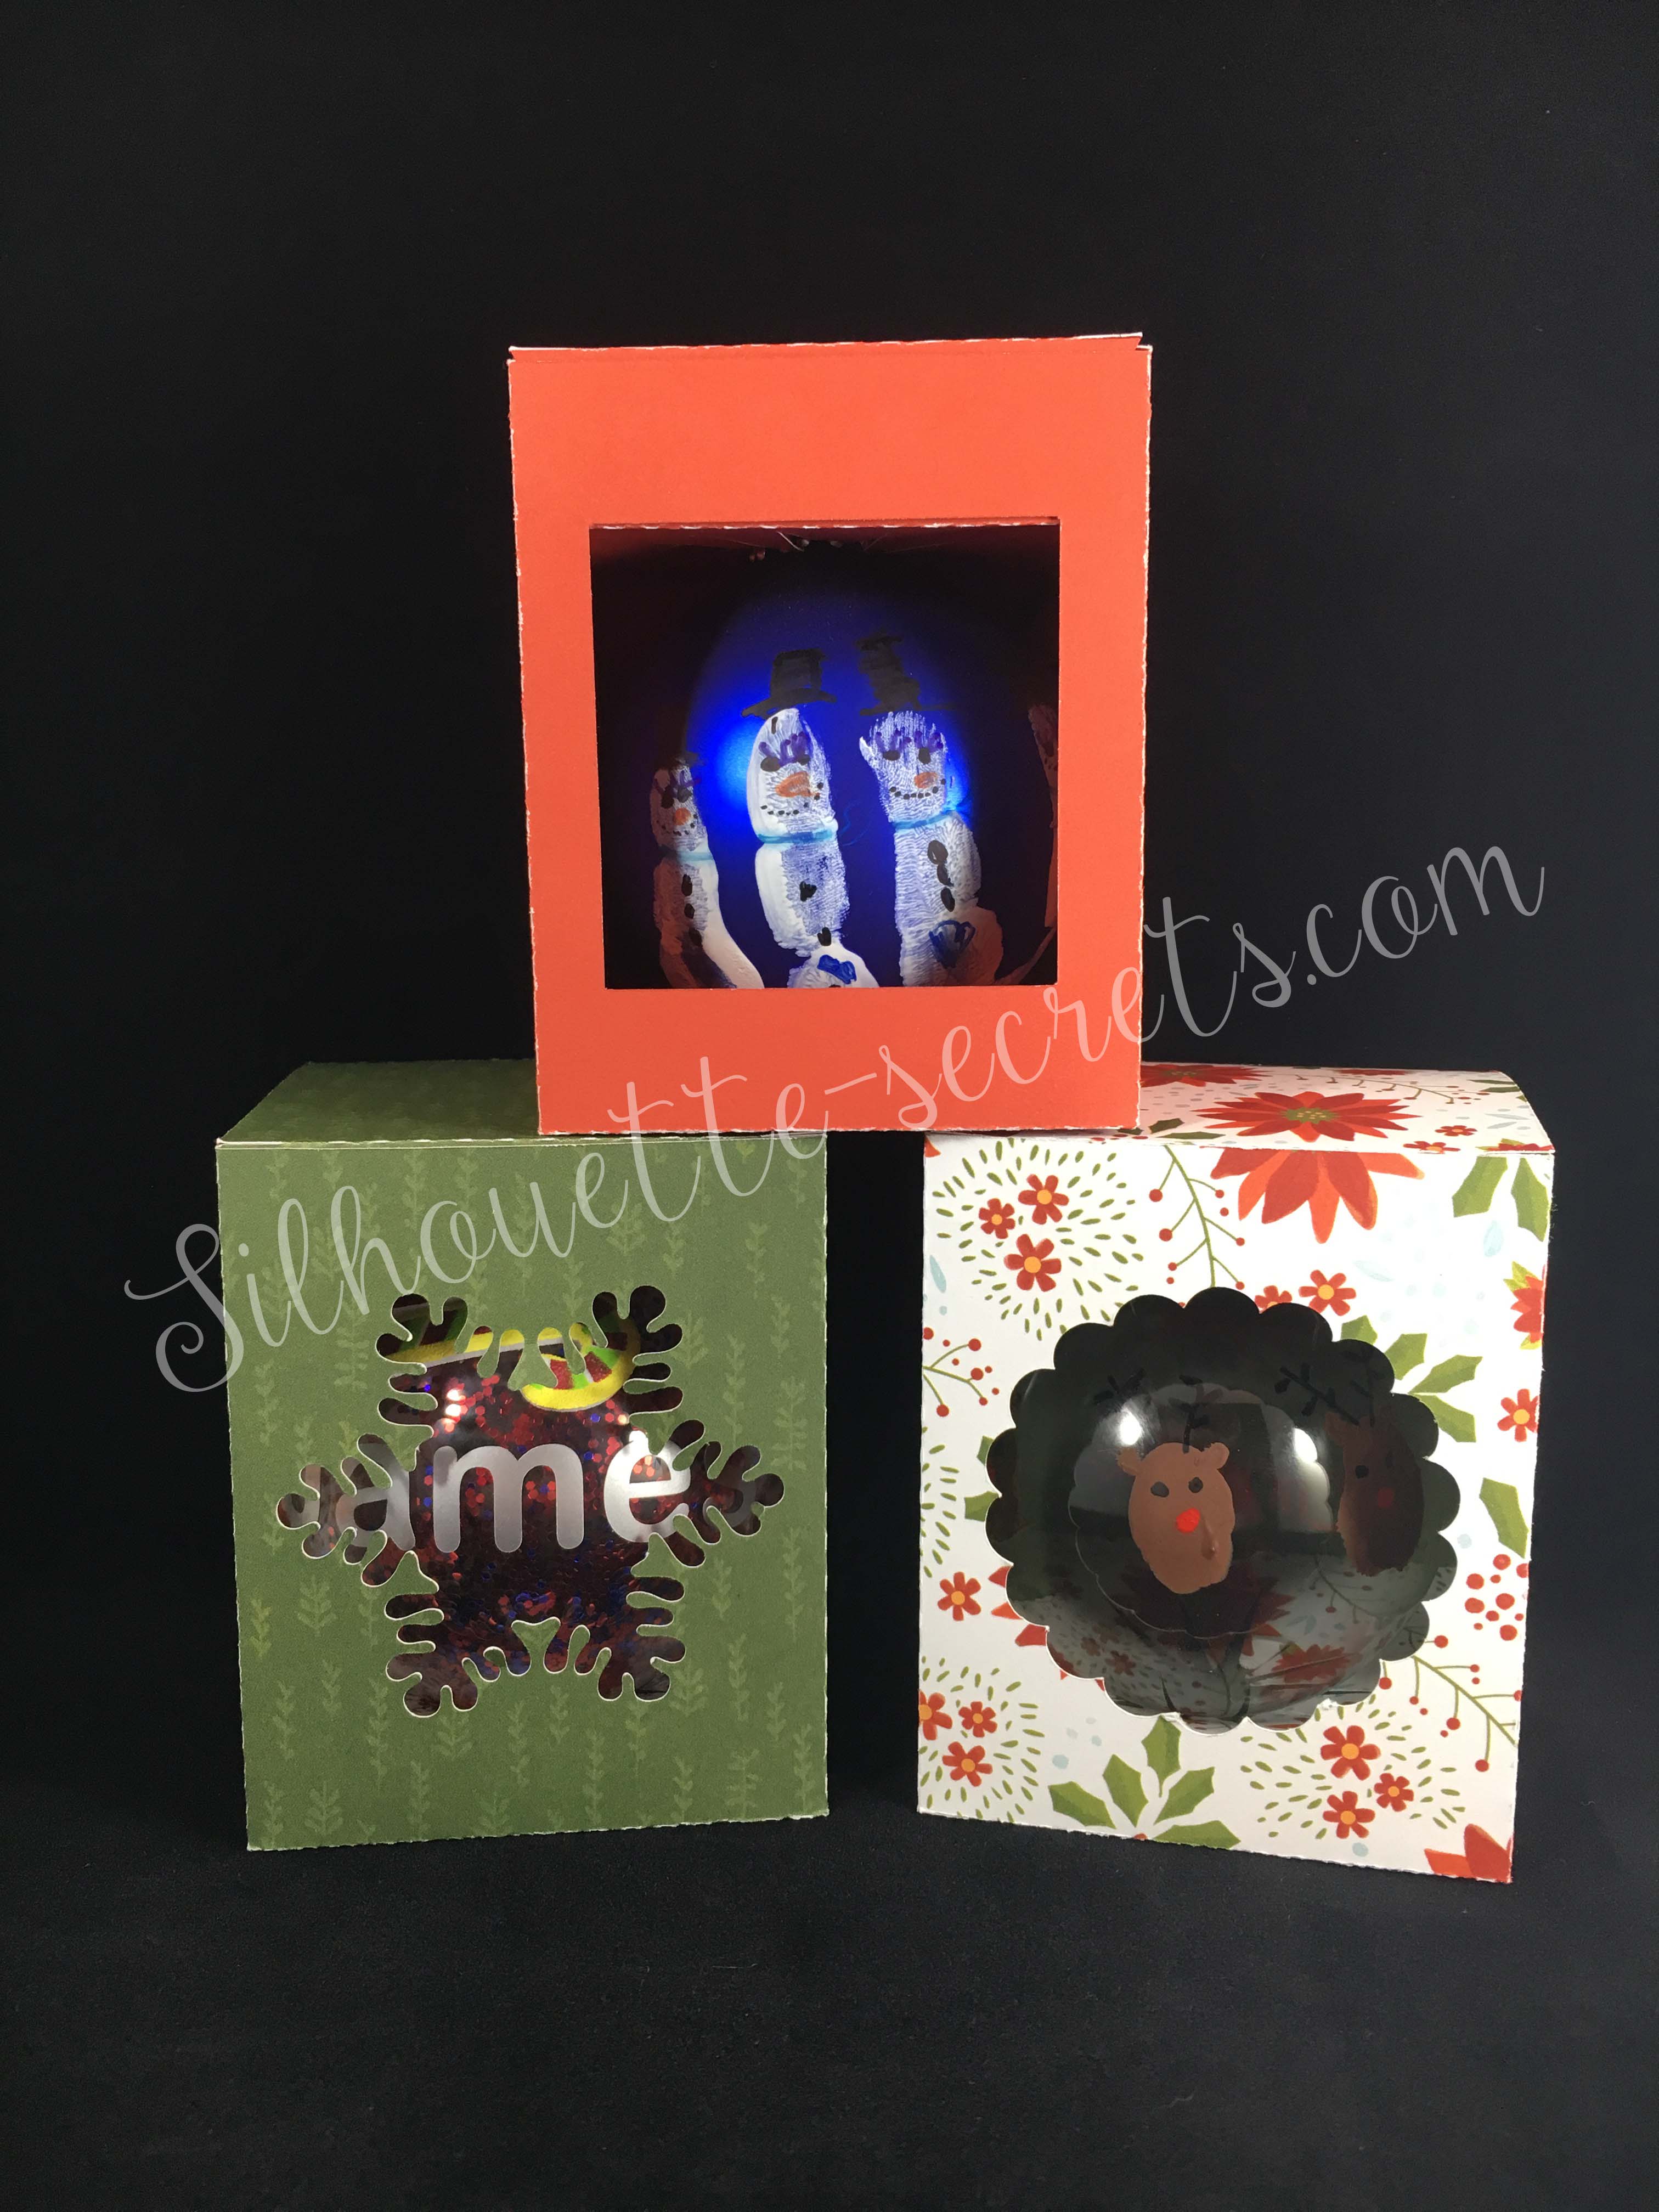
Today I took down the ornaments on our Christmas tree and as I was packing away some of the ones my children had made in school, I had a thought to use a file I purchased in the Silhouette Design store called an ornament box. So as soon as the rest of the ornaments were packed up, I headed into the Studio to create these boxes.
Now, I will say these were probably designed with the idea of using them as a gift box and not to be used as a secure storage container.
However, for my purpose I think they will be great…..
Now, what did I do….. I moved my design up a bit on my page & then go to my Send tab panel and select my Cut settings. That’s it – so simple!!!
I chose Textured cardstock as my material (I cut almost all cardstock on this setting with great results), set my blade depth and click Test Cut.
Yes, Test Cut!…. this cuts a small square with a triangle out of the center of it and let me tell you, it will save you so much material!!! If it doesn’t cut correctly, you can make adjustments to your settings or blade depth before you cut the entire design.
After you have cut your design out, flip your mat over and peel your mat away from your material. This is a good practice to get in to for many reasons. I find that it helps my paper not to curl as bad and it also helps keep the adhesive on the mat longer. If you pull your paper or vinyl off the mat, it can bring up some of that adhesive with it.
On my second box, shown on the left, I noticed that my blade was not getting a crisp cut. Normally, I would recut this, but since I’m cutting for the purpose of my own storage box, I left it. However, I knew exactly how to fix it. A new cutting mat! Yes, as easy as that. The mat I was using with the one on the left (green) was well used and even though it felt sticky enough, if that cardstock moves even just a little bit, it can make your blade tear the cardstock.
So when I went to cut my 3rd box, I pulled out a new mat and look at the difference on the right side (red). I changed nothing else, except using a new mat and it made such a better crisp cut. If you are having cutting issues and your mat is well used, even if you think it’s sticky enough, just try it – get a new mat out and see what the difference is.
I do de-stick my mat a bit when I first open it by applying it to a clean cotton t-shirt a time or two before I stick my cardstock down on it.
If you are looking for a new mat or other Silhouette supplies, check out the prices at Swing Design – I always price check there first and they usually have the best prices.
Plus, free shipping on orders over $35.
Above are all the pieces of this box….. 3 – yes 3! And do you know what is even better? There is only 1 tab that needs to be glued together. It’s so simple and a great project for a beginner.
I am a big fan of this liquid adhesive called Liquid Glass for any 3-D project. It is made by a company called Close to My Heart who is a papercraft & stamping company. I find just a little amount of the glue goes a long way and then I hold it together for the count of 10 and it’s stuck pretty good.
You can find it HERE on my website.
Ornament box
Ornament box
Now, I purchased both the Scalloped box and the Snowflake box and here are my completed boxes cut with the same double sided paper.
I used the Beary Christmas paper from the Close to My Heart Holiday Expressions catalog. This expired tonight at midnight, so grab it quick – available while supplies last!
And then I needed a 3rd box, so I decided to ungroup the original design, draw a rectangle that was the same dimensions as the snowflake and put that in for my 3rd box. This could be done with any shape that you would like to use.
You can mix and match designs to your liking, but do keep in mind that it is the original creators file that you have used as your base.
And there you have it….. 1 cut, 1 tab glued and fold the box together. So simple!
There is a big sale going on in the Silhouette Design store right now, so pop on other there to grab this and so many others for 50% off.
I hope you enjoy your last evening in 2017 and I look forward to bringing you lots of new things in 2018!
Enjoy !
THANK YOU for your support! How can you help? Click HERE & buy a coffee.
Every little bit helps with the cost of running the site.
Looking for more in-depth, step-by-step classes, check out all of my online Silhouette classes on my Teachable site HERE.
**This post may contain affiliate links. What that means is that I may receive compensation if you purchase through the links I have provided. The price you pay for the product or service is not higher but I may get compensated for sharing.
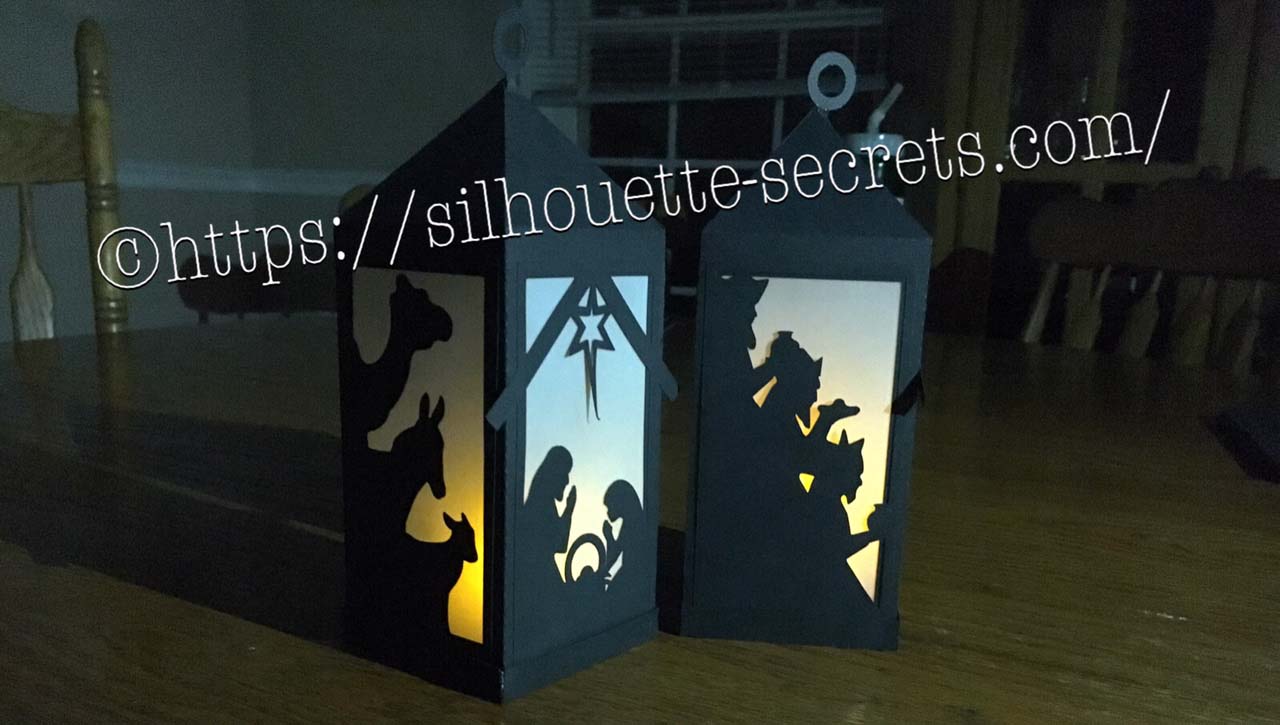
As we are all thinking of packing away that Christmas decor, I thought I would share a
3-D project I made to add to my Christmas decor this year.
I love working with paper crafts and 3-D items.
Affiliate links may be present in the following blog post and as an Amazon Associate I earn from qualifying purchases.
I have to say this file was pretty easy to work with.
When you first open this or any layered design up, it may look a bit intimidating but I promise the more you play with them, the easier it becomes to turn it into a masterpiece.
This design has 2 colors – the black for the entire 3-D box and the vellum papers for the “glass” of the lantern, so very easy to cut. First, you right click on the entire design and ungroup. This will separate all your pieces of the lantern out and you can move them around. Then, I will select the like items and group them back together. In this design, I grouped the bottom 3 rectangles back together because they will all be cut from the vellum. Then I move my other parts around on my 12 x 12 design mat to get as many to fit in the space as I can. In this case, you can move the circle hangers to the middle of your cutout, as shown below, to get a little more use out of your cardstock or position where ever you want on the mat. It is really a personal preference how much you move them around to cut. I like to get as much on one page as possible to send it through the Cameo one time.
I then choose the Textured Cardstock setting and Send to cut on my Cameo. After it’s cut, I flip my mat over and peel it away from the cardstock. This helps with the paper not curling as much, keeps the adhesive on your mat and helps it release a bit better. Your Silhouette cutting mat is very flexible and can be rolled back quite a ways. That doesn’t mean they won’t crack, because they can – yep I’ve done that… but it’s was an old mat too…. so it had a lot of miles on it.
In the Silhouette Studio, I move the pieces I’ve cut off my Design mat and then move the other pieces on to the mat to cut them. Or you can copy and paste the designs that are off the Design mat to a new Design mat and cut that way. Either way works and I use both methods depending on what I’m cutting.
Now comes the assembly. These are all scored where you need to fold and then you glue into place. I use a liquid glue called Liquid Glass by Close to My Heart for most of my 3-D projects. You place a small amount along the length of where you are gluing and then I hold for 10 seconds. As long as you didn’t use too much glue, it has a pretty good hold after that 10 seconds. And then you want to allow the entire project to dry completely before using. You work you way around the design until it is all assembled together.
The designer, Jennifer Rush, has also included a link to assembly instructions in the description of the design. You can find those instructions HERE as well.
And now, here are a couple images of the finished project….
There are so many cool projects and so little time to make them.
I encourage you to take a design for a spin. Try it out, play and learn as you go.
Now, these neat decorations will get packed away in a shoe box for safe keeping when the Christmas decor comes down this week.
I hope you enjoyed this project! Let me know what you have created below in the comments.
Enjoy !
THANK YOU for your support! How can you help? Click HERE & buy a coffee.
Every little bit helps with the cost of running the site.
Looking for more in-depth, step-by-step classes, check out all of my online Silhouette classes on my Teachable site HERE.
**This post may contain affiliate links. What that means is that I may receive compensation if you purchase through the links I have provided. The price you pay for the product or service is not higher but I may get compensated for sharing.
September happens to be my Mom’s birthday month and I wanted to make her a special card.
Affiliate links may be present in the following blog post and as an Amazon Associate I earn from qualifying purchases.
I found this Unicorn Hug Gift Card holder from the Silhouette Design store that I had acquired at some time and I thought it would be perfect. I had purchased a couple pairs of earrings from Mags Bonham at our TJC Curio Intensive Retreat last weekend and thought I could slip them inside the gift card pocket.
I created this card using the following supplies: Unicorn Hug Gift Card Holder by Jennifer Rush from the Silhouette Design Store CTMH Cardstock – White & Pixie CTMH Pink Glitter Cardstock – retired (but they have other new colors) CTMH Dual Action Glue Pen Z553 CTMH Stamp sets: Birthday Sparkles (B1537) and Happy Heart (A1192) CTMH Bitty Sparkles Z1263 CTMH Archival Black Ink, Bashful Ink, Raspberry Ink, Blossom Ink CTMH Clear Shimmer Brush Z3293
This was a very simple card to cut & put together. You can read more of the instructions on how to put it together on the designer, Jennifer Rush’s blog HERE.
This is definitely a card that I could create again!
Enjoy !
THANK YOU for your support! How can you help? Click HERE & buy a coffee.
Every little bit helps with the cost of running the site.
Looking for more in-depth, step-by-step classes, check out all of my online Silhouette classes on my Teachable site HERE.
**This post may contain affiliate links. What that means is that I may receive compensation if you purchase through the links I have provided. The price you pay for the product or service is not higher but I may get compensated for sharing.
THANK YOU for your support! How can you help? Click the link to buy a coffee. Every little bit helps in the cost of running the site.


 The bottom line is the score line for the center of the card. Match the score line up with the Guide created at 4.25″When the design is selected, a directional arrow in the center appears & that can be used to move and adjust the design and pop up features and vary the length of the design to pop out of the base.
 The farther down you pull the arrow, the more the features adjust.
 Pull the red dots on either side of the score line out to the edges of the card, so it will score a fold line to the edge of the card.

 Each line will now become it’s own separate piece and can be moved or deleted, as you see fit.
 Here I increased it to 57% to show you how it looks. Each design will vary in how it looks and the look you want to achieve.
 I increased the Min. Strut Width to 0.269″ and it changes so there are only 5 tabs at the top of my design.