When you use the drawing tools in the Silhouette Studio software, does every click of your mouse continue to draw another shape?
Did you know that you can change this behavior within the software?
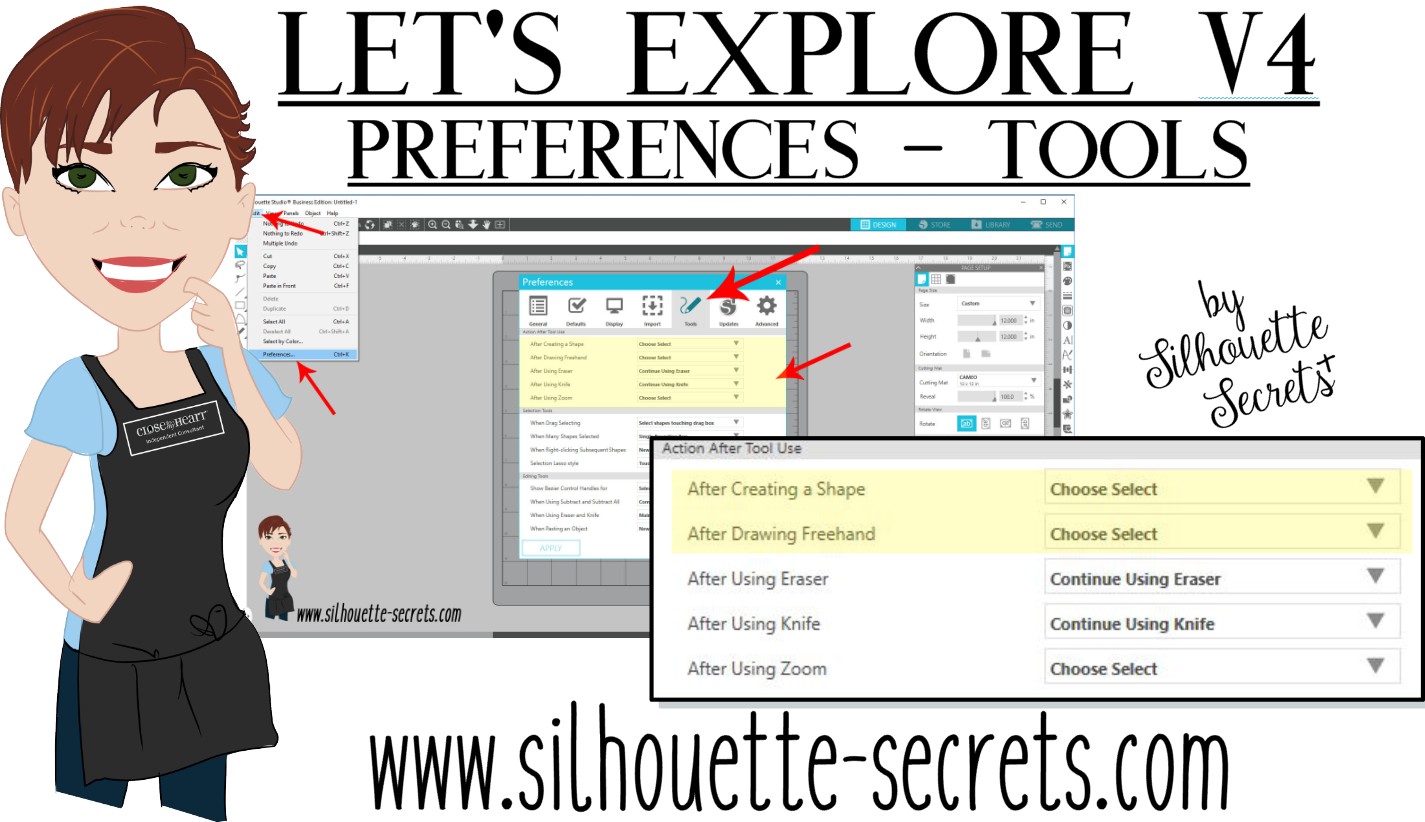
Click on the Preferences icon in the bottom right corner of the Design Tab or click on the Edit option in the top left menu & choose Preferences.
Then choose the Tools tab at the top of the Preferences window.
If the software continues to draw shapes with each click of the mouse, this preference can be found under the “Action After Tool Use” section of the Tools tab.
I change the After Creating a Shape and the After Drawing Freehand to “Choose Select” then choose Apply and Ok.
Now when you choose a Drawing Tool or the Line Drawing Tool, it will go back to the selection arrow instead of continuing to draw shapes.
Tip: I keep the Eraser and the Knife tool as “Continue Using” because typically I will continue using the eraser or knife. I have the After Using Zoom set to “Choose Select” because I don’t want each click of my mouse to keep zooming in on the design. I prefer to have my selection tool again and if I need to zoom in more, I will choose zoom again.
Sometimes these defaults can get reset in the software, but after you know what they are and how to adjust them, you can easily go in and change it to what you prefer.
Each user will have a preference on how they like to work in the software. I prefer to draw one shape and then have the selection arrow as my next option as I am rarely drawing more than 1 of an item at a time when I’m designing.
**This post may contain affiliate links. What that means is that I may receive compensation if you purchase through the links I have provided. The price you pay for the product or service is not higher but I may get compensated for sharing.
Original post written in July 2019. Updated on May 21, 2020 with the current diagram link.Updated 5/31/25.
In January 2018, I started the “Let’s Explore v4” series with the intention of breaking down each of the panels on the right side of the Silhouette v4 software and explaining the parts of them. When I started, I had no idea how far it would go and it has grown to so much more than my original thought. I have learned so much by writing these posts and exploring other tools in the software that I have never used because I get stuck in the same old routines. It is so exciting to see something come to life in the Silhouette software and I love learning new things and being able to share those.
I do feel that the software is the key no matter what Silhouette machine you have. If you learn how to do something in the software, you can apply that to so many other projects that you create.
Today, I want to share a free PDF chart I created that maps out the Design tab of the Silhouette Studio v4 software.
Click HERE or on the image above to download this PDF diagram.
This can either be printed as a reference guide or opened on a computer. When the file is opened on a computer with a PDF viewer, all of the blue titles have been linked to the blog post in the Let’s Explore v4 series that it corresponds with it.
I have had such great feedback on this series and I hope that it has helped you learn a little bit more about this powerful software by Silhouette!
Now, keep in mind that Silhouette is always adding new things into the software and I think this is awesome! What that means is that this chart is good for today and for users who are using a version of the Silhouette software that contain these features.
Just like many things in life, things change. Change can be hard for most of us, but it can also be good. I will update this free PDF with future changes, once I know those changes will be sticking around.
If you are not using the Silhouette Studio v4.2 software yet, I would highly encourage you to do so. You can download the current version of the software direct from the Silhouette America website HERE. I am using v4.2.279, which can be found under the Legacy section and it is what I’d recommend today. As always with any software, they may be a “bug” or two in it. This happens with all software programs. There are 2 that are known in this version 4.2.279 I am recommending, but they are more just annoyances than anything. I explain those “bugs” and how you can work with them in this post – Let’s Explore v4 – Bugs.
And if you are considering updating or even if you are not, it is always a good time to backup the Silhouette library if you store personal files there – for more tips on the Silhouette Library prior to version 4.2 check out this post – Silhouette Library Tips.
While you are exporting a backup, don’t forget to export your custom cut settings if you have those in the Silhouette software too! This is an awesome feature.
Check out how to do that in this post – Add Cut Settings & Export.
Don’t forget to grab the free PDF diagram of the Design Tab in the Silhouette Studio v4 software and save it some place safe on your computer to refer back to when needed.
I’d love to hear your feedback or suggestions for things you would like to see in the future!
Enjoy !
THANK YOU for your support! How can you help? Click HERE & buy a coffee. Every little bit helps with the cost of running the site.
Silhouette Classes
Never stop learning! Let me help you take the anxiety out of learning with Silhouette and get to creating faster! My Silhouette classes are heavily focused on software, so you can take the skills & techniques taught and apply them to many future projects!
**This post may contain affiliate links. What that means is that I may receive compensation if you purchase through the links I have provided. The price you pay for the product or service is not higher but I may get compensated for sharing.
Let’s talk software. The Silhouette Studio program is a software program that is installed directly on your computer.
What is software? Well, the most basic answer I can use to describe it is, it is code put together in a pattern that tells it what to do. We don’t see this side of things and I know I wouldn’t understand any of it if I did. It is numbers and letters arranged in a particular pattern to create what we see on the screen.
The Silhouette software has grown over the past 10 years from a basic cutting software to a powerful graphics program that can do much more than just send a design to be cut on a Silhouette machine.
Silhouette America puts out software updates on a regular basis. These updates are free of charge and are either released to correct a bug (coding) or to release new features in the software.
Recently (2019), the version 4.2 was released and this has many new features added into it such as flexi-shapes, color fonts, library updates, lasso selection, warp templates, puzzle generator, and more. But, any time a new feature is added it changes the “code” of the program. This is true for all software related devices – Iphones, Ipads, android devices, Silhouette Studio, etc.
There is a Silhouette Beta team, which I am a member of, and this team tests updates as they are created. At any point and time, there may be 1 or more Closed Beta versions that are released to us to test. Testers download and use these current “test” versions and report back on any unusual things we experience. There may also be a Public Beta version on the website, that any user can download and use. However, I do only suggest an experienced user download the Beta version as it is still in testing and may have unknown bugs in it.
There are many, many factors that play into how the software will react for a user. And even though the version is tested within the Beta group and Silhouette’s staff, there may still be things that pop up after it is released to the general public. This can be for many reasons, but the number 1 reason I see is that no user’s computer is the same as the next person. Some of us have computers built for multiple graphic program use, while others are built for surfing the internet. That means that a software program may react differently for one user vs the next.
And then you throw in another big factor – the big computer companies also have updates to their operating systems. And they don’t let anyone know prior to releasing the update what they are going to change. In this day and age, you may not even have a choice on whether to accept these updates to the Operating System or not, it just happens. You close your computer one night and then next morning open it back up and are faced with that spinning wheel that says, “Please wait while updates are installing.”
Now, I say all that to give you a little back story on my view of software updates as a Silhouette Studio user and Terri Johnson Creates Licensed Silhouette Instructor. I troubleshoot a lot on Facebook and when teaching classes at events, so I see a lot of things pop up. Not all the issues that come up can be blamed on the software.
Today, I’m going to touch on 2 “bugs” in the software that we experienced in my classes at the All Things Silhouette Conference this past weekend. I say “bugs” because they are not detrimental bugs but are changes that a user can still work with once they know why it is happening.
Today we will discuss 2 of the things that I saw during my classes – edit points & multiple machines recognized.
Both of these are workable “bugs” once you understand that they are happening.
Edit points
Edit points are the data points of a design that the software recognizes and relays to the Silhouette machine to make the cut happen.
For a more information on edit points and working with them check out this blog post HERE.
The typical behavior is if you double click on a design, they will appear. However, in the current public versions of the Silhouette software, they are more sensitive and like to come out to play much easier – sometimes with a single click of the mouse button. And sometimes they do not necessarily show up on the screen as the dots, especially if a design is grouped together.
There are a few ways you can tell if the object has entered point edit mode.
The first would be that the gray edit points appear on the edge of the design.
The next way to tell if the Edit points have come out to play is if you can see the Edit Points options in the top left corner of the QAT (Quick Access Toolbar) or if the Edit Points Panel opens on the right side. There may be times that you may not see the gray dots of the edit points so at first glance, you may not know that’s what happened, but check to see if the Point Edit mode panels come up.
So, what do you do if this happens? First, try not to get frustrated as that doesn’t make those little guys go away.
Two things you can do – click off the object and try to select it again or right click to bring up the menu and choose “Exit Point Edit Mode”.
Knowing why it is happening, what causes it to happen and how to get out of it – I believe helps with understanding how to work with it.
And of course, when you want to recreate the issue to show someone or demonstrate in class, those little guys keep on hiding. But, they love to come out to play when you aren’t try to get them to do it on purpose. I find this happens often when I find something I think might be a bug in the software & I try to recreate it to bring to the Beta teams attention – and it just laughs at me.
Multiple Machines Recognized
Now, this “bug” may not affect users as much as it did for those in attendance at the All Things Silhouette Conference, but you may notice that the software is now scanning continually for machines nearby.
On the Send tab in the top right corner, at the bottom right of the page is a machine icon. By selecting this icon you can switch between Silhouette machines, which is a Business Edition feature, or if the software is picking up multiple machines, you can choose the one that shows “Available”.
With the current Silhouette Studio v4 software, it is continually scanning and will pick up some other machines nearby. Sometimes, it may even recognize the same machine, but think it’s a new one that’s plugged in. We had both situations happen during class at the June 2019 All Things Silhouette Conference.
The good news on this is the connection between the Silhouette software is getting much stronger and it’s picking up more now. However, I did see more issues with a MAC vs a PC in class. Now, as a home user you may not have any issues with it picking up and placing more machine names in the machine list. But, if you are at an event or just returned from the All Things Silhouette Conference, you may see that you have a lot. The most that I saw on a users computer was 62. While we figured it out during class (Thank you to my Silhouette America staff helpers – Jesse & Ben!), it can still be there when you get home.
The Silhouette America website has a fix for this. While these are the instructions for a “Crash on initializing”, they are also the same instructions for many other issues & can clear out a lot of things that will help the software run a bit smoother as well.
On the other side of it, this operation does wipe out any Custom cut settings (User Defined Settings), so it is best to export those before you proceed. Check out this post on how to Export the User Defined Settings – HERE. It also will reset some of the Preferences to factory defaults, so keep that in mind. The Preferences in the software can be adjusted and which option you choose is a personal preference. But, we will get to that part in a bit.
Once you have exported those User Defined Settings, then you can proceed to clearing out the machine history.
These instructions are direct from the Silhouette America website HERE and I have verified these with Silhouette support.
Since I know that some are visual learners, I have created a video going through the steps of both exporting the User Defined Settings and Clearing out the Silhouette Studio software preferences.
Here are the written instructions from the Silhouette America website, if you are showing multiple machines in the Silhouette software and want to clear those out do the following:
“Please do the following to clear your Silhouette Studio software preferences. Please note that this procedure will result in the removal of user generated cut settings (blade/thickness/speed settings) and user option selections:
On a Mac:
Close the Silhouette Studio software
Open the Finder
Press CMD+SHIFT+G
Type in ~/Library/Preferences
Press Return
Delete the Folder com.aspexsoftware.Silhouette_Studio
Empty the Trash
Re-open the Silhouette Studio Software
On a PC:
Close the Silhouette Studio software
Press the Windows key (lower left, between CTRL and ALT) and the R key on your keyboard simultaneously
Type in %appdata%
Press Enter
Delete the Folder com.aspexsoftware.Silhouette_Studio
Empty the Recycle Bin
Re-open the Silhouette Studio software”
Now, the next step. Once you have cleared out all of the Silhouette Studio software preferences, there may be a few things that you want to go in and change back in the Preferences Panel.
While a few of these Preferences are personal preference, there are also a couple that will help the software run better if you do not need them.
The Preferences panel can be found under the Edit menu in the top left corner or by clicking on the gear icon in the bottom right corner of the Design tab.
Under the Preferences Panel, click on the Defaults tab at the top.
I choose to have the Default Fill Style as Outline Only and the Cut to Edge of Page checked. These are personal preferences only.
Under the Tools tab in the Preferences Panel, I change it to “Choose Select” on After Creating a Shape, After Drawing Freehand & After Using Zoom.
Next, click on the Advanced tab at the top of the Preferences Panel.
These are 2 options that will help the software run smoother by decreasing the data that is saved with each file. It does not affect the design but does affect how large the file is.
Change the Packet Size to 500
Uncheck the “Include Cut Data” – this is only needed if you are saving to a USB stick and want to use the USB stick directly in the Silhouette machine to cut the design with.
I hope this helps explain a little bit about the Silhouette software and how to work with some of these “bugs” that are showing in v4.2. As I said above, I don’t really find them to detrimental bugs, but things that can be worked with once you understand that they are there.
**This post may contain affiliate links. What that means is that I may receive compensation if you purchase through the links I have provided. The price you pay for the product or service is not higher but I may get compensated for sharing.
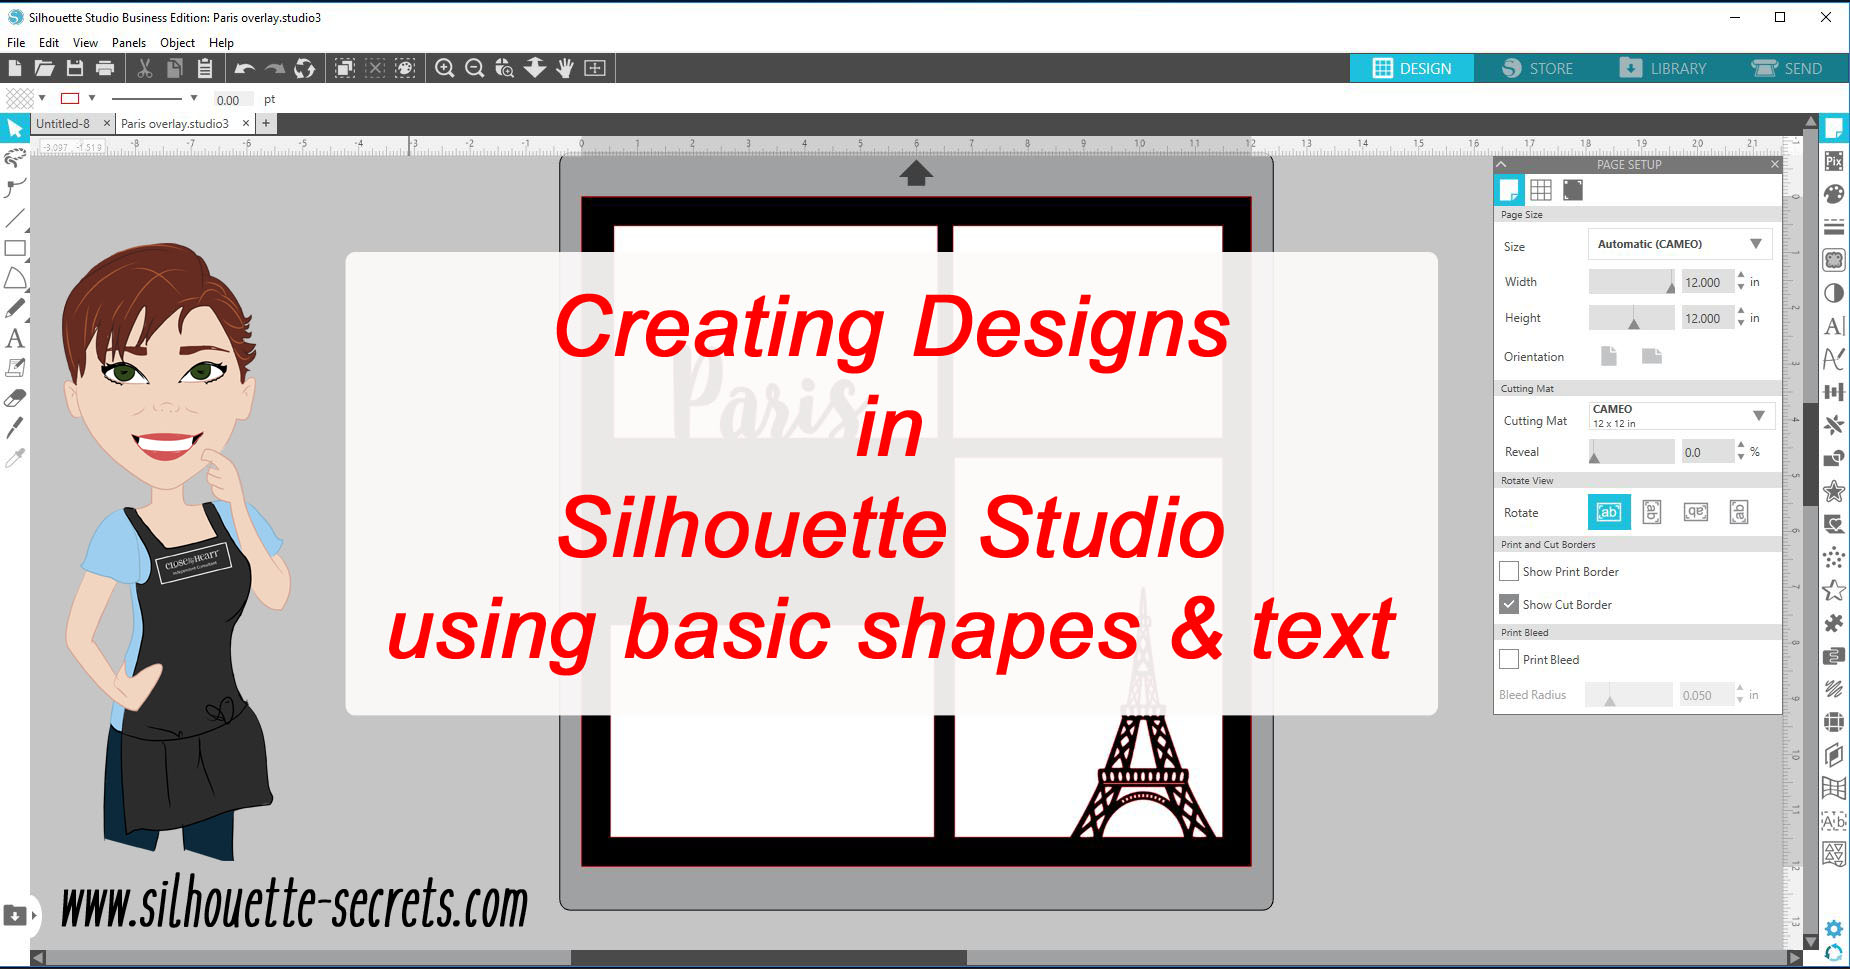
This week let’s take a look at how to create your own design in the Silhouette Studio software using basic shapes and text.
We will create an overlay that could be cut out of cardstock or other materials. I most often see these at trade shows cut by big, fancy laser cutters.
But, why can’t you create your own?
You can!
With just a few basic shapes and tools, you can open up so many doors.
Let’s Explore how to create this overlay in the Silhouette Studio v4.
Start by drawing a square using the Draw a Rectangle Tool on the left side.
To draw a perfect rectangle, hold down the Shift key while drawing the shape.
Do not worry about drawing an exact rectangle dimension.
Use the Scale Tab (2nd tab) located under the Transform Panel on the right side, click on the lock to lock the Aspect so that the dimensions of the object change proportionally. Then type 12 inches in the width and hit enter.
Since the lock was closed, the height will automatically change keeping the proportion of the design.
Select the Square by clicking on it and then choose the Center to Page option. This is found in the QAT (Quick Access Toolbar) or under the Transform Panel – Align Tab.
Now, draw 2 more rectangles and resize them using the Transform Panel – Scale Tab to 3.8″ x 5.8″ and 4.8″ x 6.8″.
These are the sizes for a 4″ x 6″ and 5″ x 7″ photo, the overlay will overlap the photos by just a little bit when it sits on top of it.
Make a copy of the 3.8″ x 5.8″ rectangle and move it to the bottom left side.
My favorite way to make a copy is to hold down the Alt key and drag a copy off of the design.
Make another copy of the 3.8 x 5.8″ rectangle and move it to the top right corner. Resize this rectangle using the Scale Tab to 3.8″ x 5.8″.
Next, use the Transform Panel – Align Tab to align the rectangles.
Select the top right and bottom right rectangles, choose Align Right.
Select the top left and top right rectangles, choose Align Top.
Select the top left and bottom left rectangles, choose Align Left.
Select the bottom left and bottom right rectangles, choose Align Bottom.
For the next step, select all the rectangles including the 12″ x 12″ rectangle.
To select everything on the page, left click and drag the cursor across all the objects or on the keyboard hold down the Ctrl + A buttons.
With all the rectangles selected, click on the Fill Color Panel and fill it with black.
Now, what you have created is 4 rectangles on top of the 12″ x 12″ rectangle.
We are going to take those 5 separate objects and combine them into 1 object by making a compound path.
With all 5 rectangles selected, right click and choose Make Compound Path.
This combines those 5 objects into 1 layer.
Check out this post on Compound Paths for more information.
With those basic shapes you have created the overlay base.
You can create any combination of layouts you want using any shapes you want for the overlay.
Now, let’s add a few more things to this.
Click on the Text Tool on the left side, then click on the design mat to get a text cursor and type “Paris”.
Click off of the text to deselect it and then back on it once to select it.
Open the Fill Color Panel and fill the text with black.
Then open the Text Style Panel on the right side and choose the Text Style you prefer.
Each text style you choose may be different. I chose LW Kaylee’s Script by Lori Whitlock. Resize the text to your liking.
Because of the slight angle of the text from left to right, I also rotated the text to sit straighter on the frame. This is a personal preference and each user may vary in what they like.
Move the Paris text so it overlaps the bottom section on the top left rectangle.
Next, let’s add one more element to this. I have an Eiffel tower image from the Silhouette Design Store by Samantha Walker – Design #41675.
From the Silhouette library, double click on the image and it will add to the design mat.
If it does not and opens onto another design mat, either copy and paste it to the previous work space or go back into the library and right click and choose Merge.
Click on the Eiffel tower to select it, then using the Fill Color Panel, fill it with black.
Then resize it to your liking and place it in the bottom left rectangle overlapping at the bottom.
And now the final step. Select the overlay background, the Paris text and the Eiffel tower design and right click and choose Weld.
Keep in mind that once you weld or change text in any way, it is no longer editable text, so you might want to make a copy or use the Sticky Note feature to make yourself a note on the Text Style used. For more information on Text tips, check out this post HERE.
And we have now used basic shapes, text and a design to create a overlay.
Click on the Send tab and it will show us how this will cut. It will all cut as 1 piece except the dot of the i, since it was not overlapping any other piece, it does not weld to the frame.
What will you create today?
Check out the video of creating this overlay here:
**This post may contain affiliate links. What that means is that I may receive compensation if you purchase through the links I have provided. The price you pay for the product or service is not higher but I may get compensated for sharing.
I see many questions regarding .svg files come up across the Silhouette world, so let’s take a look at it.
What is a svg file?
A .svg is a Scalable Vector Graphic.
But what does that mean to a Silhouette user?
It is a cut file that you can resize without losing image quality.
How is it different than a file from the Silhouette Design Store?
Silhouette design store files (.studio or .studio3) files are a proprietary file that can be found in the Design store and downloaded direct to your Silhouette library. These files should be ready to cut when you open them.
These are the easiest files to open and cut as a new beginner with the Silhouette and what I would recommend a new user starts with.
As with any file, it is dependent on how the designer saved the file.
The Silhouette Design store does have an option to purchase the .svg file in addition to the .studio file, however, it is not needed unless you are using it outside of the Silhouette software.
An .svg file is a common cut file and can be opened in many programs.
How to Open a .svg file in Silhouette Studio
In order to open a .svg file in the Silhouette Studio software it requires a Silhouette software upgrade of Designer Edition or higher. I highly suggest at least the Designer Edition upgrade, it is a great investment and will save you time & headache in workarounds.
With a software upgrade to Designer Edition or higher, it unlocks additional features in the software.
For a list of those features unlocked with each upgrade check out this chart from Silhouette America HERE.
Click on the video camera icon for a brief demo of each feature.
After you purchase the upgrade and receive the code, enter it under Help > Upgrade in the software and it will be active.
As you can see in this photo, my Upgrade option is grayed out because I have the highest level of Business Edition. This will show at the top of the software or under Help > About Silhouette (PC) or About Silhouette (MAC).
Extracting a downloaded folder
The first step to opening a .svg is to download the file from the source. Most files will come in a zipped (compressed) folder and this will need to be unzipped/extracted first. This will depend on your computer system but for me on a Windows PC, I right click on the folder and choose Extract All. Or select the file by clicking on it once and choose the Extract button at the top of the folder.
You can tell this is a compressed folder because it says at the top of the window and has a zipper on the file icon.
You will not be able to access the full design files unless the folder is unzipped/extracted.
Once you click the Extract All button, it will give you the options to choose where to save the Extracted file to. Select where and then click Extract.
Now, the folder can be fully accessed.
Opening a .svg file in Silhouette Studio
Now that the downloaded file is fully accessible, it can be opened in Silhouette Studio. Again keep in mind, that you must have the Designer Edition upgrade or higher in order to open a .svg file in the Silhouette software.
As with a lot of the tools and features, there are several ways you can open files in the Silhouette software.
1. Using the menu options.
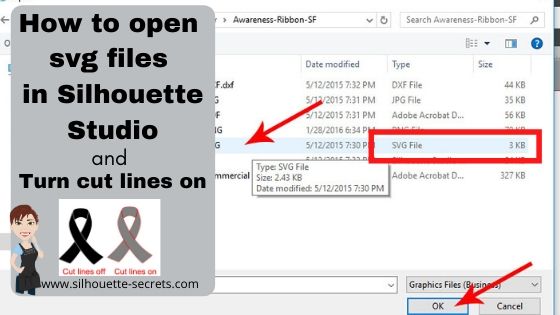
In the top left corner, choose File and then Open.
Then choose where the file is located and click OK. Or double click on the file and it should open in the Silhouette software.
2. Drag and drop the file from the Computer folder.
With the Silhouette software open on the Design tab, open the My Computer folder where the file is saved.
Now grab the .svg file by left clicking the mouse and holding the mouse button down, then drag the file on to the design mat of the Silhouette software.
The design will show up on the Silhouette work space where you drag it to.
3. Double click the .svg file to open directly in the Silhouette software.
The computer will use the default program to open any file type when you double click it.
What does this mean?
You will most likely have to change the default program that the computer uses to open .svg files with a double click.
When an .svg file is downloaded, the icon shown next to the file name will most likely be a web browser icon such as Internet Explorer or other. This means that the computer is set to open a .svg file with a web browser. But, you can change that.
Changing the default program for .svg files on Windows
Right click on the .svg file name and choose Properties.
Under the General Properties tab, next to the “Opens with” section, click on Change.
Now, find the Silhouette program and choose it as the default. Scroll down to the bottom and choose More Apps if you do not see it in the list.
You may need to keep clicking to look further on the computer programs.
Once you find the Silhouette Program keep on clicking into the folder, then choose Silhouette Studio for the default to open .svg files.
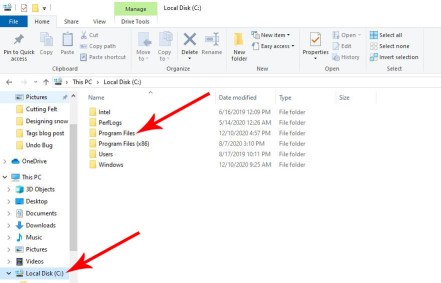
The Silhouette software will be found under the C: Program Data (x86) if you are using a software version older than v4.3. For all v4.3 and higher versions, the software is found under C: Program Data.
Once you have set the default to use the Silhouette software to open a .svg file, then you will see the icon next to the file name change to the Silhouette icon.
And when you double click on that file, it will then open up in the Silhouette software.
Another tip here is that you can change how a .svg file opens in the Silhouette software. The choices are As Is, Centered, or Fit to Page. You will find these options under the Import tab in the Preferences.
I have mine set to open Centered, meaning that the .svg image will be centered on the design mat.
MAC users: On a Mac – right click on any SVG file, then click on Get Info. In the popup window, near the bottom, you’ll see where it says “Open With”. Click on that and you’ll see a list of programs. Click on “Other” to open the Applications folder, where you’ll be able to select your Silhouette program. If Silhouette Studio is greyed out, make sure you have “All Applications” enabled. There is also an option in the Get Info window to make the selected application (in this case, Silhouette Studio) open all file types with the same extension as the one selected (which would mean all SVGs in this example).
Thanks to my colleague Lycia Evanoff with Caught By Design for this MAC information.
Now, once the .svg file is open in the software there is one more thing you will need to do before it will cut.
Turn on the cut lines.
The .svg files open in the software with the cut lines defaulted to off.
How to turn the cut lines on.
1 – Select the image by clicking on it.
You will know that it is selected by the gray box showing around the object.
2 – In the top right corner of the Silhouette software, choose the Send tab.
You will notice that the design is selected and “No Cut” is highlighted on the right. This is because the default for a .svg file is the cut lines are off.
3 – Choose Cut and the bold red cut lines should turn on.
Two key things to note here are:
The Design must be selected in order to turn the cut lines on. If nothing is selected, choosing the Cut option will not turn anything on.
It must be the .svg file that you opened. Other file types such as .jpeg or .png files are not cut files and will not have cut lines around the object. Most often you will only see the outer edge of a jpeg or png file turn on and show a rectangle.
There are so many great cut files out there and from many locations. The file that I used as an example today is from SoFontsy that has 100% Commercial Use friendly designs.
Keep in mind that with any file you acquire, it is dependent on how the designer designed and saved it.
Hope that helps explain a very common question I see all the time.
Save this for future reference by pinning the image below.
**This post may contain affiliate links. What that means is that I may receive compensation if you purchase through the links I have provided. The price you pay for the product or service is not higher but I may get compensated for sharing.
Everyone starts out with one material or another, mine was paper. I started with my Silhouette as a paper-crafter and it has grown from there.
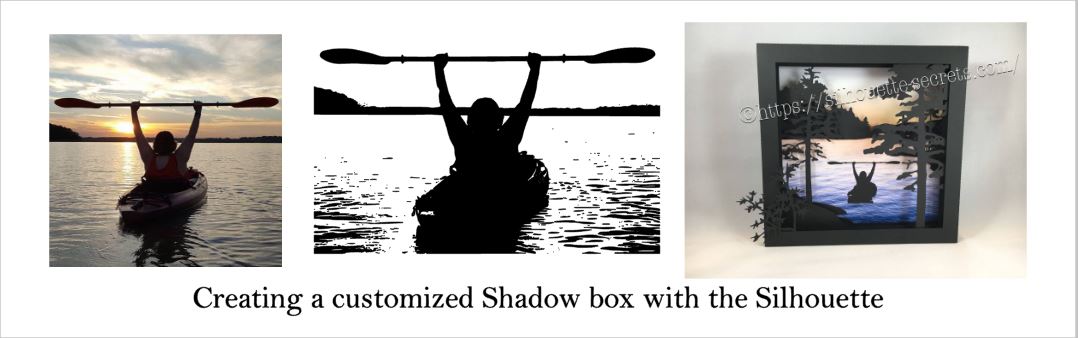
A while back I was visiting friends in Kansas and playing with the Silhouette and my friend asked if I could trace a photo for her that a friend took.
Now, photo tracing can be tricky. Each photo can yield different results tracing in the Silhouette Studio and you just never know until you try to see what will happen.
In this case, it was a great photo to trace.
Here is how the trace came out.
I used Basic Trace panel to achieve this.
Check out the Trace Panel HERE.
Then I released the compound path and deleted the water areas and used the point editing and deleting points to clean up edges and take out the skyline.
Now, like I said above, each photo is going to vary in how it traces and this one turned out to be pretty simple with a little time for editing.
Instead of adding the canoe, I cut and added my traced image of my friend on her kayak. It was perfect!
I am one of those people who has to do a project pretty much exactly like the demo, at least the first time. So I did go to the designer’s website and purchase the file again – yes, sounds crazy – but I wanted the backgrounds for this particular project.
However, you can use any background that you want and add it to your project.
What are you creating today?
Feel free to post your project photos & questions on my Facebook group at
Silhouette Secrets+ with EllyMae.
Enjoy !
THANK YOU for your support! How can you help? Click HERE & buy a coffee.
Every little bit helps with the cost of running the site.
Looking for more in-depth, step-by-step classes, check out all of my online Silhouette classes on my Teachable site HERE.
**This post may contain affiliate links. What that means is that I may receive compensation if you purchase through the links I have provided. The price you pay for the product or service is not higher but I may get compensated for sharing.
There are so many things that the Silhouette Studio program can do. It is really an amazing program and I hope that you have learned something throughout the series. There is still so much more to explore!
Please let me know what is one thing you have learned that you did not know before by leaving a comment here or on my Facebook group.
Enjoy !
THANK YOU for your support! How can you help? Click HERE & buy a coffee.
Every little bit helps with the cost of running the site.
Looking for more in-depth, step-by-step classes, check out all of my online Silhouette classes on my Teachable site HERE.
**This post may contain affiliate links. What that means is that I may receive compensation if you purchase through the links I have provided. The price you pay for the product or service is not higher but I may get compensated for sharing.
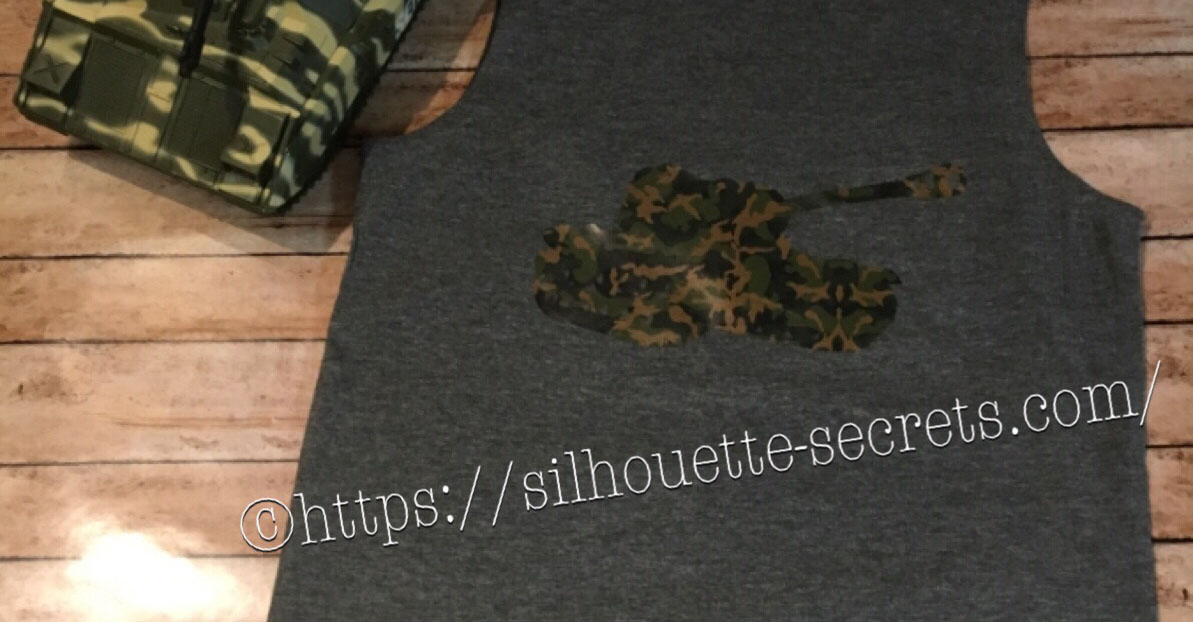
I created this shirt for my son to wear on vacation. He is all about Army and tanks at 6 years old and picked out this Military Set by Studio Ilustrado – Design #83790 in the Silhouette Design Store.
When this file is opened there are multiple designs so I had to right click on it then chose ungroup and deleted the designs I did not want.
THANK YOU for your support! How can you help? Click HERE & buy a coffee.
Every little bit helps with the cost of running the site.
Looking for more in-depth, step-by-step classes, check out all of my online Silhouette classes on my Teachable site HERE.
**This post may contain affiliate links. What that means is that I may receive compensation if you purchase through the links I have provided. The price you pay for the product or service is not higher but I may get compensated for sharing.
I am a big Pinterest lover. I pin a lot of things of all categories and sometimes just sit and pin ideas for hours. I find it relaxing. Do I make all the pins I save?
No – but I have made quite a few.
Check out my Pinterest boards HERE and maybe you’ll get some ideas.
My son was looking for something to put on a shirt and he found one he really liked. I realized I could re-create it with designs from the Silhouette Design Store. My son loves Legos. He will wake up and create something before his eyes are fully opened. And he is good! I have to have directions to follow to make something and that goes for anything – I just don’t have that engineering mind. He can just imagine something and then create it out of Legos. It’s amazing and love that at 6 years old, he is doing that.
While creating this shirt, I used many of the features we have already reviewed in the “Let’s Explore v4” series. Watch for links throughout this post that will explain more about each function I used in designing the shirt.
You can find more information on Compound Paths HERE.
I like to fill all my designs with color as it makes it easier to work with the design and you can see it better. Check out more information on the Fill Color Panel HERE.
Next, I took the drawing tools on the left side and drew a rounded rectangle.
Then I right clicked on the rectangle and chose “Convert to Path”.
This will set the design as a solid rectangle. Before convert to path is chosen, the red dots can still be moved in the top left corner and this will change the angle of the rounded rectangle corners.
Now, make an offset of the rounded rectangle. Find more information on creating an Offset HERE.
Then select both rectangles, right click and choose “Make Compound Path“. Then fill with color and now there is a rectangle outline.
Then the rectangle can be replicated 2 more times for design. Check out more information on the Replicate Panel HERE.
I accessed the Dingbat font in the Text Style Panel under the Glyphs panel and double clicked on the character I wanted.
For more information on accessing glyphs directly in the software click HERE.
Then I right clicked and chose “Release Compound Path“, deleted the spoon, moved the fork to the right side, selected both and grouped them back together.
Now I have all my designs and just need to resize them to fit inside the rectangles.
Now that the designs are sized how I like, I can use the Transform Panel – Align tools to make sure they are centered and the spacing between each section is the same.
Check out more information on using the Align tools HERE.
Once I have everything centered and aligned how I want it, I select it all and then Group it together, so it moves as one object.
Then I right clicked on the design and chose “Flip Horizontal”, since I am cutting this from Heat Transfer Vinyl. I prefer to flip the image myself and then tell the software to “Send As Is” when it gives me the pop up after clicking on Send, so there is no issue with it flipping it to the wrong side of my mat.
And now you are ready to send this to cut after making sure you blade is installed right and choosing the correct material.
My son loved his shirt and I loved creating it by combining several designs.
Are you not finding the exact design that you envision for a project?
Why not create your own?
Combine designs that you buy, create your own or a combination of both.
THANK YOU for your support! How can you help? Click HERE & buy a coffee.
Every little bit helps with the cost of running the site.
Looking for more in-depth, step-by-step classes, check out all of my online Silhouette classes on my Teachable site HERE.
**This post may contain affiliate links. What that means is that I may receive compensation if you purchase through the links I have provided. The price you pay for the product or service is not higher but I may get compensated for sharing.
Affiliate links may be present in the following blog post and as an Amazon Associate, I earn from qualifying purchases.
Let’s Explore v4 Tutorial– Nesting Panel in Silhouette
If you have the Designer Edition upgrade to the Silhouette Studio, the Nesting Tool is available in the software.
This feature allows you to “nest” the design together to either conserve material or create a new design.
Let’s Explore the Nesting Panel.
Set Selected Shape as Boundary – Select a shape to be the nesting boundaries. Make copies of the design across the page, then draw a rectangle.
Select the rectangle and choose Set Selected Shape as Boundary.
The rectangle turned blue and is now the nesting boundary. Then select all the designs and choose Nest.
.
It will nest the design within that shape.
Use Cut Area or Use Selected – With a shape selected as a boundary, the “Use Selected” option is checked.
If the entire page size is being used, then the “Use Cut Area” is checked.
Only Shapes on Media – Choose whether you want to include all the designs that are on the design page, no matter where they are, such as the holding area or only designs on the Media.With Only Shapes on Media checked, it will only nest the designs showing on the design mat.
If Only Shapes on Media is unchecked, then it will nest all the designs, no matter where they are on the page.
Align – This will align as many designs with each other as possible. Here align is unchecked and the Rotations is increased to 4.
With Align checked, it gives a different nesting option.
Padding – Increase or decrease the amount of space between each design when it’s nested.Above the Padding is at 1 and below the padding has been changed to 5 and allows extra spacing or padding between each design.
Rotations – Choose how many times a design can be rotated to make it nest with another design. Here the rotations have been increased to 12 and changes the nesting a little bit.
Nest – Choose this when you are ready for the design to nest according to the settings you have chosen.
Why would you use this?
Do you have a piece of material that is 5″ x 7″ and you want to fit as many of a design as you can on the material without manually adjusting each design? The nesting tool will help, let the software work for you.
Or how about nesting a design within a larger design?
This would be a great start to filling the shape with words and then you can add more to it.
Keep in mind that you do need the Designer Edition software upgrade or higher to access this feature.
Check out the A to Z resource to learn even more about Silhouette HERE.
Save this for future reference by pinning the image below.
Enjoy !
THANK YOU for your support! How can you help? Click HERE & buy a coffee. Every little bit helps with the cost of running the site.
Silhouette Classes
Never stop learning! Let me help you take the anxiety out of learning with Silhouette and get to creating faster! My Silhouette classes are heavily focused on software, so you can take the skills & techniques taught and apply them to many future projects!
**This post may contain affiliate links. What that means is that I may receive compensation if you purchase through the links I have provided. The price you pay for the product or service is not higher but I may get compensated for sharing.
THANK YOU for your support! How can you help? Click the link to buy a coffee. Every little bit helps in the cost of running the site.