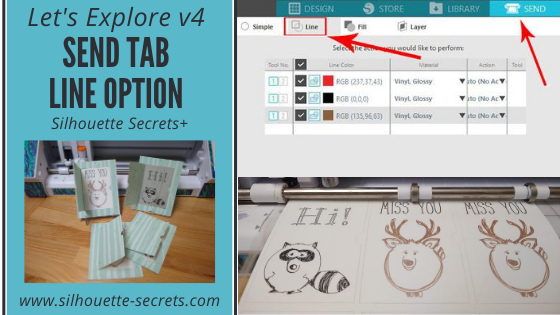
Today, let’s take a look at the Send Tab – Line option. Most often you will hear it referred to as Cut by Line or Sketch by Line, but in the software it is simply called Line under the Send Tab.
Tutorial completed in version 4.3.372 of Silhouette Studio.
Affiliate links may be present in the following blog post and as an Amazon Associate I earn from qualifying purchases.
First, you will want to set up the design you want to cut or sketch by Line Color. Use the Line Style Panel – 2nd tab to change the line color of the designs on the mat or the QAT – Line Color Option.
Select each object and change the colors of the Line. This way we can set up the design so that each color can have a different material type, action, and tool. For instance, to cut and sketch a design of a project.
In this case, I want the sentiment and the animals to sketch and then the card pieces to cut. So I have turned my sketch lines to black & brown and my cut lines are red.
Once the design is set up, click on the Send tab in the top right corner and the Line option.
In this tab, you have each color separated out in it’s own line and you can adjust the settings accordingly. For instance, I want the black and brown lines to sketch and the red lines to cut. I can change the Action and Tool for each of these settings.
Let’s take a look at what this all means.
Tool No. Choose whether you will be using Tool 1 or Tool 2 For Cameo 4 users, there are 3 tools that will work in Tool 2 – find more information on the Cameo 4 Tools HERE.
Line Color The same colors of lines that were set up on the Design Tab, should all show in the list under Line Color. The checkbox next to the color is how you turn the cut line on or off. If the box is checked, the cut line for that color is ON. Bold color lines will be around the design that the cut lines are turned ON for.
If the box is unchecked, the cut line for that color is OFF. Notice the red line is not bold since it is turned OFF.
Material Choose the Material type you are using for each color. Each line color will need to be changed separately.
Action Choose what action you will want to perform. In this case, I want the red lines to Cut and the black & brown lines to Sketch.
Tool Choose what tool you will be using to perform the action. In this example, red lines will be cut with an Autoblade and black & brown lines will be sketched with a pen.
If you were to keep all of the colors checked and have the cut lines ON, the order in which they appear in the list is the order in which the action will be done. For instance in my photo that would mean, the red would cut, then the black would sketch, then the brown would sketch.
You can rearrange the order by clicking and grabbing a color and move it up or down in the list.
Moving down the right side of the Send tab – Line Option, you will see that the cut settings are expanded further down to show what the settings are for each option you have chosen.
The color that is highlighted (selected) at the top of the panel will be the settings that you see at the bottom. In my photo, the black color is highlighted, so it shows the settings for the Black lines in the bottom.
Here is where you can adjust the settings as needed. For the Cameo 4 with the Silhouette sketch pens, I decreased the force to 7 and the speed to a 5. This seems to work well with the sketch pens and causes less drag marks than the preset settings. (Note: in v4.4, the sketch pen settings have been adjusted so you may not need to change them)
You can also add a Pause in between the difference color actions if you would like to do that versus unchecking the box to turn the cut lines off. Each user is going to vary in what they prefer to do. I prefer to check and uncheck the boxes as needed, just in case I have to step away from my machine. But you can test out which way works best for you.
Now, the rest of this panel is the same as when using the Simple tab. Check out the post on the Send Tab – Simple Option HERE for all those details.
Using the Send Tab – Line Option, you can turn the lines on and off and perform several actions on the same project such as cutting and sketching. Do not unload the cutting mat between the colors, just swap out the tools you are using if you are switching between sketch pen colors or the blade.
Tips when using Sketch Pens – Scribble with the pen prior to using and get the ink flowing. – On the Cameo 4, the black bodied sketch pens are designed for the blue adapter. There is a lip on the sketch pen that holds it securely in the adapter. Some users may find the white Silhouette pens work in the blue adapter, while others feel it is too lose and do not get a good sketch with it. – On the Cameo 4, decrease the Force to 7 and Speed to 5. This will help with any drag marks. – I sketch first and then cut so the cardstock doesn’t move between actions. – Cap the sketch pen immediately after use. – DO NOT unload the cutting mat between colors. Wait until all the sketching and cuts are complete, so it will line up completely.
Sketching with the Silhouette can be a unique way to create something new!
There are so many options available in the Silhouette software, sometimes it’s just fun to play! Set aside some “free” time to just explore the software and see what you can create!
I would love to see what you make! Feel free to post photos or questions on my Facebook group at Silhouette Secrets with EllyMae.
Save this for future reference by pinning the image below.
Enjoy!
**This post may contain affiliate links. What that means is that I may receive compensation if you purchase through the links I have provided. The price you pay for the product or service is not higher but I may get compensated for sharing.
The hardest part of creating something is choosing the design that I want to commit to. I was searching for a 50th Anniversary card to create and nothing looked right to me.
Then I saw a project on my Silhouette Secrets+ with EllyMae Facebook group that a member was creating and it was an inspiration (Thank you Patti!).
Sometimes that is all it takes. Seeing a project that someone else is creating and it sparks that creative energy and all the pieces just fall into place.
Today, I am here to share the finished project and how you can get started creating amazing things with the Silhouette Curio.
Affiliate links may be present in the following blog post and as an Amazon Associate I earn from qualifying purchases.
I always like to create gifts that are unique and with the Curio that is possible. With the ability to etch on metal or acrylic, I can create a customized gift in no time. But, sometimes I still need a creative jump-start. I know many of my Facebook group members love and can’t wait to see what is posted in the Show and Tell on Saturdays. It is a great place to share your Silhouette creations, projects in-progress, or see what others might be creating with their machines.
8 – Curio Advanced Beginner – Metal Etching placement video course HERE
8 – Embossing Leather with the Curio can be found HERE
The Curio is a fantastic machine and takes some time to learn. But it is so worth it when you do!
I would love to see what you are creating with your Silhouette machines. Feel free to post photos or questions on my Facebook group at Silhouette Secrets with EllyMae.
Don’t have a Curio machine yet, but want to add it to your tools? Find it here: Silhouette America Amazon
Save this for future reference by pinning the image below.
Enjoy!
**This post may contain affiliate links. What that means is that I may receive compensation if you purchase through the links I have provided. The price you pay for the product or service is not higher but I may get compensated for sharing.
Today, let’s explore what does Group and Ungroup mean.
Basically, if a design is grouped it means that you have separate pieces of a design that are acting together and move as one object. It can be resized or moved together and the changes apply to all the elements.
Ungrouped means that each piece can be selected separately and if only 1 piece is selected, that is the only one changes will apply to.
Affiliate links may be present in the following blog post and as an Amazon Associate I earn from qualifying purchases.
It opens with all the pieces since it is designed to be cut from cardstock and you will cut each piece separately. When open, the pieces are all grouped together and you can see the selection box around the entire design. This file can be scaled by grabbing the bounding box and moving it in or out to increase or decrease the size. All of the pieces act together.
To ungroup this design, right click on the photo and choose Ungroup.
Notice that all the pieces have their own selection box around each of them.
Now, click off the design to deselect it and then each piece can be selected and moved individually.
It will ultimately depend on the design in how they saved the file and if the file is grouped when it is opened or not. Each file may vary.
Grouping and Ungrouping can also be found in the Quick Access Toolbar at the top of the Silhouette software. This Quick Access Toolbar is only active when objects are selected and it will vary what tools show up in the toolbar depending on what the objects are.
How is Grouping different than Making a Compound Path?
Grouping selects all the pieces together and they function as one object, but they are still separate pieces. Compound paths change the design and combine the 2 objects that are selected.
I would love to see what you create with your Silhouette machines & software. Feel free to post photos or questions on my Facebook group at Silhouette Secrets with EllyMae.
Save this for future reference by pinning the image below.
Enjoy!
**This post may contain affiliate links. What that means is that I may receive compensation if you purchase through the links I have provided. The price you pay for the product or service is not higher but I may get compensated for sharing.
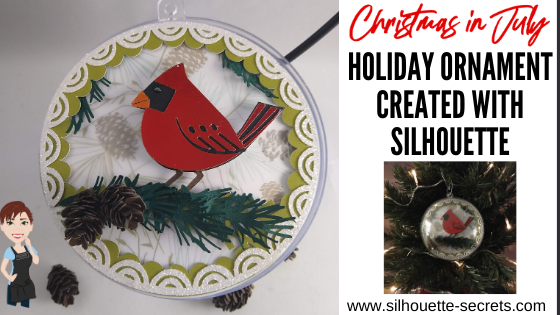
Why not get an early start this year? It hasn’t been a typical year yet, right? This year I am creating a Christmas in July ornament!
This is the Winter Bird design from the Silhouette Holiday Ornament kit.
Affiliate links may be present in the following blog post and as an Amazon Associate I earn from qualifying purchases. Sponsored post.
The Holiday Ornament kit includes: 6 clear plastic ornaments (100 mm size), 6 sheets cardstock (8.5 in. x 11 in.), 6 ornament hooks, and an exclusive download card redeemable on the Silhouette Design Store for 10 pre-selected layered ornament designs It is on sale for $10.00 (Retail value $19.99) with my code SILSECRETS. Here is one of the designs in this Holiday Ornament kit.
Today I’m going to show you how you can take this design and go farther!
You can cut the design as is like this.
Or the best part about the Silhouette software is that the options are limitless to what you can do. You can make it unique to you. Here I’ve added some dimension with foam tape, a few branches, cut a few types of paper, and added 3-D paper pinecones. All created using Silhouette Studio tools and cut with the Cameo.
You are the one that can decide what you want to create with it!
You know what it takes the most of? Time But, the end result can be so worth it!
This Silhouette Holiday Ornament kit is awesome in that it is an open 4″ ball that you can add dimension to and create an awesome scene inside. I got so excited as I was testing and creating things to add to it. I hope I am not the only one that still does a little happy dance when a project turns out or turns out better than it did in my head. And it’s open on both sides, so you can make it double sided too!
Let’s take a look at how I created this scene using the design provided with the kit. I used just a few tools in the software to make it go farther. And I believe that any user can do this! Also, at the end of the post is a video clip of how I assembled all the pieces and a supply list of what I used.
This is what the design looks like when opened from the Silhouette library.
Next, I moved the pieces off the design mat and changed the color of the designs using the Fill Color Panel, just so they would show more accurately of how I would cut them. Or you can use the Quick Access Tool bar in the top left and change the color too. The backing piece I changed to white and the green bird shape I changed to transparent.
I started with the bird piece first. To break this bird design up, right click and choose Release Compound Path. It will separate the cut lines into individual pieces.
Here you can see the design has multiple selection boxes around the individual pieces.
Next, I moved the circle off the cutting mat and made a copy. In one circle I added a pattern, using the Pattern Fill panel. This will be my patterned piece of paper I cut and is just to designate visually what piece is which. The other circle I added a white fill to and decreased the transparency. This is my vellum piece that will be cut.
Now, let’s work with the bird. The red bird piece on the left will be the top layer of the bird and cut out of a red metallic foil paper. But, I wanted additional layers to make the bird thicker and to stand out.
First, I’m going to use the Line drawing tools on the left side and draw a new beak and this will be cut out of an orange metallic foil paper.
Then I selected both of the beak pieces that were just drawn, moved them away from the bird, grouped them together, and filled them with orange.
And now we will do a little bit of point editing on the bird to create the full bird shape to make our figure. Double click on the red cut line of the bird to bring up the Edit Points.
Next, I deleted a couple of the edit points and then moved a couple out to the edge of the beak. I moved the orange beak back on top to adjust the outline of the bird’s beak exactly how I wanted, so it matched up and I had a solid bird background.
Now that the base bird outline is created, I needed to make several copies. One white as the very back layer of the bird. This is so the eye will show up as white. Next, I selected the bird and the circle for the eye, right clicked, and chose Make Compound Path. This bird I filled with black and made 3 more copies of. And then 1 more copy of the bird that I filled with brown.
Next, I zoomed in on the brown bird and used the Knife tool to cut the feet away from the body. I used the Polygon Knife tool and unchecked the Auto Apply so I could verify exactly where I wanted the knife to cut before it did.
Once it is where you want, then click the Apply option in the Knife Toolbar.
Next, delete the top of the bird. All that is needed is the legs. And I want to make a small offset just to thicken them up a bit as they will be the top layer added on top of the black bird legs. I used the Offset Panel and added a 0.020″ distance offset. Delete the inside brown legs and fill the offset with brown. Select both the feet offsets, right click, and group them together.
Now, I have all the pieces I need to cut the design out. I arrange the pieces on my design mat and decrease the Transparency on the Page Setup Panel so I can reveal the cutting grid. Then I cut my papers down to the size needed and place them on the cutting mat.
You can also cut each color out separately on the design mats, but I find once you get the hang of this method I can send almost all the design pieces through to be cut on only a few times through the machine. I line up my design with the cutting mat grid on the screen and then place the materials in the same location on the design mat. I also find that this saves adhesive on my cutting mat too as I’m not sticking a full sheet of each material down on all the adhesive. Find more cutting mat tips click HERE.
And I continued to move pieces on and off the mat as needed to be cut until all the pieces were cut.
All ready for assembly.
And you don’t have to stop there. Create a few more design to incorporate and make your design unique. I took a Pinecone 3-D Miniature design by Snapdragon Snippets – Design #279267 and scaled the size down to 33% of the original using the Transform Panel – Scale Tab.
The next step is to start adding glue to each piece and layering it on top of each other. I used a variety of different adhesives to give it dimension and get it to adhere. A full supply list is at the bottom of this post. Check out this video on the Silhouette Secrets+ YouTube channel HERE on how I assembled the design. I ended up cutting 2 of each piece and gluing it together once everything was dry to use both sides of this ornament.
I had so much fun creating this ornament from the Holiday Ornament kit by Silhouette. Make both sides the same or add a different element like fake snow to the design as well.
There really is no right or wrong way to create these projects. Just have fun and try some new things!
I am excited to see what I can fill the other 5 ornaments with.
I would love to see what you create with your Silhouette machines & software. Feel free to post photos or questions on my Facebook group at Silhouette Secrets with EllyMae.
Save this for future reference by pinning the image below.
Enjoy!
**This post may contain affiliate links. What that means is that I may receive compensation if you purchase through the links I have provided. The price you pay for the product or service is not higher but I may get compensated for sharing.
I love creating 3-D design with Silhouette! However, taking a 2 dimensional cut file and then assembling it into a 3-D project can be a bit intimidating. And I’ll tell you that for anyone, even experienced users, not all projects work the same each time. But, I’ll show you a few tips on how I assemble a design today.
Affiliate links may be present in the following blog post and as an Amazon Associate I earn from qualifying purchases.
First, let’s start with the design. I needed a small pinecone for a project, so I chose this Pinecone 3D Miniature file by Snapdragon Snippets – Design #279267.
The first thing I do is look to see if the designer has included a link to instructions for the file. Not all designers do, but in this case, there is an instructions button to click on. Find those instructions HERE. The link includes instructions for several of the 3D files that can be combined to make up a whole decor project. Today, I am just using the pinecone, so I scrolled down to those instructions.
I assembled the original pinecone exactly as those instructions showed.
But, I need my pinecone to be a LOT smaller. At first, I was feeling bummed that it wasn’t going to work for my project. Even though this design turned out exactly as it was supposed to, it didn’t work for my purpose. I just wasn’t sure that I could make it smaller and still get it assembled properly.
What did it take to change my mind? A quick discussion with my husband, 1 comment from a member of my Facebook group, and a nights sleep – where all I did was think about this project. By the next morning, I was itching to try it again.
One of the great features of the Silhouette software is the possibilities are pretty much endless! Want a smaller design, no problem!
Using the Scale option, I can take the original design and decrease the size. I knew I needed small scale, so I tried 33% of the original size. This is found under the Transform Panel – Scale Tab or at the top of the software in the Quick Access Toolbar.
For the “baby” miniature pinecones, the center stem and the spacers were not going to work or be needed at that size. I right clicked on the design and ungrouped it, then deleted the pieces I did not need to cut. Make sure to delete the numbers and text that is not needing to be cut.
With all the numbers and text removed, I moved the pieces around on the cutting mat to cut out of cardstock.
Then I cut this out of a brown cardstock using the Cardstock Textured setting. I find this works well for me on almost all cardstock. I do prefer to cut smooth cardstock as textured can be a bit of a headache.
Check out this video on cutting and then assembly of the pinecone at 33% of the original size. Note the video speed has been increased for cutting and assembly. More tips following the video.
Tips for cutting & assembly
Cut the cardstock down to size. I use a paper trimmer to cut all my materials down to size, so then I am only using the adhesive under the area of my design and not peeling a full sheet of material from the cutting mat. I find that this saves my adhesive on the cutting mat and makes my mats last longer. More tips to getting the most out of your cutting mats HERE.
Adhesive The right adhesive can make all the difference! For the original 3-D Pinecone Miniature Design, I used a clear, liquid glue called Liquid Glass. But, for the file reduced to 33% of the original size, I used hot glue. This helped for both adding a little bit of space between the layers to give the “baby” pinecone dimension as well as gluing it together. When using the hot glue, thread the piece onto the wire first before applying the glue or it can cool before you get it in place. I bought this fine tipped SureBonder hot glue gun and love it.
Sticky cutting mat If your finding that cuts are not connecting or pieces are peeling up, you might want to try a new cutting mat after desticking it a bit. You will notice in the video above, that I had 2 spacers that did not cut right and it was because my mat was very well used and the cardstock did not stay stuck down. I find that this can be a big issue when cutting lots of cardstock. While my mat may “feel” sticky to me, it may not be good enough to hold down all the pieces of the cardstock while it’s being cut, in order to connect the cuts. If that cardstock moves at all, it may lead to a mis-cut.
Recut pieces as needed To follow the sticky mat, you may need to re-cut a piece or two here and there. That is not a bad thing. I just copied what I needed and moved it to a new area on my cutting mat and re-cut it. I did cut a couple extra… just in case!
Don’t give up! If you have never done a 3-D design before – try it out! If you have tried one and it didn’t work out – try again! I will fully admit that the first one I made, turned out great, but it was too large for what I needed. It took a little advice & rethinking to reduce the size and alter the design for my purpose.
Here are the babies. This is the original 3-D Miniature Pinecone file reduced to 33% of the original size.
I have a very special project for this coming up and cannot wait to show you. Stay tuned for that!
The Silhouette Design Store has an entire section dedicated to 3-D designs. Keep in mind, just like any site you get files from, some are more complex than others. There are some that even as an experienced paper crafter, I have yet to tackle. One of these days I will conquer this LowPoly Paperman, but for now, he will stay on my future to-do list. The biggest thing that these designs take is … time.
Want a few suggestions to get started on 3-D files?
Check out this tutorial on Lori Whitlock’s site for tips on assembly HERE. I find the first time you do this, you may not think you like it, but the more you do it, the better it gets.
Another flower type is one that the petal layers are stacked on each other, like this Poppy Flower by Echo Park – Design #249937.
Whatever you choose to get started, just get started! And I would love to see what you create. Feel free to post photos or questions on my Facebook group at Silhouette Secrets with EllyMae.
Save this for future reference by pinning the image below.
Enjoy!
**This post may contain affiliate links. What that means is that I may receive compensation if you purchase through the links I have provided. The price you pay for the product or service is not higher but I may get compensated for sharing.
Affiliate links may be present in the following blog post and as an Amazon Associate I earn from qualifying purchases.
What is a Silhouette Design Store Subscription?
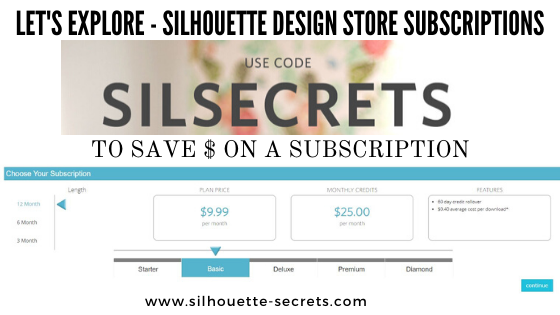
A subscription to the Design Store means that you pay a set price per month and you get a certain amount of credit for that price. For instance, if you choose the Basic subscription plan, you pay $9.99 per month and get $25 in credits to spend in the Silhouette Design Store. On average most designs are $0.99, which means that if you were to pay full price, you could buy about 10 designs if you spent $9.99 per month. But, with a subscription that money goes even further. You would get about 25 designs for the $9.99 spent each month. All of this is based on a $0.99 item, which means with a subscription you are paying an average of $0.40 per design.
I started with the Basic subscription to test the waters and found that I loved being able to shop or just go click a design and buy it without a second thought when I had credits to use.
The higher the subscription, the greater the savings.
A Deluxe Subscription = $14.99 per month = $50 credit *average cost is $0.30 per design *if credits are depleted you get 25% off all designs until your next credit
A Premium Subscription = $19.99 per month = $150.00 credit *average cost is $0.13 per design *if credits are depleted you get 50% off all design until your next credit *Free download of all “Last Chance Designs”
A Diamond Subscription = $29.99 per month = $250.00 credit *average cost is $0.12 per download *if credits are depleted you get 50% off all designs until your next credit *Free download of all “Last Chance Designs”
All subscriptions allow the credits to be rolled over for 60 days, just make sure to use them before that time limit hits or they expire. (I never seem to have a problem using up mine.)
These examples above are all using the 12 month option, but there are also options for 6 months and 3 months too.
How to save more
There are a couple of ways you can save even more.
Pay the full year in advance. This is what I do and it gives you even more of a discount.
Use the credits when there is a sale. I save things to my wishlist all the time and then when a sale comes along, I’ll go through my wishlist and decide what I want to purchase.
For instance, if there is a 50% off sale in the Design Store and you have a Basic Subscription, that means that your credit will go twice as far. Instead of the average of $0.40 per design, you will getting those design for $0.20 because they are 50% off.
I started with the Basic and found I like it enough to keep on going. Each user is going to vary in what works for you. Some find they love it, while others may not, but I want to let you know how to save the most you can.
I love to design my own, but I don’t always have time to do that or I am overly-critical of my designs, which then means I end up spending more time arguing with myself than I do cutting and getting the job done.
Hope this helps explain a little about subscriptions and you get more things done with your Silhouette!
Let me know if you have any questions on my Facebook group Silhouette Secrets+ with EllyMae. I would love to see what you are creating with your Silhouette machines!
Save this information for later by pinning the image below.
Enjoy!
**This post may contain affiliate links. What that means is that I may receive compensation if you purchase through the links I have provided. The price you pay for the product or service is not higher but I may get compensated for sharing.
The first Curio Virtual Retreat was such a success and we had so many requests to do it again, that it is now scheduled for August 14-16, 2020.
This event is limited to 40 attendees and the best part is no travel! Right from your own computer, tv, or other viewing source. You work at your own pace to follow all of the step-by-step video courses. Join us on the weekend of August 14-16 for Zoom calls and online support. Class kits will be mailed to you and include written handouts too!
Check out this Curio Retreat Highlights post to see a little bit about what happened at our last event.
I loved seeing all the projects that the attendees created and shared with us after going through the step-by-step classes. These include: – Curio Basics & Setup – Curio Tips – Metal Etching – Acrylic Etching – Leather Embossing – Sketching on Wood
And the projects keep rolling in that they are creating since attending the event! I love seeing them all!
The weekend includes: – Class kits mailed to you to complete all the projects – Instructional step-by-step video classes that are available for you to watch for 30 days following the event – Online support through scheduled Zoom calls and a private Facebook group
Student Testimonies
Here are a few reviews from the previous weekend:
“The event exceeded my expectations. The prerecorded segments were excellent. Really far better than anything I have found in the internet.” Doug B.
“The virtual retreat was very educational. The ability to be able to follow along with notes, pause the video, take my own notes, at my own pace was amazing and increased my comfort level and education experience.” Charlee R.
“I appreciated all the experience and effort that went into the written materials and the instructional videos – so thorough yet easy to follow! It was great to be able to re-watch portions of the videos while working through the projects. The Zoom chats and the Facebook group were fun and perfectly rounded out this virtual retreat. I will definitely attend in the future!” – Linda M
“Learned a ton from the virtual Curio retreat this weekend and had so much fun completing the projects! EllyMae is a fabulous teacher and we had a lot of great support throughout the weekend. Thank you TJC for this wonderful event!” Kathy S.
“At first I wondered how this would work. Worried about not having the hands on mostly. But I will have to say that it turned out better than I could have ever imagined. Loved that I could watch the video, pause and rewind, and repeat. The notes were great and I believe they will help me in re-creating new projects.” Nancy C
Curio Demos
Want to see a virtual demo table of things I’ve created using my Curio? Check out this video on my YouTube channel HERE.
And here is a little demo of the Curio in action embossing on leather.
Registration
Register HERE for this event! Attendance is limited to 40 attendees.
I always love to see what you are creating! Feel free to post photos or questions on my Facebook group at Silhouette Secrets with EllyMae.
Enjoy!
**This post may contain affiliate links. What that means is that I may receive compensation if you purchase through the links I have provided. The price you pay for the product or service is not higher but I may get compensated for sharing.
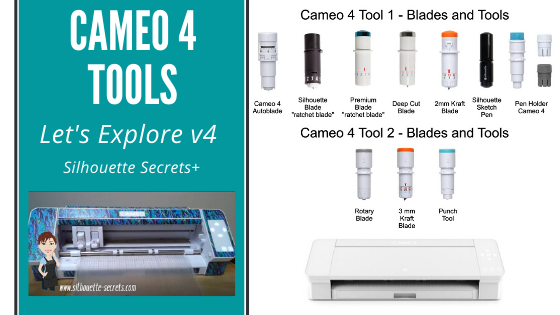
The Cameo 4 Autoblade is the only blade that can fit in Tool 1 housing with no adapter. All of the other blades or tools pictured above will fit in the Tool 1 housing with an adapter.
Cameo 4 Tool adapters
Note: this information is accurate as of 6/11/20. The Premium Blade has been redesigned with a small T on the front of it and now fits in the black adapter. Information you may see that was published prior to this date, may show that it fits in the gray adapter. Older Premium Style blades will fit in the gray adapter, but the new style does not.
The Cameo 3 Autoblade is NOT compatible with the Cameo 4 machine.
These are the only blades or tools currently available for the Tool 2 housing on the Cameo 4.
Why can you not put tools from Tool 1 in Tool 2?
The basic answer is because the tool housing for Tool 1 and Tool 2 is not the same. Therefore, the same tools cannot be used in both.
On the Cameo 4, Tool 1 and Tool 2 housings are designed with different motors in them, which means they function differently.
The Tool 1 housing has a motor that allows the housing to move up and down. While the motor is Tool 2 is a circular motor. You can see the difference in these housings if you touch them. Tool 1 will freely move down when you press on the front locking mechanism. While the Tool 2 housing is stationary & does not and should not be forced to move.
I am loving the new tools for the Cameo 4 – Tool 2 housing.
With the Rotary blade I have been cutting crepe paper and fabric. And I love it! Check out these posts below for more information and tips
I am still in the process of testing several different materials with the 3 mm Kraft blade. But, I have successfully cut this Light Chipboard from Amazon. This chipboard is twice as thick as the Silhouette Chipboard. More details on that coming soon!
What I will say is that each design will vary and some will cut better than others. And it does require multiple passes and patience. The later is probably the biggest part for successful cuts. But, all of these were cut using the 3 mm Kraft blade and the Light Chipboard.
Hopefully that helps explain a few of the tools for the Cameo 4!
If you are new to the Cameo 4 and just don’t know where to get started, check out the step-by-step Silhouette Beginner First Cuts video class HERE.
Save this information for later by pinning the image below.
Enjoy!
**This post may contain affiliate links. What that means is that I may receive compensation if you purchase through the links I have provided. The price you pay for the product or service is not higher but I may get compensated for sharing.
This 1 hour and 12 minute video class includes: – Setting up a design page using a Silhouette file to cut – Setting up the software to cut cardstock – Setting up the Curio to cut cardstock – Test cuts – Setting up a design page using a Silhouette file to cut adhesive vinyl – How to move a test cut – Weeding adhesive vinyl – Applying transfer tape to adhesive vinyl
Don’t own a Curio, no problem! Other Silhouette classes are available too! Click HERE for the full list or keep scrolling below to view. These classes are created in the Silhouette Studio v4 software and include all my tips, tricks, and supply lists to complete each class. All of the classes are created using the same class content that I use when teaching a hands-on, in-person lesson and have as little video editing as possible, in order for you to get the full class effect.
However, you learn the Silhouette machine, the best way is to play, play, play. Each user may be different in how they learn best. I get a lot of requests for online classes. Want to see student testimonies? Click HERE.
What ever tools you use to learn your Silhouette machine, the key is to do it! Don’t let it sit in the box. Get it out and start playing with it!
Enjoy!
Want to save this information for later – pin the image below!
**This post may contain affiliate links. What that means is that I may receive compensation if you purchase through the links I have provided. The price you pay for the product or service is not higher but I may get compensated for sharing.
Today, let’s take a look at the Send tab in the Silhouette Studio software. It has a lot of information in it! In the v4 software, it is located in the top right corner of the program and controls everything about the cut settings.
This tutorial is written in v4.3.372 of the Silhouette software.
There are 4 different options for working in the Send Tab. – Simple – Line – Fill – Layer (Designer Edition feature)
The Simple option in the Send tab is the one I find I use the most.
But what does all this mean? Let’s take a look.
With a Cameo 3 or Curio selected as the machine being used, the above is what you will see on the Send tab.
On a Cameo 3 or Curio the tool housing is distinguished by a red circle (Tool 1) or a blue circle (Tool 2).
Tool housing on Curio & Cameo 3
On a Cameo 4, there are no red or blue circles, but it is designated by a number 1 or 2 for each tool housing. When a Cameo 4 is selected as the machine being used, you will see the Send tab show like this.
The numbers 1 and 2 are located on the tool housing locking tab on the Cameo 4. You will also notice that the blade and adapters for the Cameo 4, will also have either a 1 or 2 on the front of the tool to designate which tool holder it fits in.
The most important thing to keep in mind when you are switching between the Tool 1 and Tool 2 housing is that you first have to select the design on the screen you want to change and then choose No Cut under Tool 1 before turning on Cut under Tool 2. If you do not turn the cut lines off under Tool 1 housing, then it will complete the action using both Tool housings.
Now, let’s break this down into what each section of the Simple Send tab means.
There are 2 options for Cut Line behavior on the Send tab. No Cut, Cut, and Cut Edge. If you look at the icons each one shows you exactly what it does. Let’s take a look with some examples.
The #1 thing to note here is that the design has to be selected on the design mat in order to make any changes to the cut setting. To select the design, click directly on the design or the red line of the design. A selection box will appear around the design meaning that it is selected. Then you can change the cut setting between No Cut, Cut, or Cut Edge.
Since we are under Tool 1 – the cut lines will show as bold red. As you can see when the cut lines are turned off, there is no bold red outline around the design like the example in the top left corner.
No Cut and Cut are pretty easy to understand. Either the cut line is on, indicated by bold red cut lines or it is off, indicated by no bold red cut lines. If a design is sent to the Silhouette machine with the cut lines off, it will go through the motions of aligning the housing and setting the blade (Autoblade), but then the software will say “Cut Complete”. (More on that HERE) Note: if a design is sent to the machine with the cut lines OFF and you get the message “Cut Complete” – unload and reload the Silhouette cutting mat before sending again after turning on the cut lines to ensure that the blade housing resets to the proper starting point.
Cut and Cut Edge are the ones that I see the most questions about. Cut means that it is going to cut around each object on the screen. If the design is overlapping, then it is going to cut through each piece.
Cut Edge means that it will cut around the outside edge of any objects that are overlapping. It will also show a bolder, fuzzier red cut lines around it on the Send tab when it is set to Cut Edge.
In the Silhouette Studio v4 software, it now defaults all text to Cut Edge. So I often see a user question why the red lines appear fuzzy. It will still cut the same, but now welding a scripty, overlapping font is not absolutely necessary. The red fuzzy does not affect how it will cut, it is appearance on the screen only.
If you select the entire design on the screen, choose No Cut under Tool 1 and then turn on Tool 2 using the same designations as above, you will see bold blue cut lines appear around the images. Red lines = Tool 1 Blue lines = Tool 2
You will also notice that as it is shown above, I get a message that there is no Cameo 4 Tool 2 compatible Kraft Cut Action for this material as chosen for Cardstock. If there is not a preset for the specific material and tool chosen, you will see this message. You may have to create your own settings – see below for more information on that.
Next on the Send tab, we have the Materials, Action, and Tool options.
The Materials drop down is where you choose what material you are cutting from the preset options in the software or your own custom created settings.
If you choose a preset setting, this is just a recommended starting point for materials that are similar. Keep in mind that not all materials are created the same and there can be variance in those materials, even within the same brand. Also keep in mind, that as your blade dulls, you may need to adjust those settings to get a good cut using the same blade. The presets are just a recommendation for a starting point and I always recommend that you do a Test Cut first to see if it will work for you before sending the full design.
User Defined Settings are ones that you create or have modified yourself. These settings will appear at the end of the preset settings list.
The first time you create a new custom setting, it will appear at the very bottom of the list. Once the software is closed and reopened the list should be in alphabetical order.
Next, you have the Action. This is what you are telling the Silhouette machine to do. The Actions that are available will depend on what tool is selected.
Then comes the Tool section. This will show you what tool options you have available for the Tool housing you have selected, the material selected, and the action selected.
Now we move to the next section.
In the gray section, you will see the Action and Material chosen in the upper section appear as the Title. If using a Curio and the v4 software, you will also see it show the Platform stack recommendation there too.
The black dial is the blade depth. The current blade depth recommendation is the middle number that has a blue shading to it. The arrow on the left changes the blade depth down and the arrow on the right increased the blade depth up. If you are using an Autoblade in the Cameo 3, Cameo 4, or Portrait 2, this is the information that is sent to the machine to set the Autoblade by it’s tap dance at the beginning.
Blade depth is how far out the blade is sticking from the end of the blade. For thinner materials, you will use a lower blade depth and or thicker materials you use a higher blade depth. If you have too high of a blade depth for the materials you are cutting, the blade may get stuck in the cutting mat and cause cut issues.
The triangle with the overlapping areas is called Overcut and it is a neat feature that can help make cutting corners easier. Each design may vary. Learn more about the Overcut feature HERE.
Next is the Force and Speed.
Force is the amount of pressure that the Cameo is using to press down on the blade. Higher force equals higher pressure and can also cause the blade to stick in the mat, if the setting is too high.
Speed is how fast the blade is moving. Faster is not always better, but slower is not always better either. Each material will vary in the perfect settings.
Next comes the Passes and More option.
Passes is how many times you want the blade to do the same action. Some thicker materials require several passes to cut completely through the material. For normal cutting materials such as vinyl, htv, and cardstock; I find 1 pass should be sufficient with the correct settings.
More is the Advanced Settings and where you would enter Custom Cut Settings. Check out more information on that HERE.
So now you may be asking yourself – how do you know to change the settings? Honestly, I use the preset settings for the materials in the software almost all the time for most materials. I do use the Textured Cardstock setting to cut almost all cardstock. If it’s a material not in the presets, then I start with the recommendations from the manufacturer, or the closest material to it. The more you cut, the more comfortable you will get with the materials you are using and the settings needed.
And, I do Test Cuts. These will be your best friend and save you lots of materials! If the square with the triangle test cut is not working for you, make your own with a capital B and move it around. For more details and photos on creating your own Test Cut, check out this Beginner HTV post HERE to see how I do that.
If the test cut does not come out well, then I look at adjusting my settings. I usually start with blade depth. Increase it by 1 and try a test cut. If it works, great! If not, then it will depend on what it did. If it cut too deep, then I will decrease the blade depth to what it was and increase the force by 1-2 and try another test cut. Do not change too much too fast, or you really don’t know what worked and what didn’t.
Now, let’s look at the bottom of the Send tab and what it tells us.
Machine name – this will show you the name of the current machine selected from the Machine list. Right click on the name and you can rename the machine.
Under this menu, there are also options to do a few more other things such as Calibration, Distance Adjustment, Tool Separation, Manual Registration (Print and Cut), and Automatic Registration (Print and Cut). We will not cover these in this tutorial today, but you can find more information on all of those in the Silhouette Handbook that is FREE in the Silhouette Design Store. Grab it HERE and then open it and hold down Ctrl+F on the keyboard for the search bar. Type in what you are looking for to learn more about that item.
Machine icon and status is directly below the Machine name. This will show a photo of the current Silhouette machine that is selected as the default machine and tell you the status of it.
Machine list is where you will toggle between different Silhouette machines or choose the USB versus Bluetooth connection.
Here you will see the Machine name, Firmware version, x to close a machine connection, Bluetooth and USB connections that are recognized by the software. To choose a new machine simply select the machine from the list that you want to send the project to and it will be the new default machine. Check out how to rename your machine HERE With the Business Edition upgrade, you can use multiple machines at the same time and just toggle between them under this icon. For more information on using multiple machines at the same time click HERE.
Next to the Machine list icon is a small icon like a graduation cap. It has a few instructions in there that need to be updated.
Moving to the right side at the bottom of the Send tab, you will find the Test Cut options.
The Test Cut arrows move the blade housing if you need to adjust where the test cut location is. Make sure to move the housing both directions to the exact location you want it to cut at.
Next to that is where you choose whether to perform the Test cut with Tool 1 or Tool 2.
And then you have the Test Cut button. When you are ready, click it to cut a small square with a triangle out of the material wherever the blade housing is set up. Note: after doing a test cut, make sure to unload and reload your mat before sending the project to cut, so it will cut in the exact location you have setup on the screen.
Below that is the Send button. When all test cuts have been performed, double check that the material settings are correct and press the Send button to send the project to the Silhouette machine.
Next to the Send button on the right is the barcode icon. A print and cut project can be setup with a barcode to read for the cut settings. It is briefly described in this post on the Registration Marks Panel HERE. It is not something I have needed to use.
And in the far bottom right corner is the Advanced Settings for the Send tab.
For most users, you may never use this Advanced Settings Panel. The 2 that I find are used the most are the Feed Option and the Cut Order Sorting.
After Cutting a Tile – choose whether the machine should “Await cutter ready” or “Pause”. For more information on the Tiling feature – check out this post HERE.
Feed Option – choose between “Return to Origin” or “Feed” Return to Origin tells the machine whether to pull the mat or material back to the front of the machine to unload it Feed tells the machine to feed to the back of the machine to use the Cross Cutter option. This can be helpful when cutting off a roll. For more information on the Cameo 4 roll feeder and cutting from a roll check out this post HERE.
Layer Sorting – choose between “no sort” or “Group Layers by Condition”. No sort cuts the layers in the order they are listed in the Layers Panel. Group Layers by Condition will cut layers with the same conditions together for instance, same color lines are considered a layer.
Show Cutter Divisions – choose between “Known Cutters” or “All Cutters” *more information on this option coming soon
Show Weed Settings – choose between “Auto”, “Always”, “Never” *more information on this option coming soon
Cut Order Sorting – choose between “No sort”, “Maximize Speed”, “Minimize Roller Movement”, and/or “Sort Interior Contours First”. This is where you can change the order in which the machine cuts. You select what you want it to do whether by the fastest way to cut, minimize roller movement, etc. What works best may be different for each user. I have mine set to Minimize Roller Movement and Sort Interior Contours First. The Silhouette software and machine will choose the best order to cut with based on these selections. It does not always cut in the order we think it should, but I just let it go and it will do it’s thing.
Note: different version of the software may show different Advanced Settings under this menu. Older software version may not have as many options as shown above. This tutorial is written using v4.3.372.
Whew!
Did you know that the “Simple” tab of the Silhouette software contained all that information?
I would love to hear what you learned today or see your Silhouette projects! Feel free to post photos or questions on my Facebook group at Silhouette Secrets with EllyMae.
Save this for future reference by pinning the image below.
Enjoy !
THANK YOU for your support! How can you help? Click HERE & buy a coffee. Every little bit helps with the cost of running the site.
Silhouette Classes
Never stop learning! Let me help you take the anxiety out of learning with Silhouette and get to creating faster! My Silhouette classes are heavily focused on software, so you can take the skills & techniques taught and apply them to many future projects!
**This post may contain affiliate links. What that means is that I may receive compensation if you purchase through the links I have provided. The price you pay for the product or service is not higher but I may get compensated for sharing.
THANK YOU for your support! How can you help? Click the link to buy a coffee. Every little bit helps in the cost of running the site.