Posted on — 3 Comments

Creating Templates in Silhouette Studio

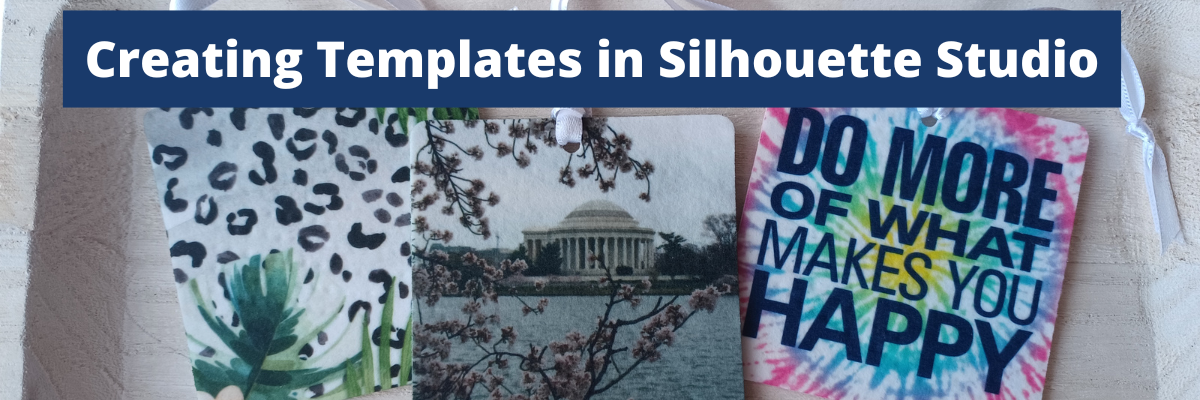
In today’s tutorial I’m going to share how I create a template file in Silhouette Studio that can be reused for future projects. In this particular example, I’ll be using an air freshener sublimation blank. But, this same technique can be applied for all kinds of future projects.
This is a great trick to have in your toolbox, especially if you are using the same blanks over and over.

Affiliate links may be present in the following blog post and as an Amazon Associate I earn from qualifying purchases.

Supplies used:

– Sublimation air freshener square blanks from Heat Transfer Warehouse
– Epson F170 sublimation printer
– Epson sublimation ink
– Sublimation paper
– Heat Tape
– Parchment Paper
– Heat Safe Gloves
– Patterns or photos
Patterns in demo below:
– Tie-Dye Pattern by Renee Jablow – Design #330722
– Tropical Watercolor Leopard Print by Sophie Galo – Design #416584
– Do More of What Makes You Happy Phrase by Lori Whitlock – Design #35309
– Sharpie Pen font by Flycatcher Design – Design #299019
– Heat source – Siser Heat Press

Optional:
– Artesprix Protective Pad (heat safe surface)
– Air Purifier (helps with any smells from sublimation)
– Tape dispenser

Silhouette Step-by-Step Tutorials

Check out the full written tutorial below or find a video tutorial on the Silhouette Secrets+ YouTube channel HERE.

How to create a Template in Silhouette Studio

Measure sublimation blank.

Use drawing tools in the Silhouette Studio software to draw the shape needed.

Use the Scale Tools under the Transform Panel or the Quick Access Toolbar (QAT) at the top to size the template as needed.

With sublimation it is a good idea to make your print a bit larger than actual size, so you have a little wiggle room when placing your image on the blank. Add a small extra border to the exact measurement you took of the blank and use that as your template.

If you plan to print several on the same page, make copies of the template shape.
If needed, check the Show Print Border option on the Page Setup Panel – Tab 1 to see where your printer page margins are and make sure your design won’t get cut off.

When you have the shape, save the file as your template file that can be reused in the future.

When you are ready to use the template file, open it, then choose File > Save As and rename it for your current project.

Now, we can fill the template shapes with the images or patterns for the project.
If your sublimation blanks are double sided, you will need patterns for both sides.

How to Fill in Template Shapes

With Silhouette Studio you have so many options to design within your template shapes.
Here are a couple ways.

Use the Pattern Fill Panel to add a pattern to the shape

Or access larger images of the Patterns folder from the Show/Hide library option by clicking the folder icon in the bottom left corner of the Silhouette Studio Design Tab.

This will open up a split screen between the library and the design area. It can be easier to view things from the library, especially patterns at a larger size.

Or drag and drop a photo from your computer into the shape too!

Add any additional elements to the design you want.
I added a text design Do More of What Makes You Happy Phrase by Lori Whitlock to the top and text for the location using Sharpie Pen font by Flycatcher Design to the bottom one.

If you do add elements and you want both sides to match exactly, make a copy of the one you altered and delete the template. Then they will match exactly.

Make sure to save your file often and keep in mind that the more graphics you add to a file it increases the size of that file. If you find your computer taking longer to process, it could be due to large photos and patterns.

When you are ready to print, go to File > Print and follow the direction for printing to the sublimation printer you have.

Check that the print came out properly. Any text should be mirrored when it prints because it’s an ink transfer.

Sublimation on Air Freshener Blanks

Cut the printed designs apart and secure the print to the sublimation blank with heat tape.

Even though these are double sided, you still want to press each side separately. The side with the print should be the side that is against the top platen of the heat press, so it gets the adequate heat for a full transfer.

Use a piece of parchment paper on the bottom of the heat press surface to protect it.
Then place the sublimation blank on top with paper side up.
Cover with another piece of parchment paper to protect the top platen of the press.

Press the sublimation blank according to the manufacturer’s instructions.
For these air fresheners it calls for 400 degrees F for 60 seconds with medium to firm pressure. Hot peel!

Be very careful when removing the items after pressing as they will be hot.
Throw out any parchment paper that has ink on it as it can transfer to the next blanks or your press.
These are a hot peel and you better be quick about it!
I would recommend having heat safe gloves ready to go. I had to run get mine the first time and it was not quick enough.

I found it much easier to press 1 at a time and then after remove the sublimation paper quickly and press it down on my Artesprix Heat Safe Protective Mat to help it stay flat and not curl.

I learned several things during this process.
At first I tried to press 3 at a time. I wasn’t fast enough to remove the paper before they cooled and the paper stuck to the blank. I’ll work on ways to remove that in the future and see if I can save those blanks.

Once cooled, secure the sublimation print to the blank with heat tape on the other side of the blank.
Press again at the recommended time and temperature and quickly remove the sublimation paper.

Important Tips

Follow the instructions for any sublimation blank or material you are using.
These specified “hot peel” and I definitely found that out the hard way. The first 3 I did, did not turn out because I wasn’t fast enough.

Get extra blanks.
Especially if it’s the first time you are working with a material! Extra blanks are always a good idea.

Only press one air freshener at a time so you can work quickly.
Unless you are pressing the entire sheet of fresheners with the same pattern. Then you can do the full sheet with a full printed sheet as Heat Transfer Warehouse showed in this tutorial HERE.
They also share how to scent the fresheners there too!

Keep in mind that when you are pressing a print to a surface, the surface can affect the final colors as well. You can see in my projects that my darker photo of Washington D.C. looks a bit darker and not as bright as the others. That is due to how the photo started and the surface of the blank too!

I think this might be my favorite one!

Save this for future reference by pinning the image below.

Enjoy !

THANK YOU for your support! How can you help? Click HERE & buy a coffee.
Every little bit helps with the cost of running the site.

Looking for more in-depth, step-by-step classes, check out all of my online Silhouette classes on my Teachable site HERE.

SS Logo snip it
**This post may contain affiliate links. What that means is that I may receive compensation if you purchase through the links I have provided. The price you pay for the product or service is not higher but I may get compensated for sharing.

Posted on — Leave a comment

Drawing Designs using Object to Path & Tools in Silhouette Studio

This past week there was a question on my Silhouette Secrets+ Facebook Group and I was working on my computer so did a quick video tutorial on how they could accomplish the design they wanted.
Several asked if there was a way to save that video so I re-recorded it and put it up on the Silhouette Secrets+ YouTube Channel.

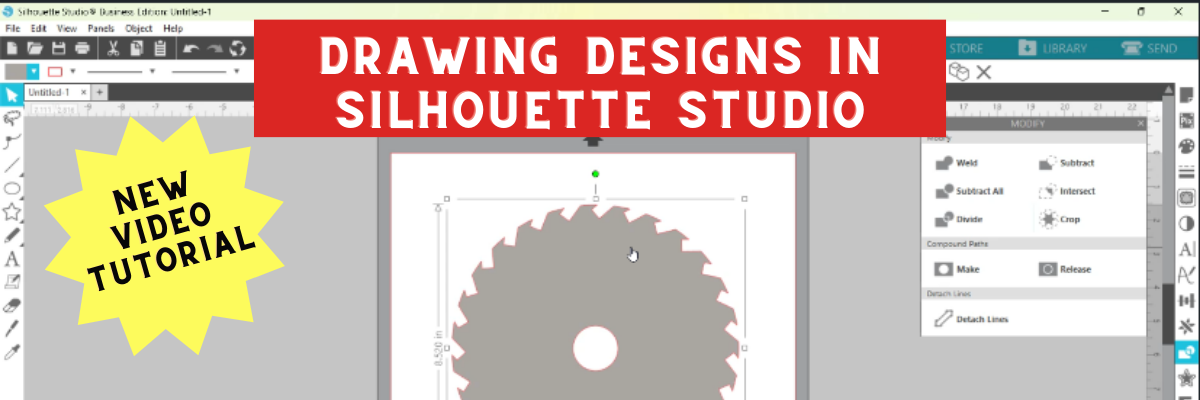
While the video shows how to create a saw blade because that was what the user was asking, the techniques could be used to create all kinds of designs from wreaths, frames, and so much more!

Check out this video HERE

Here is more information on the tools I used in Silhouette Studio:
– Drawing Tools
– Rotate Panel
– Replicate Object to Path
– Modify Panel
– Compound Paths

And check out the A to Z Silhouette Resource tab at the top of the website as well. You can search for any tool or keyword for Silhouette in alphabetical order.

If you are looking for step-by-step classes for Silhouette, check out all my Silhouette classes on Teachable HERE.

Save this for future reference by pinning the image below.

Enjoy !

THANK YOU for your support! How can you help? Click HERE & buy a coffee.
Every little bit helps with the cost of running the site.

Watch for more from me on the Silhouette Secrets+ blog and YouTube channel this month!

Find me online at: Silhouette Secrets+ Blog – https://bit.ly/3CnLZ8s
Silhouette Secrets+ FB Page – https://www.facebook.com/SilhouetteSecretsplus
Silhouette Secrets+ FB Group – https://www.facebook.com/groups/silhouettesecretsplus
Silhouette Secrets+ Instagram – https://www.instagram.com/silhouettesecretsplus/
Swift Creek Customs FB Page – https://www.facebook.com/swiftcreekcustoms
Swift Creek Customs FB Group – https://www.facebook.com/groups/swiftcreekcustoms

SS Logo snip it

**This post may contain affiliate links. What that means is that I may receive compensation if you purchase through the links I have provided. The price you pay for the product or service is not higher but I may get compensated for sharing.

Posted on — 1 Comment

Creating a shadow box with Silhouette

Everyone starts out with one material or another, mine was paper. I started with my Silhouette as a paper-crafter and it has grown from there.

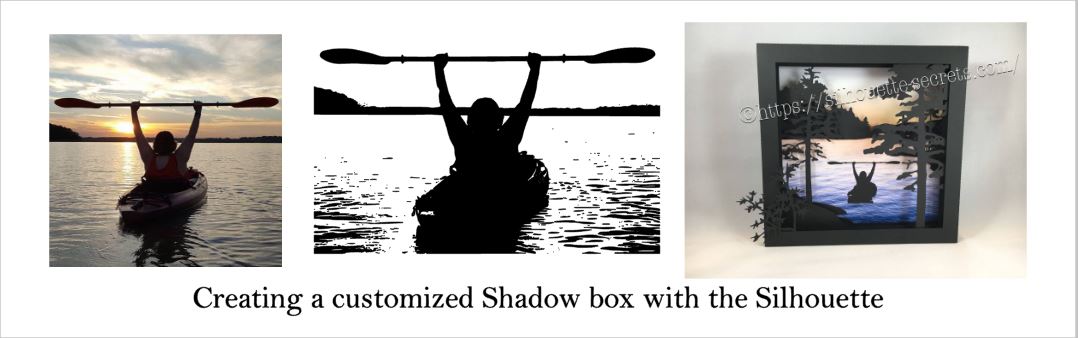
A while back I was visiting friends in Kansas and playing with the Silhouette and my friend asked if I could trace a photo for her that a friend took. Now, photo tracing can be tricky. Each photo can yield different results tracing in the Silhouette Studio and you just never know until you try to see what will happen.

In this case, it was a great photo to trace.

Bobbi's photo

Here is how the trace came out. I used Basic Trace panel to achieve this. Check out the Trace Panel HERE.

Photo trace

Then I released the compound path and deleted the water areas and used the point editing and deleting points to clean up edges and take out the skyline.

Cleaned up

Now, like I said above, each photo is going to vary in how it traces and this one turned out to be pretty simple with a little time for editing.

Then when I saw this Canoe at Sunrise shadow box in the Silhouette Design Store, I knew it was perfect for a gift that I could incorporate this trace into.

Design Store file

Instead of adding the canoe, I cut and added my traced image of my friend on her kayak. It was perfect!

Shadow box

I am one of those people who has to do a project pretty much exactly like the demo, at least the first time. So I did go to the designer’s website and purchase the file again – yes, sounds crazy – but I wanted the backgrounds for this particular project. However, you can use any background that you want and add it to your project.

What are you creating today? Feel free to post your project photos & questions on my Facebook group at Silhouette Secrets+ with EllyMae.

Shadow box

Enjoy !

THANK YOU for your support! How can you help? Click HERE & buy a coffee. Every little bit helps with the cost of running the site.

Looking for more in-depth, step-by-step classes, check out all of my online Silhouette classes on my Teachable site HERE.

SS Logo snip it

**This post may contain affiliate links. What that means is that I may receive compensation if you purchase through the links I have provided. The price you pay for the product or service is not higher but I may get compensated for sharing.

Posted on — 2 Comments

Using multiple files to create a design

Where do you find your ideas?

I am a big Pinterest lover. I pin a lot of things of all categories and sometimes just sit and pin ideas for hours. I find it relaxing. Do I make all the pins I save? No – but I have made quite a few.

Check out my Pinterest boards HERE and maybe you’ll get some ideas.

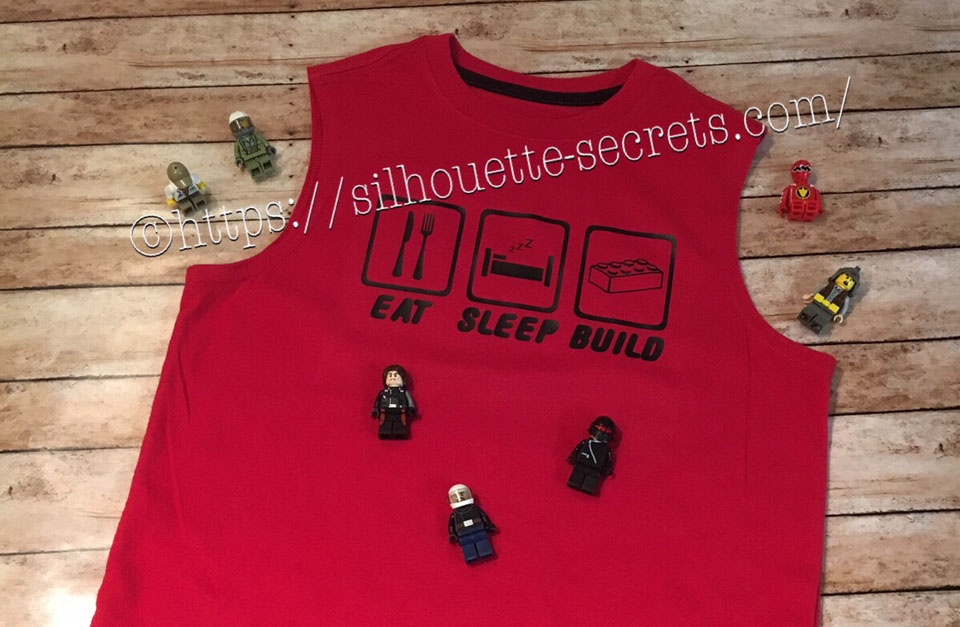
My son was looking for something to put on a shirt and he found one he really liked. I realized I could re-create it with designs from the Silhouette Design Store. My son loves Legos. He will wake up and create something before his eyes are fully opened. And he is good! I have to have directions to follow to make something and that goes for anything – I just don’t have that engineering mind. He can just imagine something and then create it out of Legos. It’s amazing and love that at 6 years old, he is doing that.

While creating this shirt, I used many of the features we have already reviewed in the “Let’s Explore v4” series. Watch for links throughout this post that will explain more about each function I used in designing the shirt.

temp_1

First, I went shopping in the Silhouette Design Store and here are the designs I picked up:

Sleep Icon by Rhonna Farrer – Design #200750 Sleep photo DS

ZP Brick Blocks Print by ScrapNFonts – Design #120497 ZP Brick Blocks Print

Building Block by Snapdragon Snippets – Design #34936 Building Block DS

Kitchen Dingbats by Lori Whitlock – Design #215176 Kitchen Dingbats by LW

Now, I am ready to create my design. I opened each of the designs from my Silhouette library and have them on my mat.

Designs on page1

Now I can start editing them to delete the pieces I do not need.

By releasing and making compound paths, I was able to alter both of these designs to ones that I could use in with HTV on the shirt.

Designs on page1

You can find more information on Compound Paths HERE.

Altered designs

I like to fill all my designs with color as it makes it easier to work with the design and you can see it better. Check out more information on the Fill Color Panel HERE.

Next, I took the drawing tools on the left side and drew a rounded rectangle.

Rounded Rectangle copy

Then I right clicked on the rectangle and chose “Convert to Path”.

Convert to Path copy

This will set the design as a solid rectangle. Before convert to path is chosen, the red dots can still be moved in the top left corner and this will change the angle of the rounded rectangle corners.

Now, make an offset of the rounded rectangle. Find more information on creating an Offset HERE.

Offset

Then select both rectangles, right click and choose “Make Compound Path“. Then fill with color and now there is a rectangle outline.

Rectangle outline

Then the rectangle can be replicated 2 more times for design. Check out more information on the Replicate Panel HERE.

Replicate rectangle

Next, I used the Lori Whitlock Kitchen Dingbats for my fork and knife.

I accessed the Dingbat font in the Text Style Panel under the Glyphs panel and double clicked on the character I wanted.

For more information on accessing glyphs directly in the software click HERE.

LW Dingbats copy

Then I right clicked and chose “Release Compound Path“, deleted the spoon, moved the fork to the right side, selected both and grouped them back together.

Now I have all my designs and just need to resize them to fit inside the rectangles.

Transform Panel - Align

Now that the designs are sized how I like, I can use the Transform Panel – Align tools to make sure they are centered and the spacing between each section is the same. Check out more information on using the Align tools HERE.

All that is left is to create my text. For this, I used the ZP Brick Blocks Print by ScrapNFonts from the Silhouette Design Store.

Block font

I used the Text Style Panel to choose the font that I wanted and then used the Transform -Align Panel to center the words to each rectangle.

Once I have everything centered and aligned how I want it, I select it all and then Group it together, so it moves as one object.

Flip Horizontal

Then I right clicked on the design and chose “Flip Horizontal”, since I am cutting this from Heat Transfer Vinyl. I prefer to flip the image myself and then tell the software to “Send As Is” when it gives me the pop up after clicking on Send, so there is no issue with it flipping it to the wrong side of my mat.

Flip copy

And now you are ready to send this to cut after making sure you blade is installed right and choosing the correct material.

This design is cut out of Siser Easyweed Black HTV and I applied it using my heat press with a Siser Pressing pillow to help raise the design area above the seams.

IMG_4003_edited

My son loved his shirt and I loved creating it by combining several designs.

temp

Are you not finding the exact design that you envision for a project? Why not create your own? Combine designs that you buy, create your own or a combination of both.

Feel free to share the creations you make on my Facebook group at Silhouette Secrets+ with EllyMae.

Enjoy !

THANK YOU for your support! How can you help? Click HERE & buy a coffee. Every little bit helps with the cost of running the site.

Looking for more in-depth, step-by-step classes, check out all of my online Silhouette classes on my Teachable site HERE.
SS Logo snip it

**This post may contain affiliate links. What that means is that I may receive compensation if you purchase through the links I have provided. The price you pay for the product or service is not higher but I may get compensated for sharing.

Posted on — Leave a comment

Simple Santa Ornament

Photo shows a DIY Santa red glitter ornament

Here is another simple ornament made using basic shapes within the Silhouette Studio program.
I created a long rectangle belt after measuring the circumference of my square ornament, which I then cut out of black 651 vinyl.
Then I made 2 squares and used the Subtract all feature to make the belt, which I cut out of silver 651 vinyl. santa-ornament-copy

I then used transfer tape to place the images onto my ornament.

img_4059-1

And added a few clear rhinestones with some E6000 glue and you have a simple Santa belt ornament.

img_4062-2

Hope you are able to create something today1


Enjoy !

THANK YOU for your support! How can you help? Click HERE & buy a coffee.
Every little bit helps with the cost of running the site.

Looking for more in-depth, step-by-step classes, check out all of my online Silhouette classes on my Teachable site HERE.

SS Logo snip it
**This post may contain affiliate links. What that means is that I may receive compensation if you purchase through the links I have provided. The price you pay for the product or servic