
Silhouette IPT is short for Intelligent Path Technology and was first announced to us at the 2023 Silhouette Summit when the Silhouette Cameo 5, Curio 2, and Portrait 4 models were announced.
Affiliate links may be present in the following blog post and as an Amazon Associate, I earn from qualifying purchases.
In this blog post, I am sharing some of the details of the IPT setup and how it works. Read more details below and then watch the video tutorial with even more tips on the Silhouette Secrets+ YouTube channel HERE.
The Silhouette IPT is a patented cutting technology that changes the cut order of a design to “help” it stay in position and complete the cut. Depending on the design you have on the file, when it’s turned on, it will complete the cut of the design in segments versus a continuous cut around the entire design. The photo below shows the standard method of cutting on the left side, that would be from 1 starting point and cut around in one continuous cut back to the starting point on a heart. On the right side, the white dots are points of reference in how the design would be cut in segments, starting on the top right, then moving to the top left and then moving to complete the bottom on each side. This method is designed to “hold” the design in place and not have shifting as it’s being cut.

This new technology was created to help delicate materials such as vellum be more successful when cutting out designs and to cut through multiple layers of materials at once, such as several sheets of vellum stacked on top of the Silhouette Electrostatic Mat.
Here is the video we were shown at Silhouette Summit 2023 to explain the process.
This is a setting you have to set up and turn on in order for it to use the IPT cutting method and is not an automatic setting. It is compatible with the Silhouette Cameo 5, Curio 2, and Portrait 4 models.
Silhouette IPT settings can be found under the advanced settings on a preset setting, or you can turn it on for a custom cut setting. On the Send tab in Silhouette Studio, select the MORE button and you will see a box next to “Intelligent Path Technology”.
Here is a look at Silhouette Studio version 5

And a look at the Advanced Settings in Silhouette Studio version 4

If IPT is selected on a preset material setting, you will need to Save As to create a new material in order for it to be activated on the cut setting. If you simply check the box and X out of the preset material, it will not activate the IPT setting.

How Silhouette IPT (Intelligent Path Technology) Works
Let’s take a real world look at the IPT cut setting and the order that it takes. Keep in mind that the Silhouette software will change this order for every design, and you do not know what the order will be unless you watch and record the machine behavior.
I’ll be using the Silhouette Curio 2 for this demonstration, but it works the same for the Silhouette Portrait 4 and the Silhouette Curio 2. I am using Silhouette Vellum sheets for this test along with a brand new Silhouette Autoblade.
I used the same shape from the video by Silhouette from 2023. I drew the heart using the Flexishapes tool on the left side in Silhouette.

This was completed as a continuous cut, the blade never lifted.
Then I turned the cut lines off for the first heart and turned the cut lines on for the 2nd heart, which is an exact copy of the first one.
My first attempt at this IPT cut, I used the Vellum preset, checked the box, but then X’d out and found out that it did not activate the IPT setting. A new custom setting is required by clicking on Save As after checking the box.
So I made a 3rd copy of the heart and I clicked on the MORE button and checked the box next to Intelligent Path Technology and chose Save As. Then clicked the X in the top right and chose the new material of Vellum (1) as my setting. I then clicked on the MORE button to double check that IPT setting did save with the new material.

The IPT function did work and it cut the heart in 10 different line segments. However, the cut order was a bit different than the video by Silhouette from 2023 and I noticed it started the first cut in the bottom left area of the design. I am using Silhouette Studio version 4.5.815 for this demonstration. The order in which it cuts may vary by software version, which may be why the order is different than what the video shows from 2023.
Here is a diagram of the cut order using IPT with this heart shape

This heart with this specific material cut fine both ways. But, that won’t always be the case.
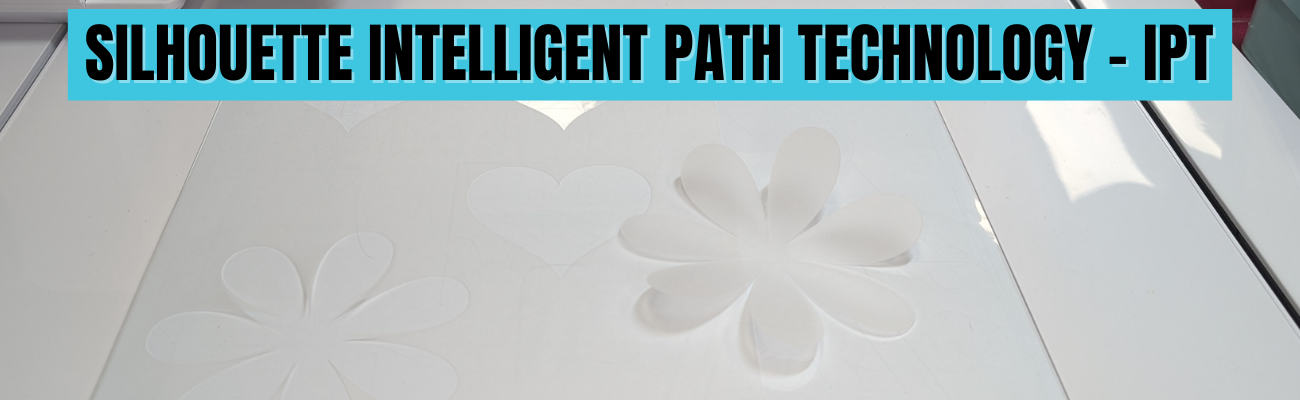
On a more complex design, such as this flower shape drawn with the Flexishapes and the control point adjusted to make a sharper petal, IPT did make a difference in the cut. Instead of tearing, smooshing, or ruining the corners on the interior of the petals, it was a clean sharp point and the design cut well.

For this flower shape that is approximately 4.3″ tall and 4.2″ wide, it did 51 segmented cuts. I am not going to study the video to diagram all that out, however, it was pretty neat to watch. And it was a success, with no smooshed corners or tears. I did have to “pop” out the flower carefully, but for some designs that extra little bit of care is worth it!

Here is a close up look at the interior cuts on the flower shape. Look at those crisp, cut edges! No tearing or smooshing using the IPT feature in Silhouette.

Vellum is a very delicate material and can be difficult to cut, especially on an intricate cut. Vellum will also curl as you can see in this photo, the flower immediately started to curl. Humidity can also affect the success of cutting vellum, well, really any paper is affected by humidity. For best results, store vellum in a sealed envelope and completely flat. The Silhouette Electrostatic Mat is awesome for cutting vellum designs and I share even more in the Silhouette Curio 2 – Out of the Box class found HERE.
Here are a few more vellum products I’ve tested with:
Things to Know About the Silhouette IPT Method
- It is not automatic.
- It is a setting you can turn on for a preset material, then Save As a new material.
- It is a setting you can turn on for a custom setting.
- It does take longer to cut a design because the blade will lift, move, and cut in a different order.
- It will take longer on the Silhouette Curio 2 versus a Silhouette Portrait 4 or Silhouette Cameo 5 model due to the slower movement of the arm on the Silhouette Curio 2. It may only be a few seconds longer, but it will.
- IPT is compatible with the Silhouette Curio 2, Portrait 4, and Silhouette Cameo 5 models.
- IPT setting can be used with both the Silhouette adhesive cutting mat and the Silhouette Electrostatic Mat.
- Testing is the only way you will know if it will work for a design and material.
- The Silhouette software decides the order of IPT based on the shape, size, and design. The user does not see the order or know how many segments a design will be cut out in.
- Don’t believe AI answers on what IPT does or in general how to use a Silhouette. AI has no experience using Silhouette machine and will come back with some very bad advice. Experience using a cutting machine will beat AI hands down – literally.
- This is NOT the same as Cut Order Sorting options found under the Settings (gear icon) on the Send Tab in Silhouette Studio.

Here is a look at where to find the Cut Order Sorting options in Silhouette Studio version 4

I have included more details and real time demonstrations in the video below or on the Silhouette Secrets+ YouTube channel too.
It did take more time to cut, but I was able to successfully cut out a rolled flower design using the Silhouette Electrostatic Mat and IPT setting. This has been something I have troubleshot with users several times and the intricate design just couldn’t be held in place to complete the cut using the standard cutting methods with the electrostatic mat.

I am thrilled with how this worked out!
Does Silhouette IPT Work?
Yes – but not for every design, material, or project. I thought it worked great with the flower design above as that is one of those highly likely designs to smoosh and tear on the sharp corners.
Personally, I do not typically like the little tabs it left, similar to pop out cutting. However, it might be beneficial for those materials or designs that just will not cut the standard way. The only way to know is to test it and see what happens. If you do use it, I would recommend a sharp pair of detail scissors to snip the little connections and care when separating it from the full sheet.
The second part of IPT method for cutting through multiple layers of materials, proved to be much more finicky with mixed results. I spent hours and hours testing and was never really impressed with the results. The more layers of material, the less desirable the cut results were. It is not something I’ve spent more time testing. Maybe someday I’ll try again.
I hope those tips give you a better idea of how this new cut path technology works. You never know until you try and hopefully that will help your trials go a bit easier.
Next time you have a design that is just giving you fits with a standard, continuous cut setup – you might try out the IPT setting and see if it makes a difference in the success with your material.
Good luck!
Save this for future reference by pinning the image below.

Enjoy !
THANK YOU for your support! How can you help? Click HERE & buy a coffee.
Every little bit helps with the cost of running the site.
Silhouette Classes
Never stop learning! Let me help you take the anxiety out of learning with Silhouette and get to creating faster! My Silhouette classes are heavily focused on software, so you can take the skills & techniques taught and apply them to many future projects!