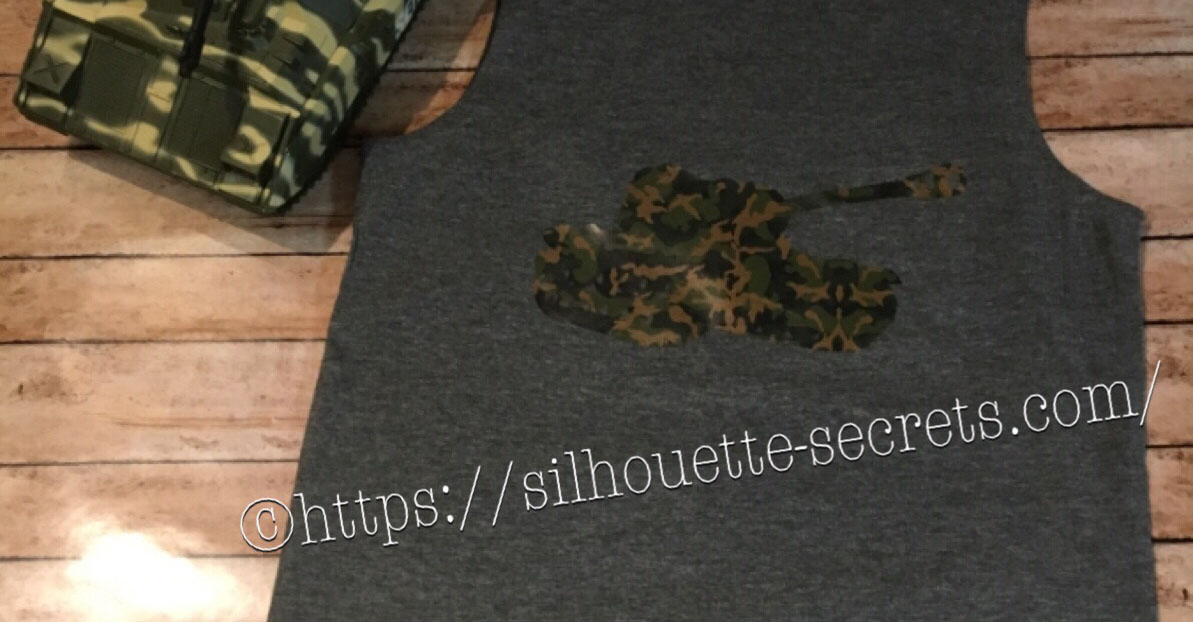
I created this shirt for my son to wear on vacation. He is all about Army and tanks at 6 years old and picked out this Military Set by Studio Ilustrado – Design #83790 in the Silhouette Design Store.
When this file is opened there are multiple designs so I had to right click on it then chose ungroup and deleted the designs I did not want.
THANK YOU for your support! How can you help? Click HERE & buy a coffee.
Every little bit helps with the cost of running the site.
Looking for more in-depth, step-by-step classes, check out all of my online Silhouette classes on my Teachable site HERE.
**This post may contain affiliate links. What that means is that I may receive compensation if you purchase through the links I have provided. The price you pay for the product or service is not higher but I may get compensated for sharing.
I am a big Pinterest lover. I pin a lot of things of all categories and sometimes just sit and pin ideas for hours. I find it relaxing. Do I make all the pins I save?
No – but I have made quite a few.
Check out my Pinterest boards HERE and maybe you’ll get some ideas.
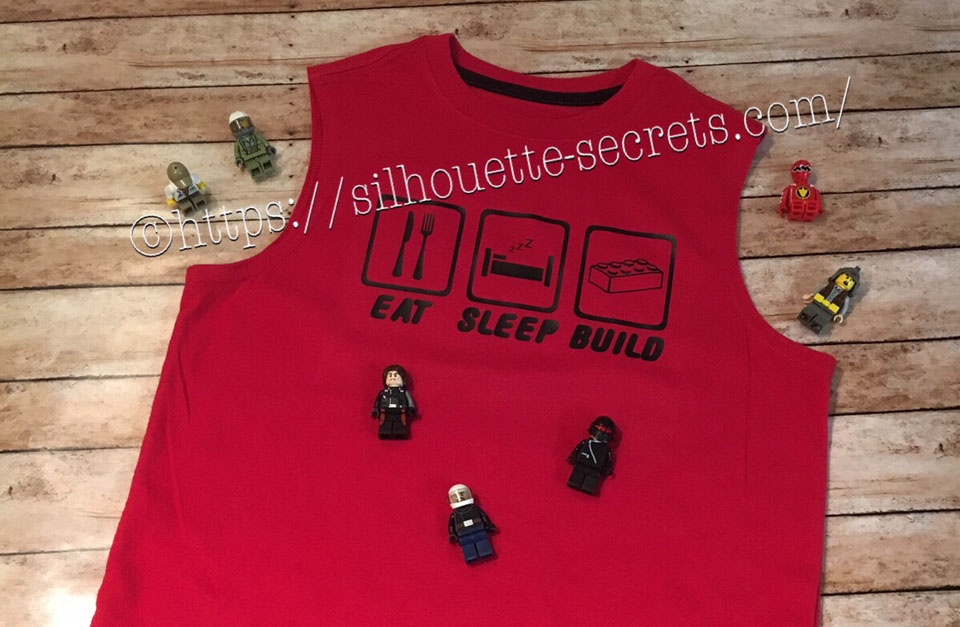
My son was looking for something to put on a shirt and he found one he really liked. I realized I could re-create it with designs from the Silhouette Design Store. My son loves Legos. He will wake up and create something before his eyes are fully opened. And he is good! I have to have directions to follow to make something and that goes for anything – I just don’t have that engineering mind. He can just imagine something and then create it out of Legos. It’s amazing and love that at 6 years old, he is doing that.
While creating this shirt, I used many of the features we have already reviewed in the “Let’s Explore v4” series. Watch for links throughout this post that will explain more about each function I used in designing the shirt.
You can find more information on Compound Paths HERE.
I like to fill all my designs with color as it makes it easier to work with the design and you can see it better. Check out more information on the Fill Color Panel HERE.
Next, I took the drawing tools on the left side and drew a rounded rectangle.
Then I right clicked on the rectangle and chose “Convert to Path”.
This will set the design as a solid rectangle. Before convert to path is chosen, the red dots can still be moved in the top left corner and this will change the angle of the rounded rectangle corners.
Now, make an offset of the rounded rectangle. Find more information on creating an Offset HERE.
Then select both rectangles, right click and choose “Make Compound Path“. Then fill with color and now there is a rectangle outline.
Then the rectangle can be replicated 2 more times for design. Check out more information on the Replicate Panel HERE.
I accessed the Dingbat font in the Text Style Panel under the Glyphs panel and double clicked on the character I wanted.
For more information on accessing glyphs directly in the software click HERE.
Then I right clicked and chose “Release Compound Path“, deleted the spoon, moved the fork to the right side, selected both and grouped them back together.
Now I have all my designs and just need to resize them to fit inside the rectangles.
Now that the designs are sized how I like, I can use the Transform Panel – Align tools to make sure they are centered and the spacing between each section is the same.
Check out more information on using the Align tools HERE.
Once I have everything centered and aligned how I want it, I select it all and then Group it together, so it moves as one object.
Then I right clicked on the design and chose “Flip Horizontal”, since I am cutting this from Heat Transfer Vinyl. I prefer to flip the image myself and then tell the software to “Send As Is” when it gives me the pop up after clicking on Send, so there is no issue with it flipping it to the wrong side of my mat.
And now you are ready to send this to cut after making sure you blade is installed right and choosing the correct material.
My son loved his shirt and I loved creating it by combining several designs.
Are you not finding the exact design that you envision for a project?
Why not create your own?
Combine designs that you buy, create your own or a combination of both.
THANK YOU for your support! How can you help? Click HERE & buy a coffee.
Every little bit helps with the cost of running the site.
Looking for more in-depth, step-by-step classes, check out all of my online Silhouette classes on my Teachable site HERE.
**This post may contain affiliate links. What that means is that I may receive compensation if you purchase through the links I have provided. The price you pay for the product or service is not higher but I may get compensated for sharing.
What an amazing weekend spent with colleagues and new Silhouette friends!
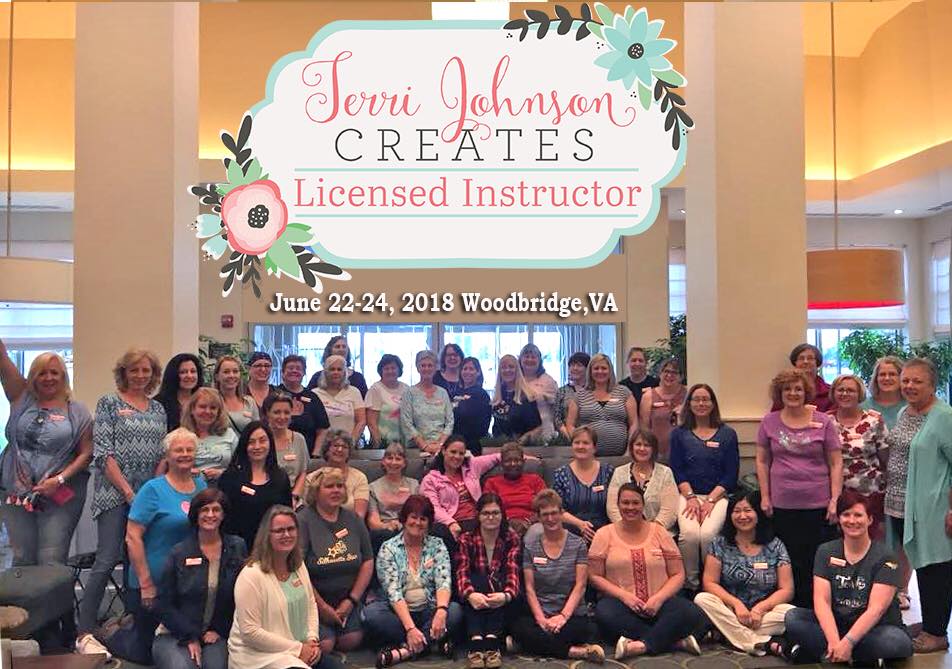
I was on staff at the Terri Johnson Creates Silhouette Instructor Licensing retreat two weeks ago and let me tell you, while it may have been long days, I still woke up feeling like my battery was recharged on Monday morning.
First, I want to say Congratulations to all the new TJC Licensed Silhouette Instructors!
It was an amazing weekend meeting you all and seeing some of you I already knew.
I loved watching attendees create all of the projects and seeing that light shine when they finished their creations or learned a new technique in the software.
That is what I love about being an Instructor!
A weekend full of Silhouette machines, class projects and new friends! And to top it off, working with my colleagues, who have become some of my closest friends since I attended the TJC Silhouette Licensing Program in September 2016.
We laughed, we talked, we bounced ideas off each other, we laughed some more….. we cried because we were laughing so hard.
This makes it all worth it – the friends you meet!
The weekend was filled with business tips, Silhouette software, projects created with the Silhouette, demos, tips, tricks, troubleshooting and lots of fun!
On Saturday evening, during the hands on session, I showed a demonstration of the Silhouette Curio etching on an acrylic coaster. This little Curio machine has very quickly become well loved in my studio and I am amazed at what it can do.
Here are just a few of the projects I’ve created using my Curio machine.
Since I attended the TJC Licensing Program in September of 2016, I have expanded my knowledge of Silhouette and many more things – more than I ever could have imagined. I have been teaching Silhouette classes in person, by video conference call and by phone; been on staff for several Terri Johnson Creates Events including the Curio Intensive, All Things Silhouette Conferences and Licensing; started the “Let’s Explore v4” series on my blog; am an Admin on several Facebook groups; written several guest posts for Silhouette School and Craft Chameleon; created product/project videos for Craft Chameleon and am now recording and creating video lessons for users who do not have access to a hands on event.
I still don’t know where it’s leading me, everyday seems to bring a new opportunity.
But, I am enjoying it and learning as I go.
Each Silhouette user will read this and take something different away from it.
Do you want to know more about becoming a TJC Licensed Silhouette Instructor?
(Click HERE)
Do you want to look for a hands on event or local Instructor in your area?
(Click HERE)
Do you want to check out more information on the Instruction that I offer or have an interest in video lessons?
(Click HERE)
Do you want to check out the “Let’s Explore v4” series?
(Click HERE)
Do you just want to get your Silhouette machine out and play?
YEA!!!
That is the best way to learn. Of course, it is always a little easier with some guidance and that is why the Terri Johnson Creates Licensed Silhouette Program was created.
Who knows where this path will take me, but I know my life is different because I am on it and I would not trade meeting these wonderful ladies (and many more not pictured) for anything in this world.
**This post may contain affiliate links. What that means is that I may receive compensation if you purchase through the links I have provided. The price you pay for the product or service is not higher but I may get compensated for sharing.
Affiliate links may be present in the following blog post and as an Amazon Associate, I earn from qualifying purchases.
Let’s Explore v4 Tutorial– Nesting Panel in Silhouette
If you have the Designer Edition upgrade to the Silhouette Studio, the Nesting Tool is available in the software.
This feature allows you to “nest” the design together to either conserve material or create a new design.
Let’s Explore the Nesting Panel.
Set Selected Shape as Boundary – Select a shape to be the nesting boundaries. Make copies of the design across the page, then draw a rectangle.
Select the rectangle and choose Set Selected Shape as Boundary.
The rectangle turned blue and is now the nesting boundary. Then select all the designs and choose Nest.
.
It will nest the design within that shape.
Use Cut Area or Use Selected – With a shape selected as a boundary, the “Use Selected” option is checked.
If the entire page size is being used, then the “Use Cut Area” is checked.
Only Shapes on Media – Choose whether you want to include all the designs that are on the design page, no matter where they are, such as the holding area or only designs on the Media.With Only Shapes on Media checked, it will only nest the designs showing on the design mat.
If Only Shapes on Media is unchecked, then it will nest all the designs, no matter where they are on the page.
Align – This will align as many designs with each other as possible. Here align is unchecked and the Rotations is increased to 4.
With Align checked, it gives a different nesting option.
Padding – Increase or decrease the amount of space between each design when it’s nested.Above the Padding is at 1 and below the padding has been changed to 5 and allows extra spacing or padding between each design.
Rotations – Choose how many times a design can be rotated to make it nest with another design. Here the rotations have been increased to 12 and changes the nesting a little bit.
Nest – Choose this when you are ready for the design to nest according to the settings you have chosen.
Why would you use this?
Do you have a piece of material that is 5″ x 7″ and you want to fit as many of a design as you can on the material without manually adjusting each design? The nesting tool will help, let the software work for you.
Or how about nesting a design within a larger design?
This would be a great start to filling the shape with words and then you can add more to it.
Keep in mind that you do need the Designer Edition software upgrade or higher to access this feature.
Check out the A to Z resource to learn even more about Silhouette HERE.
Save this for future reference by pinning the image below.
Enjoy !
THANK YOU for your support! How can you help? Click HERE & buy a coffee. Every little bit helps with the cost of running the site.
Silhouette Classes
Never stop learning! Let me help you take the anxiety out of learning with Silhouette and get to creating faster! My Silhouette classes are heavily focused on software, so you can take the skills & techniques taught and apply them to many future projects!
**This post may contain affiliate links. What that means is that I may receive compensation if you purchase through the links I have provided. The price you pay for the product or service is not higher but I may get compensated for sharing.
If you are Silhouette Cameo 3, Cameo 4, or Curio owner and have plugged your machine into your computer, you will have access to the Stipple Panel.
With a Cameo 3 or 4, you can use a pen or marker to stipple a design. This means that the design is a series of dots. With this feature you can turn any design or photo into a stippled image.
With a Curio, the Stippling tool and the embossing mat can be used together to create the stippled design on other media types. With the Curio, it actually makes small indents in the material such as the Stippling metal sheets. The Stippling tool is designed to be used with the Curio machine.
Stipple Edge – This option will add Stippling dots around the edges of the design on the screen.
*Mama Needs Wine by Dawn Nicole Designs – Design #209918
Spacing – Adjust the spacing between the dots on the Stipple edge by increasing or decreasing the inches here.
Stipple Fill – Choose from many fill options. The way it fills in with a stipple will vary with each design.
Grid Spacing – Increase or decrease the grid spacing of the design being stippled.Here I have decreased the grid spacing on all the designs to 0.500 inches. This places more of the design and stipple into a smaller grid area on the original object.
Stipple Spacing – Increase or decrease the spacing of the stipple dots to be closer or farther from each other. Something to note here is that with some Stipple fill patterns, options may be grayed out because they do not apply. As you can see in the first 2 of my example here.Here I increased the Stipple spacing to 0.100 inches.
Scale Factor – Increase or decrease the scale of the points by a percentage.Here I scaled all of them down to 50%. As you can see, with each option, the look of the design changes and you can hardly recognize which options that I filled each with.
Angle – Change the angle of how the design fills the object.Above, the Angle is set for 135 degrees on all the designs.
Offset – This controls how far the fill pattern starts from the edge of the original design.Above, I have changed the offset to 0.250 inches and you can see that on all of the hearts, it has started the fill pattern 0.250 inches from the edge of the design.
Stipple Size – Change the size of the Stipple point.This option only changes the visual look of your design and does not change how big of a point the pen or tool will stipple.
Print Stipple – By checking this, the design can be sent to the printer to print the stippled image.
Keep in mind that the more dots you add to your design, the more details that is for your Studio program and computer to process. What does that mean? That means the more details you have in your design, the more data you computer is processing. If you experience a lag, be patient, the computer is working and will catch up.
Now, another thing to note, if you missed it in the beginning, is that this Stipple feature is only available for Cameo 3 or Curio owners, otherwise, the panel will be grayed out.
There are so many fun options to explore in the Silhouette software – hope you have fun creating today!
Feel free to post on my Facebook group at
Silhouette Secrets+ with EllyMae.
Enjoy !
THANK YOU for your support! How can you help? Click HERE & buy a coffee.
Every little bit helps with the cost of running the site.
Looking for more in-depth, step-by-step classes, check out all of my online Silhouette classes on my Teachable site HERE.
**This post may contain affiliate links. What that means is that I may receive compensation if you purchase through the links I have provided. The price you pay for the product or service is not higher but I may get compensated for sharing.
Today we are exploring the Pop Up Panel. Did you know there was such a thing? If you have v4.1.197 or higher of the Silhouette software, then this is available to you.
This is a neat feature that you can take a design and make it pop out of base shape, such as a card.
Let’s take a look at how we can go from this
to this
First, I started with my Page Size set at 5.5″ x 8.5″ for my card base and turned it to a Portrait Orientation.
Next, I drew a 5.25″ x 8.25″ rectangle to fit inside my card base. I used the Scale Tab to get the exact dimensions I wanted for my inner rectangle.
Then, I used the Align Tool to Center the design to my Page.
Then, I pulled down a vertical Guide (blue line) from the top to line it up with the center fold line of my card at 4.25″. Guides are a Designer Edition upgrade feature and you can turn them on and off under the Page Setup Panel – Tab 2.
Now, open the design you want to use for the Pop up card.
We are now ready to take a look at the Pop Up Panel features.
Convert Selected Shapes to Popup – Select the Design and click this to create your Popup shape on your base. Lines will show up on the design at the top and towards the bottom.The bottom line is the score line for the center of the card. Match the score line up with the Guide created at 4.25″When the design is selected, a directional arrow in the center appears & that can be used to move and adjust the design and pop up features and vary the length of the design to pop out of the base.The farther down you pull the arrow, the more the features adjust.
Pull the red dots on either side of the score line out to the edges of the card, so it will score a fold line to the edge of the card.
Restore Original Shapes – This will restore the shape to the original design. This is great if you decide you don’t like it and want to start fresh.
Release Popup – This releases the design into individual cut lines, which can be used to further manipulate the design how you like it.
Each line will now become it’s own separate piece and can be moved or deleted, as you see fit.
Base Width – This will adjust the base width of the score line on the bottom edge of your design where it meets the card.Here I increased it to 57% to show you how it looks. Each design will vary in how it looks and the look you want to achieve.
Min. Strut Width – This adjusts the Popup tabs at the top of the design. As the number increases the number of tabs goes down.I increased the Min. Strut Width to 0.269″ and it changes so there are only 5 tabs at the top of my design.
Dash Pitch – Dash pitch adjusts the score line width and how far each line will cut before skipping to the next one.
And here is the final view on the Send tab before you go to cut the Popup design.
Send your design to cut and assemble the card.
This PopUp feature is amazing!
So many options & so much fun to create with.
What is the best way to learn? Play, play, play!!!
Will you make mistakes? YES! Everyone makes mistakes!
But you learn as you go!
Yes, you read that right. I used Oracal 651 vinyl on a card. This would not work with all cardstock as it will depend on the fibers of the cardstock but a high quality, smooth cardstock you should have no issues using transfer tape to apply your design.
THANK YOU for your support! How can you help? Click HERE & buy a coffee.
Every little bit helps with the cost of running the site.
Looking for more in-depth, step-by-step classes, check out all of my online Silhouette classes on my Teachable site HERE.
**This post may contain affiliate links. What that means is that I may receive compensation if you purchase through the links I have provided. The price you pay for the product or service is not higher but I may get compensated for sharing.
The offset panel in Silhouette Studio is a really useful and functional tool that can be used in many project designs from creating frames, thickening fonts, making layers, and more! This tutorial will show the details of the offset panel and then examples of how an offset can be used several ways.
Affiliate links may be present in the following blog post and as an Amazon Associate, I earn from qualifying purchases.
This tool can be very useful for many things such as creating a background layer for a decal, creating a shadow, thickening fonts, making frames, etc.
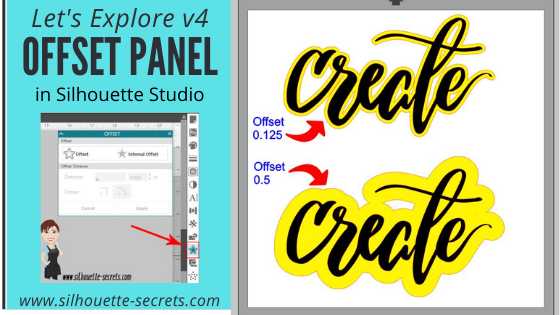
Offset – This tool creates a copy of the design on the outside edge of the original shape. The default distance is 0.125 inches in older software versions and that is what shows when Offset button is chosen, it can then be adjusted. Select your design and click on the Offset button.
*The default distance was updated in later versions of 4 and will be the last used distance number.
*the offset is filled with yellow for you to see it better
Once the Offset is applied, it will automatically weld together and any parts that are overlapping will now be welded. Keep in mind that if there is a part of the design, such as a dot of an i, that is not overlapping, it will not be welded and it will need to be grouped after you create your Offset.
Internal Offset – This will apply the offset inside of the design. The default is set for 0.125 inches here too and most likely you won’t see any offset created, if that is left. Once you decrease the offset distance, you can see a change happen.
*The default distance was updated in later versions of 4 and will be the last used distance number.
This is one way to fill a font that you want to use the sketch pens with. By creating multiple internal offsets, the sketch pen will “fill” the font in by drawing all the internal offsets.Here is an example of creating multiple internal offsets to “fill” in a font to sketch.
This was many internal offsets, so many I lost track of how many I created.
First, I will say that it took a lot of ink to fill this in. I was using the Silhouette sketch pens and your results will vary depending on the pen you use and the tip it has on it.
You can see above that even with multiple internal offsets, it did not fill in completely with the Silhouette sketch pen.
In some cases, it is not worth the ink or the time to use the sketch pens like this and would be easier to use the Print and Cut feature instead.
Offset Distance – Change the Distance of the offset to achieve the look you want.
Offset Corner – Change the look of the offset created by changing the corner shape.
Cancel or Apply – Choose whether to Apply the Offset (can also hit Enter key) or Cancel.
Let’s take a look at some examples of using Offsets.
Creating an offset as a background to layer a decal:
Check out how I created this and then used layering marks to line up the decal exactly HERE.
Using a Offset to create a space when subtracting and layering HTV:
Using an Offset to thicken fonts for cleaner cutting:
The Samantha font is very popular but it can sometimes be a pain to cut for small projects, a small offset can make a big difference without changing the look too much.
Using an Offset to make a frame:
Make an Offset of the original design, select the offset & original, then right click and choose Make Compound path or use the Modify Panel and choose Make Compound path. Now, you have a frame.
There are many ways to use the Offset and these are just a few examples. How do you use the Offset feature?
Save this for future reference by pinning the image below.
Enjoy !
THANK YOU for your support! How can you help? Click HERE & buy a coffee. Every little bit helps with the cost of running the site.
Silhouette Classes
Never stop learning! Let me help you take the anxiety out of learning with Silhouette and get to creating faster! My Silhouette classes are heavily focused on software, so you can take the skills & techniques taught and apply them to many future projects!
**This post may contain affiliate links. What that means is that I may receive compensation if you purchase through the links I have provided. The price you pay for the product or service is not higher, but I may get compensated for sharing.
So last week we talked about the differences in welding, subtract, subtract all, intersect, divide and crop in the Modify Panel – Tab 1. This week we are moving on to something that I think is very often more confusing than it should be – Modify Panel – Part 2 – Compound Paths.
First, if you are just joining us, the Modify Panel is on the right side of the Silhouette Studio v4 software.
Last week we dove into the top section of the panel under the Modify header and this week we are going to look at the bottom section – Compound Paths and Detach Lines.
So first, what is a compound path?
A compound path is a way 2 shapes interact with each other.
For example – let’s look at the letter ‘O’.
The letter ‘O’ is made up of 2 ovals on top of each other that are a compound path (left). If you release the compound path, then you have 2 ovals stacked on top of each other (right).
Both of these will still cut the same, but a compound path design when filled with color, will look more like the end result of what you are cutting.
Let’s take another look:
I have used the USA State Dingbat Font by Sandi Idleman in the Silhouette Design Store, to create my state shape. Then I used the Text Tool to write out Montana and placed it across the design.
On the top, the 2 designs are layered on top of each other, they are treated as 2 designs. The middle design is still just 2 designs that have been filled with a color. And the bottom design I selected both shapes and choose Make Compound path. This has taken and cut the Montana out of the bottom state shape, now they are one design.
Now, let’s look at them on the Send Panel.
They all have the same bold cut lines. All of them will cut the same, the difference is how they look in the software when you are designing.
Now that we know a little more about how the Compound path works, let’s finish the Modify Panel.
7. Make Compound Path – This will take 2 or more designs and combine the paths making them 1 design.
For instance, some files from the Silhouette Design Store will open and you will notice if you fill it will color, that it looks odd. This is a Camera design by Amy Tangerine – Design #181402.
All of these camera designs will cut the same, but how they look on the design screen is affected by choosing Making Compound Path.
8. Release Compound Path – This will take 1 design and releasing it into multiple shapes.
For example, if I wanted to use this Fish Mandala design by Zigi Design Studio but I just want the outline of it, I can choose Release Compound Path.
This will take the design from 1 layer and release all the layers. You may need to Ungroup the Design at this point, it just depends on how the Designer created and saved the file.
Now, you can see all the selection boxes that are highlighted. The Compound Paths have been released and it is now in many layers.
Note: When you do this on such a complex design, it increased the amount of data in that file because each piece is now an individual layer. So keep that in mind when you do this, in case your computer seems sluggish or with a really complex design, you may get a Not Responding message. It’s a lot of date, so be patient.
There are many reasons why you would want to do this and it can be helpful to know how to “break up” a design by releasing the compound paths.
With these tools, you can make the designs you have go farther.
For example, after I released the Compound Path and moved the outline away, then I could add text in the middle of the design, select both and choose Make Compound Path and it would then cut the Montana text out of the center of the fish.
9. Detach Lines – If the image is filled with color, this option will separate the colored parts of the design from the lines of the design.
This is a Spring Butterfly Set by Sophie Gallo – Design #56994.
You could use this option when doing a Print and Cut project versus changing the line color on each design.
If you click on the Send tab, you will see that they both have Cut lines on the design, but one is the lines and one is the image with the fill.
Here is the same idea but the Butterflies were filled with a pattern and then detach lines was chosen.
And there you have all the tools in the Modify Panel. Check out Part 1 of the Modify Panel HERE.
Now, the best way to learn is to play, play, play. Go find a design and see what compound paths do!
THANK YOU for your support! How can you help? Click HERE & buy a coffee.
Every little bit helps with the cost of running the site.
Looking for more in-depth, step-by-step classes, check out all of my online Silhouette classes on my Teachable site HERE.
**This post may contain affiliate links. What that means is that I may receive compensation if you purchase through the links I have provided. The price you pay for the product or service is not higher but I may get compensated for sharing.
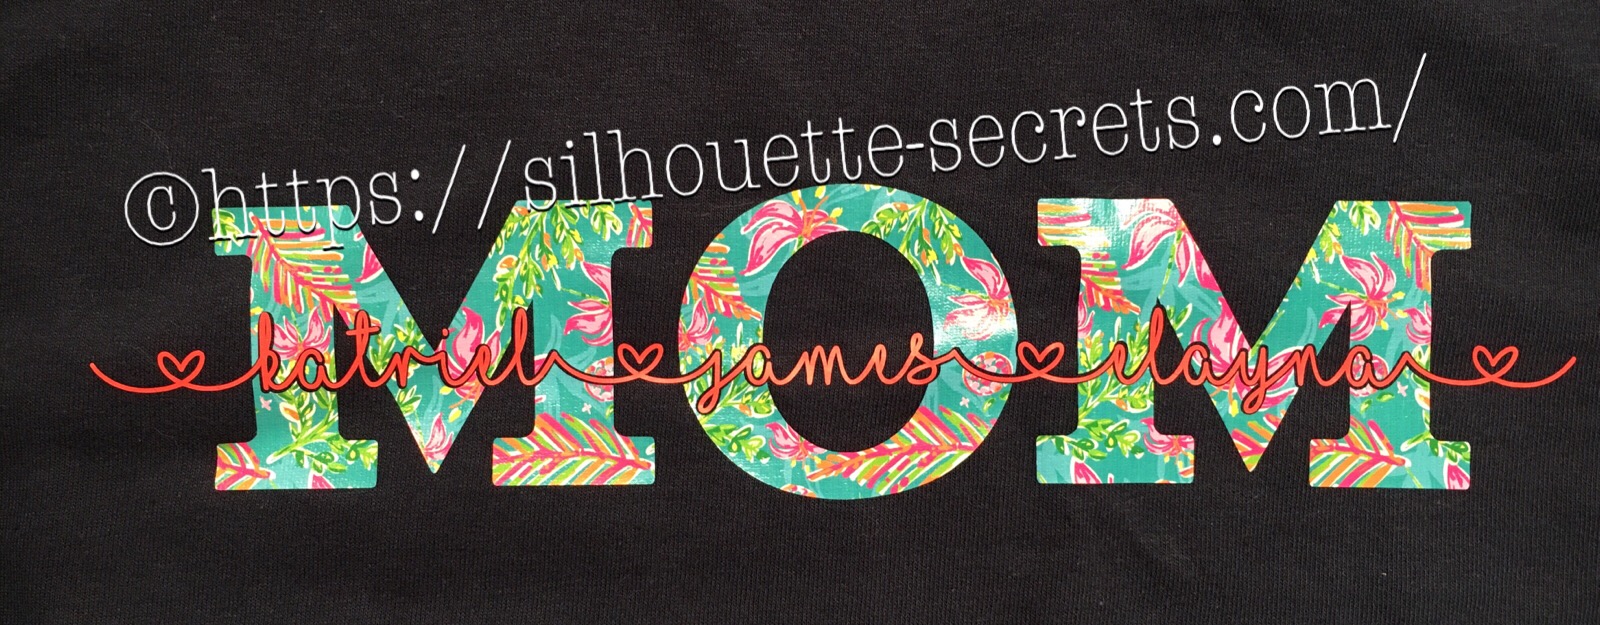
If you’ve ever wanted to turn a simple word into meaningful, personalized word art, the “subtract the name from Mom” technique is one of the most popular and impactful designs you can create in Silhouette Studio. By using basic subtract, weld, and text tools, you can carve a child’s name directly out of the word “Mom,” transforming it into a custom design that feels both modern and deeply personal. In this tutorial-style project, I’ll show you how to build this custom MOM shirt word art and then bring it to life by cutting it from HTV to create beautiful, custom apparel that’s perfect for gifts, family matching shirts, or keepsakes.
These designs have been a big hit for Mother’s Day and we will walk through how to created one.
Affiliate links may be present in the following blog post and as an Amazon Associate, I earn from qualifying purchases.
Create a Custom MOM Shirt with Silhouette & HTV
First click on the Text Tool on the left side of the Silhouette Software.
Click on the design mat & type out the words.
Click off of the words to deselect it and then click back on the text once to select it.
Fill the text with color to make it easier to see & work with.
Now, click on a Font Style Name, the text will change to that font style.
You can then either click on each font, use the text search bar if you know what you are looking for or use the arrow keys to scroll through the text list and as you do the words will change to each font – this is my favorite method if I don’t know what font I want.
For Mom, I chose a font called Gulana – I chose this one by just scrolling through my font list and seeing what I liked best.
Now, resize it how you like it.
Next using the same text tools, type out your second layer.
I used the font MF I Love Glitter by Misti Fonts in this example. The swirl hearts are called Glyphs and are special characters within the font that you can add.
Since this font overlaps make sure to weld the letters together before you cut.
Now position your name design over the top of the Mom design and align it how you want it.
We are going to Subtract the top layer (names) from the bottom layer (Mom).
First, I’d suggest creating an offset. When you are using HTV and pressing individual layers, the HTV can shrink as it’s applied with heat. To help with that we will create an offset, so we don’t have unwanted gaps in our design.
First, make a copy of your design and pull it off to the side in the holding area of the design space. Any time you are working with text, it’s a good idea to make a copy and pull the original off, just in case you need to go back. Once you edit text, it is no longer text and is now treated as a vector image – so the text is no longer editable.
Next, select your name text and click on the Offset Panel on the right side of Silhouette Studio v4.
Then next to the Distance highlight the numbers and type in 0.040, then click on Apply or hit Enter. The Distance of the offset will vary depending on the design you are using. Enter some larger or smaller offsets and see what you like – the Undo button will be your best friend.
The offset option gives you an outline around your text. It can also be used to make text thicker when you are using a very fine line font.
Once you Apply the offset, it will weld any parts that are overlapping. Parts of the design that are not overlapping (like dots of an i) will not be welded together, so you will need to group the offset before you move it, so it all moves as one.
Now move your original text off of the Mom design.
To create this design, we are going to use the Mom and the offset of our name text.
Select both Mom and the offset and under the Modify Panel, choose Subtract.
This will Subtract the top layer (offset) from the bottom layer (Mom) and any pieces that are not connected will now be individual. I would group these together before anything gets moved.
The Group option can be found in the QAT (Quick Access Toolbar) at the top of the software, right click and choose Group or under the Object menu at the top left of the software.
Now, we can move our original text back on top of our Mom design.
You can see when we zoom in that we have created a gap in our layering. This is done with the purpose of allowing for the shrinkage of the HTV and not getting unwanted gaps in our design.
Do you have to do an offset before you use the Subtract option? No, but it can save some frustration when the HTV does shrink.
Now, you are ready to set it up to cut out the material.
I used this awesome Sparkleberry Vaca HTV by Sparkleberry Ink on the Mom design. This is a patterned vinyl and you do not have to mirror or flip your image when you cut their patterned vinyl.
For the name text, I am using Siser Easyweed HTV in Hibiscus. Since this is regular HTV, I will flip (mirror) the text prior to cutting.
Next, prepare your materials. Cut them down to the size you need or place each one on the mat individually, however you like to cut.
Click on the Send tab in the top right corner. Select your Material. Heat Transfer – Smooth is what I used for both the pieces I cut.
Once your mat is loaded, I always suggest doing a Test Cut before cutting the full design. This can save you a lot of frustration in the long run.
Click on the Send button at the bottom and once it’s cut you can weed your designs.
Layer & press the designs on your t-shirt or tote bag and you have a custom made design.
This MOM shirt technique could be used to create many different custom designs such as DAD, NANA, GRANNY, etc.
Save this for future reference by pinning the image below.
Enjoy !
THANK YOU for your support! How can you help? Click HERE & buy a coffee. Every little bit helps with the cost of running the site.
Silhouette Classes
Never stop learning! Let me help you take the anxiety out of learning with Silhouette and get to creating faster! My Silhouette classes are heavily focused on software, so you can take the skills & techniques taught and apply them to many future projects!
**This post may contain affiliate links. What that means is that I may receive compensation if you purchase through the links I have provided. The price you pay for the product or service is not higher, but I may get compensated for sharing.
The Modify Panel has lots of neat tools in it that perform a variety of functions.
It can be found on the right side of the Silhouette Studio v4.
Let’s take a look at all the tools in this panel.
Weld – Joining two or more objects that are overlapping together to form 1 object. This is often used with text when you want it to cut as one solid design vs individual letters.You will notice that the top text, the red lines from the characters overlaps the letter next to it. If you sent it to cut like this, it will cut out the red lines exactly how they show, so your letters would have cuts through them.By choosing to weld the font first, you can join the letters together so it cuts as one smooth piece. After you have welded, any piece of the text that is not overlapping will now be a separate object – like the dots of the i, so you want to make sure to Group them together to keep the text moving as one design.
When you weld text, it does change it from editable text to a vector image, so make sure to make a copy & pull it off to the side so you have the original in case you need to go back.
Subtract – Takes the top layer and subtracts it out of the bottom layer under it.On top is the original design. Mom is typed out and behind the names.
When you select both designs and choose Subtract, it subtracts out the names (top layer) from the Mom design (bottom layer).
This works well for things like layering HTV where you don’t want the bulk of layering on your shirt or if you are using glitter HTV that is not recommended to be layered.
Tip: with this design, I would create an offset of the original names and then use the offset to subtract from the Mom design. It gives you a little more flexibility in placement when you apply it to the shirt.
I used a 0.20 offset on this design. Then moved the original name text away and used the Mom (bottom layer) and the offset (new top layer) to Subtract.
Since I used an offset, this will allow you to place your names text inside of the area when applying the HTV and you won’t have to worry as much about shrinkage and getting it perfect.
Move the name text back on top of your Subtracted design to get an idea of how it looks. On the top design, you have to get the exact placement of the names lined up with the bottom layer. On the bottom design, you will notice there is a bit of white showing around the name text, this will be beneficial when you are applying HTV so you don’t have to worry as much as about the HTV shrinking when you press each color.
I used MF I love glitter font by Misti Fonts and Gulana font.
Keep in mind if you plan to sell creations with these fonts, you will want to purchase the Commercial License for each.
If you are using adhesive vinyl, it is not as much of an issue because there is no shrinkage. But, you will still need to get it lined up perfectly and layering marks can help with that – check out how to do that HERE.
Subtract All – This option removes any part of an design that is behind another design.
I always start my pulling off a copy of my design to the holding area off the mat, so I can go back to the original if needed.
So above I drew a heart and moved it behind my Mom and name layers. Make sure to align the design how you want and then I chose Subtract All and it cuts out the top 2 layers from the very bottom layer (heart).
This works great for making designs that you don’t want to have the bulk of materials overlapping.
Again you could use an offset to help with ease of getting it lined up and not worrying about shrinkage.
Intersect – When 2 or more designs are overlapping, this will keep only the part of the design that is intersecting between the designs and the rest is deleted.
Divide – When 2 or more designs are overlapping, this will divide any parts that are overlapping, but keeps all of the pieces on the design mat. Nothing is deleted.
Crop – This will allow you to crop a shape out of a pattern, design or in this case a photo.Draw a heart over the photo, select both the photo and circle, then choose Crop and it will take that shape out of the layer under it.
There are so many neat things you can accomplish with these tools under the Modify Panel. I encourage you to draw some shapes, pull in some patterns and just play around with them to see what they do.
Save this for future reference by pinning the image below.
I truly believe that if you learn how to create in the software, the possibilities are endless!
The software is the key!
And it is such a powerful program that is available for anyone to use.
I would love to see what you are creating or learning with your Silhouette!
Feel free to post photos or questions on my Facebook group at
Silhouette Secrets with EllyMae.
Enjoy !
THANK YOU for your support! How can you help? Click HERE & buy a coffee.
Every little bit helps with the cost of running the site.
Looking for more in-depth, step-by-step classes, check out all of my online Silhouette classes on my Teachable site HERE.
**This post may contain affiliate links. What that means is that I may receive compensation if you purchase through the links I have provided. The price you pay for the product or service is not higher but I may get compensated for sharing.
THANK YOU for your support! How can you help? Click the link to buy a coffee. Every little bit helps in the cost of running the site.









 *
*

 Here I have decreased the grid spacing on all the designs to 0.500 inches. This places more of the design and stipple into a smaller grid area on the original object.
 Here I increased the Stipple spacing to 0.100 inches.
 Here I scaled all of them down to 50%. As you can see, with each option, the look of the design changes and you can hardly recognize which options that I filled each with.
 Above, the Angle is set for 135 degrees on all the designs.
 Above, I have changed the offset to 0.250 inches and you can see that on all of the hearts, it has started the fill pattern 0.250 inches from the edge of the design.
 This option only changes the visual look of your design and does not change how big of a point the pen or tool will stipple.


 The bottom line is the score line for the center of the card. Match the score line up with the Guide created at 4.25″When the design is selected, a directional arrow in the center appears & that can be used to move and adjust the design and pop up features and vary the length of the design to pop out of the base.
 The farther down you pull the arrow, the more the features adjust.
 Pull the red dots on either side of the score line out to the edges of the card, so it will score a fold line to the edge of the card.

 Each line will now become it’s own separate piece and can be moved or deleted, as you see fit.
 Here I increased it to 57% to show you how it looks. Each design will vary in how it looks and the look you want to achieve.
 I increased the Min. Strut Width to 0.269″ and it changes so there are only 5 tabs at the top of my design.








 You will notice that the top text, the red lines from the characters overlaps the letter next to it. If you sent it to cut like this, it will cut out the red lines exactly how they show, so your letters would have cuts through them.
 By choosing to weld the font first, you can join the letters together so it cuts as one smooth piece. After you have welded, any piece of the text that is not overlapping will now be a separate object – like the dots of the i, so you want to make sure to Group them together to keep the text moving as one design.
When you weld text, it does change it from editable text to a vector image, so make sure to make a copy & pull it off to the side so you have the original in case you need to go back.
By choosing to weld the font first, you can join the letters together so it cuts as one smooth piece. After you have welded, any piece of the text that is not overlapping will now be a separate object – like the dots of the i, so you want to make sure to Group them together to keep the text moving as one design.
When you weld text, it does change it from editable text to a vector image, so make sure to make a copy & pull it off to the side so you have the original in case you need to go back. On top is the original design. Mom is typed out and behind the names.
When you select both designs and choose Subtract, it subtracts out the names (top layer) from the Mom design (bottom layer).
This works well for things like layering HTV where you don’t want the bulk of layering on your shirt or if you are using glitter HTV that is not recommended to be layered.
Tip: with this design, I would create an offset of the original names and then use the offset to subtract from the Mom design. It gives you a little more flexibility in placement when you apply it to the shirt.
On top is the original design. Mom is typed out and behind the names.
When you select both designs and choose Subtract, it subtracts out the names (top layer) from the Mom design (bottom layer).
This works well for things like layering HTV where you don’t want the bulk of layering on your shirt or if you are using glitter HTV that is not recommended to be layered.
Tip: with this design, I would create an offset of the original names and then use the offset to subtract from the Mom design. It gives you a little more flexibility in placement when you apply it to the shirt.
 I used a 0.20 offset on this design. Then moved the original name text away and used the Mom (bottom layer) and the offset (new top layer) to Subtract.
 Since I used an offset, this will allow you to place your names text inside of the area when applying the HTV and you won’t have to worry as much about shrinkage and getting it perfect.
 Move the name text back on top of your Subtracted design to get an idea of how it looks. On the top design, you have to get the exact placement of the names lined up with the bottom layer. On the bottom design, you will notice there is a bit of white showing around the name text, this will be beneficial when you are applying HTV so you don’t have to worry as much as about the HTV shrinking when you press each color.
 I used
  So above I drew a heart and moved it behind my Mom and name layers. Make sure to align the design how you want and then I chose Subtract All and it cuts out the top 2 layers from the very bottom layer (heart).
This works great for making designs that you don’t want to have the bulk of materials overlapping.
Again you could use an offset to help with ease of getting it lined up and not worrying about shrinkage.
So above I drew a heart and moved it behind my Mom and name layers. Make sure to align the design how you want and then I chose Subtract All and it cuts out the top 2 layers from the very bottom layer (heart).
This works great for making designs that you don’t want to have the bulk of materials overlapping.
Again you could use an offset to help with ease of getting it lined up and not worrying about shrinkage.

 Draw a heart over the photo, select both the photo and circle, then choose Crop and it will take that shape out of the layer under it.









