Posted on Leave a comment

One SVG, Four Stunning Projects: Crafting with Diva Watts Designs and Silhouette

Silhouette Secrets+ with EllyMae

Looking for creative ways to get more out of your cut files? In this post, I’m sharing how I used one SVG file from Diva Watts Designs to create four unique and beautiful projects—all with Silhouette! From a layered cardstock sign with vinyl to an interchangeable home décor frame, greeting cards, and even a custom wood sign, you’ll see just how versatile one SVG project can be. Whether you’re crafting for fun, decorating your space, or creating gifts, this post is packed with inspiration and ideas to help you make the most of your designs.

Affiliate links may be present in the following blog post and as an Amazon Associate, I earn from qualifying purchases.

When you look at a design file, do you see one project idea, or can you envision it on multiple projects? I started the Crafting Creativity series to help spark ideas and inspiration to do more with your files.

Design featuring a floral pattern with the words 'Oh, Hello' on a circular background, accompanied by the logo of Diva Watts Designs.

I took this Oh Hello design by Diva Watts Designs and am sharing several projects below that could be created from this one file.

First, here is a look at a finished wood sign by Diva Watts Design using this design.

A round wooden sign featuring a floral design with the text 'Oh, Hello' in a stylish script. The sign has a natural wood background and a black band at the bottom with white lettering.

Crafting Creativity Projects with Diva Watts Designs

One simple design opens the door to endless crafting ideas. You may look at this design and say, “I don’t have a laser, so I cannot do anything with it.” But that’s simply not the case! Let’s take a look at a few possibilities.

Project #1 – Door Hanger with Cardstock and Vinyl

A round chalkboard sign featuring a floral design with the text 'Oh, hello' written in a playful font. 
Blog post features one SVG to create multiple projects.

Rather than limit yourself to a specific material, use different materials to create a similar style. I used cardstock and vinyl added to a pre-made wood backer for this design.

Check out this post – How to Make a DIY Door Hanger Sign with Cardstock & Vinyl Using Silhouette HERE for more details.

A round wooden sign featuring the phrase 'Oh Hello' with floral designs above and a dark horizontal band across the middle, resting on a crafting mat with tools nearby.

Additional Resources:

Supplies Used:

Project #2 – Card Designs

I love this one! I used just the hello part of the design, cut a bit off the left side using the Knife tool and then welded it to rectangle frame. Then I made an offset of the design and layered it together to make it pop.

A close-up of a layered cardstock project featuring the word 'hello' in a decorative font, set on a wooden table with adhesive tools and a cutting machine in the background.
Blog post features one SVG to create multiple projects.

Using just the text from the wood sign design I created the next cards. Don’t throw out those bits! In some cases, like this one, you can use the negative part of the design that’s been cut and create with it too!

Craft projects featuring the phrase 'Oh Hello' on colorful cardstock, along with crafting tools like scissors and a tape runner, displayed on a wooden surface.
Blog post features one SVG to create multiple projects.

When using the negative of a design, a quick trick to get the placement is to use the positive part of the design as your “stencil” and glue the pieces in place first. This means that the design will be placed exactly where you want it. I show using this technique in a video on the Swift Creek Customs channel HERE.

After I used the background as a stencil, I used double-sided foam tape to pop up the striped background to give it some dimension on it’s own card. One cut = 2 card designs.

Additional Resources for the tools I used to create the designs:

Supplies Used:

Project #3 – DIY Glass Frame Sign with Vinyl and Sharpie Markers

I love creating projects that can be repurposed and have use all year long! This glass frame with the flower portion of the design does just that.

A colorful glass frame sign featuring the text 'hello FRIENDS' with a floral illustration at the bottom, surrounded by crafting markers and tools.
Blog post features one SVG to create multiple projects.

I cut the flower design from adhesive vinyl and added it to the backside of the frame. Then colored that in using Sharpie markers on the backside. While that was drying and the adhesive vinyl curing, I designed several backgrounds to swap out in the frame. This really makes the project versatile and something that can be used year round.

A framed sign featuring the text 'life is beautiful' with a colorful gradient background and floral design at the bottom, surrounded by craft markers.
Blog post features one SVG to create multiple projects.

There are so many patterns & design sentiments options out there!

A framed design featuring floral elements and an inspirational quote, surrounded by craft markers and tools on a workspace.
Blog post features one SVG to create multiple projects.

This was another project that I didn’t even bother to use registration marks with. I designed it the size I needed and then used a paper trimmer to cut the straight edges to fit the frame. Sometimes I think we can overcomplicate projects just because we have a machine that can cut things. A good ole paper trimmer is a great tool to have in your tool box!

See the step-by-step tutorial for this project here – DIY Interchangeable Glass Frame Sign with Silhouette Studio – One Project for All Seasons

Additional Resources:

Supplies Used:

Project #4 – Wood Sign

Finished laser wood sign created with a design by Diva Watts Designs. Blog post features one SVG to create multiple projects.

I used my Glowforge laser to cut all the pieces out of a piece of Maple Plywood. Here is a look at the pieces etched, scored, and cut out.

Laser-cut wood pieces featuring the text 'Oh Hello' and floral designs on a cutting bed.

I prefer to mask my wood pieces before cutting with the laser and then I can simply remove the masking and they are much cleaner.

Once I had all the pieces cut, the Posca Paint Markers made this so easy to color in. Painting is not my favorite part of the finishing process and I hate waiting for things to dry, but I’m getting used to it. Coloring with the paint markers was so satisfying.

Close-up of a round wooden plaque with a floral design, surrounded by various colored markers and a measuring tool, showcasing crafting materials.

The larger pieces I did end up using a bit of acrylic paint to cover the larger surface area.

Crafting workspace with colorful markers, a green wood piece, and a round wooden sign adorned with flowers and the word 'hello' in yellow.
Blog post features one SVG to create multiple projects.

I shared my process including how I set up the “OH, hello” to score on the wood section so that I knew exactly where to glue the pieces in place in this video on the Silhouette Secrets+ YouTube channel HERE – Laser Engraved Wood Sign Using Silhouette Studio

A workspace displaying tools and materials for crafting a laser wood sign, featuring markers and a circular cut wood piece with flower designs.
Blog post features one SVG to create multiple projects.

Additional Resources:

Supplies Used:

All of these projects were completed using just 1 file from Diva Watts Designs! Stacey has so many more amazing designs too!

Find designs by Diva Watts Designs at:

Follow along with Diva Watts Designs on the Diva Watts Designs websiteFacebook and Instagram too!

A great big thank you to Stacey at Diva Watts Designs for contributing the free file for the Silhouette Secrets+ newsletter for the month of July! If you missed grabbing the free design in July, it is available in the Silhouette Design Store HERE.

This year I started offering a free file each month for Silhouette Secrets+ newsletter subscribers. I love designing in the Silhouette Studio software and have shared some of my creations as well as look forward to collaborating with more artists in the future too!

Silhouette Secrets+ Newsletter

Never miss out on the news, tips, “secrets”, deals, classes, and more that I share on Silhouette Secrets+. Sign up for the newsletter and get information delivered to your inbox every Friday.
Unsubscribe at anytime.

Sign up for the weekly newsletter HERE to have information delivered direct to your inbox and grab each month new freebie.

Did this give you some ideas? How about how you can take 1 file and create a variety of projects with it. I had so much fun brainstorming, designing, and creating with this file. See more ideas and inspiration in the Crafting Creativity section on the website HERE.

Save this for future reference by pinning the image below.

Collage of four crafting projects showcasing the 'Oh Hello' design by Diva Watts Designs, featuring a wooden sign, a floral artwork, and greeting cards, highlighting creative variations using Silhouette tools.

Enjoy !

THANK YOU for your support! How can you help? Click HERE & buy a coffee.
Every little bit helps with the cost of running the site.

Silhouette Classes

Never stop learning! Let me help you take the anxiety out of learning with Silhouette and get to creating faster! My Silhouette classes are heavily focused on software, so you can take the skills & techniques taught and apply them to many future projects!

Silhouette step-by-step Classes by Silhouette Secrets+

Silhouette Secrets+ with EllyMae
**This post may contain affiliate links. What that means is that I may receive compensation if you purchase through the links I have provided. The price you pay for the product or service is not higher but I may get compensated for sharing.
Posted on 1 Comment

LIVE Silhouette Studio Tutorial: Create a Stunning Pop Out Top Card & Master Print & Cut!

Pop Out Top Card
Silhouette Secrets+ with EllyMae

New Silhouette tutorial step-by-step to creating a Pop Out Top Card & Mastering Print and Cut in Silhouette Studio on the Silhouette Secrets+ YouTube channel.

Just a quick note to share the link for the Live Silhouette tutorial that happened this month.

Silhouette Pop Out Top Card Tutorial

Click the photo above or find it HERE.

Silhouette Pop Out Top Cards with Print and Cut

This card design technique could be used for many different projects such as place cards, treat toppers, or a card too!

Supplies used for Pop Out Top Card Projects:

Additional Resources:

Here’s a look at another design with this same technique too!

Pop Out Top Card with Silhouette

Make sure to check the Silhouette Secrets+ Upcoming Events tab HERE for future Live tutorials and other events too!

Save this for future reference by pinning the image below.

Silhouette Tutorial Pop Out Top Card

Enjoy !

THANK YOU for your support! How can you help? Click HERE & buy a coffee.
Every little bit helps with the cost of running the site.

Silhouette Classes

Never stop learning! Let me help you take the anxiety out of learning with Silhouette and get to creating faster! My Silhouette classes are heavily focused on software, so you can take the skills & techniques taught and apply them to many future projects!

Silhouette step-by-step Classes by Silhouette Secrets+

Silhouette Secrets+ with EllyMae
**This post may contain affiliate links. What that means is that I may receive compensation if you purchase through the links I have provided. The price you pay for the product or service is not higher but I may get compensated for sharing.
Posted on 2 Comments

Off the Edge Die Cut Card with Silhouette

Off the Edge Die Cut Card with Silhouette

In this tutorial, I’m going to share how I created what’s called an “Off the Edge” die cut card with my Silhouette machine. This can add an interesting element to any card design and is fun to create.

Affiliate links may be present in the following blog post and as an Amazon Associate, I earn from qualifying purchases.

Off the Edge Die Cut Card with Silhouette

I recently attended the Card Maker Success Challenge hosted by Brandi Mahon of Stamp Me Some Love and was so inspired by her card ideas. I took the card ideas she was sharing and modified them to be used with my Silhouette software and machine. If you are looking for card making inspiration, I recommend you check out her monthly Card Maker’s Success Subscription.

Supplies Used:

Creating an Off-the-Edge Die Cut Card with Silhouette

The Background

First, I opened up an Alcohol Ink Background by Sarah Hurley and printed that as a full letter size page for my card backgrounds. I printed this onto Koala Glossy Photo Paper and it turned out awesome!

Alcohol Ink Background by Sarah Hurley Silhouette

I have a Canon TS9521C that is a borderless printer, but you can do the same even without a borderless printer.

Alcohol Ink Glossy Photo Paper

Then, I will use a paper trimmer to cut the page down to the size I need for my cards front. But, I won’t know the size until I have the other pieces cut out, so I just set this aside.

Designing in Silhouette Studio

Drawing the Card Pieces

Next, in the Silhouette software, using the Drawing Tools on the left side, draw out a rectangle and then scale it to 4.25″ x 5.5″ or whatever card size you are wanting. Unlock the lock to be able to change the height and width of the rectangle individually. Type the number and press Enter to set the dimension. Find more on the Scale Tools HERE.

Silhouette Drawing Tools and Scale Tools

Select the rectangle and then choose Align Left in the Alignment tools. With only 1 object selected it will align it to the left side of the page. This will help us in just a minute with our design.

Silhouette Studio Align Tools

Choosing a Sentiment

Next, open the sentiment design you want to use or with the Text Tool and type out the sentiment you want. If you type out the text, make sure to weld any overlapping pieces.

I used Hello by Diva Watts Designs found HERE for this card design.

Open Hello Design by Diva Watts Designs

Scale the hello down to fit within the card base and use the green dot at the top to rotate it to the desired angle. Or you can use the Rotate Panel and rotate to 45 degrees and adjust from there.

Editing the Card Front

Next, open the Page Setup Panel – Tab 2 and check the Show Grid and Snap to Grid boxes.

Silhouette Snap to Grid

This is going to allow us to adjust the rectangle and maintain straight lines.

Double click on the red line of the rectangle to bring up the Edit Points. Drag the top left edit point (gray dot) down.

Silhouette Edit Points

Grab the top right edit point and drag it down, so the top of the rectangle is angled as desired to run through the middle of the sentiment.

Silhouette Edit Points

With the Snap to Grid tool activated, it snaps the edit points to specific locations and easily allows the design to be manipulated and maintain the straight lines of the card edges.

Once the edges are how we want, Show Grid and Snap to Grid can be toggled off on the Page Setup Panel – Tab 2 again. I find the grid lines distracting when designing, but they can easily be turned back on if needed.

Create a Copy for Future Templates

Make a copy of the card base and you can use it for future cards as a starting point.

Silhouette Make Copies

Select both the card base and the sentiment and Align the Center in Silhouette. Depending on the design, center aligned may not look centered to the eye. Use the arrow keys to adjust if needed in small increments any direction.

Silhouette Center Align

Adding an Offset

Next, click on the sentiment to select it and open the Offset Panel on the right side. Click Offset and adjust the distance of the Offset as desired, then click Apply or press Enter. The distance of the offset will all depend on the sentiment and the size you are using. There is no magic number.

Silhouette Offset Panel

The offset should overlap the angled rectangle securely and not have too many tiny bits to be cut out.

Silhouette Weld

Welding the Offset to the Card Front

After clicking on Apply, the offset will be selected. Hold the Shift key down and click on the angled rectangle so that both are selected, then right click and choose Weld.

Silhouette Compound Path

This now combines the angled rectangle and the offset into 1 cut and creates the off-the-edge design. If there are any tiny bits like what the red arrow points to above, those are not needed in the design. Move the sentiment off of the design.

Then right click on the design and choose Release Compound path. Click off of it to deselect and click back on the little bit, press delete. When all the pieces you want are deleted, select the entire design again, right click and choose Make Compound Path.

Silhouette Compound Path

Use the drag select method to select all the pieces at the same time. Left click the mouse and hold it down in the top left corner above the design and drag it all the way through the design to the bottom right corner. Anything that the selection box touches, should be selected.

Cutting the Card Pieces & Assembly

Now you have your pieces for the Off-the-Edge card design designed and ready to cut in Silhouette.

Off the Edge Die Cut Card

I cut the sentiments from Oracal 651 Black vinyl and applied it to the off-the-edge piece that I cut from white cardstock. I reused a piece of transfer tape to apply it and was careful that it didn’t stick to the cardstock too much. You could also cut from cardstock and glue to the front, but adhesive vinyl makes it a bit quicker to assemble and the glossy sentiment made it pop with the photo paper background too!

Oracal Adhesive Vinyl 651 Cut Sentiments

Then I took the printed sheet of the alcohol background paper and cut it to 4.25″ x approximately 3.5″ with my paper trimmer. This size depends on how far the left side of the off-the-edge cut comes down. I used a Scrapbook tape runner to adhered the alcohol background to the front of a card base at the top.

You can either buy ready made card bases or make your own. In this card tutorial HERE at 32:30, I show how I cut my own card bases from a letter size sheet of paper.

Off the Edge Die Cut Card

Then used foam tape to add the off-the-edge cut piece to the front of the card at the bottom.

Off the Edge Die Cut Card

Off-the-Edge Die Cut Cards with Silhouette

Once you have the basics of the card creation down, you can modify it for different sentiments. Save the angled rectangle as a template for future card cuts.

Off the Edge Die Cut Card with Silhouette

I also created this with a Happy Birthday design by Erica Digital Designs, a Thank You design by Erica Digital Designs, and a Thank You design by Dresden Carrie.

Off the Edge Die Cut Card with Silhouette

The first card will take the longest to design, but then you will have all the steps and if you save the files, you can easily open in the future and get to cutting.

You will also notice that a couple of mine got a bit close to the edge and really did go off-the-edge. For these I can just snip that part off before placing in the envelope, but in the future I’ll adjust the design a bit smaller so the offset doesn’t go outside the bounds. Something like that is easily corrected in the software when it happens to you.

Save this for future reference by pinning the image below.

Off the Edge Die Cut Card with Silhouette Pinterest

Enjoy !

THANK YOU for your support! How can you help? Click HERE & buy a coffee.
Every little bit helps with the cost of running the site.

Silhouette Classes

Never stop learning! Let me help you take the anxiety out of learning with Silhouette and get to creating faster! My Silhouette classes are heavily focused on software, so you can take the skills & techniques taught and apply them to many future projects!
Silhouette step-by-step Classes by Silhouette Secrets+

**This post may contain affiliate links. What that means is that I may receive compensation if you purchase through the links I have provided. The price you pay for the product or service is not higher but I may get compensated for sharing.
Posted on Leave a comment

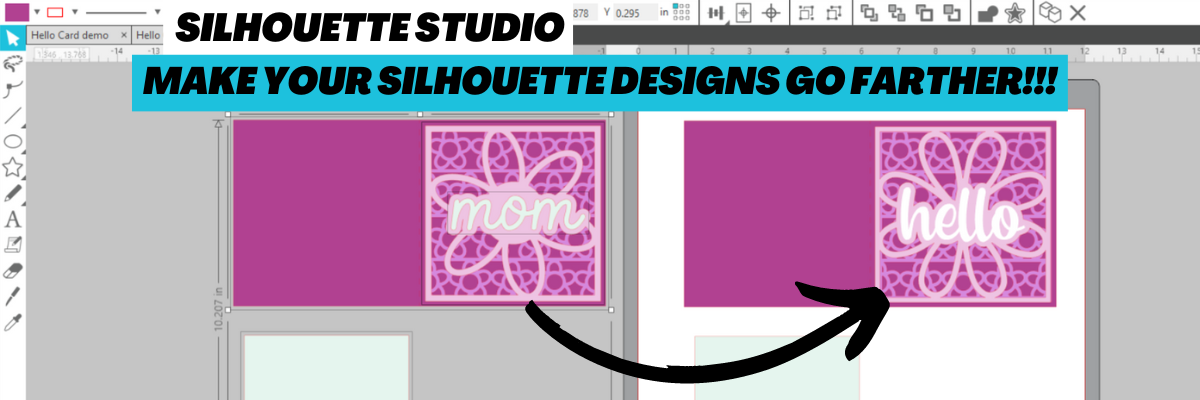
Make Your Silhouette Designs Go Farther

Affiliate links may be present in the following blog post and as an Amazon Associate I earn from qualifying purchases.

Did you know that the Silhouette Design Store has a new free file every week?

In today’s video tutorial on the Silhouette Secrets+ YouTube channel, I am sharing how you can take a design and using some of the tools in Silhouette Studio, alter the design to fit your needs.

This file is a Mother’s Day Flower Card file

and I changed it up to be a Hello card.

Supplies used:
Mother’s Day Flower Card by Silhouette – Design #436258
Daisy Flower Frame by Sweet Elise – Design #59629
Sharpie Pen font by Flycatcher Design – Design #299019
Recollections Pink Button Cardstock Pack
Recollections Dreamy Cardstock Pack
Recollections White Cardstock
– Tombow Mono Liquid Glue – Michaels or Amazon

Check out the new video tutorial HERE on the Silhouette Secrets+ YouTube channel.

And check out Part 2 of Make Your Designs Go Farther HERE

Here are more resources on each of the tools in the Silhouette Studio software that I used for this tutorial:
Release and Make Compound Path
Weld
Offset
Fill Color Panel
Line Color
QAT – Quick Access Toolbar
Text Style Panel

I love all the possibilities in the Silhouette Studio software!

Save this for future reference by pinning the image below.

Enjoy !

THANK YOU for your support! How can you help? Click HERE & buy a coffee.
Every little bit helps with the cost of running the site.

Looking for more in-depth, step-by-step classes, check out all of my online Silhouette classes on my Teachable site HERE.

SS Logo snip it
**This post may contain affiliate links. What that means is that I may receive compensation if you purchase through the links I have provided. The price you pay for the product or service is not higher but I may get compensated for sharing.
Posted on 1 Comment

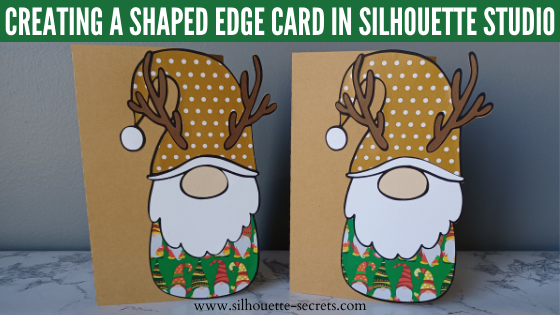
Create a Shaped Edge Card in Silhouette

Have you ever had a design that just kept “talking” to you and creating more ideas to be made with it?
My gnome design file took on a life of it’s own and one project after another came to mind. In this post I’m sharing how I created a Gnome Shaped Edge card. I am using the same design from the last post found HERE where I used this simple Reindeer Gnome design by Lilium Pixel SVG to create a layered cut file.

Affiliate links may be present in the following blog post and as an Amazon Associate I earn from qualifying purchases.

Then the ideas just kept coming and this shaped edge card came to life.

Gnome Shaped Edge Card Design

In just a few steps create a shaped edge card base.

Creating a Gnome Shaped Edge Card

Start with a card base.
The standard sizes for U.S. are 4.25″ x 5.5″ or a 5″ x 7″ card.
However, you can create the card base any size you want.
Keep in mind that you want it to fit in an envelope if mailing.

Silhouette Studio Create a Card Base

Here are 2 ways you can create the card base:
Draw your own using a rectangle and a line – check out how to do that HERE
or use the Project Wizard to create the card base – more on how to do that HERE.

Make sure that the score line is ungrouped from the outside edge of the card base.
In the photo above, you can see there is a gray selection box around both the outer edge and the score line in the middle. This means that they are no longer grouped together.

Open the design to use for card edge onto the same design mat as the card base.

Silhouette Studio Creating Gnome Shaped Edge Card
Gnome layered design created in this tutorial found HERE

Check out the tutorial on
Creating a Layered Cut File from an Outline HERE

Next, move the design to the right side of the card base so the right edge of the design is on the right edge of the card base.

Silhouette Studio Gnome Shaped Edge Card Creation

Scale the design to fit exactly from the top to bottom of the card base.
Use the corner bounding box to scale the design down. Keep the design within the boundaries of the card base you’ve created so you know it will fit in the envelope after it’s cut.

Gnome Shaped Edge Card Design Creation

Now that it is the size we need, make a copy and pull to one side.

Using the design that is still on the card base, ungroup it if necessary and move the pieces off. We only need to work with the background/outline of the design since we have a copy of the original.

Gnome Shaped Edge Card Design Outline

Double click on the card base outer edge to bring up edit points.
Edit points are the data points that create a design. The Silhouette machine “connects the dots” in order to complete the cut.

Silhouette Studio Edit Points

For more detailed information on edit points check out this post –
Let’s Explore v4 – Edit Points HERE.

With the Edit Points active, click at the top of the gnome shape to add an edit point.

Silhouette Studio Add Edit Points

Next, grab the top right corner and move it inside the gnome shape.

Silhouette Studio Move Edit Points

Now click at the bottom of the gnome shape to add an edit point.

Silhouette Studio Alter Edit Points

Next, grab the bottom right corner and move it inside the gnome shape.

Silhouette Studio Gnome Shaped Edge Card Design

Select both the card outer edge and the gnome shape.
Do not select the score line.
To select, click off the shapes to deactivate the edit points. Then click back on the gnome shape, hold the Shift key down, and click on the outer card base line.

Silhouette Studio Select Gnome Shape and Card Base

With both selected, right click and choose Weld.
If the shape was filled with color when welded, the entire shape will take on that color. It may also bring it to the front. Right click and choose Send to Back and/or change the fill color as needed.

Silhouette Studio Weld Gnome Shape to Card Base

Move the original copy of the design on top of the shaped edge and it should fit together.

Silhouette Studio Gnome Design Shaped Edge Card

Ta-da! You’ve created a shaped edge card.

Cut all the pieces and glue together to create a unique card.

Gnome Shaped Edge Card Finished Project

Check out the full video tutorial on my YouTube channel HERE.

I would love to see what you are creating with your Silhouette software or machines!
Feel free to post photos or questions on my Facebook group at 
Silhouette Secrets with EllyMae.

Save this for future reference by pinning the image below.

Gnome Shaped Edge Card Design Pinterest

Enjoy !

THANK YOU for your support! How can you help? Click HERE & buy a coffee.
Every little bit helps with the cost of running the site.

Silhouette Classes

Never stop learning! Let me help you take the anxiety out of learning with Silhouette and get to creating faster! My Silhouette classes are heavily focused on software, so you can take the skills & techniques taught and apply them to many future projects!

Silhouette step-by-step Classes by Silhouette Secrets+

Silhouette Secrets+ with EllyMae
**This post may contain affiliate links. What that means is that I may receive compensation if you purchase through the links I have provided. The price you pay for the product or service is not higher but I may get compensated for sharing.
Posted on 3 Comments

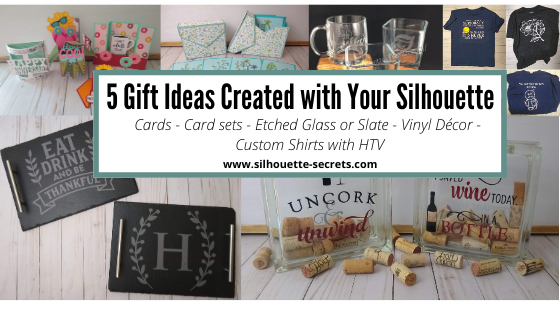
5 Gift ideas created with Your Silhouette machine

There are so many possible things that you can create using your Silhouette machine. Today let’s take a look at some possible gift ideas you can create.

Each one of these gifts can be tailored to your needs or personalized in their own way.

5 Gift ideas

1 – Cards
2 – Card sets
3 – Custom Etched projects
4 – Glass block décor
5 – Custom t-shirts with HTV

I’ve provided more details on each project below such as examples, supply lists, and resources. Perfect to get started with gifts for the year!

Gift idea details

Affiliate links may be present in the following blog post and as an Amazon Associate I earn from qualifying purchases.

1 – Cards

The great part about cards is anyone can do it!
They can be simple 2 color cards or range up in complexity.

A hand-made card is a special gift, no matter if the recipient appreciates that or not. It is because you created it! You used your time & talent to create it!

Supplies used:
Cardstock
Michael’s Recollection cardstock
Close to My Heart cardstock
– any high quality cardstock will work, cut settings may vary by brand
Adhesive
Scrapbook EZ Runner tape runner
Scrappy Tape or Score Tape
Xyron Sticker Maker
Glue Dots
Foam Tape
– I use a variety or combination of whatever is best for the project
Assorted Embellishments or Tools as needed
Silhouette sketch pens*
Watercolor pencils*
Water brush*
*used in the sketch cards above

You can use as little or as much as you want on the cards.

Resources:
Cards with your Silhouette
Cutting Cards with the Silhouette
Creating Cards with Your Silhouette – Free Z-fold card cut file
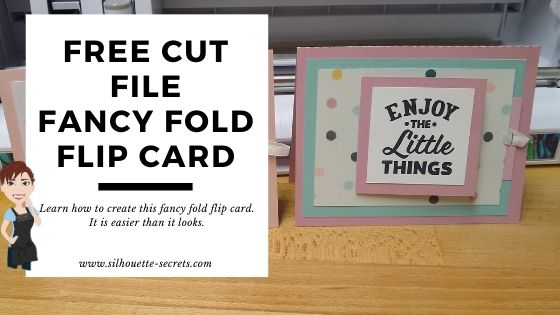
Let’s Explore v4 – Creating a Card – Free Fancy Fold Flip Card cut file
A Fun Card with Silhouette
Sketching with Silhouette

2 – Card sets

Need a special gift for someone who has everything.
A set of Thank You cards or Birthday cards might be the perfect idea!

Make a custom card box for the cards to be stored and gifted in to add to it.

Supplies used:
Floral Border Sketch by Silhouette – Design #67187
Sketched Florals by Silhouette – Design #334152
Sketch font of your choice
A2 Card Envelope box by Lori Whitlock – Design #315108
– Cardstock and Adhesive – *see card details above for suggestions

3 – Custom Etched Projects

Etched glass

Etched slate serving tray

Supplies used:

– Glass coffee mug from Target
– Glass candle holders from Dollar Tree
– Slate:
Serving tray in photo above from Johnson Plastics Plus
Other slate: Cheese board, hexagon coasters, circle coasters also can be found on Amazon
Etchall Etching cream
Some use Armour Etch, but I prefer Etchall and get a perfect etch each time. I have used Armour Etch in a pinch and it was ok, but highly recommend using in a well ventilated area for either.
– Oracal 651, 631, or Oramask 813 for stencil
– Transfer tape
Adhesive vinyl and transfer tape can be found at:
Expressions Vinyl, Heat Press Nation, Silhouette America or Swing Design
Pretty much anything that can stick and seal well so the etching cream does not seep underneath can be used as a stencil

Designs used:
Glass Etched designs:
Coffee Pulse by Sophie Gallo – Design #149882
Yay Coffee by Dawn Nicole Designs – Design #188578
Shells by Tanya Batrak – Design #205625
1 Piece Flower by Samantha Walker – Design #7833
Etched Slate designs:
Eat Drink and Be Thankful by Jillibean Soup – Design #280222
Monogram Family 6 by Lori Whitlock – Design #271080

Resources:
Step-by-step Glass Etching Class on Teachable

4 – Glass block décor

Supplies used:
– Glass blocks from Hobby Lobby or other (these have a hole to insert objects inside)
– Adhesive Vinyl and transfer tape
Adhesive vinyl and transfer tape can be found at:
Expressions Vinyl, Heat Press Nation, Silhouette America or Swing Design

Designs Used:
Uncork & Unwind Phrase by Kolette Hall – Design #142100
I Saved Some Wine Today Phrase by Kolette Hall – Design #131228

Resources:
Layering Vinyl
Layered Vinyl decal for a teacher gift
Layered Vinyl Acrylic Ornament
Creating a Vinyl Decal & Layering Adhesive Vinyl class on Teachable

5 – Custom shirts with HTV

Here are a few shirts I created for family members. Having the ability to customize and create designs in the Silhouette software is a big plus.

These VooDoo designs had jumped in my cart at some point in the past and it was perfect for a couple family members having surgery and who have chronic pain.
They loved them!

Supplies used:
– Shirts
– Siser HTV
Can be found at the following retailers:
Expressions Vinyl, Heat Press Nation, Michaels or Swing Design

Designs used:
LW Love Letters Font by Lori Whitlock – Design #240682
Smiley Face Whatever by Loni Stevens – Design #8114 with a yellow circle behind it
Magnolia Flower by Sophie Gallo – Design #341162
Voodoo Doodles by Jamie Lane Designs – Design #332386
CG Create Font by Carina Gardner – Design #290474

Resources:
Silhouette “Secrets” Beginner HTV Tips & Tricks
Subtracting Text for HTV
Cutting & Layering HTV in Silhouette Studio Class on Teachable
Creating a Knockout Design with HTV – Bonus Subtracting HTV Class on Teachable

Whether you go big or go small, the ability to create a custom or handmade gift with your Silhouette is awesome!

I always see user’s frantically creating gifts at the end of the year for the holidays, but why not start now. Use these gift ideas for birthdays, anniversaries, house warming gifts, and holiday gifts as well!

I would love to see what you create with your Silhouette!
Feel free to post on my Facebook group
Silhouette Secrets with EllyMae.
If you have questions feel free to post below or on the Facebook group too!

Save this for future reference by pinning the image below.

Enjoy!

This image has an empty alt attribute; its file name is logo.jpg

THANK YOU for your support! How can you help? Click HERE & buy a coffee.
Every little bit helps with the cost of running the site.

Or if you are looking for more in-depth, step-by-step classes, check out all of my online Silhouette classes on my Teachable site HERE.

SS Logo snip it
**This post may contain affiliate links. What that means is that I may receive compensation if you purchase through the links I have provided. The price you pay for the product or service is not higher but I may get compensated for sharing.
Posted on 11 Comments

Create a Flip Action Interactive Card in Silhouette Studio: Step-by-Step Tutorial

Silhouette Secrets+ with EllyMae

What inspires you?

That may sound like an odd question. But, stop and think about it.

Where do you get ideas from? What sparks the creative thoughts flowing? Have you been feeling in a slump lately?

With everything going on right now, I am sure that many are not feeling like their peppy selves or are maybe finding a hard time feeling “creative”.

Keep looking!
Keep looking for that creative spark!

*Blog post updated 10/25/25

A few weeks back I saw a Virtual Crop being hosted by 2 fellow Close to My Heart Consultants. This Creative Collaboration duo team is made up of Susan Williams (USA) and Chris Robertson (Canada). I signed up last minute to attend it because I saw a couple card designs that I wanted to learn to recreate. I have followed Susan Williams before and purchased several of her scrapbook and card kits in the past. So I knew it would be good!

But, what I didn’t count on was how good it was for me! It really gave me a boost to watch them create and start creating along with them.

For this event, we were given a recipe sheet. What’s that?
It’s a page that tells you all the supplies needed to recreate the projects, dimensions needed to cut for each paper, plus tips along the way.

I took that and put it into the Silhouette software and created my own cut file for this card design. I reached out to Susan for permission and today I am sharing this free card file with all of you!
Thank you Susan Williams for permission to share!

Affiliate links may be present in the following blog post and as an Amazon Associate I earn from qualifying purchases.

First, gather the supplies needed to complete this card. It is really not much.

Supplies:

Creating the Cut File

Next, let’s take a look at this file in the Silhouette software.

I drew the card pieces using the drawing tools on the left side of the Silhouette software and then used the Scale panel to resize each to the exact dimensions that were provided to us in the recipe.

Drawing tools on the left
Transform Panel – Scale Tab on the right

To create the score lines, I used the line drawing tools and the Move by tool to place the score line exactly where I needed it on the card piece.

Next, with the line selected, I used the Line Style Panel to create a dashed line for the score line.

I followed the same steps to create the “faux stitching” lines. I duplicated the outside card piece shape, decreased the size, used the alignment tool to center, and then used the Line Style Panel to change it to a dashed line.

Grab the cut file HERE or click on the photo below

When you are ready to cut, open the cut file. Then choose File > Save As and save a new copy as the “working file”. This way you always have an original copy to go back to.
Now, move the text out of the way and move the pieces on and off the cutting mat as needed to cut out of each color.
I use the Textured Cardstock Setting in the software to cut almost all cardstock, but I prefer to cut smooth cardstock as textured can be a bit more finicky sometimes.

Then check out this video on how to assemble this card. I promise it is easier than it looks.

Additional options:

1. Use patterned paper

2. Stamp sentiments on cards

3. Print patterned paper
Using the print and cut process along with digital patterns in the Silhouette library, print your own patterns on cardstock for the pieces as desired.

How do you use the digital patterns & print and cut?
Check out these posts for more information on digital patterns and print and cut:
Print and Cut Basics
Patterns and Print Bleed
Let’s Explore v4 – Pattern Fill

4. Print Sentiments with print and cut.
Following the same steps above for print and cut, I moved copied the Sentiment pieces to a new design mat and made copies. Then I filled each with different sentiments.

You could either type out the text and choose a Text Style or use designs to fill the pieces.
I used a couple different Dingbat fonts to add sentiments in the pieces.
SG Inspirational Sentiments Dingbats by Sophie Gallo – Design #276558
SG Happy Birthday Dingbats by Sophie Gallo – Design #276562
Fancy Sentiments by Sarah Hurley – Design #273562

Cut a bunch and assemble to have on hand for any occasion. Leave the sentiment blank until needed, or stock up on cards you frequently use, such as Birthday or Anniversaries.

This is such a great card design and can be used for so many occasions all year long.

Save this for future reference by pinning the image below.

Enjoy !

THANK YOU for your support! How can you help? Click HERE & buy a coffee.
Every little bit helps with the cost of running the site.

Silhouette Classes

Never stop learning! Let me help you take the anxiety out of learning with Silhouette and get to creating faster! My Silhouette classes are heavily focused on software, so you can take the skills & techniques taught and apply them to many future projects!

Silhouette step-by-step Classes by Silhouette Secrets+

Silhouette Secrets+ with EllyMae
**This post may contain affiliate links. What that means is that I may receive compensation if you purchase through the links I have provided. The price you pay for the product or service is not higher but I may get compensated for sharing.