I love creating 3-D design with Silhouette! However, taking a 2 dimensional cut file and then assembling it into a 3-D project can be a bit intimidating. And I’ll tell you that for anyone, even experienced users, not all projects work the same each time. But, I’ll show you a few tips on how I assemble a design today.
Affiliate links may be present in the following blog post and as an Amazon Associate I earn from qualifying purchases.
First, let’s start with the design. I needed a small pinecone for a project, so I chose this Pinecone 3D Miniature file by Snapdragon Snippets – Design #279267.
The first thing I do is look to see if the designer has included a link to instructions for the file. Not all designers do, but in this case, there is an instructions button to click on. Find those instructions HERE. The link includes instructions for several of the 3D files that can be combined to make up a whole decor project. Today, I am just using the pinecone, so I scrolled down to those instructions.
I assembled the original pinecone exactly as those instructions showed.
But, I need my pinecone to be a LOT smaller. At first, I was feeling bummed that it wasn’t going to work for my project. Even though this design turned out exactly as it was supposed to, it didn’t work for my purpose. I just wasn’t sure that I could make it smaller and still get it assembled properly.
What did it take to change my mind? A quick discussion with my husband, 1 comment from a member of my Facebook group, and a nights sleep – where all I did was think about this project. By the next morning, I was itching to try it again.
One of the great features of the Silhouette software is the possibilities are pretty much endless! Want a smaller design, no problem!
Using the Scale option, I can take the original design and decrease the size. I knew I needed small scale, so I tried 33% of the original size. This is found under the Transform Panel – Scale Tab or at the top of the software in the Quick Access Toolbar.
For the “baby” miniature pinecones, the center stem and the spacers were not going to work or be needed at that size. I right clicked on the design and ungrouped it, then deleted the pieces I did not need to cut. Make sure to delete the numbers and text that is not needing to be cut.
With all the numbers and text removed, I moved the pieces around on the cutting mat to cut out of cardstock.
Then I cut this out of a brown cardstock using the Cardstock Textured setting. I find this works well for me on almost all cardstock. I do prefer to cut smooth cardstock as textured can be a bit of a headache.
Check out this video on cutting and then assembly of the pinecone at 33% of the original size. Note the video speed has been increased for cutting and assembly. More tips following the video.
Tips for cutting & assembly
Cut the cardstock down to size. I use a paper trimmer to cut all my materials down to size, so then I am only using the adhesive under the area of my design and not peeling a full sheet of material from the cutting mat. I find that this saves my adhesive on the cutting mat and makes my mats last longer. More tips to getting the most out of your cutting mats HERE.
Adhesive The right adhesive can make all the difference! For the original 3-D Pinecone Miniature Design, I used a clear, liquid glue called Liquid Glass. But, for the file reduced to 33% of the original size, I used hot glue. This helped for both adding a little bit of space between the layers to give the “baby” pinecone dimension as well as gluing it together. When using the hot glue, thread the piece onto the wire first before applying the glue or it can cool before you get it in place. I bought this fine tipped SureBonder hot glue gun and love it.
Sticky cutting mat If your finding that cuts are not connecting or pieces are peeling up, you might want to try a new cutting mat after desticking it a bit. You will notice in the video above, that I had 2 spacers that did not cut right and it was because my mat was very well used and the cardstock did not stay stuck down. I find that this can be a big issue when cutting lots of cardstock. While my mat may “feel” sticky to me, it may not be good enough to hold down all the pieces of the cardstock while it’s being cut, in order to connect the cuts. If that cardstock moves at all, it may lead to a mis-cut.
Recut pieces as needed To follow the sticky mat, you may need to re-cut a piece or two here and there. That is not a bad thing. I just copied what I needed and moved it to a new area on my cutting mat and re-cut it. I did cut a couple extra… just in case!
Don’t give up! If you have never done a 3-D design before – try it out! If you have tried one and it didn’t work out – try again! I will fully admit that the first one I made, turned out great, but it was too large for what I needed. It took a little advice & rethinking to reduce the size and alter the design for my purpose.
Here are the babies. This is the original 3-D Miniature Pinecone file reduced to 33% of the original size.
I have a very special project for this coming up and cannot wait to show you. Stay tuned for that!
The Silhouette Design Store has an entire section dedicated to 3-D designs. Keep in mind, just like any site you get files from, some are more complex than others. There are some that even as an experienced paper crafter, I have yet to tackle. One of these days I will conquer this LowPoly Paperman, but for now, he will stay on my future to-do list. The biggest thing that these designs take is … time.
Want a few suggestions to get started on 3-D files?
Check out this tutorial on Lori Whitlock’s site for tips on assembly HERE. I find the first time you do this, you may not think you like it, but the more you do it, the better it gets.
Another flower type is one that the petal layers are stacked on each other, like this Poppy Flower by Echo Park – Design #249937.
Whatever you choose to get started, just get started! And I would love to see what you create. Feel free to post photos or questions on my Facebook group at Silhouette Secrets with EllyMae.
Save this for future reference by pinning the image below.
Enjoy!
**This post may contain affiliate links. What that means is that I may receive compensation if you purchase through the links I have provided. The price you pay for the product or service is not higher but I may get compensated for sharing.
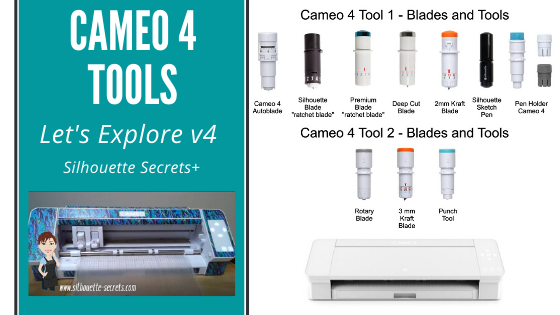
The Cameo 4 Autoblade is the only blade that can fit in Tool 1 housing with no adapter. All of the other blades or tools pictured above will fit in the Tool 1 housing with an adapter.
Cameo 4 Tool adapters
Note: this information is accurate as of 6/11/20. The Premium Blade has been redesigned with a small T on the front of it and now fits in the black adapter. Information you may see that was published prior to this date, may show that it fits in the gray adapter. Older Premium Style blades will fit in the gray adapter, but the new style does not.
The Cameo 3 Autoblade is NOT compatible with the Cameo 4 machine.
These are the only blades or tools currently available for the Tool 2 housing on the Cameo 4.
Why can you not put tools from Tool 1 in Tool 2?
The basic answer is because the tool housing for Tool 1 and Tool 2 is not the same. Therefore, the same tools cannot be used in both.
On the Cameo 4, Tool 1 and Tool 2 housings are designed with different motors in them, which means they function differently.
The Tool 1 housing has a motor that allows the housing to move up and down. While the motor is Tool 2 is a circular motor. You can see the difference in these housings if you touch them. Tool 1 will freely move down when you press on the front locking mechanism. While the Tool 2 housing is stationary & does not and should not be forced to move.
I am loving the new tools for the Cameo 4 – Tool 2 housing.
With the Rotary blade I have been cutting crepe paper and fabric. And I love it! Check out these posts below for more information and tips
I am still in the process of testing several different materials with the 3 mm Kraft blade. But, I have successfully cut this Light Chipboard from Amazon. This chipboard is twice as thick as the Silhouette Chipboard. More details on that coming soon!
What I will say is that each design will vary and some will cut better than others. And it does require multiple passes and patience. The later is probably the biggest part for successful cuts. But, all of these were cut using the 3 mm Kraft blade and the Light Chipboard.
Hopefully that helps explain a few of the tools for the Cameo 4!
If you are new to the Cameo 4 and just don’t know where to get started, check out the step-by-step Silhouette Beginner First Cuts video class HERE.
Save this information for later by pinning the image below.
Enjoy!
**This post may contain affiliate links. What that means is that I may receive compensation if you purchase through the links I have provided. The price you pay for the product or service is not higher but I may get compensated for sharing.
Today, let’s take a look at the Send tab in the Silhouette Studio software. It has a lot of information in it! In the v4 software, it is located in the top right corner of the program and controls everything about the cut settings.
This tutorial is written in v4.3.372 of the Silhouette software.
There are 4 different options for working in the Send Tab. – Simple – Line – Fill – Layer (Designer Edition feature)
The Simple option in the Send tab is the one I find I use the most.
But what does all this mean? Let’s take a look.
With a Cameo 3 or Curio selected as the machine being used, the above is what you will see on the Send tab.
On a Cameo 3 or Curio the tool housing is distinguished by a red circle (Tool 1) or a blue circle (Tool 2).
Tool housing on Curio & Cameo 3
On a Cameo 4, there are no red or blue circles, but it is designated by a number 1 or 2 for each tool housing. When a Cameo 4 is selected as the machine being used, you will see the Send tab show like this.
The numbers 1 and 2 are located on the tool housing locking tab on the Cameo 4. You will also notice that the blade and adapters for the Cameo 4, will also have either a 1 or 2 on the front of the tool to designate which tool holder it fits in.
The most important thing to keep in mind when you are switching between the Tool 1 and Tool 2 housing is that you first have to select the design on the screen you want to change and then choose No Cut under Tool 1 before turning on Cut under Tool 2. If you do not turn the cut lines off under Tool 1 housing, then it will complete the action using both Tool housings.
Now, let’s break this down into what each section of the Simple Send tab means.
There are 2 options for Cut Line behavior on the Send tab. No Cut, Cut, and Cut Edge. If you look at the icons each one shows you exactly what it does. Let’s take a look with some examples.
The #1 thing to note here is that the design has to be selected on the design mat in order to make any changes to the cut setting. To select the design, click directly on the design or the red line of the design. A selection box will appear around the design meaning that it is selected. Then you can change the cut setting between No Cut, Cut, or Cut Edge.
Since we are under Tool 1 – the cut lines will show as bold red. As you can see when the cut lines are turned off, there is no bold red outline around the design like the example in the top left corner.
No Cut and Cut are pretty easy to understand. Either the cut line is on, indicated by bold red cut lines or it is off, indicated by no bold red cut lines. If a design is sent to the Silhouette machine with the cut lines off, it will go through the motions of aligning the housing and setting the blade (Autoblade), but then the software will say “Cut Complete”. (More on that HERE) Note: if a design is sent to the machine with the cut lines OFF and you get the message “Cut Complete” – unload and reload the Silhouette cutting mat before sending again after turning on the cut lines to ensure that the blade housing resets to the proper starting point.
Cut and Cut Edge are the ones that I see the most questions about. Cut means that it is going to cut around each object on the screen. If the design is overlapping, then it is going to cut through each piece.
Cut Edge means that it will cut around the outside edge of any objects that are overlapping. It will also show a bolder, fuzzier red cut lines around it on the Send tab when it is set to Cut Edge.
In the Silhouette Studio v4 software, it now defaults all text to Cut Edge. So I often see a user question why the red lines appear fuzzy. It will still cut the same, but now welding a scripty, overlapping font is not absolutely necessary. The red fuzzy does not affect how it will cut, it is appearance on the screen only.
If you select the entire design on the screen, choose No Cut under Tool 1 and then turn on Tool 2 using the same designations as above, you will see bold blue cut lines appear around the images. Red lines = Tool 1 Blue lines = Tool 2
You will also notice that as it is shown above, I get a message that there is no Cameo 4 Tool 2 compatible Kraft Cut Action for this material as chosen for Cardstock. If there is not a preset for the specific material and tool chosen, you will see this message. You may have to create your own settings – see below for more information on that.
Next on the Send tab, we have the Materials, Action, and Tool options.
The Materials drop down is where you choose what material you are cutting from the preset options in the software or your own custom created settings.
If you choose a preset setting, this is just a recommended starting point for materials that are similar. Keep in mind that not all materials are created the same and there can be variance in those materials, even within the same brand. Also keep in mind, that as your blade dulls, you may need to adjust those settings to get a good cut using the same blade. The presets are just a recommendation for a starting point and I always recommend that you do a Test Cut first to see if it will work for you before sending the full design.
User Defined Settings are ones that you create or have modified yourself. These settings will appear at the end of the preset settings list.
The first time you create a new custom setting, it will appear at the very bottom of the list. Once the software is closed and reopened the list should be in alphabetical order.
Next, you have the Action. This is what you are telling the Silhouette machine to do. The Actions that are available will depend on what tool is selected.
Then comes the Tool section. This will show you what tool options you have available for the Tool housing you have selected, the material selected, and the action selected.
Now we move to the next section.
In the gray section, you will see the Action and Material chosen in the upper section appear as the Title. If using a Curio and the v4 software, you will also see it show the Platform stack recommendation there too.
The black dial is the blade depth. The current blade depth recommendation is the middle number that has a blue shading to it. The arrow on the left changes the blade depth down and the arrow on the right increased the blade depth up. If you are using an Autoblade in the Cameo 3, Cameo 4, or Portrait 2, this is the information that is sent to the machine to set the Autoblade by it’s tap dance at the beginning.
Blade depth is how far out the blade is sticking from the end of the blade. For thinner materials, you will use a lower blade depth and or thicker materials you use a higher blade depth. If you have too high of a blade depth for the materials you are cutting, the blade may get stuck in the cutting mat and cause cut issues.
The triangle with the overlapping areas is called Overcut and it is a neat feature that can help make cutting corners easier. Each design may vary. Learn more about the Overcut feature HERE.
Next is the Force and Speed.
Force is the amount of pressure that the Cameo is using to press down on the blade. Higher force equals higher pressure and can also cause the blade to stick in the mat, if the setting is too high.
Speed is how fast the blade is moving. Faster is not always better, but slower is not always better either. Each material will vary in the perfect settings.
Next comes the Passes and More option.
Passes is how many times you want the blade to do the same action. Some thicker materials require several passes to cut completely through the material. For normal cutting materials such as vinyl, htv, and cardstock; I find 1 pass should be sufficient with the correct settings.
More is the Advanced Settings and where you would enter Custom Cut Settings. Check out more information on that HERE.
So now you may be asking yourself – how do you know to change the settings? Honestly, I use the preset settings for the materials in the software almost all the time for most materials. I do use the Textured Cardstock setting to cut almost all cardstock. If it’s a material not in the presets, then I start with the recommendations from the manufacturer, or the closest material to it. The more you cut, the more comfortable you will get with the materials you are using and the settings needed.
And, I do Test Cuts. These will be your best friend and save you lots of materials! If the square with the triangle test cut is not working for you, make your own with a capital B and move it around. For more details and photos on creating your own Test Cut, check out this Beginner HTV post HERE to see how I do that.
If the test cut does not come out well, then I look at adjusting my settings. I usually start with blade depth. Increase it by 1 and try a test cut. If it works, great! If not, then it will depend on what it did. If it cut too deep, then I will decrease the blade depth to what it was and increase the force by 1-2 and try another test cut. Do not change too much too fast, or you really don’t know what worked and what didn’t.
Now, let’s look at the bottom of the Send tab and what it tells us.
Machine name – this will show you the name of the current machine selected from the Machine list. Right click on the name and you can rename the machine.
Under this menu, there are also options to do a few more other things such as Calibration, Distance Adjustment, Tool Separation, Manual Registration (Print and Cut), and Automatic Registration (Print and Cut). We will not cover these in this tutorial today, but you can find more information on all of those in the Silhouette Handbook that is FREE in the Silhouette Design Store. Grab it HERE and then open it and hold down Ctrl+F on the keyboard for the search bar. Type in what you are looking for to learn more about that item.
Machine icon and status is directly below the Machine name. This will show a photo of the current Silhouette machine that is selected as the default machine and tell you the status of it.
Machine list is where you will toggle between different Silhouette machines or choose the USB versus Bluetooth connection.
Here you will see the Machine name, Firmware version, x to close a machine connection, Bluetooth and USB connections that are recognized by the software. To choose a new machine simply select the machine from the list that you want to send the project to and it will be the new default machine. Check out how to rename your machine HERE With the Business Edition upgrade, you can use multiple machines at the same time and just toggle between them under this icon. For more information on using multiple machines at the same time click HERE.
Next to the Machine list icon is a small icon like a graduation cap. It has a few instructions in there that need to be updated.
Moving to the right side at the bottom of the Send tab, you will find the Test Cut options.
The Test Cut arrows move the blade housing if you need to adjust where the test cut location is. Make sure to move the housing both directions to the exact location you want it to cut at.
Next to that is where you choose whether to perform the Test cut with Tool 1 or Tool 2.
And then you have the Test Cut button. When you are ready, click it to cut a small square with a triangle out of the material wherever the blade housing is set up. Note: after doing a test cut, make sure to unload and reload your mat before sending the project to cut, so it will cut in the exact location you have setup on the screen.
Below that is the Send button. When all test cuts have been performed, double check that the material settings are correct and press the Send button to send the project to the Silhouette machine.
Next to the Send button on the right is the barcode icon. A print and cut project can be setup with a barcode to read for the cut settings. It is briefly described in this post on the Registration Marks Panel HERE. It is not something I have needed to use.
And in the far bottom right corner is the Advanced Settings for the Send tab.
For most users, you may never use this Advanced Settings Panel. The 2 that I find are used the most are the Feed Option and the Cut Order Sorting.
After Cutting a Tile – choose whether the machine should “Await cutter ready” or “Pause”. For more information on the Tiling feature – check out this post HERE.
Feed Option – choose between “Return to Origin” or “Feed” Return to Origin tells the machine whether to pull the mat or material back to the front of the machine to unload it Feed tells the machine to feed to the back of the machine to use the Cross Cutter option. This can be helpful when cutting off a roll. For more information on the Cameo 4 roll feeder and cutting from a roll check out this post HERE.
Layer Sorting – choose between “no sort” or “Group Layers by Condition”. No sort cuts the layers in the order they are listed in the Layers Panel. Group Layers by Condition will cut layers with the same conditions together for instance, same color lines are considered a layer.
Show Cutter Divisions – choose between “Known Cutters” or “All Cutters” *more information on this option coming soon
Show Weed Settings – choose between “Auto”, “Always”, “Never” *more information on this option coming soon
Cut Order Sorting – choose between “No sort”, “Maximize Speed”, “Minimize Roller Movement”, and/or “Sort Interior Contours First”. This is where you can change the order in which the machine cuts. You select what you want it to do whether by the fastest way to cut, minimize roller movement, etc. What works best may be different for each user. I have mine set to Minimize Roller Movement and Sort Interior Contours First. The Silhouette software and machine will choose the best order to cut with based on these selections. It does not always cut in the order we think it should, but I just let it go and it will do it’s thing.
Note: different version of the software may show different Advanced Settings under this menu. Older software version may not have as many options as shown above. This tutorial is written using v4.3.372.
Whew!
Did you know that the “Simple” tab of the Silhouette software contained all that information?
I would love to hear what you learned today or see your Silhouette projects! Feel free to post photos or questions on my Facebook group at Silhouette Secrets with EllyMae.
Save this for future reference by pinning the image below.
Enjoy !
THANK YOU for your support! How can you help? Click HERE & buy a coffee. Every little bit helps with the cost of running the site.
Silhouette Classes
Never stop learning! Let me help you take the anxiety out of learning with Silhouette and get to creating faster! My Silhouette classes are heavily focused on software, so you can take the skills & techniques taught and apply them to many future projects!
**This post may contain affiliate links. What that means is that I may receive compensation if you purchase through the links I have provided. The price you pay for the product or service is not higher but I may get compensated for sharing.
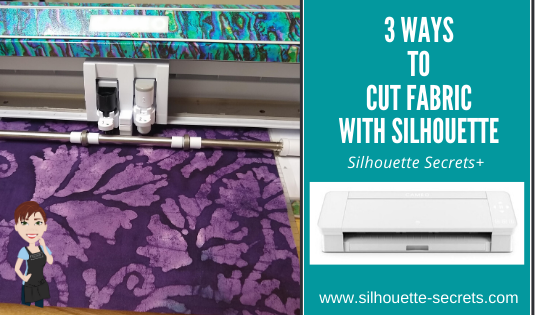
Today we are going to look at 3 different ways you can cut fabric using your Silhouette machine. The technique that you use may vary depending on the easiest to use and also which Silhouette machine you currently are using.
Affiliate links may be present in the following blog post and as an Amazon Associate I earn from qualifying purchases.
For this post, I am a face mask file that was in the Silhouette Design Store.
Once you have the file, open it in the Silhouette software.
Use the Transform – Scale Panel to size the pattern to what you need by entering the exact percentage to size the pattern up or down.
Now, let’s take a look at 3 different options you have for using the Silhouette to make these fabric masks.
Option #1 – Cut a template with the Silhouette.
I used the Face Mask Sewing Pattern file to cut a template out of cardstock. I then labeled each panel for future use.
I was cutting several of the same fabric, so I could layer the fabric and cut through multiple layers with a hand held rotary blade.
If you are using this method, you only need to cut 1 of each panel for the template. I folded the fabric over several times to get both sides and then pinned the template to the fabric. I was able to cut the outer panel for 2 masks of each size. You could cut more at the same time depending on how much fabric you have and how many masks you want.
I did the same with the Liner fabric.
I found this way to be the fastest way as you could cut multiple layers of fabric at the same time. You could also cut with scissors around the template if you don’t have a hand-held rotary blade.
Option #2 – The Cameo 4 with the rotary blade
If you have a Cameo 4, Cameo 5, or Curio 2 you have the option of using the Rotary blade in the Tool 2 housing. The Rotary blade is only compatible in the Cameo 4 machine. *Updated to include new Silhouette machine models compatible with rotary blade.
You will want to use a super sticky cutting mat to hold the fabric in place. A strong grip matwill work well or grab a brand new regular cutting mat. A brayer is also a good idea to roll over your material to make sure it is good and stuck to the cutting mat. In order for it to complete the cut, the fabric needs to stay stuck to the mat.
Stabilized fabric means that you have applied something to it to help “stabilize” it or make it stiffer.
My favorite method is using Terial Magic and this is what I used in this tutorial.
To use Terial Magic, spray the entire fabric down with the solution.
Let it dry for 20-40 minutes. Don’t get rid of those hangers from clothes you buy – they work perfect for projects like this or hanging swim suits to dry. Then press it with an iron to dry completely.
This makes the fabric stiff and almost like paper. Now, with a sharp Silhouette blade, it will cut like butter.
I used the Fabric, Cotton Print setting with a Black Silhouette blade, also called a “ratchet” blade. The pattern above is enlarged 115% for the Large size.
Look at those nice, crisp cut edges.
Perfect cuts each time!
I do have to say, this is my favorite way to cut fabric with the Silhouette machines. It will work on all Silhouette machines with a regular, sharp blade.
It does require pre-treatment, but it is so worth it for the end result!
The other awesome thing about Terial Magic, is that it washes out, so it is perfect for applique, quilting, or these fabric masks.
You do not want to use a product like starch or other stabilizers that are not sewable, or you may gum up the cutting blade.
For this design, once it was cut, I followed the step-by-step tutorial on the Silhouette 101 blog for assembling this face mask.
I am not an expert at sewing. Basically, I can sew a straight line. And I used a basic Brother sewing machine to finish these masks out while following the tutorial on my ipad.
So grab your favorite fabric and create something!
Go MSU Bobcats!
And then try to get a photo where your kids aren’t acting up.
See that sideways Momma look? This was not the first take on the photo – lol.
What will you create with your Silhouette machine? My kids are already requesting more masks in other fabric patterns and shirts too! Stay tuned for more on that!
Save this for future reference by pinning the image below.
Enjoy !
THANK YOU for your support! How can you help? Click HERE & buy a coffee. Every little bit helps with the cost of running the site.
Silhouette Classes
Never stop learning! Let me help you take the anxiety out of learning with Silhouette and get to creating faster! My Silhouette classes are heavily focused on software, so you can take the skills & techniques taught and apply them to many future projects!
**This post may contain affiliate links. What that means is that I may receive compensation if you purchase through the links I have provided. The price you pay for the product or service is not higher but I may get compensated for sharing.
Let’s explore the eraser tool today in the Silhouette Studio software.
Tutorial created in v4.3.372
To start, the eraser and the knife tool are both very heavy data tools. This is because both of these tools are changing a large amount of data when in use. The computer and software has to reorganize this data and why the computer may take time to process or some users may even experience a software shut down. This will depend on 2 main factors.: the design that is being used and the user’s computer. This means that each user may experience different results when the eraser tool.
The eraser tool is found on the left side of the Silhouette Studio software. Or the keyboard shortcut to activate the Eraser is Shift+E.
Once you click on the Eraser tool, the features of the tool will show up in the Quick Access Toolbar along the top of the Silhouette software.
There are several options that you have to customize the eraser you are using.
Solid vs Outline
The solid eraser will erase the section and if the eraser connects to the other side, break that design up into solid pieces.
The outline eraser will erase the section and break the design up into solid lines as shown above.
If an object is filled with color, the eraser will break the design up into solid pieces because of the fill color. It will act the same no matter if Solid or Outline is selected.
Square tip or Circle tip
The 2 choices for the eraser tip style are either a square or a circle.
Size
The size of the eraser can be changed depending on what you want to work with.
The smallest size is 0.375″ and you can see the small blue eraser tip above.
The largest size being 3.875″ as shown above.
And that is it. The eraser tool is a very powerful tool, but keep in mind that it can be very data heavy depending on what you are working with.
Let’s take a look at an example of this data.
Affiliate links may be present in the following blog post and as an Amazon Associate I earn from qualifying purchases.
On the left I have opened up a Mandala by Sarah Hurley – Design #276072 and on the right I have drawn a square. I selected both of the designs and then double clicked on them to bring up the Edit Points.
Edit points are the data points for the software to tell the Silhouette machine to move to connect the cut. (Find out more about edit points HERE) As you can see, the mandala design has a LOT more data points than the square. This means that using the eraser tool on it will take more processing power to change the design because there is more information in that design to change.
Now, each user may experience something a little bit different. You may see your computer taking longer to process. You may hear your computer start running more. You may experience a software crash. Since each user’s computer varies, the results may vary in what the computer can handle.
And what you may find is that the Eraser Tool might not be the best tool for the job.
Eraser Tips
If the design can be ungrouped and pieces deleted, that will help with the data processing. An ungrouped design means you are changing the data of a single line or two, versus the data of the entire design all at once.
A design may not be able to be ungrouped, but you might be able to release the compound path and delete pieces, which can help with the data processing.
User’s may experience different results with the eraser, such as creating new lines or the design disappearing. Both of these are indicators of data processing. Try ungrouping or releasing the compound path to make it less data being changed at a time.
I would suggest just playing around with the eraser tool and just seeing what will happen.
I would love to see what you are creating with your Silhouette! Feel free to post photos or questions on my Facebook group at Silhouette Secrets with EllyMae.
Save this for future reference by pinning the image below.
Enjoy!
**This post may contain affiliate links. What that means is that I may receive compensation if you purchase through the links I have provided. The price you pay for the product or service is not higher but I may get compensated for sharing.
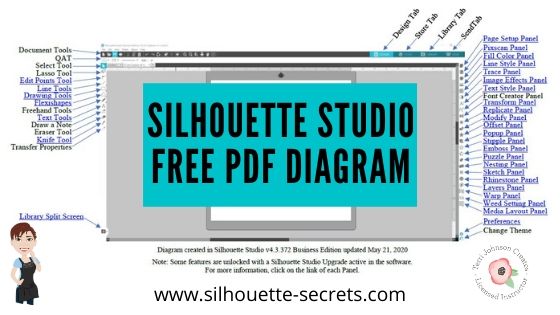
Last year I created a free PDF document that is a diagram of the Design Tab in the Silhouette Studio software. Each of the tools and features is labeled and links back to more information on that feature or tool.
I have just updated this PDF file, so if you grabbed it before make sure to delete the old one and download this new one for future reference.
Save this for future reference by pinning the image below.
I would love to see what you are creating with your Silhouette! Feel free to post photos or questions on my Facebook group at Silhouette Secrets with EllyMae.
Enjoy!
**This post may contain affiliate links. What that means is that I may receive compensation if you purchase through the links I have provided. The price you pay for the product or service is not higher but I may get compensated for sharing.
That may sound like an odd question. But, stop and think about it.
Where do you get ideas from? What sparks the creative thoughts flowing? Have you been feeling in a slump lately?
With everything going on right now, I am sure that many are not feeling like their peppy selves or are maybe finding a hard time feeling “creative”.
Keep looking! Keep looking for that creative spark!
*Blog post updated 10/25/25
A few weeks back I saw a Virtual Crop being hosted by 2 fellow Close to My Heart Consultants. This Creative Collaboration duo team is made up of Susan Williams (USA) and Chris Robertson (Canada). I signed up last minute to attend it because I saw a couple card designs that I wanted to learn to recreate. I have followed Susan Williams before and purchased several of her scrapbook and card kits in the past. So I knew it would be good!
But, what I didn’t count on was how good it was for me! It really gave me a boost to watch them create and start creating along with them.
For this event, we were given a recipe sheet. What’s that? It’s a page that tells you all the supplies needed to recreate the projects, dimensions needed to cut for each paper, plus tips along the way.
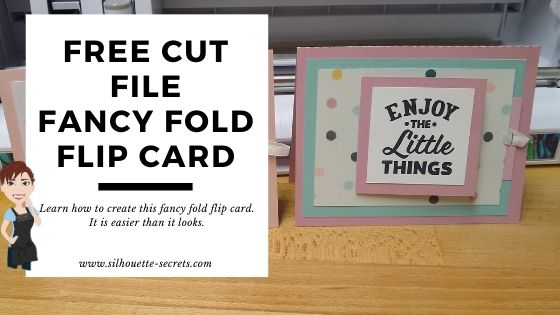
I took that and put it into the Silhouette software and created my own cut file for this card design. I reached out to Susan for permission and today I am sharing this free card file with all of you! Thank you Susan Williams for permission to share!
Affiliate links may be present in the following blog post and as an Amazon Associate I earn from qualifying purchases.
First, gather the supplies needed to complete this card. It is really not much.
Supplies:
Cardstock – several colors
Patterned paper (optional – see alternative below)
Next, let’s take a look at this file in the Silhouette software.
I drew the card pieces using the drawing tools on the left side of the Silhouette software and then used the Scale panel to resize each to the exact dimensions that were provided to us in the recipe.
Drawing tools on the left Transform Panel – Scale Tab on the right
To create the score lines, I used the line drawing tools and the Move by tool to place the score line exactly where I needed it on the card piece.
Next, with the line selected, I used the Line Style Panel to create a dashed line for the score line.
I followed the same steps to create the “faux stitching” lines. I duplicated the outside card piece shape, decreased the size, used the alignment tool to center, and then used the Line Style Panel to change it to a dashed line.
When you are ready to cut, open the cut file. Then choose File > Save As and save a new copy as the “working file”. This way you always have an original copy to go back to. Now, move the text out of the way and move the pieces on and off the cutting mat as needed to cut out of each color. I use the Textured Cardstock Setting in the software to cut almost all cardstock, but I prefer to cut smooth cardstock as textured can be a bit more finicky sometimes.
Then check out this video on how to assemble this card. I promise it is easier than it looks.
Additional options:
1. Use patterned paper
2. Stamp sentiments on cards
3. Print patterned paper Using the print and cut process along with digital patterns in the Silhouette library, print your own patterns on cardstock for the pieces as desired.
4. Print Sentiments with print and cut. Following the same steps above for print and cut, I moved copied the Sentiment pieces to a new design mat and made copies. Then I filled each with different sentiments.
Cut a bunch and assemble to have on hand for any occasion. Leave the sentiment blank until needed, or stock up on cards you frequently use, such as Birthday or Anniversaries.
This is such a great card design and can be used for so many occasions all year long.
Save this for future reference by pinning the image below.
Enjoy !
THANK YOU for your support! How can you help? Click HERE & buy a coffee. Every little bit helps with the cost of running the site.
Silhouette Classes
Never stop learning! Let me help you take the anxiety out of learning with Silhouette and get to creating faster! My Silhouette classes are heavily focused on software, so you can take the skills & techniques taught and apply them to many future projects!
**This post may contain affiliate links. What that means is that I may receive compensation if you purchase through the links I have provided. The price you pay for the product or service is not higher but I may get compensated for sharing.
You can choose the Commercial Use license and the svg option for FREE too!
Why would you want these option?
The commercial use license gives you the rights to be able to make an item and then sell that physical item. You may not need it right now, but why not grab it while it’s FREE.
You can find the full commercial use terms of use for the Silhouette Design Store HERE. This will tell you all the things you CAN and CANNOT do with the file.
The svg option is a fairly new option to the Silhouette Design Store and confuses a lot of new Silhouette users.
You do not NEED the svg option if you are only using the file in the Silhouette software. However, it is not an option for those who use other cutting machines that open svg files.
Then why select that option too? Because it’s FREE, so why not. You never know when it might come in handy in the future.
And here is another “secret”?
I cut my materials down to the size I need and place multiple colors on the same cutting mat to not only save adhesive on my cutting mat, but to send it all through at one time to be cut.
In the software, I ungrouped the design and moved each color together and placed it on the virtual cutting mat where I wanted it to cut. Then I cut my materials down to the exact size using a paper trimmer and placed them on my cutting mat as shown above.
By cutting the materials down, I find that it saves the adhesive on my cutting mat and makes it last longer because I am not placing a full sheet of material on the adhesive and peeling it back off again.
I used the Transparency option on the Page Setup Panel to reveal the cutting grid, so I knew exactly the size I needed and where to place the cardstock on my cutting mat.
I’d love to see what you are creating with your Silhouette! Feel free to post photos or questions on my Facebook group at Silhouette Secrets with EllyMae.
Save this for future reference by pinning the image below.
Enjoy!
**This post may contain affiliate links. What that means is that I may receive compensation if you purchase through the links I have provided. The price you pay for the product or service is not higher but I may get compensated for sharing.
I’ve been seeing a lot of frustration on the Silhouette Facebook groups lately and that prompted me to create a list of the 5 most common causes that might cause this frustration.
5 Silhouette Tips
Tutorial created in Silhouette Studio v4.3.372
Tip #1 – Make sure the USB cord is plugged in correctly. While this may sound silly, this is especially important to take note of with the new Cameo 4 machine. The USB plug has a specific way to go into the port on the Cameo 4.
The curve of the USB plug should be facing down and the straight part facing up. Do not force the USB plug into the port or you could damage the connection.
If the USB plug is not inserted correctly, the Silhouette software will not pick up the Silhouette machine connection.
Tip #2 – Make sure the blade is installed properly. There should be no gap at all between the lip of the blade and the housing of the machine.
Cameo 4 Autoblade installation
To ensure that the blade is completely down in the housing, lift up on the front of the lock carefully as you install the blade. Then hold pressure down on the top of the blade as you push the lock in.
If you still have questions on proper blade installation, check out this video from Silhouette on installing the blade in the Cameo 4 – HERE.
If you are using a Silhouette black “ratchet” blade, make sure the fin of the blade is at the 6 o’clock position and there is no gap between the housing and the lip of the blade.
Ratchet blade parts
Cameo 3 blade installation
It does not matter which Silhouette machine you are using. The blade installation applies for all Silhouette machines.
If you are using a black “ratchet” blade, premium blade, or deep cut blade in the Cameo 4; make sure you are using the correct adapter and installing in the Tool 1 housing.
Tip #3 – Make sure the mat is loaded properly. There are only 2 ways the Silhouette cutting mat can be loaded properly in the machine. The cutting mat has specific dimensions and the left and right sides are narrower than the top and bottom margins.
New Silhouette cutting mat
With a new Silhouette cutting mat, there are 2 arrows designating the top and bottom of the mat. The cutting mat can be loaded in the machine with the arrow in. On an older Silhouette cutting mat, there may be only 1 arrow. The cutting mat can be loaded in the machine arrow in or arrow out.
Place the left edge of the cutting mat next to the line on the left that the arrows point to.
Load icon on Cameo 4
Gently hold the cutting mat up to the rollers and then press the Load button on the Cameo and the machine will pull it into the machine. If the cutting mat does not pull in evenly, press the unload button and load it again.
If you are using a Cameo 3 or Cameo 4, the Autoblade needs access to the adjustment holes on the left side. If the cutting mat or material is loaded too far to the left or sideways, the blade cannot hit those adjustment holes properly to adjust the blade correctly.
Tip #4 – Make sure the Page Setup Panel options are set correctly. The Page Setup Panel is where you tell the software what you are working with. This is where you set up your machine, cutting mat, and media size.
If you are cutting without a mat, the cuttable area is different than cutting with a mat. For more information on cutting without a mat click HERE or on this post about the roll feeder HERE.
Tip #5 – Make sure that the design is set up with cut lines. When you are ready to send the design to cut, make sure there are bold red cut lines showing on the Send tab around the design.
Affiliate links may be present in the following blog post and as an Amazon Associate I earn from qualifying purchases.
If there are no bold red cut lines around the design, the software has nothing to communicate to the Silhouette machine to cut.
Click on the design to select it. This is the most important part. If the design is not selected then there is nothing to change.
A .svg file, the cut lines should turn on if you have the Designer Edition upgrade or higher and have opened the file correctly. Find out more information on svg files HERE.
A .jpeg or .png file is a graphics file only and does not have cut lines. Most often when you choose cut the bold red cut lines show up in a rectangle or square around the design. Jpeg or png file will need to be traced to get cut lines. Find our more information on tracing HERE.
And just because I can’t stop there, here are a few other tips.
Bonus Tip #1 Make sure you have the correct material chosen on the Send tab before sending to cut.
Bonus Tip #2 Do a test cut. This will save you frustration and materials. You can either use the test cut in the software or create your own by typing out a capital ‘B’ to use. Check out this Beginner HTV post for more information on using your own test cut.
Make sure to unload the mat and reload it before you send the design to cut. There are currently some versions of the software that do not reset the blade housing to the same location after a test cut and the design may not cut in the correct location if the mat is not unloaded after a test cut.
Bonus Tip #3 Make sure the Registration marks are OFF. These are marks that are only used for print and cut, but I see many new users accidentally turn them on without realizing it.
If a new user is trying to type out text and presses the ‘M’ when not in text typing mode, the registration marks will appear on the screen. The keyboard shortcut is the letter ‘M’ or they can be turned off on the Page Setup Panel – Tab 3 – Registration Marks.
Registration Marks Explanation created in v4.2 software – 12/27/17
Troubleshooting Tip
If you run into cutting issues and post on a Facebook group asking for help, post a photo of the blade installed in the machine with the mat loaded.
If you have followed me on Facebook, you have probably noticed that is the first question I will ask a user when they are experiencing cutting issues. It is the #1 place to start no matter if you are a new user or experienced user.
Why?
Most issues start with the blade, however, there are many things we can tell by looking at a blade photo such as: which Silhouette machine it is, alignment of the blade housing, are there cracks in the blade, is there material stuck in the housing, is the mat loaded properly, has the packing material been removed, etc. and YES – is the blade installed correctly. But, it is not always just about the blade being installed correctly in the machine.
And sometimes, it is not what we are looking for but what might be off. It is not always easy to explain what we look for when troubleshooting but it is the first place to start when troubleshooting.
If you are still having issues getting started or are feeling overwhelmed, check out the new Beginner Video Class I created after so many users struggling with the same issues when getting started.
Save this for future reference by pinning the image below.
I’d love to see what you are creating with your Silhouette! Feel free to post photos or questions on my Facebook group at Silhouette Secrets with EllyMae.
Enjoy!
**This post may contain affiliate links. What that means is that I may receive compensation if you purchase through the links I have provided. The price you pay for the product or service is not higher but I may get compensated for sharing.
It is so hard to just show one feature in a post. This post started out as a one to show you how to add patterns to your designs so that you can print unique creations and use digital papers. But, then it morphed.
Today we will talk about 3 features in the v4 software.
Adding patterns to your design to create unique projects
Print Bleed
Show/Hide Libary feature
What are patterns used for?
Patterns can add a unique element to your creations that you can print out.
Affiliate links may be present in the following blog post and as an Amazon Associate I earn from qualifying purchases.
Filling a design with a pattern can open a whole new world of possibilities. I have these card pieces on my design mat and I want to fill them with one of the new digital pattern that’s available at Sparkleberry Ink called Choose Happy Digital Pattern Collection. With everything going on right now, these patterns were released to bring out a little bright color and happiness. I saw them and knew I had to create something with them.
Select the objects you want to fill with the pattern and then in the Fill Color Panel – Patterns Tab (Tab 3), choose the Pattern you want to fill it with. And watch the magic happen.
I set up my page to do a Print and Cut and then printed a 12″ x 12″ page with my Canon TS9521C printer.
Adding patterns to the Silhouette library is a Designer Edition upgrade feature. Find out more about the Pattern Fill Panel HERE.
Print Bleed
Something that is new in the v4 software is a feature called Print Bleed. What this does is it will bleed the outside edge of your design color out away from the design. This helps when you are doing a print and cut to eliminate a white border that you may have around the design.
The Print bleed can be found in the v4.4 software on the Page Setup Panel – Registration Marks Panel.
Print Bleed in v4.4
In previous versions of v4, the Print Bleed is found on Tab 1 of the Page Setup Panel.
Once the Print Bleed option is checked, then you can adjust the distance you want the bleed to have from the design. However, something to note here is that the print bleed does not show up on the design screen and it applies to all objects on your screen.
As each design is different, it can also affect designs differently. For instance, a design that is made up of different parts that are all individual pieces and colors, it will bleed all of those colors of the individual pieces. Print bleed works well on a single object, a graphic file, or print and cut design.
This time when I added the pattern I used a different method though. On the Design tab in the bottom left corner, there is now a Show/Hide Library option.
Show/Hide Library on Design Tab
Click on this little folder and the Library will expand out from the left side, so you have a split screen and can see both designs in the library and on the design mat at the same time. Of course, your screen size will determine if this is a suitable feature for you to use or not.
Show Library Split Page Design Tab
Select the object on the screen and choose one of the patterns from the Patterns folder in the library and it will fill with that pattern. This will work for adding other designs to your current design mat in the software too. (Sometimes you may notice it will add an extra pattern piece, you can just delete what you don’t need.)
In the Advanced Options of the Fill Color Panel – Patterns tab (3rd tab), you will find options for panning the pattern, rotating it, or scaling it as well.
Sometimes I find it hard to see the little patterns that show up in the Patterns Tab on the Fill Color Panel. They are not well organized and the pattern photo is small, so using the Show Library split panel can be an option to make it easier to find a pattern you are looking for.
Cutting aftermath
Go big or go home, right? When I cut out papercraft projects that have several pieces to them, I tend to make extras. I can set these pieces aside to assemble at a later date or have extras on hand. In this case, I cut the pieces to make 6 each of 4 different pattern designs. So I have 24 cards that I can now send out to friends.
Card pieces
Once the file is set up in the Silhouette software is it just a matter of loading and unloading the cutting mat each time and I just started making piles for each set of cards.
Craftermath from cutting
A couple hours later and I had all the pieces to assemble these cards. About half way through I had the thought that I could hook up another machine and then cut from multiple machines at the same time to make it go faster. But, I was enjoying cutting with the Cameo 4 and didn’t go that route.
But it’s an option – check out how to use multiple Silhouette machines at the same time HERE.
24 finished cards
Now here is the really fun part!
Flip card video
I love being able to create custom designs with my Silhouette and make the cutting of all the pieces go so smooth. I embellished these cards with a few stamps from Close to My Heart and they are ready to send off.
What are you creating with your Silhouette today? I’d love to see it over on my Facebook group at Silhouette Secrets with EllyMae.
Save this for future reference by pinning the image below.
Enjoy!
**This post may contain affiliate links. What that means is that I may receive compensation if you purchase through the links I have provided. The price you pay for the product or service is not higher but I may get compensated for sharing.
THANK YOU for your support! How can you help? Click the link to buy a coffee. Every little bit helps in the cost of running the site.