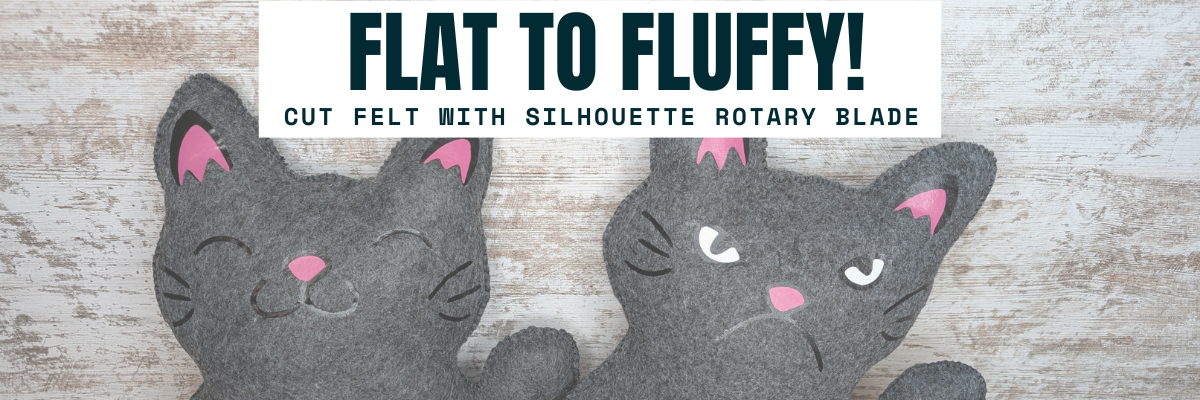
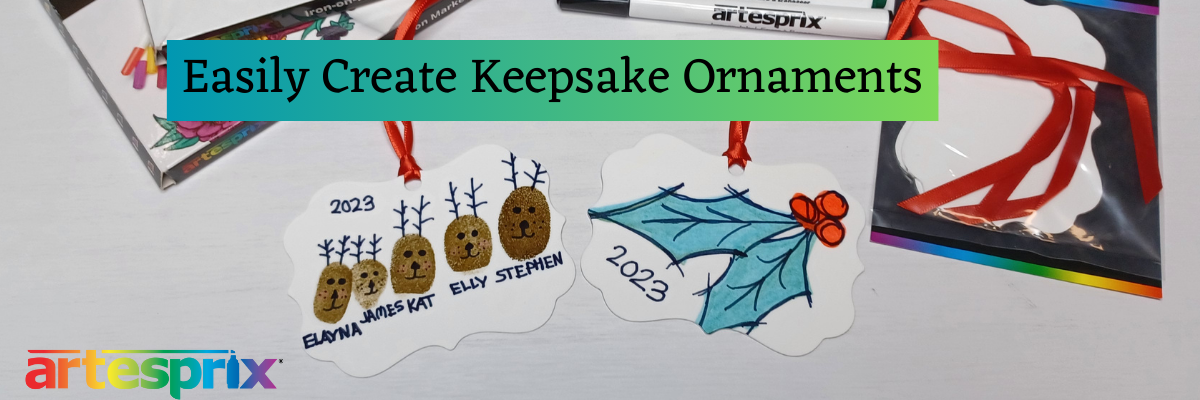
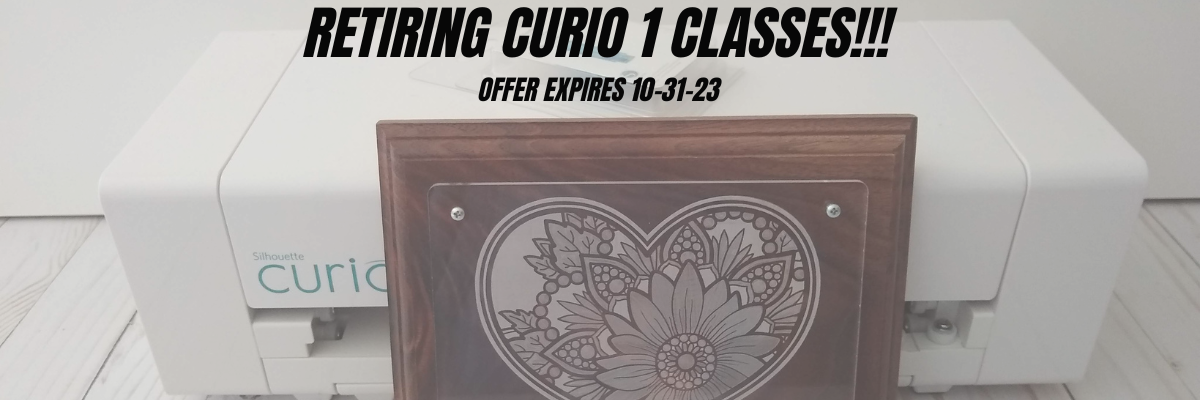
Brilliant Living is a gorgeous digital kit by Nitwit Collections and I was thrilled to collaborate with them for the March 2026 Silhouette Secrets+ newsletter. Newsletter subscribers had the chance to grab the Brilliant Living Knick Knack kit for free exclusive to them in March. Throughout the month I created several different projects using the kit to show it’s versatility from layered cards to tags and even sublimation projects too! Find all the details below.
Affiliate links may be present in the following blog post and as an Amazon Associate, I earn from qualifying purchases.
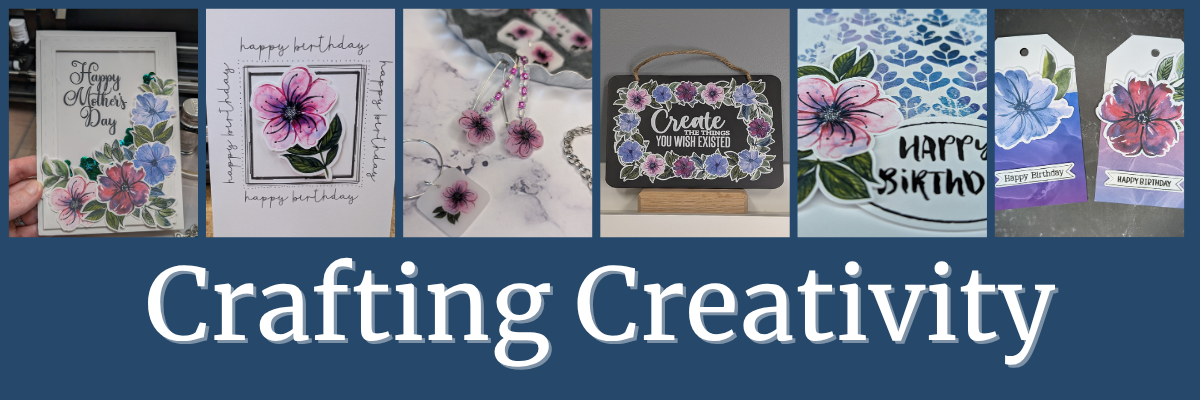
Crafting Creativity with Nitwit Collections– Brilliant LivingDigital Kit
This card has 4 layers of the elements stacked on top of each other with foam tape to give it dimension.
Here is a look at the print and cut page printed out ready to cut around each of the layers.
There are so many options with a digital kit and you can mix and match, add more layers, decrease the layers, or only print one layer for a project as well.
If you are mailing the card, you may need to keep the thickness of the layers in mind when creating it.
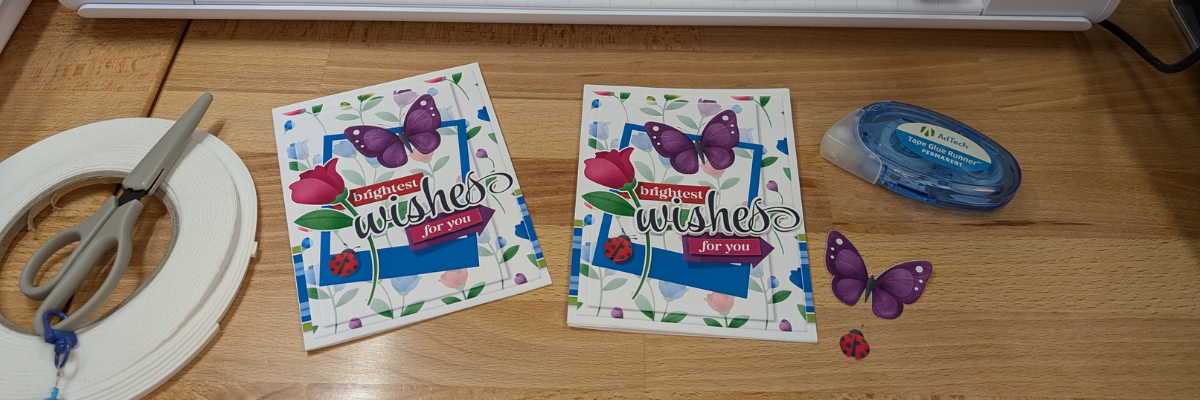
So for the next cards, I stacked elements together and then was able to print 2 card fronts on one sheet of paper. Each of these designs have different elements that can be layered together.
Here is a look at the final results from this printed page.
The card on the left side only has the “for you” and the “ladybug layered”, while the card on the right has the “wishes, for you, and the ladybug layered”.
There were a couple intricate areas that may not cut well for all users. I was able to get these ladybugs with their antennae’s to cut, but had to be extremely careful removing them off the cutting mat. However the butterfly antennae’s were just too delicate, which is another reason you may want to add that layer directly to the card background instead of trying to add it as a 3-D layer. But you never know until you try. The Silhouette machine might amaze you in the cut it can get.
Project #2 –Layered Tag Designswith Brilliant Living Digital Kit
Being able to create your own designs means that you can make them any size you want and create as many as you need in the moment. I started with the idea to create only 2 tags, but it ended up being 4 complete designs.
I used 2 sheets of paper to print and created 1 layered tag and one simple print and cut tag on each sheet.
Here is a look at one of the layered tags using the foam tape to pop up the dimension.
The great part about creating your own tags is there are no rules. Flower hangs off the edge, no problem! Want the design to be flush on the edges – no problem! Or mix and match. And using a digital kit allows you to mock it up first in the Silhouette software before you even cut the elements out.
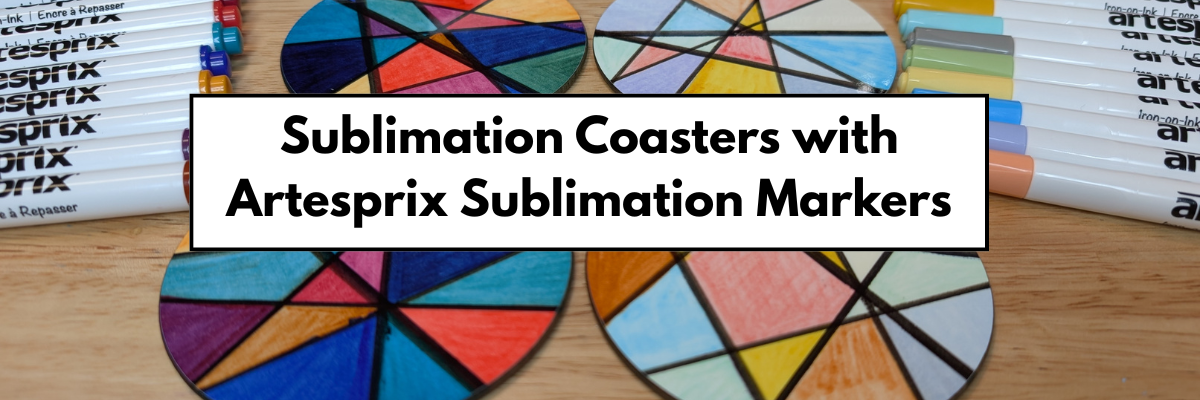
Project #4 –Sublimation Projects with Brilliant Living Digital Kit
Digital designs worked perfectly for sublimation projects! I created 4 sublimation project designs on 1 sheet of sublimation paper.
I made a decorative panel, cover for a compact mirror case, a bookmark, and a coaster.
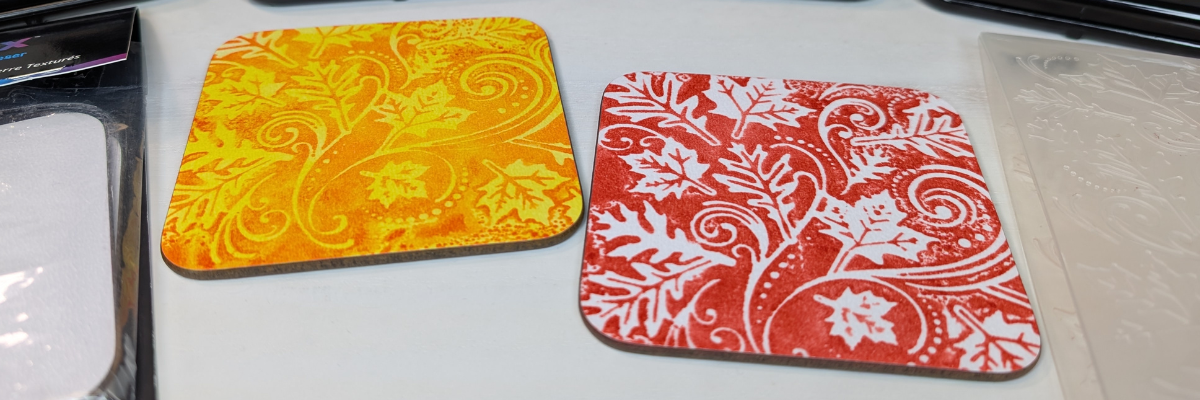
The colors are so bright and brilliant with these projects, except the center of the coaster turned out a bit washed out. This can happen with hardboard at times and moisture affecting the outcome.
Never miss out on the news, tips, “secrets”, deals, classes, and more that I share on Silhouette Secrets+. Sign up for the newsletter and get information delivered to your inbox every Friday. Unsubscribe at anytime.
Did this spark some new creative ideas for you? It’s always inspiring to see how a single flower and greenery design can bloom into so many completely different projects! I had so much fun reimagining this one design across five unique creations and showing just how versatile a single file can be. If you’re looking for even more inspiration, tips, and creative project ideas, be sure to browse the Crafting Creativitysection on the Silhouette Secrets+ website — click HERE to explore!
Save this for future reference by pinning the image below.
Enjoy !
THANK YOU for your support! How can you help? Click HERE & buy a coffee. Every little bit helps with the cost of running the site.
Silhouette Classes
Never stop learning! Let me help you take the anxiety out of learning with Silhouette and get to creating faster! My Silhouette classes are heavily focused on software, so you can take the skills & techniques taught and apply them to many future projects!
**This post may contain affiliate links. What that means is that I may receive compensation if you purchase through the links I have provided. The price you pay for the product or service is not higher but I may get compensated for sharing.
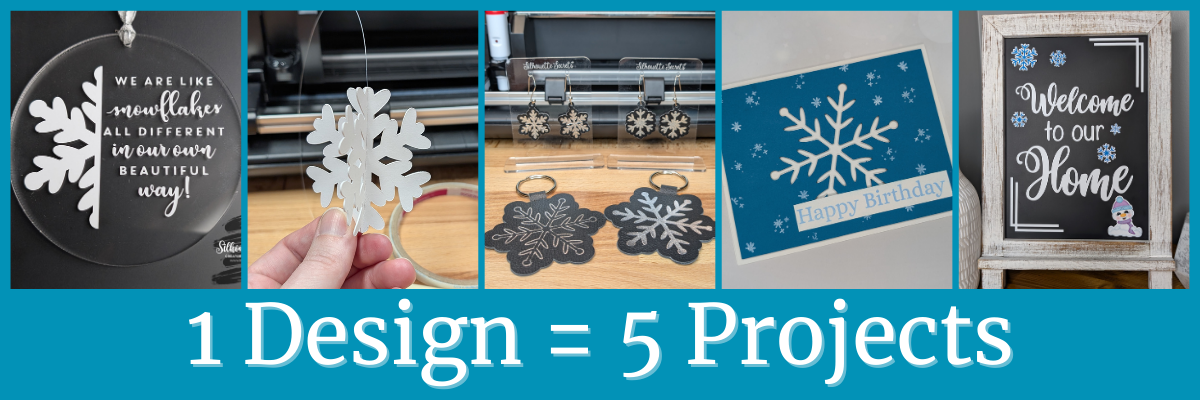
What can you do with one cut file? A lot. Each month I work with a featured designer in the Silhouette Secrets+ newsletter who provides a file for subscribers, and I share new projects each week during the month with that file. I typically start with the original file, add my own touches to it and then I create additional projects to show the versatility that one file can have. The Carrot Balloon Bunny Card by Studio Ilustrado is a perfect example. In this blog post I’m sharing 5 different design ideas that can be made with a Carrot Balloon Bunny Card design.
Affiliate links may be present in the following blog post and as an Amazon Associate, I earn from qualifying purchases.
Crafting Creativity with Studio Ilustrado
One file, endless possibilities.
Project #1 –Bunny Carrot Balloon Card
I started out creating the design as originally intended by making the card and adding my own special touches with inking, paper shaping, and foam tape.
I had the Silhouette Curio 2 out from testing with the Silhouette Leather Carving Knife, so it was the machine I used to cut this card. Almost all the pieces were cut out using scraps from my stash. I love being able to use my scraps!
Look at these tiny details!
To be honest, I wasn’t sure if it would cut well with the electrostatic mat on the Curio 2, but it did! Especially using a scrap piece of cardstock with the Silhouette Electrostatic Mat.
Sometimes we all just need a little bit of help and taping down the cardstock scraps on the Electrostatic Mat can be that help. It just added a little bit more security to hold my scraps in place and get a successful cut with the Electrostatic Mat. I love this new technology that Silhouette has. While it does not work with all materials, it has saved me hours of time cutting cardstock.
While I used the Silhouette Curio 2 to cut the projects, any Silhouette machine could be used to create these projects.
The bunny made the perfect peeking addition to this gable box card. Don’t let the name of a design fool you either. The title of the box is called Christmas Gable Box by Studio Ilustrado, but it can be used for so much more!
Now here is one of my “secrets” – while the Silhouette machines can cut acetate for the window of this box card, I can cut it faster and with less headache.
I cut the window shape from a piece of cardstock using the Silhouette machine and then used it as a template to make a few quick snips with scissors and I was on my way to assembly. It doesn’t have to be perfect since it will be hidden inside the box. And I saved myself time, headache, and didn’t dull my blade.
However, if cutting multiples or a different design than a rectangle, it may be beneficial to set up the machine to cut acetate when needed. It’s great to have options.
I used my laser to cut this out of wood, but you could also use other materials such as cardstock too! Even though I have a laser machine, I started with a 12 inch wood round blank, which you could use as your backing board too.
I used the SVG file, opened it in Silhouette and made a few modifications to the file to be able to create the layers for cutting on wood. Since the wood has more thickness to it than a material such as cardstock, I had to add a layer behind the bunny and cut multiples to make it sit flush with the sign and balloon basket. The knife tool in Silhouette helped me to cut the bunny’s little feet off so it would sit flush on the balloon for this design. That sounds so bad when I type it out, but if you have designed in Silhouette, you’ll know exactly what I mean.
As I was designing and cutting the first sign, another idea popped into my head too! Have you seen the door corner designs?
I drew out a skinny rectangle, made a copy and rotated it 90 degrees. Aligned the right edges and welded it together to make the corner. Then sized the bunny and welded the bunny background to the rectangles to sit on top. Next, I added letters down the right side. Before welding the letters, I made a copy so I could cut them out and layer on top for color and dimension.
Before you go to cut the design, make sure it’s all flush. I forgot to cut the bunny’s feet with the knife tool, but I didn’t realize it until after he was all cut out, so he sits a little bit higher on the top of the door. In this case, it wasn’t worth recutting the design simply because you can’t really tell on our door frame.
I love these little door corner designs, even if we only have a few door frames that I can add them to in our house because the previous owner used the wrong trim to frame out the doors or the frame is too close to the wall. It is a fun way to add a bit of decoration without putting another hole in the wall.
I used the Silhouette Curio 2 to sketch this design using the electrostatic mat because that was the machine on my desk this week, but sketching can be done with any Silhouette machine model.
The clay pot was drawn in Silhouette Studio using basic shapes and adjusting the bottom edit points on a rectangle too!
Unlock your creativity by learning more about Silhouette. You never know where it will take you! Even making cards with carrots.
A great big thank you to Studio Ilustrado for contributing the free file for the Silhouette Secrets+ newsletter for the month of February! If you missed grabbing the free design in February, grab it HERE and start creating!
This year I started offering a free file each month for Silhouette Secrets+ newsletter subscribers. I love designing in the Silhouette Studio software and have shared some of my creations as well as look forward to collaborating with more artists in the future too!
Silhouette Secrets+ Newsletter
Never miss out on the news, tips, “secrets”, deals, classes, and more that I share on Silhouette Secrets+. Sign up for the newsletter and get information delivered to your inbox every Friday. Unsubscribe at anytime.
Sign up for the weekly newsletter HERE to have information delivered direct to your inbox and grab each month’s new freebie.
Did this spark some new creative ideas for you? It’s always inspiring to see how a single design can be used in completely different projects! I had so much fun reimagining this one design across five unique creations and showing just how versatile a single file can be. If you’re looking for even more inspiration, tips, and creative project ideas, be sure to browse the Crafting Creativitysection on the Silhouette Secrets+ website — click HERE to explore!
Save this for future reference by pinning the image below.
Enjoy !
THANK YOU for your support! How can you help? Click HERE & buy a coffee. Every little bit helps with the cost of running the site.
Silhouette Classes
Never stop learning! Let me help you take the anxiety out of learning with Silhouette and get to creating faster! My Silhouette classes are heavily focused on software, so you can take the skills & techniques taught and apply them to many future projects!
**This post may contain affiliate links. What that means is that I may receive compensation if you purchase through the links I have provided. The price you pay for the product or service is not higher but I may get compensated for sharing.
The Silhouette Cameo5α (Alpha) model is the latest machine released by Silhouette America. It was announced at the Silhouette Summit 2025 in Japan in September 2025 and was released shortly after the Summit.
Affiliate links may be present in the following blog post and as an Amazon Associate, I earn from qualifying purchases.
I was not able to attend the Silhouette Summit in Japan, but did order the Silhouette Cameo5α as soon as it was available on the Silhouette America website. At the time of the release, only the white Silhouette Cameo5α models were available and there was no timeline on the other colors being released, so I grabbed it. However, if I would have had choices, I would have selected the Bianco Carrara pattern. When this pattern was first released, I was not impressed, until I had one in my hands and it is my new favorite pattern.
I released 2 unboxing videos on the Silhouette Secrets+ YouTube channel sharing a quick setup as well as an in-depth look at the new machine model. So far the in-depth unboxing and setup has been the most popular.
I did not get a blog post out at the time of releasing the unboxing, but sometimes a delay can also be a good thing as I’ve had some time to work with the Silhouette Cameo5α and really test it out. This means that I can add more information and real world experience to the blog post.
Here is one of the first projects I cut out after unboxing the Silhouette Cameo5α.
This project had many intricate cuts from the wood layers to the small skeleton hands. At this size, the cardstock makes a huge difference too! The first one I cut, the cardstock paper layers were separating and I had to switch to a higher quality smooth cardstock for these details.
Here is a close up look at this finished project of the 3-D Skeleton Coffin with all of the details.
This was just one piece to my Halloween busted canvas project, but it was a great test to really see what the Silhouette Cameo5α was capable of.
But, of course, I couldn’t stop there! The coffin was only the first piece of my Halloween busted canvas project.
I continued to cut out pieces for the 3-D Tombstone and put the Silhouette Cameo5α to the test. Within a short amount of time from unboxing the machine, I had a lot of cut hours into testing it out.
The Silhouette Cameo5α is an updated model of the original Cameo 5. The original Silhouette Cameo 5 model is no longer manufactured.
The Silhouette Cameo5α features a new roller design and I do like how it is much more visible to see the rollers and if ever there is a need, easier to clean them as well. It also has a pinch pressure button locking mechanism on the right roller that is so much nicer than the original model design.
It also has an additional 0.3 mm clearance on the roller bar for the Silhouette Cameo5α. At the Silhouette Summit, they mentioned this in reference to use with the Silhouette Electrostatic Mat. With the Silhouette Electrostatic Mat, there is a protective sheet that goes on top of the mat before you place your materials on it to be cut. This protective sheet adds height to what is rolling through the machine. I have not had any issues with this, however, they must have received some feedback from users who were using multiple layers of materials, such as stickers with a laminate on top of it which is thicker than your average cardstock. So the clearance was increased a tad bit.
Keep in mind that when you are talking about clearance, the material also has to “clear” the bottom of the tool that is being used. So even if it clears the bottom of the roller bar, thicker materials also have to allow the blade or tool to clear it as well. And even if a material can clear both the roller bar and tool tip, that does not guarantee that it is a cuttable material with the Silhouette. There are many factors that go into whether a material is going to cut well with a Silhouette.
With the Silhouette Cameo5α, you do have to use a Silhouette software version of 5.0.402 in order for the machine to be recognized. As I type this up, there are still many bugs and issues with version 5 and I am not recommending version 5 for all users. But, if you are a Silhouette Cameo5α owner, you do have to use version 5 and there is no way around that. I recommend using version 5.0.402 at this time and not the current version (5.0.414) as we have seen some issues with the current version. We have seen some issues of machines being bricked or recognized as a regular Cameo 5 and not a Silhouette Cameo5α. If you encounter any of those issues, please contact Silhouette Support and be as detailed as possible in your request for assistance. Including photos and video can help them help you faster as well.
The Silhouette Cameo5α also uses the 4 point registration marks for print and cut projects. This was first released with the Silhouette Cameo Pro MK II model and now is available with the Silhouette Cameo5α model. Silhouette states that this is supposed to improve accuracy of the print and cut results. However, I have not seen any significant improvements in my testing. The biggest issues we see with print and cut are still due to setup and user errors.
I use both the Silhouette Cameo 5 original model and the Silhouette Cameo5α. It really just depends on what I am doing and what the project might be.
Anytime I get a new machine, I like to put it through the paces to see what works and what doesn’t. This means testing both the machine and the Silhouette Studio software.
Here are some print and cut projects I did while testing it.
I do love that I can create meaningful cards and gifts for friends and family, no matter what the circumstances are.
I really do wish cutting machines came with a cut hours timer. Within the first few weeks of owning the machine, I racked up a lot of cut hours.
Save this for future reference by pinning the image below.
Enjoy !
THANK YOU for your support! How can you help? Click HERE & buy a coffee. Every little bit helps with the cost of running the site.
Silhouette Classes
Never stop learning! Let me help you take the anxiety out of learning with Silhouette and get to creating faster! My Silhouette classes are heavily focused on software, so you can take the skills & techniques taught and apply them to many future projects!
**This post may contain affiliate links. What that means is that I may receive compensation if you purchase through the links I have provided. The price you pay for the product or service is not higher, but I may get compensated for sharing.
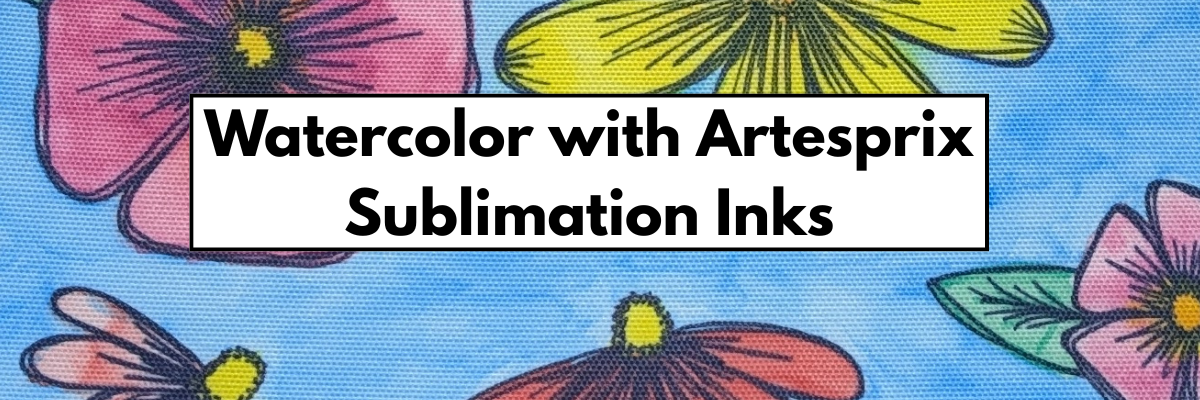
Glass etching is a great way to make unique projects and combine that with a Silhouette cutting machine and you have endless possibilities of customization. In this blog post I’m sharing a look at custom etched martini glasses I made while creating the March 2026 exclusive video tutorial for the Creative Community.
Affiliate links may be present in the following blog post and as an Amazon Associate, I earn from qualifying purchases.
Steps to Etched Glass Projects
Create a stencil for etching.
Clean glass blank with alcohol and allow to dry.
Apply stencil.
Mask off edge of stencil to prevent bleeding
Apply Etchall Etching Creme and allow to sit for 20 minutes.
Remove any excess Etching Creme and place back in the bottle.
Wipe off remaining excess with a paper towel and safely discard paper towel.
Run water in the sink and rinse off decal thoroughly.
Remove masking tape and adhesive vinyl under running water.
I started with created the stencil design in the Silhouette software using the Conical Warp Panel.
I shared an in-depth look at the Conical Warp Panel and step-by-step instructions for several projects, including these stencils in the March 2026 Creative Community exclusive video tutorial. For more details on the Creative Community, check it out HERE.
I wanted the design visible when drinking from the glass, so I flipped the design in the software prior to cutting the stencil.
Then sent the design to cut from Oracal 651 adhesive vinyl. Scraps are great for making stencils and I have a whole drawer full of adhesive vinyl scraps.
After weeding the design, I applied transfer tape and applied the adhesive vinyl as smooth as possible to the cleaned martini glass.
Here is a look at the stencil and how it will read after the design is etched.
Then, I created and cut a few more designs.
If I am etching one glass, might as well etch a few more at the same time.
Adding painters’ tape to the edges of the stencil can prevent any bleeding. Etching is permanent and it never fails that if the etching creme touches a spot you don’t want etched for even just a second, it will etch it. One of those craft project oopsies.
Apply the Etchall etching creme and let it sit for 20 minutes.
Carefully scrape off any excess Etchall etching creme and put it back in the bottle. It can be reused over and over again. Make sure not to scrape too hard to dislodge any small bits of the stencil or etching creme can get in areas that you don’t want to be etched.
I also like to take a paper towel and carefully remove any other excess etching creme and then discard the paper towel. Then I run water in the sink and begin rinsing and removing the painter’s tape and adhesive vinyl. Rinse the glass thoroughly and dry.
Enjoy your custom etched martini glasses.
Drink Happy Thoughts Etched Martini Glass
Espresso Yourself Etched Martini Glass
Don’t Ask Just Pour & Sip Sip Hooray! Etched Martini Glass
Save this for future reference by pinning the image below.
Enjoy !
THANK YOU for your support! How can you help? Click HERE & buy a coffee. Every little bit helps with the cost of running the site.
Silhouette Classes
Never stop learning! Let me help you take the anxiety out of learning with Silhouette and get to creating faster! My Silhouette classes are heavily focused on software, so you can take the skills & techniques taught and apply them to many future projects!
**This post may contain affiliate links. What that means is that I may receive compensation if you purchase through the links I have provided. The price you pay for the product or service is not higher, but I may get compensated for sharing.
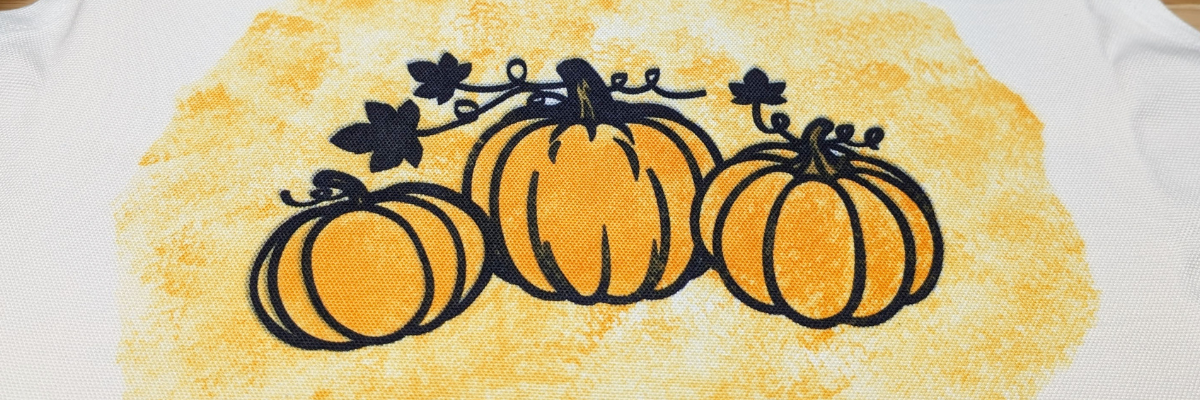
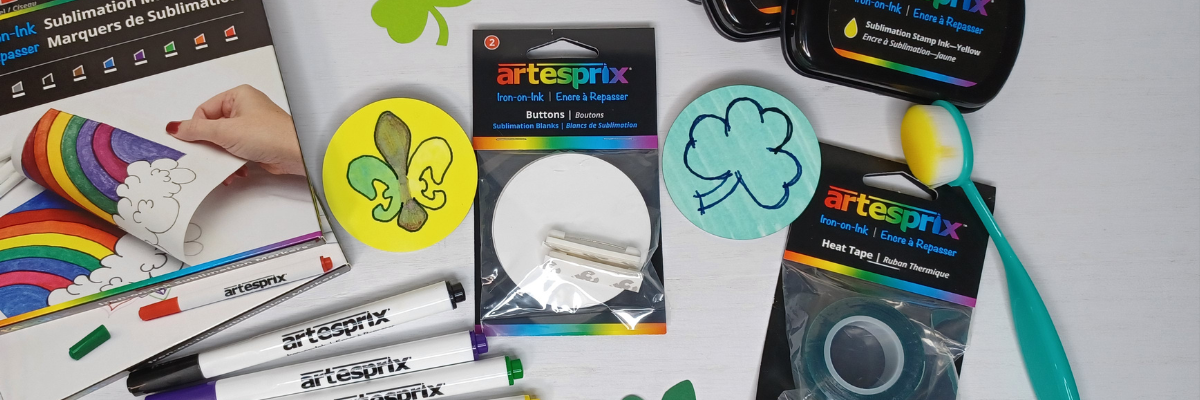
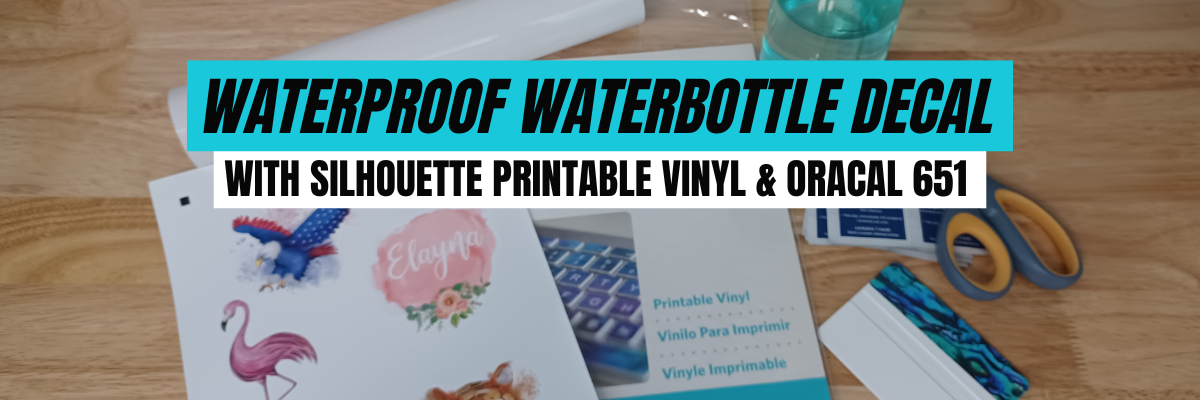
New video out on the Silhouette Secrets+ YouTube channel!! In this video I share step-by-step how I created a layered card design in the Silhouette Studio software using a digital kit by Nitwit Collections.
Affiliate links may be present in the following blog post and as an Amazon Associate, I earn from qualifying purchases.
This is the first Crafting Creativity project for the month of March that I shared with newsletter subscribers.
I love the bright colors Knick Knack kit by Nitwit Collections. This kit is exclusive to newsletter subscribers for the month of March and then will be available in their shop for purchase later.
Save this for future reference by pinning the image below.
Enjoy !
THANK YOU for your support! How can you help? Click HERE & buy a coffee. Every little bit helps with the cost of running the site.
Silhouette Classes
Never stop learning! Let me help you take the anxiety out of learning with Silhouette and get to creating faster! My Silhouette classes are heavily focused on software, so you can take the skills & techniques taught and apply them to many future projects!
**This post may contain affiliate links. What that means is that I may receive compensation if you purchase through the links I have provided. The price you pay for the product or service is not higher, but I may get compensated for sharing.
I am so excited to announce that I am an instructor again at this year’s Bella Con event hosted by Bella Crafts Publishing! This is a LIVE virtual crafting event bringing creative instructors together for four full days of inspiration and hands-on learning. And… I get to be on-site with the other instructors this year in Texas to share my classes too! Bella Con is happening March 25-28, 2026.
Affiliate links may be present in the following blog post and as an Amazon Associate, I earn from qualifying purchases.
This is a wonderful event full of inspiring and talented creators. Not only are there awesome classes, but each instructor also shares their tips, tricks, and wisdom throughout the entire event and that adds so much to the value.
BellaCon 2026 features 24+ LIVE workshops, creative tips and techniques, giveaways, and interactive sessions you can enjoy from the comfort of home. Every registered attendee receives access to all of the workshops, not just a single class.
One of the highlights of the event is the LIVE Pajama Party, where many of the instructors will be together in one location, coming to you live with mini workshops, prizes, surprises, and a chance to win giveaways from our generous sponsors.
If you love crafting, learning new ideas, and connecting with creative people, I would love for you to join us.
There are 2 options to join us:
SWAG option – this features a SWAG bag full of goodies from the sponsors plus access to all of the classes virtually shipped directly to you Don’t delay if you think you might want SWAG as it is limited to the first 125 and does tend to sell out quickly. Estimated retail value of SWAG bag is $200
Class supply lists will be available, and some classes will also have the option to purchase kits too!
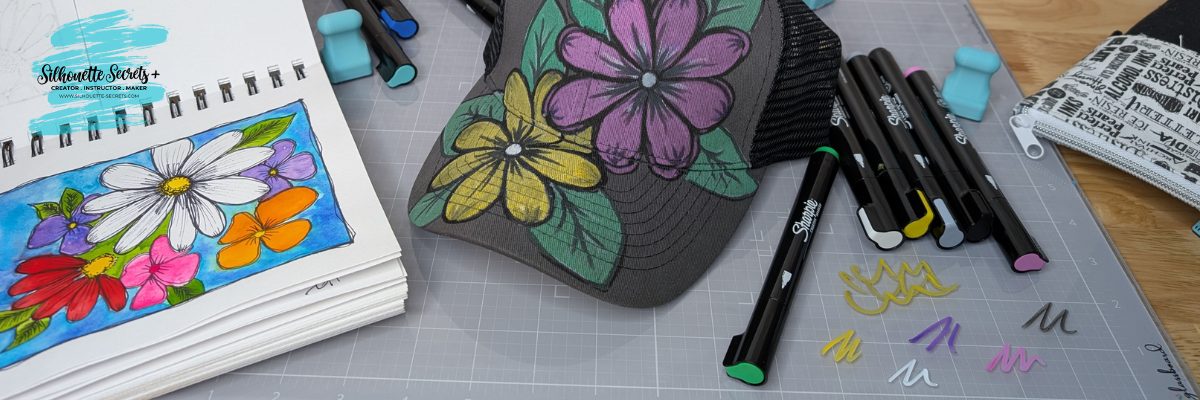
I will be teaching 2 classes live from Texas, and they can be done with or without a cutting machine. These classes are designed to be customized and add your own creative flair to them. I’ll share my ideas and you can see where it takes you.
Rewriting the Story – Class Supplies Photo
Rewriting the Story…Creative Home Decor with Repurposed Books: Give old books a fresh new purpose in this creative home decor class. You’ll learn the basic steps for transforming repurposed books into a unique decorative piece, then take those ideas and make the project your own. A variety of craft supplies can be used, encouraging creative exploration and personal expression. This class will also share a cut file, background photo, and supply list, along with ideas for variations so every project is one of a kind.
For this class, I did a couple test rounds and love how they turned out! This is one of those projects that you can let your imagination run wild with and customize however you want. You never know what embellishment might speak to you in your craft stash to add this project.
Northern Lights Themed Book Decor
My first project with this is a Northern Lights themed design. Growing up in Montana I am drawn to the Northern Lights.
Custom Beaded Embellishment
I made a custom pendant piece using a beading technique I learned from Julianna the creator behind the Jewel Loom. The funny part is, I bought Julianna’s eBook when researching writing my own eBook and then I fell in love with the designs taught and that sent me down the rabbit hole of beading. Find the Jewel Loom Inspirations book HERE at Bella Craft Publishing under eBooks – just be careful, it can spark a whole new world of crafting energy!
Instead of making a full bracelet this time, I made it smaller and customized it with a custom pendant using the same image that is on the book decor. Find more on creating custom pendants HERE.
Fairy Themed Book Decor
The second one I made is a Fairy Garden theme. Ever since I made my first fairy garden in 2014 when we lived in California – back before they were even a “thing” – I’ve wanted to create another and when the fairy garden supplies all but jumped off the end cap into my cart at the Dollar Tree – the project design fell into place.
I used drywall spackle to create a “tree” texture as the base and then started embellishing from there.
I love how these both turned out and have them displayed in my home. This is a project you can turn into your own and make it personalized however you would like.
I will be teaching a spring themed design for this class at Bella Con 2026. I’m so excited to see how it turns out.
The second class I’ll be sharing is another one that is completely customizable too! Give your project a personality of it’s own and you might not know what that is until it’s almost finished.
Grow Your Style Class Supplies Photo
Grow Your Style…A Little Pot of Personality: Create a charming mini clay pot full of character in this playful and creative class. Using multi color green beads, you’ll design a unique style and finish your pot by adding a face and choosing its personality. Cute, quirky, sassy, or sweet, no two projects will look the same. This easy and relaxed project is perfect for all skill levels and can be completed with or without a cutting machine.
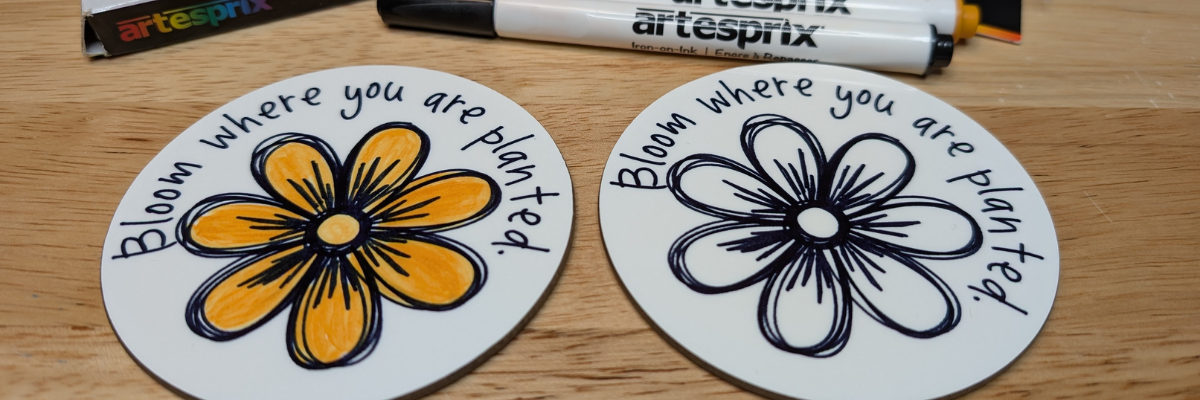
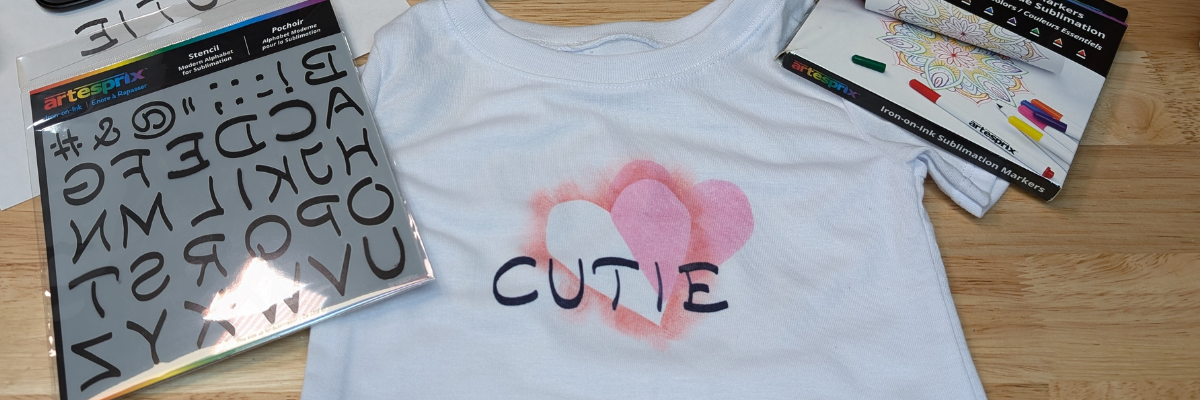
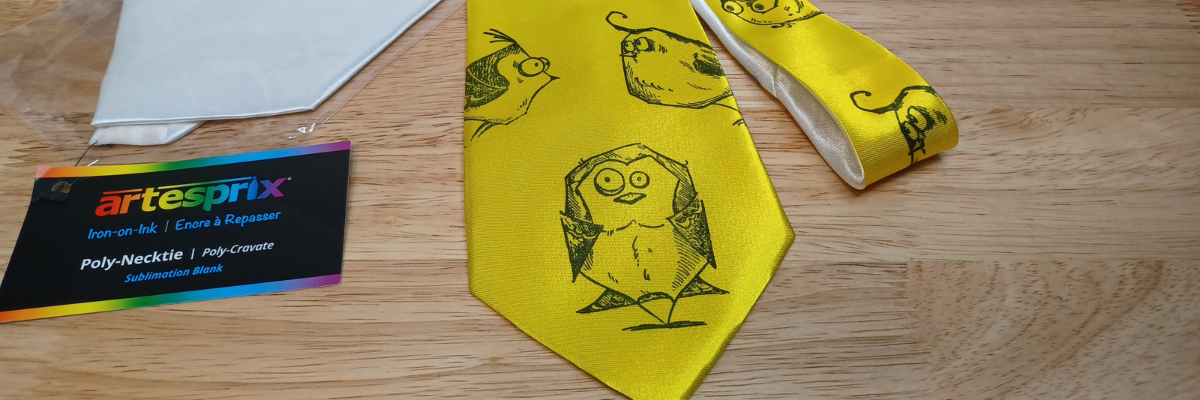
I’ll also be co-teaching a class with the amazing, talented artist Julie McGuffee and sharing a quick project for Artesprix too!
This event is filled with so much creative inspiration and talented artists! I am honored to be a part of it.
And those are only the classes I am teaching. There is so much more! Look at all those faces above.
Bella Con 2026 Class Sneak Peek
Here are a couple sneak peeks at the other instructors and their projects too! Find the full list HERE
Eilleen Hull is a maker, teacher, influencer, and creative community builder with a passion for helping others discover the joy of making. She licenses her art with leading craft manufacturers, including an 18-year partnership with Sizzix that resulted in hundreds of innovative die designs.
Julianna (aka Jewels) – the one who got me addicted to beading. Julianna is an award-winning innovator, product developer, bestselling Amazon author, and creative entrepreneur with over 25 years in the craft industry. She became a household name through thousands of appearances on shows such as Aleene’s Creative Living, The Carol Duvall Show, and HSN, inspiring millions to create.
Amanda is one of the founders of Pear Blossom Press, a company known for innovative products designed especially for paper crafters.
Julie McGuffee has been professionally involved in the arts and crafts industry since 1988. She hosted a scrapbooking television show for 15 years and has appeared as a guest and guest host on numerous craft shows over the past 30+ years, including popular shopping channels. As an all-around crafter and designer, Julie has authored over 150 “how-to” craft books covering a wide variety of techniques, from decorative painting to silk ribbon embroidery.
I wish I could list them all, but that might get a bit long. You can check out the full list of instructors and classes directly at Bella Con HERE. Then come back and click the link below to register.
I hope you’ll join us and soak up all the creative inspiration shared by these amazing instructors and artists. Bella Con is one of my favorite events of the year.
Thanks so much for using my links when you register for the event. This helps to cover the costs of developing the classes and travel expenses too!
I cannot wait to share more from the “Instructor Zone” in March!
Enjoy !
THANK YOU for your support! How can you help? Click HERE & buy a coffee. Every little bit helps with the cost of running the site.
Silhouette Classes
Never stop learning! Let me help you take the anxiety out of learning with Silhouette and get to creating faster! My Silhouette classes are heavily focused on software, so you can take the skills & techniques taught and apply them to many future projects!
**This post may contain affiliate links. What that means is that I may receive compensation if you purchase through the links I have provided. The price you pay for the product or service is not higher, but I may get compensated for sharing.
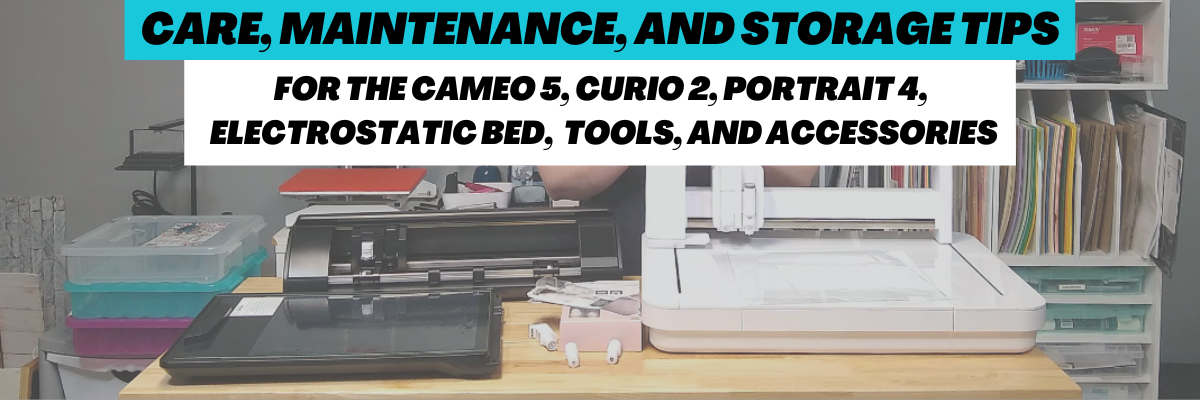
Silhouette IPT is short for Intelligent Path Technology and was first announced to us at the 2023 Silhouette Summit when the Silhouette Cameo 5, Curio 2, and Portrait 4 models were announced.
Affiliate links may be present in the following blog post and as an Amazon Associate, I earn from qualifying purchases.
In this blog post, I am sharing some of the details of the IPT setup and how it works. Read more details below and then watch the video tutorial with even more tips on the Silhouette Secrets+ YouTube channel HERE.
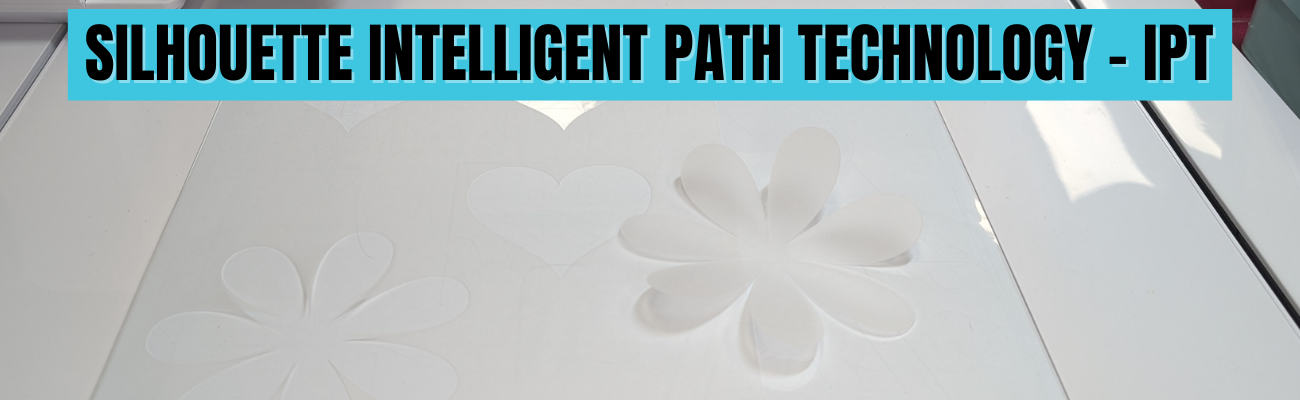
The Silhouette IPT is a patented cutting technology that changes the cut order of a design to “help” it stay in position and complete the cut. Depending on the design you have on the file, when it’s turned on, it will complete the cut of the design in segments versus a continuous cut around the entire design. The photo below shows the standard method of cutting on the left side, that would be from 1 starting point and cut around in one continuous cut back to the starting point on a heart. On the right side, the white dots are points of reference in how the design would be cut in segments, starting on the top right, then moving to the top left and then moving to complete the bottom on each side. This method is designed to “hold” the design in place and not have shifting as it’s being cut.
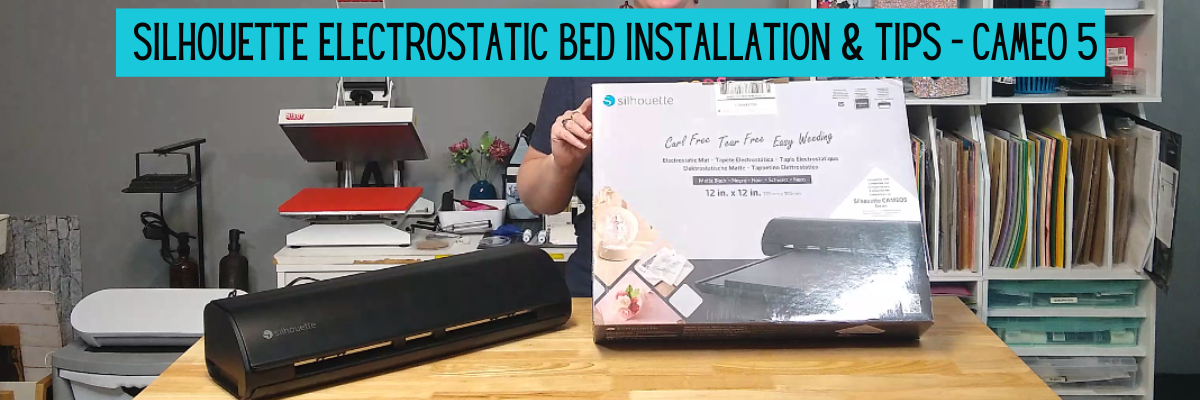
This new technology was created to help delicate materials such as vellum be more successful when cutting out designs and to cut through multiple layers of materials at once, such as several sheets of vellum stacked on top of the Silhouette Electrostatic Mat.
Here is the video we were shown at Silhouette Summit 2023 to explain the process.
This is a setting you have to set up and turn on in order for it to use the IPT cutting method and is not an automatic setting. It is compatible with the Silhouette Cameo 5, Curio 2, and Portrait 4 models.
Silhouette IPT settings can be found under the advanced settings on a preset setting, or you can turn it on for a custom cut setting. On the Send tab in Silhouette Studio, select the MORE button and you will see a box next to “Intelligent Path Technology”.
Here is a look at Silhouette Studio version 5
Screenshot Silhouette Studio v5.0.402
And a look at the Advanced Settings in Silhouette Studio version 4
Screenshot Silhouette Studio v4.5.815
If IPT is selected on a preset material setting, you will need to Save As to create a new material in order for it to be activated on the cut setting. If you simply check the box and X out of the preset material, it will not activate the IPT setting.
Screenshot Silhouette Studio v4.5.815
How Silhouette IPT (Intelligent Path Technology) Works
Let’s take a real world look at the IPT cut setting and the order that it takes. Keep in mind that the Silhouette software will change this order for every design, and you do not know what the order will be unless you watch and record the machine behavior.
I’ll be using the Silhouette Curio 2 for this demonstration, but it works the same for the Silhouette Portrait 4 and the Silhouette Curio 2. I am using Silhouette Vellum sheets for this test along with a brand new Silhouette Autoblade.
I used the same shape from the video by Silhouette from 2023. I drew the heart using the Flexishapes tool on the left side in Silhouette.
This was completed as a continuous cut, the blade never lifted.
Then I turned the cut lines off for the first heart and turned the cut lines on for the 2nd heart, which is an exact copy of the first one.
My first attempt at this IPT cut, I used the Vellum preset, checked the box, but then X’d out and found out that it did not activate the IPT setting. A new custom setting is required by clicking on Save As after checking the box.
So I made a 3rd copy of the heart and I clicked on the MORE button and checked the box next to Intelligent Path Technology and chose Save As. Then clicked the X in the top right and chose the new material of Vellum (1) as my setting. I then clicked on the MORE button to double check that IPT setting did save with the new material.
The IPT function did work and it cut the heart in 10 different line segments. However, the cut order was a bit different than the video by Silhouette from 2023 and I noticed it started the first cut in the bottom left area of the design. I am using Silhouette Studio version 4.5.815 for this demonstration. The order in which it cuts may vary by software version, which may be why the order is different than what the video shows from 2023.
Here is a diagram of the cut order using IPT with this heart shape
This heart with this specific material cut fine both ways. But, that won’t always be the case.
On a more complex design, such as this flower shape drawn with the Flexishapes and the control point adjusted to make a sharper petal, IPT did make a difference in the cut. Instead of tearing, smooshing, or ruining the corners on the interior of the petals, it was a clean sharp point and the design cut well.
For this flower shape that is approximately 4.3″ tall and 4.2″ wide, it did 51 segmented cuts. I am not going to study the video to diagram all that out, however, it was pretty neat to watch. And it was a success, with no smooshed corners or tears. I did have to “pop” out the flower carefully, but for some designs that extra little bit of care is worth it!
Here is a close up look at the interior cuts on the flower shape. Look at those crisp, cut edges! No tearing or smooshing using the IPT feature in Silhouette.
Vellum is a very delicate material and can be difficult to cut, especially on an intricate cut. Vellum will also curl as you can see in this photo, the flower immediately started to curl. Humidity can also affect the success of cutting vellum, well, really any paper is affected by humidity. For best results, store vellum in a sealed envelope and completely flat. The Silhouette Electrostatic Mat is awesome for cutting vellum designs and I share even more in the Silhouette Curio 2 – Out of the Box class found HERE.
Here are a few more vellum products I’ve tested with:
It is a setting you can turn on for a preset material, then Save As a new material.
It is a setting you can turn on for a custom setting.
It does take longer to cut a design because the blade will lift, move, and cut in a different order.
It will take longer on the Silhouette Curio 2 versus a Silhouette Portrait 4 or Silhouette Cameo 5 model due to the slower movement of the arm on the Silhouette Curio 2. It may only be a few seconds longer, but it will.
Testing is the only way you will know if it will work for a design and material.
The Silhouette software decides the order of IPT based on the shape, size, and design. The user does not see the order or know how many segments a design will be cut out in.
Don’t believe AI answers on what IPT does or in general how to use a Silhouette. AI has no experience using Silhouette machine and will come back with some very bad advice. Experience using a cutting machine will beat AI hands down – literally.
This is NOT the same as Cut Order Sorting options found under the Settings (gear icon) on the Send Tab in Silhouette Studio.
Screenshot from version 5 Silhouette Studio
Here is a look at where to find the Cut Order Sorting options in Silhouette Studio version 4
It did take more time to cut, but I was able to successfully cut out a rolled flower design using the Silhouette Electrostatic Mat and IPT setting. This has been something I have troubleshot with users several times and the intricate design just couldn’t be held in place to complete the cut using the standard cutting methods with the electrostatic mat.
I am thrilled with how this worked out!
Does Silhouette IPT Work?
Yes – but not for every design, material, or project. I thought it worked great with the flower design above as that is one of those highly likely designs to smoosh and tear on the sharp corners.
Personally, I do not typically like the little tabs it left, similar to pop out cutting. However, it might be beneficial for those materials or designs that just will not cut the standard way. The only way to know is to test it and see what happens. If you do use it, I would recommend a sharp pair of detail scissors to snip the little connections and care when separating it from the full sheet.
The second part of IPT method for cutting through multiple layers of materials, proved to be much more finicky with mixed results. I spent hours and hours testing and was never really impressed with the results. The more layers of material, the less desirable the cut results were. It is not something I’ve spent more time testing. Maybe someday I’ll try again.
I hope those tips give you a better idea of how this new cut path technology works. You never know until you try and hopefully that will help your trials go a bit easier.
Next time you have a design that is just giving you fits with a standard, continuous cut setup – you might try out the IPT setting and see if it makes a difference in the success with your material.
Good luck!
Save this for future reference by pinning the image below.
Enjoy !
THANK YOU for your support! How can you help? Click HERE & buy a coffee. Every little bit helps with the cost of running the site.
Silhouette Classes
Never stop learning! Let me help you take the anxiety out of learning with Silhouette and get to creating faster! My Silhouette classes are heavily focused on software, so you can take the skills & techniques taught and apply them to many future projects!
**This post may contain affiliate links. What that means is that I may receive compensation if you purchase through the links I have provided. The price you pay for the product or service is not higher but I may get compensated for sharing.
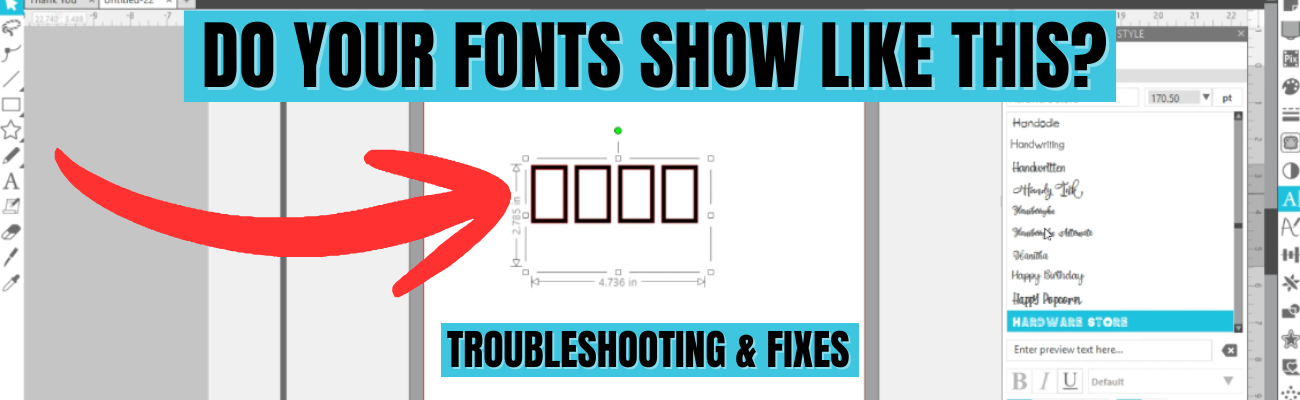
Have you ever opened Silhouette Studio, started designing with text, and instead of a beautiful font you’re greeted with rectangles, boxes, or missing letters? Font issues in Silhouette Studio are a common frustrations that we see when troubleshooting with users—whether fonts don’t show up at all, won’t display correctly, or refuse to work the way you expect. The good news? These problems usually have simple explanations and easy fixes once you know what to look for.
Affiliate links may be present in the following blog post and as an Amazon Associate, I earn from qualifying purchases.
I just shared a brand new video on the Silhouette Secrets+ YouTube channel that walks you through exactly why font issues happen in Silhouette Studio and how to troubleshoot them. In this tutorial, you’ll learn why fonts show up as rectangles, a glimpse at previewing fonts, why fonts can go missing or seem like they are missing, and how to reinstall fonts correctly—including whether OTF or TTF files work best. If you’ve ever wondered “Why is my font doing that?” this video will help you get back to designing quickly and show how to avoid some of these issues.
If you’re ready to go beyond troubleshooting and really learn how to use fonts to create your own designs in Silhouette Studio, come join us in the Creative Community with EllyMae | Crafting & Troubleshooting site. Our February 2026 exclusive member video covers working with text, fonts, and design techniques so you can move from simply typing words to confidently creating custom designs with fonts. It’s the perfect next step if you want to unlock the creative power of text in Silhouette Studio and design projects that are truly your own. In the 96 minutes step-by-step video tutorial I cover everything from where fonts are stored, font storage, designing with glyphs, offsets, compound paths, combining shapes, and more! Create 10 unique designs in less than 2 hours and then take and use those techniques to create even more!
Save this for future reference by pinning the image below.
Enjoy !
THANK YOU for your support! How can you help? Click HERE & buy a coffee. Every little bit helps with the cost of running the site.
Silhouette Classes
Never stop learning! Let me help you take the anxiety out of learning with Silhouette and get to creating faster! My Silhouette classes are heavily focused on software, so you can take the skills & techniques taught and apply them to many future projects!
**This post may contain affiliate links. What that means is that I may receive compensation if you purchase through the links I have provided. The price you pay for the product or service is not higher but I may get compensated for sharing.
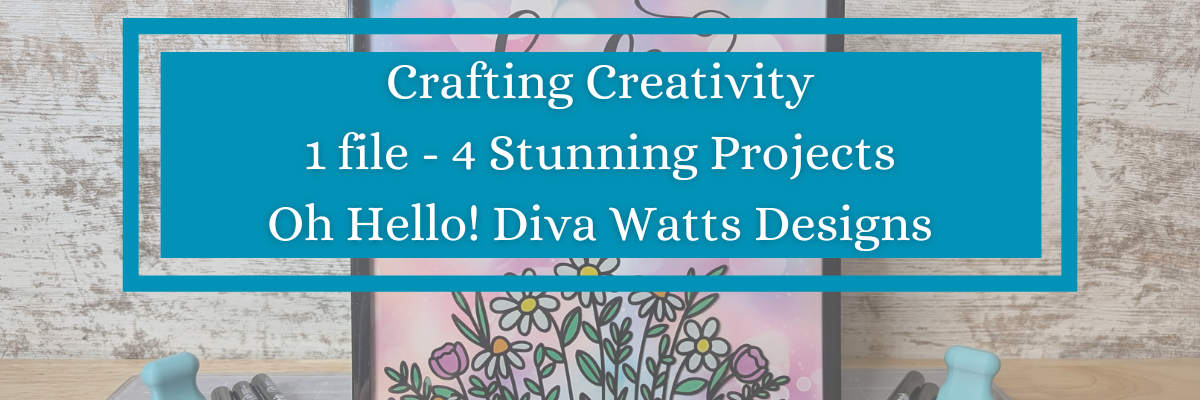
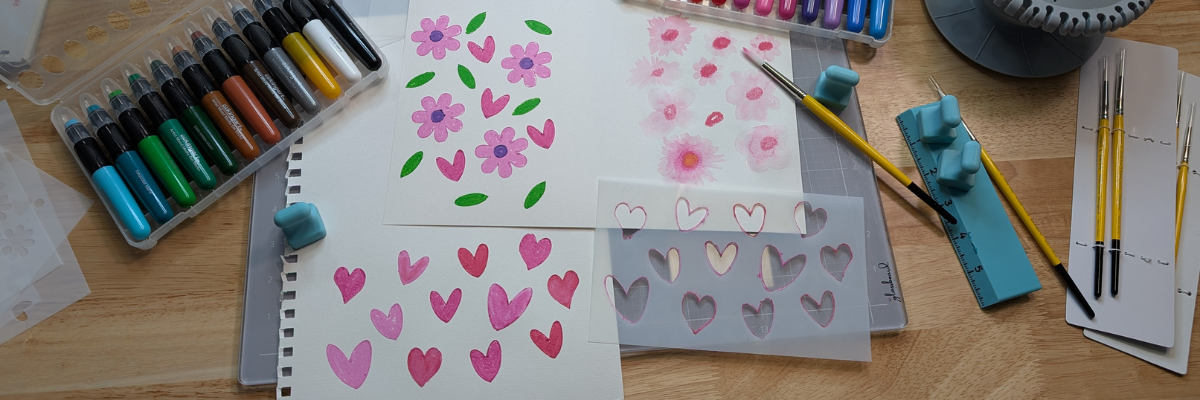
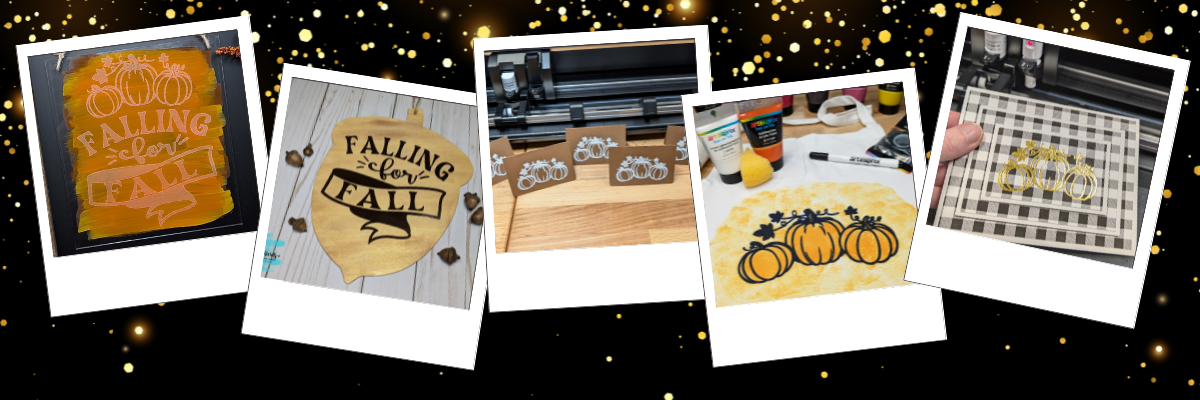
Creativity truly blooms when you learn how to stretch a single design into multiple handmade projects. In this Crafting Creativity blog post, I’m sharing how one flower design by Flavir Design can be transformed into five stunning Silhouette flower projects using a cutting machine and paper crafting techniques. From a layered paper flower bouquet and custom greeting cards to a paper flower box topper, custom bookmarks with patterned backgrounds, and even miniature flowers, this project series is all about getting more value, versatility, and inspiration from one cut file. If you love Silhouette crafting, paper flowers, and creative ways to maximize your digital designs, this post will spark new ideas for your next crafting session.
Affiliate links may be present in the following blog post and as an Amazon Associate, I earn from qualifying purchases.
Crafting Creativity Flowers & Greenery by Flavir Design
Daniela Moscone is the creative artist behind Flavir Designs and can be found in the Silhouette Design Store or on their website HERE. Make sure to check out their YouTube channel HERE for assembly videos too!
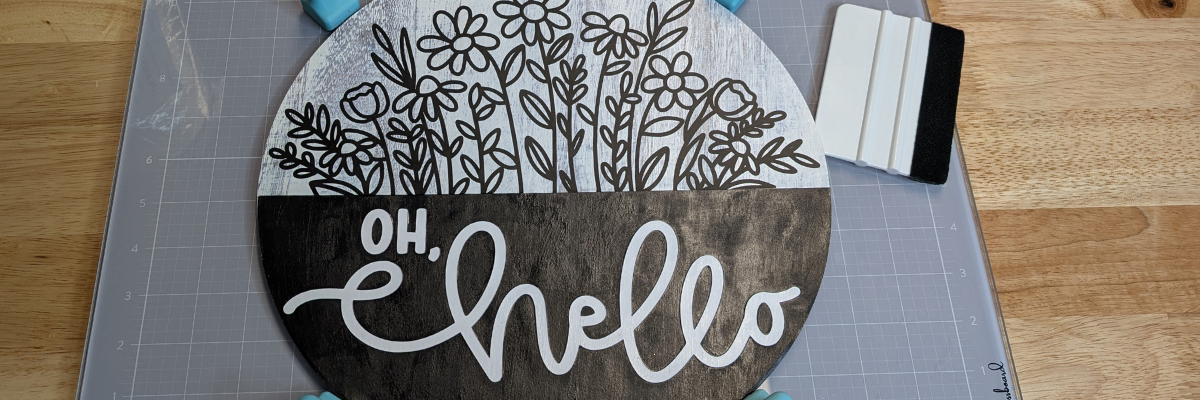
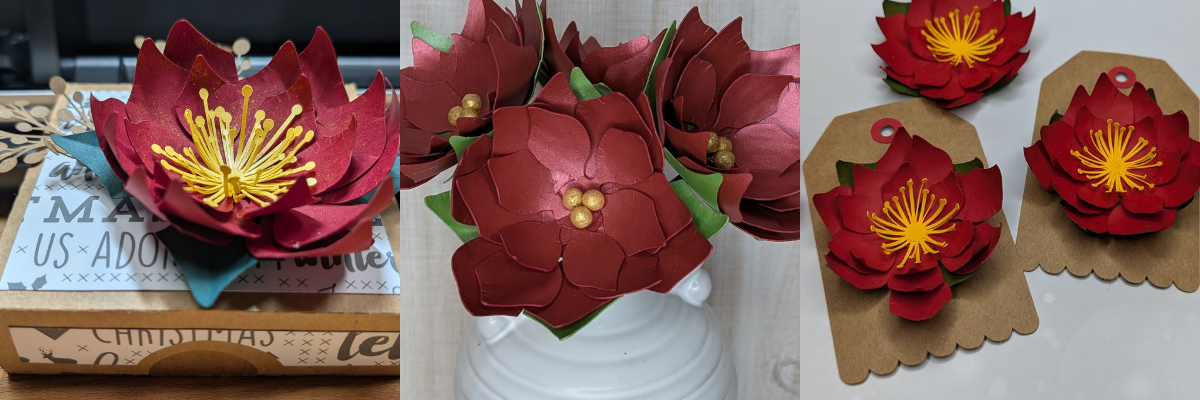
Project #1 –Flower Bouquet
I typically start out each month creating the file in the way it is shown. I decided at the last minute to take the pieces and add them to wire to create a bouquet to add to a vase. The best part about this is, if I change my mind, I can easily clip off the wires and add it to a wreath as the original image.
I love all the layers of these flowers and you can change it up however you want. And, with flowers, there is no wrong way because flowers are not perfect in nature, so if one petal has a chunk out of it, perfect! A bug took a bite. When was the last time you saw a flower in nature that didn’t have an imperfection?
I grabbed some Bazzill smooth cardstock to cut these bright colored flowers. Now, typically I’ve shied away from thicker cardstock like Bazzill and in some cases, Bazzill can be difficult to cut. I knew my blade and my cutting mat were on the older side, so I increase my settings just a bit and then used 3 passes and I had perfect, crisp cuts.
Since my mat is older and starting to lose it’s stick, I did secure it down really well with a squeegee. Or you can use a brayer. I was lazy and didn’t go grab it in the other room. Now, if the paper had started to shift, I would have gotten up and gotten the brayer or grabbed a new cutting mat.
I sponged on color to the flowers and the leaves and then shaped them before assembling all together. It can make a big difference in the final results of the project with just a few simple touches.
This project started out totally different than a card design. I love it and it’s a good thing I can create more otherwise it might never leave my studio.
I was playing around with a Two-Tone Metallic Spray – Fuchsia & Gold by Hero Arts and now I feel like using it on all my projects. Everything needs to be bright pink with gold flecks right! Well, maybe not everything. Hero Arts has other colors too!
The idea started out with spraying the flower layers to add coloring to the solid pink cardstock. I sprayed it on top of my Glassboard mat and then used a sheet of mixed media paper and picked up excess ink to create a background paper that I cut up for the bottom half of the card. The Glassboard mat is so easy to clean up that I find myself working with more mixed media and messy things.
The flowers and greenery were scaled down to fit this 4.25″ x 5.5″ card design. I added a few splatters of the Two-Tone Metallic Spray – Fuchsia & Gold to the card base. Instead of spraying it on, I took the cap off and splattered it to give it a different look.
I used a paper curling tool to give the flower layers dimension and next reached for my shaping kit to hand embossed the greenery to add more texture to it too. After that I curled the leaves a bit with a curling tool too. Then grabbed an extra Happy Birthday sentiment from a previous project and popped that up with some foam tape. For this card, I also used 2 other adhesives – an adhesive tape runner for the large piece adhered to the bottom of the card base and the Precision Glue Press with the glue it came with to adhere the flower layers together, the greenery to the card, and the flower on top.
I added some gold shimmer trim that is adhesive backed in the middle of the card base. Unfortunately, this is a Close to My Heart product that is no longer made, but I’m using my stash.
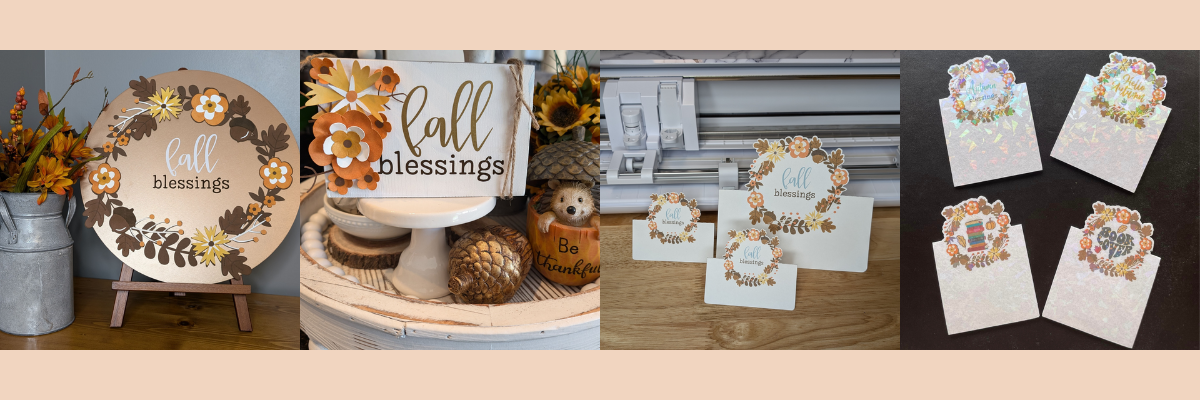
Add flowers on top of a box to create a unique gift box or decoration. I used both flower shapes in the flower design to create these box toppers.
This box is originally designed with a cherry flower top, but why stop there! Swap out the flowers and watch it change the look of this Silhouette flower project.
This box is a unique design and easy to put together too! But if needed, there is an assembly video too – find that HERE.
I used several patterns and printed my own pattern paper for the boxes.
For this one, I didn’t even use the registration marks to print it. I added an offset of the box only and then filled the offset design with the pattern. Using a Silhouette mat and loading the mat next to the load line, I sent it to cut. With the manual print bleed, even if it was off by just a little bit, you won’t be able to notice.
I don’t recommend this method if you are needing completely accurate cuts, but it can work for some designs and projects such as this one.
By adding the print bleed around the entire design, I gave myself a better chance that it wouldn’t matter if the cut was off by a little bit.
3-D Flower file as a background pattern – say what! Yes! I took the flower and a leaf design and added a pattern fill to both, then used it as a background to create bookmarks.
Here is a look at the file in Silhouette. I set up the bottom 2 bookmarks to use foil on, even though it looks the same in the software as the print and cut, the bottom 2 have a sketch fill added to them, so when I go to print, it is not going to print that design.
I will say, it is much faster to just simply print and cut a design. Foiling does add setup and completion time, but sometimes it can be so worth it!
However, any time you add another factor into a project, you also increase the chances of something going wrong. I should have known better and either test foiled or not trusted Silhouette settings. In this version of Silhouette Studio 5 that I am using, it does not have a material preset for foiling on cardstock, so I had to add that in. And then the preset for force is 15 set by Silhouette. We have told them many, many times that it is too much and I should have decreased it even more. I changed it down to a 10 and that was still too much.
I just let it finish – it was ruined anyhow. If this happens to you – you are perfectly normal. Well, at least we are in the same boat together – I’m not sure I’d say I’m “normal”. LOL!
Let’s just say – HOT MESS!
But, don’t give up! I adjusted the force down to a 2, which is still probably too high and I sent the second design to foil.
Once the foiling was done, I added a holographic overlay sheet on top of the bookmarks and sent that to cut.
In the end, I have 5 new bookmarks created with the flower design from this month’s collaboration. And one design that’s got some blank foiled areas and extra glitter on it where it shouldn’t. But it could still be used as a bookmark.
These little pink flowers started out much bigger. I cut the flower shape from Silhouette Shrink plastic and then watched it transform under a heat gun. Instead of letting the shrink plastic flatten out, like you would with charms, I shaped them instead. Once they curled up, I stopped applying heat and pushed the end of the Silhouette spatula into the center to form the middle of the flower. Then I glued in a yellow bead. And the finishing touch was painting on Mod Podge Sparkle to give it a bit more fairy touch.
I wanted to maximize the space I could on using the Silhouette Shrink Plastic. Since I was cutting a flower shape out of the material and did not need accurate placement, I added a fill pattern to a 8.5″ x 11″ rectangle and centered that on the letter size media page. I used a Pastel Pink Bokeh Background pattern by Sarah Hurley – Design #469254 in my final print.
I then printed out the entire page. I checked the “Show Print Border” so that I knew where the edges of the print out would be on my printed page and I could then place the designs within that gray border.
Then I simply filled the page with different sizes of the flowers and cut out the shapes from the printed page. No registration marks needed.
I didn’t need the entire page of flowers, so I added in some hearts with another project in mind. Here is a look before adding heat to shrink them down.
I would recommend cutting extras of whatever you are working with and playing with the shrink plastic. It can be a bit unpredictable when you add that heat and take a few practice runs to get it to mold how you want.
This was actually the second sheet of flowers I had cut because I wasn’t quite thrilled with the first color pattern I’d chosen. I didn’t feel it was a bright enough pink for the project and the vision in my head.
A few tips for working with shrink plastic:
colors can change & darken as it shrinks – keep this in mind when choosing a pattern or color palette. The color gets condensed when it shrinks down. If you have dark colors, it can look black after shrinking.
any type of plastic can dull the blade quicker than other materials. The settings may need to be adjusted or a new blade needed the more you cut. It’s always a good idea to have an extra blade on hand.
carefully remove the shrink plastic from the backing layer after it’s cut. It can tear or break off during this process if handled too rough or if the design is too intricate.
Printing an entire page with a background can be an option for some projects. If you do need exact placement around a printed design, then I would recommend using registration marks so the machine knows where the design is.
A great big thank you to Daniela at Flavir Design for contributing the free file for the Silhouette Secrets+ newsletter for the month of January! If you missed grabbing the free design in January, grab it HERE and start creating!
This year I started offering a free file each month for Silhouette Secrets+ newsletter subscribers. I love designing in the Silhouette Studio software and have shared some of my creations as well as look forward to collaborating with more artists in the future too!
Silhouette Secrets+ Newsletter
Never miss out on the news, tips, “secrets”, deals, classes, and more that I share on Silhouette Secrets+. Sign up for the newsletter and get information delivered to your inbox every Friday. Unsubscribe at anytime.
Sign up for the weekly newsletter HERE to have information delivered direct to your inbox and grab each month’s new freebie.
Did this spark some new creative ideas for you? It’s always inspiring to see how a single flower and greenery design can bloom into so many completely different projects! I had so much fun reimagining this one design across five unique creations and showing just how versatile a single file can be. If you’re looking for even more inspiration, tips, and creative project ideas, be sure to browse the Crafting Creativitysection on the Silhouette Secrets+ website — click HERE to explore!
Save this for future reference by pinning the image below.
Enjoy !
THANK YOU for your support! How can you help? Click HERE & buy a coffee. Every little bit helps with the cost of running the site.
Silhouette Classes
Never stop learning! Let me help you take the anxiety out of learning with Silhouette and get to creating faster! My Silhouette classes are heavily focused on software, so you can take the skills & techniques taught and apply them to many future projects!
**This post may contain affiliate links. What that means is that I may receive compensation if you purchase through the links I have provided. The price you pay for the product or service is not higher but I may get compensated for sharing.
Creating shaped & layered paper flowers is all about the details. In Creating Layered Paper Flowers with a Silhouette Cameo: A Behind-the-Scenes Crafting Process, I’m sharing a closer look at the full creative journey behind my layered paper flower bouquet. This blog post goes hand in hand with the new YouTube video, where I walk through the behind-the-scenes process, helpful cutting tips, shaping techniques, and see the complete supply list below too. You’ll see how flat paper designs can be transformed by adding dimension, shaping each layer, and assembling them together to create full, eye-catching paper flowers using the Silhouette Cameo.
Affiliate links may be present in the following blog post and as an Amazon Associate, I earn from qualifying purchases.
Watch the Video & See the Details!
Head over to the Silhouette Secrets+ YouTube channel to catch the full behind-the-scenes video, then scroll down to explore the finished flower photos and the complete supply list for creating your own layered paper flower bouquet.
I had so much fun creating these layered paper flowers and greenery. Time is the key factor to completing projects like this. Enjoy the creative process!
Save this for future reference by pinning the image below.
Enjoy !
THANK YOU for your support! How can you help? Click HERE & buy a coffee. Every little bit helps with the cost of running the site.
Silhouette Classes
Never stop learning! Let me help you take the anxiety out of learning with Silhouette and get to creating faster! My Silhouette classes are heavily focused on software, so you can take the skills & techniques taught and apply them to many future projects!
**This post may contain affiliate links. What that means is that I may receive compensation if you purchase through the links I have provided. The price you pay for the product or service is not higher but I may get compensated for sharing.
The Silhouette Curio 2 Leather Carving Knife opens the door to a whole new level of creative possibilities for leather projects—and getting great results starts with knowing how to use it correctly. In this post, I’m sharing my brand new video tutorial that walks through using the Silhouette Leather Carving Knife with the Curio 2, including setting up custom cut settings, what to watch for during carving, and real Day 1 testing results. If you’re curious about carving leather with the Silhouette Curio 2 or want practical tips to avoid common mistakes, this guide will help you get started with confidence.
Affiliate links may be present in the following blog post and as an Amazon Associate, I earn from qualifying purchases.
Ready to see the Silhouette Curio 2 Leather Carving Knife in action? Watch the full video tutorial on the Silhouette Secrets+ YouTube channel to see my real Day 1 results, custom settings, and tips for success—then try it out on your own leather projects!
These were the results after 5-6 hours of testing on a full sheet of tooling leather. I cannot wait to share more!
Save this for future reference by pinning the image below.
Enjoy !
THANK YOU for your support! How can you help? Click HERE & buy a coffee. Every little bit helps with the cost of running the site.
Silhouette Classes
Never stop learning! Let me help you take the anxiety out of learning with Silhouette and get to creating faster! My Silhouette classes are heavily focused on software, so you can take the skills & techniques taught and apply them to many future projects!
**This post may contain affiliate links. What that means is that I may receive compensation if you purchase through the links I have provided. The price you pay for the product or service is not higher but I may get compensated for sharing.
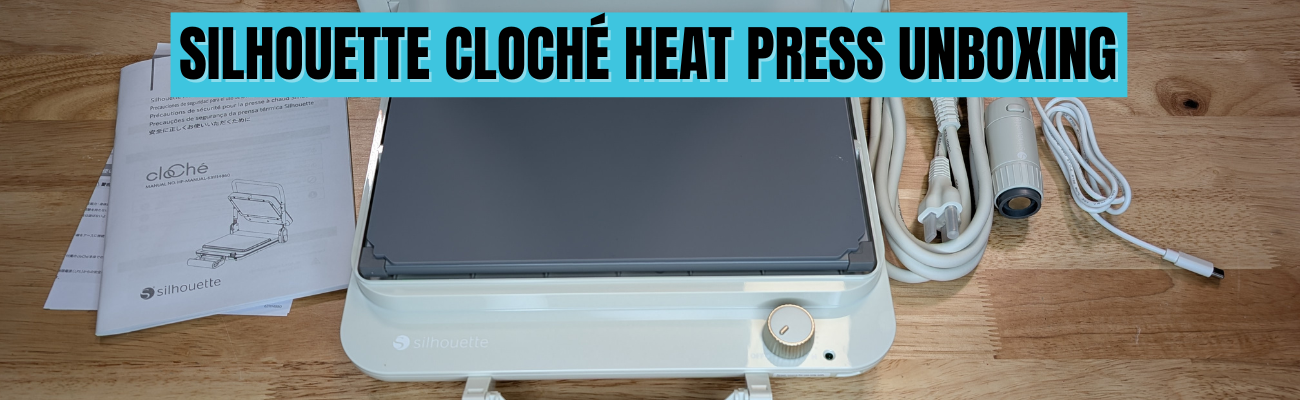
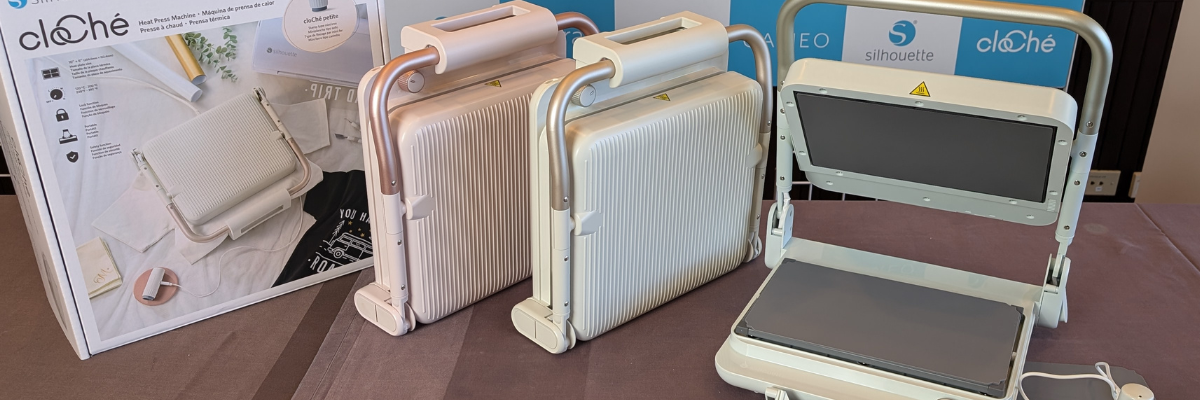
When the Silhouette cloChé Heat Press first arrived, I am so glad I didn’t rush to put out an unboxing. With time and testing, my first impression has changed. In this post, I’m sharing a full Silhouette cloChé heat press unboxing and in-depth review, including my initial impressions, the testing I did, the projects I completed, and my honest thoughts five months after unboxing. If you’re wondering whether the cloChé (or cloChé Petite) is worth adding to your craft room, this long-term, real-use review is designed to help you decide with confidence.
Affiliate links may be present in the following blog post and as an Amazon Associate, I earn from qualifying purchases.
In this blog post, I’m sharing my thoughts and recommendations along with some still shots below, but you can also find the full unboxing and review on the Silhouette Secrets+ YouTube channel HERE.
The Silhouette cloChé can be found at Silhouette America and is available in Milky White, Chiffon Pink, and Ice Green. Mine is Milky White.
In full disclosure, Silhouette America did send me the Silhouette cloChé Heat Press for testing. I was not paid to do this review and all results and opinions are my own.
Silhouette cloChé Heat Press Unboxing
This little Silhouette cloChé Heat Press is well packaged. In the box is the main heat press body, the power cord, the cloChé Petite with it’s power cable, and an instruction manual with supporting papers.
The Silhouette cloChé is small, compact, and weighs 11 lbs. It has a unique design that reminds many of a panini press. The heat press platen is 6″ x 10″.
The Silhouette cloChé Petite is an accessory that is only available with the Silhouette cloChé Heat Press. It comes packaged in a bag along with the Silhouette cloChé Heat Press power cord in the box. It can be stored on the underside of the Silhouette cloChé Heat Press.
The Silhouette cloChé Petite can be powered by plugging in the included cord to the front of the Silhouette cloChé Heat Press.
Silhouette cloChé Heat Press Unique Features
The Silhouette cloChé Heat Press has some unique features to it that makes it stand out. One is the handle on the front of the machine. This is how the heat press closes and creates the pressure.
Photo from Silhouette Summit 2024 taken by me
This handle design takes a bit to get used to locking and unlocking. While these features seem awkward at first, the more you use it the easier it gets.
The handle is composed of several moving parts and it can come apart. That doesn’t mean it’s broken. It can easily be put back together. Simply and carefully “pop” it back into place. I mention this because it can catch you off-guard if you don’t know before it happens. It happened when my friend and colleague, Sarah, first used it at the demo at Silhouette Summit 2024, which caused the Silhouette staff member to quickly fix it, so we were aware of this already. I’ve had it happen a couple times in the 5 months of testing before I write this.
Another unique feature is the lock when you raise the top platen of the Silhouette cloChé Heat Press. For me, this also takes some getting used to pressing the lock before you can lower the top platen again. This is a safety feature and just like the handle, just takes time to get used to.
The next unique feature is the On/Off switch. This is a dial that does not have temperatures. It does have several different settings indicated with a L-M-H setting dial.
This is very different than any other heat press and definitely takes time to get used to. For most regular HTV, I’ve been using the M setting. In the User Manual it does show this table.
The guide is in degrees Celsius. L is approximately 120 °C = 248 °F, M is approximately 160 °C = 320 °F, H is approximately 200 °C = 392 °F.
This definitely takes some getting used to and you just need to test with your materials. One thing I have found is that letting things cool a bit before peeling the carrier sheet can help.
The Silhouette cloChé also has a 45 second timer that begins when you close the press and lock the handle. I ignore the timer completely and just count myself. Then test. This is another area that will require some testing and seeing what works for you.
I did test a sublimation design which I’ll share later in this post and I cranked it up to the High setting and the blank only needed 45 seconds. If you are sublimating and the blank needs longer than 45 seconds, you will either need to listen to the beep or risk lifting the platen and closing the press again to reset the timer.
There are a couple disclaimers in the User Manual that I think are important to point out.
The first is that it requires a 30+ minute cool down period after 1 hour of usage.
The Silhouette User Manual states: “Do not use the machine continuously for more than 1 hour since it may lead to machine failure. If using the machine again, wait for more than 30 minutes before reconnecting the power cable.”
For this reason, I do not feel it is ideal for a business owner or use at an event. If the machine overheats, it can have issues. When at events, most don’t normally have time to give a 30 minute cool down period every hour when making personalized items.
This was stated at Silhouette Summit in 2024 when it was first announced, so it came as no surprise to me. I am glad to see that it made it into the User Manual, so it is clearly communicated to all users.
Silhouette cloChé Heat Press Initial Impression
My first day using the Silhouette cloChé Heat Press was a bit frustrating. This was due to user errors and simply that it is a new piece of equipment. Basically, I got in my own way which caused more frustration than it should have.
It is NOT like other heat presses and I was trying to compare it to others I use.
If I had released the unboxing video after Day 1, it would have been very different than what I’m sharing today. I did not like the Silhouette cloChé Heat Press the first day. However, I’ve been using it for many other projects and the more I use it, the more I do like it and believe it is useful for certain projects and uses.
I would NOT recommend starting with can koozies as a first project. I was looking for something small to create and ended up making my “quick” project much harder. Can koozies can be difficult with a normal press, but I did succeed.
Silhouette cloChé Heat Press Testing
I first started by testing the heat press platen with a digital thermometer. I did this over and over again the entire afternoon.
I tested all 4 corners and the center of the platform and wrote down each reading. The results were inconsistent every single time. Some of the readings would be close to the same temperature, but after repeated results over hours, I gave up on that.
Conclusion: it’s just a different type of press and it will not be a consistent reading across the platen. It can be close, but not perfect.
This is also referenced in the User Manual as well in the photo above – “The L to M to H ranges do not support fine temperature control, and should be used as a guide only.”
So I set it to M and began my first project. First project = first failure.
At least I got the failure out of the way right out of the gate. This was 100% user error. Like I mentioned above, can koozies probably are not the best first project. In general, I think it’s best to let it cool a bit before peeling the carrier sheet off. I did not and that equaled a project failure. I flipped it over and used the other side.
The good news after the frustrating afternoon is that I was successful with my project! Whether it was from determination or stubbornness – the end result was a success.
It worked once I started testing it and stopped trying to make it work like other heat presses. I just kept going.
I also used the Silhouette cloChé Petite to add some individual hot fix rhinestones to the can koozies. That worked too! Again, a little bit of a learning curve and referencing the User Manual to get the Silhouette cloChé Petite connected and powered up.
Once it was finished, I had to test it out with a can in the koozie and it worked. The HTV has stayed in place and the rhinestones were secured. I tried to pick them off with my fingernail and they didn’t budge.
Day 2 with the Silhouette cloChé Heat Press went much better. I came at it from a different mind set and just started playing, testing, and seeing what worked and what didn’t.
Next I tested a full design with Siser Easyweed Adhesive HTV. This is typically designed to be used with deco foils, but I wanted to see what it would look like just by itself on a black shirt.
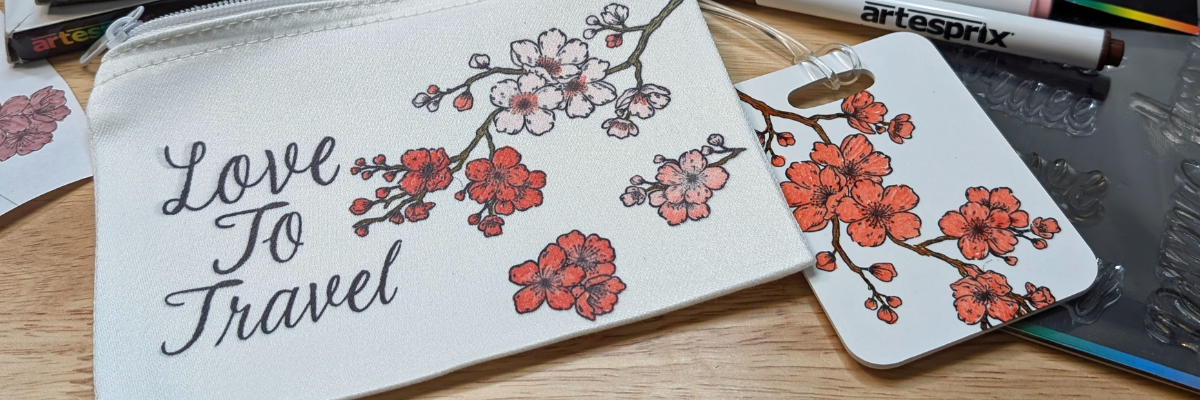
And then I turned the dial up on the Silhouette cloChé and tested a sublimation project using Artesprix sublimation supplies and a luggage tag. This particular blank only required a 45 second press, so it was perfect to test with.
And then I did another t-shirt design.
For larger blanks such as a t-shirt, you do have to roll the bottom of it up in order to close the handle on the press. This is different and takes time to get used to, but it does work!
I’ve worn this shirt often since creating it and it’s been washed and dried and the HTV still looks great!
The Silhouette cloChé and I had made progress. Day 2 was a success with less frustration than Day 1.
More Silhouette cloChé Projects
Since I did not get the unboxing out right away, I’ve had time to create more projects with the Silhouette cloChé and find I do like/love it more than Day 1. It is a useful little machine, that is also light weight, and compact to store.
I tested Siser EasyPuff Glitter HTV on a canvas zipper bag. Puff HTV can be finicky at times. I used a small pressing pillow with the Silhouette cloChé to account for the seams and get pressure on the design area. It worked!
More faux leather with Siser Easyweed Adhesive HTV. As a note, some faux leather changes colors after being pressed, just in case you decide to try it.
I figured the longer it took me to get the unboxing video edited and the blog post written, the more projects I’d get done to share.
The faux rhinestone design above is with the Silhouette Heat Transfer Vinyl – Silver and is the most recent project as I write this and I had the Silhouette cloChé Heat Press set up on a flimsy folding table. Since the machine creates it’s own pressure with the handle on the front, you don’t have to have a heavy duty table to set the press on. It’s 11 lbs and doesn’t require you to press down to close the top platen, so a lighter table will do.
Pros and Cons of the Silhouette cloChé Heat Press
Pros of the Silhouette cloChé Heat Press
lightweight at 11 lbs
compact
stylish
heats up fast
can be used on a light weight table like a folding table
travels easily
easy to store
Silhouette cloChé Petite included for small projects
Cons of the Silhouette cloChé Heat Press
different than other heat presses
no temperature reading
45 second timer
timer cannot be changed
limited on thickness of items it can press (0.5 mm maximum thickness Silhouette stated)
larger items need rolled for the handle to close
6″ x 10″ platen may require multiple presses of large designs
1 hour usage and then 30+ minute cooldown
Who is the Silhouette cloChé for?
Please keep in mind that this is my opinion only from my background using larger, more industrial heat presses and testing the Silhouette cloChé.
I’d love to say the Silhouette cloChé is for everyone, but that’s simply not the reality. Of course, the same can be said for a large 15″ x 15″ heat press as well. There is no one product that will work for all users 100% of the time.
I would not recommend this for business use unless you are planning to use it for a specific project and can stick within the 1 hour usage time and let it cool down properly before powering on again.
I would say it’s a neat little press for traveling. It’s light-weight and compact, which means it can travel easier than an industrial heat press. I’ve had (2) 9″ x 12″ heat presses that I’ve used for classes and both weight in at 35 lbs. That can be manageable, but also has it’s negatives too when traveling with them. I’ve also traveled with my big presses that are 75 lbs and while it can be done, those suckers are heavy.
The Silhouette cloChé would be good for a crafter who is limited on space and does not need to use a press all day long.
I am loving it for smaller projects and the t-shirts I’ve done have all been successful so far. And now that I found out it will work on my little folding table, I no longer have to clear a spot off my work bench to use it.
It did work for sublimation, but it will have it’s limits on those types of projects due to temperature and press time.
Conclusion
This little Silhouette cloChé has grown on me since Day 1 when I started out frustrated with trying to make it fit into my own heat press idea box. Once I let that go, I’ve had a lot of fun creating with it. I do love that it heats up quickly.
I think you will either love it or hate it. Just like everything else in life. And only you can make that decision. Between the unboxing video and the information I shared above, hopefully it gives you an idea of what it’s all about and if you do get it, don’t judge it too quickly. Give it some time and you might find that the little thing grows on you too!
And additional details on the Silhouette cloChé from Silhouette Summit 2024 can be found HERE.
Save this for future reference by pinning the image below.
Enjoy !
THANK YOU for your support! How can you help? Click HERE & buy a coffee. Every little bit helps with the cost of running the site.
Silhouette Classes
Never stop learning! Let me help you take the anxiety out of learning with Silhouette and get to creating faster! My Silhouette classes are heavily focused on software, so you can take the skills & techniques taught and apply them to many future projects!
**This post may contain affiliate links. What that means is that I may receive compensation if you purchase through the links I have provided. The price you pay for the product or service is not higher but I may get compensated for sharing.
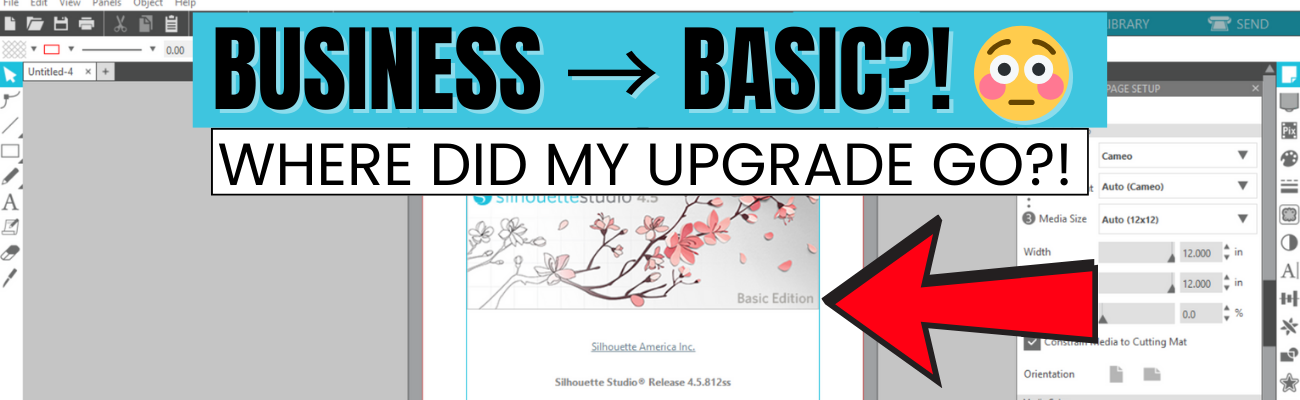
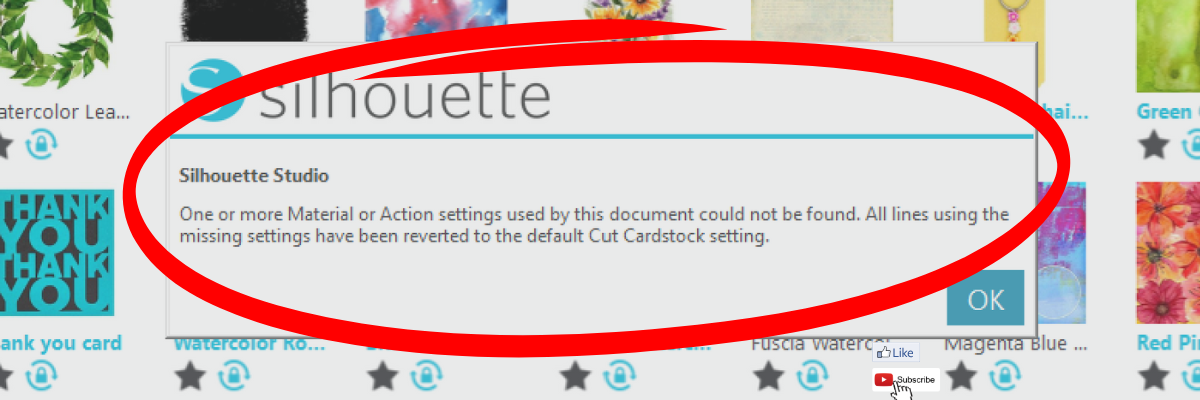
If you’re suddenly seeing Silhouette Studio revert from Business to Basic (or Designer Edition or Designer Edition Plus to Basic) and panicking because your Silhouette upgrade is missing, take a deep breath—you’re not alone, and you didn’t lose your purchase. This is one of the most common Silhouette software issues users run into, and it usually comes down to account login and/or activation, hiccups. In this post, I’ll break down why this happens, what to check first, and how to get your paid features back where they belong. I’ll also link to a detailed video on the Silhouette Secrets+ YouTube channel where I walk through the fixes step by step and share additional troubleshooting tips.
Affiliate links may be present in the following blog post and as an Amazon Associate, I earn from qualifying purchases.
The good news is – YOU can fix this easily. I am providing written information below and have also released a video on the Silhouette Secrets+ YouTube channel that can be found HERE.
Why Silhouette Studio software upgrades disappear?
The most common reasons for a software upgrade to disappear are:
Silhouette Software version update – this does not happen every time you update software versions, but can happen
Computer OS (Operating System) updates – this is on both Windows and MAC computers. Computer OS updates can happen in the background without a user knowing it.
New computer – software upgrade activations are not automatically loaded when you install the software on a new computer
How to Activate a Silhouette Software Upgrade Easily
If you previously had a upgrade active and the Silhouette upgrade is missing, you can easily activate this again simply by going to the top left menu in Silhouette Studio, select Help > Apply Upgrade Edition.
Enter your email address and password associated with your Silhouette account.
At the time I am writing this and recorded the video, I am not recommending Silhouette Studio version 5 due to many bugs in it. If you have a Silhouette Cameo5α (Alpha), then you HAVE to use version 5 and we would recommend v5.0.402 as there a some major issues we’ve seen with v5.0.414. For most Silhouette users, I am recommending v4.5.812 which the screenshots are from above.
Here is a look at Silhouette v5.0.402 and you can see you’ll find it in the same location, however, there is a new splash screen when you open version 5 that you cannot bypass. You can find the Help menu on the new Home Page or on the other tabs in the version 5 software.
If you have never activated a Silhouette software upgrade and you purchased it from a Silhouette retailer, you will first need to apply the upgrade to your Silhouette Account. Please follow these steps to apply the code.
Move to the top right and move the mouse over the person icon, select My Account.
On the left side menu, choose License Keys and apply the Silhouette software upgrade code.
Then follow the instruction shown above to activate the code in the Silhouette Studio software.
This new method of easily activating the Silhouette software upgrades is available in any version of Silhouette v4.4.552 or higher.
Missing Tools & Features in Silhouette Studio?
This is the most common reason Silhouette users notice that a software upgrade has reverted to Basic Edition.
You can easily check what software version and upgrade is active on your Silhouette Studio software and determine if your Silhouette upgrade is missing and not active.
Instructions for Windows users:
Click on Help in top left menu
Then choose About Silhouette Studio
Instructions for MAC users:
Navigate to the top left of Silhouette Studio and select Silhouette Studio in the menu
Then select About
This About window will tell you what version is open and the upgrade that’s active.
If you have a Silhouette software upgrade and it is currently showing Basic Edition in this window, please follow the instructions above to activate the upgrade on your computer.
Silhouette Studio Upgrade Information
Silhouette Studio software upgrades are a one time fee and you do not have to purchase again if it disappears.
The Silhouette upgrades can be active on up to 3 computers or 3 active devices.
With this new system, if you have 3 devices active and log into a new device or Silhouette Web, it will deactivate the software upgrade on the device that is oldest used date. This means you can easily activate the software upgrade on multiple devices, but it will only be active on up to 3 devices at one time.
Something new to mention here is that the new Silhouette Web (still being developed and in beta as I write this), that counts as one of the activations of the software upgrade license. This technically means that if you are logged into Silhouette Studio on your device and you log into the Silhouette web (web based software) on the same device, that it will use 2 software upgrade codes, even though it is the same device.
This is not an issue, but it can catch you off guard when you see the message that one device will be deactivated if you exceed the 3 upgrade log ins.
Silhouette Web is a web based program that allows users who do not have a full computer operating system, such as a Chromebook to connect to a Bluetooth enabled Silhouette machine. It does not have the full Silhouette Studio software option. However, it does have some different features than Silhouette Studio and some of these are only available with a software upgrade. At the time I am writing this, it is still being developed and is changing.
I don’t feel it is stable and there are bugs and issues with it, so I have not done any tutorials with it. To be honest, if you have a computer with Silhouette Studio, I would recommend that to design in.
Another thing to mention here is, if you do decide to try it out, for MAC users, please note that you cannot cut directly from Silhouette Web. This is due to restrictions from Apple that it will not allow a web browser to connect to any outside systems. For Apple users, you would design in Silhouette Web, then open in Silhouette Go (mobile app) in order to connect to a Bluetooth enabled Silhouette machine in order to cut.
Troubleshooting Silhouette Upgrade Activation
If you encounter issues when trying to activate a Silhouette software upgrade, there are a few steps you can do before contacting Silhouette Support.
Try again to log in with the email and password to make sure there was no mistypes or missed keystrokes.
Log into the Silhouette America website HERE. Select My Account under the person icon in the top right > License Keys and do you see your software upgrades?
Log into the Silhouette Design Store website HERE. Can you log in at both websites? The email and password has to be the same on both sites and in the Silhouette library.
If you cannot log in to those 2 websites or the information is not the same on both sites, you can try resetting your password. The password reset is supposed to send a OTP (One Time Password) to your email account. Since the website migration (May 2024), there are issues with this and the OTP does not always come through.
If you still cannot log in or cannot reset your password, then you will need to contact Silhouette Support – support@silhouetteamerica.com
Tips for Contacting Silhouette Support
If you encounter any issues with your Silhouette account and the steps above have not resolved those, you will need to contact Silhouette Support.
Silhouette Support is the only one that can access your account information and investigate or reset things for you.
Here are some tips to help you get resolutions faster:
Email Silhouette Support at support@silhouetteamerica.com – we often have seen users complain they are not getting responses and they didn’t actually contact Silhouette, but had a mistype in their email submission
Provide as much information about the issue you are encountering as possible. Be clear and concise and provide the exact issue encountered as well as the steps you have tried already.
Do not email simply stating “I can’t log in.” That will not get a quick resolution and can be a million different issues.
Provide photos of what you are seeing so the support agent will hopefully understand what you are experiencing.
Follow any instructions and respond to the Support agent with descriptive information on what you did.
Continue to contact Silhouette Support until the issue is resolved.
Don’t be surprised if you get an AI response. This is new and it is Silhouette Supports “quick response”. It will be sent on to an agent after the AI response has been sent. Follow the instructions sent and reply back to their communication.
Don’t be surprised if the Silhouette Support Agent responds with the same response as the AI bot. This is not unusual. Both the AI bot and Support Agent use the Silhouette FAQ to provide initial responses. This is why it’s so important that a user provides as much information as they can when they first contact Support.
Remember that contacting Silhouette Support and stating a basic issue such as “I can’t log in.” or “My machine isn’t cutting.” does not give the Support agent enough information to provide a good troubleshooting answer and they have to start at a million reasons and narrow it down to 1. That can take time and a lot of back and forth with Support. The more information you can provide, the faster your resolution will be … hopefully.
This is one of the most common issues we see users encounter. I hope those tips have helped!
Looking for additional Silhouette Troubleshooting? I have been teaching Silhouette and troubleshooting Silhouette issues since 2016. We have seen a lot of changes and have helped a lot of users. I have launched the new Creative Community with EllyMae where I provide troubleshooting assistance and exclusive monthly tutorials. Find more details on that HERE.
I also have step-by-step classes to help you learn the Silhouette software and your machine – find those HERE.
Save this for future reference by pinning the image below.
Enjoy !
THANK YOU for your support! How can you help? Click HERE & buy a coffee. Every little bit helps with the cost of running the site.
Silhouette Classes
Never stop learning! Let me help you take the anxiety out of learning with Silhouette and get to creating faster! My Silhouette classes are heavily focused on software, so you can take the skills & techniques taught and apply them to many future projects!
**This post may contain affiliate links. What that means is that I may receive compensation if you purchase through the links I have provided. The price you pay for the product or service is not higher but I may get compensated for sharing.
Big news for 2026! I’m thrilled to announce the launch of the Creative Community with EllyMae, a subscription-based space dedicated to crafting creativity and expert Silhouette troubleshooting.
This year, I’ll continue helping crafters troubleshoot their Silhouette projects—but now in a more interactive, subscription-based community. Your subscription supports the costs of hosting, administration, testing, and one-on-one troubleshooting time, while giving you exclusive access to tools, tips, and creative inspiration.
The first month’s exclusive video tutorial is now live inside the Community Forum, and it’s packed with value! I planned for a 1-hour tutorial… but it quickly grew into 1 hour and 30 minutes, plus a 6-minute bonus video where I break down an unexpected tool behavior I encountered during the project. While the design may look simple, this tutorial covers step-by-step instruction, real-time problem solving, and detailed troubleshooting.
Inside this tutorial, you’ll explore Silhouette Studio tools and features, including:
Drawing tools, scaling, offsets, fill colors, line colors, and thickness
Compound paths and the Replicate panel
Spacing tools, turning cut lines on and off, and Move By
Undoing alignment
Print & Cut tips and troubleshooting
…and that’s just the beginning.
Subscription Benefits:
Private Facebook Creative Community: Share projects, ask questions, and get Silhouette troubleshooting help from experienced users. Exclusively for subscribers.
Exclusive Monthly Video Tutorial: Receive detailed tutorials and bonus insights each month.
Future Perks: Additional benefits may be added as the community grows.
Other ways to stay connected and inspired in 2026:
Silhouette Secrets+ Facebook Page: Updates, tips, and inspiration — Follow here
Step-by-Step Classes: Hosted directly on my website with new releases planned for 2026 — Explore classes
Weekly Newsletter: Projects, artist collaborations, news, and sales — Subscribe here
Website Tutorials & Blog Posts: Ongoing tutorials and guides — Silhouette Secrets
If you’ve ever wanted a space focused on education, explanations, and real-world crafting solutions, this community was built for you.
👉 Find all the details about the Creative Community Subscription and join us today!Join Here
Save this for future reference by pinning the image below.
Enjoy !
THANK YOU for your support! How can you help? Click HERE & buy a coffee. Every little bit helps with the cost of running the site.
Silhouette Classes
Never stop learning! Let me help you take the anxiety out of learning with Silhouette and get to creating faster! My Silhouette classes are heavily focused on software, so you can take the skills & techniques taught and apply them to many future projects!
**This post may contain affiliate links. What that means is that I may receive compensation if you purchase through the links I have provided. The price you pay for the product or service is not higher but I may get compensated for sharing.
Creativity doesn’t have to start from scratch—sometimes it begins with one simple design. In this Crafting Creativity feature, I’m sharing how one tag design by Rabea Bilz can be taken far beyond its original purpose. With a single file as the foundation, we’ll explore four creative tag craft projects that spark ideas and show just how versatile a good design can be. From paper crafting to dimensional and decorative projects, this is all about inspiration, creative possibilities, and seeing your designs in a whole new way.
Affiliate links may be present in the following blog post and as an Amazon Associate, I earn from qualifying purchases.
Crafting Creativity with a Layered Tag Design
Don’t feel limited to using a design for just one project. When you start thinking outside the box, a single file can open the door to countless creative possibilities. Try mixing materials, changing sizes, or adapting the design for completely different purposes—you may be surprised by what you can create. I hope this inspires you to stretch your creativity and even expand your supplies in new ways as you discover just how versatile your designs can be.
Project #1 – Layered Tag Design with Print and Cut
After I had the tags assembled I decided to grab a couple Gelly Roll pens and add a few special touches to the print and cut design.
Just a little bit of additional color or shine can really make things stand out on custom projects.
I created these as a custom monogrammed bag tag, but they could also be keychains or even a gift tag that’s reusable, multi-purpose, or part of the gift itself.
These are double sides bag tags. Make sure to mirror the design when creating a double-sided design so that it will match up exactly. For these particular shapes, they are symmetrical, so it’s not a necessity, but it is a good habit to get into, especially if you did not create the design yourself. This way the front and back will line up exactly with each other.
I used Siser Easyweed Adhesive HTV in the middle to glue the layers together. Faux leather or leatherette can also be glued with fabric glues, but I’m really loving the ease of use with the Siser Easyweed Adhesive HTV. Cut the HTV the same shape as the tag and then press on the backside of one, remove the carrier sheet and line up the layers and press again. Done!
Have you ever created a shaker card? What about a shaker tag? Or any other “shaker” project. Basically, to create a shaker, you are making a “pocket” where some material such as glitter, sequins, or fake snow can be contained.
I saw these new Gingerbread Cookie designs by Rabea Bilz and knew I had to use them!
This design is 4 layers. The background is a solid piece of cardstock, then a layer of Kraft cardstock with the Gingerbread design, a layer of clear transparency to hold the snow in, and then a final layer of the Kraft cardstock. Here is a look at my file in the Silhouette Studio software.
Rather than use my machine to cut the transparency, I simply used a scrap piece of cardstock to cut a template for the size I needed and then used scissors to cut the transparency down to size. This saved time finding the right cut settings and saved a blade since cutting plastic can dull it quicker.
Once the pieces are all cut, it’s time to assemble. I used the Precision Glue Press to adhere the Gingerbread layer to the backing and then set that part aside to dry. Next I used an adhesive tape runner to secure the transparency to the backside of the top layer. Then added double sided foam tape to the edges. Since it’s a shaker project, it has to be completely taped off so the shaker bits are contained. Then I added in the fake snow. You will have to test how much to add. Too much and it won’t move around easily. Then carefully remove the backing off the foam tape and secure the back layer over top of the foam tape.
For this one, I used the tag design to create ornament designs that could be sent to my Glowforge to cut, but you could also create ornaments with other materials that could be cut with the Silhouette machine such as cardstock, acetate, adhesive vinyl, sketch pens, and more!
A great big thank you to Rabea Bilz for contributing the free file for the Silhouette Secrets+ newsletter! If you missed grabbing the free design during the month, grab it HERE and start creating!
Each month I offer a free file for Silhouette Secrets+ newsletter subscribers. I love designing in the Silhouette Studio software and have shared some of my creations as well as look forward to collaborating with more artists in the future too!
Silhouette Secrets+ Newsletter
Never miss out on the news, tips, “secrets”, deals, classes, and more that I share on Silhouette Secrets+. Sign up for the newsletter and get information delivered to your inbox every Friday. Unsubscribe at anytime.
Sign up for the weekly newsletter HERE to have information delivered direct to your inbox and grab each month’s new freebie.
I hope this inspired you to look at your designs a little differently! It’s amazing how a single file can turn into so many unique projects when you let creativity lead the way. I loved exploring new themes and possibilities while showcasing just how versatile this design can be. If you’re craving even more inspiration, helpful tips, and creative project ideas, be sure to visit the Crafting Creativity section on the Silhouette Secrets+ website — click HERE to explore what’s waiting for you!
Save this for future reference by pinning the image below.
Enjoy !
THANK YOU for your support! How can you help? Click HERE & buy a coffee. Every little bit helps with the cost of running the site.
Silhouette Classes
Never stop learning! Let me help you take the anxiety out of learning with Silhouette and get to creating faster! My Silhouette classes are heavily focused on software, so you can take the skills & techniques taught and apply them to many future projects!
**This post may contain affiliate links. What that means is that I may receive compensation if you purchase through the links I have provided. The price you pay for the product or service is not higher but I may get compensated for sharing.
If you love layered paper projects and clever cutout designs, you’re going to enjoy today’s Silhouette Studio tutorial! In this step-by-step guide, I’m sharing how to create a Peekaboo Layered Calendar—a cutout-style design where the background shows through for unique look. This tutorial walks you through the full design process in Silhouette Studio, along with a supply list, and helpful tips with your Silhouette software. Whether you’re crafting a calendar for home décor, gifts, or adding unique designs to your shop, this project is simple, fun, and perfect for any skill level.
Affiliate links may be present in the following blog post and as an Amazon Associate, I earn from qualifying purchases.
I absolutely love how this lotus flower design cut out and the pink and yellow holographic cardstock seemed just perfect for it.
The brand-new Peekaboo Layered Calendar video tutorial is now live! Click the link below to watch the full step-by-step guide and learn how to design this cutout-style calendar in Silhouette Studio. After watching, be sure to scroll down — you’ll find a complete supply list, in-progress photos of this project, and additional project ideas too!
Here is a look at my original design file showing all of the calendar pages.
When I am working with a multi-page print and cut project, I will create separate files for each page. With print and cut, it is very specific and you do not want to move anything on the screen after the page is printed.
Having each page in a separate file will allow me to be able to easily recreate the project again if I want and also allows me to setup and print page 2 and 3 while the first page is cutting. I simply copied and pasted the next set of calendar sheets onto a new design mat and saved that file as Pg 2.
The holographic cardstock was thinner than my 110 lb cardstock, so I did cut an additional backing and then used an adhesive tape runner to secure the background to it. This gave it a bit more weight so it would hold the straight shape more. I also did that on the next one too because I printed the graphics on Epson Presentation Paper – Matte, so it is a lighter weight paper, but has an excellent print quality to it and I love using it.
I can’t just print one image on a page though, so I did make some variations on this one and printed several.
Now I can swap out the images through the year if I want to and have these bright, colorful faces to look at throughout 2026.
And once I started with these projects, it really is hard to stop. And this is why the video tutorials or blog posts are delayed. I love creating new projects and have to force myself to stop to get other things done.
And then I go and ask my daughter what kind of design she would want. “A whale shark, of course, Mom!”
This peekaboo calendar turned out awesome too! I had to order a bit taller easel for this design though as it measured about 5″ tall and my smaller easels didn’t work well. My daughter loves this Whale Shark design by La La Shiba and I’ve used it on quite a few projects from temporary tattoos, water bottle decals, and shirts too!
I have so many additional ideas for the calendar designs. I’ll come back and update when I get more of the peekaboo designs made.
There are so many different design ideas you can create using the same tools shown in this video. I hope you take the tools I shared and put them to use and start creating.
Here is another example of a layered desktop calendar design.
Save this for future reference by pinning the image below.
Enjoy !
THANK YOU for your support! How can you help? Click HERE & buy a coffee. Every little bit helps with the cost of running the site.
Silhouette Classes
Never stop learning! Let me help you take the anxiety out of learning with Silhouette and get to creating faster! My Silhouette classes are heavily focused on software, so you can take the skills & techniques taught and apply them to many future projects!
**This post may contain affiliate links. What that means is that I may receive compensation if you purchase through the links I have provided. The price you pay for the product or service is not higher but I may get compensated for sharing.
If you love creating interactive cards, this JOY Spinner Card is a must-try holiday project! In this tutorial, I’ll walk you through how to design and assemble this layered spinner card using Silhouette Studio, along with a complete supply list and helpful tips and additional resources. Watch the full video, grab the supplies below, and let’s create a festive card that’s sure to impress!
Affiliate links may be present in the following blog post and as an Amazon Associate, I earn from qualifying purchases.
This card design was first shared in my Silhouette Secrets+ Facebook group and my admin did a bit of sleuth work and found who we believe is the original designer for this spinner card idea. This card design was inspired by Dress My Craft. Make sure to grab the Dress My Craft spinners linked in the supply list below.
One thing leads to another… down the rabbit hole I went and Dress My Craft has so many neat ideas to create with the spinners.
Create the layered look with the same colors of cardstock or mix it up and do multiple colors. I cut both to see what it would look like, but I think I prefer the white layered on top of each other with the offset. I am so glad I saw my admin (Teresa’s) card ideas and included that into the video tutorial. I think it really makes it stand out.
I love being able to create designs in the Silhouette software, and projects like this JOY Spinner Card truly show how versatile it can be! If you haven’t already, be sure to watch the full video tutorial on the Silhouette Secrets+ YouTube channel for step-by-step instructions and extra tips. I hope this inspires you to create your own interactive card and continue learning even more about what Silhouette can do!
Save this for future reference by pinning the image below.
Enjoy !
THANK YOU for your support! How can you help? Click HERE & buy a coffee. Every little bit helps with the cost of running the site.
Silhouette Classes
Never stop learning! Let me help you take the anxiety out of learning with Silhouette and get to creating faster! My Silhouette classes are heavily focused on software, so you can take the skills & techniques taught and apply them to many future projects!
**This post may contain affiliate links. What that means is that I may receive compensation if you purchase through the links I have provided. The price you pay for the product or service is not higher but I may get compensated for sharing.
Have you ever found a card template so versatile that it instantly becomes a go-to favorite? That’s exactly what happened when I started creating with the Accordion Filled Gatefold – Card Blank by Quietfire Designs. This beautiful, interactive card base is the perfect foundation for endless creativity—and in today’s Crafting Creativity feature, I’m sharing five completely different card designs, all made from this one stunning template.
Affiliate links may be present in the following blog post and as an Amazon Associate, I earn from qualifying purchases.
From a spooky Halloween card, to a warm and cheerful hello friends, to a vibrant bouquet of flowers, a playful Open If You Dare theme, and even a classic happy birthday design, this single cut file transformed effortlessly to fit every style. Each project highlights just how easy it is to take one card template and customize it for any season, celebration, or creative idea.
If you love stretching your Silhouette files and want inspiration for making more with what you already have, you’re going to love exploring the versatility of this Quietfire Designs favorite. Suzanne at Quietfire Designs has amazing designs and this is just one. I hope this gives you some ideas on how you can expand your supplies!
Each month in the Crafting Creativity series, I take one design file and explore just how many unique projects it can inspire. I love showing how a single cut file—like this month’s Accordion Filled Gatefold card template—can be transformed into cards for any theme or occasion. These posts are all about stretching your Silhouette skills, sparking fresh ideas, and proving that one thoughtfully designed file can open the door to endless creative possibilities. Whether you’re a longtime Silhouette user or brand new to cardmaking, Crafting Creativity is here to help you imagine, explore, and create with confidence!
Crafting Creativity with Accordion Filled Gatefold Card Blank
Suzanne at Quietfire Designs has amazing designs and this is just one of the card templates available in the Silhouette Design Store or check out the bundle of card templates HERE. Suzanne also has assembly videos on the Quietfire Designs YouTube channel too! It makes it so easy to assemble the card designs – find those HERE.
I hope this gives you some ideas on how you can expand your supplies!
Project #1 –Halloween Card
I grabbed some Halloween themed paper in my stash and created this themed card.
This one I had a lot of fun collecting “friends” to share from different files by Quietfire Designs.
Once I gathered all of the designs I wanted to use, I turned the cut files into a print and cut so I could do it all on one sheet.
Here’s a look at my print and cut design file. I always like to fill up my page when doing print and cut, so I ended up making two card designs using different patterned papers.
Once I had all the designs I wanted for the card sized to fit, I turned them all into a print and cut page. Since these were designed to cut each individual piece, I simply selected them all and on the Send tab chose “Cut Edge”.
I used the flowers and greenery design from the Flower Posy Gift Card Box – Design #346522 and cut 9 to layer inside the card. When needed, I would snip off sections of the greenery that didn’t fit well and then glue them in underneath the flowers in other spots to fill it in and make it unique.
The front section has 3 of the flowers and greenery placed together and I enlarged the bow on the design to “wrap” around all 3.
I ended up with an extra set of flowers and added that to the front belly band for the card closure.
This card is another combination of designs by Quitefire Designs.
And if you are daring enough to open the card, here is a look at the inside.
I started with an idea in my head and then simply cut out the pieces I knew I wanted to use from each of the design files. Then started moving them around and seeing where they would best fit.
A bright, fun card filled with balloons! And… it was all created with scraps. This was another card that was “built” as I went along. It may be a little over the top with balloons, but that’s the best part – you can customize it however you like!
I drew the balloon using the Flexishapes tool in Silhouette and then just cut a bunch from different colors. The Happy Birthday is a sentiment from the Dinosaur Birthday Card in a Box by Quietfire Designs. I sized and arranged the words together, then made an Offset around it.
This was the perfect sentiment for the card as both Happy and Birthday are both welded together, so it was easy to glue using my new Precision Glue Press.
A great big thank you to Suzanne at Quietfire Designs for contributing the free file for the Silhouette Secrets+ newsletter for the month of October! If you missed grabbing the free design in October, grab it HERE and start creating!
This year I started offering a free file each month for Silhouette Secrets+ newsletter subscribers. I love designing in the Silhouette Studio software and have shared some of my creations as well as look forward to collaborating with more artists in the future too!
Silhouette Secrets+ Newsletter
Never miss out on the news, tips, “secrets”, deals, classes, and more that I share on Silhouette Secrets+. Sign up for the newsletter and get information delivered to your inbox every Friday. Unsubscribe at anytime.
Sign up for the weekly newsletter HERE to have information delivered direct to your inbox and grab each month’s new freebie.
Did this spark some creative ideas for you? It’s always exciting to see how one card template can lead to so many completely different designs! I had such a great time dreaming up each of these themed creations and showing just how versatile the Accordion Filled Gatefold file can be. If you’re looking for even more inspiration, tips, and creative project ideas, be sure to browse the Crafting Creativity section on the Silhouette Secrets+ website — click HERE to explore!
Save this for future reference by pinning the image below.
Enjoy !
THANK YOU for your support! How can you help? Click HERE & buy a coffee. Every little bit helps with the cost of running the site.
Silhouette Classes
Never stop learning! Let me help you take the anxiety out of learning with Silhouette and get to creating faster! My Silhouette classes are heavily focused on software, so you can take the skills & techniques taught and apply them to many future projects!
**This post may contain affiliate links. What that means is that I may receive compensation if you purchase through the links I have provided. The price you pay for the product or service is not higher but I may get compensated for sharing.
If you’ve ever spotted a hidden gem at a thrift store and talked yourself out of it… this project is your reminder to turn back and grab it! That’s exactly how this Etched Tiered Tray came to life. I found a gorgeous three-tiered glass tray tucked behind a stack of dishes, walked away, and then thankfully circled back to bring it home. Today I’m sharing how I transformed that thrifted treasure using custom-designed stencils created in Silhouette Studio and Etchall etching creme. With the right design setup and a few simple steps, you can get beautifully crisp results that make any glass piece look high-end and completely personalized.
Affiliate links may be present in the following blog post and as an Amazon Associate, I earn from qualifying purchases.
If you have a cutting machine, you have unlimited possibilities of custom designs at your fingertips.
I started by measuring each level of the tiered tray. This gives me a starting point to draw out a template in Silhouette Studio to design within. If the tiered tray has a curve to it, then you’ll want to make sure to account for that. Adding a stencil onto a curved area can get a bit tricky to lay it straight and flat. I created my stencils so the design would be on the flat area before the curve starts.
Here is a look at my working file in Silhouette Studio.
On the left side are some designs I was playing around with to decide what I wanted to work with. I settled on using the Cherry Blossom Design by Tanya Batrak. On the right you can see the design for each level of the tiered tray. The outer oval is the template from my measurements and then I was able to design within the template for each level.
I knew I wanted something that went all the way around and I designed an oval frame using the same technique that I shared in the video tutorial on the Silhouette Secrets+ channel – Creating a Circle Frame in Silhouette Studio with Basic Tools.
Then I brought in the Cherry Blossom Design and scaled it to the size I wanted and placed it on top of the oval frame.
I modified the design a bit by cutting off the branch on one side and then for the largest tiered tray, I cut off the top 3rd flower and used edit points to make the design smooth. So each layer of this tiered tray is a bit different. Here is a close up look at my final designs.
I then made an offset of the entire design and subtracted the offset from the circle frame to give the design some space and set it apart.
Here is a look at my stencil file on the Send tab in Silhouette. I used the Cut by Line Color tab so I could set up 2 different settings and have it kiss cut around the stencil and then cut the red cut line all the way through on the offset around the entire design. This way the center of the design was cut out for me by the Silhouette machine.
Then I grabbed a color of Oracal 651 adhesive vinyl that has been in my stash for awhile and not used. Scraps or colors that you don’t use often are great for stencils.
Once the designs were cut, then carefully weed out the design. And if you mess up in the weeding or application process, grab another sheet of vinyl and cut another one. I messed up along the way on one decal and ended up cutting another stencil. So glad I have this option with owning a cutting machine!
If your tiered tray comes apart easily, it may be easier to apply the stencils and etch by taking it apart. My husband suggested I do this, but with the rubber rings separating each layer, I didn’t want to mess something up taking it apart or putting it back together, so I worked with it fully assembled.
This meant that I needed to cut the stencil apart for 2 of the layers to wrap it around and apply to the bottom of the tier.
I looked for a good section of the design to slice it apart at that would be easy to line up and get connected again when I was applying.
Find some way to set up so your glass is secure and is as flat as possible for the stencil application and while the etching creme is on the glass.
Since I left my tiered tray assembled, I propped it up using my bulk roll of AT65 Transfer Tape.
This was actually a really sturdy way to hold my tiered tray and it was stable, secure, and level the entire time.
Make sure to clean the area where you’ll be applying the adhesive vinyl with alcohol first to remove any dirt and debris so you get a good adhesion. And then let it dry completely.
The bottom layer was the easiest since it was the most accessible and that is where I started. I applied the Oracal 651 adhesive vinyl stencil and then I applied a bit of heat to help the adhesive vinyl to adhere well. I have some intricate areas and I wanted to give myself the best chance of success and not have any bleed. While this is step is not mandatory for glass etching, I do think whatever you can do to set yourself up for success saves your time and money.
Not all glass etches too! And I wasn’t sure if this would work or not on the tiered tray. Starting with the bottom layer first, this was my test. I heated it a bit and then carefully smoothed down the vinyl edges all along. Be careful as hot glass looks the same as cold glass. I then waited for the glass to cool completely before applying the Etching creme so that the adhesive could set up and less likely to move around on the smooth surface.
The next step isn’t mandatory either, but I do feel it will help you be successful! Tape off the edges around the stencil in case any etching creme gets outside of where you want it to be. It never fails that if the etching creme even touches an area you don’t want it to etch, it will.
Use painter’s tape or in this case, I had lots of excess transfer tape and since it was an oval object on a curved surface, I ended up cutting smaller sections of the AT65 transfer tape and applying it around the outer edge and the inside edge of my stencil.
For flat objects, you can simply make your stencil larger to cover a larger area of the object. However, on a curved object that can be more difficult to lay the adhesive vinyl completely flat, so I chose this method.
Next, I applied the Etchall etching creme around the entire design. And set my timer for 20 minutes.
The next steps are very important! After 20 minutes, carefully remove any excess Etchall etching creme and put it back in the bottle. It can be reused over and over again. Then I take a paper towel and wipe away any excess. And once all the excess has been removed, I will run water in my sink and then washed the entire design and remove the stencil while under running water.
It worked!!! So I dried it off and then repeated the same steps on the other 2 layers of the tiered tray.
As you can see I have 2 different colors of adhesive vinyl as I messed up weeding the top layer stencil. Easily remedied by cutting another stencil with my Silhouette machine.
All the extra steps to secure with heat and taping off the design paid off!
This etched tiered tray project turned out fantastic!!!
The hardest part about glass etching is getting a good photo and in this case, getting a good photo that shows all 3 levels off well.
I love being able to create custom and unique projects. This one was quickly claimed by my youngest, who put it to work immediately. I asked if she could to a “lifestyle” photo for me to use and this is what she did.
It is definitely being put to good use and she loves it.
Check out more information for even more creative ideas and tips to take your crafting to the next level HERE!
Save this for future reference by pinning the image below.
Enjoy !
THANK YOU for your support! How can you help? Click HERE & buy a coffee. Every little bit helps with the cost of running the site.
Silhouette Classes
Never stop learning! Let me help you take the anxiety out of learning with Silhouette and get to creating faster! My Silhouette classes are heavily focused on software, so you can take the skills & techniques taught and apply them to many future projects!
**This post may contain affiliate links. What that means is that I may receive compensation if you purchase through the links I have provided. The price you pay for the product or service is not higher but I may get compensated for sharing.
There’s still time to grab the Glassboard Studio Black Friday deals and get free products too!
Affiliate links may be present in the following blog post and as an Amazon Associate, I earn from qualifying purchases.
Here is the Holiday Sale Schedule for Glassboard Studio and there are still 2 freebies left on the schedule. Make sure to use my affiliate code SILHOUETTESECRETS to save 20% during their Black Friday sale and 15% any time after that – shop at this link HERE.
I was asked what freebies would be the best and I think that depends on each user’s preference. I use both the pawn magnets and the craft catchers. If you want to have matching colors for the pawn magnets, then I’d recommend ordering those in the color you want.
The Craft Catcher’s are new and so useful! I store everything from tools, Silhouette blades, earring hardware, project pieces, and more in mine.
I shared a video on Instagram and Facebook when the new magnetic ink pad holders and the craft catcher’s were released. Check that out here on Instagram or on Facebook.
Here is a look how I was using them while creating in October.
I have now added several new tools from Glassboard Studio to my craft room this year. It took me a bit to talk myself into investing in it, but I’m so glad I did.
Check out this video HERE where I’m using the Glassboard mat as a palette while painting my Halloween 3-D busted canvas elements. Such easy cleanup.
I love that I can use this as a palette with many different medias. I made my mom a custom zipper bag and drew a design on it using Sharpie Creative Markers. I even used it to practice my initials that I sign because I was having a “moment” and had forgotten exactly how I’ve been signing things.
I pulled out some of the creations I’ve been working on this year since taking a class with artist Tracy Weinzapfel for inspiration and reference as I drew on the black zipper bag. Since it was a black bag, I did need to use several layers of the markers to get the colors I wanted. If a marker picked up color from another section, I could easily scribble it a bit to get it back to it’s original color. I left the scribbles on there for a couple weeks as I was out of my studio and it still cleaned up easily when I got back to it.
And then Glassboard Studio released a new Scrapbook Magnetic Glassboard Craft Mat! This one fits 2 – 12″ x 12″ Scrapbook layouts completely on top of it. Something you may not know is that my crafting journey started with scrapbooking. One craft leads to another and here we are. Paper crafting is one of my favorite and when I was asked if I’d be interested in this size mat, I knew it was meant to live in my studio.
After I purchased my first Magnetic Glassboard mat, Pinterest showed me a photo of a gorgeous pattern called Oceanside, which was no longer available. I told myself if it ever became available again, that I would jump on ordering it simply because it makes me happy to look at. And wouldn’t you know, after they released the new Scrapbook Craft Mat, they also announced several special edition mats were coming back for a limited time. I guess, be careful what you tell yourself!
The ocean is calling and if I can’t go to it, why not bring it to me. I may have to play some ocean sounds and just stare at it and pretend I’m really there. My shipping information says it will arrive later today after this is published, but watch the Silhouette Secrets+ social channels and I’ll share an unboxing on there (YouTube, Facebook, Instagram).
I know, I know… how many magnetic Glassboard mats does one person need? I started the year with 0 and now own 3. But, I do have several work spaces in my craft studio, so I know they will be used.
Want to see more on how I’m using this in my studio & some project inspiration too? Check out this blog post HERE and see how I’ve put it to use.
Make sure if you do invest in some new tools for your craft room that you use code SILHOUETTESECRETS to save at this link HERE. During the Glassboard Black Friday sale save 20% and after Black Friday is over, you can still save 15% on your order any time with my code.
I know these new tools may not be for everyone and it did take me time to talk myself into getting one. I just kept seeing their awesome patterns and something tugged at me that it was right for my craft space. Timing is everything. It may not be the right time for you, but maybe you picked up some inspiration by the projects I shared above.
Thanks so much for reading!
Save this for future reference by pinning the image below.
Enjoy !
THANK YOU for your support! How can you help? Click HERE & buy a coffee. Every little bit helps with the cost of running the site.
Silhouette Classes
Never stop learning! Let me help you take the anxiety out of learning with Silhouette and get to creating faster! My Silhouette classes are heavily focused on software, so you can take the skills & techniques taught and apply them to many future projects!
**This post may contain affiliate links. What that means is that I may receive compensation if you purchase through the links I have provided. The price you pay for the product or service is not higher but I may get compensated for sharing.
Creating custom card designs in Silhouette Studio is easier than you might think, and today I’m excited to share a step-by-step Tri-Fold Shaped Edge Card tutorial now live on the Silhouette Secrets+ YouTube channel! This project is perfect for any occasion, and once you learn the process, you can customize it with your own text, images, and themes. You’ll find the full supply list conveniently located right below the video link, so you can gather everything you need and craft along with me.
Affiliate links may be present in the following blog post and as an Amazon Associate, I earn from qualifying purchases.
Head over to the Silhouette Secrets+ YouTube channel to watch the full step-by-step tutorial. I walk you through each part of creating a Tri-Fold Shaped Edge Card so you can follow along at your own pace and customize it to match any theme or occasion. And while you’re there, I’d love your support—click the Like button, leave a comment to share what design you plan to create, and make sure to subscribe for more Silhouette tips and project inspiration. Don’t forget to tap the bell so you’re notified as soon as new tutorials are released!
Ready to design your own? Once you’ve watched the tutorial and are inspired to start creating, here are the supplies I used for my Tri-Fold Shaped Edge Card. Feel free to follow along with the same materials or customize your project with what you have on hand—either way, you’ll be crafting a unique card in no time!
This is a card design that can be used all year long and for many different situations.
Here are a couple more designs that I created too!
Mix and match different paper patterns with the same designs to create different looks.
This is a great way to use up scraps papers or smaller sheets too!
Save this for future reference by pinning the image below.
Enjoy !
THANK YOU for your support! How can you help? Click HERE & buy a coffee. Every little bit helps with the cost of running the site.
Silhouette Classes
Never stop learning! Let me help you take the anxiety out of learning with Silhouette and get to creating faster! My Silhouette classes are heavily focused on software, so you can take the skills & techniques taught and apply them to many future projects!
**This post may contain affiliate links. What that means is that I may receive compensation if you purchase through the links I have provided. The price you pay for the product or service is not higher but I may get compensated for sharing.
Does anyone else get total brain freeze when someone asks what gifts you want? Whether it’s for a birthday or the holidays, I instantly get that deer-in-the-headlights look. Even if I had a list going, it somehow flies right out the coop the moment someone actually asks.
So this year, I decided to create a Holiday Gift Guide not just for those shopping for the creative makers in their life—but also for anyone like me who needs a little help remembering what we actually love. Inside, you’ll find my go-to crafting tools, creative kits, and favorite supplies that I use all year long in my own craft room. Whether you’re a Silhouette or Siser fan, a paper crafter, or just dipping your toes into DIY, these gift ideas are practical, inspiring, and perfect for any skill level.
Let’s dive into the top crafting gifts for creative makers this holiday season!
Here’s a list of my favorite tools, supplies, and crafty goodies that I use all year long, and they make perfect gifts for makers at any skill level.
Affiliate links may be present in the following blog post and as an Amazon Associate, I earn from qualifying purchases.
Now before I share more, keep in mind that you do not need ALL of these items and that it’s taken me years to collect the craft supplies and tools that I currently use and recommend. I will also be adding to this list as new light bulb moments pop up with new ideas.
*prices subject to change & what is shown below are at the time of publication as of 11/21/25
A new tool kit was announced at the 2025 Silhouette Summit – originally it was stated it would be available in November. I asked for an update and was told they didn’t have a date on when it would be available.
Glassboard Magnetic Craft Mat – select your favorite pattern Use code SILHOUETTESECRETS to save 20% from November 21-December 1, 2026 or 15% any other time – Shop HERE
I just ordered the Oceanside Pattern because it makes me happy to look at and I told myself if it was every available again, I would get it for myself just because. The little voice in my head won and it’s on it’s way to live in my studio. They have brought back a few of the Special Edition patterns for a limited time only. Their patterns are beautiful and some don’t last long.
I love these and turn to them when I get stuck or need color inspiration. I’ve used them for several projects from cardstock matching, designing in Silhouette, or beading projects.
Check out more on how I’ve used these for inspiration HERE.
And she just released an updated version – Volume 3 & 4. I wonder how much Santa can carry for me this year.
More details on the Silhouette cloChé HERE Watch for an unboxing and additional information coming soon too! I have been testing with several projects and just need to get all my thoughts compiled into written words.
I have had this heat press for 5-7 years. I’ve lost track of time and I love that it has the slide out drawer. This is my go to when pressing shirts and other larger projects.
I’ve had this one for a couple years now and I use it for smaller projects or when I’m recording videos. It’s smaller size makes it easier to move around and fit in the video frame too.
Follow more information on Siser Juliet & Romeo HERE Follow along on the Swift Creek Customs channels to see more about these machines too!
Now you may be thinking, how many cutting machines does one person need? I know it may seem crazy! But, I love learning new things and I love sharing that with others. And here we are… If you are interested in expanding your cutting machine knowledge or system of machine, let me know if you have questions.
*****
I also have an Amazon Storefront where I add craft & project supplies when I make a new project, blog post, or video tutorial. Check out that list HERE.
I could not possibly include everything I have in my craft studio. Remember I said I’ve been collecting for many years. But, I do get asked often about my supplies & tools, which is why I have a header at the top of the website for EllyMae’s Craft Supplies – find that HERE.
I hope those ideas have sparked some creative thinking about what you might find useful to either receive as a gift or give someone else.
Save this for future reference by pinning the image below.
Enjoy !
THANK YOU for your support! How can you help? Click HERE & buy a coffee. Every little bit helps with the cost of running the site.
Silhouette Classes
Never stop learning! Let me help you take the anxiety out of learning with Silhouette and get to creating faster! My Silhouette classes are heavily focused on software, so you can take the skills & techniques taught and apply them to many future projects!
**This post may contain affiliate links. What that means is that I may receive compensation if you purchase through the links I have provided. The price you pay for the product or service is not higher but I may get compensated for sharing.
Looking for a unique and elegant gift idea? This custom glass etched decanter set is the perfect project to showcase both creativity and craftsmanship! Using Silhouette Studio to design the stencil and cutting it from Oracal 651 adhesive vinyl with the Silhouette Cameo 5, I created crisp, intricate, and detailed stencils that made the etching process a breeze. With a little help from Etchall etching creme, each piece transformed into a beautifully personalized set — perfect for gifting or adding a touch of class to your own home bar. Keep reading for a full supply list, a look at the step-by-step process, and plenty of inspiration photos of the finished project!
Affiliate links may be present in the following blog post and as an Amazon Associate, I earn from qualifying purchases.
The best part about this project is that it came together for less than $20! I found the perfect glassware and decanter set during a quick trip to Goodwill, and I couldn’t pass it up. It was a very successful shopping trip to Goodwill for glassware.
After a good cleaning, the glass pieces were like new and ready for a makeover. My husband had the idea to create our own custom etched decanter set, and it turned out even better than we imagined. It just goes to show — with a little creativity (and a great thrift store find!), you can create something beautiful, personal, and completely unique without spending a fortune.
Ready to make your own custom etched decanter set? Here’s a look at the supplies and tools I used to bring this project to life — from the thrifted glassware to the vinyl stencil and etching cream that made the magic happen!
Now that you’ve got your supplies ready, let’s take a look at how this custom etched decanter set came together! I snapped a few photos along the way to show each step — from creating the stencil in Silhouette Studio to applying the Etchall etching creme and revealing the final design.
I started by using a file I purchased on Etsy and then did some clean up on the file to make it more suitable for the glass etching project. I did not need all of the fine, intricate details of the original design at the size I was creating with. On the left is the original design I purchased, and on the right is the file I used for my stencil.
Creating a clean cutting stencil can take some test cut attempts just to make sure that the details you want will remain and you won’t have any cutting issues. I started with one stencil, adjusted my design a bit after seeing how it cut, and then cut the rest of the stencils I needed.
I used scraps of Oracal 651 adhesive vinyl for this project. Or if you have a color in your stash that isn’t your favorite, this is the perfect project for it!
I applied the stencils using AT65 Transfer Tape and then I highly recommend adding painters tape around the edges of your stencil design, especially on a curved object. Etching cream is awesome and can work super quick, especially if it gets onto a spot of the glassware that you do not want to be etched. It seems like those mistakes always seem to etch the fastest.
The next step I took is optional, but since I knew my stencils were detailed, I thought it was worth the extra step to apply a bit of heat to the adhesive vinyl and make sure it had a really good adhesion. I grabbed my Heat It Gun by Ranger and applied it for a few seconds all around. Be careful as hot glass looks like cold glass. I let it cool completely so the adhesive vinyl would be well stuck.
I really like this Heat Gun by Ranger as it has more of a direct heat towards your project and doesn’t blow the hot air out around as much. I know that sounds odd, but it’s one of those things that you don’t really “get” until you have used the tool. I used it in a class at Creativation 2025 and came home and bought myself one even though I have several embossing guns already in my tool box.
Here is a close up look at the etching cream as it sneaked off my stencil and why I highly recommend using the painters tape. With curved objects, it’s not always easy to simply make the stencil bigger. That can be more difficult to get a smooth application on the glass object, so the painters tape is a great way to help add an additional barrier.
I leave the etching cream on for 20 minutes and then this is IMPORTANT! Scrape off any excess etching cream and put it back in the bottle!!! It can be reused over and over again. I’ve had bottles of Etchall Etching Creme for many years, and it is still good to use, no matter what color it turns into.
Then I take a paper towel and wipe off any excess etching cream before rinsing it thoroughly in the sink.
They turned out FANTASTIC! And I was doing a happy dance. I do believe that taking the extra time to heat the adhesive vinyl and let it cool before applying the etching cream helped to seal the edges of the stencil to prevent any seepage of the etching cream and give it crisp, smooth lines.
The next step – put them to the test & enjoy our new custom decanter set.
For our project, we thought that Buffalo Trace fit it perfectly and filled the decanter well. (*not sponsored or a promotion for Buffalo Trace – please enjoy responsibly)
Whether you’re creating a special gift or adding a custom touch to your own space, glass etching is a simple way to make something truly unforgettable. With your cutting machine, Oracal 651 vinyl, and a little Etchall etching creme, you can personalize glassware, mirrors, and so much more! I hope this project inspires you to give etching a try and see just how easy it is to get professional-looking results at home. Check out more information for even more creative ideas and tips to take your crafting to the next level HERE!
Save this for future reference by pinning the image below.
Enjoy !
THANK YOU for your support! How can you help? Click HERE & buy a coffee. Every little bit helps with the cost of running the site.
Silhouette Classes
Never stop learning! Let me help you take the anxiety out of learning with Silhouette and get to creating faster! My Silhouette classes are heavily focused on software, so you can take the skills & techniques taught and apply them to many future projects!
**This post may contain affiliate links. What that means is that I may receive compensation if you purchase through the links I have provided. The price you pay for the product or service is not higher but I may get compensated for sharing.
This edition of Crafting Creativity is full of heartwarming inspiration straight from the Hundred Acre Wood! Using the Classic Pooh: Friend Like You digital stamp set by Katie Pertiet Designs, I created several sweet and timeless projects featuring Pooh and his friends. From layered cards to charming home décor, each piece highlights how versatile digital stamps can be when paired with your Silhouette. Get ready to see how these delightful designs can bring warmth, friendship, and nostalgia to your craft table.
Affiliate links may be present in the following blog post and as an Amazon Associate, I earn from qualifying purchases.
Did you know that the Classic Pooh is now in the public domain in the U.S.? Classic Pooh entered the public domain on January 1, 2022. The Disney version is not in public domain. *Outside of the U.S., please refer to trademark laws & regulations for your area.
Each month in the Crafting Creativity series, I dive into a single design file and transform it into a variety of unique projects to inspire your own creativity. From cards and stickers to home décor and custom tags, I love exploring all the possibilities one file can offer. These posts are designed to show you how versatile a single design can be and to spark ideas for using your Silhouette in new and exciting ways. Whether you’re a seasoned crafter or just starting out, Crafting Creativity is full of tips, tricks, and inspiration to help you make the most of every design!
Crafting Creativity – Classic Pooh Projects
Digital stamps are incredibly versatile and perfect for creating a wide range of projects. Pair them with your Silhouette for precise print-and-cut projects, and suddenly one file becomes the foundation for endless creative possibilities. Whether you’re crafting for holidays, birthdays, or everyday inspiration, digital stamps make it easy to bring your ideas to life!
Project #1 – Flip Action Interactive Cards
These came together so easily and I was able to fit the print and cut designs for 6 cards onto one letter size sheet of paper. Here is a look at my print and cut page setup.
I posted a quick video of cutting the pieces for this project using the Electrostatic Mat. Check out the video on Instagram or Facebook.
And I used these designs in this video tutorial to show how to match colors in the Silhouette Studio software with the eyedropper too!
Digital stamps are perfect for creating custom stickers — you can size them exactly how you want, print them on your favorite sticker paper, and even cut them out perfectly with your Silhouette! They’re a fantastic way to bring digital designs into the physical world for planners, journals, cards, and more.
I received several questions about how to use digital stamps inside Silhouette Studio, so I created a step-by-step tutorial showing exactly how I set up, trace, and print and cut these adorable Classic Pooh images. It’s easier than you might think, and once you try it, you’ll be hooked on making your own personalized sticker sheets!
The first set I created using the Silhouette Super Fine Heat Pen with silver foil. I had a couple issues with the foil tearing which smeared a few parts, but otherwise they turned out great! They are a bit more work to set up with extra steps for the foiling, but if you are looking for a WOW factor! This can do it!
I used a different sketch font on each one and one I drew a balloon using the Flexishapes and the line drawing tool.
But I couldn’t stop there! I also went ahead and simply changed the line color on all the sketch fonts to black and then did the tags as a print and cut. This does not have the shine to it, but it was less steps to set up to have it all printed.
When working with sketch fonts, make sure to click on the Send tab and look at the bold red lines. That is exactly how it would sketch or print through a printer. Text defaults to “cut edge”, which can make sketch fonts act a bit goofy if they are close to single line fonts. They may not look complete and that is exactly how they would sketch or print.
Take the steps and tips I shared and create your own unique custom digital background too! Have you seen the shirts where the husband takes a photo of the wife or vice versa and puts it onto a shirt for special occasions like birthdays? I just had to do it! So I made my husband custom gift wrap for his birthday.
All of these projects were completed using just 1 digital stamp set by Katie Pertiet. She has a store full of amazing digital supplies and also produces physical products as well, such as stamps and more!
This year I started offering a free file each month for Silhouette Secrets+ newsletter subscribers. I love designing in the Silhouette Studio software and have shared some of my creations as well as look forward to collaborating with more artists in the future too!
Silhouette Secrets+ Newsletter
Never miss out on the news, tips, “secrets”, deals, classes, and more that I share on Silhouette Secrets+. Sign up for the newsletter and get information delivered to your inbox every Friday. Unsubscribe at anytime.
Sign up for the weekly newsletter HERE to have information delivered direct to your inbox and grab each month’s new freebie.
Did this spark some creative ideas for you? It’s amazing how one digital stamp set can be transformed into so many unique projects! I had such a wonderful time brainstorming, designing, and bringing each of these Classic Pooh creations to life. You can find even more inspiration and project ideas in the Crafting Creativity section on the Silhouette Secrets+ website — click HERE to explore!
Save this for future reference by pinning the image below.
Enjoy !
THANK YOU for your support! How can you help? Click HERE & buy a coffee. Every little bit helps with the cost of running the site.
Silhouette Classes
Never stop learning! Let me help you take the anxiety out of learning with Silhouette and get to creating faster! My Silhouette classes are heavily focused on software, so you can take the skills & techniques taught and apply them to many future projects!
**This post may contain affiliate links. What that means is that I may receive compensation if you purchase through the links I have provided. The price you pay for the product or service is not higher but I may get compensated for sharing.
Looking for a fun and creative way to take your sublimation projects to the next level? In this tutorial, I’m sharing how to combine Artesprix Sublimation Inks with embossing folders to create beautiful, designs on textured sublimation coasters! 🎨 This unique technique adds incredible depth and dimension to your projects—perfect for gifts, décor, or one-of-a-kind keepsakes. I’ll walk you through the full process step-by-step in the video below, along with a complete list of the supplies you’ll need to get started. Grab your favorite embossing folders, your Artesprix inks, and let’s create something truly unique!
Affiliate links may be present in the following blog post and as an Amazon Associate I earn from qualifying purchases.
My favorite is the single color with the white of the textured coaster coming through. I think it really makes it pop, but there are so many different color options that you could do.
THANK YOU for your support! How can you help? Click HERE & buy a coffee. Every little bit helps with the cost of running the site.
Silhouette Classes
Never stop learning! Let me help you take the anxiety out of learning with Silhouette and get to creating faster! My Silhouette classes are heavily focused on software, so you can take the skills & techniques taught and apply them to many future projects!
**This post may contain affiliate links. What that means is that I may receive compensation if you purchase through the links I have provided. The price you pay for the product or service is not higher but I may get compensated for sharing.
Looking for stencil craft ideas to spark your creativity? This week, I’m sharing how one stencil design can be transformed in six fun and unique ways! Using the Hand Carved Flower Stencil by Kassy’s Parlour, created by artist Kassandra Louise Designs, I turned this single file into a home décor sign, cup decal, jewelry pendants, painted canvas, and more. It’s incredible how one design can inspire so many creative projects.
Affiliate links may be present in the following blog post and as an Amazon Associate, I earn from qualifying purchases.
When you look at a design file, do you see one project idea, or can you envision it on multiple projects? I started the Crafting Creativity series to help spark ideas and inspiration to do more with your files.
These are cut from 6 mil stencil material and it cut beautifully.
Here is a look at the stencil before I unloaded it from the machine. For harder to cut materials, checking the cut before unloading the machine is a great habit to get into. If the cut did not complete, you can send it again and it should cut in the same place. This is great for materials such as stencil materials that dull blades quicker and may need extra passes to cut through.
Once the stencil is cut, it can be used for many different projects and mediums.
One thing to keep in mind is that stencil material is plastic and plastic will dull the blade quicker than other materials. It is perfectly normal to have to increase the blade settings or passes the more that is cut. And if you are cutting this material a lot, you may go through more blades than other thinner, easier to cut materials.
I cut this 6 mil stencil material using the preset for Stencil Material in the Silhouette Studio software. All I changed was to increase the passes to 2 and then when that started having a few hang ups, I increased it to 3 passes.
Have you ever used a Gel Press or Gelli Plate before? This is such a fun technique!
Basically, a gel press is a jelly plate that you can add paint or other mediums on top of and then you press a piece of paper over top of it and pull the paint off. You can layer colors, add textures, and have lots of options.
Here are a couple of pulls that I did using the stencil on top of the Gel Press.
These can turn out so neat and each one is unique. Once dry the pages can be used for many projects such as cards, mixed media pages, tags, backgrounds and more!
I used two of the gel prints to make this card and then stamped with black ink directly on top of the print. It turned out pretty neat with the paint showing through the black ink.
For this project, I opened the stencil design, changed the fill color to transparent and then right clicked and chose “Release Compound Path”. This will break up the design into pieces. I then deleted all the pieces around the full flower design. Then selected all of the flower pieces, right click and choose “Make Compound Path”.
I am using a 8″ frame, so drew a square and sized it to 8″ x 8″. I selected the flower design and filled it with black, just to see it better. Then started playing around with patterns. I filled the flower design with a pattern and decreased the transparency in the Fill Color panel. Then I started filling the background square with patterns and testing them out.
Here is a look at my working file where you can see the different pattern options I was playing around with.
Then I printed the design onto Epson Presentation Paper – Matte and cut it with my paper trimmer.
When there are straight lines and a larger image as shown above, an old school paper trimmer does the trick versus trying to set up for a print and cut. I use Silhouette Studio to do the design work and printing and then with 4 swipes, my paper trimmer has the project ready to go.
And the best part about this is, you can change it out whenever you feel like. Print a new image and swap it out to coordinate with the season, your decor, or your mood.
I cut several flower decals from patterned adhesive vinyl to decorate my new travel coffee cup. I used the same technique as described above to separate the flower design from the stencil and cut individual flower decals.
After I weeded the decals, I cut them apart and then applied transfer tape and placed each one individually around the cup, so I could control where they were and how they fit together.
Here is a close up of the decal where I hope you can see a bit of it’s sparkle & shine.
Tips for Creating Cup Decals with Adhesive Vinyl
Surface Area
When applying adhesive vinyl to a surface that may be handled often, you want to keep in mind the size of the pieces of the design. The smaller the piece, the less adhesive there is to stick to the surface of the blank. So thin letters, intricate flourishes, delicate designs may not stick well to the surface of an object that’s handled or washed.
Even if using “permanent” adhesive vinyl, that doesn’t mean it will never come off or lift. Permanent adhesive vinyl simply means it has a stronger adhesive on the backside than “temporary” vinyl once cured. You can still peel it off, pick it off, scrape it off, etc.
The greater the surface area of the solid pieces of the design, the more adhesive there is to stick to the object.
There are a couple things you can do to help with a decal staying put longer.
thicken fonts or enlarge small areas of the design
eliminate the smaller or tiny sections of a design if possible
clean the surface of the cup with an alcohol swab & let it dry completely – this cleans off any dust or oils off the surface that can repel the adhesive
after applying the decal, let it sit for 48-72 hours for the adhesive to set up
apply a bit of heat to help the adhesive vinyl stick – not too much, you don’t want to melt it
Surface of the Cup
Stain resistant, nonstick, or silicone surfaces are designed to repel anything from sticking to it. Even if you are able to get a decal to stick initially, it usually does not for long.
It doesn’t just apply to cups though. There are a lot more stain resistant paints on the market and being used to paint interior walls of homes. Stain resistant is designed so things don’t stick to it, so even a “permanent” adhesive vinyl decal may not stick.
Textured surfaces can also be more difficult for a decal to stick to or it may not last long on a texture surface.
Placement of the Decal
When placing decals onto a cup, keep in mind where it is placed. I purposely placed my designs higher up on the cup knowing that it would be set into a car cup holder.
The more a cup is handled, the greater chance there is that the decal can catch, lift, or come off. This would include things like someone picking at the design, washing the cup, scrubbing the cup, sliding in and out of a car cup holder, being tossed around in a bag, etc.
And…
Sometimes things just happen and it won’t last. The best part about having a cutting machine is that you can cut another one. Or you can take the current one off, clean the cup, and apply a new decal to fit your mood.
I tried several different things with these and they are still a work in progress. Some things didn’t turn out such as using the stencil with white sharpies or sponging on white texture paste. I had too much bleed, so I ended up painting another layer to cover it up.
When the white Sharpie and texture paint didn’t work out on this one, I switched gears and cut a stencil from Silhouette adhesive backed stencil material and started filling it in with TCW Stencil Butter. OH MY! I have to say that the Silhouette adhesive backed stencil material worked AWESOME! Even with the texture of the canvas, it worked great! I will definitely be using this more in the future. The only drawback is that it is letter size and I would have loved to create a larger stencil.
But I made it work. I had to let the first flower dry and then I added more.
All I need now is the perfect saying to add to it. Let me know if you have any ideas that jump out at you when you see the project!
The next one has several layers of paint on it, but ultimately, I ended up with a solid pink background. I had cut a 12″ x 12″ stencil to use with this, but then I started looking at all of those negative pieces that were left over from the stencil and wondered if I could use those in some way.
I ended up applying transfer tape and picking up all of those pieces that I then used as a negative stencil on the wet paint. It was really just a “let’s see what happens moment”. I just laid the transfer tape on top of the wet paint with the negative pieces attached and smoothed it down to see what would happen.
It gave it an interesting pattern. Once the paint was dry, I then simply traced around with the white Sharpie Creative Maker and then I added a layer of Mod Podge Sparkle on top of it.
I am not sure if it’s finished yet or if I will add more to it. Just waiting a bit to see where the art goes.
A great big thank you to Kassy for contributing the free file for the Silhouette Secrets+ newsletter for the month of August! If you missed grabbing the free design in August, it is available in the HERE.
This year I started offering a free file each month for Silhouette Secrets+ newsletter subscribers. I love designing in the Silhouette Studio software and have shared some of my creations as well as look forward to collaborating with more artists in the future too!
Silhouette Secrets+ Newsletter
Never miss out on the news, tips, “secrets”, deals, classes, and more that I share on Silhouette Secrets+. Sign up for the newsletter and get information delivered to your inbox every Friday. Unsubscribe at anytime.
Sign up for the weekly newsletter HERE to have information delivered direct to your inbox and grab each month new freebie.
Did this spark your imagination? ✨ It’s amazing how one single file can be transformed into so many unique projects! I loved exploring all the creative possibilities with this design. You can find even more inspiration and project ideas in the Crafting Creativity section on the website — check it out HERE.
Save this for future reference by pinning the image below.
Enjoy !
THANK YOU for your support! How can you help? Click HERE & buy a coffee. Every little bit helps with the cost of running the site.
Silhouette Classes
Never stop learning! Let me help you take the anxiety out of learning with Silhouette and get to creating faster! My Silhouette classes are heavily focused on software, so you can take the skills & techniques taught and apply them to many future projects!
**This post may contain affiliate links. What that means is that I may receive compensation if you purchase through the links I have provided. The price you pay for the product or service is not higher but I may get compensated for sharing.
Jewelry making just got a whole lot more creative! In this tutorial, I’ll show you how to design and create dazzling custom jewelry pieces — perfect for pendants, earrings, bag tags, keychains, and more — using Silhouette with stencil designs and a variety of patterns. From selecting your supplies to following step-by-step instructions, you’ll learn how to turn simple materials into stunning, personalized accessories that sparkle. Whether you’re making gifts or adding a touch of charm to your own style, this project is a fun way to blend creativity, craftsmanship, and a little bit of shimmer.
Scroll down for the full tutorial, or check out the video version for a closer look! You can also download the printable supply list and step-by-step instructions PDF to craft along at your own pace.
Sparkle and Shine: DIY Custom Jewelry with Silhouette | Make Custom Pendants, Earrings & Bag Tags Video Tutorial available HERE
Affiliate links may be present in the following blog post and as an Amazon Associate, I earn from qualifying purchases.
*Tutorial written in Silhouette Studio version 4.5.812 Blog post is photo heavy
Open the Silhouette Studio software and set the page size/media size to Letter or whatever size you are printing on.
Open the Registration Marks Panel and turn on the registration marks for print and cut. Click the Restore Defaults button to reset the defaults for your most accurate print and cut results.
Save the file using File > Save and select a location on your hard drive to keep your work safe.
Measure the jewelry blanks to know what size to create the design at.
In Silhouette Studio, using the Drawing Tools on the left, select the Draw Ellipse tool, hold down the Shift key and draw a circle. This will create a perfect circle.
Using the Scale Tools, adjust the size of the circle to the size of the jewelry measurement. I adjusted the circle to 1″.
Since I am filling the circle with a pattern and colors, I made an offset to create a manual print bleed. This ensures that exact size I need for the pendant is cut, it will not have white edges on it. I have no issues with print and cut using Silhouette as I follow the same steps every single time. However, it is one of the most common issues we see with troubleshooting with users and it’s usually due to something in the setup.
Silhouette has a 1/16″ off cut that is within the normal range of accuracy with the machines. Adding your own “print bleed” is just another way you can ensure success with your project turning out how you like it. There is also an automatic print bleed option in the Silhouette software, but it doesn’t always yield the look you want.
Open the Offset Panel. Select Offset and adjust the distance of the offset as desired. Set yourself up for success with this keeping in mind that 1/16″ off cut possibility. I used an offset of 0.110″. There is no magic number here and it can vary for all projects.
In order to fill the design with color, the design needs to be a cut file. If using an image file such as a png or jpeg, then you would need to trace the design to get “cut” lines to fill in certain areas with color.
For this design, first change the fill color to transparent. This makes the next steps easier to work with.
Right click and choose Release Compound Path.
Move the outer line away.
Left click and drag across all the remaining pieces to select all, then right click, and choose Make Compound Path.
Add a fill color back to the design to see how it looks.
Again, these steps may vary depending on the design you are working with. If you want to follow my exact steps, I’d recommend grabbing the Hand Carved flower stencil by Kassy’s Parlour so you are working with the exact file I’m using.
Copy and paste the stencil file to the print and cut project mat. Using the corner bounding box, scale the design down to fit within the circle offset and position as desired. Right click on the stencil design and choose Send to Back. Select everything and make a copy. Then save the file.
I actually made 2 copies and pulled the stencil design away so you could see it on the left side. The copies will come in handy in the next steps.
On the original design, hold the Shift key down and select the circle offset and the stencil design by clicking on them. Open the Modify Panel on the right side and select Crop. Now the design is cropped to the offset circle.
Once Crop is selected, it will break all the pieces of the stencil design apart. Make sure to Group the pieces back together. I use Ctrl+G to group as the keyboard shortcut.
Also, when using the Crop tool, the outer offset circle is now gone. This is where the copies come in handy. Make a copy of the offset circle from the left side and move it onto the design mat. Select the new offset circle, the cropped stencil design and the original circle; then use the Align tools to Center it together.
Make a copy of this completed design and pull it off to the left side. Then save the file.
If the wrong circle was selected when using Crop, simply use the Undo feature and go back to start again.
For this design, since we created our own print bleed, we only need to cut the inside circle and not the offset or the stencil design. Hold the Shift key down and click on the offset circle and stencil design to select them, then click on the Send tab and choose No Cut. This will turn the cut line off for the offset & stencil design. You can do this step at the end of the process too, however, if you remember before you make copies, then it can be a little bit easier.
Now it is ready to start filling it with a pattern and colors. If you want to use different patterns and background colors, make additional copies and space across the page.
I am using patterns from the Silhouette library. These are mostly files I’ve purchased from the Silhouette Design Store over the years and I have quite the collection. You can add your own patterns to the Silhouette library Patterns folder, however, I do caution users on doing so as patterns can be large files and quickly eat up storage space in your Silhouette cloud storage. I typically use the drag and drop method for bringing in patterns from an outside location. More details on Pattern Fill HERE.
Select the stencil design on the first one. Then either open the Library tab or click on the Show/Hide Library icon in the bottom left corner. Show/Hide Library will do a split screen of the Silhouette Library which can sometimes be easier when designing and less flipping back and forth on the screen.
Select the Patterns Folder in the Silhouette library on the left side and then choose a pattern. This will fill the selected object on the design mat with that pattern.
When working in the split screen, you can adjust the sections on the library if needed. This will depend on the computer screen size you are working on. Move the mouse cursor over the line the arrow points to above and then you will see a slider double arrow cursor to adjust the sections to see more of the pattern fill library. To go back to the full screen Design tab, simply click on the Show/Hide Library icon again and it will close.
Repeat this process for all the additional designs. I used a variety of different patterns for my pendants. Sometimes you really don’t know how it will print out and you may like some better than others once printed.
If you want to adjust the patterns further, open the Fill Color Panel – Tab 3 and you have additional options to Scale, Pan, Rotate, etc.
For the backgrounds, I chose to pull a color from each pattern and use that as the background color. Select the offset circle, then open the Fill Color Panel – Tab 1 and using the eyedropper tool, select a color from within the pattern. It may help to zoom in on the design to select the color you want.
If the colored circle covers the design, as shown above, right click and choose Send to Back. This happens because we made a copy of the offset and added it on top of the design and we need to reorder it.
If you don’t like the color, simply repeat the steps and select another color until you find one you like. Repeat these steps for all of the designs.
You can also use the Custom Color slider in the bottom of the Fill Color Panel to move the dot around to change the color to different shades of the color palette or even enter a HEX code at the bottom too.
I chose to print 2 copies of each pattern so I could make different projects with each or if I messed one up, I had a spare.
Continue to fill the page as desired. When the page is full, click File > Print and print the page. I printed onto Epson Presentation Paper – Matte and used the high quality photo matte settings.
Here is a look at one of my design pages before I printed it.
When doing a print and cut, set yourself up for success! Here are a couple tips that can help eliminate a lot of the issues we see users have with print and cut.
Use the default registration marks. This is where the most accurate print and cut results will occur consistently. Adjusting the marks or making them smaller increases the chance of a misread and off cut.
Keep the design out of the crosshatched area of the design screen. This is the safety zone for the optical eye to read the registration marks. Any colors or design aspects within that crosshatched area can interfere with an accurate reading.
Use a Silhouette cutting mat. The Silhouette machines are calibrated specifically for a Silhouette cutting mat. 3rd party mats are not typically the same page margins around the outer edges of the adhesive area and can cause issues with print and cut.
Place the printed page in the top left corner of the adhesive area on the grid exactly as it shows on the Silhouette software screen.
Hold the mat level or slightly elevated so the mat remains level as the registration marks are read. If the mat is hanging down in front of the machine it can cause it to bubble up in the middle between the rollers and this can affect how the registration marks are read. You can easily test this by simply loading your cutting mat and let it fall, then lift it up. You should be able to see the mat will flatten out in between the rollers when supported.
Have good lighting and not variable lighting or shadows. We have seen users have issues with print and cut simply by the amount of light from morning to afternoon. If your room lighting changes throughout the day, it can affect print and cut results. Avoid harsh shadows as well. Shining a bright light directly at the machine can also interfere with the optical eye reading the marks correctly. Shiny materials such as glossy surfaces or holographic can also interfere with an accurate reading as well as the light bounces off the material. Keep in mind that the optical eye is not a high level of intelligence. It is simply a laser eye that turns on and is looking for black registration marks in a very, very specific location on the page. The machine creates it’s own light, so technically it should be able to read the marks even with the lid closed.
The Epson Presentation Paper – Matte is a lighter weight paper and I love the print quality of images on it. I will use a slightly older cutting mat for this paper and used the Copy Paper settings with a blade depth of 2.
Once the machine has done it’s magic, then I like to remove the main paper first and I can carefully go back and remove all the circles. To help with any curling on materials, I will flip my mat over and peel the mat away from the material. I have to tell myself to slow down so I don’t tear the designs sometimes too! It’s not the machines fault if I tear it getting it off the cutting mat.
Next, it’s time to add the sparkle with the Mod Podge Sparkle and a foam brush. On a safe surface, give each of the designs a good coating of the Mod Podge Sparkle and let that dry. I use a silicone mat for easy clean up.
The first ones I made, I only used one layer of Mod Podge Sparkle. The second round, I added a second layer and let that dry completely before the next step. The double layer added even more sparkle and I felt it just added a bit more to the pendants. The design on the left has one layer of Mod Podge Sparkle on it versus 2 layers as shown on the right side.
Once it’s completely dry, then I applied a thin layer of E6000 to the inside of the jewelry pendant and carefully added the design on top and spun it around a bit. This helps to spread out the adhesive evenly. Make sure all areas are secure and let the E6000 dry completely before the next steps.
Once it’s dry completely, then add a thin layer of E6000 on the top of the design and a thin layer on the backside of the pendant glass. Then apply the glass on top of the design and spin it around to spread the adhesive evenly. Press to secure it completely. If you add too much glue, then it can seep out the edges and blur on the glass globe, but you want enough to have an even thin layer between the globe and design.
Let this dry completely before adding jewelry hardware and then admire your projects.
Here are a couple close up photos of the completed projects.
Once you get started, it’s hard to stop creating.
I had so much fun creating this mess… I mean these projects! They turned out fabulous! Sometimes you just need to allow yourself to get started and see where the project will take you.
Additional Resources on the Silhouette Tools Used in this Tutorial:
Save this for future reference by pinning the image below.
Enjoy !
THANK YOU for your support! How can you help? Click HERE & buy a coffee. Every little bit helps with the cost of running the site.
Silhouette Classes
Never stop learning! Let me help you take the anxiety out of learning with Silhouette and get to creating faster! My Silhouette classes are heavily focused on software, so you can take the skills & techniques taught and apply them to many future projects!
**This post may contain affiliate links. What that means is that I may receive compensation if you purchase through the links I have provided. The price you pay for the product or service is not higher but I may get compensated for sharing.
If you’ve ever wanted to bring digital stamps into Silhouette Studio, this tutorial is for you! In this video, I’ll walk you through the process of opening PNG files, using Autotrace, and using Print and Cut so you can create beautiful cards, scrapbook pages, and custom projects with ease. Whether you’re brand-new to Silhouette or looking to sharpen your skills, these step-by-step tips will help you get the most out of your digital stamp files and unlock even more creative possibilities.
Affiliate links may be present in the following blog post and as an Amazon Associate, I earn from qualifying purchases.
Ready to give it a try? Watch the full video tutorial below and see how easy it is to turn digital stamps into cut-ready designs in Silhouette Studio. Don’t forget to pin this post for later inspiration, share it with a crafty friend, and subscribe to my YouTube channel so you never miss a new tutorial. I can’t wait to see what you create with your own digital stamps—be sure to tag me when you share your projects!
Save this for future reference by pinning the image below.
Enjoy !
THANK YOU for your support! How can you help? Click HERE & buy a coffee. Every little bit helps with the cost of running the site.
Silhouette Classes
Never stop learning! Let me help you take the anxiety out of learning with Silhouette and get to creating faster! My Silhouette classes are heavily focused on software, so you can take the skills & techniques taught and apply them to many future projects!
**This post may contain affiliate links. What that means is that I may receive compensation if you purchase through the links I have provided. The price you pay for the product or service is not higher but I may get compensated for sharing.
Halloween crafts are some of my absolute favorites, and this year I couldn’t resist making a Boo-tiful DIY Ghost Headband 👻 using Artesprix Sublimation Paints and Markers. Sublimation isn’t just for mugs and coasters—it’s a fun way to customize wearable accessories too! With just a few supplies, I transformed a plain Artesprix sublimation headband into a spooky-cute Halloween accessory that’s perfect for parties, trick-or-treating, or just getting into the festive spirit. Create your own ghostly design so you can rock a one-of-a-kind headband this Halloween.
Affiliate links may be present in the following blog post and as an Amazon Associate I earn from qualifying purchases.
In this video tutorial I shared how to use the new Artesprix Sublimation Coloring Books. These sublimation coloring books are available in 2 formats – a printed copy ($4.99) that you can order to be shipped to you or you can download the digital copy (free) and print with a sublimation printer at home.
While brainstorming for this video, I asked my youngest her thoughts and that is how the ghosts were chosen. This headband literally walked out the door this morning and I may never get it back.
Now she has requested one in orange for “Halloween” colors. I love all the options that can be created using the Artesprix sublimation paints, markers, and inks! So many possibilities to create unique creations.
THANK YOU for your support! How can you help? Click HERE & buy a coffee. Every little bit helps with the cost of running the site.
Silhouette Classes
Never stop learning! Let me help you take the anxiety out of learning with Silhouette and get to creating faster! My Silhouette classes are heavily focused on software, so you can take the skills & techniques taught and apply them to many future projects!
**This post may contain affiliate links. What that means is that I may receive compensation if you purchase through the links I have provided. The price you pay for the product or service is not higher but I may get compensated for sharing.
Looking for a fun and creative sublimation project? These DIY Sublimation Bookmarks made with Artesprix Coloring Books, Sublimation Paints, Markers, and a Gel Plate are the perfect mix of easy and artistic! Whether you’re crafting for yourself, making gifts for book lovers, or exploring new ways to use Artesprix products, this project is full of vibrant color and unique techniques. In this tutorial, I’ll show you how to use paints on a gel plate, add detail with sublimation markers, and transform coloring book pages into stunning sublimation bookmarks you’ll love to use or share.
Affiliate links may be present in the following blog post and as an Amazon Associate I earn from qualifying purchases.
Here’s a look at the supplies on my table ready to go. I am using the new(ish) Artesprix Sublimation Coloring books combined with Artesprix Sublimation Paints & a gel plate, plus breaking a “sublimation” rule in this new tutorial. I’ve included the supply list to create DIY Sublimation Bookmarks below.
Using the Artesprix Sublimation products opens up so many options to create and just let go and see where the art takes you. What kind of design or colors would you use on a DIY sublimation bookmark?
Check out more of my Artesprix sublimation creations HERE.
THANK YOU for your support! How can you help? Click HERE & buy a coffee. Every little bit helps with the cost of running the site.
Silhouette Classes
Never stop learning! Let me help you take the anxiety out of learning with Silhouette and get to creating faster! My Silhouette classes are heavily focused on software, so you can take the skills & techniques taught and apply them to many future projects!
**This post may contain affiliate links. What that means is that I may receive compensation if you purchase through the links I have provided. The price you pay for the product or service is not higher but I may get compensated for sharing.
If you’ve clicked the SVG file option in the Silhouette Design Store recently, you may have noticed a message pop up that says: “Heads up! SVG files aren’t compatible with the Basic Edition. Upgrade your Silhouette Studio software.” Don’t worry—you’re not alone! This Silhouette SVG warning notice appears for everyone, even if you already own Designer Edition, Designer Edition Plus, or Business Edition. In this video, I’m breaking down exactly what this message means, why you’re seeing it, and how to confidently purchase SVG files from the Silhouette Design Store without confusion.
Affiliate links may be present in the following blog post and as an Amazon Associate, I earn from qualifying purchases.
Understanding the “Heads Up!” Silhouette SVG warning in the Silhouette Design Store can save you a lot of confusion (and unnecessary upgrades). Now that you know why it appears for everyone, you can shop for SVG files with confidence and focus on creating! 🎨✨ Be sure to watch the full video above for a step-by-step explanation, and don’t forget to subscribe to the Silhouette Secrets+ YouTube channel for more tips, tricks, and tutorials to help you get the most out of Silhouette Studio. Have you seen this message pop up? Share your experience in the comments below—I’d love to hear how you’re using SVG files in your projects!
Save this for future reference by pinning the image below.
Enjoy !
THANK YOU for your support! How can you help? Click HERE & buy a coffee. Every little bit helps with the cost of running the site.
Silhouette Classes
Never stop learning! Let me help you take the anxiety out of learning with Silhouette and get to creating faster! My Silhouette classes are heavily focused on software, so you can take the skills & techniques taught and apply them to many future projects!
**This post may contain affiliate links. What that means is that I may receive compensation if you purchase through the links I have provided. The price you pay for the product or service is not higher but I may get compensated for sharing.
Looking for creative ways to get more out of your cut files? In this post, I’m sharing how I used one SVG file from Diva Watts Designs to create four unique and beautiful projects—all with Silhouette! From a layered cardstock sign with vinyl to an interchangeable home décor frame, greeting cards, and even a custom wood sign, you’ll see just how versatile one SVG project can be. Whether you’re crafting for fun, decorating your space, or creating gifts, this post is packed with inspiration and ideas to help you make the most of your designs.
Affiliate links may be present in the following blog post and as an Amazon Associate, I earn from qualifying purchases.
When you look at a design file, do you see one project idea, or can you envision it on multiple projects? I started the Crafting Creativity series to help spark ideas and inspiration to do more with your files.
First, here is a look at a finished wood sign by Diva Watts Design using this design.
Crafting Creativity Projects with Diva Watts Designs
One simple design opens the door to endless crafting ideas. You may look at this design and say, “I don’t have a laser, so I cannot do anything with it.” But that’s simply not the case! Let’s take a look at a few possibilities.
Project #1 – Door Hanger with Cardstock and Vinyl
Rather than limit yourself to a specific material, use different materials to create a similar style. I used cardstock and vinyl added to a pre-made wood backer for this design.
I love this one! I used just the hello part of the design, cut a bit off the left side using the Knife tool and then welded it to rectangle frame. Then I made an offset of the design and layered it together to make it pop.
Using just the text from the wood sign design I created the next cards. Don’t throw out those bits! In some cases, like this one, you can use the negative part of the design that’s been cut and create with it too!
When using the negative of a design, a quick trick to get the placement is to use the positive part of the design as your “stencil” and glue the pieces in place first. This means that the design will be placed exactly where you want it. I show using this technique in a video on the Swift Creek Customs channel HERE.
After I used the background as a stencil, I used double-sided foam tape to pop up the striped background to give it some dimension on it’s own card. One cut = 2 card designs.
Additional Resources for the tools I used to create the designs:
Project #3 – DIY Glass Frame Sign with Vinyl and Sharpie Markers
I love creating projects that can be repurposed and have use all year long! This glass frame with the flower portion of the design does just that.
I cut the flower design from adhesive vinyl and added it to the backside of the frame. Then colored that in using Sharpie markers on the backside. While that was drying and the adhesive vinyl curing, I designed several backgrounds to swap out in the frame. This really makes the project versatile and something that can be used year round.
There are so many patterns & design sentiments options out there!
This was another project that I didn’t even bother to use registration marks with. I designed it the size I needed and then used a paper trimmer to cut the straight edges to fit the frame. Sometimes I think we can overcomplicate projects just because we have a machine that can cut things. A good ole paper trimmer is a great tool to have in your tool box!
I used my Glowforge laser to cut all the pieces out of a piece of Maple Plywood. Here is a look at the pieces etched, scored, and cut out.
I prefer to mask my wood pieces before cutting with the laser and then I can simply remove the masking and they are much cleaner.
Once I had all the pieces cut, the Posca Paint Markers made this so easy to color in. Painting is not my favorite part of the finishing process and I hate waiting for things to dry, but I’m getting used to it. Coloring with the paint markers was so satisfying.
The larger pieces I did end up using a bit of acrylic paint to cover the larger surface area.
A great big thank you to Stacey at Diva Watts Designs for contributing the free file for the Silhouette Secrets+ newsletter for the month of July! If you missed grabbing the free design in July, it is available in the Silhouette Design Store HERE.
This year I started offering a free file each month for Silhouette Secrets+ newsletter subscribers. I love designing in the Silhouette Studio software and have shared some of my creations as well as look forward to collaborating with more artists in the future too!
Silhouette Secrets+ Newsletter
Never miss out on the news, tips, “secrets”, deals, classes, and more that I share on Silhouette Secrets+. Sign up for the newsletter and get information delivered to your inbox every Friday. Unsubscribe at anytime.
Sign up for the weekly newsletter HERE to have information delivered direct to your inbox and grab each month new freebie.
Did this give you some ideas? How about how you can take 1 file and create a variety of projects with it. I had so much fun brainstorming, designing, and creating with this file. See more ideas and inspiration in the Crafting Creativity section on the website HERE.
Save this for future reference by pinning the image below.
Enjoy !
THANK YOU for your support! How can you help? Click HERE & buy a coffee. Every little bit helps with the cost of running the site.
Silhouette Classes
Never stop learning! Let me help you take the anxiety out of learning with Silhouette and get to creating faster! My Silhouette classes are heavily focused on software, so you can take the skills & techniques taught and apply them to many future projects!
**This post may contain affiliate links. What that means is that I may receive compensation if you purchase through the links I have provided. The price you pay for the product or service is not higher but I may get compensated for sharing.
Looking for a versatile home décor project you can enjoy all year long? This DIY Interchangeable Glass Frame Sign with Silhouette Studio is the perfect solution! Using a simple glass frame, adhesive vinyl, Sharpie Creative Markers, and Epson Presentation Paper, you can create a custom sign with beautiful digital backgrounds and sayings that can be swapped out for every day decor, seasonally, or for holidays. Designed entirely in Silhouette Studio, this project combines the ease of printable designs with the precision of vinyl cutting, making it beginner-friendly yet completely customizable. Whether you’re decorating for spring, adding a spooky touch for Halloween, or creating a cozy Christmas look, this reusable sign is a budget-friendly craft you’ll use again and again.
Affiliate links may be present in the following blog post and as an Amazon Associate, I earn from qualifying purchases.
For this project, you may even have all the supplies available in your craft stash or think about what you could use as an alternative. I’ve listed the supplies I used below, so you can recreate it too! Don’t limit yourself to these designs either! Think Halloween, Christmas, Winter, and more! I’ll add photos to this blog post as I create more too!
Gather the supplies. I grabbed an 8″ x 8″ glass frame from my supply closet, some scrap adhesive vinyl in black, some transfer tape and my Sharpie Creative Markers.
Measure the inside of the frame you are using. Even if the photo frame states a certain dimension, make sure to measure it and verify so that you don’t end up with a print that is too small like I did.
Open Silhouette Studio and using the Drawing Tools, draw a rectangle. Size the rectangle to the measurements taken using the Scale Tools and verify it again.
I designed 3 different backgrounds at the same time. Use the Silhouette Studio software to create the entire design, including sizing the flower shapes to fit within the shape you are working with.
Now comes the longest part of the entire project – selecting a background pattern and the quotes you want to use. This is what always takes me the longest in creating.
There are multiple ways to add a pattern to a shape. Check out the additional resources below for several options.
I selected the square and then clicked on the library tab in the top right. Then selected a pattern from under my Patterns Folder in the Silhouette library and just continued to do that until I found the ones I wanted. I have 1100 patterns in my Silhouette library, so it took me awhile to make a decision.
Repeat these steps to create as many backgrounds as you choose.
When ready to cut, it’s a great idea to use File > Save As and create a “cut file”, so you keep an original working file that could be referred back to if needed.
When ready, move the flowers away from the background design. Change the line color of the sentiment to transparent. You do not want the red cut line to print around the image and have to reprint. A line thickness greater than 0 on any line in Silhouette Studio will print out.
I am using Epson Presentation Paper – Matte with my Canon TS9521C printer on the photo matte high quality setting. Every printer can vary in what colors look like and the only way to know what the colors will be is to test with your printer. See additional resources below.
Next, cut the flower design (or whatever design you are using) from adhesive vinyl. Make sure that the adhesive vinyl you use is the same color on the backside as the front. This will be applied on the backside of the glass frame.
Weed the adhesive vinyl design and apply transfer tape to the entire design.
Clean the backside of the glass frame carefully and let dry.
Then, carefully apply the design to the backside of the glass frame.
Tip: (not shown) Use painter’s tape along the edges of the glass to make it safer to handle and prevent cuts from the glass edges.
After applying the adhesive vinyl, don’t worry about seeing the adhesive of the vinyl on the front side. As the vinyl sits on the glass and the adhesive sets up, the adhesive look will disappear. Just make sure to apply the adhesive vinyl smoothly and make sure all areas are adhered well to the glass.
Next, on the backside of the glass, start coloring in the design as desired with the Sharpie Creative Makers. These work great on glass!
Don’t worry too much about it looking a bit messy or coloring only in the lines, you won’t see the backside of the glass.
Let the paint dry. Add additional coats as needed for the desired look.
While it dries, grab a paper trimmer and trim down the printed backgrounds. I did not set this up for a print and cut as I would have lost space and not been able to fill my frames completely. Plus, it is 4 straight edge cuts per page. A good quality paper trimmer is a great tool to have in your craft supplies.
And then all that’s left to do is to add the background paper into the frame and secure it.
Grab some photos of your awesome project and think of new ideas that you can swap out the background with or keep it up all year long!
(I’ll add more photos as I create additional backgrounds to swap out.)
Save this for future reference by pinning the image below.
Enjoy !
THANK YOU for your support! How can you help? Click HERE & buy a coffee. Every little bit helps with the cost of running the site.
Silhouette Classes
Never stop learning! Let me help you take the anxiety out of learning with Silhouette and get to creating faster! My Silhouette classes are heavily focused on software, so you can take the skills & techniques taught and apply them to many future projects!
**This post may contain affiliate links. What that means is that I may receive compensation if you purchase through the links I have provided. The price you pay for the product or service is not higher but I may get compensated for sharing.
The wait is over – the Silhouette cloChé Heat Press has officially arrived in the U.S., and it’s making a stylish statement! Available in three gorgeous colors—Milky White, Chiffon Pink, and Ice Green.
Affiliate links may be present in the following blog post and as an Amazon Associate, I earn from qualifying purchases.
After the Silhouette Summit 2024, I published a detailed blog post sharing everything we learned about the Silhouette cloChé. If you are interested in seeing the specs, recommended usage, temperatures, duration of use, and more; please see the post Silhouette Summit 2024 – cloChé Heat Press HERE.
At this time, there is no release date or information for international areas. If you are outside the U.S., please contact your Silhouette retailer for more information.
Silhouette first announced a heat press with a prototype at the 2019 Silhouette Summit. It was big, clunky and only a prototype that was not functional. The new Silhouette cloChé heat press is a completely new design from what we saw originally. A sleek, modern look.
I will continue to share information on the new products released from Silhouette and watching to see who does add it to their craft rooms. I am still waiting on the new tools – Super Fine Power Engraver and the Leather Carving Knife to be available.
Save this for future reference by pinning the image below.
Enjoy !
THANK YOU for your support! How can you help? Click HERE & buy a coffee. Every little bit helps with the cost of running the site.
Silhouette Classes
Never stop learning! Let me help you take the anxiety out of learning with Silhouette and get to creating faster! My Silhouette classes are heavily focused on software, so you can take the skills & techniques taught and apply them to many future projects!
**This post may contain affiliate links. What that means is that I may receive compensation if you purchase through the links I have provided. The price you pay for the product or service is not higher but I may get compensated for sharing.
Looking for a creative way to use those gorgeous wood sign designs without needing a laser cutter? In this tutorial, I’m sharing how you can create a stunning door hanger using just cardstock and vinyl—no laser required! I’m using a design by Diva Watts Designs and showing step-by-step how to bring it to life with your Silhouette machine. Whether you’re a beginner or just looking for a new way to use your cutting machine, this is a great project that proves you can make high-impact decor with tools you already have.
Affiliate links may be present in the following blog post and as an Amazon Associate, I earn from qualifying purchases.
Quick Steps to Create Your Cardstock & Vinyl Door Hanger
Want the quick version? Here’s a fast rundown of how I created this layered door hanger using my Silhouette and a design by Diva Watts Designs:
DIY Door Hanger with Cardstock & Vinyl Project Details
First, I started by measuring my wood sign backer. Then, I grouped the Oh Hello design and scaled it up to 11.8″. Next, rather than paint, I printed a Wood White Texture Digital Pattern by Daniela Moscone onto a 12″ x 12″ sheet of cardstock and then cut the background out of the printed paper. I played around with many different color combinations and finally settled on basic black and white.
I added the digital pattern paper to the background to get a feel for how it would look before I printed the page.
If you are printing a large pattern or filling almost the entire sheet of material with a pattern design, skip the print and cut limits and print the entire page or as much as your printer will allow and then simply cut the design from the printed page. If I had used registration marks on this page, I may not have gotten the size circle I needed with my pattern.
I could then simply place the entire sheet on my cutting mat and cut the size circle I needed.
I cut the black piece from a sheet of black cardstock and the “OH, Hello” from white cardstock.
Now here is my next “secret”. I used the negative of the white cardstock as my placement template for the words on top of the black section. I used a couple pieces of washi tape to hold it in place so nothing moved.
Then I could easily add glue and every piece was placed lined up as the original design showed.
To adhere the background paper to the wood sign, I used Maker’s Magic glue and spread it all over the wood sign and on the backside of the printed cardstock. Then smoothed it down onto the wood backing. I’ve had this Maker’s Magic glue in my stash for a while. The first time I used it, I had a few issues, but I think it was me and just like many things, it takes practice. It worked great for this project, and I knew I wanted to not only protect the cardstock but also add it to the top of the entire sign before I applied the adhesive vinyl flowers so the transfer tape wouldn’t tear up my printed design. I did let the Maker’s Magic dry overnight before adding the adhesive vinyl flowers.
Next it was time to apply the adhesive vinyl flower design. I enlisted the help of my new magnetic glass craft mat & magnets helped to hold this sign in place to easily apply the adhesive vinyl in the exact location I needed.
Instead of using the magnets on top of the material, I placed them in 4 places around the edge of the wood sign and it held it securely in place.
I love how this DIY door hanger turned out with cardstock and vinyl!
Think outside the box! Even if a design is shown in a project photo a certain way, start brainstorming how else you can use it. What other materials could you use to create it? Cardstock and vinyl instead of wood cut pieces? This design is so much more than just a wood sign!
Save this for future reference by pinning the image below.
Enjoy !
THANK YOU for your support! How can you help? Click HERE & buy a coffee. Every little bit helps with the cost of running the site.
Silhouette Classes
Never stop learning! Let me help you take the anxiety out of learning with Silhouette and get to creating faster! My Silhouette classes are heavily focused on software, so you can take the skills & techniques taught and apply them to many future projects!
**This post may contain affiliate links. What that means is that I may receive compensation if you purchase through the links I have provided. The price you pay for the product or service is not higher but I may get compensated for sharing.
Ready to unlock the full potential of your Silhouette machine? Whether you’re a seasoned crafter or just starting out, stenciling is a fun and versatile technique that can transform almost any project. In this post, I’m sharing creative stencil ideas you can cut right now with your Silhouette—think custom doormats, etched glass, painted wood signs, fabric decor, layered art journaling, and more. You’ll also find must-know tips for designing stencils, multiple stencil materials that can be cut, and step-by-step tutorials below too! This blog post is packed with Silhouette information, tips, and tutorials—so make sure to bookmark it for future reference.
Affiliate links may be present in the following blog post and as an Amazon Associate, I earn from qualifying purchases.
Stencils can be created from many different materials. Cardstock, adhesive vinyl, plastic stencil materials, and more! I’m sharing some of those materials below with tips and tutorials to help you design and create in Silhouette Studio.
Project #1 – Custom Stencils with Silhouette Stencil Material
Create your own stencils with basic shapes and patterns in the Silhouette Studio software.
I created these 2 stencil patterns and cut them from the Silhouette non-adhesive stencil material using the Silhouette Autoblade.
Silhouette has both adhesive backed and non-adhesive backed stencil material as shown above. One might work better for your projects versus another. Since my plan was to use the stencil on a flat material like mixed media paper, I didn’t really need it to be sticky on the backside.
I also kept all the negative bits that were cut out from this stencil for a possible future project. They could be used as elements on a card, creating a pattern on a card, as a stencil by itself, and more!
Then I pressed a piece of bubble wrap into the stencil butter to give it even more texture.
Make sure to let the stencil butter dry completely before touching it. I sometimes get impatient, so having a heat gun can be handy to help speed up the process too.
I use adhesive vinyl for many different projects as a stencil such as glass etching, painting, or in this project below – I was trying it with a Scorch marker for wood burning.
When creating a stencil with adhesive vinyl, weed out the design and that creates the stencil. In the photo below, I have weeded the flower design out of the black adhesive vinyl. I use basic shapes such as a rectangle around the design to create the outer edge of the stencil. The actual project I’m creating will determine the size of the shape I place around my design for the stencil outer edge. For projects such as painting or glass etching, I will give myself plenty of space around the design. For something smaller, as shown below, I don’t need as much extra space since it will be close to the edge of the blank being used.
Now, in this case, my project failed, but I’m still sharing it with you because it happens! Projects don’t turn out, projects fail and what you see on social media is not always reality.
These wood earring blanks were a bit too porous, and the Scorch marker liquid just bled too much. It looks more like those therapy cards – What shape do you see?
And that’s just how it goes sometimes. Some projects fail!
Here is another example of adhesive vinyl cut for stencils that I was using for glass etching.
And this one turned out fabulous!
Additional Resources for the tools I used to create the design:
Project #3 – Layered Stencil with Plastic Stencil Material
We see a lot of questions by users on cutting stencil materials. Typically, it is in reference to plastic materials that a user is trying to cut. While Silhouette machines can cut a lot of different materials, there are limits and it is not just about thickness, but also density and composition.
Another thing to keep in mind is that stencil material is plastic and plastic will dull the blade quicker than other materials. It is perfectly normal to have to increase the blade settings or passes the more that is cut. And if you are cutting this material a lot, you may go through more blades than other thinner, easier to cut materials.
I cut this 6 mil stencil material using the preset for Stencil Material in the Silhouette Studio software. All I changed was to increase the passes to 2 and then when that started having a few hang ups, I increased it to 3 passes.
The settings that work for you will depend on the blade sharpness, material, and your machine. There is no perfect setting that works for all users magically.
I do recommend cutting one stencil design at a time. This way you can catch any issues before you’ve wasted time and materials.
Do not unload the cutting mat before you check the cut and if it did not cut through you can send it again.
I was using the same Autoblade that I used with the Silhouette Stencil material mentioned above and it’s still going strong with the settings pictured above on the 6 mil stencil material.
The hardest part for me was that I had to stop the design and creation process and move on to other things. Once you get started cutting, it is easy to get wrapped up in the projects. Here are a couple more I cut before I moved on to the next phase – using the stencils.
And there is more!!! A follower asked for more design tutorials after seeing the video above. So I also shared how to quickly design a flower and a heart in Silhouette too!
Click the images above or the links below to watch these quick tutorials:
When working with stencils whether it is a design or a font, the pieces have to all remain in the stencil somehow. If a piece is completely cut out, it will fall out of the stencil.
For instance, for letters A, B, D, O, P, Q, and R, they all have “counters”, which are the centers of the design that would fall out when cut. In order to cut as a stencil and remain in place, the letter needs a “bridge” so it can be held in place when cut.
I typed in “stencil font” to the Silhouette Design Store search and many options come up. All kinds of styles and the perfect one will vary based on your project and taste.
You can see my taste varies and some of these will cut better at larger sizes than smaller. Each project may vary and you never really know until you test it.
The fastest way to create a stencil font is to use a premade font file, but you can also create your own from a font. This works best with a bold font where you can make “bridges” to help hold the centers (counters) of the letters in place.
I used a font style called Grossura to create the stencil quote shown above.
There is so many different projects you can create with stencils! And you can apply the same techniques and design steps to other projects as well. I hope you’ve picked up a few new ideas and techniques!
Looking for more creative ideas and inspiration? Check out the Crafting Creativity blog posts for a treasure trove of fun and unique projects! Each month, I share a fresh collection of craft ideas designed to spark your imagination and help you expand your skills with confidence. Don’t miss out—your next favorite project could be just a click away!
Save this for future reference by pinning the image below.
Enjoy !
THANK YOU for your support! How can you help? Click HERE & buy a coffee. Every little bit helps with the cost of running the site.
Silhouette Classes
Never stop learning! Let me help you take the anxiety out of learning with Silhouette and get to creating faster! My Silhouette classes are heavily focused on software, so you can take the skills & techniques taught and apply them to many future projects!
**This post may contain affiliate links. What that means is that I may receive compensation if you purchase through the links I have provided. The price you pay for the product or service is not higher but I may get compensated for sharing.
Want to start playing with sublimation but don’t have all the fancy tools? This easy sublimation charm tutorial using Artesprix markers is perfect for beginners! With just three Artesprix sublimation markers, a charm blank, and a few other supplies, you can create bold, personalized designs in minutes. Whether you’re making custom keychains, jewelry, or backpack tags, this simple project is a budget-friendly way to explore sublimation with minimal supplies and maximum creativity.
Affiliate links may be present in the following blog post and as an Amazon Associate I earn from qualifying purchases.
Hand drawn design on Artesprix Sublimation Charms
So here was the challenge – a sublimation project for less than $20. This is a great way to test the waters and get started. But, I will warn you, once you get started, it’s hard to stop and the ideas just start flowing.
Artesprix now sells individual sublimation markers, which means you don’t have to buy the entire set and you can mix and match the fine tip and chisel tips markers. Will you want the full set? YES! But, you can also get started with just a few, if you can decide on the colors.
For me, the black sublimation marker is a staple, so that is a must have. I chose yellow and blue for my other 2 colors, then I could make green as well, which I share how easy that is in the video tutorial below.
I mentioned above that once you start playing it can be hard to stop. My first charms were all free hand and I noticed my hand was not as steady as I would like. This is what happens when you are on camera and standing up to record. It was a bit better when I sat down and let things dry a bit better, but once I did that, new ideas just kept coming.
Did you know you can also use the markers in your cutting machine with the pen holders?
The Artesprix Sublimation Charms are small at 0.75″. Using the Silhouette Studio software, I drew out a circle that was 0.75″ and turned the cut line off on the Send tab for my circle template. Then I started filling the circles with designs and sizing them down to fit.
I knew that not all these designs would turn out. I made duplicates of the designs, just in case one worked better than the other and I would have a choice. Since it’s just a bit of ink and copy paper, if it doesn’t turn out, no big deal! This is a great way to test designs and see what will happen.
When sketching with a cutting machine, just like when writing by hand, the tip of the pen makes a difference in the thickness of the line. Felt tip pens will spread out more than a ball point pen tip. That can affect whether the lines bleed together or not.
I chose the designs that I wanted to use and then using only the 3 markers just like in the video below, I added color to the designs with a few different methods. I used the markers to color in some areas, then with a paint brush and a bit of water you can get a watercolor effect for a background, or combine ink and water on a slick surface and smoosh the paper onto top to get a splatter or color blotch effect.
Love them! And I satisfied that little voice in my head that said… “Hey, wait, you aren’t done – what about this idea?”
Use the tools in your craft space and see what you can create! Check out the supply list and video tutorial below.
Supplies for Custom Charms with Sublimation Markers:
THANK YOU for your support! How can you help? Click HERE & buy a coffee. Every little bit helps with the cost of running the site.
Silhouette Classes
Never stop learning! Let me help you take the anxiety out of learning with Silhouette and get to creating faster! My Silhouette classes are heavily focused on software, so you can take the skills & techniques taught and apply them to many future projects!
**This post may contain affiliate links. What that means is that I may receive compensation if you purchase through the links I have provided. The price you pay for the product or service is not higher but I may get compensated for sharing.
I have been creating with the Craft Pro Mug & Tumbler Press from Heat Press Nation, and I wanted to share how easy it was to use. In this post, I’m walking you through my process from start to finish, including how I set up the sublimation designs in Silhouette Studio, how simple the pressing process was, and the finished mugs and tumblers I created. I’ve also included an unboxing video at the end so you can see exactly what comes with the press and why I think it’s a great tool for beginners or anyone looking to simplify their sublimation workflow.
Affiliate links may be present in the following blog post and as an Amazon Associate, I earn from qualifying purchases.
I purchased the Craft Pro Mug & Tumbler Press last year during the Black Friday sales and I have to admit that I didn’t unbox it right away. It sat there… whispering my name every time I walked by. By mid-January, I finally gave in, unboxed it, and set it up—and I have no idea why I waited so long! It was super easy to get started and even easier to use. Total win!
These tumblers and coffee mugs could not be any easier. Literally, print and press the design and you have colorful, beautiful projects! I will say that equipment does make a difference. I also will admit that not all projects turn out 100% of the time, but there is usually a reason for that. In my case, it’s usually due to user error of some sort. I get in a hurry or grabbed the wrong blank that’s not in fact a sublimation blank, etc.
For these projects, I am using a Windows 11 computer and printing through Silhouette software to my Epson F170 with the full printer driver’s installed direct from the Epson website. I am not changing or adjusting anything. I then press the sublimation blanks according to the manufacturer’s instructions. All sublimation blanks can vary in time and temperature.
Creating Sublimation Tumblers
The first step for a successful full tumbler wrap is to measure your sublimation tumbler. They are not all created the same size. Even if you order several at once, it’s always a good idea to grab a tape measure and just check the size really quickly.
Next, open Silhouette Studio and draw a rectangle. Scale the rectangle to the size of the tumbler measurements and center it to the page.
I used a design called Sarcastic Birds Funny Tumbler Wrap. This particular design was created for a 20 oz tumbler and since I’m doing the full wrap, I simply dragged it from the saved location on my computer and held it over top of the rectangle in Silhouette Studio and it filled the entire rectangle.
I would recommend always checking the “Show Print Border” on the Page Setup Panel in Silhouette Studio. This will turn on a gray border around the page that shows you the maximum print border for the current printer and page size set by your computer/printer. This is also the first place where you can spot an issue, such as the wrong printer selected, etc. I switch between my Canon TS9521C and my Epson F170 printer all the time and the print borders are different for each printer.
Next, save your file. This is always a good habit to get into, especially when working with heavy graphic files. I recommend saving your files every so often to preserve your work.
Before you print, you want to make sure the correct printer is selected. Click on File > Print > Select Print on the Preview > Verify Printer selected.
In this photo above, my regular printer is selected. That means the print border shown above will be what is set by the Canon TS9521C printer settings, not the Epson F170 sublimation printer.
If you have to switch printers or change page size, make the changes, click Apply and then cancel out of the windows back to the Design tab in the Silhouette Studio software. This will reset the print borders and settings to the correct printer.
Then proceed with printing by clicking File > Print > Print – verify the information is correct and send to your printer.
Sublimation prints will print mirrored. If you are using a true sublimation printer, the default should be set to mirror it automatically. If you are using a converted printer for sublimation, then you may have to mirror the design yourself before printing.
After printing, make sure to let the ink dry completely before handling.
Applying Sublimation Transfer to Sublimation Tumblers
It’s always a good idea to test the pressure on the Craft Pro Mug & Tumbler Heat Press before you get it heated up. This will guarantee that your press is tight enough around the sublimation blank and it won’t heat up the blank in the process. If you add a sublimation print to a warm/hot surface, it has a chance of starting the ink transfer process.
Adjust the pressure on the press as needed and then turn the heat press on and set the time and temperature according the manufacturer’s instructions instructions for the sublimation blank.
While the press is heating, trim the sublimation prints down using a paper trimmer or straight edge.
Clean the tumbler with an alcohol swab and a lint roller. This will remove any dust or debris on the tumbler. Dust and debris particles will absorb the ink and leave blue spots on the sublimation blank that are permanent.
Once the tumbler is dry after cleaning, wrap the sublimation print around the tumbler tight and tape securely. Make sure to place the print the right side up so you don’t press the design upside down on the tumbler.
I have tried many different ways to tape tumblers and I have to say this is one of those things that you have to practice with and you will get better and find what method works for you, your designs, and your tumblers.
For these, I wrapped the sublimation print tight, matching up the paper edges and spinning it to tighten the paper around the tumbler. Then I taped completely around the tumbler in the middle, at the top, and at the bottom. You do not want any crinkles, wrinkles, bubbles, or uneven areas when wrapped. Any air that can get in between the paper and the tumbler when pressing can cause “ghosting”, which is blurred images and not a clean transfer.
Once the Craft Pro Mug & Tumbler Heat Press is up to temperature, I wrapped a sheet of parchment paper around the tumbler and slide it into the press. Then closed the press and pressed for the recommended time. Since it is a full wrap and the tumbler press does not completely surround the tumbler, it is rotated and pressed again so the entire surface is heat pressed.
Sublimation is science. It is the process of turning the sublimation ink printed on the paper into a gas with the high heat and pressure. This gas transfers to the sublimation blank and binds to the polyester coating. Any empty space, debris, air, etc. between the print and the blank can interfere with the transfer process.
The more you do it, the better you will get. And you might as well get a box out and label it “DUDS”, because you will have them! It’s all part of the process.
Sublimation blanks are typically white and the images will show up the best on white sublimation blanks because sublimation ink is transparent. The tumbler on the left side is a Holographic Glitter Sublimation Tumbler and you can see how the colors are a bit different than the other 3 white sublimation tumblers.
I love how they all turned out! The hardest part is getting good photos of a round object. Since it is a tumbler wrap, you cannot see the entire image in a photo. Make sure to check out the unboxing video below for some full 360° views of the finished tumblers.
Since I do not sell products, I don’t print as often as some who do daily sublimation projects. I was going several weeks without printing and was having a few issues. Sublimation ink is a different composition than regular inks, however, even with a regular inkjet printer, if it goes unused for some time, it can have issues and need maintenance.
After doing some maintenance to get my Epson F170 printing well again, I decided to try to make weekly prints, whether I have a project ready to press or not. A page printed weekly is less cost in maintenance than having to do multiple maintenance cycles.
Here is a look at one of the weekly test sheets I printed out a few weeks back.
I had no real plan for the projects, just opened up my Creative Fabrica folder in my saved designs and started looking for designs that I might like to add to a future projects, such as a coffee mug. On the left side in the photo above, you can see the template shapes I drew out to size some of them. While I didn’t have a specific plan, I was thinking 3″ coasters, 11 oz., and 15 oz. coffee mugs might be a possibility.
Sublimation prints can be printed and sit for some time as long as they are in a temperature controlled environment and not subjected to moisture that would affect the paper or ink.
I love my new Sunset Turtle Coffee Mug! So bright and colorful!
And the whole reason I swapped out the tumbler attachment for the mug attachment was to press a design I created for an upcoming event. The swap between attachments was so easy! 8 screws out, switch the tumbler attachment for the mug attachment, and 8 screws in. Don’t forget to plug the new attachment into the power box on the Craft Pro Mug & Tumbler Press or it won’t heat up. Seriously, these things happen to us all!
Here is a look at the entire reason for kicking my butt into gear to get this blog post and unboxing video done. Check out the Upcoming Events page HERE or sign up to be notified by email when a new event opens for registration HERE.
Since these designs are not full wraps, they do not need taped completely around the surface. I cleaned the sublimation coffee mugs, let them dry, then placed the sublimation print where I wanted it and secured the design with heat tape around the edges. You do want to get it tight against the mug so no air gets between the paper and mug.
Coffee mugs can be tricky near the handles. Again this just takes practice and depends on the blank itself. Make sure to secure the print as best you can for the best results.
And HAVE FUN creating!
A few of these tumblers have already found their way to friends and family as gifts and I have a couple tumblers and mugs for myself too!
Save this for future reference by pinning the image below.
Enjoy !
THANK YOU for your support! How can you help? Click HERE & buy a coffee. Every little bit helps with the cost of running the site.
Silhouette Classes
Never stop learning! Let me help you take the anxiety out of learning with Silhouette and get to creating faster! My Silhouette classes are heavily focused on software, so you can take the skills & techniques taught and apply them to many future projects!
**This post may contain affiliate links. What that means is that I may receive compensation if you purchase through the links I have provided. The price you pay for the product or service is not higher but I may get compensated for sharing.
Ready to take your Silhouette skills to the next level? In this step-by-step video tutorial, you’ll learn exactly how to create custom sketch designs in Silhouette Studio—perfect for sketch pens, foiling, sublimation markers, and more! Whether you’re personalizing cards, creating decorative outlines, or adding hand-drawn touches to your projects, this tutorial will show you how to design from scratch and prepare your file for sketching.
Affiliate links may be present in the following blog post and as an Amazon Associate, I earn from qualifying purchases.
This year I took a watercolor class from artist Tracey Weinzapfel and I’ve been creating all kinds of projects with the ideas from class. When I started designing a class for the Sublimation & Beyond Camp 2025, I wanted to see if I could recreate my designs in the Silhouette Software.
I had so much fun in the design process of these custom sketch designs and just kept on creating flower designs just to see if they would turn out.
I used the sketch designs to create sublimation coasters using the Artesprix sublimation markers. Since the class would be viewed by a variety of cutting machine owners, I designed in Silhouette Studio and then saved the file as a SVG.
Here is the supply list for the sublimation coasters in case you want to create too!
Head over to the Silhouette Secrets+ YouTube channel and follow along as we unlock the creative power of sketching with your Silhouette machine! Can you spot my mistake I made in the video?
What custom sketch designs will you create? Let us know in the comments below.
Save this for future reference by pinning the image below.
Enjoy !
THANK YOU for your support! How can you help? Click HERE & buy a coffee. Every little bit helps with the cost of running the site.
Silhouette Classes
Never stop learning! Let me help you take the anxiety out of learning with Silhouette and get to creating faster! My Silhouette classes are heavily focused on software, so you can take the skills & techniques taught and apply them to many future projects!
**This post may contain affiliate links. What that means is that I may receive compensation if you purchase through the links I have provided. The price you pay for the product or service is not higher but I may get compensated for sharing.
Did you miss this video tutorial? Don’t worry — I’ve got you covered! In this step-by-step tutorial from the Silhouette Secrets+ YouTube channel, I walk you through exactly how to create a layered stencil design in Silhouette Studio. Whether you’re a beginner or just looking to level up your stencil projects, this video will show you how to break a design into layers, align them perfectly, and prep each one for cutting. Layered stencils are perfect for multi-color painting, mixed media, and more — and with these tips, you’ll be designing your own in no time! Watch the full video and start crafting with confidence.
Affiliate links may be present in the following blog post and as an Amazon Associate, I earn from qualifying purchases.
What would you use stencils for? Let us know in the comments below.
Save this for future reference by pinning the image below.
Enjoy !
THANK YOU for your support! How can you help? Click HERE & buy a coffee. Every little bit helps with the cost of running the site.
Silhouette Classes
Never stop learning! Let me help you take the anxiety out of learning with Silhouette and get to creating faster! My Silhouette classes are heavily focused on software, so you can take the skills & techniques taught and apply them to many future projects!
**This post may contain affiliate links. What that means is that I may receive compensation if you purchase through the links I have provided. The price you pay for the product or service is not higher but I may get compensated for sharing.
If you’re anything like me, finding the right tools for your creative space can make all the difference—and I just added a new one to my studio: the Magnetic Glass Craft Mat. I am loving it! From its sleek, sturdy surface to the strong magnets that keep materials perfectly in place, this mat has quickly become one of my absolute favorite tools. Whether you’re a paper crafter, vinyl user, or mixed media enthusiast, this is one studio upgrade you may find useful too!
Affiliate links may be present in the following blog post and as an Amazon Associate, I earn from qualifying purchases.
I have seen these craft mats advertised previously, but I got an in-person look at them at the 2025 Creativation in Seatle. I’ll be honest, I am usually anti-glass in my studio because you just never know what I will stumble across or drop. But I took a chance, and I bought this, and I love it!
This post is not sponsored by Glassboard Crafts or an advertisement for them. I am sharing a new tool I invested in and added to my craft space. I am asked often about tools I use and after requests by followers created a page on the website for “EllyMae’s Craft Supplies” – Find it at the top of the Silhouette Secrets+ website or click HERE.
In full disclosure, I am now an affiliate with Glassboard Crafts, and I do have a coupon code that can save you 15% on your order. Bonus for you if you decide to add this to your tools.
Use code SILHOUETTESECRETS to save 15% on your order HERE.
I knew I wanted a solid color because I record videos and a design can be distracting in the videos and white makes my camera go crazy trying to auto focus, so I chose a solid that I thought would be good. But I am drooling over all the patterns, and they just keep coming out with more.
One thing I didn’t think about until I tried to take photos to share is the reflection. Reflections always get the better of me. The surface reflects very, very well as you can see with my recording lights.
But I’ll work around that and adapt.
How I’ve Used My Magnetic Glass Craft Mat
Does everyone need this? Probably not, but I am loving it for 2 reasons – the heavy-duty magnets and the ease of cleaning up.
Lately I seem to be creating with more products that can be messy such as mixed media gel sticks, paints, paint markers, watercolors, and more. I am expanding my wheelhouse and loving the experimentation. But that can be messy too! At least for me.
Here are a few ways I’ve used it so far in the month since I received it.
This was for a video tutorial on creating a layered stencil in Silhouette (find that HERE). The magnets worked to hold the mixed media paper in place while working with the stencils. It could also be used to hold the stencils in place too; it would just depend on the thickness of your stencils and what magnets you have available to use. I ordered a 6″ magnetic ruler and have 4 of the mini pawn magnets.
I also used it as a palette to test some different techniques. I just scribbled the mixed media gel sticks on the glass surface, added a bit of water, and then used a paint brush to pick up the color. When my images didn’t turn out quite how I wanted, I simply used a paper towel to wipe up the water & remaining color.
I was using a combination of Posca Paint Markers and acrylic paint on this sign. The smaller pieces were easily colored with the markers, while larger pieces were a bit messier and needed more coverage.
I used the glass mat as my paint palette and to catch my mess when painting the larger pieces.
I love how this sign turned out. The tiki is a bit dark in the photos but shows up better in person.
And one project leads to another. While the sign was drying, I was already on to cutting the pieces of a larger tiki on the left side. No paint needed with this one, just two types of wood. And he quickly disappeared after being glued together as my husband claimed it for his office at work.
Next up was more paint markers – this time Sharpie Creative Markers on glass. This is the messy side of things. I applied adhesive vinyl to the backside of a glass frame, then colored in sections of the design with the Sharpie Creative Markers.
I could have used the magnets to hold the glass in place, which is completely an after thought. Instead, I was using the magnets to hold the rest of my markers from escaping, which you can’t see in this photo.
And while I had the Sharpie Creative Markers out, I really stepped outside my comfort zone and did a little doodling on a hat. Before I used each marker on the hat, I would scribble to make sure it was flowing well on the glass mat. A wet paper towel will make this easy clean up.
I took a watercolor class from Tracy Weinzafel earlier this year and ever since have been experimenting with different mediums and drawing the flowers taught at the event over and over for multiple projects.
I love new tools and craft supplies! Check out other supplies I use to create with HERE.
Watch for new patterns released and I’d love to hear your favorite below, even if you are just window shopping and dreaming. That’s how it all started for me!
Save this for future reference by pinning the image below.
Enjoy !
THANK YOU for your support! How can you help? Click HERE & buy a coffee. Every little bit helps with the cost of running the site.
Silhouette Classes
Never stop learning! Let me help you take the anxiety out of learning with Silhouette and get to creating faster! My Silhouette classes are heavily focused on software, so you can take the skills & techniques taught and apply them to many future projects!
**This post may contain affiliate links. What that means is that I may receive compensation if you purchase through the links I have provided. The price you pay for the product or service is not higher but I may get compensated for sharing.
What if I told you the secret to creating truly meaningful holiday cards isn’t in the hustle and bustle of December—but in the calm, creative space of summer? That’s exactly what the Card Maker Success Summit – Holiday Edition is all about—and I’m thrilled to be part of it again!
Affiliate links may be present in the following blog post and as an Amazon Associate, I earn from qualifying purchases.
🗓️ Mark your calendar: July 31–August 3, 2025 📬 And yes—it’s completely FREE to attend!
I’ll be teaching a fun fold card class during the summit, and you won’t want to miss it.
Here is a look at my class called – Flying Into the Holidays: Seagull Fun Fold Card Class. This card style can be customized in many different ways and can double as home decor too!
Whether you’re new to card making or have a craft room full of paper and stamps, this summit is designed to inspire, support, and spark your creativity.
Why Attend the Holiday Edition of the Card Maker Success Summit?
This special 4-day online event is packed with presentations from card makers and instructors who get how important handmade cards are—especially during the holiday season. It’s perfect for crafters who want to:
✅ Create holiday cards that come from the heart ✅ Learn techniques that make card making feel joyful, not stressful ✅ Build confidence in trying something new (like my fun fold project!) ✅ Connect with a warm, welcoming community of creative friends
Here’s what one past attendee, Laurie M., had to say:
“I’ve been stamping for over 30 years. I learned new techniques in almost all of the classes. I have never attended a card summit before, but I’m totally enjoying these videos!”
That’s the magic of this summit—it’s not just about techniques, it’s about connection. Every holiday card you create becomes more meaningful when made with intention, creativity, and support from a community that shares your passion.
Your free ticket gives you access to all the presentations during the summit window, including my fun fold card class designed to add that special touch to your holiday greetings.
Here’s a sneak peek that I shared at the end of my class of an alternative way to decorate this Seagull fun fold card that I created using the FQB Nutcracker Navy kit by Nitwit Collections using print and cut.
This card style can be used with many different papers, patterns, and even digital kits too! Make it your own unique creation that will wow!
Let’s make this your most inspired and stress-free holiday season yet—starting now!
Enjoy !
THANK YOU for your support! How can you help? Click HERE & buy a coffee. Every little bit helps with the cost of running the site.
Silhouette Classes
Never stop learning! Let me help you take the anxiety out of learning with Silhouette and get to creating faster! My Silhouette classes are heavily focused on software, so you can take the skills & techniques taught and apply them to many future projects!
**This post may contain affiliate links. What that means is that I may receive compensation if you purchase through the links I have provided. The price you pay for the product or service is not higher but I may get compensated for sharing.
Are you curious about sublimation, DTF, white toner, and more creative ways to bring your designs to life? You’re in for a treat! 🎨
Affiliate links may be present in the following blog post and as an Amazon Associate, I earn from qualifying purchases.
Sublimation + Beyond Camp 2025 is back—and it’s bigger than ever! This incredible 3-day virtual event is completely FREE and packed with classes for every level of crafter. Whether you’re just getting started or looking to expand your skills, there’s something here for everyone.
🗓️ Event Dates: July 17–19, 2025 💻 Where: Online – join from anywhere (yes, even in your PJs!) 🎟️ Tickets: Free for a limited time! CLICK HERE to register
And I’m so excited to share that I’ll be teaching, too!
🎉 My Class: Draw It. Press It. Love It! Sublimation with Any Cutting Machine
In this class, I’ll show you how to take a simple design, sketch it with pens in your cutting machine, and press it onto your sublimation blanks for a custom creation you’ll love.
One of the best parts? You don’t need a specific machine. This project works with any cutting machine that can use pens to sketch—whether you’re using a Silhouette, Cricut, Siser Juliet, Brother ScanNCut, or another model. If your machine can draw with a pen, you’re good to go!
I even created the design in Silhouette Studio and saved it as an SVG, so you can easily bring it into your preferred software. You’ll get the SVG file included as part of the class!
What You’ll Get with Your Free Ticket:
16 foundational classes to help you build confidence
25 beginner and intermediate classes for sublimation, DTF, white toner, and more
Access to 40+ sessions from 17 content creators + 6 amazing brands
Free 24-hour viewing access to each day’s classes
A chance to win over $4,000 in giveaways!
Want to learn at your own pace? The All Access Pass gives you one full year of access to all sessions, plus $240+ in exclusive bonuses like cheat sheets, digital files, and templates. Once you register for the FREE ticket, you’ll see the All Access Pass offer pop up.
If you’re ready to get inspired, explore new techniques, and have fun creating something awesome, join me at Sublimation + Beyond Camp 2025!
Check out the supplies I used for this class HERE.
Want to learn more about sublimation without a printer right now? Click HERE
Enjoy !
THANK YOU for your support! How can you help? Click HERE & buy a coffee. Every little bit helps with the cost of running the site.
Silhouette Classes
Never stop learning! Let me help you take the anxiety out of learning with Silhouette and get to creating faster! My Silhouette classes are heavily focused on software, so you can take the skills & techniques taught and apply them to many future projects!
**This post may contain affiliate links. What that means is that I may receive compensation if you purchase through the links I have provided. The price you pay for the product or service is not higher but I may get compensated for sharing.
Looking for a fun and easy sublimation project you can make at home? These custom magnets made with Artesprix Sublimation Ink Pads are the perfect DIY craft! Using your favorite stamp set, you can create unique designs, add color to the design, or play with ink backgrounds for a bold look. Whether you’re making personalized gifts or adding a pop of personality to your fridge or workspace, this project is a great way to explore sublimation with vibrant, professional-quality results. I’ll share how you can make your own custom sublimation magnets today!
Affiliate links may be present in the following blog post and as an Amazon Associate I earn from qualifying purchases.
Artesprix Sublimation products make it so easy to create many different projects. In the current line up of products Artesprix has sublimation markers, paints, ink pads, and ink refills. The possibilities are endless in what can be created with them and the only thing you have to do is GET STARTED!
You don’t even need a plan. Just start creating and see what happens. One of the great things about the Artesprix Sublimation products is that they only need copy paper to work. Yes! Copy paper! So if you decide you are not “feeling” what you’ve created, set it aside and try again.
I have been itching to use some new Arden Creative Studio stamp sets that I had ordered. These are designed by Katie Pertiet, who I recently met again at Creativation 2025 in Seattle. I love seeing the designer work with their products and I do wish I’d recorded more of that. On my list for next year!
Supplies for Custom Magnets with Sublimation Inks:
THANK YOU for your support! How can you help? Click HERE & buy a coffee. Every little bit helps with the cost of running the site.
Silhouette Classes
Never stop learning! Let me help you take the anxiety out of learning with Silhouette and get to creating faster! My Silhouette classes are heavily focused on software, so you can take the skills & techniques taught and apply them to many future projects!
**This post may contain affiliate links. What that means is that I may receive compensation if you purchase through the links I have provided. The price you pay for the product or service is not higher but I may get compensated for sharing.
Looking for a fast and easy way to jump into designing with Silhouette Studio? In this quick tutorial, I’ll show you how to create a custom design in under 1 minute! Whether you are brand new to Silhouette or just short on time, this step-by-step guide is perfect for beginners and seasoned crafters alike. From shape tools to compound paths, you’ll learn how to make a project-ready design in no time—ideal for faux leather, fabric, vinyl, HTV, paper crafts, and more. Let’s get designing in 60 seconds or less!
Quick Design in Silhouette Studio
Open Silhouette Studio and grab the teardrop shape from the Flexishapes menu on the left side of Silhouette Studio.
Left click on the design mat and drag down to create the teardrop shape to create approximately a 2″ tall shape. It does not have to be perfect. Then right click and choose Convert to Path.
With the tear drop selected, in the top QAT (Quick Access Toolbar), highlight the numbers in the H box and change it to 2″. Press Enter.
Double click on the tear drop shape to activate the Edit Points. Click on the edit point at the top of the tear drop and 2 blue nodes will appear.
Grab the blue node on the left and drag it out so it is even with the red cut line on the left side.
Grab the blue node on the right side and move it to the right so it’s even with the red cut line.
Ta-da! Ok. It probably took longer than a minute to read the steps and follow them, but you can do this again and could design this shape in less than a minute. But you don’t have to! It’s not a speed test.
If you want to create the hole for the top of the earrings. Grab the Draw Ellipse tool on the left side, hold the Shift key down to draw a perfect circle. Let the mouse button go before you let the Shift key up and you will have a perfect circle. Decide what size you would like and adjust as needed. Place the circle at the top, select both the circle and the tear drop and Align Center.
With both the circle and the tear drop selected, right click and choose Make Compound Path. Fill the design with color and you will see the hole is “punched out” of the tear drop shape.
Save this for future reference by pinning the image below.
Enjoy !
THANK YOU for your support! How can you help? Click HERE & buy a coffee. Every little bit helps with the cost of running the site.
Silhouette Classes
Never stop learning! Let me help you take the anxiety out of learning with Silhouette and get to creating faster! My Silhouette classes are heavily focused on software, so you can take the skills & techniques taught and apply them to many future projects!
**This post may contain affiliate links. What that means is that I may receive compensation if you purchase through the links I have provided. The price you pay for the product or service is not higher but I may get compensated for sharing.
Have you ever looked at a flat cut file design and wondered if it could become something more—like a soft, squishy 3D felt stuffy? With the Silhouette Cameo and Rotary Blade, you can easily cut felt and bring your designs to life in a whole new way! I’m sharing tips in this blog post for cutting felt and how I turned a 2D digital file into a custom 3D plush using felt, a Silhouette machine, and a little creativity. Whether you’re crafting gifts, keepsakes, or fun decor, this is a must-try technique for any felt lover or Silhouette enthusiast!
Affiliate links may be present in the following blog post and as an Amazon Associate, I earn from qualifying purchases.
These designs are by Sarah Hurley and the entire project is inspired by her cat Bosh. I have followed him since his adoption and my daughter has recently been following along too. So I asked if she wanted a Bosh stuffy, even though I already knew the answer. Anyone else have projects that jump in front of the line? Fun projects seem to do that!
I brought the design into Silhouette and scaled it up for the size I wanted to create with. When working with the Silhouette Rotary blade, size does matter! Well, let’s face it – size matters for a lot of things.
I opened both designs on the same design mat and then determined the size I wanted to make it based on my machines cut width capabilities and the felt sheet size. I used a 12″ x 24″ Silhouette cutting mat so I could make it as large as I could. For this project, I selected both designs and scaled them up at the same time, so they would be similar in size and I could make a double sided Bosh for myself.
On the Send tab, select the design and choose No Cut under Tool 1 and then click on Tool 2 and choose Cut. I used the Fabric, Wool setting to cut with.
See those little blue lines that appear around the design? Those are called hooks and loops and it is how the Silhouette Rotary blade works. It has to have some way to turn the blade to get going in the next direction. It does this by either cutting a loop to turn or lifting up and making a hook to turn the blade and start a new direction.
The hooks and loops will change depending on the design and where you have things placed on the cutting mat. You can watch this in action by following the steps above to turn the Rotary action on and then moving the design around on the Send screen. The hooks and loops change based on the design, placement of the design, and what exactly is on the design mat.
I did cut the pink and black felt for the cat face, but I ended up going a different direction after cutting the felt bits. Some of them were just too small for the felt and it just pulled apart. This was a combination of the design and the actual felt itself. Even though these were the same exact brands of felt purchased from Michaels, the larger sheets were thicker than the smaller sheets. So the pink and black were different than the gray felt sheets. That makes a difference in the success of the project. Not all felt is created equal and there are different compositions.
Here is a look at what the Send tab looked like for the Pink felt pieces.
This shows the loops that the Silhouette Rotary blade uses to turn and it just depends on the design. The Silhouette software determines what is the best method for the Rotary Action. This is based on the shape of the design, placement on the design mat, and proximity to other designs on the design mat.
The pink felt designs were successful.
And then I cut the black felt for the facial features and that just didn’t work as well as there were some pretty small bits for the whiskers, eyes, and grumpy face.
Look at those hooks and loops!
It did cut, but some of the pieces were so thin that they just easily pulled apart. So I switched directions and cut black and pink Siser Easyweed HTV and used my heat press to apply it before I stitched it together.
Now, I’ll admit that I didn’t think it would work just based on my previous experience, the material, and how this specialty blade works. In the end HTV was less work for this project. You could always hand embroider the facial features on too.
I grabbed some embroidery floss and used a basic blanket stitch to stitch the sides together. I had 2 of these to stitch together, so I kicked up my feet and turned on a tv show and started stitching away.
And don’t forget to add Poly-Fil before surgically closing the stuffy up.
My daughter chose to have a single sided Bosh stuffy and I made myself a double sided Bosh stuffy. Would you choose Happy Bosh or Grumpy Bosh? Or both depending on the day?
Tips for Cutting Felt or Fabric with Silhouette
Use transfer tape on the Silhouette cutting mat to protect the mat from fibers.
Change the transfer tape after the cut because it does cut through and shifting after can cause cut issues.
Use a sharp pair of scissors to snip any fibers and bits from fabric that didn’t cut through completely.
The design matters! Small designs or interior cuts may not work well.
Hooks and Loops matter! It’s how the blade turns and changes direction.
Complex designs can crash the software if it’s too much for the rotary action. If this happens, try having less on the design mat and cutting pieces one at a time.
Here are a couple more felt projects that I’ve cut with the Silhouette Rotary blade in the past.
This Red Panda was cut with the Silhouette Cameo 4 Pro using the Rotary blade and a Strong Tack Cutting Mat. Here is a look at all the pieces before I assembled him.
And I think this might have been my first felt stuffy I created using the Rotary Blade. I know I shared photos on Facebook when I made these, but I don’t think they ever made it to the blog.
Save this for future reference by pinning the image below.
Enjoy !
THANK YOU for your support! How can you help? Click HERE & buy a coffee. Every little bit helps with the cost of running the site.
Silhouette Classes
Never stop learning! Let me help you take the anxiety out of learning with Silhouette and get to creating faster! My Silhouette classes are heavily focused on software, so you can take the skills & techniques taught and apply them to many future projects!
**This post may contain affiliate links. What that means is that I may receive compensation if you purchase through the links I have provided. The price you pay for the product or service is not higher but I may get compensated for sharing.
Looking for a creative way to level up your handmade jewelry packaging? In this DIY tutorial, I’ll show you how to create custom earring cards using Silhouette Sketching and vibrant Sakura Gelly Roll pens. These unique earring display cards not only showcase your earrings beautifully but also add a professional, artistic touch to your small business or handmade gifts. Using Silhouette Studio software and your Silhouette cutting machine, you can sketch intricate designs, logos, or text with ease. Whether you’re selling on Etsy, prepping for a craft fair, or making gifts for friends, these handmade earring cards are the perfect finishing touch!
Affiliate links may be present in the following blog post and as an Amazon Associate, I earn from qualifying purchases.
Have you ever made custom earring cards with Silhouette? How about sketched with your Silhouette machine? Why not combine the two and create custom earring cards? I created the projects shown in this post to send with a gift to a friend.
Customize your designs for your specific project, a gift, or just because!
Keep in mind the software and machines are designed as cutting machines, so the red “cut” lines on the screen are exactly how a sketch pen will sketch out. It will sketch the outer lines of a “cut” file. If a design or font is not filled in, the sketch pen will not magically fill things in unless it’s told to.
If you want a design or font to be filled in by a pen, you can use the Sketch Panel/Line Effects Panel to add a fill. Keep in mind that the sketch fill pattern will affect the time to sketch the design. When a design or font is filled in with a small sketch fill pattern, that pen is going over and over an area just like if you were filling in a design or font by hand with a pen. That can mean that it cements the paper to the cutting mat, so be careful removing the materials from the mat.
Sketch designs, fonts, or single line fonts can work better for sketching without having to do much to alter the designs.
However, not all sketch designs or fonts are truly designed for sketching. The file name may simply include sketch, so it’s always good to click on the Send tab and take a closer look to see where the pen may travel to get an idea of what it will turn out like.
Install the pen in the Silhouette machine and test.
The Silhouette pen holders allow for a wide variety of pens to be used in the machines. The installation process is the same no matter if using the Silhouette Type A, Type B, or Type C Pen Holders. Find the collar that fits the best for the size pen you are using and make sure it’s secure.
Did you know that the cap on the Silhouette pen holder has a purpose? Keep the cap! Place the cap on the pen holder when you install the pen and when the tip of the pen touches the cap, that is your pen depth. This should work for most pen types and all Silhouette pen holders.
If needed, you can also use a popsicle or craft stick placed underneath the pen tip when you insert the pen holder in the machine. This will show you if the pen is too far down in the adapter or installed at the correct height. Pens installed too low in the adapter have a greater chance of drawing drag marks.
Silhouette Cameo 3 with Type A Pen Holder
If the pen is too low, simply remove it and lift it up in the pen holder a bit before tightening the collars. Proper setup and testing will save you frustration and drag lines across your project.
If you are working on a project with specific materials such as envelopes, etc. Test on cardstock first to save your more expensive materials.
Sketching a Designwith Silhouette
If sketching and cutting a project, set up the design to Cut by Line Color. I use red lines for the cut lines and blue lines for sketch lines.
I recommend sketching first and then cutting, so there is less chance that the design will move. Do NOT unload the cutting mat after the design has sketched.
Uncheck the sketch lines and check the box next to the cut color, install a blade, and send the job to cut.
Just get started! Set it up to sketch and just start selecting designs and sketching. It is so much fun to just play around with it, even if you do not have a specific project or purpose in mind. Grab some cardstock and set up the machine to sketch and just play!
Save this for future reference by pinning the image below.
Enjoy !
THANK YOU for your support! How can you help? Click HERE & buy a coffee. Every little bit helps with the cost of running the site.
Silhouette Classes
Never stop learning! Let me help you take the anxiety out of learning with Silhouette and get to creating faster! My Silhouette classes are heavily focused on software, so you can take the skills & techniques taught and apply them to many future projects!
**This post may contain affiliate links. What that means is that I may receive compensation if you purchase through the links I have provided. The price you pay for the product or service is not higher but I may get compensated for sharing.
Welcome to this edition of Crafting Creativity, featuring the bold and beautiful abstract floral designs by Clikchic Designs! These eye-catching patterns are the centerpiece of a wide range of creative projects that highlight the versatility of digital designs. From a custom shaker card and sketch-style greeting cards to shrink plastic tool charms, bracelet charms, earrings, wine charms, and a personalized chalkboard sign—these florals bring a fresh and modern flair to every creation. You’ll also see them used in card backgrounds and oversized tags, offering endless possibilities for crafters of all kinds. Get ready to be inspired by how one design collection can do so much!
Affiliate links may be present in the following blog post and as an Amazon Associate, I earn from qualifying purchases.
Crafting Creativity with Clikchic Abstract Florals
Project #1 – Custom Shaker Card
I set this up to print on a 12″ x 12″ sheet of cardstock. The only thing that did not fit on one sheet was the frame. It could easily be cut using letter size cardstock too.
I added a bit of sparkle on top of the flowers with a shimmer pen and love it. The hardest part is getting that to show up well on photos.
My mom loved it!
Don’t forget to add your shaker bits before you adhere the acetate & frame down. I got excited and forgot, so I had to peel up a corner and add them in. Nothing like making a project harder than it needs to be.
I drew out 2 rectangles and applied different Sketch Effects to them to create the sketched squares, then added a sketch sentiment around the outer edge of the border using a font called Flannel Shirt Sketch.
I then added some foam tape on the back of the Abstract Floral designs and added those to the center of the sketched frame to give it some dimension.
Next, I sketched a couple more with a premade frame called Dot Frame Sketched.
I think this one is my favorite of them all, but I think I’m drawn to this pink flower for some reason.
They are all gorgeous when paired with the Abstract Floral designs by Clikchic Designs.
I added the random dots around the edge of the square frames by hand after the card was sketched. I could have set it up in the software and had the machine do it perfectly, but it might have also smooshed the tip of my pen. This gives each card a randomness to it as well and makes it unique.
I used the default settings in the Silhouette Studio software to start with. Here is a look at the Send tab when I sent this page to cut.
Larger shrink plastic designs can be interesting when they shrink and you just have to keep going to get them to flatten out. Sometimes, they will also not be a uniform shape at the end. I think that adds to their uniqueness and can be fun to see what happens.
Custom tool charms are a great way to mark your scissors either for a specific purpose or to identify them when you go craft with friends. They are also handy to help you locate them on your craft table if they like to hide in a “safe” place often.
Any type of plastic will dull the blade quicker than other materials, so it is not uncommon to have to increase the settings the more you cut.
There are several brands of shrink plastic out there and they can all be a bit different. I cut both Silhouette Shrink Plastic and Grafix Shrink Plastic during this process. I was using an older blade and I think it’s about done for now. It was having a hard time cutting through the Grafix Shrink Plastic in clear.
Test cuts are really the only way to know what is going to work with your blade and materials.
Two “secrets” of mine are:
I’ll take a blade that isn’t cutting other materials such as cardstock or HTV well and move it to my shrink plastic blade. I get a bit more life out of my blades this way.
Do not unload the cutting mat after the cut and check it first. If it did not cut through, you can increase the settings and send it again until it does cut.
I started by measuring out the size of this chalkboard sign and then drew a rectangle the same size in Silhouette Studio. Then I just started adding the abstract floral designs and moving them around to create a floral frame.
Did you know that vinyl goes bad? Yep! I started this project using Silhouette Printable Vinyl, which I love for the print quality. However, it must have been an old package because it would not weed properly and was separating. I ended up using Orajet 1917 that I’ve had in my craft stash for many, many years and it cut beautifully.
There is a shelf life for vinyl and other craft products such as pens, paint, string, inks, tape, etc.
What is the lifespan of vinyl? Well, there really isn’t an exact date or time as you never really know how long it’s sat on a retailers shelf or the manufacturer’s shelf, etc. And other factors play into it as well, such as temperature, humidity, etc. You will see many mention 2 years when stored properly. But, you never really know how it was treated before you bought it. I have some vinyl that I still try to cut even though I know it’s like 7 years old. Sometimes it works and sometimes it doesn’t.
How can you tell if it’s gone bad?
The 2 most obvious signs I have found is that it can separate when you try to weed it and it’s a bugger to work with no matter your troubleshooting or cut settings. These 2 things can present themselves by the adhesive can visibly be separating from the actual vinyl or the vinyl will not easily come off the backing paper.
Usually I try to push through and I always end up kicking myself for working so hard to try to salvage it.
However, the final way I know the vinyl has gone bad is when I get a new good piece and it weeds so smoothly. And that’s when I end up kicking myself.
For this project, I lost a few letters of the text in the middle, so I just ended up cutting the text from a scrap of Oracal 651 in white and adding that on to the project. A great use of scraps!
When I do a print and cut page, I will fill the page with extra designs and this month I had a good bunch of the florals left over to create with. So I set about brainstorming what I could do with the left overs.
I was browsing Pinterest and found an idea where they created custom backgrounds with a stencil and inks. Why not do that with a stencil design & digital patterns?
Here is a look at the first ones I created.
The next set, I started playing around with the orientation and mixed it up a bit.
I had so much fun playing around and creating backgrounds with different pattern papers.
Whether you need a design 2″ or 6″, you can do it with your cutting machine. You can create things whatever size you want.
These tags are 3.5″ wide and 6.125″ tall. I used the Project Wizard in Silhouette Studio to create the basic tag design and cut from 110 lb Neenah cardstock.
I used up the last 2 flowers and bits of greenery I had printed on cardstock and combined that with a patterned paper I designed and printed when I shared the tutorial on Creating Custom Background Patterns in Silhouette.
Follow Clikchic Designs for more inspiration on her website, Facebook, and Instagram. I love watching the videos of how the designs are created. I love how she takes something that she has physically painted and turns it into a digital file so we can all enjoy and create with her amazing artwork!
From handmade cards to custom jewelry and home décor, the possibilities with these abstract floral designs by Clikchic Designs are truly endless. Each project in this Crafting Creativity edition showcases how one digital collection can be transformed into a wide variety of unique creations. Whether you’re crafting with paper, shrink plastic, or chalkboard materials, these versatile florals add a bold, artistic touch to every piece. We hope you’re inspired to explore new techniques and think outside the box with your next project.
Save this for future reference by pinning the image below.
Enjoy !
THANK YOU for your support! How can you help? Click HERE & buy a coffee. Every little bit helps with the cost of running the site.
Silhouette Classes
Never stop learning! Let me help you take the anxiety out of learning with Silhouette and get to creating faster! My Silhouette classes are heavily focused on software, so you can take the skills & techniques taught and apply them to many future projects!
**This post may contain affiliate links. What that means is that I may receive compensation if you purchase through the links I have provided. The price you pay for the product or service is not higher but I may get compensated for sharing.
If you’ve been curious about trying sublimation, this is the perfect place to start! I’m sharing a beginner-friendly project —DIY abstract coasters using Artesprix Sublimation Markers. The Artesprix Sublimation markers make it so easy to play with color and design, no matter your skill level. Whether you’re brand new to sublimation or just looking for a quick, creative project, these coasters are a fun way to jump in. Grab your heat press and let’s create something bold, vibrant, and totally unique—no perfection required!
Affiliate links may be present in the following blog post and as an Amazon Associate I earn from qualifying purchases.
This is a project that anyone, even little ones, could do! There is no wrong way to do it.
This is a great way to see what all the colors in the marker sets will look like when heat pressed. With sublimation inks, they will appear duller until the high heat and pressure is applied and that is when the colors really pop.
Here is a closer look at the finished Artesprix polished sublimation coasters.
I would recommend letting the copy paper dry completely after adding in the colors. Mine was still a bit damp in areas from my coloring and you can see a few spots where the black bled a little bit. But, that’s what also makes it unique! It does not have to be perfect or match anyone else’s design.
THANK YOU for your support! How can you help? Click HERE & buy a coffee. Every little bit helps with the cost of running the site.
Silhouette Classes
Never stop learning! Let me help you take the anxiety out of learning with Silhouette and get to creating faster! My Silhouette classes are heavily focused on software, so you can take the skills & techniques taught and apply them to many future projects!
**This post may contain affiliate links. What that means is that I may receive compensation if you purchase through the links I have provided. The price you pay for the product or service is not higher but I may get compensated for sharing.
If you’ve ever created a design in Silhouette Studio and wanted to use it outside the software—whether for DTF (Direct to Film) printing, sublimation, print-and-cut, or any high-quality print project—this guide is for you! With just a few simple steps, you can save your design as a transparent PNG file directly from Silhouette Studio. This method is perfect for uploading to services like Siser®’s Easy® Transfers for vibrant, press-ready DTF prints, but it’s also a great option for any project that needs a clean, high-resolution image. In the video below, I’ll walk you through how to export your design as a PNG and show you exactly how to upload it to the Siser Easy Transfers site to order custom DTF transfers—plus, you’ll get tips to ensure your file is properly formatted for print success. You’ll also find written step-by-step instructions below the video in this post to make it even easier to follow along.
Affiliate links may be present in the following blog post and as an Amazon Associate, I earn from qualifying purchases.
In the video linked above, I show how I created the design featured. I am going to skip right to the steps of saving as a PNG from Silhouette Studio Business Edition. If you would like to see how I create the design, check it out in the video HERE.
When creating your own designs, make sure you are starting with high resolution images. Photos and digital files that are 72 dpi are designed for internet quality images and you want 300 dpi for print quality.
Note: if you are on a MAC, the screenshots below may look a bit different as I am using a Windows computer, however, the process is the same.
Select all parts of the design to be saved. This can be done by left clicking and dragging across the entire design to “rubber band” select everything the mouse moves across.
In the top left corner of Silhouette Studio, select File > Save Selection > Save to Hard Drive.
Using this method will save the design at the size created and not the entire art board. I explain and show a demonstration of why I recommend this method in the video tutorial HERE.
Choose the location you want the file to be saved, name the file, and change the Save as type at the bottom to PNG (or whatever other file type you’d like to save as).
Silhouette has a default DPI (Dots per inch), this is NOT print quality. Highlight the number and change it to 300, then press the Enter key. You will notice that the Pixels for both Width and Height increase. Pixel size is directly related to DPI.
Check the box next to Transparent background if you want a transparent background.
PNG and JPEG files are rectangle shaped files. If a PNG was not designed with a transparent background, it will show as a white rectangle behind the design. JPEG files do not have transparent backgrounds.
The maximum pixel size that can be saved for either width or height in Silhouette Studio is 10,000 pixels.
Make sure to press Enter after changing the DPI or the change will not take effect.
Click the Save button to save the file as a PNG.
Check the file in the saved location to make sure it saved as you want. On a Windows computer, in the Windows folder, move the mouse over the image and it will tell you the pixel size.
To change how you view files in the Windows Folder, select View at the top and select how you want to see those files in the folder.
When using those steps, the design should be saved at 300 DPI from Silhouette Studio.
Save this for future reference by pinning the image below.
Enjoy !
THANK YOU for your support! How can you help? Click HERE & buy a coffee. Every little bit helps with the cost of running the site.
Silhouette Classes
Never stop learning! Let me help you take the anxiety out of learning with Silhouette and get to creating faster! My Silhouette classes are heavily focused on software, so you can take the skills & techniques taught and apply them to many future projects!
**This post may contain affiliate links. What that means is that I may receive compensation if you purchase through the links I have provided. The price you pay for the product or service is not higher but I may get compensated for sharing.
If you get files from the Silhouette Design Store, make sure to check out the Free Design of the Week! Each week, Silhouette offers a brand-new design file at no cost — perfect for your cutting machine projects. These free files are typically added on Fridays now along with the new featured designer spotlight. In this post, I’m sharing a quick video tutorial that walks you through exactly how to get the free file for FREE.
Affiliate links may be present in the following blog post and as an Amazon Associate, I earn from qualifying purchases.
The Silhouette Design Store recently added a new subscription to the store and it appears as an option to select on every single file in the store. We’ve had several users confused by how to get the free weekly design for free without signing up for another subscription.
My biggest concern for users is that they know what they are signing up for and are not getting into a program that they don’t want.
To find out more details on this new Free Trial being offered, you can find the Free Trial button on the Silhouette Design Store website in the header.
Or there is a button on every single design when you click on it in the store.
Please make sure to read the terms of use and details of this program if you choose to sign up. You can find the details of the Free Trial HERE and the Terms of Use HERE.
Please note that the screenshots and video above are the current view as of this publication date 5/10/25 and Silhouette is still changing things on the websites. This means that while menu headers and designs will change from the screenshots, but the information is still relevant.
If you do sign up for the new Free Trial and do not want to continue or pay the monthly fee, please make sure you cancel in time. At the time of writing this, there are no instructions on the steps to cancel that I can find. I did ask for clarification and received no response. If you do need to contact Silhouette Support to cancel, please do so well in advance of the due date.
Want to help other Silhouette users? Please share this post and the video link with other Silhouette users.
Want to learn more about Silhouette? Check out these resources:
Save this for future reference by pinning the image below.
Enjoy !
THANK YOU for your support! How can you help? Click HERE & buy a coffee. Every little bit helps with the cost of running the site.
Silhouette Classes
Never stop learning! Let me help you take the anxiety out of learning with Silhouette and get to creating faster! My Silhouette classes are heavily focused on software, so you can take the skills & techniques taught and apply them to many future projects!
**This post may contain affiliate links. What that means is that I may receive compensation if you purchase through the links I have provided. The price you pay for the product or service is not higher but I may get compensated for sharing.
Welcome to this edition of Crafting Creativity! In this edition, I am sharing the vibrant world of mixed media digital design with the talented Sarah Hurley! In this post, we’re spotlighting sharing inspiring ways to incorporate Sarah’s digital elements into your own creative projects. Whether you’re crafting cards, journals, or home décor, you’ll find plenty of ideas to spark your next masterpiece. Let’s explore how digital and traditional techniques can come together to make something truly magical!
Last month was the 2025 Creativation by NAMTA event in Seattle and I was able to connect with Sarah Hurley in person. I’ve known Sarah for a couple years now and always enjoy getting together with her to connect and collaborate.
The Sarah Hurley Academy Pavilion was on the trade show floor and I loved hearing her Trend Report during the event. I was madly typing my notes in my phone during her presentation.
It was the perfect month to collaborate again with Sarah’s designs for the Silhouette Secrets+ newsletter.
Affiliate links may be present in the following blog post and as an Amazon Associate, I earn from qualifying purchases.
Project #1 – Artist Trading Cards– Mixed Media Background Elements
One of the projects the Creative Professionals did at the 2025 Creativation was create “found art” and place them all over the trade show floor for people to find and keep. I designed it all in Silhouette Studio using a collection of different elements, including the mixed media designs by Sarah Hurley.
I am not sure which one I like the most, but I love that I can create in the software and test things out before I print my projects. I wanted each one to be a bit different and I was able to achieve that easily.
I also designed these double sided so I could include my information on the backside.
The biggest thing about doing a double sided print and cut is your printer. Every printer is different and you have to figure out how the printer prints and how to insert the page back in the printer so everything lines up.
I printed these and then used my paper trimmer to cut to the size I needed. Since it was a simple rectangle I felt it was more efficient for this project. I cut between 60-70 cards to “hide” during the event.
Project #2 – T-shirt with Siser Metallic Puff HTV & Mixed Media Designs
This may be my new favorite shirt! Not only is the Siser Tiger Lily Metallic Puff HTV gorgeous, but the mixed media background really made this design unique!
I duplicated the mixed media design, scaled it up, and then subtracted an offset of the text from the background.
Here is a closer look at the design.
I just love how the mixed media design puffed up. I’ll definitely be using more mixed media designs for backgrounds!
Specialty materials with shine are always so difficult to photograph and really capture how beautiful it is. I have had great luck with the Siser Metallic Puff HTV living up to it’s puff. Regular puff HTV and I have had a few issues, but the Metallic Putt HTV is so easy to use.
Project #3 – Digital & Physical Backgrounds – Cards
I added the mixed media files on top of a patterned background and set it up as a print and cut for a 4.25″ x 5.5″ card background.
On the left side I used a pattern called Purple and Rainbow Bubble Background by Sarah Hurley, then placed the mixed media design on top on the left side. I used the eyedropper tool in the Fill Color panel to pull a color from the pattern and then adjusted it just a bit to make it pop.
On the right side, I used the background pattern created using the Gradient Fills in Silhouette from last month’s YouTube videos. I then added a different mixed media design on top and again pulled color from the pattern and adjusted to make it pop.
Check out more on how I created this background pattern in these videos:
I wanted the sentiment to stand out a bit so added that as a separate piece to the print and cut file so I could pop it up with foam tape.
Here is a look at the print and cut file I created in Silhouette.
I used the Enjoy Every Moment by Sarah Hurley sentiment and added an offset around the design. For this design, I first made a larger offset to enclose everything and then made an internal offset to bring it back closer to the design. Once I had the offset as I wanted, I deleted the larger offset as it was not needed.
But I couldn’t stop there! These designs can be used for more than just digital projects too!
I cut these same designs from cardstock using the Silhouette Autoblade with the Cameo 5. Look at those cuts!
Then I added the designs on top of a dark blue card base to make them stand out.
Add a sentiment and you have a quick easy card design.
I did not just want to print and cut 2 designs, so I filled the page and had several options to choose from.
I drew a circle and centered the design inside, then with both the circle and design selected, chose Cut Edge on the Send tab. Once it was cut, I added foam tape to the back of the sentiments to give the card a bit of dimension.
Stencils can be from many different types of materials. I grabbed some scrap cardstock and also cut some plastic stencil material as well.
Scrap cardstock is a very economical way to test out a stencil design and it can hold up and work for many projects too. I know I have a lot of scrap cardstock in my stash, so it’s perfect to test with.
I also see many who want to cut plastic stencil materials and I have both 6 mil and 7 mil stencil material on hand. Something to keep in mind with plastic stencil material is that plastics dull a blade differently and often quicker than other materials. All stencil material will vary in the cut settings that will work well with it.
The one above is 6 mil stencil plastic and I used the Stencil Material setting in the software with a used blade, but increased the passes to 3. I still had to pop the bits out of place, but it actually cut better than some of the smaller areas did on my fibrous cardstock.
And then just have fun! I grabbed some of the DecoArt Paints and a Dynasty EvoArt paint brush and just started stenciling a background. I don’t know how this will turn out yet, but I’m going to keep adding to it and see what speaks to me.
If you are cutting lots of stencil material, I’d recommend having extra blades on hand and also know that you will need to increase the cut settings as the blade dulls.
I am always looking for sales or bundles to stock up on blades or mats. Check out Crafter Cuts for a blade bundle HERE and use coupon code SECRETS to save 10% on supplies too!
I love this background pattern so much and still don’t know what I want to do with it. I asked for suggestions from my community and one of them was to scan it and save it as a digital background. YES! I love this idea.
Bringing mixed media designs by Sarah Hurley into your creative projects is a fantastic way to add personality, depth, and a unique flair to your crafts. Whether you’re layering textures, combining materials, or experimenting with color, these designs offer endless possibilities to explore your creativity. If you’ve enjoyed this project, be sure to check out the full Crafting Creativity series for even more inspiration, step-by-step ideas, and creative ways to make your projects truly stand out. Let your imagination lead the way—there’s always something new to discover! Check out the Crafting Creativity series HERE.
Save this for future reference by pinning the image below.
Enjoy !
THANK YOU for your support! How can you help? Click HERE & buy a coffee. Every little bit helps with the cost of running the site.
Silhouette Classes
Never stop learning! Let me help you take the anxiety out of learning with Silhouette and get to creating faster! My Silhouette classes are heavily focused on software, so you can take the skills & techniques taught and apply them to many future projects!
**This post may contain affiliate links. What that means is that I may receive compensation if you purchase through the links I have provided. The price you pay for the product or service is not higher but I may get compensated for sharing.
I am popping in to share some important information that I received direct from Silhouette about the Silhouette Studio Library Storage. I was asked to share and I am because this affects many Silhouette users.
Affiliate links may be present in the following blog post and as an Amazon Associate, I earn from qualifying purchases.
If you have ever stored files in the Silhouette library, please read below carefully.
I am going to copy the exact email from Silhouette below and then I’ll add in some important notes and information to clarify below the email text.
***Update 5/8/25 from Silhouette – storage removal will occur in batches, so user’s will not see it happen at the same time. ***
Email I received from Silhouette America on 4/28/25 at 6:19 pm CT regarding Silhouette library storage.
Customers who have canceled Club Silhouette will lose the 5GB benefit. It will be reduced to 1GB on May 1, 2025 unless they rejoin Club Silhouette before this date.
If a Diamond subscriber or anyone that is still receiving the 5G benefit cancels, it will automatically be reduced to 1GB. Grandfathered users with more than 1GB who cancel must follow the new subscription offerings when they re-join.
Designs purchased from the Silhouette Design store at any time are theirs to keep, they will not be affected by this change.
It is highly recommended that all customers export and back up their custom user content. User files will still be accessible on their own computer if they have exported them correctly.
How to Export User Made Designs:
Log into the Silhouette account.
Go to the Library.
Click their name in the upper left corner.
Select “Export User Made Designs.”
Choose a location on their computer to save all their user-created content safely.
Thank you so much for helping us share this information! We need your help to convey to the customers how easy it is to export and backup their custom user content. This is a simple process, as long as they follow the steps above.
Those customers that are current subscription members that fall into the categories above don’t need to worry about this, but we do recommend that they always back up their files.
They can do a full library backup by clicking on their name and going to “export library”. “
Export User-Created Files is ONLY an option in software versions v4.4.552 or higher. If you are using an older version of software, you will either need to update (we’d recommend v4.5.812) or open each file and save using File > Save As > Save to Hard Drive. *how to install legacy versions HERE
We highly recommend exporting ALL user created files even if you are under the 1 GB limit for Silhouette library storage. This ensures you have a copy of files you have created. Silhouette has NEVER guaranteed that user created files can be recovered. I do not anticipate Silhouette helping users try to recover their files once they are deleted.
Exporting user-created files does NOT remove them from the Silhouette library storage. It simply exports a copy of your files. If you want to remove them completely, you have to delete them and empty the recycle bin, however, we have had reports of that not working and they come back when synced again.
A library backup is NOT the same as exporting individual files. A backup does NOT contain individual files and it CANNOT be opened outside the software. *more details on backups HERE
Develop a method for saving files outside the Silhouette library storage and DO NOT rely on it to keep your files save.
The safest place for your files is in multiple locations. Save the files and have a backup of those files too!
I hope to reach as many user’s as I can with this information before Silhouette starts deleting user files. I have no control over what Silhouette does, but I can try to reach as many user’s as I can.
Save this for future reference by pinning the image below.
THANK YOU for your support! How can you help? Click HERE & buy a coffee. Every little bit helps with the cost of running the site.
Silhouette Classes
Never stop learning! Let me help you take the anxiety out of learning with Silhouette and get to creating faster! My Silhouette classes are heavily focused on software, so you can take the skills & techniques taught and apply them to many future projects!
**This post may contain affiliate links. What that means is that I may receive compensation if you purchase through the links I have provided. The price you pay for the product or service is not higher but I may get compensated for sharing.
Have you ever explored the Fill Gradient panel in Silhouette Studio to create your own custom backgrounds? It’s a powerful feature that often flies under the radar—but it can completely transform your designs with just a few clicks. Recently, a fellow Silhouette user reached out asking for more details on how to use gradient fills for creating eye-catching backgrounds. So we explored exactly how the Gradient Fill Panel works —and I’ve got two great resources where I walk you through the process step-by-step. Whether you’re crafting cards, printable art, or layering cut designs, you’ll love what gradient fills can do!
Affiliate links may be present in the following blog post and as an Amazon Associate, I earn from qualifying purchases.
Note: all screenshots and references are using version v4.5.812 of Silhouette Studio. At the time of publication, I am not recommending the current version 5, as it has too many bugs and issues in it. Silhouette Studio version 5 does have a bit different look and some things have been moved around. If you are on version 5 and want to revert to a legacy version, see how HERE.
The Fill Color Panel in Silhouette Studio has 3 tabs that include the main Fill Color, Gradient Fill, and Pattern Fill Panels. It is located on the right side and looks like an artists palette.
Gradient Fills in Silhouette Studio
Let’s get right down to the resources on Gradient Fills in Silhouette Studio.
We covered the Gradient Fill Panel in depth and you can see the demonstration in real time. There are so many options that you can create and play with!
I took one of the gradient patterns I made in the LIVE tutorial and then added an alcohol ink texture on top of it and created 3 different alcohol ink backgrounds.
I printed this on 12″ x 12″ cardstock and also on Epson Presentation Paper – Matte. Here is a look at both of those print outs. Notice how the colors are a bit different. The material surface you print on can affect the final colors. The ink soaks into the cardstock more than on the presentation paper, which shows in the final colors. Both can still be used for different projects.
A great way to test and see how colors will look on different materials with your printer is to print out a test. Check out this post – Silhouette Studio: Testing Print Colors for more information and tips.
Custom created backgrounds can be used for many projects. I used the sheets I printed and cut the pieces for this scalloped step card design by Lori Whitlock. Then stamped a quick sentiment and now have an easy to assemble card.
There is so much you can do with the Silhouette Studio software. Want to learn more? Check out these additional resources below.
Has this sparked ideas of what you could create? Let me know in the comments below.
Save this for future reference by pinning the image below.
Enjoy !
THANK YOU for your support! How can you help? Click HERE & buy a coffee. Every little bit helps with the cost of running the site.
Silhouette Classes
Never stop learning! Let me help you take the anxiety out of learning with Silhouette and get to creating faster! My Silhouette classes are heavily focused on software, so you can take the skills & techniques taught and apply them to many future projects!
**This post may contain affiliate links. What that means is that I may receive compensation if you purchase through the links I have provided. The price you pay for the product or service is not higher but I may get compensated for sharing.
Looking for a fun and vibrant way to personalize your own tote bag? In this DIY project, I’m sharing how I combined techniques I recently learned from a class taught by my talented friend Tracy Weinzapfel to create a custom watercolor-inspired design using Artesprix Sublimation Inks. I took those creative watercolor techniques and transformed them into a one-of-a-kind sublimation design that pops with color on an Artesprix sublimation tote bag. Whether you’re new to sublimation or looking for fresh inspiration, this project is a perfect blend of art and function—let’s get creative and make something beautiful you can carry with pride!
Affiliate links may be present in the following blog post and as an Amazon Associate I earn from qualifying purchases.
You do not have to be an artist to do this! All you need is the ability to let yourself go and see what you can create. I share tips in the new video that help me create this and allow myself the freedom to just let it go.
The black sketched outline really makes it all pop and come together. Keep in mind that sublimation inks do not show their true colors until they are heat pressed for the full time and temperature. Once pressed, you will see those colors brighten and become vibrant.
Supplies for Custom DIY Watercolor Design Sublimation Tote:
I’m completely hooked on crafting with Artesprix products—every time I use them, my creativity sparks and fresh project ideas start flowing! Combine using Artesprix with your cutting machines or just allow yourself to play all on your own. There are so many possibilities.
I would highly recommend just playing around and see what you create, but if you just don’t feel comfortable drawing freehand, you can always set up your cutting machine to sketch with a pencil too.
Since it is pencil, it is harder to see. Here is a close up of this sketch flower design.
Since pencil does not transfer to the sublimation blank, I’m not worried about the drag marks, but you could adjust and play with settings to get it just right if you wanted. When using pencil, keep in mind that it will dull quickly, but you can always send it back through again as long as you do not unload the cutting mat.
Sketching with your machine can be done with any pen, marker, pencil that can fit in the pen adapters. Find more resources on sketching with Silhouette HERE and all about sketching supplies HERE.
This hand drawn design was inspired by Tracy Weinzapfel and her amazing talent as an instructor. I am so glad I signed up for her Fresh Start in Art 5 Day challenge when I saw it.
Check out more of my Artesprix sublimation creations HERE.
THANK YOU for your support! How can you help? Click HERE & buy a coffee. Every little bit helps with the cost of running the site.
Silhouette Classes
Never stop learning! Let me help you take the anxiety out of learning with Silhouette and get to creating faster! My Silhouette classes are heavily focused on software, so you can take the skills & techniques taught and apply them to many future projects!
**This post may contain affiliate links. What that means is that I may receive compensation if you purchase through the links I have provided. The price you pay for the product or service is not higher but I may get compensated for sharing.
Welcome to this edition of Crafting Creativity! This time, we’re diving into the wonderful world of digital kits with an inspiring collection from Nitwit Collections. Their beautifully designed elements and papers make it easy to create stunning projects with Silhouette. From layered cards to custom decor and everything in between, we’ll explore creative ways to bring these digital designs to life. Get ready for a fun and crafty adventure as we showcase projects that highlight the versatility and charm of Nitwit Collections!
Affiliate links may be present in the following blog post and as an Amazon Associate, I earn from qualifying purchases.
If you missed these files in the March newsletter, you can find the Warm Embrace Knick Knack kit HERE. There are so many amazing kits available, make sure to check out the full shop HERE.
I have also released a new print and cut class: Master Print and Cut with Silhouette: Step-by Step Class that is available on my Teachable site HERE. The kit is provided in the class so you can use the same files I do and create amazing projects too!
If you are looking for step-by-step classes to learn more, check out all of the classes that are currently available on my Teachable site HERE.
Crafting Creativity with Nitwit Collections
Project #1 – Creative Card Designs: Make Every Greeting Uniquely Yours
I just started playing around in the software to see what new card idea I could create after I finished the Print and Cut class. I like to make a mock-up in the software of a lot of projects before I actually cut. That means I will add all of the design pieces and play around with placement, elements, colors, and more right in Silhouette Studio.
Here is a look at my design file for this card in Silhouette Studio.
Once I have an idea of the card design layout, I can start cutting and in this case, printing, then cutting all the pieces.
Here is a close up look at the finished card with the 3-D layers.
But, I didn’t stop there! The creative ideas were still flowing and I decided to share how I created this card design in Silhouette with a LIVE tutorial on the Silhouette Secrets+ YouTube channel.
This session covers essential skills and techniques, including drawing tools, scaling tools, pattern fills, the Quick Access toolbar, Flexishapes, Draw Note, and more! Plus, with real-time viewer participation, questions were answered and demonstrated live to help you master these features. Check out the replay HERE on the Silhouette Secrets+ YouTube channel.
Don’t forget to Like and Subscribe if you want to be notified when new videos are released or Live tutorials are scheduled.
I’ve been watching the Nitwit Collections Facebook group and saw that a member, Lisa Shaw, was doing a Live demo and I joined in. I was mesmerized by her demo of a flying seagull card! The moment I saw it, I knew everything else had to wait. I just had to dive in and create this card style as a 5″ x 7″ card!
Immediately following the LIVE demo, I started working out the math to make a prototype of this card. It reminded me how much I love to design and create fun fold and 3-D cards. Now, I can’t say that I got it right the first few times, so there was a few sheets of cardstock that are now in my scraps pile, but I did get there eventually.
After I made the prototype, I could then bring it all together in the Silhouette Studio software to create a cut file.
And then I printed all the pieces and started assembly to see where the elements should go. Here is another behind the scenes look at creating this card.
Here is a collage of how this card looks finished out from a few different angles.
The top photo shows how the card look when completely unfolded. The bottom left shows the card completely closed and then on the right is a top look showing the Seagull Design.
I love using this Sticky Note & Pen Holder file from Lori Whitlock and the Nitwit Collections kits work perfect for creating a custom cover. These make great gifts and work awesome for swaps at events too!
Here is a close up look at the design layered on the front of the sticky note holder.
Unlock endless creative possibilities with a digital kit! In this edition of Crafting Creativity, we showcased a fabulous digital kit from Nitwit Collections and explored how a variety of unique projects. The Crafting Creativity blog series is your ultimate source for fresh ideas, practical tips, and expert techniques to take your crafting to the next level. Whether you’re transforming a go-to design, trying out new materials, or refining your skills, these posts are designed to ignite your creativity and help you bring your ideas to life. Check out the Crafting Creativity series HERE and discover where your imagination can take you!
Save this for future reference by pinning the image below.
Enjoy !
THANK YOU for your support! How can you help? Click HERE & buy a coffee. Every little bit helps with the cost of running the site.
Silhouette Classes
Never stop learning! Let me help you take the anxiety out of learning with Silhouette and get to creating faster! My Silhouette classes are heavily focused on software, so you can take the skills & techniques taught and apply them to many future projects!
**This post may contain affiliate links. What that means is that I may receive compensation if you purchase through the links I have provided. The price you pay for the product or service is not higher but I may get compensated for sharing.
Get ready to unleash your creativity with a one-of-a-kind project—no sublimation printer needed! In this tutorial, I’ll show you how I used Artesprix Sublimation Acrylic Paints, a Black Artesprix Sublimation Marker, and stencils to transform a plain apron into a bright, bold, and unique piece of wearable art. The best part? No two aprons will ever be the same, making this a truly custom creation. Whether you’re crafting for yourself or gifting it to a fellow maker, this vibrant apron is sure to make a statement in any creative space. Let’s explore the colorful world of sublimation painting and bring your artistic vision to life!
Affiliate links may be present in the following blog post and as an Amazon Associate I earn from qualifying purchases.
I really wanted to go all in on this project and create a design across the entire white apron. And why not? Let yourself go and have some fun just creating and see what’s possible.
I’ll even admit that I messed up during the process and it wasn’t quite the same vision I has original started with, but it still worked out.
I used the Artesprix Heat Transfer Resist Mask, which has a lot of different ways it could be used. Each time I use it, I think of something new, but that usually is because I did it “wrong” and realize it too late. In this case, my goal was to have the area white underneath the Heat Resists Mask. However, I painted on top of the mask and then did not remove it before pressing, so the paint showed through. It was one of those moments that should have had a camera on my face when I realized what I did, but I just went with the flow and it’s unique.
However, it gave it an interesting and custom look in the end. It’s a good thing I added the sketched outline around it with the Artesprix Sublimation Marker or it wouldn’t have shown at all. That was another idea I was testing out to see how it would look.
Working with the Artesprix Sublimation products has been a great source of enjoyment & experimentation for me. I have learned to just go with the flow and not try to control things as much when creating. See what can happen and you never know… you might like the outcome better than you thought you would.
Here is a look at the full apron design
A bright colored, artistic art apron that is perfect to protect your clothes when making any mess. Oh wait – that might just be me that needs an apron full time.
Other supplies: pencil, scissors, paper towels, copy paper, ruler, wet wipes
And don’t throw away any extras!!! Save those and you can use that for future projects. Here is a look at my pages I picked up extra paint on and some of the extra stencil designs I had after making my apron.
I absolutely love crafting with Artesprix products—they never fail to ignite my creativity and inspire new project ideas! Check out more of my Artesprix sublimation creations HERE.
THANK YOU for your support! How can you help? Click HERE & buy a coffee. Every little bit helps with the cost of running the site.
Silhouette Classes
Never stop learning! Let me help you take the anxiety out of learning with Silhouette and get to creating faster! My Silhouette classes are heavily focused on software, so you can take the skills & techniques taught and apply them to many future projects!
**This post may contain affiliate links. What that means is that I may receive compensation if you purchase through the links I have provided. The price you pay for the product or service is not higher but I may get compensated for sharing.
If you love designing in Silhouette Studio and want to take your projects to the next level, you won’t want to miss this new LIVE tutorial! In this session, we are Creating Stunning Projects with Nitwit Collections Digital Kits and Cut Files. Learn how to combine beautifully designed digital elements with cut files to craft unique, professional-quality designs. Whether you’re a beginner or an experienced user, this tutorial will walk you through step-by-step techniques to make your projects stand out. Plus, with viewer participation, questions were answered and demonstrated in real time, making it an interactive and engaging learning experience. Watch the replay now and get inspired to create!
In the video I share how I went about designing these cards with the Warm Embrace Knick Knack kit by Nitwit Collections.
Here is a closer look at this layered card. With the high quality graphics of the Nitwit Collections digital kits and layering with 3D foam tape, you can create amazing, unique cards and projects.
THANK YOU for your support! How can you help? Click HERE & buy a coffee. Every little bit helps with the cost of running the site.
Silhouette Classes
Never stop learning! Let me help you take the anxiety out of learning with Silhouette and get to creating faster! My Silhouette classes are heavily focused on software, so you can take the skills & techniques taught and apply them to many future projects!
**This post may contain affiliate links. What that means is that I may receive compensation if you purchase through the links I have provided. The price you pay for the product or service is not higher but I may get compensated for sharing.
Create a Unique Signature Line with Silhouette Studio! 🖋️✨
Want to add a personalized touch to your projects? Whether you’re crafting custom cards, digital designs, or branding your creations, a unique signature line can make all the difference! In my latest YouTube video, I’ll walk you through the process of designing your own signature line using Silhouette Studio (or other design software). You’ll learn how to use the Text Tool, explore different Font Families, adjust Edit Points, and apply creative effects like Offset and Weld to achieve a polished, professional look. Ready to elevate your designs?
I’m also sharing a look at how I used this to create a custom stamp after I made the video tutorial below.
After I made the video, I used the file to create a custom stamp with my Silhouette Mint machine. I love this little piece of technology. While the Mint Stamp machine is no longer manufactured, it is still a very handy tool to have around if you can get the stamp kits.
While the Mint Studio software is no longer updated, it can still be used on most computers. I was able to connect to my Silhouette Mint machine with no problems with a Windows 11 computer. However, we have seen some issues connecting to some MAC systems, but not all and the only way to know is to test it.
Find the Mint Studio Software HERE. It’s like a step back in time to what Silhouette version 2 was like. Make sure to follow my tutorial for how you can design in Silhouette and then open in Mint Studio to create your stamp.
Save this for future reference by pinning the image below.
Enjoy !
THANK YOU for your support! How can you help? Click HERE & buy a coffee. Every little bit helps with the cost of running the site.
Silhouette Classes
Never stop learning! Let me help you take the anxiety out of learning with Silhouette and get to creating faster! My Silhouette classes are heavily focused on software, so you can take the skills & techniques taught and apply them to many future projects!
**This post may contain affiliate links. What that means is that I may receive compensation if you purchase through the links I have provided. The price you pay for the product or service is not higher but I may get compensated for sharing.
If you’ve ever struggled with text, glyphs, offsets, or edit points in Silhouette Studio, this video is for you! We hit a small bump during the LIVE tutorial, but I’ve recorded a brand-new video to ensure you get all the details without any interruptions. And by popular request, the original 39-minute Live replay is also staying up! Now you have two great resources to help you master these essential design techniques.
What You’ll Learn in This Video:
How to customize fonts and text in Silhouette Studio
Unlock glyphs & special characters for beautiful typography
Master internal & external offsets for layered designs
Edit points to refine & tweak your designs like a pro
Tips for creating custom designs with precision and ease
And catch the Live Replay (39 Minutes) with user interaction and questions Available HERE
I hope these videos help you feel more confident when designing in Silhouette Studio! Let me know in the comments if you have any questions or if there’s anything else you’d like to learn in future tutorials.
These techniques can be used for all kinds of projects from cake toppers, stickers, card, t-shirt designs, and more! Let us know in the comments below what you create.
THANK YOU for your support! How can you help? Click HERE & buy a coffee. Every little bit helps with the cost of running the site.
Silhouette Classes
Never stop learning! Let me help you take the anxiety out of learning with Silhouette and get to creating faster! My Silhouette classes are heavily focused on software, so you can take the skills & techniques taught and apply them to many future projects!
**This post may contain affiliate links. What that means is that I may receive compensation if you purchase through the links I have provided. The price you pay for the product or service is not higher but I may get compensated for sharing.
In this edition of Crafting Creativity I’ll be sharing the projects I created through the month with a 3-D Hawaiian Turtle Tote and Tag file and the Tropical Fish pattern. A great big thank you to Suzanne from Quietfire Designs for providing the free file for the Silhouette Secrets+ February newsletter!
Affiliate links may be present in the following blog post and as an Amazon Associate, I earn from qualifying purchases.
If you missed these files in the February newsletter, you can find the Hawaiian Turtle Tote file HERE and the Tropical Fish pattern HERE in the Silhouette Design Store. And then make sure to check out the assembly tutorial HERE on the Quietfire Design website.
Crafting Creativity with One Designby Quietfire Design
Project #1 – Hawaiian Turtle Tote and Tag
I always like to start with creating the design file at the original size it was created at. But I also couldn’t resist to create a mini turtle tote too!
Look at that mini tote! I just love it! I love sharing all the possibilities you can create with 1 file!
Project #2 – Valentine’s Treat Tote or Table Decoration
I scaled the design up as much as I could to still be able to cut it the main piece from a 12″ x 12″ sheet of cardstock. Then cut the main tote part from pink cardstock and used a heart flourish pattern to create this Valentine’s treat tote.
Or you could use it for a table decoration or centerpiece.
Use this design for many different holidays, seasonal decorations, or just every day use.
I used the Silhouette Studio software to design this card and create a mock-up of the project before I even started cutting.
Then used the Tropical Fishes pattern background and print and cut the elements for the waves and the turtle. Foam tape added to the back of the elements such as the waves, matted sentiment, and the turtle gave the card some dimension.
I love that I was able to combine Silhouette, Artesprix, and my new beading hobby!
I measured the size of the Artesprix jewelry pendant and then drew a circle in Silhouette Studio to use as my template to size the turtle in. Tip: hold the Shift key down while you draw to create a perfect circle or rectangle shape.
Once I had the size right, I made a couple copies and then cut the Artesprix Heat Resist Mask with the Silhouette. I love using the heat resist mask to create unique projects.
Other supplies: pencil, scissors, paper towels, copy paper, ruler, brush
Project #5 & 6 – Custom wood button & earrings
There are so many projects that you can create with one design or even just one element of a design.
For this one, I opened the SVG file for the Hawaiian Turtle Tote & Tag design in Silhouette Studio, then ungrouped the file to use only the turtle design.
Next, I released the compound path so I could remove the inside pieces and add in 2 circles in the center. Once I had the circles in place, I selected everything, right clicked and chose Make Compound Path. Then I exported as a SVG file and opened in the Glowforge app to cut a custom button from wood with the laser.
I set it up on the Glowforge to engrave the turtle design and then cut the button shape. Once I had my new button, I was able to string it up on some leather cording and make the rest of this beaded bracelet.
But now, I needed some earrings to wear with it. I started again with the SVG file and used the turtle shape, added a small hole at the top and exported as a SVG file to cut custom earrings with the Glowforge. I just couldn’t decide what color wood to use, so I cut multiples.
If you don’t have a laser machine, don’t let that stop you from creating fabulous projects! Think about what you do have available. There are many materials you could use such as faux leather and more!
If you are creating files to export as SVGs for use with other cutting machines, laser machines, printers, etc. I do have a class sharing showing how to create and export SVGs and what you need to consider when designing in Silhouette Studio for use in other programs.
One design, endless possibilities! The Crafting Creativity blog series is your go-to hub for fresh inspiration, packed with clever ideas, hands-on tips, and expert techniques to elevate your crafting. Whether you’re reinventing a favorite design, experimenting with new materials, or honing your skills, these posts are here to spark your creativity and turn imagination into reality. Dive into the Crafting Creativity series HERE and see where your creativity takes you!
Save this for future reference by pinning the image below.
Enjoy !
THANK YOU for your support! How can you help? Click HERE & buy a coffee. Every little bit helps with the cost of running the site.
Silhouette Classes
Never stop learning! Let me help you take the anxiety out of learning with Silhouette and get to creating faster! My Silhouette classes are heavily focused on software, so you can take the skills & techniques taught and apply them to many future projects!
**This post may contain affiliate links. What that means is that I may receive compensation if you purchase through the links I have provided. The price you pay for the product or service is not higher but I may get compensated for sharing.
I am beyond excited to announce the launch of my brand-new Master Print and Cut with Silhouette class, now available! If you’ve ever struggled with misaligned cuts, tricky registration marks, or wasted materials, this class is for you. Whether you’re new to Silhouette or simply want to level up your skills, this course is designed to help you achieve accurate Print and Cut results every time. Plus, this class includes a special kit provided by Nitwit Collections, giving you everything you need to create stunning, professional-quality projects as you learn. Get ready to unlock your Silhouette’s full potential and take your crafting to the next level!
Take your Silhouette skills to the next level with this in-depth Mastering Print & Cut class! Using the provided class files from Nitwit Collections, you’ll follow a guided, step-by-step process to set up and execute Print & Cut projects with confidence.
✅ Learn expert techniques for tracing, registration marks, and precision cutting ✅ Troubleshoot common issues and avoid wasted materials ✅ Discover bonus resources to enhance your workflow ✅ See the electrostatic mat in action for improved material handling
Whether you’re a beginner or want to perfect your Print & Cut technique, this class gives you the tools and knowledge to createprojects with ease!
Take your Silhouette skills to the next level—start now – enroll HERE.
I hate to see Silhouette users struggling with their machines, so I’ve included all of my tips and tried and true methods that I use to get successful results.
Find more resources on the Silhouette Secrets+ A to Z Guide on the blog HERE.
Save this for future reference by pinning the image below.
Enjoy !
THANK YOU for your support! How can you help? Click HERE & buy a coffee. Every little bit helps with the cost of running the site.
Silhouette Classes
Never stop learning! Let me help you take the anxiety out of learning with Silhouette and get to creating faster! My Silhouette classes are heavily focused on software, so you can take the skills & techniques taught and apply them to many future projects!
**This post may contain affiliate links. What that means is that I may receive compensation if you purchase through the links I have provided. The price you pay for the product or service is not higher but I may get compensated for sharing.
Looking for a fun and easy way to create a custom DIY wine stopper? 🍷✨ In this project, I’m using Artesprix Sublimation Markers to design a one-of-a-kind personalized wine stopper with the Artesprix Sublimation Wine Stopper Blank! Whether you’re making a unique gift or adding a personal touch to your kitchen accessories, this shows you how easy it can be to create your own design.
Affiliate links may be present in the following blog post and as an Amazon Associate I earn from qualifying purchases.
I recently took a 5 day challenge for a watercolor class held by Tracey Weinzapfel and it was so inspiring. Each night we had a 1 hour live class and she would show us some techniques to just play with. I loved it and sometimes my brain just would not stop thinking of new ideas. This one hit me in the middle of the night and I knew I wanted to try it out.
I can say that there is not another one like this in the world as it was custom drawn by me. But, you do not have to hand draw a design like I did. You can also use small stamps, add textures, paint a design, and more!
I absolutely love crafting with Artesprix products—they never fail to ignite my creativity and inspire new project ideas! Check out more of my Artesprix sublimation creations HERE.
THANK YOU for your support! How can you help? Click HERE & buy a coffee. Every little bit helps with the cost of running the site.
Silhouette Classes
Never stop learning! Let me help you take the anxiety out of learning with Silhouette and get to creating faster! My Silhouette classes are heavily focused on software, so you can take the skills & techniques taught and apply them to many future projects!
**This post may contain affiliate links. What that means is that I may receive compensation if you purchase through the links I have provided. The price you pay for the product or service is not higher but I may get compensated for sharing.
Looking to add a creative touch to your journal covers or other projects? In my latest video tutorial, I’ll show you step-by-step how to design a stunning mixed media journal cover using Silhouette Studio and bring it to life with physical mixed media elements. From printable vinyl to layered textures, this project blends digital design with hands-on creativity for a truly unique result! Watch the full tutorial now and get inspired to craft along with me!
Affiliate links may be present in the following blog post and as an Amazon Associate, I earn from qualifying purchases.
I had so much fun creating this project and can’t wait to create more with the digital elements and mixing physical mixed media to add a unique touch.
I am including the supply list for what I used, but you can use what you have and just start playing around.
And find the original blog post and short form video that is on the Grafix YouTube channel HERE.
Save this for future reference by pinning the image below.
Enjoy !
THANK YOU for your support! How can you help? Click HERE & buy a coffee. Every little bit helps with the cost of running the site.
Silhouette Classes
Never stop learning! Let me help you take the anxiety out of learning with Silhouette and get to creating faster! My Silhouette classes are heavily focused on software, so you can take the skills & techniques taught and apply them to many future projects!
**This post may contain affiliate links. What that means is that I may receive compensation if you purchase through the links I have provided. The price you pay for the product or service is not higher but I may get compensated for sharing.
Each month in the Silhouette Secrets+ newsletters, there is a free file offer. I then use that file to create multiple projects, showcasing the endless possibilities you can achieve with just one design. In this blog post I am sharing a variety of creative projects made using snowflakes designs that I created in the Silhouette Studio software. There are so many possibilities when working with just one design and I hope it sparks your creativity to look at your designs differently and think about the possibilities for multiple projects with one file.
Affiliate links may be present in the following blog post and as an Amazon Associate, I earn from qualifying purchases.
The January newsletter files were several snowflake designs that I created in the Silhouette Studio software. This is a great way to learn more about using the tools in the Silhouette Studio software and every single user could create these themselves. Check out the tutorial on the tools I used HERE.
I drew a 3″ circle in the Silhouette Studio software as my template to create within for placement and getting an idea of what the design would look like. Using one of the snowflake designs, I added an offset and then used the Knife tool in Silhouette to cut the snowflake design in half. Next, I opened a snowflake saying, adjusted it at bit, and added that to the design. Then cut everything from Oracal 651 and applied it to the front of a 3″ acrylic circle.
I used the Silhouette Autoblade for these cuts and it did beautifully.
Using the Line Drawing Tools to add weeding lines can help so much when you have intricate designs to weed. This allows you to weed smaller sections of the design and not have the material stick back to itself.
Using one of the snowflake designs, I added a score line down the center and cut 3 for each 3-D snowflake out of cardstock. Then assembled them together to make the 3-D ornaments. The score line helped to fold each of the snowflake sides directly in half for assembly.
Project #3 – Keychains/Bag Tags and Earrings with Heat Foil on Silhouette Leatherette
This silver foil looks amazing on the Silhouette black leatherette. I highly recommend the Silhouette leatherette for anyone who wants to get started with cutting faux leathers. Create many different projects with the Silhouette heat pen and Silhouette leatherette.
I cut the snowflake design out of a blue sheet of cardstock and then had to walk away for a bit because I wasn’t sure how to finish this out.
I ended up pulling out supplies and stamps just to see what might be good to add on to finish this card out. I stamped some embellishments from a birthday stamp set as snowflakes in white ink and then stamping the sentiment in a light blue and adding it to the card with foam tape for dimension.
Print and cut is so awesome and there are many different material types you can use, such as printable magnet sheets. I filled the snowflake designs with color, added an offset and then a few more shapes to fill the page. These could be used to decorate any magnetic surface.
I used them to give additional ideas for a recent class I taught on creating a custom chalkboard for home decor. This chalkboard is magnetic and has so many options you can play around with.
I love discovering how a single design can spark endless creative possibilities! The Crafting Creativity blog series is your ultimate source of inspiration, filled with innovative ideas, practical tips, and expert techniques to take your crafting to the next level. Whether you’re transforming a favorite design, exploring new materials, or refining your skills, these posts are here to fuel your creativity and bring your ideas to life. Check out more in the Crafting Creativity series HERE and see where your imagination leads you! ✨
Save this for future reference by pinning the image below.
Enjoy !
THANK YOU for your support! How can you help? Click HERE & buy a coffee. Every little bit helps with the cost of running the site.
Silhouette Classes
Never stop learning! Let me help you take the anxiety out of learning with Silhouette and get to creating faster! My Silhouette classes are heavily focused on software, so you can take the skills & techniques taught and apply them to many future projects!
**This post may contain affiliate links. What that means is that I may receive compensation if you purchase through the links I have provided. The price you pay for the product or service is not higher but I may get compensated for sharing.
Have you ever wanted to create your own custom jewelry with vibrant, professional-looking designs? With Artesprix Sublimation Inks, you can turn your creative ideas into stunning custom jewelry pendant that is truly a one-of-a-kind piece. In this blog post, I’m sharing the simple process of designing and sublimating your own jewelry pieces, perfect for gifts, personal accessories, or even to sell. No matter your experience level, this fun and easy project is sure to inspire your creativity!
Affiliate links may be present in the following blog post and as an Amazon Associate I earn from qualifying purchases.
The white part of the design is the white of the sublimation blank and is created by using the Artesprix Heat Transfer Resist Mask. Basically it’s a stencil in reverse. The Heat Transfer Mask blocks any of the ink from binding to the sublimation blank and leaves it a bright white.
I cut the Heat Transfer Resist Mask with the Silhouette Cameo 5 using a Blade depth – 2, Force – 14, and speed 5 cut this design beautifully. I would highly recommend test cutting to get the best cut settings for use with your machine and blade. My blade is older and well used, so it did use more force than a brand new blade would.
Here is a close up look at the finished custom jewelry pendant.
I LOVE them! Love the colors that turned out and I also combined my new hobby of beading to complete these projects.
I absolutely love working with Artesprix products—they always spark my creativity and inspire endless ideas for future projects. You can explore more of the projects I’ve created with Artesprix sublimation products HERE.
THANK YOU for your support! How can you help? Click HERE & buy a coffee. Every little bit helps with the cost of running the site.
Silhouette Classes
Never stop learning! Let me help you take the anxiety out of learning with Silhouette and get to creating faster! My Silhouette classes are heavily focused on software, so you can take the skills & techniques taught and apply them to many future projects!
**This post may contain affiliate links. What that means is that I may receive compensation if you purchase through the links I have provided. The price you pay for the product or service is not higher but I may get compensated for sharing.
Ready to take your Silhouette crafting skills to the next level? In our latest LIVE tutorial, we demonstrated the exciting world of working with leatherette, faux leather, and adding dazzling details with heat foiling using the Silhouette Heat Pen. Whether you’re creating personalized accessories, decorative pieces, or custom gifts, these techniques will help you achieve professional-looking results with ease. If you missed it, don’t worry—we’ve got all the tips, tricks, and must-know details right here! And I am sharing more tips below too!
Affiliate links may be present in the following blog post and as an Amazon Associate, I earn from qualifying purchases.
We had such an amazing time during this month’s Live Silhouette Tutorial! The session was packed with valuable tips, tricks, and techniques to help you elevate your crafting game. I walked through the entire process of creating a bookmark shape, adding a design, and using the Silhouette Heat Pen for stunning foiled details. Plus, I shared insider tips on using the Knife Tool and so much more!
Grab your favorite drink, get comfy, and check out the replay on the Silhouette Secrets+ YouTube channel under the Live section. Don’t miss the chance to learn and create along with us! And that’s not all! I have a couple more tips I wanted to elaborate on below to help you be more successful in your Silhouette journey!
What if you don’t have a newer model machine that can utilize the Silhouette Heat Pen? No problem, the same tips, techniques, and tricks I shared in the video and below can still be useful. I’ve included additional resources below as well for users with older model machines.
When I asked the viewers if they wanted to see more, they said yes! They stuck around while I set up another design but this time with a fill option. Don’t believe that little timer in the Silhouette Studio software!!! The filled design took around 10 minutes to foil completely. That was twice as long as the estimated timer in Silhouette.
In the live, I also mentioned some tips about tool storage with the new powered tools and I wanted to share a bit more about that.
If these prongs get damaged, the powered tools will no longer work. The new tools are not cheap, so I would recommend storing them safely where they will not get beat up. In the video, I shared a brief glimpse at the storage I’m using, which is a storage container by Creative Options.
This works well for the storage of many Silhouette tools as you can see. The Silhouette Gold and Silver Foil have their own space so they won’t get damaged. The sections are adjustable so I’m able to partition the Silhouette powered tools off and store them so their prongs are not going to get knocked into anything else that could damage them. I also have my Silhouette Power Engraver in this container along with a couple blades and the Silhouette Embossing Tools.
My Options container is part of a larger Creative Options system that can house even more supplies too! I love the color of it too!
I shared even more storage tips in this blog post HERE.
One of the other tips that I mentioned in the video that is very important for using these new Silhouette powered tools. That is to keep the machine clean and free of dust and debris.
Any dirt or debris that gets in the powered tool housing connection or on the prongs of the powered tools can affect the functionality of those tools.
I want you to be as successful with your Silhouette machines and tools as possible!
And I know I mention that the end of the Live video that I will record another video sharing the tassel creation, however, when I got started making it, I found I’m no expert on this topic. So I’m sharing the video I followed to create my tassels by Notches Sewing found HERE.
Here is a list of the supplies I used for creating these foiled leatherette projects:
Save this for future reference by pinning the image below.
Enjoy !
THANK YOU for your support! How can you help? Click HERE & buy a coffee. Every little bit helps with the cost of running the site.
Silhouette Classes
Never stop learning! Let me help you take the anxiety out of learning with Silhouette and get to creating faster! My Silhouette classes are heavily focused on software, so you can take the skills & techniques taught and apply them to many future projects!
**This post may contain affiliate links. What that means is that I may receive compensation if you purchase through the links I have provided. The price you pay for the product or service is not higher but I may get compensated for sharing.
Heat foil projects are a show-stopping way to add a touch of elegance and shimmer to your designs, whether you’re crafting cards, gifts, or custom decor. With the right tools and techniques, creating stunning heat foil projects can be simple and rewarding. In this guide, we’ll walk you through five easy steps to achieve excellent results using your Silhouette machine. Whether you’re a beginner or looking to enhance your foiling skills, these tips will help you create dazzling projects that shine every time. Let’s get started!
Affiliate links may be present in the following blog post and as an Amazon Associate, I earn from qualifying purchases.
5 Steps for Gorgeous Heat Foil Projects
Create Your Design – design or select your project in Silhouette Studio
Set Up the Foil Action – adjust your settings for the perfect foil application
Prepare the Mat – place the foil on your material in the correct position & secure it
Send to Foil – let your Silhouette machine work it’s magic
Reveal Your Design – carefully remove the foil to unveil your stunning creation
New video on the Silhouette Secrets+ YouTube channel – Additional Tips!
We’ve just released a brand-new video on the Silhouette Secrets+ YouTube channel, Silhouette Heat Foil Pen Dos & Don’ts: Tips for Perfect Foiling Every Time! In this video, we break down the essential tips and common mistakes to avoid when using the Silhouette Heat Foil Pen. You can see the machine in action and what goes right and what did not. Use these tips along with the step-by-step details below for perfecting your foiling techniques.
Don’t forget to like, subscribe, and hit the notification bell to stay up-to-date with all our Silhouette tips and tricks on YouTube.
Your Step-by-Step Guide to Flawless Heat Foil Projects
1 – Create the Heat Foil Design
Choose a design to foil, or create your own custom design in Silhouette Studio.
Decide if you want the outline of the design to be foiled or if you prefer to fill the entire design with foil.
Silhouette Studio is a cutting program, so any design that is on the screen is automatically an outline. Filling it with a color only changes how it looks on the screen and is used for printing through a printer. The design on the left in the photo above is the snowflake design sent without adding any additional steps to it. The design on the right is filled with a cross-hatched fill using the Specialty Tools Panel – Heat Pen Tab.
The best fill and spacing is really dependent on the design and materials that are being used. The only way to really know what will look the best is to test it and see for yourself.
If the fill on your design is too tight, it can cause the foil to be removed from certain areas due to multiple passes over the same spot, leaving blank spaces. On the other hand, if the fill is too loose, it can also result in gaps. The ideal fill depends on the desired final look, and the best way to determine what works is to test it out.
I set my foiling and sketch projects up with blue as the foil/sketch lines and red for the cut line using the Line Color in the QAT or the Line Style Panel. This will be helpful when setting up the foiling settings in the next step.
For those who are using older model Silhouette machines and the Foil Quill, the Sketch/Line Effects Panel can be used to add a fill to the design following the same tips listed above.
2 – Set Up the Heat Foil Action
When using the Silhouette Heat Pen, there is an Action for the Heat Pen that may need to be set up. Click on the Send tab and then select your material such as Cardstock, Plain Cardstock, or Leatherette. If there is no Heat Foil Action that shows up for the material, then a custom setting will need to be created. This is not hard to do and we will go through it below.
On the Send tab, in Silhouette Studio, once the Heat Pen has been recognized in the Silhouette Cameo 5, Portrait 4, or Curio 2, you should see a message asking if you want to turn it on. The Silhouette Heat Pen takes approximately 3 minutes to heat up before it can be used properly.
I use the Cut by Line option on the Send tab, so the different actions can easily be turned on and off, so the design can first be foiled, then the foil removed, and then cut if the project requires.
Select the material setting for the red color cut lines. Test cuts will be the only way you know what the perfect setting is for your material, so don’t skip that step before you start and waste materials.
When using the Cut by Line or Cut by Fill Color options, it’s important to ensure the correct color is selected when adjusting settings in the bottom section of the Send tab. For example, if red is selected at the bottom but isn’t the box check for cutting, any changes made will apply to the red cut lines instead of the intended selection. Always double-check that the selected color matches the cut settings you’re adjusting. More details and a visual example of that in this Silhouette Cutting Issues – Cut by Line or Fill Color video.
The next thing to note is that if there is no Heat Pen action programmed for a material, you will see a Setting not found message. This is not a problem, we will create a custom setting by clicking on the MORE button and then creating our own setting for our material.
Click the + sign at the bottom of the materials list, name your material, and then select the machine model.
Now, the next steps are important so the setting is not created with actions that are not needed.
With the material you added selected, select Carriage 2, then click on the + sign on the right side. Choose Add Foil Action. Adjust the settings for force, speed, etc. The only way to know what settings work will be to test and use those settings.
Now, the important part. Click on the Kraft Action and choose REMOVE ACTION at the bottom of the Send tab.
If the Kraft Action or any other action that is set for a material is not removed, it will show up in the settings when the material is selected and can be confusing and cause future issues for projects.
Next click the drop down shown above and select the material that is closest to what you are using for this setting. I don’t actually know that this does anything other than serve as a reminder to you, but it was added randomly to the software many versions back.
Click SAVE if it’s available and then click the giant X at the top of the Send tab to close this window.
Then select the new material created in the drop down next to the line color you want it applied to. User Created Settings will appear at the bottom of the Materials selection drop box.
Verify that the settings are what you created and look right.
Congratulations! You have created your own custom setting. I would also recommend writing down these settings in a safe place. Sometimes they can disappear out of the software. They can also be exported by clicking on the MORE button and right click on the material and export, however, that file cannot always be successfully imported back in. These are just some things we’ve seen over the years with different software versions.
For older model machines and creating a custom setting, please see this tutorial HERE.
3 – Prepare the Mat
If the material will be cut after the foiling, place the materials at the bottom of the Silhouette cutting mat so it easier to remove the foil before sending the material to be cut.
Apply the foil in the same location on the material and mat that is set up in the Silhouette Studio software. Make sure the foil covers the entire area of the design to be foiled and that the washi tape is not in the areas being foiled or it can interfere with a complete foiled image.
Add the washi tape to one corner and then move to the diagonal corner and apply the washi tape, pulling it taunt. Then add washi tape to the final 2 corners and pull taunt as applied. Adjust as needed so the foil does not have any slack or creases. If it catches or has creases, it can affect the final results.
Once the foil is secured flat on the materials, load the cutting mat in the Silhouette machine.
When the design is placed in the top left corner as we are used to, then it can be difficult to remove the foil without unloading the mat. I got too excited and did that on my first design.
It took a bit more work, but I was able to remove the washi tape and foil without unloading the cutting mat. If this every happens to you, make sure to check for any washi tape that might get stuck under the roller bar or in the machine. I found a small piece that could have been a BIG problem on future projects if I had not seen it.
4 – Send to Foil
Check the box next to the Heat Foil setting and verify it’s set for Tool 2. Make sure the red is unchecked so you have time to remove the foil before it cuts the design. Then click Send in the bottom right and approve any windows that might pop up.
Remove the foil before cutting or the foil can dull the blade faster or get caught up in the machine during the cut and the project can be ruined.
5 – Reveal Your Design
Make sure to carefully remove the washi tape & don’t let the foil touch the adhesive cutting mat. It will stick immediately and then be stuck onto your cutting mat. If you reveal it slowly and it did not foil well, you can try securing the foil back down and run it again to see if it will foil better. You may need to adjust the settings and this is why testing is so important.
Do not unload the cutting mat between the foil and cut action or the design may not cut in the correct location. This is why the location of the design at the bottom is easily to work with.
Next, on the Send tab in Silhouette Studio, uncheck the blue line color and check the red color, then send the design to be cut.
When it’s finished, check the cut before unloading the cutting mat. If it did not cut well, you can send it again. After it’s cut, unload the cutting mat, flip the mat over, and peel the mat away from the material at a sharp angle to help it release.
Keep in mind that anytime you sketch or foil with a fill, the tool is going over the design multiple times depending on your fill options. This can mean that the material will be stuck down to the cutting mat in that area and may need a bit more care to remove without damage.
Finish out the project with any assembly needed and then enjoy!
Make sure to check out the video on the Silhouette Secrets+ YouTube channel for a visual of creating these projects and additional Dos and Don’ts too! Find it HERE.
Additional Resources for Mastering Heat Foiling Techniques
Save this for future reference by pinning the image below.
Enjoy !
THANK YOU for your support! How can you help? Click HERE & buy a coffee. Every little bit helps with the cost of running the site.
Silhouette Classes
Never stop learning! Let me help you take the anxiety out of learning with Silhouette and get to creating faster! My Silhouette classes are heavily focused on software, so you can take the skills & techniques taught and apply them to many future projects!
**This post may contain affiliate links. What that means is that I may receive compensation if you purchase through the links I have provided. The price you pay for the product or service is not higher but I may get compensated for sharing.
Each month in the Silhouette Secrets+ newsletters, I team up with a talented designer to offer a free file. I then use that file to create multiple projects, showcasing the endless possibilities you can achieve with just one design. In this blog post I am sharing a variety of creative projects made using the Poinsettia Gift Tag file by Jamie Lane Designs.
Affiliate links may be present in the following blog post and as an Amazon Associate, I earn from qualifying purchases.
To start the month off, I cut the design and assembled it for gift tags using kraft cardstock and colored cardstock. I then inked the edges of the cut pieces and used some paper shaping tools to add dimension to the flowers before gluing it all together.
I scaled the flower design down just a bit and used it as an embellishment on our Christmas card.
This one shown isn’t quite mail friendly, so I kept it for myself and used it as decoration for this year.
I added an easel to the back of all the Christmas cards I sent out and the one shown above that I have on display in my home.
The Silhouette LIVE tutorial on the Silhouette Secrets+ YouTube channel from November is what started the entire idea of using this with my Christmas card design. In the live I followed a suggestion from a viewer which began the creation of this years Christmas cards. I also shared sketching tips and a demo using the Silhouette Electrostatic Mat.
I scaled the poinsettia design up a little bit, cut a few more center pieces for the flower and added it on top of a hinged gift box. Added a little bit of gold sparkle spread on the poinsettia and now have a custom made gift box ready to go.
Want to know the perfect cut settings for all cardstock? There isn’t one. There are many factors that affect cut results such as: brand, color, weight, paper finish, blade life, cutting mat adhesion, humidity, the design, and more! Test cuts are the best way to know what will work for your particular cardstock or any material in fact. This will save you time, frustration, money, and supplies.
Over a year ago, I started working on a poinsettia project and crafted these gold-painted wool ball centers for the flowers. While that project was never finished, I kept all the pieces neatly tucked away in a basket, waiting for the right moment to complete it. As I revisited the project, I realized I had used this exact poinsettia flower file from Jamie Lane Designs. Inspired, I decided to pair it with beautiful pearlescent papers from 12 x 12 Cardstock Shop to create a stunning bouquet.
I ordered the cardstock and when I went to use it I was surprised at how thick it was. I wasn’t sure if I would be able to successfully cut it with the Silhouette Electrostatic Mat. After feeling it, I went looking for the weight and found it was 105 cover that’s 285 gsm. Even though I thought it might be too thick, the only way you really know if something will work is to test it! So I did just that. I did have to adjust my cut settings a bit at the beginning and then it cut beautifully!
As I mentioned above, there are no perfect cut settings that work for all cardstock. The faster you can learn to accept that, the less frustrating it will be. You will quickly learn that test cuts will save you time and if you are like me, kick yourself when you don’t do them.
Check out the new video on the Silhouette Secrets+ YouTube channel where I shared how I created this paper flower bouquet with tips to using the Electrostatic Mat too!
I miss counted when I was cutting the flowers out and I had more flower pieces cut than I had wool ball centers, but I wasn’t going to let this one sit unfinished. I had extra center pieces leftover from the previous projects and still finished these out to use for a future project or gift.
What are some ideas you have for projects this year?
I love exploring how one design can inspire multiple creative projects! The Crafting Creativity blog series is your go-to source for endless inspiration, packed with innovative ideas, practical tips, and expert techniques to elevate your crafting. Whether you’re reimagining a favorite design, experimenting with new materials, or mastering advanced skills, these posts are here to ignite your imagination and help you bring your creative visions to life. Head over to the Crafting Creativity series HERE and discover where your creativity can take you!
Save this for future reference by pinning the image below.
Enjoy !
THANK YOU for your support! How can you help? Click HERE & buy a coffee. Every little bit helps with the cost of running the site.
Silhouette Classes
Never stop learning! Let me help you take the anxiety out of learning with Silhouette and get to creating faster! My Silhouette classes are heavily focused on software, so you can take the skills & techniques taught and apply them to many future projects!
**This post may contain affiliate links. What that means is that I may receive compensation if you purchase through the links I have provided. The price you pay for the product or service is not higher but I may get compensated for sharing.
Are you ready to start crafting with your Silhouette Cameo 5 but don’t know where to begin? 🎉 Our brand-new Beginner’s Guide to the Silhouette Cameo 5: Crafting Made Easy is here to help! This step-by-step class is designed with beginners in mind, walking you through everything from unboxing your machine to mastering your first project. Whether you’re brand-new to Silhouette or want to boost your confidence with the Cameo 5, this class is packed with practical tips and easy-to-follow instructions to set you up for crafting success. Let’s get started on your creative journey today! 🌟
Beginner’s Guide to the Silhouette Cameo 5: Crafting Made Easy step-by-step class Click HERE
Take the guesswork out of using your Silhouette Cameo 5 with this hands-on, step-by-step class designed for beginners. You’ll learn how to set up your machine, navigate the essential features of Silhouette Studio, and master the basics of cutting with confidence. This class covers everything from opening the box to getting your first successful cuts, with expert tips all along the way. Perfect for new users, this guide will leave you equipped with the skills and knowledge to bring your creative ideas to life!
Portrait 4 owners: this video course can also be used for Portrait 4 machines as well. Most of the information is the same for both machine models, the main difference is the cutting width of each machine. View an unboxing of the Portrait 4 here.
The supplies needed for this class are minimal. I used Oracal 651 adhesive vinyl, AT 65 Transfer Tape, and Cardstock.
Complete course outline below:
Introduction, Unboxing, and Proper Setup of the Silhouette Cameo 5 – 20 minutes
Unboxing the Silhouette Cameo 5
Explanation of all parts included in the box
Proper Setup of Silhouette Cameo 5 machine
Proper Installation of the included Roll Feeder on the Silhouette Cameo 5
Explanation & Tips to Autoblade Installation and Tool Housings
Silhouette Cameo 5: First Cuts with Adhesive Vinyl & Cardstock – 56:40 minutes
Setting up a Design Using Text
Cut Settings on the Send Tab Explained
2 Ways to Do Test Cuts
First Cuts from Adhesive Vinyl
Explanation of the Autoblade Adjustment
Removing materials from the cutting mat
Weeding Tips
Applying Transfer Tape
Removing the Backing off Adhesive Vinyl & Cutting Tips
Changing Blades & Reinstalling for Cardstock Cuts
Test Cuts on Cardstock
Drawing Basic Shapes & Adjusting a Polygon
Cutting Basic Shapes from Cardstock
Troubleshooting Tips for Cut Issues
Tips to Removing Materials, Saving Adhesive on the Mat, and Materials Not Curling When Removed
More Tips
Additional Resources Terms of Use
This class will help get you up and cutting faster than figuring it out yourself! Help yourself get started quicker and be on your way to more fabulous projects in no time!
Save this for future reference by pinning the image below.
Find more Silhouette resources and tutorials on the A to Z section on the blog HERE.
Enjoy !
THANK YOU for your support! How can you help? Click HERE & buy a coffee. Every little bit helps with the cost of running the site.
Silhouette Classes
Never stop learning! Let me help you take the anxiety out of learning with Silhouette and get to creating faster! My Silhouette classes are heavily focused on software, so you can take the skills & techniques taught and apply them to many future projects!
**This post may contain affiliate links. What that means is that I may receive compensation if you purchase through the links I have provided. The price you pay for the product or service is not higher but I may get compensated for sharing.
Looking for a fun and creative way to make a personalized baby bodysuit with sublimation? In the latest project video on the Artesprix channel, I’m showing you step-by-step how to sublimate an adorable baby bodysuit using Artesprix Sublimation Markers, Stencils, and Inks. Whether you’re crafting a unique gift for a baby shower, making something special for your little one, or just exploring sublimation techniques, this project is easy, beginner-friendly, and oh-so-cute! I’ll also share all the supplies you need to create your own, so you can get started right away.
Affiliate links may be present in the following blog post and as an Amazon Associate I earn from qualifying purchases.
I absolutely love working with Artesprix products—they never fail to ignite my creativity and inspire countless ideas for future projects. Find more projects I’ve created using the Artesprix sublimation products HERE.
THANK YOU for your support! How can you help? Click HERE & buy a coffee. Every little bit helps with the cost of running the site.
Silhouette Classes
Never stop learning! Let me help you take the anxiety out of learning with Silhouette and get to creating faster! My Silhouette classes are heavily focused on software, so you can take the skills & techniques taught and apply them to many future projects!
**This post may contain affiliate links. What that means is that I may receive compensation if you purchase through the links I have provided. The price you pay for the product or service is not higher but I may get compensated for sharing.
Have you ever seen the message stating materials not found when opening a design in Silhouette Studio? Encountering the “Materials Not Found” message in Silhouette Studio can leave you wondering “What is wrong?”. Whether you’re working on a vinyl project, heat transfer design, or a print and cut masterpiece, this error can be frustrating and confusing. But don’t worry! In this post, we’ll explain why it happens and what to do next.
Affiliate links may be present in the following blog post and as an Amazon Associate, I earn from qualifying purchases.
Materials Not Found Message– Silhouette Studio
This is what the materials not found message can look like in Silhouette Studio on the Design Tab.
It can also appear when you are opening from the library tab before the image is placed on the design mat.
This materials not found message is not something to be alarmed about. It simply means that the cut setting that the person who created the file had on their software is not found within the Silhouette Studio software on your computer. This could be for several reasons.
The most common reason is that the designer has their own custom setting created and when they saved the design, those cut settings were saved with the file. When opened, if that cut setting is not on your Silhouette Studio software, it triggers this message.
Whether cut settings are saved with a file in Silhouette Studio is dependent on the software version that the design is saved with.
Another reason is that Silhouette has made changes to the cut settings menu and changed names or added/removed cut settings. With the release of newer model Silhouette machines, more cut settings have been added over time to the Silhouette preset menu.
This message is just letting you know that the cut setting has been switched back to the default of Cardstock. Click OK and proceed as usual.
When it comes time you cut the design, select the material that best fits your project and test cut.
While the idea of having a cut setting that works for all users perfectly is appealing, that is not reality. Materials vary worldwide and many factors go into getting a clean cut such as blade life, machine model, cutting mat adhesion, etc.
Here is a quick video clip demonstrating the ‘Materials Not Found’ message that appears when opening a design file in Silhouette Studio.
Save this for future reference by pinning the image below.
Enjoy !
THANK YOU for your support! How can you help? Click HERE & buy a coffee. Every little bit helps with the cost of running the site.
Silhouette Classes
Never stop learning! Let me help you take the anxiety out of learning with Silhouette and get to creating faster! My Silhouette classes are heavily focused on software, so you can take the skills & techniques taught and apply them to many future projects!
**This post may contain affiliate links. What that means is that I may receive compensation if you purchase through the links I have provided. The price you pay for the product or service is not higher but I may get compensated for sharing.
Discover the magic of versatility with Megan Hardy’s creative designs! In this post, we’ll show you how you can transform a single design into five unique projects that are perfect for any occasion. From an etched acrylic sign with the Silhouette Curio 2 to a wood sign using adhesive vinyl, a personalized apron using Artesprix sublimation markers and paints, a sketched place card for stylish gatherings, and a dazzling foiled card featuring the triple mat stacked technique—this post is packed with inspiration and tips to make the most of your crafting tools. Do more with your designs and bring your creativity to life!
Affiliate links may be present in the following blog post and as an Amazon Associate, I earn from qualifying purchases.
Each month in the Silhouette Secrets+ newsletters, I collaborate with an amazing designer to bring you a free file. Throughout the month, I work with the newsletter file to create and share a variety of projects, showcasing the many ways it can be used.
Project #1 – Etched Acrylic Sign with the Silhouette Curio 2
I used the Silhouette Curio 2 with the Power Engraver to etch on a clear acrylic sign.
In most cases, I prefer to etch on the backside of acrylic, however, I knew I want to paint on the back, so I etched the front for this design. The Silhouette Power Engraver leaves a pretty smooth finish, but that will also vary based on the actual acrylic being used and the fill options chosen. The only way to know how it will turn out is to test.
I use shapes in the Silhouette Studio software to create a “template” in order to align the design where I want on the blank I’m using. Just make sure to turn the “cut” line off for the template before you send it to etch or it will also etch the outer edge of your blank as well.
Also make sure to keep the design away from the taped edges or it could affect the etch results. I got lucky in this etching and it still etched through the painters tape, however, that can also gum up the Power Engraver tool too with the tape particles and adhesive.
I grabbed a plain wood sign from my stash that I had picked up years ago in a Target dollar spot. Added a couple layers of paint to the sign and let it dry. Then measured the inside of the blank and used a rectangle as a template to size the design. Once I had the design sized, I moved my rectangle off to the left side and drew in some weeding lines with the line tools so it was easier to weed in pieces.
I also cut my material down to the size I need so I can save the adhesive on my cutting mat and don’t have to peel a full sheet of material off the mat each time. To do this I decrease the Transparency on the Page Setup Panel so I can reveal the cutting grid and know what size to cut my material down to.
Now I am not using the adhesive on the rest of the mat and it will increase the lifespan on the cutting mat.
Adding weeding lines in the Silhouette software may take a couple extra seconds before you send the design to cut, but can save you frustration when weeding adhesive vinyl.
I love how these turned out! This place card was designed in the Silhouette software, using a rectangle, dashed line for scoring, and the pumpkin design from the Falling for Fall design.
Let’s not talk about the fact that I created these for Thanksgiving dinner and then totally forgot to use them. There is always next year!
But, they turned out looking awesome! I love the painted liked texture that the sketch fill with the white pen gave it. Each one turned out just a bit different in the way the ink laid down and moved.
After creating these, I did a LIVE tutorial on the Silhouette Secrets+ YouTube channel sharing more on sketching tips and a demo using the Silhouette Electrostatic Mat as well.
Project #4 – Custom Apron with Artesprix Sublimation Markers and Paints
Artesprix sublimation products are a great way to test and investigate if you want to go deeper into the sublimation side of things. I used the Artesprix black sublimation marker to sketch out the design with my Silhouette.
With Artesprix sublimation products, you don’t need any special paper! Plain ordinary copy paper is all that’s needed and if you don’t like what you’ve made, you aren’t out much. I love playing with the Artesprix products and seeing what can happen.
Once the main design was sketched, then I sponged on some paint in 2 shades of orange around the design to complete the custom apron.
Other supplies: pencil, scissors, paper towels, copy paper, ruler, sponges or paint brush, paint palette
Project #5 – Foiled Card Design with the Triple Mat Stacked Technique
Make your cards pop with the Triple Mat Stacked technique and add heat foil to that for even more wow factor. I love combining things to make unique projects!
This was completed using a digital pattern in Silhouette Studio, setting it up for a print and cut, then using the setup for foiling the design before cutting.
Foiling can really add a unique touch to your projects! It does take extra time in creating, but can definitely be worth it.
I love exploring how one design can inspire multiple creative projects! The Crafting Creativity blog series is your go-to source for endless inspiration, packed with innovative ideas, practical tips, and expert techniques to elevate your crafting. Whether you’re reimagining a favorite design, experimenting with new materials, or mastering advanced skills, these posts are here to ignite your imagination and help you bring your creative visions to life. Head over to the Crafting Creativity series HERE and discover where your creativity can take you!
Save this for future reference by pinning the image below.
Enjoy !
THANK YOU for your support! How can you help? Click HERE & buy a coffee. Every little bit helps with the cost of running the site.
Silhouette Classes
Never stop learning! Let me help you take the anxiety out of learning with Silhouette and get to creating faster! My Silhouette classes are heavily focused on software, so you can take the skills & techniques taught and apply them to many future projects!
**This post may contain affiliate links. What that means is that I may receive compensation if you purchase through the links I have provided. The price you pay for the product or service is not higher but I may get compensated for sharing.
Are you ready to take your wall art to the next level? Or just want to try something new? A busted canvas project is the perfect way to add a bold, trendy touch to your home decor. This creative technique combines texture, dimension, and artistic flair to transform a plain canvas into a statement piece that’s truly one of a kind. Whether you’re a seasoned crafter or new to DIY projects, this guide will walk you through every step of creating your own stunning busted canvas.
First, I don’t think there is a “wrong” way you can do this! Look around your supplies and use what you have and then just keep going. Start with an idea and let it take you from there.
Affiliate links may be present in the following blog post and as an Amazon Associate, I earn from qualifying purchases.
I’m going to share the steps I took, but you can do some of these in any order.
Step 1 – Prep the canvas frame.
With a paint brush or foam brush, add an even layer of Mod Podge to the inside of the back of the canvas frame as a base coat.
Step 2 – Cut the pattern material down to size.
Using scissors, cut the pattern material down to size. This does not have to be exact, but get as close from frame edge to frame edge. You want to make sure the center of the canvas is fully covered.
If using napkins, separate the ply of the napkin so you are only using 1 layer that is the patterned piece. This will ensure that the layers don’t separate later on in the process.
With the pattern face up, smooth down on top of the Mod Podge layer. Use a squeegee to help smooth it down onto the backside of the canvas.
Step 3 – Add an even layer of Mod Podge on top of patterned material.
I used the Mod Podge Sparkle on this one and love it, but of course, not every design will need bling.
Allow it to dry completely.
Step 4 – Measure the backside of the frame.
Measure the inside of the frame and the outer edge of the frame, so you know how large to create the design. Keep in mind that you want the design to be centered and if it’s too big, the canvas edges may hide part of the design.
Step 5 – Pick a background design
For this one, I printed a digital patterned background by Clikchic Designs of the Christmas tree. I started by opening the design in the Silhouette Studio software, set my page to letter size for the Koala Inkjet Glossy Paper, and then drew some rectangles using the measurements I took. This way I knew how large to size the design and what would be seen within the frame.
Then I printed the design.
Step 6 – Trim the background design down to canvas size.
I used a paper trimmer to trim the background design down to the 8″ x 10″ size of the frame.
Step 7 – Decorate the front side of the canvas however you desire.
For this one, I decided I wanted to try to replicate the outer edge design of the patterned background with the blue sky, stars, and snow.
I started with a base layer of a blue metallic paint. Then sponged on a darker blue on top of that. And then added some lighter blue & white paint splatters for the stars. I added a bit of water to the acrylic paints to thin them out and give it some dimension too!
I just kept going to see how it would turn out. I’m learning to do that more and more and just see where it takes me and I’ve been thrilled with almost all the results.
Let that dry completely before moving on to the next step.
Step 8 – Cut the canvas from the backside
Using a sharp utility knife on a safe surface such as a self healing cutting mat, find the center of the backside of the canvas and make slices from the center out towards the frame randomly. The farther back you cut, the deeper the curl will be on the front of the frame.
Step 9 – Secure the background photo to the backside of the frame
Add hot glue along the edges of the frame and line up the background image to secure it to the backside of the canvas frame.
Gluing down the opposite corners to start can help get it aligned properly before you are too committed and the fine tip glue gun can come in handy. Use a squeegee to run along the edges of the background paper and smooth it down to the glue.
Step 10 – Roll back the cut pieces on the front of the canvas
Flip the canvas over and gently roll back the cut pieces. Training the curls by rolling it a bit before gluing can help to prevent lifting after it’s glued down. Once curled as desired, add a bit of hot glue to the end and press it down to the canvas. I found using the end of my paint brush worked well to hold it in place while the glue dried and I didn’t burn my fingers.
Continue around the entire frame until all of the sections are curled and securely glued in place.
Step 11 – Admire your new DIY Busted Canvas artwork
Each diy busted canvas will be a unique creation!
I love how this turned out!
Like I mentioned at the beginning, I don’t think there is any “wrong” way to do this. I’m definitely hooked on the busted technique.
Step 12 – Start planning your next creation
I hope this has given you some creative ideas! Look around your stash and see what you could use to create your own DIY Busted Canvas.
Save this for future reference by pinning the image below.
Find more project ideas and tutorials on the blog HERE.
Enjoy !
THANK YOU for your support! How can you help? Click HERE & buy a coffee. Every little bit helps with the cost of running the site.
Silhouette Classes
Never stop learning! Let me help you take the anxiety out of learning with Silhouette and get to creating faster! My Silhouette classes are heavily focused on software, so you can take the skills & techniques taught and apply them to many future projects!
**This post may contain affiliate links. What that means is that I may receive compensation if you purchase through the links I have provided. The price you pay for the product or service is not higher but I may get compensated for sharing.
Lori Whitlock’s designs are a treasure trove of inspiration for crafters of all skill levels. Whether you’re a seasoned maker or just starting out, her versatile and beautifully crafted files can transform any project into something truly special. In this blog post, we’ll explore four unique ways to bring Lori Whitlock’s designs to life, showcasing a mix of techniques and ideas that highlight their creative potential. From cards to home décor, these projects will not only spark your imagination but also help you get the most out of your crafting tools.
Affiliate links may be present in the following blog post and as an Amazon Associate, I earn from qualifying purchases.
Crafting Creativity with Lori Whitlock
Project #1 – Fall Blessing WreathSign
I cut all of the cardstock pieces for the wreath using the Silhouette Electrostatic Bed along with my Cameo 5 . Once everything was cut, I started gluing the pieces of the wreath together and then added it onto a wood round that I’ve had in my stash for awhile.
I am loving the Silhouette Electrostatic Bed and not having to peel the cardstock off the adhesive sticky mat. I’ve cut lots of cardstock in the last year and it has saved me time.
While I was cutting the cardstock for the wreath shown above, I cut extra flowers and branches. Then added some ink to the cardstock pieces and used shaping tools to give the flowers dimension before gluing them together. Once the flowers were assembled, I cut fall blessings from adhesive vinyl and added that to the wood block. Then arranged the flowers and glued them down on the left side. Added a bit of twine wrapped around the wood on the right and had a new sign for my tiered tray.
Project #3 – Pop Out Top Used for Place Cards, Cards, or Treat Toppers
This is such a fun design to create! For this pop out top card, I used the Fall Blessings design and print and cut. I shared the entire process to create this in a live YouTube tutorial on the Silhouette Secrets+ YouTube channel. In the video tutorial I not only shared how to create the design of the pop out top card, but also gave many tips for successful print and cut projects!
I love these so much! After the Silhouette Live tutorial where I shared how to create the pop out top, I woke up the next morning to see these beauties posted on my group. My friend Teresa creates amazing things and she combined several of my tutorials to make some new magnetic bookmarks.
She used print and cut and added a holographic overlay on top to make them sparkle. In her region, they don’t use the term “fall” so she swapped it out for a few other designs to make it a better fit.
I love taking one design and thinking of several ways to make projects with it!
The Crafting Creativity blog posts are your ultimate source of inspiration, designed to spark new ideas and help you explore the endless possibilities in crafting. Each post is packed with innovative project ideas, practical tips, and expert techniques to help you think outside the box and take your creativity to new heights. Whether you’re looking for fresh ways to use your favorite designs, exploring new materials, or learning advanced techniques, these posts aim to fuel your imagination and empower you to turn your crafting dreams into reality. Check out the Crafting Creativity series HERE and see where your creativity takes you!
Save this for future reference by pinning the image below.
Enjoy !
THANK YOU for your support! How can you help? Click HERE & buy a coffee. Every little bit helps with the cost of running the site.
Silhouette Classes
Never stop learning! Let me help you take the anxiety out of learning with Silhouette and get to creating faster! My Silhouette classes are heavily focused on software, so you can take the skills & techniques taught and apply them to many future projects!
**This post may contain affiliate links. What that means is that I may receive compensation if you purchase through the links I have provided. The price you pay for the product or service is not higher but I may get compensated for sharing.
If you’re looking to add a personal touch to your kitchen or craft space, creating a custom apron is a fun and creative way to do so! In this DIY project, I’m sharing how I designed and create a one-of-a-kind apron using Artesprix Sublimation Markers, Sublimation Paints, and a Silhouette Machine. Whether you want to add a quirky quote, a custom graphic, or a colorful design, this technique allows you to create vibrant, long-lasting prints on fabric. Follow along for a step-by-step guide on how to use these amazing tools to bring your unique design vision to life, all while learning some fun sublimation techniques along the way!
Affiliate links may be present in the following blog post and as an Amazon Associate I earn from qualifying purchases.
I absolutely love working with Artesprix products—they always spark my creativity and leave me inspired with even more ideas for future projects. Find more projects I’ve created using the Artesprix sublimation products HERE.
THANK YOU for your support! How can you help? Click HERE & buy a coffee. Every little bit helps with the cost of running the site.
Silhouette Classes
Never stop learning! Let me help you take the anxiety out of learning with Silhouette and get to creating faster! My Silhouette classes are heavily focused on software, so you can take the skills & techniques taught and apply them to many future projects!
**This post may contain affiliate links. What that means is that I may receive compensation if you purchase through the links I have provided. The price you pay for the product or service is not higher but I may get compensated for sharing.
New Silhouette tutorial step-by-step to creating a Pop Out Top Card & Mastering Print and Cut in Silhouette Studio on the Silhouette Secrets+ YouTube channel.
Just a quick note to share the link for the Live Silhouette tutorial that happened this month.
Save this for future reference by pinning the image below.
Enjoy !
THANK YOU for your support! How can you help? Click HERE & buy a coffee. Every little bit helps with the cost of running the site.
Silhouette Classes
Never stop learning! Let me help you take the anxiety out of learning with Silhouette and get to creating faster! My Silhouette classes are heavily focused on software, so you can take the skills & techniques taught and apply them to many future projects!
**This post may contain affiliate links. What that means is that I may receive compensation if you purchase through the links I have provided. The price you pay for the product or service is not higher but I may get compensated for sharing.
Looking to personalize your office supplies or make a custom gift? In this post, I’m excited to share a recent project I created using the Silhouette Curio 2 and the Power Engraver: a beautifully etched acrylic clipboard featuring a design by Sarah Hurley. This project showcases the versatility of the Curio 2, turning a simple clipboard into a stylish, functional piece. Create your own etched masterpiece, perfect for home, office, or as a unique gift. Read on to discover how to elevate your DIY etching projects with the Silhouette Curio 2!
Affiliate links may be present in the following blog post and as an Amazon Associate, I earn from qualifying purchases.
When I get an idea in my head, there are times, it just will not leave until I do something. That is how this project came to be. The first one I did, I etched on the backside of the clipboard.
It looks great in person, but I had to hold up a sheet of black cardstock behind it in order to get it to show up on a photo. This one was a bit tricky because the hardware on the clipboard is not removable, so I had to rig up some supports underneath the clipboard to make it a completely flat surface. It was definitely a trial and I am so happy with how it turned out, but I knew I wanted to try again.
Test #2 actually was a failure. I switched to etching on the top of the clipboard to see how it would work and I could hear that something was not right while it was etching. Eventually, it just stopped etching entirely. I thought I’d take the Power Engraver out to clean it. Don’t do that during an etch! When the power tool was removed, it did not start up again when I put it back in while the machine was paused.
It is NOT a waste though! The one thing I’ve learned through the years in all the testing and troubleshooting that I do is that things WILL go wrong. Get extra blanks because something is going to happen. And if it doesn’t, well, you have extra blanks to use. Not a waste! A learning experience and opportunity.
I could not figure out what the issue was, so I swapped out the Silhouette Power Engraver for a new one and marked the old one with issues. I’ll troubleshoot that another day.
Test #3 was a success! The Silhouette Power Engrave tool has a smooth finish so even though this etch is on the top of the clipboard, it is not rough to the touch.
I used a lint roller to clean up the acrylic dust that the Silhouette Power Engraver creates before I removed anything. Be careful with any debris and keep your machine clean for best results. Do not inhale the acrylic dust or get it in your eyes.
Supplies Used for Etched Acrylic Clipboard with the Silhouette Curio 2
Secure the blank well – any movement and it will be a dud as the etching is permanent
Not all acrylic is good acrylic – some will just smoosh versus etch – testing is the only way to know what will work
Start small – I prefer a 3″ round or a coaster when practicing and testing – cheaper to test and mess up with
Do not remove the tool from the machine, even if it is paused.
Be careful with any debris and keep your machine clean for best results. Do not inhale the acrylic dust or get it in your eyes.
Silhouette Curio 2 Classes
Want to get started with the Silhouette Curio 2 faster? I have step-by-step classes available on Teachable from out-of-the-box projects to setting up for successful etching on acrylic.
Find more Silhouette Curio 2 information on the website HERE.
And more videos on the Silhouette Secrets+ YouTube channel HERE. Silhouette Curio 2 playlist HERE.
Save this for future reference by pinning the image below.
Enjoy !
THANK YOU for your support! How can you help? Click HERE & buy a coffee. Every little bit helps with the cost of running the site.
Silhouette Classes
Never stop learning! Let me help you take the anxiety out of learning with Silhouette and get to creating faster! My Silhouette classes are heavily focused on software, so you can take the skills & techniques taught and apply them to many future projects!
**This post may contain affiliate links. What that means is that I may receive compensation if you purchase through the links I have provided. The price you pay for the product or service is not higher but I may get compensated for sharing.
My mixed media journal is no longer naked!!! I had so much fun creating with a combination of digital mixed media and physical mixed media materials. And I feel confident that my cover is going to stand up to being in and out of a tote bag as I travel with it because it’s protected with the Grafix Laminate. I love how all the layers came together!
Affiliate links may be present in the following blog post and as an Amazon Associate, I earn from qualifying purchases.
I have really not gotten into creating with mixed medias too much. But, it is growing on me! One of the hardest things for me to overcome is that there are no rules. There is no right or wrong way to do it. You can use whatever supplies you want, mix them, match them, throw them at it. There is no wrong way. I just have to tell myself to keep going and if I really don’t like something, leave it alone and come back later. My perspective often changes when I take a step back and am not scrutinizing it so close.
I say all of that to say, I am not an expert in mixed media at all! I am watching others and learning from them.
In today’s project, I’ve taken digital mixed media created in the Silhouette Studio software and combined it with physical mixed media to add dimension and layers to it.
I created a background in the Silhouette Studio software combining a patterned background and clipping masks that were filled with colors to match the background. Then added the text on top and filled with white. Since it was created in Silhouette, I could move things around, adjust colors, test out the text saying, and tweak things without committing. Once I was satisfied, then I printed it on Silhouette Printable Vinyl using the high quality settings on my printer. Make sure to let that dry completely before moving on to the next step.
I stamped white acrylic paint on top of the printed background and then splattered paint around the design.
I love how the stamps looked with the acrylic paint and how it dried to give it texture.
Once that was completely dry, then I applied the Grafix Laminate on top of it. This will act as a protectant for the journal cover, but it does not stop there! I used the Tim Holtz Layering Splatters Stencil with a bit of Staz-On ink and added that to the top of the laminate.
And here is a look at the bottom right corner of the journal cover.
I love the textured look that is protected with the layers of ink on top of the Grafix Laminate!
This was so much fun to create and I’m not even sure it’s 100% finished. I can continue to add things to it in the future. That’s one of the the things I’m learning more and more with these projects is that there is no wrong way to do it!
Check out the video on the Grafix Arts YouTube channel where I share how I did this HERE and I’ve included a supply list below too!
Save this for future reference by pinning the image below.
Find more tutorials on the Silhouette Secrets+ website HERE.
Enjoy !
THANK YOU for your support! How can you help? Click HERE & buy a coffee. Every little bit helps with the cost of running the site.
Silhouette Classes
Never stop learning! Let me help you take the anxiety out of learning with Silhouette and get to creating faster! My Silhouette classes are heavily focused on software, so you can take the skills & techniques taught and apply them to many future projects!
**This post may contain affiliate links. What that means is that I may receive compensation if you purchase through the links I have provided. The price you pay for the product or service is not higher but I may get compensated for sharing.
Want to learn a few stamping techniques that can be fun in creating custom designs? I’m sharing several tips in the latest Artesprix YouTube video tutorial that can work whether you are making cards, using sublimation supplies, or other stamping projects.
Affiliate links may be present in the following blog post and as an Amazon Associate I earn from qualifying purchases.
I did not have a stamp to make up the word “To”, so I shared some tips in using a stamping technique called “masking” in order to make up the word I needed with the stamps I did have. I wanted the text to match. Find out what went right and what did not along the way in the new video tutorial. I’ve included a list of the supplies I used below.
Check out additional ideas created with the Artesprix Canvas Zipper Bag HERE.
I absolutely love working with Artesprix products—they always spark my creativity and leave me inspired with even more ideas for future projects. Find more projects I’ve created using the Artesprix sublimation products HERE.
THANK YOU for your support! How can you help? Click HERE & buy a coffee. Every little bit helps with the cost of running the site.
Silhouette Classes
Never stop learning! Let me help you take the anxiety out of learning with Silhouette and get to creating faster! My Silhouette classes are heavily focused on software, so you can take the skills & techniques taught and apply them to many future projects!
**This post may contain affiliate links. What that means is that I may receive compensation if you purchase through the links I have provided. The price you pay for the product or service is not higher but I may get compensated for sharing.
Have you ever had a tool in your craft studio that helps you save time and be more creative? I am sure there are a few you utilize if you stop to think about it. The Color Cubes by Sarah Renae Clark have helped me. I am terrible at picking coordinating colors for projects and often will spend hours going back and forth on colors. Now there is no more guessing and I have a great resource at my finger tips.
In this blog post, I’m excited to share some creative ways Color Cubes by Sarah Renae Clark have helped me in my recent Silhouette projects.
Affiliate links may be present in the following blog post and as an Amazon Associate, I earn from qualifying purchases.
Crafting Creativity with Color Cubes by Sarah Renae Clark
Creating Custom Color Palettes in Silhouette StudioUsing Color Cubes
Did you know you can add your own custom color palettes to the Silhouette software Fill Panel?
With the Color Cube cards it makes it so easy because it has the HEX code for the colors on the backside of the card. Simply pick the color card of your choice.
Then add a new palette to the Fill Color Panel in the Silhouette Studio software by clicking on the + to add a palette and then entering the HEX code at the bottom of the Fill Color Palette.
I also did a live tutorial sharing even more on colors in Silhouette Studio. Check it out HERE.
How to Test Print Colors in Silhouette Studio
We often see users ask why the colors that printed do not match the colors they see on the screen? One way you can find out what colors will print and compare those to what you see on the computer screen is to do a test print.
For this test, I used the Color Cube cards 001-009 and added the colors in using the HEX code to fill in squares and then did a test print out to see what the outcome would be.
This can be a big help in seeing what colors might print out for a project you are working on. I share even more details in the blog post Silhouette Studio: How to Test Print Colors HERE. Using the Color Cubes I was able to add a variety of colors to the test print page to see how they would turn out. There are many other factors that can affect your print colors and I share those too in the post linked above.
Selecting Cardstock Colors for a Project
Do you ever get stumped trying to pick out colors for a project? The Color Cube cards can help! Or need a little bit of inspiration on getting started with a project? Grab a color card and match your cardstock to the card colors. Even if the colors are off by just a bit, it can help you get started in the selection process and visualize how different color combinations look together.
Color Selection for Other Projects
It does not have to be limited to projects with your cutting machines either. Grab a Color Cube card for matching bead color combinations for bracelets, earrings, and more!
I have recently gotten into beading and find it so relaxing to string beads, however, it doesn’t matter what project I’m working on, picking colors can take me the longest time. I grabbed a few Color Cube cards and opened my Tool Box where I am storing some of my beads that are just waiting to be made into a project and started matching up the colors to see what I had that was close.
—–
You never know when you might pick up inspiration! This new beading hobby started with me purchasing a book written by a friend, Juliana C. Avelar. I bought the Jewel Loom Inspirations book to do a bit of research as I was writing my own eBook and I fell in love with the projects. For a few months, I just drooled over the pages because I didn’t have the supplies and kept telling myself I didn’t need a new hobby. But one bracelet featured in the book kept calling my name. Then I attended an in-person crafting weekend in Texas and we used the Eileen Hull Jewel Loom and I was hooked!
I am not even a chunky jewelry type of person, but I just had to make one and wanted to have it for my trip to Hawaii for the Silhouette Summit. I am sharing because it was not hard at all and sometimes we need a little inspiration outside of our normal arenas.
I tried to get some photos in Hawaii, but nothing really captured the bracelet well.
Here is another look at my first bracelet (in front) and the next one that is on my loom. Both of these have a very similar color scheme. I started with the Eileen Hull Jewel Loom and of course, one thing led to another and now I have a few more looms like the Beadalon Jewel Loom pictured below.
I need to add findings to the bracelet to finish it up and then my next bracelet will be with colors found using the Color Cubes for inspiration. I can’t wait!
Whatever your hobbies include, whether that’s crafts with cutting machines, collecting craft supplies, cardmaking, scrapbooking, beading, fabrics, or something else – keep on creating!
If you are looking for inspiration, check out the other options on the Sarah Renae Clark website too! She has journals, notebooks, stickers, planners, adult coloring pages, printables, and more!
And follow along on social media too for more crafty, colorful inspiration too!
Save this for future reference by pinning the image below.
Enjoy !
THANK YOU for your support! How can you help? Click HERE & buy a coffee. Every little bit helps with the cost of running the site.
Silhouette Classes
Never stop learning! Let me help you take the anxiety out of learning with Silhouette and get to creating faster! My Silhouette classes are heavily focused on software, so you can take the skills & techniques taught and apply them to many future projects!
**This post may contain affiliate links. What that means is that I may receive compensation if you purchase through the links I have provided. The price you pay for the product or service is not higher but I may get compensated for sharing.
Have you ever tried tracing an image in Silhouette Studio only to find the result wasn’t as clean or precise as you’d hoped? You’re not alone! Many users struggle with getting a smooth, accurate trace that leads to a successful cut file. We see questions about this all the time, and that’s why I’ve created an in-depth tutorial to help you master tracing and cleaning up your designs in Silhouette. Whether you’re working with complex images or simple shapes, these tips and techniques will help you put the tools in the Silhouette Studio software to work for you!
Find this FREE in-depth video tutorial on the Silhouette Secrets+ YouTube channel HERE.
Every single image that you trace can be different because each one is made up of different colors, gradients, shading, etc. In the video tutorial, I take you along for the journey and it is step-by-step exactly how I would work with a file that needs clean up. The only way to actually know if the file will be a successful cut file in the end is to cut it, so I included my tips after cutting and shared exactly what I would change after I finished the cut to make it even more successful for the final project.
The original traced image started with 24,528 edit nodes and through the clean up process, I was able to get that down to 1,848. That makes a huge difference in the cuttability of a file.
My goal through the entire process was to maintain as much of the character of the image as possible. This makes a great way to make unique projects & gift ideas.
Check out the full in-depth video to learn more about how you can make the tools in the Silhouette Studio software do what you want.
I hope you pick up a few tips to mastering tracing in Silhouette Studio and how to clean up a file for a cuttable design!
Silhouette Tutorial: In-Depth Guide to Tracing & Cleaning Up Detailed Images – Step-by-Step Video on the Silhouette Secrets+ YouTube channel HERE
For more in-depth tutorials and inspiring projects, explore our comprehensive A to Z of Silhouette section on the website HERE, where you’ll find years of creative resources to help you master your Silhouette skills!
Save this for future reference by pinning the image below.
Enjoy !
THANK YOU for your support! How can you help? Click HERE & buy a coffee. Every little bit helps with the cost of running the site.
Silhouette Classes
Never stop learning! Let me help you take the anxiety out of learning with Silhouette and get to creating faster! My Silhouette classes are heavily focused on software, so you can take the skills & techniques taught and apply them to many future projects!
**This post may contain affiliate links. What that means is that I may receive compensation if you purchase through the links I have provided. The price you pay for the product or service is not higher but I may get compensated for sharing.
I had so much fun playing with alcohol inks and the Grafix Dura-Bright White creating a background that I used for several different projects!
Affiliate links may be present in the following blog post and as an Amazon Associate, I earn from qualifying purchases.
This project took on a life of it’s own as I went. I started with the idea to create a card and a bookmark, but ended up letting the art talk to me and see where it went. I love it!!!!
Anyone can do this! I used alcohol ink and dropped it onto the Dura-Bright White and moved it around with an air blower. While the background was drying, I cut some designs out of Oracal 651 white adhesive vinyl. After the Dura-Bright was fully dry, I cut it up into several sizes for the projects, then added a laminate overlay on top to protect the alcohol ink design. Finished off the designs with the adhesive vinyl decal on top.
While creating the intended designs, another idea was born, and I just rolled with it. Now I have a framed piece of art for my desk. I love it!!!!
Save this for future reference by pinning the image below.
Enjoy !
THANK YOU for your support! How can you help? Click HERE & buy a coffee. Every little bit helps with the cost of running the site.
Silhouette Classes
Never stop learning! Let me help you take the anxiety out of learning with Silhouette and get to creating faster! My Silhouette classes are heavily focused on software, so you can take the skills & techniques taught and apply them to many future projects!
**This post may contain affiliate links. What that means is that I may receive compensation if you purchase through the links I have provided. The price you pay for the product or service is not higher but I may get compensated for sharing.
As a paper crafter I am loving the Silhouette Electrostatic (ES) Mat! This new technology is pretty darn cool and not having to remove the cut pieces from an adhesive cutting mat can save time. Especially when cutting for large projects! In this post, I’m sharing more tips on having successful results when using the Silhouette Electrostatic (ES) Mat.
Affiliate links may be present in the following blog post and as an Amazon Associate, I earn from qualifying purchases.
How Does the Silhouette Electrostatic Mat Work?
When the electrostatic mat is turned on, a static charge is built up between the electrostatic mat and the protective sheet. This holds the protective sheet in place and materials can be placed on top of it. The charge then builds between the protective sheet and the material, which holds it in place while it’s being cut. Once the design is cut simply break that charge by either lifting the protective sheet off the ES Mat or turning the ES mat off. The charge will dissipate and the material can easily be removed.
What materials does the Silhouette Electrostatic Mat Work With?
Materials that are smooth and completely flat are going to work best with the Silhouette ES Mat. The material has to be able to build up that electrostatic charge and be held in place the entire time it’s being cut. Textured materials, “breathable” materials such as fabric, or curled materials are not going to work well because it cannot build up a charge to hold it in place.
I have cut vellum, copy paper, sticker paper, 65 lb cardstock, 85 lb cardstock, 110 lb cardstock, adhesive vinyl, and I’m sure I’m probably forgetting a few others in the past year that I’ve been testing it.
I did try a thicker cardstock by Bazzill which was their smooth cardstock and it cut, but it was not as clean of a cut as I prefer. However, I have had the same results when using Bazzil on an adhesive cutting mat too. Some cardstocks are just a bit more difficult to cut cleanly with the Silhouette. I tend to stay away from those for cutting projects, but they work well when cut with a paper trimmer.
Tips for Successful Cuts with the Silhouette ES Mat
While cutting pieces for demo projects for an upcoming class, I knew I wanted to share the tips I’ve learned during testing to achieve successful cuts. The best way to learn what works and what doesn’t is often through the failures encountered along the way. And even though I’ve been using cutting machines for many years, there are still failures along the way.
Check out the new video on the Silhouette Secrets+ YouTube channel where I am sharing a look at the cutting process and sharing things that work and things that don’t work.
Don’t forget to like, subscribe, and click the bell for notifications on the Silhouette Secrets+ YouTube channel!
A Closer Look at the Final Cuts
It is so nice to just lift off the cardstock after the cut and see the pieces laying there.
You will start to see the pieces pile up on the right side of the photos as I share the progression.
These projects and cuts can also be successful on an adhesive cutting mat, but it was so nice to just be able to slide the finished cuts off and be ready for the next sheet of cardstock.
Especially when you have a million tiny pieces like on these film strips!
In the video, I also show how my first attempt at cutting these film strips was not successful. I had the design placed too close to the edge of the cardstock and a piece lifted during the cut and it pretty much ate my cardstock. I simply unloaded the ES Mat, cleaned all the bits up, reset the machine, and then moved my design down on the design mat a little bit and sent it again to cut. Perfect cuts!
Now, this design cut beautifully. The ring design is 2 pieces cut for a background. However, I did have to babysit it a little bit more as some of the cavities of the design would lift as it was being cut with the movement under the roller bar. I carefully removed the pieces as they were lifting during the cut and showed that in the video too.
All of these designs were created in the Silhouette Studio software from scratch for an upcoming class. The cutting process is a bit of the behind-the-scenes of that class creation. Watch the Upcoming Events tab or sign up for the Upcoming Craft Events emails and I’ll send an email direct to your inbox when new events open for registration.
Sometimes, the cut won’t stay in place when the excess is removed. This can happen with smaller designs as there is a smaller surface area to hold the electrostatic charge in place.
Master Perfect Silhouette Cuts: Top Tips for Electrostatic Mat
the ES Mat needs a secure connection that is completely flat to connect to the Silhouette Cameo 5 or Portrait 4 machine
materials need to be completely flat to maintain the charge
designs placed too close the edges can cause cut issues and/or lifting which can affect cut results
test cut, test cut, test cut!
make sure ES Mat is turned on and remains on during the entire cut
Save this for future reference by pinning the image below.
Enjoy !
THANK YOU for your support! How can you help? Click HERE & buy a coffee. Every little bit helps with the cost of running the site.
Silhouette Classes
Never stop learning! Let me help you take the anxiety out of learning with Silhouette and get to creating faster! My Silhouette classes are heavily focused on software, so you can take the skills & techniques taught and apply them to many future projects!
**This post may contain affiliate links. What that means is that I may receive compensation if you purchase through the links I have provided. The price you pay for the product or service is not higher but I may get compensated for sharing.
The Silhouette Cameo Pro MK II was announced for future release at the 2024 Silhouette Summit. I attended the Silhouette Summit and asked a lot of questions regarding this new machine model. In this blog post, I’ll be sharing details that we learned at Summit. We were able to see this new model in action on both the demo floor and also a close up look where we could ask specific questions in a classroom setting.
This blog post is part of series of my account at Silhouette Summit 2024 because it’s a lot of information on new products and information. Find more details on Silhouette Summit 2024 – Part 1 – cloChé Heat Press announcement HERE. And I’ll add additional links as I publish information too!
Affiliate links may be present in the following blog post and as an Amazon Associate, I earn from qualifying purchases.
The Silhouette Cameo Pro MK II is now available at Silhouette America HERE or at CrafterCuts HERE. *updated 12/12/24 Silhouette Stand released 3/26/25 – available HERE
Silhouette Cameo PRO MK II
Please note that the following information & photos are all directly from the Silhouette Summit 2024 and at the time of writing this the Cameo Pro MK II is not yet available for purchase. I will be updating the post when we receive more information.
First, this is NOT a Cameo 5 model. It is called a Cameo PRO MK II, which is a little bit to get used to saying as you’ll see me mention in the videos linked above.
Why is it not just called a Silhouette Cameo 5?
It is different and why it could not simply be called a 5. It is the Cameo Pro 4 body with all of the guts of the Cameo 5 model installed.
The Silhouette Cameo PRO MK II has:
Updated chassis system for improved carriage stability and new belt drive minimizes deviation and vibration
New design of the roller bar and rollers, which include the ability to move the right roller to more locations to be locked in securely
5 auxiliary rollers that are removable for additional support when cutting different widths of materials
Dual cross cut option – the user can choose to use the Auto cross cut or the rear cross cut option (more on the auto cross cut feature HERE)
Repeat Job now available – when a repeat job is enabled, the load button flashes. Press and hold the button for more than 3 seconds and it will repeat the last job sent.
Powered Carriage 2 tool housing for use with powered Silhouette accessories
NEW!!! 4 point registration mark for print and cut. There will now be registration marks on all 4 corners of a print and cut jobs. **This will be an addition to the Silhouette software in a future release.
Basically, the Silhouette Cameo 5 guts installed in the Cameo 4 Pro body. Some of the updates from the Cameo 5 12″ and 15″ Plus are now in the Cameo Pro MK II.
The Silhouette Cameo PRO MK II is NOT compatible with the Silhouette Electrostatic Bed accessory. It does not have the powered connection on the front of the machine to connect to an electrostatic bed.
So bottom line is, it is a Cameo 4 Pro body with the improved guts of the Silhouette Cameo 5 models installed inside.
We did see the Silhouette Cameo PRO MK II in action both in the Summit demo room and in smaller classroom settings where we were able to ask questions and get a closer look.
Here is a look at the machine in action cutting a large decal. There were 3 class session times and they demonstrated it for all who attended those sessions. In the above photo you can also see the demos from the previous sessions behind the machine against the wall.
In the classroom session, there were 4 Cameo PRO MK II machines all set up and providing a close up look at the machine. These are smaller breakout sessions where it was much easier to ask questions, touch and feel, and really see if it was doing what they said it was.
I did check the cut after it was completed and it was successfully cut and was able to be weeded. They did offer to let me keep one of the decals, but I had no easy way to get it home successfully on the airplane.
Now, let’s take a closer look at some of the specifics mentioned above.
Silhouette Cameo PRO MK II – Auxiliary Rollers
The Cameo PRO MK II now has 5 auxiliary rollers to help in keeping materials as flat as possible while it’s being cut. Each auxiliary roller can be moved left to right along the roller bar. For best results, space the auxiliar rollers out evenly across the width of a material.
The auxiliary rollers on the Cameo PRO MK II are removable. This is the only machine model that the rollers are removable. If the auxiliary roller is removed, make sure to keep it in a safe place so you can find it again. Or move it to the right side of the machine and install on the roller bar (I show this tip in the video HERE)
When cutting wider widths of materials, the material needs to be held securely and as flat as possible while it’s cut. Any bunching or bowing of materials between the left and right rollers can cause cut issues.
The auxiliary rollers of the Silhouette Cameo PRO MK II can be used on the Silhouette Cameo 5 models (12″ and Plus 15″) that have the redesigned roller bar. Note: the auxiliary rollers are NOT removable on the Silhouette Cameo 5 model machines.
NEW!!! 4 Point Registration Mark for Print and Cut
There will now be a 4th registration mark added to print and cut projects. This is designed for more accurate reading and to reduce the off-cuts in the bottom right corner.
Unfortunately, we did not get any really good photos of the examples shown on screen of this new feature and I only have the image from the media kit provided to me from Silhouette. It was not something that was demonstrated for us at Summit.
It will be something that is implemented into the Silhouette Studio software in a future release.
Silhouette Cameo PRO MK II Wrap Up
I am one of the original testers for the Silhouette Cameo 4 Pro model and have a lot of information out there on proper setup and usage (more details HERE). Most of the same information, tips, and recommendations will still apply to the Silhouette Cameo Pro MK II model.
I know there has been lots of users frustrated with the Cameo 4 Pro and the exact setup that it requires to function properly. I do feel the improvements to the Cameo Pro MK II will solve some of those user frustrations, however, it will still be very, very important to have the proper setup and space for a machine of this size to function properly. For all models of cutting machines, proper setup is important!
I did see many demonstrations of the Silhouette Cameo Pro MK II in action performing different functions and completing projects, but will not have real life experience with the machine until it is available for consumers. At the time of this publication we do not have a release date, but I will update with more information as I get it.
Save this for future reference by pinning the image below.
Enjoy !
THANK YOU for your support! How can you help? Click HERE & buy a coffee. Every little bit helps with the cost of running the site.
Silhouette Classes
Never stop learning! Let me help you take the anxiety out of learning with Silhouette and get to creating faster! My Silhouette classes are heavily focused on software, so you can take the skills & techniques taught and apply them to many future projects!
**This post may contain affiliate links. What that means is that I may receive compensation if you purchase through the links I have provided. The price you pay for the product or service is not higher but I may get compensated for sharing.
This month’s project with Artesprix is all about adding a personal touch with a custom sublimation door hanger! For this design, I decided to go the extra creative mile by hand-drawing the artwork, giving it a unique and personal feel. Using Artesprix sublimation markers and my own creativity, I transformed a simple blank door hanger into a vibrant, one-of-a-kind piece of home decor. From the initial sketch to the final heat press reveal, this project showcases just how versatile and fun sublimation crafting can be!
Affiliate links may be present in the following blog post and as an Amazon Associate I earn from qualifying purchases.
For this design I was experimenting a bit along the way and I already have ideas for another one too!
I used the Artesprix Sublimation Ink mixed with a bit of water for the background and painted that onto mixed media paper. In the future, I will add a little more water to the ink to make it a little bit lighter. With sublimation colors, you don’t see the final color until after it has been heat pressed. This turned out with a very vibrant, bright yellow.
Then I hand lettered the text using the Artesprix sublimation markers. The key about text with sublimation is that it has to be mirrored. I am not great at writing backwards, so I shared some tricks I used in the video below.
Next, I drew the leaves using a pencil. Pencil does not transfer to the sublimation blank so it’s great to draw around your blank for a template or sketch in designs. And then used more ink colors to color in the leaves and finished those off by outlining with the sublimation markers in several colors.
Anyone can do this and you do NOT have to be an artist to create with the Artesprix Sublimation products. You also do NOT need a sublimation printer, so it is a great way to dip your toe in the water to test sublimation before investing in a bunch of equipment.
Other supplies: pencil, scissors, paper towels, paint brush(es)
Watch how this all came together with the Artesprix Sublimation products in the new tutorial HERE on the Artesprix YouTube channel.
Check out additional ideas created with the Artesprix Door Hanger HERE.
I love creating with the Artesprix products and find it really stretches my creative soul often leaving me with more ideas for future projects. Find more projects I’ve created using the Artesprix sublimation products HERE.
THANK YOU for your support! How can you help? Click HERE & buy a coffee. Every little bit helps with the cost of running the site.
Silhouette Classes
Never stop learning! Let me help you take the anxiety out of learning with Silhouette and get to creating faster! My Silhouette classes are heavily focused on software, so you can take the skills & techniques taught and apply them to many future projects!
**This post may contain affiliate links. What that means is that I may receive compensation if you purchase through the links I have provided. The price you pay for the product or service is not higher but I may get compensated for sharing.
The Silhouette Studio software allows you to print directly from the program to any printer that is setup on your computer. This action can be performed easily by going to File > Print and selecting the printer you are using once the design is ready to print. However, the colors you see on the computer screen may not be the actual results that print out from your printer.
Affiliate links may be present in the following blog post and as an Amazon Associate, I earn from qualifying purchases.
Factors That Can Affect Printed Colors
A computer monitor is not calibrated to print colors. Each brand of computer monitor can vary in the visual representative that you see. If you were sitting next to someone else using the exact same Silhouette Studio software version, your colors may not appear the same on screen as that person next to you simply because you are using different computers.
Computer monitors display in RGB (Red Green Blue) versus printers that are CYMK (Cyan, Yellow, Magenta, black) – this can affect the actual printed results versus what is seen on the screen.
There are many different brands and models of printers out there on the market being used worldwide. Different brands and models of printers can yield different results.
Printer ink can vary by brand and yield different results.
The material being printed on can affect the colors. Different materials absorb the ink and the final color you see can vary depending on the material. For instance, plain cardstock will absorb more ink into the paper versus a glossy photo paper. This can make the color appear muted on the cardstock versus a more vibrant print on a shiny gloss of photo paper.
The printer settings selected when printing can affect color outcome. Each printer model has different settings it can print at and what you select for the print job sent can affect the final outcome of colors. For example, draft settings versus normal versus photo quality.
Printer drivers can affect the outcome of colors and other options available, such as print page size, etc. For best results, install the full printer drivers direct from the printer manufacturer’s website for your specific printer model. Simply plugging in a printer or connecting it to your computer does not usually install the full printer drivers. While it may print, it may not have all the options of the full print driver as it’s using a default driver that’s in the computer operating system to perform basic print functions.
Computer operating systems (OS) and updates. Print quality can vary by Windows versus MAC and also by the OS updates on those computer systems. We have seen print color output change overnight with a computer OS update.
Different software programs can have different print color results.
Now that we’ve covered a few things that can make the difference, how can you test what colors you see versus what colors you get when printing?
Silhouette Studio: Color Test Print
Draw out 1-inch squares (or larger if needed) and replicate to fill the page
Open the Fill Color Panel and fill each square with a color that you want to test print.
The full Fill Color Panel on the right side of the Silhouette software has several options for adding colors. Use the preset colors, add your own custom color, or add in colors by HEX, HSL, or RGB codes. Create your own custom color palettes too for easy access on future projects.
I used the Color Cubes by Sarah Renae Clark to fill in a page of color combinations that I want to test print. The color cards give 5 colors with the HEX code for each color and also have shades of that color shown on the card.
In the Silhouette Studio software, at the bottom of the Fill Color Panel, you can adjust the color to another shade easily by moving the custom color dot around on the color palette.
Once page is filled as desired, then select File > Print in top left corner.
Verify on the Print Preview that everything will be printed as desired. The print preview is where you can catch errors before you waste ink printing. For instance, if the design is not showing completely and is cut off, that can indicate the wrong printer is selected or the page size is incorrect. There is still time to make changes before you commit to printing and using ink. If you are doing a print and cut project, verify that all 3 registration marks show as printing completely on the page before you click print.
When ready, click Print. The printer menu will pop up and you can select what options you would like to print at and where to print from. I use the rear tray on my printer when printing any specialty materials or cardstock.
If you make any changes such as the actual printer being used or the page size, you will need to apply those changes and then cancel out to the main design screen to reset those settings completely.
Once printed, you can see how the colors will print on that particular material. It’s always best to test on the actual material you will be using to know for sure.
I printed this on higher quality copy paper using the regular print settings from my printer. I was also notified that one ink cartridge was low on ink, so I know that will affect the colors that are printed as well.
Additional Tips for Printing:
Objects or designs need to be filled with color to print.
Silhouette Studio is designed as a cutting software. That means the red lines you see on the design mat are cut lines for a Silhouette machine to follow. When a shape is drawn or text typed out, it is generally not filled with any color and the software sees it as empty. Which is exactly how it will print to a printer if sent. This is one great thing about utilizing print preview, you can catch issues before you’ve actually tried to print the project.
Cut lines do not print unless told to do so.
There are 2 options if you want the line of an object to print.
1 – Increase line thickness above 0. Any line thickness above 0 will print on the material.
Here is what the text above will show on the Print Preview when the top text line is set to 0 line width and the bottom is set to 1.75.
2 – Select the objects you want the lines to print on and check the Print Lines of Selected Shapes box on the bottom of the Line Style Panel.
Here is what the text above will show on the Print Preview when the top text has the print lines of selected shapes chosen.
There is also an italic note stating: This will display your 0 pt cut lines as 0.1 pt lines in prints and in SVG and PDF exports.
Sublimation prints need to be pressed to show true color.
If you are printing using sublimation inks, the true colors will not show until the design has been pressed. A sublimation print will always look dull or muted prior to pressing. For best results and the most accurate colors, press onto 100% polyester. This will show the final colors
New equipment may not function the same as old equipment.
Getting a new, updated printer model can be a great thing! However, users can be quickly frustrated when things do not work the same or the new printer doesn’t print the same colors the same as the old one did. It can take some getting used to for all new equipment.
Low ink of any cartridge or tank can affect the color outcome.
Most home printers have a set of color cartridges or tanks, for instance, my Canon TS9521C has 3 colors and 2 black cartridges. To make up the colors you are asking it to print, the printer combines those inks in order to make the color output. If a color cartridge or tank is low on ink, it may not yield the desired results.
The results that each user sees and has when printed can vary simply because we all have different equipment we are using.
Save this for future reference by pinning the image below.
Enjoy !
THANK YOU for your support! How can you help? Click HERE & buy a coffee. Every little bit helps with the cost of running the site.
Silhouette Classes
Never stop learning! Let me help you take the anxiety out of learning with Silhouette and get to creating faster! My Silhouette classes are heavily focused on software, so you can take the skills & techniques taught and apply them to many future projects!
**This post may contain affiliate links. What that means is that I may receive compensation if you purchase through the links I have provided. The price you pay for the product or service is not higher but I may get compensated for sharing.
Using patterns in the Silhouette Studio software can give your projects a unique look. Whether you are doing a print and cut project or creating a digital graphic image. Digital patterns can be a great asset to your toolbox. As with many tools in the Silhouette Studio software, there can be multiple ways to do it. I’m sharing 4 ways that patterns can be opened in Silhouette Studio below, but first what is a pattern?
A digital pattern is a photo file. It is typically a JPEG, PNG, or TIFF file format. Before we get too far into it, one thing to note about digital patterns is that they can be quite large. A digital pattern, when designed properly should be 300 dpi for print quality. That means the file size is much greater than your average SVG file. Since every user has a different computer with different specifications, that also means that each user’s computer may handle data differently. When working with heavy data files, close any programs that are not necessary and any tabs within Silhouette that are not needed. I’d also recommend clearing out any Recovered Documents and keep that cleared out as well. This will help your computer and software run as smooth as it can.
4 Ways to Open Patterns in Silhouette Studio
1 – Open the pattern from the Silhouette Library Patterns Folder. If you want to open the full pattern on the design mat, double click on the pattern in the Silhouette Library Patterns folder. If you want to fill a particular shape, click on the shape to select it on the design mat. Then click on the Library Tab, Patterns folder and single click on the pattern. Click back on the Design tab and the shape will be filled with the pattern selected. If you double click with a shape selected, it will fill the shape and then also open the full pattern on top of that too.
2 – Select a pattern from the Fill Color Panel – Tab 3.
3 – Click on the Show/Hide Library icon in the bottom left corner of the design tab. This will open a split screen showing the library and the design tab. This can be much easier to see larger images of thumbnails and design with instead of having to swap back and forth between the Design and Library tabs. Select a pattern the same way as in #1.
4 – Drag and drop a pattern from a folder saved on your computer or storage device. When dragging and dropping, drag the pattern to the shape you want to fill and hold it until the pattern has filled the shape. If you move too fast and release the mouse button too quick a little white rectangle will appear and not go away. The only way to get it to disappear is to close and reopen the software.
I hope these tips have helped give you some ideas on how to work with patterns and create unique projects in Silhouette Studio. Check out the additional resources below to learn even more!
Save this for future reference by pinning the image below.
Enjoy !
THANK YOU for your support! How can you help? Click HERE & buy a coffee. Every little bit helps with the cost of running the site.
Silhouette Classes
Never stop learning! Let me help you take the anxiety out of learning with Silhouette and get to creating faster! My Silhouette classes are heavily focused on software, so you can take the skills & techniques taught and apply them to many future projects!
**This post may contain affiliate links. What that means is that I may receive compensation if you purchase through the links I have provided. The price you pay for the product or service is not higher but I may get compensated for sharing.
I’m back from the Silhouette Summit 2024 event and will be sharing more information that I learned in the demo room and classes at the Summit event. There is a lot of information so it will be a series of blog posts to share all the details. Part 1 will include details about the new Silhouette cloChé (clo-shay) Heat Press and cloChé Petite.
Affiliate links may be present in the following blog post and as an Amazon Associate, I earn from qualifying purchases.
It is cute, stylish, and has a slim line design that can be stored on a shelf when not in use. It is a heat press designed for the hobby crafter.
Silhouette cloChé Heat Press
It will be released in 3 colors – Milky White, Chiffon Pink, and Ice Green. Additional colors may become available if retailers choose to have an exclusive option in the 7 additional options.
You can get a glimpse of those colors in the live video I shared walking the Silhouette Summit demo floor found HERE.
L – M – H heat settings with options in between L – 250° F M – 320° F H – 400° F There is no digital display. In order to gauge the actual temperature, you would need a digital thermometer to read the temperature of the top platen.
45 second timer There is no digital display and the timer is not adjustable.
0.5 mm maximum thickness of materials pressed
Locking mechanism on the front
Voltage setting on backside of heat press
Silhouette cloChé Petite hand held press included with Silhouette cloChé Heat Press
Retail price $249.99 (price given at Summit ’24)
Release Date – Coming Soon
Here is a look at the temperature dial on the Silhouette cloChé heat press. It has a L, M, and H setting, but can also be set in between those as well. (L = 250° F, M = 320° F, H = 400° F)
Here is a look at the front locking mechanism. When the lid is closed, then it will fold up over top of the top platen handle and lock into place. Be gentle with the handle and do not force it closed or open. It will take some practice to get the hang of how it locks and unlocks.
Here is a view from the side of the Silhouette cloChé Heat Press. The maximum thickness for materials is 0.5 mm. I would not recommend using thicker materials than what is recommended in the press.
Recommended Usage of Heat Press
Heating
To turn machine on, open heat press and then turn the dial. The Silhouette cloChé heats up with the lid open and comes to temperature fairly quickly from what we saw in the Summit demo.
Pressing Time
In the demos shown at the Silhouette Summit, the Silhouette cloChé they pressed the garment with HTV for 45 seconds as the first press, then said to cold peel the carrier sheet, then add a parchment paper on top and press another 45 seconds for a finishing press.
We did question this length of time and why they are using 45 seconds when most HTV is 15 seconds on average. There was never really a definite answer except, that’s what worked for the Silhouette cloChé heat press. We did not see the product packaging for the HTV they were using.
If you are using other brands of HTV, please test your garments and I’d recommend starting with the recommended settings for the actual HTV you are using. Grab a timer and set it for the recommended setting of the HTV brand.
I’d also recommend getting a digital thermometer so you can check the heat platen for an accurate temperature reading.
Auto Shut Off
There is an auto shut off when the Silhouette cloChé heat press is not in use. If the lid is open, after 15 minutes it will auto shut off. If the lid is closed, it will shut off after 2 minutes.
Duration of Use
It was stated that the Silhouette cloChé heat press was designed with a use time of 1 hour and then it needs a 30 minutes cool down period.
Silhouette cloChé Petite Handheld Press
The Silhouette cloChé Petite shown on the right side of the photo above that is plugged into the heat press is a handheld press that has a heat platen approximately 1/2″ in diameter. It is designed for usage with small designs or rhinestones.
The Silhouette cloChé Petite is not sold separately at this time. We did recommend that it be considered as an option to sell separately.
The Silhouette cloChé Petite does have to be plugged when using. It can be plugged directly into the Silhouette cloChé Heat Press or other suitable power sources. Please read the instructions that come with the Silhouette cloChé Petite for specific instructions.
It comes with a USB C to USB C cord that also can be stored on the backside of the Silhouette cloChé Heat Press. The Silhouette cloChé Heat Press does not have to be turned on for the Silhouette cloChé Petite to be used, but the heat press does need to be plugged in to an electrical outlet.
Recommended Usage of the Silhouette cloChé Petite
The Silhouette cloChé Petite does include instructions in the box and I would recommend reading through those thoroughly before use.
For use with HTV, cover the HTV with a protective sheet such as parchment paper and then tap the cloChé Petite on the HTV until adhered. For use with rhinestones, cover the rhinestone with protection and press the Silhouette cloChé Petite down until rhinestone is adhered. It is recommended to use a silicone mat or heat safe surface to press on top of with the Silhouette cloChé Petite. The silicone mat that comes with the Silhouette heat press can be used or I would recommend the Artesprix Protective Mat as well. I use the protective mat for many different projects.
We did receive a Silhouette cloChé Petite at the Silhouette Summit.
Overall, the new Silhouette cloChé Heat Press is cute and light weight. I’ve had several group members already comment with ideas for how to use it in their hobby craft business. It is designed for the hobby crafter and I would not recommend it for commercial use.
I have also created a Silhouette Summit playlist on the Silhouette Secrets+ YouTube channel that can be found HERE. I have a couple more to add to the video playlist on YouTube once they are edited, so make sure to like, subscribe, and click that bell for notifications.
THANK YOU for your support! How can you help? Click HERE & buy a coffee. Every little bit helps with the cost of running the site.
Silhouette Classes
Never stop learning! Let me help you take the anxiety out of learning with Silhouette and get to creating faster! My Silhouette classes are heavily focused on software, so you can take the skills & techniques taught and apply them to many future projects!
**This post may contain affiliate links. What that means is that I may receive compensation if you purchase through the links I have provided. The price you pay for the product or service is not higher but I may get compensated for sharing.
There are so many possibilities when you have a cutting machine and can cut any design that you want. Combine that with the Grafix Frisket Film and wow! Endless card designs and projects you can create. I’m sharing a few cards I created below and I hope it sparks some ideas of projects you could create too!
Affiliate links may be present in the following blog post and as an Amazon Associate, I earn from qualifying purchases.
For this project I used several flower designs in Silhouette Studio and cut those from the Grafix Frisket Film on the Silhouette Cameo 5. You could use any brand of cutting machine or a die cut machine as well to cut the Grafix Frisket Film.
Cut settings for materials can vary by machine, blade life, material, and more! Test cuts are the only way you will know for sure what will work best and not waste materials.
For the Grafix Frisket Film, I used Silhouette settings of: Blade Depth – 2, Force – 10, and Speed – 5
Take a look at these stunning cards—yes, you can create them too! I am sharing the video tutorial and supply list below to start crafting your own beautiful designs today!
Find the new video on the Grafix Arts YouTube channel where I share how I did this HERE and I’ve included a supply list below too!
Supplies used for Creating Cards with Grafix Frisket Film:
Every card you create can be unique and you can use the Grafix Frisket Film over and over again or cut new designs to use too!
Save this for future reference by pinning the image below.
Enjoy !
THANK YOU for your support! How can you help? Click HERE & buy a coffee. Every little bit helps with the cost of running the site.
Silhouette Classes
Never stop learning! Let me help you take the anxiety out of learning with Silhouette and get to creating faster! My Silhouette classes are heavily focused on software, so you can take the skills & techniques taught and apply them to many future projects!
**This post may contain affiliate links. What that means is that I may receive compensation if you purchase through the links I have provided. The price you pay for the product or service is not higher but I may get compensated for sharing.
In this edition of Crafting Creativity I’ll be sharing the projects I created through the month with an arrow background/stencil design. So many great options from one file! A great big thank you to Sarah Hurley for providing the free file for the Silhouette Secrets+ August newsletter!
Affiliate links may be present in the following blog post and as an Amazon Associate, I earn from qualifying purchases.
What is Crafting Creativity?
I started sharing a blog post each month where I’m sharing the projects I’ve created with 1 file from an artist I have collaborated with. This is a file that the designer has provided for the Silhouette Secrets+ Newsletter subscribers and each month is something new! My goal is to share how you can take 1 design and think about different projects use it in to make your designs go farther! In each blog post, I’m sharing the projects created, the supply list, and additional resources that can help you learn more and advance your skills!
Crafting Creativity with Sarah Hurley
Project #1 – Fun Card with Bosh Cat and Arrow Background
I knew the moment I saw the Bosh cat design that I wanted to use him on a project. In following Sarah Hurley on social media and saw that she had adopted him, so I watch for his appearances. I always wonder what he’s thinking and feel like many of her designs would fit right in with Bosh’s thoughts.
Projects seem to take on a life of their own and I am getting better about just going with the flow of things and the direction it takes me. I knew I wanted to start with something bigger with this project and it developed along the way.
This fun sign is magnetic and the saying can be swapped out depending on what mood strikes you. Feeling snarky? Add a snarky saying. Sarah Hurley has some good ones in the Silhouette Design Store and sometimes I just enjoy scrolling through them for a laugh. Need a pick-me-up? Add an inspiration saying…. or – leave them guessing at what will be up next.
Watch the video on the Silhouette Secrets+ YouTube channel and learn how to create your own interchangeable sign. Find it out HERE or click the image below.
Video tutorial on the Silhouette Secrets+ YouTube channel HERE
Project #3 – This Side Up T-Shirt Using Text to Path
This was a fun way to use up scraps and create a fun shirt for myself. Anyone who’s ever traveled with me knows that I can trip over thin air. It’s genetic or that’s what we joke about because I get it from my Mom. If you ever see me on the ground, you’ll know why.
Project #4 – Sublimation Journal Cover with a Stencil
I love being able to create my own projects and modify them as needed. That is exactly what I did in creating this stencil with the Grafix Stencil Film. The arrow background/stencil design came in as a square, but I was able to modify it with a few simple steps to make it for what I needed.
Or use with any inks or paints to create amazing projects!
Project #5 – Bookmarks with Print and Cut
I used the arrow background/stencil design to create these bookmarks and then added my own custom color to it with the help of the Color Cubes by Sarah Renae Clark to select a color palette for the 2 different designs.
I hope this edition of Crafting Creativity with Sarah Hurley has sparked a few ideas about what you can create. Write those ideas down and see where they take you!!!
A great big thank you to Sarah Hurley for contributing the free file for the Silhouette Secrets+ newsletter for the month of August! If you missed grabbing the free Arrow Background/Stencil, it is available in the Silhouette Design Store HERE.
Sign up for the weekly newsletter HERE to have information delivered direct to your inbox and grab the new freebie each month.
Silhouette Secrets+ Newsletter
Never miss out on the news, tips, “secrets”, deals, classes, and more that I share on Silhouette Secrets+. Sign up for the newsletter and get information delivered to your inbox every Friday. Unsubscribe at anytime.
I hope this has given you some ideas on how one file can lead to many different projects!
Save this for future reference by pinning the image below.
Enjoy !
THANK YOU for your support! How can you help? Click HERE & buy a coffee. Every little bit helps with the cost of running the site.
Silhouette Classes
Never stop learning! Let me help you take the anxiety out of learning with Silhouette and get to creating faster! My Silhouette classes are heavily focused on software, so you can take the skills & techniques taught and apply them to many future projects!
**This post may contain affiliate links. What that means is that I may receive compensation if you purchase through the links I have provided. The price you pay for the product or service is not higher but I may get compensated for sharing.
Have you ever wanted to add text along a shape? A circle? Or even just along a wavy line? The Silhouette Studio software has just the tool and it is available for everyone! It’s called Text to Path and I have a new video tutorial out showing how I used this to create a fun t-shirt.
Affiliate links may be present in the following blog post and as an Amazon Associate, I earn from qualifying purchases.
This design was created in Silhouette Studio and I have a few tricks to show you. I used 1 arrow elements from a stencil/background design by Sarah Hurley and used it as my base to build on.
A few more tips came to mind after the video was recorded that can help you with Text to Path in Silhouette Studio for your future projects.
What is a Path?
A path is any line in Silhouette Studio. This can be a single line, a closed shape, a design. The red “cut” lines you see in the Silhouette software around a design are “paths”.
If 2 or more “paths” are close together, it can get take some work to get the text to snap to the shape you want. The text may jump back and forth to the path you don’t want it on.
Sometimes it can be easier to work with individual shapes and then put the design together after the text to path has been added.
Text Styles for Text to Path
There are millions of different font styles out there and each one can act a bit differently when added to a path. Every font style is unique and that means it can have different spacing, characters, glyphs, etc. However, it’s not just the font style, but can be the font style in combination with the shape/path that it’s added to.
In the photo above are 3 examples of different font styles and how they can vary when added to a path. Probably the most difficult font styles to add and adjust so they look pleasing are scripty fonts. Since text has to be in editable mode, you cannot weld the font together prior to adding it to a path. Once it’s added to a path, the spacing may not look right for the script to connect.
Not all font styles will look good when added to a shape or path or they may need some additional manual manipulation to adjust.
Editable Text Mode – #1 Tip for Text to Path
The biggest factor for adding text to a path is that the text HAS to be in editable text mode. This means that you type the text out and immediately add it to path. It cannot be changed in any way such as welding, ungrouping, release compound path, etc. When text is modified in any of those manners, it is no longer editable text and you will not get the Text to Path Control point on the bottom left of the text box.
In the same manner, text designs cannot be added to a path since they are not editable text, but are vector designs.
Text to Path Video Tutorial T-shirt Design Creation
Please let me know if you have any questions in the comments below.
Save this for future reference by pinning the image below.
Enjoy !
THANK YOU for your support! How can you help? Click HERE & buy a coffee. Every little bit helps with the cost of running the site.
Silhouette Classes
Never stop learning! Let me help you take the anxiety out of learning with Silhouette and get to creating faster! My Silhouette classes are heavily focused on software, so you can take the skills & techniques taught and apply them to many future projects!
**This post may contain affiliate links. What that means is that I may receive compensation if you purchase through the links I have provided. The price you pay for the product or service is not higher but I may get compensated for sharing.
Sharing a bit of information today on how to install fonts for use in the Silhouette Studio software. Well, any program really. Fonts are installed directly on the computer and then software programs pull from the Fonts folder on the computer hard drive to access.
Affiliate links may be present in the following blog post and as an Amazon Associate, I earn from qualifying purchases.
Font files are typically OTF or TTF font files. OTF stands for Open Type Font and if you have the option to install this, that is the one you should install. The OTF file is the newer font format and is the one that has all the special characters, also called glyphs, that we have seen evolve over time. Over time we have seen a shift in font development and are now seeing hundreds of characters in one font file versus the original 26 characters of the alphabet + numbers.
TTF stands for True Type Font and these are the older style font files that do not have as many special characters. If TTF is the only option you have to install for a font, that will work just fine. All it means is that the font file does not contain as many special characters.
How to Install Fonts for Silhouette
Check out the new video tutorial on the Silhouette Secrets+ YouTube channel as I’m sharing step-by-step how to install fonts for use in Silhouette.
As a Silhouette user we’ve been kind of spoiled in seeing font file thumbnails show up in the Fonts folder of the Silhouette library and with most of your basic fonts, the font will install on the computer when the font thumbnail syncs to the library. However, with the Silhouette website migration issues that started on 5/22/24, we have seen fluctuation in files actually syncing properly to the Silhouette library.
The fonts from the Silhouette Design Store, do NOT have to sync to the library for use. It’s just kind of a perk that we have gotten used to. Once things are back to working like they should with the Silhouette websites someday, we may see things return to normal.
The Silhouette Fonts folder only contains thumbnails for fonts that are purchased and synced to the library directly from the Silhouette library. Font files can be found in many online sites. Check out the Recommended Design & Retailers for the group for more options HERE.
The same steps apply for all fonts to be installed no matter what site you obtain them from.
I also have a written tutorial that I published a few year back called Let’s Explore v4 – Installing Fonts. In this tutorial I have provided additional details on things you might encounter such as extracting downloaded files and installation steps for a MAC.
As technology changes and we see updates from both Microsoft and Apple in the computer operating systems, there can be new ways they “hide” things or change things that users have to figure out. For instance, with the release of Windows 11, Microsoft hid the “Install for all users”. It is an important step in the process or the font file might not show up in all programs. That is also another change by Microsoft that occurred with Windows 10 release. If you encounter any issues with installing fonts or see something different than my video tutorial shows, please check out the written tutorial HERE for more details.
If you have any questions, please let me know in the comments below.
Save this for future reference by pinning the image below.
Enjoy !
THANK YOU for your support! How can you help? Click HERE & buy a coffee. Every little bit helps with the cost of running the site.
Silhouette Classes
Never stop learning! Let me help you take the anxiety out of learning with Silhouette and get to creating faster! My Silhouette classes are heavily focused on software, so you can take the skills & techniques taught and apply them to many future projects!
**This post may contain affiliate links. What that means is that I may receive compensation if you purchase through the links I have provided. The price you pay for the product or service is not higher but I may get compensated for sharing.
I love creating with the Artesprix Sublimation products! It has really helped me to just let go of my perfectionist tendencies and just create. These custom drawstring bags turned out FANTASTIC! I used the Artesprix mirror stamp plate for the text and then used it again as a color palette to pick up ink and paint the flowers. I wasn’t quite sure how the colors would show up on the background of the drawstring bag, but it was so bright and vibrant.
Affiliate links may be present in the following blog post and as an Amazon Associate I earn from qualifying purchases.
Anyone can do this and you do NOT have to be an artist to create with the Artesprix Sublimation products. You also do NOT need a sublimation printer, so it is a great way to dip your toe in the water to test sublimation before investing in a bunch of equipment.
I am sharing the supplies I used to create the custom sublimation bag in the video that is linked below too!
Other supplies: cardstock or copy paper, pencil, scissors, paper towels, paint brush(es), silicone mat
Watch how I made these custom drawstring bags with the Artesprix Sublimation products in the new tutorial HERE on the Artesprix YouTube channel.
Find more ideas on creating with the Artesprix Drawstring Bag HERE.
You never know what you can create until you just do it and there are times I have to give myself a little pep talk and say “Just Do It!”… Just get started and see where it might take you! Find more projects I’ve created using the Artesprix sublimation products HERE.
THANK YOU for your support! How can you help? Click HERE & buy a coffee. Every little bit helps with the cost of running the site.
Silhouette Classes
Never stop learning! Let me help you take the anxiety out of learning with Silhouette and get to creating faster! My Silhouette classes are heavily focused on software, so you can take the skills & techniques taught and apply them to many future projects!
**This post may contain affiliate links. What that means is that I may receive compensation if you purchase through the links I have provided. The price you pay for the product or service is not higher but I may get compensated for sharing.
Have you ever made your own custom stencils? Combining Grafix Stencil Film with a Silhouette cutting machine opens up endless possibilities for creative projects and designs. You can easily create a wide variety of customized pieces! Using the Silhouette, a design by Sarah Hurley, and Grafix Stencil Film, I created a custom stencil that can be used over and over again.
Affiliate links may be present in the following blog post and as an Amazon Associate, I earn from qualifying purchases.
I would recommend having a dedicated blade for cutting different materials. This will help to increase the lifespan on the blades, as well as help with future cut issues. Each material will dull the blade differently and stencil material is plastic, so that does affect it differently than say cutting a much thinner material such as adhesive vinyl.
The best thing you can do is test cut to determine what settings are going to work for your blade, machine model, and the materials being used.
After the cut is finished, check the cut to see if it cut completely through before unloading the mat from the machine. I have to tell myself this constantly because I’m so quick to press that unload button, but it can save you time and materials if you get in the habit of checking the cut first and if it did not cut through, then you can send it again and it should cut in the same exact location.
Or use with any inks or paints to create amazing projects!
What kind of projects would you create with your own custom stencils? Let us know in the comments below, we would love to hear from you!
Save this for future reference by pinning the image below.
Enjoy !
THANK YOU for your support! How can you help? Click HERE & buy a coffee. Every little bit helps with the cost of running the site.
Silhouette Classes
Never stop learning! Let me help you take the anxiety out of learning with Silhouette and get to creating faster! My Silhouette classes are heavily focused on software, so you can take the skills & techniques taught and apply them to many future projects!
**This post may contain affiliate links. What that means is that I may receive compensation if you purchase through the links I have provided. The price you pay for the product or service is not higher but I may get compensated for sharing.
Affiliate links may be present in the following blog post and as an Amazon Associate, I earn from qualifying purchases.
Just a quick note to share 3 crafting events that are coming up soon!!!
August 2024 events
Gifts & Business Summit – August 23-25, 2024 – details HERE
I am teaching a class called Creating Bespoke Earrings & Custom Gift Packing with Digital Patterns.
Class description: Boost your crafting skills and create unique, personalized gifts with ease! Design one-of-a-kind bespoke earrings that showcase your style and pair them with beautifully coordinated gift packaging. Impress your friends and family with delightful, handmade gifts they’ll adore! Don’t forget to create extras for yourself too!
I show how to set up the design for print and cut in Silhouette Studio, tips for print and cut with Silhouette, and assembly of the earrings and gift boxes too! For this project I used Siser EasyColor DTV on which is an inkjet printable HTV (real HTV) made by Siser, and added that to wooden earring blanks. Find more details on the Siser EasyColor DTV here.
Check out all the classes offered and register for your free ticket HERE.
*****
Maker’s Retreat – Virtual Event – August 28-31, 2024 – details HERE
I am not an instructor at this event, but I attended the in-person Maker’s Retreat in Texas in July and had a blast! They wanted more to be able to attend the event and have opened it up for a virtual retreat! Erin Reed, Eileen Hull, and Kassandra Louise are amazing instructors! This is NOT a cutting machine event and all are welcome!
Get ready for the 2024 Virtual Maker’s Retreat!! It is going to be an amazing event filled to the brim with projects, classes, techniques and LIVES. The Maker’s Retreat is an event that caters to the maker and crafter who loves to do a little bit of everything. From cardmaking to sublimation to mixed media to journaling and so much more!! You will learn how to create over 14 different projects and try out over 18 different techniques all from the comfort of your home. The Maker’s Retreat is a virtual event, so you get to enjoy all the classes, live streams, and events all in your jammies, and it is all happening from August 28 to Aug 31st!
Crafty Con 2024 – September 4-6, 2024 – details HERE
Crafty-Con features over 30 workshops led by experts, all designed to help you break free from any crafting ruts, master new skills, and strengthen your Cricut or Silhouette fundamentals.
I am teaching Intro to Print and Cut in Silhouette where we will use print and cut to create tags.
Class description: In this workshop, you’ll learn the basics of the Print and Cut feature on your Silhouette machine. EllyMae will guide you through the process of designing and creating custom tags using text and graphics. By the end of the session, you’ll have hands-on experience in setting up your design, printing it, and then using your Silhouette to cut it out perfectly. Perfect for adding a personalized touch to gifts, party favors, or any project that needs a special tag! And you’ll be set up for success to create your next print and cut project with your Silhouette.
And Save the Date for future events coming up too!
September & October 2024 Events
September 23, 2024 – Silhouette Secrets+ YouTube LIVE tutorial and Q & A Save the Date – October 10-12, 2024 Save the Date – October 21, 2024 – Silhouette Secrets+ YouTube LIVE tutorial and Q & A
THANK YOU for your support! How can you help? Click HERE & buy a coffee. Every little bit helps with the cost of running the site.
Silhouette Classes
Never stop learning! Let me help you take the anxiety out of learning with Silhouette and get to creating faster! My Silhouette classes are heavily focused on software, so you can take the skills & techniques taught and apply them to many future projects!
**This post may contain affiliate links. What that means is that I may receive compensation if you purchase through the links I have provided. The price you pay for the product or service is not higher but I may get compensated for sharing.
Compound paths are one of the things in Silhouette Studio that can take the longest to grasp. We see compound paths every day but are not always really “seeing” them. Most often the initial experience with compound paths leaves you saying, “What the heck?” or something along those lines. Or “Why did it do that?
Affiliate links may be present in the following blog post and as an Amazon Associate, I earn from qualifying purchases.
Compound Paths in Silhouette Studio
In this month’s LIVE YouTube tutorial we covered compound paths and I walked through several different demonstrations starting with simple compound paths and working our way up to a little more complex designs with compound paths.
Those who attended live were able to ask questions and I answered those on the spot and showed additional demonstrations.
Make sure to check out the Events Tab HERE for upcoming LIVE tutorials and more events too!
Save this for future reference by pinning the image below.
Enjoy !
THANK YOU for your support! How can you help? Click HERE & buy a coffee. Every little bit helps with the cost of running the site.
Silhouette Classes
Never stop learning! Let me help you take the anxiety out of learning with Silhouette and get to creating faster! My Silhouette classes are heavily focused on software, so you can take the skills & techniques taught and apply them to many future projects!
**This post may contain affiliate links. What that means is that I may receive compensation if you purchase through the links I have provided. The price you pay for the product or service is not higher but I may get compensated for sharing.
In this edition of Crafting Creativity I’ll be sharing the projects I created through the month with a watercolor background pattern. Patterns can really make your project unique and be used in creative ways with Silhouette. A great big thank you to Clikchic Designs for providing the free file for the Silhouette Secrets+ July newsletter!
Affiliate links may be present in the following blog post and as an Amazon Associate, I earn from qualifying purchases.
Silhouette Background Patterns Projects
This past month I have had so much fun designing and creating with the Watercolor Background design by Clikchic Designs.
I even went LIVE on YouTube – which for me is a big step, especially with all the issues Silhouette has been having. In the live video tutorial I shared all about pattern fill and how you can use it.
I’ve been collaborating with designers this year and each week I am sharing new projects that can be created from 1 file. This is a file that the designer has provided for the Silhouette Secrets+ Newsletter subscribers. I want to share how you can take 1 design and think about different projects you can use it in to make your designs go farther!
Project #1 – Card Design with Watercolor Background
I used the Watercolor Grunge background and printed it on a 12″ x 12″ sheet of cardstock. Don’t worry if you don’t have the capability to print on 12″ x 12″ cardstock, the same technique can be done with letter size paper too!
I participated in a card swap and signed up to exchange 20 cards, so this was a perfect way to create 6 cards from one sheet of paper. And every one of these cards was different because of the unique watercolor grunge background.
Here is another set I made with a vertical layout.
What started out as a sublimation tumbler idea, morphed into a sublimation journal cover project instead. I could not think of what I wanted to put as a saying onto a tumbler and while I was stumbling over that, I kept walking by these sublimation journals that I had ordered several weeks back.
Sometimes when the original project does not turn out, the next one is even better than you could imagine. I love these journal covers!
Project #4 – T-shirt Design using Siser EasyColor DTV
Printable patterns can be used for all kinds of projects, including printable HTV. Siser EasyColor DTV is real HTV that can be used with an inkjet printer.
I have had great success with the Siser EasyColor DTV and I would contribute that to following the printing and care instructions exactly. I have shirts that still look fantastic that I made when it was first released in August 2022.
I had a misprint when I first did the sublimation print for the journal and I had a line of “tiling”, which is a sharp distinct line in the actual printout and would not look good on my finished project. I explained about this and showed exactly what it looks like in the YouTube video HERE.
But, I wasn’t just going to throw away the printed sublimation page. I can use it for other projects! So I started digging in my sublimation blanks to see what the design would fit completely on. The coaster was the perfect fit and now sits on my desk too!
For the photo, I paired it with a tumbler that I use all the time from a previous class on creating your own custom designs.
Sometimes mistakes can be a good thing!
Next, I took a few more sublimation blanks and made some earrings and a necklace pendant from the extra pieces of the mistake sublimation print.
I don’t even want to admit how many pieces of sublimation printed designs I have just hanging out waiting for the perfect blank. Shhhh…. we won’t talk about it.
A great big thank you to Clikchic Designs for contributing the free file for the Silhouette Secrets+ newsletter for the month of July! If you missed grabbing the free Watercolor Grunge Background, it is available in the Silhouette Design Store HERE.
This year I started offering a free file each month for Silhouette Secrets+ newsletter subscribers. I love designing in the Silhouette Studio software and have shared some of my creations as well as look forward to collaborating with more artists in the future too!
Silhouette Secrets+ Newsletter
Never miss out on the news, tips, “secrets”, deals, classes, and more that I share on Silhouette Secrets+. Sign up for the newsletter and get information delivered to your inbox every Friday. Unsubscribe at anytime.
Sign up for the weekly newsletter HERE to have information delivered direct to your inbox and grab each month new freebie.
I hope this has given you some ideas on how one file can lead to many different projects!
Save this for future reference by pinning the image below.
Enjoy !
THANK YOU for your support! How can you help? Click HERE & buy a coffee. Every little bit helps with the cost of running the site.
Silhouette Classes
Never stop learning! Let me help you take the anxiety out of learning with Silhouette and get to creating faster! My Silhouette classes are heavily focused on software, so you can take the skills & techniques taught and apply them to many future projects!
**This post may contain affiliate links. What that means is that I may receive compensation if you purchase through the links I have provided. The price you pay for the product or service is not higher but I may get compensated for sharing.
Just a quick post to share something I stumbled upon yesterday while I was writing the weekly Silhouette Secrets+ newsletter. There is now a Silhouette Design Store direct download search feature!!!!
Silhouette Design Store – Direct Download Search
If you have been following along we are now 70+ days after the Silhouette website started to be migrated. The migration started on May 22, 2024 and it’s been well… a mess. It did not go as planned and it’s still ongoing. Little by little there are small improvements such as a new search is now available under the Downloads section on your Silhouette Account. This is BIG! For more than 70 days users have had to direct download if their Silhouette library was not working properly. However, that has had major issues too. For users like myself, who have thousands of designs, it was impossible to view them.
In the video I share how the Silhouette Design Store direct download search currently works and also options for accessing direct downloads too! Slowly, one step at a time, the website is improving… it might be baby steps, but at least it’s progress in the right direction.
I have more tips in the Silhouette Library & Account Issues: What to Do? Recommendations video HERE too.
Sign up for the Silhouette Secrets+ Newsletter for tips delivered weekly to your inbox and a new free file each month too! Subscribe HERE. Then make sure to confirm your subscription too!
Want to learn more? Check out the Silhouette A to Z Guide on the website HERE.
Save this for future reference by pinning the image below.
Hope that helps!
THANK YOU for your support! How can you help? Click HERE & buy a coffee. Every little bit helps with the cost of running the site.
Silhouette Classes
Never stop learning! Let me help you take the anxiety out of learning with Silhouette and get to creating faster! My Silhouette classes are heavily focused on software, so you can take the skills & techniques taught and apply them to many future projects!
**This post may contain affiliate links. What that means is that I may receive compensation if you purchase through the links I have provided. The price you pay for the product or service is not higher but I may get compensated for sharing.
Join me in creating a custom pillowcase that sparkles and shines! With the Artesprix Sublimation Sequin Pillowcase and the Artesprix Heat Resistant Mask, this project is not only fun but also easy to personalize. Using the Silhouette Cameo 5, I cut out a design that bring a unique flair to the pillowcase.
Affiliate links may be present in the following blog post and as an Amazon Associate I earn from qualifying purchases.
Watch how you can make your own custom creation with the Artesprix Sublimation products in the new tutorial HERE on the Artesprix YouTube channel.
Supplies used for Sequin Sublimation Pillow Case:
Here is a list of the supplies I mentioned and demonstrated in the new YouTube video:
Other supplies: cardstock or copy paper, pencil, scissors, paper towels, paint brush(es), transfer tape, weeding tool, spatula
Find more ideas on creating with the Artesprix Sublimation Sequin Pillow Case HERE.
Let your imagination go and see what you could create to add some sparkle to your space! Find more projects I’ve created using the Artesprix sublimation products HERE.
THANK YOU for your support! How can you help? Click HERE & buy a coffee. Every little bit helps with the cost of running the site.
Silhouette Classes
Never stop learning! Let me help you take the anxiety out of learning with Silhouette and get to creating faster! My Silhouette classes are heavily focused on software, so you can take the skills & techniques taught and apply them to many future projects!
**This post may contain affiliate links. What that means is that I may receive compensation if you purchase through the links I have provided. The price you pay for the product or service is not higher but I may get compensated for sharing.
In this edition of Crafting Creativity I’ll be sharing the projects I created through the month with the 3-D flower flamingo file from Tanya Batrak. This is a 3-D design file that is easy to assemble. A great big thank you to Tanya for providing the free file for the Silhouette Secrets+ June newsletter!
Affiliate links may be present in the following blog post and as an Amazon Associate, I earn from qualifying purchases.
3D Flower Flamingo File – 3-D Design
This past month I created with this 3-D Flower Flamingo File by Tanya Batrak.
My goal each month that there is a featured designer in the newsletter is to show how you can take 1 file and create several projects with it. I want to help you start thinking about different ways you can make your designs go farther!
Project #1 – Table or home decor decoration
I started with creating the 3-D Flower Flamingo at the original size it was designed with and cutting all the pieces out of cardstock for assembly.
I always love cutting and creating with cardstock! I recorded my assembly process of this file too! Check out the new video below.
This next design was a request from my daughter for a shoe charm. She had been watching me create and design with Grafix Shrink Plastic and wanted a new charm for her shoe.
I took 2 of the flower shapes and the little heart from the 3-D Flower Flamingo file and added color to them to print onto Grafix Shrink Film.
I added several more designs for future projects to the sheet of Grafix Shrink Film and cannot wait to finish creating with those too!
After cutting the Shrink Film with Silhouette, then I placed in the convection oven for 3 minutes at approximately 350 degrees. I love to see the before and after of these shrink plastic designs. It’s so neat! After it was cooled, I sealed the designs with UV Resin for protection, and then glued the pieces together.
Project #4 – Flocking Flamingos using Print and Cut
Next up, I really was considering doing some cupcake toppers, but just ran out of time. But these ones are calorie free!
Instead of paper piecing the bodies together, I set it up as a print and cut project using glossy photo paper instead.
I took the original file size and then deleted one side of the flamingo head. Made a copy and then right clicked and chose Flip > Horizontal, so I knew the design would be mirrored exactly.
Next, I ungrouped the file so the score line at the bottom was separated. Selected all of the body parts, excluding the score line and used Cut Edge on the Send tab to cut only the outer edge of the flamingo body. Check out the video below showing how I did this step.
Then I cut all the flower pieces out of cardstock and assembled the entire design.
Check out this neat video that first caught my eye when she released these designs HERE.
A great big thank you to Tanya for contributing the free file for the Silhouette Secrets+ newsletter for the month of June! If you missed grabbing the free 3D Flower Flamingo file in June, it is available in the Silhouette Design Store HERE.
This year I started offering a free file each month for Silhouette Secrets+ newsletter subscribers. I love designing in the Silhouette Studio software and have shared some of my creations as well as look forward to collaborating with more artists in the future too!
Silhouette Secrets+ Newsletter
Never miss out on the news, tips, “secrets”, deals, classes, and more that I share on Silhouette Secrets+. Sign up for the newsletter and get information delivered to your inbox every Friday. Unsubscribe at anytime.
Sign up for the weekly newsletter HERE to have information delivered direct to your inbox and grab each month new freebie.
I hope this has given you some ideas on how one file can lead to many different projects!
Save this for future reference by pinning the image below.
Enjoy !
THANK YOU for your support! How can you help? Click HERE & buy a coffee. Every little bit helps with the cost of running the site.
Silhouette Classes
Never stop learning! Let me help you take the anxiety out of learning with Silhouette and get to creating faster! My Silhouette classes are heavily focused on software, so you can take the skills & techniques taught and apply them to many future projects!
**This post may contain affiliate links. What that means is that I may receive compensation if you purchase through the links I have provided. The price you pay for the product or service is not higher but I may get compensated for sharing.
So much fun to create this custom water bottle! And I have more to share too! Find more projects I’ve created using the Artesprix sublimation products HERE.
THANK YOU for your support! How can you help? Click HERE & buy a coffee. Every little bit helps with the cost of running the site.
Silhouette Classes
Never stop learning! Let me help you take the anxiety out of learning with Silhouette and get to creating faster! My Silhouette classes are heavily focused on software, so you can take the skills & techniques taught and apply them to many future projects!
**This post may contain affiliate links. What that means is that I may receive compensation if you purchase through the links I have provided. The price you pay for the product or service is not higher but I may get compensated for sharing.
Have you ever wanted to have distressed background or edges on a pattern or photo? While Silhouette Studio does not have the same tools as a graphics program like Photoshop does, there are still ways you can get distressed or grunge edges in the Silhouette Studio software.
Affiliate links may be present in the following blog post and as an Amazon Associate, I earn from qualifying purchases.
Recently I was creating a bundle of 20 cards for a card swap that I signed up for through Erin Reed Makes and saw an idea to create 6 card backgrounds from 1 sheet of 12″ x 12″ paper on Pinterest. It was a distressed background with white space left for additional elements to be added to the card front.
Now, these distressed designs are not ideal for cutting as they are quite detailed, but they are awesome for print projects, like creating card backgrounds, sublimation, or other printed projects.
I grabbed some clipping mask png files from ClikChic Designs on Etsy and created exactly what I wanted. But, I knew it could be easier or more available to Silhouette users, so I reached out to ClikChic Designs and we started working together testing some designs and I’m excited to say there are a few in the Silhouette Design Store! If this is a popular idea, you may see more too – so make sure to leave a comment below so we know if you like this style of designs.
Let’s take a look at how I created this distressed background pattern in Silhouette Studio.
Distressed Background Designs in Silhouette
Open Silhouette Studio and set up the page size for your printer.
If you don’t have the capability to print a 12″ x 12″ sheet of paper, don’t let that stop you. This could be done with whatever size you can print on to create projects with.
Open the distressed design and scale it to the size you want to fill as much of the page as you want.
A .studio file, which is what is in the Silhouette Design Store or a .svg file is a cut file. This means that you can add patterns to the design. If you open another file type such as a .png or .jpeg, you would need to do additional steps to work with that file. (See below for additional information)
**Currently as I type this, you will need to download these files direct to your computer to use as the library syncing is broken – click HERE for how to do that.
If the pattern is outside Silhouette, drag it from the My Computer folder location and hold it over top of the design. The design will fill with that pattern.
If you move too fast doing this step, it may not work or you may end up with a small square that won’t disappear without closing the software to reset it. Go slow and hold that pattern on top of the design in Silhouette Studio until it fills the shape.
Patterns from the Silhouette Library could also be used as well. For more on Patterns in Silhouette, check out these tutorials HERE.
Next, change the Line Color to Transparent to see how the pattern will look. This step also ensures that the red cut border will not print.
The next steps would depend on what project you are working on. I printed the design on a 12″ x 12″ sheet of Recollections cardstock.
Then I used my paper trimmer, cut the 12″ sheet at 6″ in the middle of the pattern and then again cut those sections down to 4″ widths. Once I had each section I could trim it down further to 4″ x 5.25″ for my card backgrounds.
I added a stamped sentiment to the front and added some rhinestone gems to each card.
There are so many options! 6 card backgrounds from 1 sheet of 12″ x 12″ cardstock
A great big thank you to ClikChic Designs for working with me and the idea to make this style of designs easily available to Silhouette users. Check out their blog post for additional ideas on this technique HERE.
I have collected designs by ClikChic for awhile. And then I saw on their Instagram channel where they showed how they create their designs by hand painting them and then digitizing them. I was mesmerized. So make sure to check out their Instagram too!
Save this for future reference by pinning the image below.
Enjoy !
THANK YOU for your support! How can you help? Click HERE & buy a coffee. Every little bit helps with the cost of running the site.
Silhouette Classes
Never stop learning! Let me help you take the anxiety out of learning with Silhouette and get to creating faster! My Silhouette classes are heavily focused on software, so you can take the skills & techniques taught and apply them to many future projects!
**This post may contain affiliate links. What that means is that I may receive compensation if you purchase through the links I have provided. The price you pay for the product or service is not higher but I may get compensated for sharing.
Affiliate links may be present in the following blog post and as an Amazon Associate, I earn from qualifying purchases.
Did you know that you can use the Silhouette software without EVER using the Silhouette library?
If you are reading this when it’s first published, we’ve been encountering an issue where we are currently 23 days into an outage of the Silhouette websites where there are issues syncing files to the Silhouette library and anything that “talks” to the Silhouette servers. It has worked a bit in the last 23 days, but for the most part users are dead in the water if they only use the Silhouette library and rely on it only.
But, you DO NOT have to rely on the Silhouette library at all! And, to be honest, you should NOT! You should not rely on 1 source as an absolute. You purchase files and you should have those files available to you whenever you need them.
First Thing First
Before I even begin to show you how you can use Silhouette without the library, the first thing I want to advise you is….
1 – Save your personal files to an outside location!!!
It’s really easy to do. File > Save As > Save to Hard Drive. Or if you are saving a file type besides .studio file I would recommend selecting your entire design and then using File > Save As > Save Selection and then choose the file type.
2 – Back up your files. Even if you save your files to an outside source. Back them up to another source! There is NOTHING that is 100% safe! Except multiple back ups.
More tips on backing up files, including what I’m currently using as my primary storage and back up sources – click HERE
I hate to say it but in general, we have all gotten complacent. We used to save Word documents every 5 minutes and that was the standard. It doesn’t really matter that technology has improved, it can still fail! Nothing is 100% fool proof except multiple saving a backup to multiple locations.
3 Ways to Use Silhouette Without the Library
1 – Design your own files using tools in Silhouette Studio
Every single user can create their own files! You do not have to have a degree to do this. Use the tools in Silhouette Studio software to create your own designs.
2 – Open a design in Silhouette Studio and use to cut. Silhouette Studio can open many file types from outside sources.
This method depends on what Silhouette Studio upgrade you have. The basic (free) software is limited on what file types it can open. Silhouette Studio upgrades will allows you to open more file types such as the common SVG file type that is a cut file.
3 – If you can access your Silhouette library, you can open from there. But what if you cannot access it for some reason – like the software update mess or another issue?
You can download the files direct to your computer and use them!
Check out this video on how you can download your files directly from the Silhouette Design Store and save to your external source on the Silhouette Secrets+ YouTube channel HERE.
You have the resources at your finger tips! Use them! Learn how to make Silhouette Studio software work for YOU!
Want to learn more on how you can make Silhouette Studio work for you? Check out the A to Z resource on the blog HERE.
Save this for future reference by pinning the image below.
I hope these tips help you on your journey, especially as we navigate the Silhouette Studio website issues we are currently experiencing as I type this.
Enjoy !
THANK YOU for your support! How can you help? Click HERE & buy a coffee. Every little bit helps with the cost of running the site.
Silhouette Classes
Never stop learning! Let me help you take the anxiety out of learning with Silhouette and get to creating faster! My Silhouette classes are heavily focused on software, so you can take the skills & techniques taught and apply them to many future projects!
**This post may contain affiliate links. What that means is that I may receive compensation if you purchase through the links I have provided. The price you pay for the product or service is not higher but I may get compensated for sharing.
Creating unique tool charms is a fun and rewarding DIY project that allows you to personalize your tools and accessories. Using Grafix Shrink Plastic and a Silhouette cutting machine, you can craft intricate, customized charms that add a touch of creativity to your toolbox.
Affiliate links may be present in the following blog post and as an Amazon Associate, I earn from qualifying purchases.
Do you lose track of your tools when crafting? Or attend events where your table neighbor might have the same scissors as you? Tool charms are not only fun to make but can serve a functional purpose too!
Custom Tool Charm with Grafix Shrink Plastic
I had so much fun creating all of these tool charms! And I’m sharing how I created them as a contributing artist over on the Grafix Arts YouTube channel HERE.
All brands of shrink plastic can vary and the blade sharpness will affect the cut settings needed to cut completely through. I started with the Shrink Plastic setting in the software and increased the blade depth to a 7, force 33, and 2 passes. As the blade dulls, you will need to increase the settings.
DO NOT unload the cutting mat after the cut is complete. Check to see if it’s cut through and if not, send the cut again as needed.
This would be a fun project to set up for a kid’s party or a craft night with friends!!!
Save this for future reference by pinning the image below.
Enjoy !
THANK YOU for your support! How can you help? Click HERE & buy a coffee. Every little bit helps with the cost of running the site.
Silhouette Classes
Never stop learning! Let me help you take the anxiety out of learning with Silhouette and get to creating faster! My Silhouette classes are heavily focused on software, so you can take the skills & techniques taught and apply them to many future projects!
**This post may contain affiliate links. What that means is that I may receive compensation if you purchase through the links I have provided. The price you pay for the product or service is not higher but I may get compensated for sharing.
In this edition of Crafting Creativity I’ll be sharing the projects I created through the month with the butterfly file from Wispy Willow Designs. A great big thank you to Hannah from Wispy Willow Designs for providing the free file for the Silhouette Secrets+ May newsletter!
Affiliate links may be present in the following blog post and as an Amazon Associate, I earn from qualifying purchases.
Wispy Willow Designs is another one of my favorite designers that I’ve grown to collecting over the years. It was great to meet Hannah at the Silhouette Summit in September 2023 and put a face with the name in person.
Silhouette Summit 2023 Demo Room with Wispy Willow Designs
My goal each month that there is a featured designer in the newsletter is to show how you can take 1 file and create several projects with it. I want to help you start thinking about different ways you can make your designs go farther!
Project #1 – Adhesive vinyl cut and layered
I created this flower wreath design in Silhouette Studio for a class I taught at Bella Con 2024. It sat for a couple weeks until I settled on a design for the center. The butterfly design is cut from black Oracal 651 and then orange glitter adhesive vinyl is layered on top.
It was perfect for the finishing touches on this wood sign creation!
And look how small and detailed those cuts are! I cut this using the Silhouette Cameo 5 and the Silhouette Autoblade. It took a few exact moments to weed the design to make sure all the pieces stayed in one place, but it was totally worth it!
Project #2 – Card Embellishment with Holographic Cardstock
I’ve been wanting to use this holographic cardstock that I had purchased for awhile and this added that special sparkle to the card. I added some foam tape to the backside and popped it off the card.
The card base was one I had made previously for the Silhouette Cameo 5 & Curio 2 – Type C Pen Holder video where I showed sketching with the new pen holder. The sentiment was sketched and the card was just waiting for something more.
I used the pattern fill option in Silhouette Studio to add a different fill to each of the butterflies and make them all unique.
Glossy or holographic materials can sometimes be problematic for users to get an accurate print and cut on. Check out the video on the Silhouette Secrets+ YouTube channel where I shared the creation and tips too!
Project #4 – Acrylic Etched with the Silhouette Curio 2
Here is a look at the acrylic etchings that I tested. I had not intended to do more than 1, but then I messed up and didn’t decrease the spacing on the first one I did (middle), so I ended up going down the rabbit hole and etched 3 more with different etch fills and spacing.
And then I started playing around with some alcohol markers. The alcohol ink sort of spreads into the etching and can be fun to play with. Normally I do not fill my etchings in because I don’t have complete control and nothing is permanent when you color an etch in.
My favorite has to be the one on the far right, but I also like the look of the first one I etching with the larger fill pattern too. With each one I played with different techniques but they are all growing on me.
While I do not like the look of the Silhouette Power Engrave tool marks that show as a spiral on the single line outline (1st photo, top left), it does give a neat look once filled with the alcohol markers.
New video out on the Silhouette Secrets+ YouTube channel sharing a quick look at the process of etching these acrylics and testing the fills with the alcohol markers – check it out HERE.
A great big thank you to Hannah at Wispy Willow Designs for contributing the free file for the Silhouette Secrets+ newsletter for the month of May! If you missed grabbing the free flower file in May, it is available in the Silhouette Design Store HERE.
This year I started offering a free file each month for Silhouette Secrets+ newsletter subscribers. I love designing in the Silhouette Studio software and have shared some of my creations as well as look forward to collaborating with more artists in the future too!
Silhouette Secrets+ Newsletter
Never miss out on the news, tips, “secrets”, deals, classes, and more that I share on Silhouette Secrets+. Sign up for the newsletter and get information delivered to your inbox every Friday. Unsubscribe at anytime.
Sign up for the weekly newsletter HERE to have information delivered direct to your inbox and grab each month new freebie.
I hope this has given you some ideas on how one file can lead to many different projects!
Save this for future reference by pinning the image below.
Enjoy !
THANK YOU for your support! How can you help? Click HERE & buy a coffee. Every little bit helps with the cost of running the site.
Silhouette Classes
Never stop learning! Let me help you take the anxiety out of learning with Silhouette and get to creating faster! My Silhouette classes are heavily focused on software, so you can take the skills & techniques taught and apply them to many future projects!
**This post may contain affiliate links. What that means is that I may receive compensation if you purchase through the links I have provided. The price you pay for the product or service is not higher but I may get compensated for sharing.
If you have not seen the many thousands of posts on social media, then this may be news to you. Silhouette has been updating their websites. Both the Silhouette America website and the Silhouette Design Store website have been undergoing a major update where all the data has to be transferred from one system to another. Silhouette has run into issues with the site updates.
Updated 7/9/24 10:30 am CDT – Website & Library issues
User’s are starting to receive this email from Silhouette about a “fix” for the library (photo below). It is a slow roll out as described in the email dated 6/25/24.
Silhouette version 4.5.807 that is referenced, was released on Friday, July 5, 2024 as the “fix” under Open Beta version on the Silhouette website. This is all new territory for all of us and we have no idea what will happen or what will come in the future. So far we’ve seen mixed results.
RECOMMENDATIONS:
Do nothing until you get an email from Silhouette that your account is enabled. If you do try to sync before getting the email, then most likely your account is not enabled yet and it won’t work anyhow.
if you decide to test v4.5.807 – turn off and unplug all of your Silhouette machines and DO NOT connect to them until you decide if you are going to keep this version. v4.5.971+ have firmware updates required for newer model machines and is another reason we were not recommending that update. Neither v4.5.791 or v4.5.807 have much testing by users and we reported several bugs in .791. If you decide to keep v4.5.807 – you will need to process those firmware updates if it notifies you. There is no way around that unless you use older software – which means the library and new files may not successfully sync.
or wait and see what happens going forward
I honestly don’t like the fact that a software update is released and users are forced to update if they want their library to sync, but it’s not my call.
If you received the email and after following Silhouette’s instructions still have issues with the library syncing, files not downloading, download failed, logging into the websites, credit balances, subscriptions, or shopping in the Silhouette Design Store you will need to email Silhouette at support@silhouetteamerica.com as the email instructs.
For the best results you can expect from Support, be as detailed in the email and explain the steps that you have taken and provide any photos that help explain your issue as well as what you currently see. This will hopefully help them understand what your particular issue is.
I wish this were different, but please understand we are all experiencing the issues together.
Even if your library is still not syncing, I do have resources that can help for you to still be able to use your Silhouette software and machines….
How to Direct Download from the Design Store video HERE
Library Extractor for Windows and MAC Please read all the notes. This will extract library files that were synced to the computer prior to the website issues. It will not contain any files that have not successfully synced to the library. However, it does extract user created files too! I have tested this and it worked for me.
Please continue reading below for additional information that has been shared during this entire process. It has been a long 50 days as I type this of the mess, but we are all experiencing the issues together.
*****
Silhouette users who are signed up for email notifications were sent an email on May 21, 2024 notifying them of this update. Here is a copy of the email notice I received.
Affiliate links may be present in the following blog post and as an Amazon Associate, I earn from qualifying purchases.
Update: email sent to users on 6/24/24 5 pm CDT
Update: email sent to users on 6/14/24
Update: email sent to users on 5/30/24 “We are aware of the issues being encountered with the new websites. We apologize for any inconvenience and frustration this may have caused. Rest assured we are working diligently to resolve these problems and will have everything up and running smoothly soon. Our intent with this upgrade is to improve your experience and the offerings we provide. We thank you for your patience and understanding.”
The emails are only be sent out to those subscribed to receive their emails. Many users also found that the email ended up in their spam or junk folder, or the email provider marked it as spam and it was not received.
Silhouette also put up a notice on the websites that they were under maintenance starting at midnight on 5/22/24 and hoped it would be complete at 7 am MST on 5/22/24.
Unfortunately, technology did not follow their schedule and we are now (7) 9 days out and it is still not functioning properly.
So here we are…
I am going to provide some information below and will continue to update this post as things progress, so it may be a good one to bookmark for future reference.
Now “hold onto your butts” because this is a lot of information to share below…. (side note: we saw a car decorated as a Jurassic Park tour car last weekend and that saying was on the back window. The entire vehicle was decked out including a dinosaur riding on the dash – so it’s fresh in my mind)
Silhouette Website Updates
Updates 6/14/24 from Silhouette Secrets+ – Recommendations
Do NOT try to sync the library! Syncing has been turned off the past week or so, so it will not work while they continue to work on it.
Turn the library to “Working Offline”. Click the Library tab. Click your name in the top left. Make sure there is a red checkmark next to Working Offline. No red checkmark = not set to work offline.
Do not click the Sync button. I know that is a repeat but we’ve been repeating ourselves thousands of times.
Download any files directly from the Silhouette Design Store – video on how to do that HERE
If you are getting an error accessing the Design Store – type “Silhouette Design Store” into a Google search and use that link that comes up. Do not use auto suggested links as some are not working since the change over.
You can continue to use your Silhouette software and machines!!! Find out how HERE
Start thinking about storage options for the future!!! Once this is over and we see how things will be in real time, I will put out information on “What to Do Now”. But, I cannot begin to do that until I know how the changes will affect the Design Store and what the functionality will be. I use an external hard drive, well actually, I use 2. One is my everyday working hard drive and the other is my backup of that hard drive and I try to backup weekly. It will depend on how many files you save and how much you save on the size of storage you need or how often you back up your files, but I’d recommend at least once a month. Find out more on backups HERE *this is good information to save for the future!!!
UPDATE 6:00 PM CDT 6/9/24 Please read entirely.
Updates are still in process and they do not expect them to be fixed until sometime later this week….. that’s an estimate at this point.
DO NOT try to sync your libraries – it will not work as it’s been turned off while they are trying to fix it. If your library happens to sync, it’s a fluke and they might be testing things and have turned it back on for a short time. We have recommended this entire time to keep the library at Working Offline. That means you should see a red check mark next to Working Offline in the Library menu when you click on your name. If there is no red checkmark, it is NOT set to Working Offline completely.
Sales tax – sales tax charged “should” be fixed. Sales tax will be charged in all states that require that sales tax be charged in. It’s the law!!! It should only apply to purchases made with a credit card or Paypal. Anything covered by your subscription credit completely, should not be charged sales tax. If you go over your credit balance, you will be charged tax on that because it’s over the credit balance. There may still be issues here and there because they are NOT done fixing it.
Design Store sale – is 50% off but you may need to click on the actual item and the Quick Add to cart in order to see the sale price accurately. I did report that. Check out how to direct download your files from the Silhouette Design Store while these updates are being fixed HERE.
Free files – do NOT use the link in the email that Silhouette sent. It is not showing properly. I reported that too. Go directly to silhouettedesignstore.com and log in, then it should show properly.
Silhouette Design Store Access – we’d recommend that you DO NOT use the button in the Silhouette software to access the Design Store. Use a web browser and log in for best results. There are issues with accessing it through the button in the software.
Logging in to the Design Store – you WILL need to log in each and every time you visit the Design Store. Yes, we all know it’s a pain in the butt…. but it’s better than it was before during this mess, so I count that as a win right now. We need the little wins!!! Type in your email and password each time. DO NOT use the computer’s autofill for best results as we’ve seen issues with that too.
Cannot log in – you can try a password reset but there are no guarantees. If you cannot log in, then you will most likely have to wait until the mess is fixed.
Please continue reading below for additional information and specifics on the issues users are encountering during these updates.
Update 6/24 10:00 am CDT updates ongoing….. New video on how to direct download Silhouette Design Store files on the Silhouette Secrets+ YouTube channel HERE.
Update 6/5/24 8:30 am CDT Updates are still ongoing. Issues reports are listed below.
Update 6/4/24 5:30 am CDT Updates are still ongoing. Many different issues reported and being experienced by users and myself. – new designs not downloading properly – Silhouette library will not sync – maximum number of devices reached error – passwords not working (make sure you are accessing the Silhouette Design Store from a web browser, not the button in the software. And do not use an autofill on the computer for the password for best results) – credits and subscriptions not showing properly (they will address this as soon as the updates are functioning properly and they can get into the system to start fixes)
I do feel that a lot of the issues will resolve themselves once the websites are fully functional and stable. Right now, it’s having a major issue syncing the massive amounts of user data to each user’s Silhouette software.
Currently, I have 2 computers that the library is all messed up. I try to sync each day and it gives me a new error. I have tried every trick in my tool box to see if it will work and some have just made it worse. If your Silhouette library is showing up, I’d recommend turning it to Working Offline (instructions below) and do not try to sync it until this is all over. If your Silhouette library is not showing properly, I do not have a solution for a “fix” at this time. I’ve tried it all and it has just made my 2 computer libraries worse.
I will continue to update when I start seeing things change.
Update 6/2/24 4:20 pm CDT The updates are still in process and I am still seeing as well as experiencing issues. Lots of issues reported by users and they are not all the same. I hope for more progress this week.
I was able to shop in the Silhouette Design store last night and it was faster, however, I had mixed results on syncing to my library on 2 computers. My test computer, is a mess. It did say it was synced but only shows the new files I purchased as Download failed and 200 free with machine designs. The 2nd computer I tried to sync, which before had my full library synced on, has not deleted everything but the free with machine and the new files I bought last night. However, those files all show as fully synced and do not show as Download failed. My 3rd working computer is set to work offline and I am not risking it at this moment.
I am recommending that users do not try to sync their libraries or it can have a mixed result.
Update 6/1/24 11:00 am CDT As I type this to try to provide more information, the Design Store is not loading for me at all – I get a 504 error…. but if you can get it to load, the following information may be relevant.
Seeing all kinds of odd behaviors as listed below. Nothing is consistent and users should expect to see odd things if they are trying to sync, buy designs, or download designs. There is nothing we can do but wait to see what happens.
NEW!!! Direct Download option of Silhouette Designs. Click on heart or person icon in the top right of site. On the left side, select Downloads. Click on the thumbnail of design and it should open the downloads window. However, it is not easy to search through your designs for a specific file and you may spend more time scrolling and waiting on pages to load. Might work in a pinch, but will take time to process.
However, note that the site is super slow and the more users try to access it will affect the results. This is a catch 22 – it’s not functioning properly yet, but they also need traffic in order to see how that function is working and to be made aware that it is not going to hold up to the “normal” flow of user traffic. Please be aware of this and understand that at this moment, all I can guarantee is that it is NOT working properly and is super SLOW, if you can get the site to even load.
At this point, the only thing we can count on is…. it is going to take time for it to all be “normal” again.
Update 5/31/24 6:00 pm CDT We are starting to see some changes occurring. Some users have been able to log in and see their designs. However, we are also seeing a lot of strange and misfit information too! I do not think it’s over, but at least a step in the right direction. Some of the things we are currently seeing are: – file names not matching thumbnails – only free files showing – some not able to log in – download failed on files when library syncs – new files are not showing download failed – Silhouette Design Store is slow – syncing is super slow – website in and out at time I don’t think it’s over, but a few more good reports than there were earlier today!!!
——–
What we do know:
the websites are currently undergoing updates
anything that “talks” to the Silhouette servers can be affected
Silhouette is aware and is continuously working on it
Silhouette Support has been bombarded with complaints & user issues
Silhouette Support cannot “fix” anything at the moment until the website updates are finished
No one can do anything to “fix” it at the moment until the website updates are completed and stable
I have been reassured that the data is still there and Silhouette can see it, but we as a user may not be able to “see” it during this update because of the issues they are working through
I do believe that most of the issues we are seeing will be resolved when the Silhouette websites are 100% fully functional and stable. Most of the issues “should” work themselves out on their own once the systems are stable.
What is affected?
It might be easier to list what is not affected. Currently anything that has to “talk” to the Silhouette server to receive data may be affected. This includes the Silhouette library, Silhouette Design Store, and everything in between.
The Silhouette Design Tab and the cutting machine capabilities are all offline, so they should be able to still be used. However, we’ve already had reports starting today that the software is crashing when the library is trying to log back in or sync.
What can you do?
First, don’t panic. It won’t help anything and it will not “fix” it.
I am going to list some things that you can do to hopefully continue working in your Silhouette software below and I will update this as it progresses.
1 – If it’s possible, turn off the WIFI/internet from your computer for the next step. This will ensure that it will not try to “talk” to the servers before you complete the next step.
2 – With WIFI/internet disabled on the computer, open the Silhouette software, click on the Library tab in the top right corner and then click on your name in the top left corner of the library. Check the box next to Work Offline.
Now you “should” be able to use the Silhouette software without it trying to connect to the servers. You should be able to turn on the WIFI/Internet on your computer again.
Continue using your Silhouette Studio software and machines to cut projects as needed. You will be able to open any .studio files that you have saved from an external source such as your hard drive. If you have the Silhouette Studio Designer Edition upgrade or higher, you will be able to also open other file types such as a SVG file, which is a cut file as well.
If your Silhouette library is still showing, you will be able to use any files currently in the library (if it’s not showing at all, please continue reading below)
Save any files you are designing to an external source by using File > Save As > Save to Hard Drive and select a location.
3 – Click on your name in the top left corner and select Library Export. Save that file to your computer or an external source with the current date.
4 – Click on your name in the top left corner and select Export User Created Files. Save that file to your computer or external source with the current date.
Both steps 3 & 4 can be performed if your library is still showing and I am only recommending as a precaution. As a note, these are 2 steps that we recommend users are doing on a regular basis anyhow.
5 – Do NOT log out of the Silhouette library.
6 – Do NOT try to sync the Silhouette library.
7 – At this time, I do NOT recommend shopping in the Silhouette Design Store. The more users who are trying to access the Design Store website or trying to sync their accounts is bogging down the system. Having multiple web pages open on your computer trying to access designs “faster” in the Silhouette Design Store is not helping anyone.
8 – At this point and time, Silhouette Support cannot do anything to “fix” the issue. They are in the same boat as we are while we wait for the company in charge of the migration to figure their stuff out. Silhouette Support has received thousands of emails, many of which are complaints about how users don’t like the colors, the headers, the look in general, etc. All of those emails will take time to answer, but currently there are no answers until the websites are functioning properly again.
Silhouette Support is responding to the thousands of emails and here is an example that does confirm they are aware of the issues and continuing to work on it.
“Thank you for your email. We are sorry to hear of the issue encountered. Thank you for your continued patience. we have worked diligently over the weekend to get the website back to normal operation. Some things may still be non-functioning as the data that is being transferred from our old website to the new one is massive. Rest assured , none of your libraries have disappeared and will soon be functional once all of the data is transferred. You can expect some functions to be back to normal while others are not. The website will be very slow while all of the data is still transferring as well as the web traffic we are experiencing from customers trying to log in, change passwords and sync their libraries. We apologize for the delay in getting the website back to 100%. We are continuing working on this behind the scenes and we have a dedicated team that has worked through the weekend, the holiday and nights in order to move this process along. Again, we appreciate your patience and hope to have all sites back up and functioning as normal soon. We hope this information is helpful. Please let us know if you have any other questions.” Silhouette Support Team
9 – Do NOT uninstall and reinstall the Silhouette software. At this point, if you do, you may not be able to get it reinstalled and set up again. It will not “fix” this issue.
At this time there is nothing anyone can do to speed this up. The company in charge of the migration is working on it and we just have to wait. It is 15+ years of data that is being moved and stabilized onto a new system.
No one wants to be in this situation, especially Silhouette. But, at the moment we are in it and there is absolutely nothing you can do about it.
What to do if your Silhouette library has disappeared?
Updated Information 5/31/24 We have received reports that some users have been able to get their libraries to sync. However, reports go back and forth on it will sync and then kick them out again, and then they get error notifications. Users are still having issues and behavior is unknown.
If your library does sync, we would highly recommend that once that is complete, change the Silhouette library to “Working Offline” as explained above. We would recommend not trying to sync again until the websites are completely functioning and stable or you risk losing the library again.
—–
5/29/24 – original publication Unfortunately, there is nothing that can be done right now.
The Silhouette library “talks” to the Silhouette servers and if it cannot communicate with the server, it cannot pull the data it needs to show you the library.
I have been told that Silhouette can see the user information and all the information is still out there, but users just cannot “see” it in the library currently due to the upgrades.
I know it won’t help at all and will just make some users angry, but try not to panic. Panicking will not help the situation and it will only add to your stress. Silhouette is aware and they are trying to fix it.
I do believe that once the Silhouette website updates are complete that a lot of these issues will “fix” themselves and we can get back to our projects.
At this time, I am NOT recommending that users import a backup of the library into the Silhouette software simply because I have no idea how that might be treated once the Silhouette websites begin functioning again. It is possible it could duplicate the entire library, throw an error because it “thinks” the cloud storage is full, or freak it out altogether and do something different. It may cause more issues and take longer to resolve than if we just wait it out.
What to do if your Silhouette upgrade disappeared?
Unfortunately, the answers don’t get any happier. At the moment, there isn’t much you can do. In order to activate the upgrade, the software has to “talk” to the Silhouette server to get that data.
Your choices are:
try to activate the upgrade again under Help > Apply Upgrade – enter only your email and password
wait until the Silhouette websites are functioning again
If you do try to log in and activate the software upgrade again, please be aware that it may or may not work. If it cannot connect to the Silhouette servers to get that information, then it won’t work and you do risk the Silhouette library trying to sync and disappearing.
But, if you are trying to activate the upgrade to open SVG files, it may be worth the risk to still continue to work with the Silhouette software. Only you can make that decision.
What to do if you received an email that there was an error with your payment
With the systems down and not functioning properly, I know many have received emails that there was an error with their payment. This is probably not something to do with your actual payment method, but caused by the updates. At this point, we don’t know
Here is how I suggest you proceed:
1 – I would check with your payment source and see if the payment did actually go through. If it did grab a screen shot or photo of that. Gather the information you can from your payment source.
2 – Contact Silhouette Support with the information & provide a detailed description of what has happened. However, understand that Silhouette Support is backlogged with user emails and they currently cannot do anything to “fix” the issue until the system is back completely. At this time, all they can really do is respond with a message like I showed above.
So my recommendation is to add this to your to-do list to contact Silhouette Support when the websites are back online, functioning, and stable if you do not see that the issue has been resolved under your Account on the website.
Please understand that it will take time for all the issues to work out once the Silhouette websites are updated, functioning, and stable. The more information you can provide in your email to Support the faster the issue can be addressed.
What to do if you had credits expire during this down time?
At this point and time, there is nothing that anyone can do to fix that during this migration time frame. Silhouette is waiting on the company who is migrating all the data to get it stabilized and they cannot make any changes during that time.
Once the Silhouette websites are functioning properly and stable, they will begin addressing these issues and the expired credits is on their list. I have submitted the issue to several at Silhouette and they are aware. They want to fix it, but have to wait just like we do.
As mentioned, Silhouette Support is bogged down with complaints about everything from hating the new colors to actual real issues. I’d recommend making an note of what credits expired and once this is all said and done, compose a nice email to Silhouette providing the information you have.
Two things to remember here: 1. Silhouette Support agents have no control over this either, but they are taking the brunt of all the nasty emails and people yelling at them 2 – “You catch more flies with honey than vinegar.” – a please and thank you can go a long way. I’ve seen some of the emails that are being sent as users share online, they are not nice at all. Your email may make all the difference in that person’s day! I understand we are all frustrated, but it’s not their fault, they are just doing their job to respond to as many support requests as they can in their work day, including all the ones complaining about the colors of the website.
When will the updates be done?
At this point, we are on day (7) 9 and they had hoped it would be done overnight on 5/22. That did not happen, so the best answer I have for that is something I say to my kids when they ask when dinner will be ready….
It will be done when it’s done.
It is not what any of us want to hear, believe me – I know!
I am just as frustrated, if not MORE than you are! We have fielded thousands and thousands of comments, posts on social media, emails, and messages in regards to this. We CANNOT fix it either and all we can do is provide the information that we are seeing and experiencing.
I have been a Silhouette user for 11+ years now and this is the first time this has ever happened. They are changing system completely and things happen. It is not the norm and rarely are we ever down this long.
Now, a bit of humor because if I don’t laugh at something I might scream….
A few designs from my Silhouette library that you may want to grab once everything is back to “normal”.
This pretty much describes the last week as we have tried to navigate these issues and respond to thousands of user posts, comments, emails, and messages.
As a note, I grabbed that design before the typo could be fixed in the Silhouette Design Store a long time ago and have kept for my own use. I had planned to make a sign for my studio with it at some point. It fits in with the Swift Creek Customs logos I designed.
And after this is all over and done with, we might all need badges.
Note: I have NOT linked these designs as I am staying off the Silhouette Design Store website until the issues are resolved as I advised above.
We are all in the same boat… up a creek without a paddle…. we will get through it! Hopefully the information provided above can help most users.
I have also compiled a long list of issues we have seen or experienced and have sent that off to several of my contacts at Silhouette. They are aware of the issues and will continue to work through them as they can. The most important factor right now is getting the Silhouette websites functioning and stable, then other issues can be addressed. Hopefully, many of those issues will be resolved simply by the website functioning properly again.
Note: this blog post will be updated as information changes
I don’t even know how to sign off on this post…. to all my fellow Sh*t Creek members – hopefully we will have a resolution soon!
THANK YOU for your support! How can you help? Click HERE & buy a coffee. Every little bit helps with the cost of running the site.
Silhouette Classes
Never stop learning! Let me help you take the anxiety out of learning with Silhouette and get to creating faster! My Silhouette classes are heavily focused on software, so you can take the skills & techniques taught and apply them to many future projects!
**This post may contain affiliate links. What that means is that I may receive compensation if you purchase through the links I have provided. The price you pay for the product or service is not higher but I may get compensated for sharing.
Want to create unique DIY items? This month I created this fun, bright colored DIY necktie that is definitely unique and a one-of-a-kind using the Artesprix sublimation paints, stamp ink, and a fun Tim Holtz – Crazy Birds stamp set. The best part is… you can do this too!
Affiliate links may be present in the following blog post and as an Amazon Associate I earn from qualifying purchases.
I went to ask my husband to tie this as I was trying to take the final photos and he had a friend over. The reaction I got was worth it all! They both loved it! A unique DIY necktie that is one-of-a-kind. I mentioned that it would take a special, fun event to wear this and his remark was, “Absolutely not.” I think he was ready to take it and prove me wrong. It was the perfect reaction to confirm I was on the right path with my unique creation.
Watch how you can make your own DIY creation with the Artesprix Sublimation products in the new tutorial HERE on the Artesprix YouTube channel.
I just love these fun spirited birds. They bring a smile to my face each time I see them.
Supplies used for DIY Necktie:
Here is a list of the supplies I mentioned and demonstrated in the new YouTube video:
So much fun to create! And I have more to share too! Find more projects I’ve created using the Artesprix sublimation products HERE. And stay tuned for other fun projects because I just couldn’t stop creating with the ribbon and inks!
THANK YOU for your support! How can you help? Click HERE & buy a coffee. Every little bit helps with the cost of running the site.
Silhouette Classes
Never stop learning! Let me help you take the anxiety out of learning with Silhouette and get to creating faster! My Silhouette classes are heavily focused on software, so you can take the skills & techniques taught and apply them to many future projects!
**This post may contain affiliate links. What that means is that I may receive compensation if you purchase through the links I have provided. The price you pay for the product or service is not higher but I may get compensated for sharing.
Under the new Specialty Tools Panel on Tab 4 in Silhouette Studio, is the Heat Pen Panel.
This tutorial was written in Silhouette Studio version 4.5.770.
The Specialty Tools Panel was released in v4.5+ software versions. If you don’t see it on the right side of the Silhouette Studio, your software version may be older than v4.5.
Affiliate links may be present in the following blog post and as an Amazon Associate, I earn from qualifying purchases.
Here is a look at the details of the Heat Pen Panel in Silhouette Studio.
1 – Heat Pen Fill Patterns – choose from None, Lined, Concentric, Cross-hatched, and Spiral
All designs will vary in how the pattern fills in the area. I used Hi by Diva Watts Design – Design #399489 and at the size shown, there isn’t much inside the Concentric Pattern fill at a 0.079 spacing. Testing is the only way to know what fill pattern and spacing will look good on the finished project.
2 – Spacing– Increase or decrease the grid spacing between the lines of the pattern. A spacing of 0.004″ will fill in the design more, but depending on the pattern chosen, there can still be some bare spots.
In this example, the Concentric fill pattern at a 0.004″ spacing fills in most areas, but there are still some white spaces in certain areas. Zoom in on your designs so you can see the tight fills and how each pattern fills in the designs.
These spaces may or may not affect the outcome of the final project. Testing is the the only way to know what will work and all designs will vary.
This is another area where you are changing a lot of data at one time, so be patient with your computer if it is thinking.
3 – Angle – Change the angle of the fill pattern.
4 – Release Heat Pen Fill – selecting this option will take the fill from an editable fill pattern and makes it a vector design.
When using this feature, be aware that once the fill has been released and file saved and closed, it is a permanent change to that file. If the design needs to be adjusted, you would need to start over.
Save this for future reference by pinning the image below.
Enjoy !
THANK YOU for your support! How can you help? Click HERE & buy a coffee. Every little bit helps with the cost of running the site.
Silhouette Classes
Never stop learning! Let me help you take the anxiety out of learning with Silhouette and get to creating faster! My Silhouette classes are heavily focused on software, so you can take the skills & techniques taught and apply them to many future projects!
**This post may contain affiliate links. What that means is that I may receive compensation if you purchase through the links I have provided. The price you pay for the product or service is not higher but I may get compensated for sharing.
There are a few things I want to give you a heads up about this month for Silhouette users.
Affiliate links may be present in the following blog post and as an Amazon Associate, I earn from qualifying purchases.
New Silhouette software version 4.5.791 released
At this time, I cannot recommend v4.5.791 for users. Normally a version is released to Closed Beta testers for a bit prior to being pushed to release on the Silhouette website. Sometimes that “bit” is only a few hours, but we usually get a small heads up at least. This version went to public release and none of the Beta testers knew about it.
For the average user, I would suggest just staying where you are. If you get the notice to install a new version, click Later.
I always recommend downloading direct from the Silhouette website for any updates, for best results. In the past, there have been hang ups with the updates through the software, especially for MAC users. It seems to go much smoother if updates are completed direct through the website.
I would recommend v4.5.770 for most users, however, if you are experiencing no issues with the version you are on, stay there!
At this time, it is a wait and see how this new version affects users and what the bugs might be. We have asked for clarification from Silhouette, but have not had any updates so far. Here are the public release notes, which don’t really say much and are missing quite a few things that were updates between v4.5.770 and v4.5.791 that were being tested by Beta testers.
Hopefully we will find out more soon on what it includes.
I have started seeing issues posted by users, however, they are all a bit different and the only way to try to identify what might be causing them is to troubleshoot with each user. Not all users are willing to troubleshoot, which means it can take longer to identify the issues and get them fixed.
We cannot report issues unless we’ve done the troubleshooting first and have information and data to report with the claim. If we get the information needed, we can report direct to Silhouette. However, please understand, while we can report the issue, we have no control over the investigation time or the fix being released. We can only do the things that are in our control, which is collect information and report.
Silhouette America website and Silhouette Design Store
The Silhouette websites will be updating sometime in the near future. I do not have exact dates and it could be delayed even farther out, but that means we have time to prepare.
Anytime there are big updates to a website, there can be hiccups along the way. Technology is our friend, until it isn’t….. and I’d rather be prepared and help you prepare too!
So my motto going into this is… plan for the worst and hope for the best. Or be prepared! This is not to panic anyone, but to inform you of things YOU can do (and should be doing 😉 on a regular basis. I hate when any user has an issue and if there are some tips I can provide to help you out, that’s my goal.
What can you do?
Export User Design – if you store any personal files in the Silhouette library. This is super easy to do now if you are using software version v4.4.552 or higher. Details HERE
Set Up Library Snapshot – just in case, it’s a good fall back and a good idea to check that it’s working. Details HERE
Back up Silhouette Library – this is different than exporting user designs. The file that saves is a backup file only. It does not contain individual files and cannot be opened outside the software, but if needed can be imported back into the software. Details HERE.
I have the resources that can help and I’ve linked those above. So there really is no reason not to do it, right?
Again, I don’t know the exact dates of the website updates, but I can tell you, there are updates coming. While we do try to troubleshoot with users, there are limits too. We do NOT have access to your account. All account issues have to be handled by Silhouette Support.
Now, I would HIGHLY recommend that you add this to your calendar and start doing it on a regular basis. It can save you a lot of frustration down the road.
Silhouette Users: Log In Info
After the website update, you may need to log in again on all devices. This is pretty routine when a connection is interrupted. I would highly recommend that you make sure you know your Silhouette account information – this includes the email address and password to log in. Write it down! Do not rely on your computer’s auto fill. We have seen issues in the past few months with computer systems and their auto fill systems.
Silhouette Users: Sync the Silhouette Library
If you do store files to the Silhouette library, not only should you be backing those files up to an outside source, but I’d highly recommend that you are verifying that the files are synced completely with the current date and time after you save them.
If you are experiencing issues with the Silhouette library syncing at any time, please follow the steps in this tutorial EXACTLY and if you continue to have an issue, reach out to Silhouette Support with a detailed description and photos. The more information they have to start troubleshooting the better.
*as a note, during the update, the website and Silhouette Support may not be available – that is why I’m sharing this information in advance. I recommend you do it now, not later.
Just like weathering a storm…. it’s better to be prepared and not need it, then to be unprepared. Can you tell I live in the mid-west and it’s storm season – lol!
I hope those tips will help you. Now it’s your turn to take action!
Enjoy !
THANK YOU for your support! How can you help? Click HERE & buy a coffee. Every little bit helps with the cost of running the site.
Silhouette Classes
Never stop learning! Let me help you take the anxiety out of learning with Silhouette and get to creating faster! My Silhouette classes are heavily focused on software, so you can take the skills & techniques taught and apply them to many future projects!
**This post may contain affiliate links. What that means is that I may receive compensation if you purchase through the links I have provided. The price you pay for the product or service is not higher but I may get compensated for sharing.
Under the new Specialty Tools Panel on Tab 3 in Silhouette Studio, is the Power Engraver Panel.
This tutorial was written in Silhouette Studio version 4.5.770. The Specialty Tools Panel was released in v4.5+ software versions. If you don’t see it on the right side of the Silhouette Studio, your software version may be older than v4.5.
Affiliate links may be present in the following blog post and as an Amazon Associate, I earn from qualifying purchases.
The Power Engraver is specific to the Silhouette Curio 2 and is one of the new powered tools that was announced and released in September 2023.
The backside of the Power Engraver features a power plug that sits in the Carriage 2 housing and powers the device through the Silhouette Curio 2 machine. The end of the tool is a router tip that spins to perform the engrave process. It functions like a Dremel tool and sounds like one too. The sound changes depending on the materials being used.
And I’ll just say – I love it!
Specialty Tools Panel – Power Engraver – Tab 3
Here is a look at the details of the Power Engraver Panel in Silhouette Studio.
1 – Power Engraver Etch Fill Patterns – choose from None, Lined, Concentric, Cross-hatched, and Spiral
2 – Spacing– Increase or decrease the grid spacing between the lines of the pattern. The dark red star shows a 0.004″ spacing – a really tight etch fill
This is another area where you are changing a lot of data at one time, so be patient with your computer if it is thinking.
3 – Angle – Change the angle of the etch pattern.
4 – Release Engraving Fill – selecting this option will take the fill from an editable fill pattern and makes it a vector design.
This can be helpful if you are trying to stack multiple layers of etch for engraving on harder materials. It is not necessary to do this with simple etch designs or softer materials such as acrylic.
When using this feature, be aware that once the fill has been released and file saved and closed, it is a permanent change to that file. If the design needs to be adjusted, you would need to start over.
Find the Silhouette Curio 2, Power Engraver Tool, and the Curio Debris Tray at either CrafterCuts, Silhouette America, or Amazon. CrafterCuts has free shipping on orders over $35 and use code SECRETS to save 10% on supplies & accessories (not valid on machines). Silhouette America has free shipping on orders over $50 if you are a Silhouette Club member.
Save this for future reference by pinning the image below.
Enjoy !
THANK YOU for your support! How can you help? Click HERE & buy a coffee. Every little bit helps with the cost of running the site.
Silhouette Classes
Never stop learning! Let me help you take the anxiety out of learning with Silhouette and get to creating faster! My Silhouette classes are heavily focused on software, so you can take the skills & techniques taught and apply them to many future projects!
**This post may contain affiliate links. What that means is that I may receive compensation if you purchase through the links I have provided. The price you pay for the product or service is not higher but I may get compensated for sharing.
Under the new Specialty Tools Panel on Tab 2 in Silhouette Studio, is the Score & Emboss Panel.
This tutorial was written in Silhouette Studio version 4.5.770. The Specialty Tools Panel was released in v4.5+ software versions. If you don’t see it on the right side of the Silhouette Studio, your software version may be older than v4.5.
Affiliate links may be present in the following blog post and as an Amazon Associate, I earn from qualifying purchases.
The score & emboss process is designed to cut a shallow line before embossing, intending to deepen the embossing.
This option is available to Silhouette Curio 1, Silhouette Curio 2, and Silhouette Cameo 5 model owners. If one of these machines is not plugged in and recognized, the panel will gray out, and you may not be able to select the options.
Specialty Tools Panel – Score & Emboss – Tab 2
Here is a look at the details of the Score & Emboss Panel.
1 – Tool Selection – Choose either the Fine or Wide Embossing tool according to what you are using.
Fine Embossing tool is a 1 mm tip and designated by a light blue/green top. Wide Embossing tool is a 3 mm tip and designated by a darker blue top.
2 – Passes – choose the number of passes for the tool to complete from 1 – 10 3 – Fill – check this to add a fill to the object selected. 4 – Apply Score & Emboss Lines – selecting this confirms to the software that you want to apply both these actions to the selected object
Score & Emboss on the Send Tab in Silhouette
Once you apply the Score & Emboss, clicking on the Send tab will display both a red cut line and a blue emboss line around the design.
Carriage 1 performs the red cut line with a blade installed, and Carriage 2 performs the blue emboss line with the embossing tool.
To be honest, I tested both with and without the Score line and it did not make a difference that I could tell with my cardstock, except that scoring increased the time & caused more debris. All cardstock will vary and testing is the only way to know what will work best with your brand and thickness of cardstock.
Here is a look at the Score & Emboss results. I noticed that it created debris and separation in some areas where it scored and embossed.
Results may vary depending on the actual cardstock being used. Silhouette does have a Score & Emboss paper that they recommend for this method. However, you can test with any cardstock and simply select the Score & Emboss Paper as the material on the Send tab.
Tips to Keep in Mind with Score & Emboss
When using the Score & Emboss feature, keep in mind that it increases the time for the project to complete because you have 2 tools working consecutively. Depending on what you tell the software to do, it can be a lot of data to process, so be patient with your computer if it is thinking.
Embossing is available on the following Silhouette model machines: Curio 1, Curio 2, Cameo 5.
At the time of publishing this post, a bug persists in the Silhouette software for the Silhouette Cameo 5 causing it not to emboss where it shows on the screen. I will not release a tutorial until this bug is fixed, as I don’t want users to ruin their $30 embossing mat, as I did on the first try.
If you do attempt to do this with the Silhouette Cameo 5, I would highly recommend that you use a full 12″ x 12″ sheet of cardstock to protect the entire emboss mat surface.
Cutting completely through a material on top of the Silhouette Embossing mat is not recommended as it can damage the embossing pad and tear it up.
As new information is released and the bugs are fixed, I will add additional resources for embossing.
Silhouette Cameo 5 additional resources found HERE
Silhouette Curio 2 additional resources found HERE
Silhouette Studio Specialty Tools Panel Tabs (coming soon)
Specialty Tools Panel – Tab 3 – Power Engraver – details HERE
Save this for future reference by pinning the image below.
Enjoy !
THANK YOU for your support! How can you help? Click HERE & buy a coffee. Every little bit helps with the cost of running the site.
Silhouette Classes
Never stop learning! Let me help you take the anxiety out of learning with Silhouette and get to creating faster! My Silhouette classes are heavily focused on software, so you can take the skills & techniques taught and apply them to many future projects!
**This post may contain affiliate links. What that means is that I may receive compensation if you purchase through the links I have provided. The price you pay for the product or service is not higher but I may get compensated for sharing.
New for the Silhouette Studio version 4.5+ software is the Specialty Tools Panel on the right side of the Silhouette Studio software. It originally started with only a few options showing available, such as the Silhouette Emboss Panel and Alta options. When Silhouette released the Cameo 5 and Curio 2 along side software version 4.5.735+, they introduced more options.
If you are using older software prior to v4.5, check out this post on the Emboss Panel HERE.
Affiliate links may be present in the following blog post and as an Amazon Associate, I earn from qualifying purchases.
The Specialty Tools Panel resides on the right side, just below the Page Setup Panel. Upon its addition, all other icons shifted downward, and the Silhouette Emboss Panel became nested under the Specialty Tools.
The Emboss Panel is available to Silhouette Curio 1, Silhouette Curio 2, and Silhouette Cameo 5 model owners. If one of these machines is not plugged in and recognized, the panel will appear grayed out, and you may not be able to select the options.
Specialty Tools Panel – Emboss Tab – Tab 1
1 – Deboss – the design will be created as seen on the screen & will press the design down into the material exactly as seen on screen. For example, if using cardstock, it will create a valley where the design is. Emboss – the design is flipped horizontally so it is mirrored BUT it does not show this on the screen. You will place your material face down on the embossing mat and the design will be pressed mirrored. When it’s finished, you will flip it over and the design should be raised on the side that was face down on the mat.
2 – F – This tells you which way to put the material on the mat.
For deboss, put the material face up.
For emboss, put the material face down.
3 – Embossing Patterns – Choose between 5 options: none, lined, concentric, cross hatched, or spiral.
Each design will vary in which pattern may look better for the emboss. Again it is a matter of personal preference. I prefer the look of the cross hatched pattern for most projects. However, the only way to know what might look best on any material is to test it.
5 – Spacing– Increase or decrease the grid spacing between the lines of the pattern. The dark blue heart shows a 0.004″ spacing – a really tight Deboss
If we zoom in on the design, you will see the pattern.
This is another area where you are changing a lot of data at one time, so be patient with your computer if it is thinking.
If you ever encounter a blue square/rectangle with an X in it, it may be smaller than what the Silhouette can process. Use the up arrow and increase the spacing just a bit or delete and type in a number just a bit higher than the current spacing, until the box disappears. Remember, be patient and go slow, it is processing a lot of data.
Here is an example of what it might look like.
5 – Angle – Change the angle of the deboss or emboss pattern.
6 – Release Emboss– Releases the lines of the emboss pattern. When you are satisfied with the pattern, click the Release Emboss button. You will not really see it do anything, but it is no longer an editable fill pattern. Once you release the emboss/deboss, you can add another pattern on top if you choose to.
Embossing is available on the following Silhouette model machines: Curio 1, Curio 2, Cameo 5.
At the time of publishing this post, a bug persists in the Silhouette software for the Silhouette Cameo 5 causing it not to emboss where it shows on the screen. I will release a tutorial until this bug is fixed, as I don’t want users to ruin their $30 embossing mat, as I did on the first try.
If you do attempt to do this with the Silhouette Cameo 5, I would highly recommend that you use a full 12″ x 12″ sheet of cardstock to protect the entire emboss mat surface.
Cutting completely through a material on top of the Silhouette Embossing mat is not recommended as it can damage the embossing pad and tear it up.
On the Send tab, select Score & Emboss paper to have the settings for embossing. If you want the emboss settings with any other material, you would need to create your own custom setting.
And then test, test, test! Remember that the preset settings in the Silhouette Studio software are just a starting point to test!!! All cardstock and materials will vary and there is no perfect setting for all materials worldwide. More information on Perfect Cut Settings found HERE.
Additional resources
I will add additional resources for embossing as new information is released and the bugs are fixed.
Silhouette Cameo 5 additional resources found HERE Silhouette Curio 2 additional resources found HERE
Silhouette Studio Specialty Panel Tabs 2-6 Info (coming soon)
Specialty Tools Panel – Tab 3 – Power Engraver – details HERE
Save this for future reference by pinning the image below.
Enjoy !
THANK YOU for your support! How can you help? Click HERE & buy a coffee. Every little bit helps with the cost of running the site.
Silhouette Classes
Never stop learning! Let me help you take the anxiety out of learning with Silhouette and get to creating faster! My Silhouette classes are heavily focused on software, so you can take the skills & techniques taught and apply them to many future projects!
**This post may contain affiliate links. What that means is that I may receive compensation if you purchase through the links I have provided. The price you pay for the product or service is not higher but I may get compensated for sharing.
This months video for the Artesprix YouTube channel took a turn when I had too much ink leftover and I loved the end result of my “accident” better than my original idea. I used the Artesprix Sublimation Stamp Ink Refills, mixed media paper, and Artesprix Satin Ribbon to create some fun and awesome creations. For my original idea, I used a paint brush and painted brushstrokes for my design, but then when I went to clean up my excess ink, I found that I loved the pattern it created so much better!
Affiliate links may be present in the following blog post and as an Amazon Associate I earn from qualifying purchases.
Do you ever have that happen? Think you have a plan and then it all changes and turns out even better than your original idea?
Watch how I made these custom ribbons with the Artesprix Sublimation products and added it to make custom ribbon in the new tutorial HERE on the Artesprix YouTube channel.
Artesprix Sublimation Supplies
Here is a list of the supplies I mentioned and demonstrated in the new YouTube video:
THANK YOU for your support! How can you help? Click HERE & buy a coffee. Every little bit helps with the cost of running the site.
Silhouette Classes
Never stop learning! Let me help you take the anxiety out of learning with Silhouette and get to creating faster! My Silhouette classes are heavily focused on software, so you can take the skills & techniques taught and apply them to many future projects!
**This post may contain affiliate links. What that means is that I may receive compensation if you purchase through the links I have provided. The price you pay for the product or service is not higher but I may get compensated for sharing.
I want to share a fabulous designer that I’ve had the privilege to collaborate with recently – Diva Watts Designs!!!
Affiliate links may be present in the following blog post and as an Amazon Associate, I earn from qualifying purchases.
I have been a collector of Stacey’s designs in the Silhouette Design Store and in September 2023 was able to connect and meet her face-to-face at the Silhouette Summit.
I love meeting others in the industry and getting to put a face with a name in real life and getting to know them! At least as much as we can squeeze into a whirlwind trip at these conferences.
I took 1 file and each week in March shared a new project that I had created with just that single file. I wanted to share some of the possibilities that you can do featuring the design by Diva Watts Designs. I’ll include a supply list for each of the projects below too!
Here is a look at the Flower file from Diva Watts Designs – you can find it HERE.
One design from Diva Watts Designs = 5 projects
Project #1 – Paper Flowers to Embellish a Card
I started out with simply cutting out the flower design from cardstock, adding some ink, and using paper shaping tools gave the flowers some dimension. The flowers were then glued onto a card base that I had sketched on.
Next, I cut multiples of the flower design in several sizes, added them onto a floral wire stem, and layered them together to create a 3-D flower arrangement. I had some crepe paper flower leaves from a different project that I added into the vase with the flowers too.
I had originally intended to create 2 sizes of earrings, but I cracked one during the process, so I ended up with 2 different projects. I used Silhouette Shrink Plastic and set it up as a print and cut project with the flower shapes filled with a watercolor pattern.
And as can happen, a project takes on a life of it’s own. I had originally designed and cut this so it was a layered earring design with the flower center facing forward. But after seeing it together, the center created a unique look showing through and I finished the project loving it even more!
Since I cracked one of my flower designs after shrinking it, I wasn’t going to let the other one go to waste and decided it would make a great tool charm. I added a tassel onto the chain and attached it to my scissors with a lobster claw clasp.
Now these are MINE! This is a great way to designate scissors for different purposes or lay claim to your tools.
A great big thank you to Stacey at Diva Watts Designs for contributing the free file for the Silhouette Secrets+ newsletter for the month of March! If you missed grabbing the free flower file in March, it is available in the Silhouette Design Store HERE.
This year I started offering a free file each month for Silhouette Secrets+ newsletter subscribers. I love designing in the Silhouette Studio software and have shared some of my creations as well as look forward to collaborating with more artists in the future too!
Silhouette Secrets+ Newsletter
Never miss out on the news, tips, “secrets”, deals, classes, and more that I share on Silhouette Secrets+. Sign up for the newsletter and get information delivered to your inbox every Friday. Unsubscribe at anytime.
Sign up for the weekly newsletter HERE to have information delivered direct to your inbox and grab each month new freebie.
Did this give you some ideas? How about how you can take 1 file and create a variety of projects with it. I had so much fun brainstorming, designing, and creating with this file. Thank you Diva Watts Designs!
Save this for future reference by pinning the image below.
Enjoy !
THANK YOU for your support! How can you help? Click HERE & buy a coffee. Every little bit helps with the cost of running the site.
Silhouette Classes
Never stop learning! Let me help you take the anxiety out of learning with Silhouette and get to creating faster! My Silhouette classes are heavily focused on software, so you can take the skills & techniques taught and apply them to many future projects!
**This post may contain affiliate links. What that means is that I may receive compensation if you purchase through the links I have provided. The price you pay for the product or service is not higher but I may get compensated for sharing.
I’m playing with paint this month on the Artesprix YouTube channel. Specifically, the new colors of the Artesprix Sublimation Paints. I made a fun potholder for my craft room.
Yes, you read that right! Since I’m often playing with sublimation blanks, they get HOT! This will come in handy in my craft room and brighten up the place a bit. But, you can also create these to brighten up your kitchen. Function and fun all in one!
Affiliate links may be present in the following blog post and as an Amazon Associate I earn from qualifying purchases.
THANK YOU for your support! How can you help? Click HERE & buy a coffee. Every little bit helps with the cost of running the site.
Silhouette Classes
Never stop learning! Let me help you take the anxiety out of learning with Silhouette and get to creating faster! My Silhouette classes are heavily focused on software, so you can take the skills & techniques taught and apply them to many future projects!
**This post may contain affiliate links. What that means is that I may receive compensation if you purchase through the links I have provided. The price you pay for the product or service is not higher but I may get compensated for sharing.
I get so excited each time I create a new class and this one is no different. This one is a faster paced class where you will create your own designs in the Silhouette Studio software completely from scratch. Introducing the Designing a Layered Card in Silhouette Studio – Intermediate class.
In this class, you will learn how to create designs using the tools in the Silhouette Studio software to make it your own! The entire design is created start to finish in Silhouette Studio.
This class is listed as an Intermediate class due to the faster pace, however, any level of Silhouette user can do this project and create their own designs. If you are a brand new beginner the tools and terminology may be unfamiliar and it may take longer to digest the information, but that’s also why I offer a lifetime access option to the classes, so you can watch as many times as needed.
Silhouette Studio tools used to create this card design include:
Drawing Tools
Flexishapes
Line Drawing Tools
Offset
Point Editing
and more!
This class also includes instruction on the card assembly and adding dimension and inking for paper flowers too!
But, there’s more! Not only will you learn how to design in the Silhouette software, but the design ideas can be used to create even more projects than just this card! I have also included a bonus class showing how to create a few additional elements in the the Silhouette software and make 5 additional projects too!
Here is a closer look at one of the 3-D paper flower projects created with just 1 of the designs you will create.
*Note: this class was taught during the March 2024 Card Maker Success Summit. If you purchased a VIP All Access Pass to that event, you have lifetime access to the main class through that event. The bonus class is available to purchase HERE.
Affiliate links may be present in the following blog post and as an Amazon Associate, I earn from qualifying purchases.
The design portion of this class only requires the Silhouette Studio Business Edition upgrade, but if you want to create the projects, there are additional supplies needed. I have listed those supplies below and there are downloads in the class for easy access too!
Supplies for Designing in Silhouette Class:
Silhouette Studio software found HERE – basic software is free to download
Silhouette Business Edition upgrade – more information on upgrades HERE
I had so much fun creating all of these projects, I hope you do too!
Find the Designing a Layered Card in Silhouette Studio class HERE. Find all of the Silhouette classes available on my Teachable site HERE.
Save this for future reference by pinning the image below.
Enjoy !
THANK YOU for your support! How can you help? Click HERE & buy a coffee. Every little bit helps with the cost of running the site.
Silhouette Classes
Never stop learning! Let me help you take the anxiety out of learning with Silhouette and get to creating faster! My Silhouette classes are heavily focused on software, so you can take the skills & techniques taught and apply them to many future projects!
**This post may contain affiliate links. What that means is that I may receive compensation if you purchase through the links I have provided. The price you pay for the product or service is not higher but I may get compensated for sharing.
Looking to add a touch of personality to your reading experience? Or give these as a gift for an avid reader? Or maybe encourage someone else to read more? In this tutorial, I’m sharing how to create your own unique magnetic bookmarks using Silhouette.
Affiliate links may be present in the following blog post and as an Amazon Associate, I earn from qualifying purchases.
You can head over to the Silhouette Secrets+ YouTube channel for a video tutorial creating these fun magnetic bookmarks or keep reading for the written tutorial below.
Design Fun Magnetic Bookmarks with Silhouette video HERE
*This project can be made with any model of Silhouette cutting machine.
DIY Fun Magnetic Bookmarks with Silhouette
1. Open Silhouette Studio and start by setting up the page size on the Page Setup Panel.
2. Click on the Page Setup Panel – Tab 3 and turn on the registration marks. Click on the Restore Defaults button.
The default registration marks are where the most accurate print and cut results will be so we always recommend starting there. The farther you move the marks out or smaller you make them, the greater chance of an inaccurate cut.
Check out these tutorials HERE for setting up print and cut for successful results.
3. Use File > Merge to open the graphic if the file is saved to an outside source. If the file is in the Silhouette library, right click on it and select Merge to bring it onto the page you have set up.
I used a transparent PNG file and have Autotrace turned off. Autotrace is a great feature to have, but is not needed for this project. I do not need to excessive data that Autotrace creates when it opens high resolution PNG files. The Autotrace feature can cause slowness and lag on the computer because it has to recalculate all of the cut data each time the user makes a change to the design. Check out this tutorial HERE for more details on the Autotrace feature.
4. Scale the design to the size you want.
Keep in mind if using a PNG or JPEG image, that it is a flattened photo file and you can scale down without losing image quality, but in most cases cannot scale up or it will become pixelated.
Tip: If the PNG or JPEG file opens large, easily resize it by using the Scale down 50% or 33% in the Scale Tools depending on your project and then use the Center to Page to bring it onto the workspace.
5. Open the Trace Panel, click Select Trace Area, and draw a box around the design. Increase the threshold to 100%. Click Trace at the bottom.
A basic outline of the design is all that’s needed and it does not have to be perfect.
6. Move the original image away from the cut line. Right click on the cut line and choose Release Compound Path.
This will separate any “artifacts” from the outer cut line.
7. Hold the Shift key down and click on the outer cut line only. This will deselect the outer cut line and only the artifacts will be selected. Press delete.
Alternate option: Click off the image entirely to deselect everything. Click back on the outer cut line and move it away. Left click and drag the mouse from the top left to the right and down to the bottom right of the original area of the trace area. All artifacts should be selected. Press delete.
8. Click on the trace cut line and open the Offset Panel. Next click on Offset and adjust as desired. Then click Apply or press enter to apply the offset.
9. Move the original trace cut line off the mat. Keep the original in case you need to go back to it later.
10. Select both the cut line and the design, then Center Align. Then group the cut line and design together (right click choose Group or Ctrl+G is the shortcut)
In most cases, the design will be exactly centered with the cut line, however, sometimes it will be slightly off. Simply adjust it manually to be centered as desired.
11. Select the design and click on the Replicate Panel. Choose Mirror Above. Use the arrow keys to move the mirrored copy up as desired.
Tip: if using text, you do not want to mirror or it will be backwards. Since text is not mirrored, it can affect the outline edge of the offset and they may not line up when folded together. Each design can vary in what you need to adjust to make it match. I’d recommend starting with images first and then play with text as you get more comfortable with the process.
12. Draw a rectangle or shape between the cut lines of the 2 designs. Make sure that the shape overlaps the cut lines.
If needed, activate the Edit Points by double clicking and move the edit points so that the cut lines are overlapping or make the rectangle larger. Each design may vary in what works best.
13. Ungroup the design from the offset cut lines on both.
14. Select the offset cut line of 1 design, hold the Shift key, select the rectangle in the middle, and select the 2nd offset cut line. Right click and choose Weld.
If something goofy happens with the graphic design, that means it was selected and not the cut line. Use Undo and start again selecting only the cut lines. Click exactly on the red line for it to be selected and use the Zoom tools if needed.
15. Group the entire design together and arrange on the print and cut page.
16. Save a copy of the design.
17. Repeat those steps to create additional designs to fill the page. Save your work along the way.
If you have a design that doesn’t have defined outer edges, like the watercolor Crazy Cat image on the top right, you can also use simple shapes like a rectangle for the bookmark shape.
And here is a tip to getting the image to be the exact same distance from the bottom of the bookmark on both sides.
I drew a long rectangle, then sized the image to fit inside of the rectangle design and then used the Align tools to align the bottom of the image with the bottom of the rectangle.
Then click off the design to deselect it and click back on the image only. Select the Move By Tool, enter the distance amount and press the directional arrow you want it to move.
This moves the image the exact distance in the direction selected. Group the bottom image with the rectangle.
Repeat the same steps for the top image. Align to the top of the rectangle and then used the Move By tool and selected the down arrow. Group the image with the rectangle so nothing moves out of place. Now it is perfectly aligned the same distance on either end of the rectangle shape.
The Move By Tool is a very handy tool to use in designing. Find more information HERE.
18. Print out the page of designs on the desired material. I tested with both the Koala Glossy Photo paper and 110 lb Neenah cardstock. The photo paper was a bit thin, but still worked with the laminate on top of it.
19. Apply laminate on top if desired. This will help to protect the bookmark with use.
Tip: For best results, do not cover the registration marks of the print and cut with the laminate surface. The Silhouette optical eye can have a difficult time reading accurately on glossy materials due to reflections from that material. This can affect the cut accuracy. However, the newer Cameo 5 and Portrait 4 are supposed to read better on glossy surfaces, so you’ll see me test that in the Magnetic Bookmark video found HERE. It worked, but it may not work for all users.
20. Place the printed page on the Silhouette cutting mat exactly as it shows on the Silhouette software screen in the top left corner. Make sure to test cut for your materials. And then send the job to cut.
Check the cut before pressing the unload button and if it did not cut through completely, send the job again until you get a clean cut.
21. Unload the mat, flip the mat over and carefully peel the cutting mat away from the materials.
22. Fold the bookmark designs over, line the edges up exactly, and use a bone folder to crease the top.
23. Test the magnets to make sure they will stick to each other.
Polarity matters and if the magnet doesn’t line up properly, it will not work. Magnet strength also matters, so make sure to test before applying to the project.
24. With the magnets together, peel the backing off the adhesive side and press down to the inside of the bookmark design.
If not using adhesive backed, you will need to add adhesive to one side of the magnet for it to stick to the inside of the bookmark.
25. Peel the backing off the other side and carefully press the bookmark closed along the fold line. This should line up the magnetic bookmark evenly.
26. Relax, read a book, and enjoy! Or give as a gift and share the joy with others too!
But, fair warning…. once you start creating these fun magnetic bookmarks, it can be hard to stop.
Save this for future reference by pinning the image below.
Enjoy !
THANK YOU for your support! How can you help? Click HERE & buy a coffee. Every little bit helps with the cost of running the site.
Silhouette Classes
Never stop learning! Let me help you take the anxiety out of learning with Silhouette and get to creating faster! My Silhouette classes are heavily focused on software, so you can take the skills & techniques taught and apply them to many future projects!
**This post may contain affiliate links. What that means is that I may receive compensation if you purchase through the links I have provided. The price you pay for the product or service is not higher but I may get compensated for sharing.
Have you ever sketched designs or fonts with your Silhouette machine? It can give your projects a unique look or just be fun to play around with.
I’m fascinated by the countless creative applications Silhouette users create with sketching options, from addressing envelopes to crafting signs and beyond!
Today I wanted to share some tips and resources that can help when you are sketching with your Silhouette machines. Sketching can be done with all Silhouette machine models, with the right tools.
This week I released a new video on the Silhouette Secrets+ YouTube channel sharing information on sketching with the Silhouette Cameo 5 and the new Type C pen holder. Even if you do not have a Cameo 5, the information in the video can be helpful and I’ve had several comments from users who learned new things.
Find out which Silhouette pens fit in each machine model, what adapters you might need, and which pen holder is compatible with your Silhouette machine HERE.
How to Fill in a Sketch with Silhouette
One of the most common things we see asked is how to fill in a font or design.
The Silhouette machines do what the user tells them to do. They are designed as cutting machines, so the red cut lines that you see on the screen around a design is the exact path that any tool placed in the Silhouette machine would follow.
In the photo above, the design is showing exactly what a pen would sketch out using a font called Willow Bloom Modern Calligraphy Font by Angele Kamp. The red lines that you see are the exact path the pen would follow.
Since all text that is typed in Silhouette Studio now defaults to Cut Edge, you don’t need to weld it prior to sending, however, you still want to look closely to make sure that the letters are overlapping. If a letter does not overlap another letter, then it will be sketched as an individual letter. Personally, I always weld my text, just because it’s a routine step in my process and I know I’ve looked closely at the font to make sure it’s going to do what I want before I send it.
Remember that once you change a font in any way, such as welding, it is no longer editable text and is now a vector design. I recommend making a copy of the text so you always have an original before you make changes.
Another big thing to note here is that since text now defaults to Cut Edge, that also affects some sketch fonts and how they behave. In the example below, I used BFC Fantasy Sketch by Blush Fonts. Notice how there are sections that are missing or are not highlighted bold red? It is going to sketch exactly as you see on the screen.
This is easily fixed by selecting the entire design and choose Sketch instead of the Sketch Edge. The most important factor here is that the design has to be selected first before you can change the action.
Now that we’ve covered the normal behavior of a font, can you fill in a font or design? Yes!
The best method to use is the Line Effects or Sketch Fill Panel. This is the same exact panel, however, the name has changed depending on the software version you are using.
The Sketch Panel gives you the most fill options and can be used for a wide variety of things.
Keep in mind when filling in a design or font, that the pen follows every single red line in the design. If you use a tight fill pattern, the pen will completely fill in the object, however, it can also be more difficult to remove from the cutting mat as the pen has gone over and over that design many times.
Scribble with the pens prior to installing in the machine to get the ink flowing. The machine writing with a pen is just like writing with a pen by hand. If the pen won’t write smoothly by hand, you can’t expect the machine to magically make it happen either.
Use a clean cutting mat free of debris. Any bits of paper or debris that are stuck to the cutting mat will affect how that pen reacts on the paper and you could have skipping in the sketch.
Keep the Silhouette cutting mat completely level and flat the entire time it is sketching. If the mat is hanging down in front or behind, it can bubble up in the middle and the pen can hit it and cause marks as it travels to complete the sketch.
Keep the material completely flat and secure on the cutting mat. Any variance in the thickness of material can affect how it sketches. For example the flap on the envelope will create a bump that can affect how the pen writes over that area. Keep that in mind when you are sketching.
When using the Silhouette pen holders, use the pen holder cap to set the pen depth. Not sure what I mean, check out the YouTube video and I show a demo of how this is done. Or another method is to place a popsicle stick (craft stick) underneath the tool housing. Then place the pen in the housing. When the tip touches the popsicle stick, lock the pen holder in place.
Silhouette Cameo 3 with Type A Pen Holder
This is easier to do on the older Silhouette machine models. The newer machine models have different housings and not as easy to maneuver.
And DON’T FORGET to take the popsicle stick out after you are done setting the blade depth.
Test, test, test!!! Have fun with it!
Want to see how a font will sketch out? Type out the name of the font style and select that font and then sketch it out. The photo above is an example how I did just that. All of these are fonts I have from the Silhouette Design Store and that is exactly what I did.
This is a tip I shared last year in the Silhouette Secrets+ weekly newsletter. If you’d like tips, information, news, sales, and more “secrets” delivered to your inbox on a regular basis, make sure to subscribe and confirm your subscription.
Silhouette Secrets+ Newsletter
Never miss out on the news, tips, “secrets”, deals, classes, and more that I share on Silhouette Secrets+. Sign up for the newsletter and get information delivered to your inbox every Friday.
The Sketching with Your Silhouette class has been one of my most popular classes released. I have been blown away at the feedback from this class by those who’ve enrolled.
And just have FUN!!!!
Oh and if you have a Silhouette Curio 2, there are even more possibilities for sketching on thicker materials too! The Silhouette Curio 2 has a clearance of 20 mm, which is the highest clearance of any cutting machine out there!!! So exciting and fun to play with!
Find more details on sketching with the Silhouette Curio 2 HERE.
Save this for future reference by pinning the image below.
Enjoy !
THANK YOU for your support! How can you help? Click HERE & buy a coffee. Every little bit helps with the cost of running the site.
Silhouette Classes
Never stop learning! Let me help you take the anxiety out of learning with Silhouette and get to creating faster! My Silhouette classes are heavily focused on software, so you can take the skills & techniques taught and apply them to many future projects!
**This post may contain affiliate links. What that means is that I may receive compensation if you purchase through the links I have provided. The price you pay for the product or service is not higher but I may get compensated for sharing.
In this Let’s Explore v4 tutorial, we will cover the Silhouette Cut by Fill option. The Silhouette Studio software, has 4 options on the Send Tab on how to send the design to be cut – in the top right corner of the Send tab you will find the options Simple, Line, Fill, and Layers.
Affiliate links may be present in the following blog post and as an Amazon Associate, I earn from qualifying purchases.
The Silhouette Cut by Fill option allows you to cut a project by fill color. The Silhouette software generates the list shown under the Fill option based on the colors that you (or the designer) has filled the design with.
In this example using the Mardi Gras Mask file by Cut Files Makers, the file is already filled with color. If a design is not, you would need to select the pieces you want to fill and then select the color you want designated for that piece from the Fill Color Panel on the right or the Fill Color icon in the QAT in the top left of the Silhouette Studio software.
In this Send – Fill option, you have each fill color separated out in it’s own line and you can adjust the settings accordingly.
If you see an option that has a crosshatched pattern in it, that means there is no fill color for that cut line. This can happen when shapes haven’t been filled with a color or there is an image such as a png or jpeg on the file.
Details of the Silhouette Cut by Fill Color
Let’s take a look at what the actions are at the top of the Send tab in Silhouette for Cut by Fill Color.
Tool No. Choose whether you will be using Tool 1 or Tool 2, also called Carriage 1 and Carriage 2
On/Off Checked = Cut lines On Unchecked = Cut lines Off
Bold color lines will be around the design that the cut lines are turned ON for. Notice the purple and yellow lines are not bold since they are turned OFF. Some colors are more difficult to see the bold edge, such as white.
Weld The outer edge of overlapping objects of the color selected will be cut. Welding typically combines objects, but in this instance, the objects remain separate and the Cut Edge is activated.
Fill Color The same colors of the fill that were set up on the Design Tab, should all show in the list under Fill Color. Different shades of a color will show up as different options.
Material Choose the Material type you are using for each color. Each fill color will need to be changed separately if you did not select the material on the Simple tab before clicking on the Cut by Fill Color option.
Action Choose what action you will want to perform.
Tool/Carriage Choose what tool you will be using to perform the action.
If you were to keep all of the colors checked and have the cut lines ON, the order in which they appear in the list is the order in which the action will be done. For instance in my photo that would mean, the green would cut first, then the yellow, and then the purple.
You can rearrange the order by clicking and grabbing a color and move it up or down in the list as shown in the video below demonstrating with the line color option.
Moving down the right side of the Send tab – Fill Option, you will see that the cut settings are expanded further down to show what the settings are for each option you have chosen.
The color that is highlighted (selected) at the top of the panel will be the settings that you see at the bottom. In my photo, the green color is highlighted, so it shows the settings for the green lines in the bottom.
Here is where you can adjust the settings as needed. The key here is to make sure that the color you want to change is the one highlighted at the top AND the color shows on the bottom. We are seeing many users changing the settings for the wrong color.
You can also add a Pause in between the difference color actions if you would like to do that versus unchecking the box to turn the cut lines off. Each user is going to vary in what they prefer to do. I prefer to check and uncheck the boxes as needed, just in case I have to step away from my machine. But you can test out which way works best for you. See a quick demo of Adding a Pause HERE.
Now, the rest of this panel is the same as when using the Simple tab. Check out the in-depth tutorial on the Send Tab – Simple Option HERE for all those details.
Save this for future reference by pinning the image below.
Enjoy !
THANK YOU for your support! How can you help? Click HERE & buy a coffee. Every little bit helps with the cost of running the site.
Silhouette Classes
Never stop learning! Let me help you take the anxiety out of learning with Silhouette and get to creating faster! My Silhouette classes are heavily focused on software, so you can take the skills & techniques taught and apply them to many future projects!
**This post may contain affiliate links. What that means is that I may receive compensation if you purchase through the links I have provided. The price you pay for the product or service is not higher but I may get compensated for sharing.
Buttons are back!!! I am seeing buttons and pins as a big souvenir item when I’m traveling and I’ve even invested in a pin board for my collection. This month I am sharing my button creations with the Artesprix Sublimation markers and inks.
Affiliate links may be present in the following blog post and as an Amazon Associate I earn from qualifying purchases.
I cut a few simple shapes with the Silhouette Cameo 5 using the new Electrostatic bed and some cardstock scraps for the button design creation.
You could use all kinds of objects to trace and create with. Start looking for things around the house or when you are out shopping and see what you might add to your craft stash.
THANK YOU for your support! How can you help? Click HERE & buy a coffee. Every little bit helps with the cost of running the site.
Silhouette Classes
Never stop learning! Let me help you take the anxiety out of learning with Silhouette and get to creating faster! My Silhouette classes are heavily focused on software, so you can take the skills & techniques taught and apply them to many future projects!
**This post may contain affiliate links. What that means is that I may receive compensation if you purchase through the links I have provided. The price you pay for the product or service is not higher but I may get compensated for sharing.
I love being able to take a blank and come up with new ideas for it. This month on the Artesprix YouTube channel I’m sharing how you can take a glitter zipper bag, mix Artesprix Sublimation Paints and create a custom gift bag. Fill it with goodies to give as a gift for a friend or holidays like Valentine’s Day!
Affiliate links may be present in the following blog post and as an Amazon Associate I earn from qualifying purchases.
Or fill it with your favorite Artesprix products to gift to a crafty friend.
For this project, I mixed colors with the Artesprix sublimation paints and the paint mixing color chart. Once the paint was dry on the copy paper, I stamped onto the paper for a subtle touch with a couple stamps I picked up at Michaels. Keep your eyes peeled when you are out shopping for little things you can add on to each project.
THANK YOU for your support! How can you help? Click HERE & buy a coffee. Every little bit helps with the cost of running the site.
Silhouette Classes
Never stop learning! Let me help you take the anxiety out of learning with Silhouette and get to creating faster! My Silhouette classes are heavily focused on software, so you can take the skills & techniques taught and apply them to many future projects!
**This post may contain affiliate links. What that means is that I may receive compensation if you purchase through the links I have provided. The price you pay for the product or service is not higher but I may get compensated for sharing.
I’m in love with these Layered Snowflake Arabesque Tile acrylic shapes from Craft Chameleon. They come in a wide variety of colors and I’ve been using them for testing. I want to share 3 methods I tested, my results with each, and which one is my favorite at the end – you might be surprised.
Affiliate links may be present in the following blog post and as an Amazon Associate, I earn from qualifying purchases.
I am calling these ornaments, but they can be so much more. Gift tags, ornaments, stand alone decor item, and more!
3 Ways to Customize Acrylic Shapes with Silhouette
Etching Acrylic with the Silhouette Curio 2 Power Engraver – Let It Snow Design
Etching Acrylic with the Silhouette Curio 2 Punch Tool – top left Snowflake saying (the Curio 1 and Silhouette etching tool can do this too – more info below)
Adhesive Vinyl Decal – any cutting machine can do this with good quality vinyl!
1 – Etching Acrylic with the Silhouette Curio 2 Power Engraver
I have had great results with the Silhouette Power Engraver. However, it is not a fine detail engraving tip. When you are working with it, you want to keep that in mind and may need to adjust the design to work with it.
I have a full step-by-step class the Silhouette Secrets+ Teachable site on setting up for etching/engraving on acrylic with the Silhouette Curio 2 including how to get exact placement on shapes. I share all the things that worked and those that did not in the class too! Find all the details and see more examples of my etching tests HERE.
The etch is pretty subtle on the colored acrylic. Acrylic blanks are also one of the most difficult things to photograph too! Right up there with glass objects.
I love the sparkle of the top layer of this acrylic shape.
For more details on etching with the Silhouette Cameo 5 and Punch Tool check out this post HERE. Note: etching on the Silhouette Cameo 5 is designed for Silhouette metal etching sheets and not for acrylics – more details in my blog post
The Silhouette Punch Tool is supposed to be the etching tool for finer details with the Silhouette Curio 2 and Cameo 5. While it does etch, it definitely is no where near the same quality of etch as the Silhouette Curio 1 was with the Silhouette etching tool.
If you have a Silhouette Curio 1, I would recommend hanging on to it and get that baby out to etch on acrylic. It does a fantastic job.
However, the Silhouette Curio 2 is here to stay. It is the new machine model and the Silhouette Curio 1 is no longer manufactured. Honestly, the Curio 1 had a really, really long lifespan for a machine model. I am surprised that it was manufactured for so long.
The Silhouette Curio 2 and the Silhouette Cameo 5 has a specialized Carriage 2 housing that allows not only for specialty tools, but also a higher force. While the Carriage 1 housing on Silhouette models is an up and down motor, the Carriage 2 housing on Silhouette model machines is a round and round motor. This means that it is different than the Silhouette Curio 1 machine that was designed over 10 years ago. Different machine, different results. I’ll have more details on the blog later about all of that.
I selected the Vinyl Glossy setting and increase the blade depth to a 2. Actual cut settings that will work for you will depend on your material, machine, and blade life. Test cuts are the only way you will know what works for you. Find more information on Perfect Cut Settings HERE.
One of the big key factors is you want high quality adhesive vinyl and good quality transfer tape for detail works. Low quality vinyl can just be a mess and more of a headache than the money it tricked you into saving. If you have ever cut low quality vinyl or old vinyl, you are nodding right now and know exactly what I mean!
Now, yes, I lost the dots to my i’s. But holy smokes! This is tiny details! At this size, I could care less about those little dots on the i’s. I can either cut more and add them or add in a different embellishment to the project.
One of the things that can help when cutting this small is adding Weeding Lines to the design and it definitely helped in this small detail cut. For more details on adding Weeding Lines click HERE. For designs like this, I prefer to draw my own weeding lines. It takes just a little more time in the setup and cutting process, but it can be 100% worth it to save you headache when weeding.
I have more tips on cutting small fonts & designs HERE too!
Out of all 3 methods, this one has to be my favorite because it really stands out. And the best part is, anyone with a cutting machine could do this method!
I hope that gives you some ideas how you can create and customize with acrylic shapes. You are not limited to Snowflake Arabesque Acrylics either! Craft Chameleon has a wide selection of acrylic blanks. The 3″ clear acrylic rounds are my favorite and I make sure to stock up each time I order.
Save this for future reference by pinning the image below.
Enjoy !
THANK YOU for your support! How can you help? Click HERE & buy a coffee. Every little bit helps with the cost of running the site.
Silhouette Classes
Never stop learning! Let me help you take the anxiety out of learning with Silhouette and get to creating faster! My Silhouette classes are heavily focused on software, so you can take the skills & techniques taught and apply them to many future projects!
**This post may contain affiliate links. What that means is that I may receive compensation if you purchase through the links I have provided. The price you pay for the product or service is not higher but I may get compensated for sharing.
In this tutorial, I’m going to share how I created what’s called an “Off the Edge” die cut card with my Silhouette machine. This can add an interesting element to any card design and is fun to create.
Affiliate links may be present in the following blog post and as an Amazon Associate, I earn from qualifying purchases.
I recently attended the Card Maker Success Challenge hosted by Brandi Mahon of Stamp Me Some Love and was so inspired by her card ideas. I took the card ideas she was sharing and modified them to be used with my Silhouette software and machine. If you are looking for card making inspiration, I recommend you check out her monthly Card Maker’s Success Subscription.
I have a Canon TS9521C that is a borderless printer, but you can do the same even without a borderless printer.
Then, I will use a paper trimmer to cut the page down to the size I need for my cards front. But, I won’t know the size until I have the other pieces cut out, so I just set this aside.
Designing in Silhouette Studio
Drawing the Card Pieces
Next, in the Silhouette software, using the Drawing Tools on the left side, draw out a rectangle and then scale it to 4.25″ x 5.5″ or whatever card size you are wanting. Unlock the lock to be able to change the height and width of the rectangle individually. Type the number and press Enter to set the dimension. Find more on the Scale Tools HERE.
Select the rectangle and then choose Align Left in the Alignment tools. With only 1 object selected it will align it to the left side of the page. This will help us in just a minute with our design.
Choosing a Sentiment
Next, open the sentiment design you want to use or with the Text Tool and type out the sentiment you want. If you type out the text, make sure to weld any overlapping pieces.
I used Hello by Diva Watts Designs found HERE for this card design.
Scale the hello down to fit within the card base and use the green dot at the top to rotate it to the desired angle. Or you can use the Rotate Panel and rotate to 45 degrees and adjust from there.
This is going to allow us to adjust the rectangle and maintain straight lines.
Double click on the red line of the rectangle to bring up the Edit Points. Drag the top left edit point (gray dot) down.
Grab the top right edit point and drag it down, so the top of the rectangle is angled as desired to run through the middle of the sentiment.
With the Snap to Grid tool activated, it snaps the edit points to specific locations and easily allows the design to be manipulated and maintain the straight lines of the card edges.
Once the edges are how we want, Show Grid and Snap to Grid can be toggled off on the Page Setup Panel – Tab 2 again. I find the grid lines distracting when designing, but they can easily be turned back on if needed.
Create a Copy for Future Templates
Make a copy of the card base and you can use it for future cards as a starting point.
Select both the card base and the sentiment and Align the Center in Silhouette. Depending on the design, center aligned may not look centered to the eye. Use the arrow keys to adjust if needed in small increments any direction.
Adding an Offset
Next, click on the sentiment to select it and open the Offset Panel on the right side. Click Offset and adjust the distance of the Offset as desired, then click Apply or press Enter. The distance of the offset will all depend on the sentiment and the size you are using. There is no magic number.
The offset should overlap the angled rectangle securely and not have too many tiny bits to be cut out.
Welding the Offset to the Card Front
After clicking on Apply, the offset will be selected. Hold the Shift key down and click on the angled rectangle so that both are selected, then right click and choose Weld.
This now combines the angled rectangle and the offset into 1 cut and creates the off-the-edge design. If there are any tiny bits like what the red arrow points to above, those are not needed in the design. Move the sentiment off of the design.
Then right click on the design and choose Release Compound path. Click off of it to deselect and click back on the little bit, press delete. When all the pieces you want are deleted, select the entire design again, right click and choose Make Compound Path.
Use the drag select method to select all the pieces at the same time. Left click the mouse and hold it down in the top left corner above the design and drag it all the way through the design to the bottom right corner. Anything that the selection box touches, should be selected.
Cutting the Card Pieces & Assembly
Now you have your pieces for the Off-the-Edge card design designed and ready to cut in Silhouette.
I cut the sentiments from Oracal 651 Black vinyl and applied it to the off-the-edge piece that I cut from white cardstock. I reused a piece of transfer tape to apply it and was careful that it didn’t stick to the cardstock too much. You could also cut from cardstock and glue to the front, but adhesive vinyl makes it a bit quicker to assemble and the glossy sentiment made it pop with the photo paper background too!
Then I took the printed sheet of the alcohol background paper and cut it to 4.25″ x approximately 3.5″ with my paper trimmer. This size depends on how far the left side of the off-the-edge cut comes down. I used a Scrapbook tape runner to adhered the alcohol background to the front of a card base at the top.
You can either buy ready made card bases or make your own. In this card tutorial HERE at 32:30, I show how I cut my own card bases from a letter size sheet of paper.
Then used foam tape to add the off-the-edge cut piece to the front of the card at the bottom.
Off-the-Edge Die Cut Cards with Silhouette
Once you have the basics of the card creation down, you can modify it for different sentiments. Save the angled rectangle as a template for future card cuts.
The first card will take the longest to design, but then you will have all the steps and if you save the files, you can easily open in the future and get to cutting.
You will also notice that a couple of mine got a bit close to the edge and really did go off-the-edge. For these I can just snip that part off before placing in the envelope, but in the future I’ll adjust the design a bit smaller so the offset doesn’t go outside the bounds. Something like that is easily corrected in the software when it happens to you.
Save this for future reference by pinning the image below.
Enjoy !
THANK YOU for your support! How can you help? Click HERE & buy a coffee. Every little bit helps with the cost of running the site.
Silhouette Classes
Never stop learning! Let me help you take the anxiety out of learning with Silhouette and get to creating faster! My Silhouette classes are heavily focused on software, so you can take the skills & techniques taught and apply them to many future projects!
**This post may contain affiliate links. What that means is that I may receive compensation if you purchase through the links I have provided. The price you pay for the product or service is not higher but I may get compensated for sharing.
Have you ever wondered what tools are compatible with the Silhouette Curio 2? The Silhouette Curio 2 flatbed cutting machine can use a few additional tools that are not designed for the Silhouette Cameo 5 models. Let’s take a look at those today!
Affiliate links may be present in the following blog post and as an Amazon Associate, I earn from qualifying purchases.
I have created a free PDF chart of all the tools that can be used in the Silhouette Curio 2 . This chart is available as a free download exclusively for confirmed newsletter subscribers.
I always recommend stocking up on extra blades and cutting mats to have on hand. It can be very frustrating to be in the middle of a project with a dull blade or and adhesive mat that is no longer sticky. It is also one of the fastest ways to rule out a cutting issue you might have.
For some of the specialty tools listed below I’ve also included links for tutorials and more information on their usage as well.
Silhouette Blades
Silhouette Autoblade – Type B Carriage 1 Used for paper, cardstock, sticker sheets, adhesive vinyl, HTV, Chipboard, Acetate, and select specialty materials. Materials under 1 mm thick Available at Silhouette America or Crafter Cuts *This is the blade I use most often. Most cut issues occurring with this blade can be fixed by following the steps in this video HERE – Troubleshooting Cut Issues
Silhouette 1 mm Manual Blade Carriage 1 Used for paper, cardstock, sticker sheets, adhesive vinyl, HTV, Chipboard, Acetate, and select specialty materials. Materials under 1 mm thick
Silhouette 2 mm Manual Blade Carriage 1 Used for paper, cardstock, sticker sheets, adhesive vinyl, HTV, Chipboard, Acetate, Craft Foam, and select specialty materials. Materials under 2 mm thick
Silhouette 2 mm Kraft Blade – Type B Carriage 1 Used for chipboard, acetate, craft Foam, leather, and select specialty materials Materials up to 2 mm thick *15+ Tips for using the Kraft blade foundHERE
Silhouette Tool Adapter Set Carriage 1 Adapters are color coded for specific blades/tools Black adapter = Silhouette blade (ratchet) & Premium blade White adapter = 2 mm Kraft blade Gray adapter = Deep Cut blade Blue adapter = Silhouette Sketch pens
Silhouette Blade – often referred to as a “ratchet” blade but the official name is Silhouette blade Carriage 1 with black adapter Used for paper, cardstock, sticker sheets, adhesive vinyl, HTV, Chipboard, Acetate, and select specialty materials. Materials under 1 mm thick
Silhouette Premium Blade Carriage 1 with black adapter Used for paper, cardstock, sticker sheets, adhesive vinyl, HTV, Chipboard, Acetate, and select specialty materials. Materials under 1 mm thick
Silhouette Deep Cut Blade Carriage 1 with gray adapter Used for paper, cardstock, sticker sheets, adhesive vinyl, HTV, Chipboard, Acetate, Craft Foam, and select specialty materials. Materials under 2 mm thick
Silhouette 2 mm Kraft Blade Carriage 1 with white adapter Used for chipboard, acetate, craft Foam, leather, and select specialty materials Materials up to 2 mm thick *15+ Tips for using the Kraft blade foundHERE
Silhouette 3 mm Kraft Blade Carriage 2 Used for chipboard, acetate, craft Foam, leather, and select specialty materials Materials up to 3 mm thick *15+ Tips for using the Kraft blade foundHERE
Silhouette Rotary blade Carriage 2 Used for fabrics, crepe paper, felt, wool, and select specialty materials *Rotary Blade TutorialHERE
Additional Silhouette Tools
Silhouette Pen Holder Type B Carriage 1 Use with a variety of pen styles to sketch onto materials such as cardstock, paper, faux leather paper, etc. *Step-by-step Sketching ClassHERE **More tutorials on sketchingHERE
Silhouette Punch Tool Carriage 2 Used with adhesive vinyl or HTV to punch a hole to designate where to weed the material out. Also used with the Cameo 5 for etching on Silhouette metal sheets. *12+ Tips for Etching with the Silhouette Cameo 5HERE
Silhouette black bodied sketch pens Carriage 1 with blue adapter Used to sketch onto materials such as cardstock, paper, faux leather paper, etc. *Step-by-step Sketching ClassHERE **More tutorials on sketchingHERE
Silhouette Pen Holder – Type C Carriage 2 Use with a variety of pen styles to sketch onto materials such as cardstock, paper, faux leather paper, etc. Type C Pen Holder has a broader barrel on the end so you can use wider bodied pens and markers
Silhouette Heat Pen Set – Powered Tool Carriage 2 Applies foil transfer material to surfaces of many materials such as cardstock, faux leather, etc. Cordless design and powered by the Cameo 5 Tool 2 housing *Heat Pen Setup & Foiling tutorials HERE
Silhouette Heat Pen Super-Fine Carriage 2 Applies foil transfer material to surfaces of many materials such as cardstock, faux leather, etc. Cordless design and powered by the Cameo 5 Tool 2 housing 0.5 mm Super Fine Tip
Silhouette Power Engraver Carriage 2 Surface engraves on materials such as metal sheets, acrylic, etc. To be used with the Silhouette Curio Debris Tray *Beginner Acrylic Etching Class with Power EngraverHERE **Additional Silhouette Curio 2 InformationHERE
Grab the free PDF chart of all the Silhouette Curio 2 tools for future reference when you subscribe to the Silhouette Secrets+ newsletter. *chart is the current tools available for the Silhouette Curio 2January 2024
Find even more information on the Silhouette Curio 2 HERE including an unboxing, setup, first cuts, and the Electrostatic Bed.
Please let me know if you have any questions in the comments below.
Save this for future reference by pinning the image below.
Enjoy !
THANK YOU for your support! How can you help? Click HERE & buy a coffee. Every little bit helps with the cost of running the site.
Silhouette Classes
Never stop learning! Let me help you take the anxiety out of learning with Silhouette and get to creating faster! My Silhouette classes are heavily focused on software, so you can take the skills & techniques taught and apply them to many future projects!
**This post may contain affiliate links. What that means is that I may receive compensation if you purchase through the links I have provided. The price you pay for the product or service is not higher but I may get compensated for sharing.
Let’s talk tools. Tools for the Silhouette Cameo 5 and Cameo 5 Plus model machines specifically in this post.
Affiliate links may be present in the following blog post and as an Amazon Associate, I earn from qualifying purchases.
With the release of the Silhouette Cameo 5, a couple new tools were released that can be used with the new machines. These include the Embossing tools, Heat Pen Set, and Pen Holder Type C.
I’ve created a free PDF chart listing all the tools compatible with the Silhouette Cameo 5 and Cameo 5 Plus. This chart is available as a free download exclusively for confirmed newsletter subscribers.
I always recommend stocking up on extra blades and cutting mats to have on hand. It can be very frustrating to be in the middle of a project with a dull blade or and adhesive mat that is no longer sticky. It is also one of the fastest ways to rule out a cutting issue you might have.
Let’s take a look at all the blades and tools that can be used in the Silhouette Cameo 5. For some of the specialty tools listed below I have also included links for tutorials and more information on their usage as well.
Silhouette Blades
Silhouette Autoblade – Type B Carriage 1 Used for paper, cardstock, sticker sheets, adhesive vinyl, HTV, Chipboard, Acetate, and select specialty materials. Materials under 1 mm thick Available at Silhouette America or Crafter Cuts *This is the blade I use most often. Most cut issues occurring with this blade can be fixed by following the steps in this video HERE – Troubleshooting Cut Issues
Silhouette 1 mm Manual Blade Carriage 1 Used for paper, cardstock, sticker sheets, adhesive vinyl, HTV, Chipboard, Acetate, and select specialty materials. Materials under 1 mm thick
Silhouette 2 mm Manual Blade Carriage 1 Used for paper, cardstock, sticker sheets, adhesive vinyl, HTV, Chipboard, Acetate, Craft Foam, and select specialty materials. Materials under 2 mm thick
Silhouette 2 mm Kraft Blade – Type B Carriage 1 Used for chipboard, acetate, craft Foam, leather, and select specialty materials Materials up to 2 mm thick *15+ Tips for using the Kraft blade foundHERE
Silhouette Tool Adapter Set Carriage 1 Adapters are color coded for specific blades/tools Black adapter = Silhouette blade (ratchet) & Premium blade White adapter = 2 mm Kraft blade Gray adapter = Deep Cut blade Blue adapter = Silhouette Sketch pens
Silhouette Blade – often referred to as a “ratchet” blade but the official name is Silhouette blade Carriage 1 with black adapter Used for paper, cardstock, sticker sheets, adhesive vinyl, HTV, Chipboard, Acetate, and select specialty materials. Materials under 1 mm thick
Silhouette Premium Blade Carriage 1 with black adapter Used for paper, cardstock, sticker sheets, adhesive vinyl, HTV, Chipboard, Acetate, and select specialty materials. Materials under 1 mm thick
Silhouette Deep Cut Blade Carriage 1 with gray adapter Used for paper, cardstock, sticker sheets, adhesive vinyl, HTV, Chipboard, Acetate, Craft Foam, and select specialty materials. Materials under 2 mm thick
Silhouette 2 mm Kraft Blade Carriage 1 with white adapter Used for chipboard, acetate, craft Foam, leather, and select specialty materials Materials up to 2 mm thick *15+ Tips for using the Kraft blade foundHERE
Silhouette 3 mm Kraft Blade Carriage 2 Used for chipboard, acetate, craft Foam, leather, and select specialty materials Materials up to 3 mm thick *15+ Tips for using the Kraft blade foundHERE
Silhouette Rotary blade Carriage 2 Used for fabrics, crepe paper, felt, wool, and select specialty materials *Rotary Blade TutorialHERE
Additional Silhouette Tools
Silhouette Pen Holder Type B Carriage 1 Use with a variety of pen styles to sketch onto materials such as cardstock, paper, faux leather paper, etc. *Step-by-step Sketching ClassHERE **More tutorials on sketchingHERE
Silhouette Punch Tool Carriage 2 Used with adhesive vinyl or HTV to punch a hole to designate where to weed the material out. Also used with the Cameo 5 for etching on Silhouette metal sheets. *12+ Tips for Etching with the Silhouette Cameo 5HERE
Silhouette black bodied sketch pens Carriage 1 with blue adapter Used to sketch onto materials such as cardstock, paper, faux leather paper, etc. *Step-by-step Sketching ClassHERE **More tutorials on sketchingHERE
Silhouette Pen Holder – Type C Carriage 2 Use with a variety of pen styles to sketch onto materials such as cardstock, paper, faux leather paper, etc. Type C Pen Holder has a broader barrel on the end so you can use wider bodied pens and markers
Silhouette Embossing Tool Set – Type C Carriage 2 Embosses onto materials such as cardstock, embossable foil, etc. Set includes a fine and wide tip.
Silhouette Heat Pen Set – Powered Tool Carriage 2 Applies foil transfer material to surfaces of many materials such as cardstock, faux leather, etc. Cordless design and powered by the Cameo 5 Tool 2 housing – 1 mm & 2.5 mm tip *Heat Pen Setup & Foiling tutorials HERE
Silhouette Heat Pen Super-Fine Carriage 2 Applies foil transfer material to surfaces of many materials such as cardstock, faux leather, etc. Cordless design and powered by the Cameo 5 Tool 2 housing 0.5 mm Super Fine Tip
Additional Supplies
There are a few additional supplies for use with some of the specialty tools listed above.
Silhouette 12″ x 12″ Embossing Mat For use with the Silhouette Embossing Tools
Silhouette Heat Transfer Foil – Gold & Silver For use with the Silhouette Heat Pen Set 2 heat foil rolls (3 in x 33 feet) *Heat Pen Setup & Foiling tutorials HERE
Silhouette Electrostatic Bed Uses static electricity to hold materials in place while being cut with the Cameo 5 models *Tips for using the Silhouette Electrostatic BedHERE
Silhouette Electrostatic Protection Sheet 12″ x 12″ – 2 per pack Protects the Electrostatic Bed from damage.
There are a lot of options now available with the Silhouette Cameo 5 and Cameo 5 Plus.
Grab the free PDF chart of all Silhouette Cameo 5 tools for future reference when you subscribe to the Silhouette Secrets+ newsletter. *chart is the current tools available for the Cameo 5 and Cameo 5 Plus January 2024
Find even more information on the Silhouette Cameo 5 HERE including an unboxing, setup, first cuts, and the Electrostatic Bed.
Please let me know if you have any questions in the comments below.
Save this for future reference by pinning the image below.
Enjoy !
THANK YOU for your support! How can you help? Click HERE & buy a coffee. Every little bit helps with the cost of running the site.
Silhouette Classes
Never stop learning! Let me help you take the anxiety out of learning with Silhouette and get to creating faster! My Silhouette classes are heavily focused on software, so you can take the skills & techniques taught and apply them to many future projects!
**This post may contain affiliate links. What that means is that I may receive compensation if you purchase through the links I have provided. The price you pay for the product or service is not higher but I may get compensated for sharing.
Have you ever had this little bullseye pop up in Silhouette Studio? Has it ever annoyed you? The Center of Rotation is its official name, but many simply refer to it as a bullseye or target-shaped feature that appears on an object in Silhouette.
Affiliate links may be present in the following blog post and as an Amazon Associate, I earn from qualifying purchases.
What if I told you this Silhouette bullseye was a really useful tool when you get to creating your own designs?
And what if I told you that it is easy to turn on and off?
Silhouette Center of Rotation
In this quick video tutorial on the Silhouette Secrets+ YouTube channel, I demonstrate how to turn it on, turn it off, and utilize it. Or continue reading below for more details.
The Center of Rotation can be turned on for several reasons in Silhouette. Center of Rotation is available in the Designer Edition upgrade or higher. We see users ask about this a lot and it wasn’t until recently that we found out that it is not on the upgrade list, but it is in fact an upgrade feature. When a user upgrades to Designer Edition or higher, it can be turned on in the software by default.
The Center of Rotation might turn on for other reasons, such as if you open a file and the designer had previously activated it, or, most commonly, if the letter “O” on the keyboard has been pressed. The letter “O” is the keyboard shortcut for Center of Rotation.
To toggle the Center of Rotation on and off using the keyboard shortcut, you need to select the design.
Or you can find the Center of Rotation under the Preferences Panel, under the Defaults tab.
Preferences Panel
You can find the Preferences panel in several ways:
Click the gear icon in the bottom right corner
Click the Edit menu in the top left corner & Preferences is at the bottom of the menu
There are probably 2 things that are the most annoying about this little bullseye in Silhouette.
The first is merely the sight of it. If you do not know what it is, what it does, or how to turn it off, it can be distracting or just a visual eyesore.
The second is that when you are trying to move an object, the Center of Rotation wants to play. When you think you are grabbing the design to move it, the Center of Rotation moves and not the design.
But, once you know what it is and how to turn it off, you can easily make it disappear.
What purpose does the Center of Rotation serve?
It is exactly as the name says. It is the Center Point of Rotation, whether you are rotating a single object or you are replicating an object.
The default for the Center of Rotation is exactly in the center of an object. If you rotate the object as is, it is going to act as you would normally see with it turned off.
If you move the Center of Rotation away from the center point of the design and then rotate the object, it will rotate around wherever you placed the Center of Rotation bullseye.
Round and round she goes!
Now, what would you use this for?
The most common way I use it is for creating designs such as flowers or snowflakes. I am sure you can think of many other applications as well.
If I move the Center of Rotation to the bottom of the design as shown below.
I can then open the Replicate Panel and replicate the shape around the Center of Rotation.
And I have the beginnings of a snowflake design.
Or if I use a different shape, like an oval, then a beginning shape of a flower.
While it can be an annoying little thing that pops up, it is also a very useful tool too!
I’ll be sharing some free files coming up soon for the Silhouette Secrets+ Newsletter subscribers. Hint: the snowflake design is a brief glimpse at the beginnings of my creations.
If you are already subscribed, watch for those soon! Or you can subscribe below.
Silhouette Secrets+ Newsletter
Never miss out on the news, tips, “secrets”, deals, classes, and more that I share on Silhouette Secrets+. Sign up for the newsletter and get information delivered to your inbox every Friday. Unsubscribe at anytime.
I hope you will take some time today and just play! See what you can create using basic shapes and the Center of Rotation. Keep in mind that designing is simply placing shapes together to make new shapes. Just like a beginners drawing book!
Save this for future reference by pinning the image below.
Enjoy !
THANK YOU for your support! How can you help? Click HERE & buy a coffee. Every little bit helps with the cost of running the site.
Silhouette Classes
Never stop learning! Let me help you take the anxiety out of learning with Silhouette and get to creating faster! My Silhouette classes are heavily focused on software, so you can take the skills & techniques taught and apply them to many future projects!
**This post may contain affiliate links. What that means is that I may receive compensation if you purchase through the links I have provided. The price you pay for the product or service is not higher but I may get compensated for sharing.
I’ve wanted to write a faux leather tutorial with tips for Silhouette for a long time, but other things seemed to jump in front of it on my to-do list. So when Amy announced her Faux Leather event, I made it a goal to really dive in and create with some faux leather.
Affiliate links may be present in the following blog post and as an Amazon Associate, I earn from qualifying purchases.
Amy Romeu, hailed as the Queen of Faux Leather by many, recently hosted an event that I attended. I had a great time crafting along with her videos and picked up a lot of great tips that can help in being successful in cutting faux leather with any cutting machine.
Before we get too far in, let’s cover a few things about faux leather that will help in the process.
Faux Leather Information
Can Silhouette machines cut faux leather? Yes! Can Silhouette machines cut ALL faux leather? NO! Can all cutting machines cut ALL faux leather? NO!
Faux leather is such a broad term, just like “genuine” leather is. Cutting some faux leathers is easy, some pose greater difficulty, and others simply do not cut well at all.
Factors influencing whether a Silhouette or another machine can cut faux leather include:
Color – Yes! Many users don’t know this, but color affects how materials cut. Different colors go through different processes in the production and that can affect how it cuts. Some can be tougher than others due to coloring.
Backing – Faux leathers can have a variety of backing on it. Some don’t have any and are soft and pliable. While others can have a mesh, woven backing which can be difficult to cut through.
Texture – Faux leathers can come in all kinds of textures such as embossed, glitter, sequins, etc. This will affect how it cuts. Just think of a blade trying to bounce over a texture material to cut a clean line. Texture affects it! The texture also influences the ease of cutting by hand. The same is true for a cutting machine.
Thickness – There is a wide array of thicknesses for faux leather. Super thin ones can be too pliable and just smoosh around on the cutting mat. Thicker ones may need multiple passes to cut through and a longer blade such as the Deep Cut blade.
Composition – Faux leather is such a broad term. The definition of “faux” is artificial or fake. So keep in mind that faux leather is fake leather. What it is made of? A wide variety of things. Plastic mostly. For instance, I ordered some leather on Amazon and it is PU Leather. It is by definition, artificial leather, crafted from a thermoplastic polymer commonly employed in the production of furniture or shoes. Faux leather = fake leather = plastic
Silhouette 2 mm Manual Blade (this is what I used – more info below), Premium blade or Deep Cut blade, Silhouette Autoblade, 1 mm Manual blade, Silhouette blade available at CrafterCuts (code SECRETS for 10% off) or Silhouette America (code 10OFF for 10% off)
So the first place to start is to gather your supplies for whatever you are working on. I was so excited for these projects and I knew I would be creating several, so I pulled out all my faux leathers and my scrap HTV. I have several boxes of scrap HTV and it’s a great way to use it by adding it to faux leather projects.
Keep it a secret, but I actually obtained more faux leather than shown because I needed to test several during these projects. And once I went down that rabbit hole, I found many patterns I wanted to collect.
Cut the faux leather down to size and give yourself some extra space for taping down the edges to the cutting mat.
Place the faux leather front facing down on the cutting mat, so you are cutting through the backside first. **NOTE: if cutting real leather, DO NOT place it face down or you can ruin the finish on the real leather. That can be a very expensive mistake!
Utilize a reliable sticky cutting mat to secure the materials in place during the cutting process. Using a brayer to smooth the materials down to secure it. If the materials shift during the cut, the cut may fail, or your blade might become stuck.
Securely tape down the material edges. I found that using longer pieces of tape not only ensured a better hold but also reduced the risk of it getting caught in the machine during cutting. You can also reuse painter’s tape if removed carefully at the end.
For best results, keep the painters tape away from the edges of the cutting mat so it is not going under the rollers. Any change in the surface area under the rollers and it can cause it to lose grip or the left and right roller to not move at the same rate, which can cause issues.
When using a Silhouette cutting mat, you can use the grid for exact placement for lining up your materials and your design. If you load the mat properly, the on-screen design will align with the Silhouette cutting mat. Third party cutting mats may not line up and it will be a guessing game for design placement and alignment.
Give yourself a good allowance and grace because you may still mess up, just like I did in the photo above. I would recommend that you cut a little bit excess of the faux leather and not try to cut through the painters tape as it can affect the cut results. The cut was ok in this instance, but it went off my faux leather, so I ended up cutting another truck piece.
For tips on lining things up check out this tutorial HERE. I use this method all the time and still make mistakes. Remember to “measure twice, cut once.” But, I find I make the most mistakes if I’m rushing or I tell myself it will be just a quick project.
Test cut, test cut, test cut!!!
I used a 2 mm Manual blade for all of my faux leather cuts. This blade is the equivalent of the older style Premium blade, it’s just redesigned to fit directly into the newer model machines housing without needing an adapter. The 2 mm Manual blade (or Deep Cut blade) allows you to go from 1-20 in the blade depth settings. All faux leather will vary and some can be cut with a regular blade that is 1-10 settings, while others may need a higher blade depth than 10. Test cuts are the way you will know.
Do not unload the mat after you cut!!! Check to see how well it cut. Having a thread or two is not a bad thing! Grab a sharp pair of scissors and simply snip it.
If it does not lift easily or has more than just a few threads hanging on, send the cut again. If you have not unloaded the cutting mat, it should cut again in the exact same place. If you unload the cutting mat, it will be a hope and a prayer trying to get it lined up perfectly again to cut in the same place.
Some faux leathers may take more than 1 pass and this is why test cutting is such an important step. I write down the settings that worked for each of the materials I test and keep a log so I can refer back to it. It is not a bad thing to use more than 1 pass with certain projects. I find with thicker materials, you can get a cleaner cut when you are not trying to force the machine to do it all at once time. However, for thinner materials such as adhesive vinyl or regular cardstock, multiple passes shouldn’t be necessary if the blade is installed properly.
This is white faux leather from Craft Chameleon. I used the 2 mm Manual blade (equivalent of the Deep Cut blade) . Blade depth – 9 Force – 30 Passes – 2
For more details on what blade depth and force are, check out this in-depth tutorial on the Silhouette Send tab HERE.
Once the cut is successful, unload the mat, remove the painter’s tape – it can be reused and carefully peel away the excess. Snip any threads as you carefully remove the excess so you do not stretch the design.
When cutting, check the blade regularly for debris stuck to it or inside the cap. The fibers of the faux leather can hinder the cut results.
It is perfectly normal to have to increase the settings of the blade as you cut materials. A blade cutting any material is going to dull with usage. Keep in mind that you are cutting through plastic and fibers. That will cause a blade to wear differently than other materials.
For this design I used the Red Truck Ornament file from Amy Romeu and there is a front and back layer cut from faux leather that will be glued together. The rest of the design is cut from HTV, so I swapped out my blade for my HTV blade and set up my cutting mat to cut different colors of scraps at the same time.
I used the Cut by Fill Color so I could set up different cut settings for my Smooth HTV versus my Glitter HTV. The Autoblade did all the work to change the settings once set up. Check out this tutorial HERE for tips on cutting by line or fill color – they are the same.
And then I set up my cutting mat to match exactly what I had set up on the Silhouette software. Check out tips on cutting multiple colors at the same time HERE.
Then I simply weeded the design and pressed the pieces on according to Amy’s instructions. I also cut this design out of cardstock and adhesive vinyl too! The faux leather ornament is on the left and the cardstock ornament is on the right.
Check out Amy Romeu’s YouTube video HERE for instructions on the assembly. Even though she is using a Cricut machine to cut, the process and tips are useful.
I was having so much fun cutting faux leather that I couldn’t stop and wanted to test more!
I followed the same tips as above and taped it securely to my cutting mat.
If you compare this photo to the first one, you’ll notice that the backing differs on the white versus this silver embossed piece. That can affect the cut settings and results. The woven backing texture can be a bit more difficult to cut and may require higher settings and more passes to cut cleanly.
I used the 2 mm Manual blade (equivalent of the Deep Cut blade). Blade depth – 9 Force – 30 Passes – 2-3 however, that was still not a clean cut, so I then increased the Blade depth to 11 and did 2 more passes.
In this case, the Embossed texture on the front is uneven and can affect the cut.
I did not have all the supplies to finish this out as Amy did, so I used what I had on hand and made my own holly berries and leaves. The holly leaves are drawn from scratch in Silhouette Studio. If you want to learn how, I show step-by-step in the Designing in Silhouette Studio – Creating Keepsake Ornaments class HERE. I cut the leaves from cardstock, painted some small craft balls, and then glued it all onto the ornament.
In both the designs shown above, the faux leather was cut for the front and the backside and then glued together so it had a finished look. But for this next project, I used Siser Metal HTV and adhered it to the backside of the white faux leather from Craft Chameleon before cutting.
I pressed it once with the carrier sheet on and then a second time without the carrier sheet for just a few seconds. The second press allows the texture of the faux leather to show through and it is gorgeous! Photos do not do it justice.
But keep in mind, anytime you add something to a material, that can change the cut settings.
I used the 2 mm Manual blade (equivalent to the Premium blade). Blade depth – 10 Force – 30 Passes – 1 And I probably could have done one more pass.
Now, what you’ll notice is that all of the pieces are still attached. However, they easily popped out and I only had a few threads to snip. This actually worked better for the next steps as I could keep it all organized in one place until I was ready to press.
I loved the finished look of the Siser Metal HTV on the backside! And I used up a few scraps of Glitter HTV, not much, but it is the perfect project for those scraps that you might have.
I had so much fun creating along with this event and now have faux leather for many more projects.
I hope those tips help you to be successful with cutting faux leather with your Silhouette machine.
You can still purchase the VIP package for the Faux-La-La Crafting Fun and join in on the fun. You get the files for all the projects, all the videos in one place, a printable guide, and more! Check it out HERE for all the details.
Save this for future reference by pinning the image below.
Enjoy !
THANK YOU for your support! How can you help? Click HERE & buy a coffee. Every little bit helps with the cost of running the site.
Silhouette Classes
Never stop learning! Let me help you take the anxiety out of learning with Silhouette and get to creating faster! My Silhouette classes are heavily focused on software, so you can take the skills & techniques taught and apply them to many future projects!
**This post may contain affiliate links. What that means is that I may receive compensation if you purchase through the links I have provided. The price you pay for the product or service is not higher but I may get compensated for sharing.
Whether you are celebrating on New Years or for some other event throughout the year, bring a little something with you and add a special touch. This month I’m sharing how to create a custom wine bag with Artesprix Sublimation supplies in a few easy steps on the Artesprix YouTube channel.
Affiliate links may be present in the following blog post and as an Amazon Associate I earn from qualifying purchases.
Stencils are great for text with using the Artesprix sublimation products because text needs to be mirrored, so it will be correct when pressed onto the sublimation blank. A stencil can easily be used on either side, so is very versatile for many projects.
Now, to decide which I like better? The text running top to bottom?
Or bottom to top?
When I asked Google, one reference said, “If the text is to be read above eye level, then it should run from bottom to top. If the text is to be read below eye level, it should run top to bottom.” – Paxton Signs
So I guess it’s all a matter of how high you hold the wine bottle in the bag when looking at it? Or maybe if you drink the wine in the bag, it really won’t matter?
THANK YOU for your support! How can you help? Click HERE & buy a coffee. Every little bit helps with the cost of running the site.
Silhouette Classes
Never stop learning! Let me help you take the anxiety out of learning with Silhouette and get to creating faster! My Silhouette classes are heavily focused on software, so you can take the skills & techniques taught and apply them to many future projects!
**This post may contain affiliate links. What that means is that I may receive compensation if you purchase through the links I have provided. The price you pay for the product or service is not higher but I may get compensated for sharing.
With the release of software version v4.5.760, the answer is now yes. Silhouette Studio v4.5.760 was released to the current version as of December 12, 2023 and it now has the capabilities to use the Silhouette Punch Tool to etch from the Carriage 2 housing. It is designed for etching on the Silhouette Metal Etching sheets and that is the preset that is in now in software v4.5.760.
Affiliate links may be present in the following blog post and as an Amazon Associate, I earn from qualifying purchases.
You can read all the release notes for Silhouette Studio v4.5.750 HERE.
I have tested this and it does work. While I am glad there is finally a good use for the Silhouette Punch Tool, I’d recommend reading through this completely for more information. I didn’t find the Silhouette Punch Tool particular efficient or effective. It took more time to setup and actually complete the “punch” action on adhesive vinyl or HTV than it would take to weed the design. But, that is also a personal preference as well. Those of us who have been working with those materials for a longer period of time have developed more efficient ways to just “get things done.”
Now, the first thing I will say is that it is slow. It is not a fast process to etch. The default settings for the Silhouette Metal Etching Sheets in the Silhouette Studio v4.5.760 software are Force 1 and Speed 1. This is what I tested at.
Does it etch? Yes!
Is this what users wanted? Yes! So Silhouette listened and implemented it.
As far as what it can etch? My recommendations are thin materials. Thin as in the same thickness as the Silhouette Metal Etching Sheets thin. I did test with a 3 mm piece of acrylic and it was a no-go. To my surprise, the material just barely cleared the roller bar. I could hear it skim the bottom of the inside of the machine as I fed the mat in and out. The Silhouette Punch Tool did clear the top of the acrylic. These are the first 2 factors that I looked at before even attempting to set up an etch.
However, when I sent a simple sketch design to etch, the force of 1 was too great for that thickness of material and it went all wonky. I immediately pressed the Emergency Stop (power button) and cancelled the job.
Recommendations & Tips for Etching with the Cameo 5
Tip #1
Read this entire post first before you decide to update to the v4.5.760. This will depend on when you are reading this post. On November 28, 2023, Silhouette Studio v4.5.760 entered Open Beta. At the time that I write this post, this version has not been out long and there are not many users using it. I always recommend waiting when any new version is released until we see how it’s going to affect users. At this moment, as I write this, I have no idea what could pop up and only time will tell. I am part of the Silhouette Beta testing team and can report issues directly to them. This version skipped the Beta testing team and was released directly to the Open Beta, so there hasn’t been much user testing yet.
If the etch goes off course or gets stuck at any time or if you notice that your Autoblade is not adjusting properly or the cut is not in the correct placement after you have etched, you may need to do a blade housing reset.
If the housing is not in proper alignment, it will not hit the alignment holes to adjust the blade properly.
Unplug the machine, then carefully move the blade housing all the way to the right and all the way to the left. Do this 3 more times and leave it on the right side. Plug it back in and turn it on. The housing should align to the correct location. This is called a blade housing reset and it is a regular part of machine usage since the Cameo 3 and the Autoblade was first introduced.
Check out this video HERE for more troubleshooting tips that solve most cut issues.
Tip #4
Use thin blanks to start and to test with. The etch settings released for v4.5.760 are designed for the Silhouette Metal Etching sheets and the force default is as low as it will go. If you use thicker materials, it may not work well as I mentioned above with my testing on the 3 mm acrylic.
Tip #5
Don’t expect speed. The default setting for Silhouette Metal Etching Sheets in the software is a speed of 1. While it does allow you to increase the speed, higher speed is not always better for etching projects. As I was doing a large etch project, I felt it was slow, but when I compared it to my older etchings on the Silhouette Curio 1 with the Metal Etching Sheet defaults, the speed was the same.
Tip #6
Stay close to your Silhouette Cameo 5. If needed, you can quickly press the Emergency Stop (power button) on the Cameo 5 for the project to immediately stop. The job is lost, but it can prevent a bigger mess from happening.
Tip #7
Draw shapes as templates to design within for getting the best possible alignment of the design on the blank. I drew a rectangle 5″ x 7″ in the software and placed it at the 2″ x 2″ grid line on the virtual cutting mat. Then I placed my blank on the cutting mat with the top left corner at the 2″ x 2″ mark.
This will only work for proper placement if you are using a Silhouette cutting mat and you load the mat properly. The on screen virtual mat and the Silhouette machine are calibrated for the exact dimensions and margins on a Silhouette cutting mat. Third party cutting mats will not line up and may be thicker, which can also affect the results of etching as well, as it will increase the height of the project.
Make sure after you have drawn the shape for alignment, that you click on the Send tab and choose No Cut under Carriage 1 so it will not cut or etch that shape. It is simply a template to design within and how to line up your blank on the cutting mat.
Tip #8
Secure your blank to be etched with painters tape. Any movement in the blank on the cutting mat during etching will result in the etch being off. Etching is permanent and there is no way to “fix” when an etch is off.
Tip #9
Create templates when using smaller metal blanks that are not as easy to place. Place cardstock on the cutting mat, draw a shape that fits your size blank, cut that shape from the cardstock, DO NOT remove the cutting mat from the machine and secure your blank in place. If the cutting mat is unloaded from the machine, it most likely will not line up exactly right again.
Tip #10
If you are etching a large project such as a full 5″ x 7″ Silhouette metal etching sheet, plug in the USB cord and use it with a direct connection!!! I sent this job to etch and it said it would be 114 minutes.
After almost 2 hours etching, it stopped and I got a notice on the software that it had lost the connection with my computer. This project is lost. There is no way to restart it.
To be honest, I should know better! The Curio 1 was hardwired to the computer and I would etch projects that took hours on it. Bluetooth is great, but there are so many things that can interfere with it. If you are etching, plug in by USB cord and choose that connection so it’s a hard wire connection.
Tip #11
Do not trust the timer. The timer is rarely ever correct. I mentioned the estimate was 114 minutes. I started the job at 11:04 am and at 12:56 pm it lost the connection and it still had a ways to go to finish up.
Tip #12
I used the Emboss/Deboss Panel using the Deboss option with the crosshatched pattern at a 0.004″ spacing. This panel is unlocked to me because I have a Curio 1 and Curio 2. It may not be available for all users if you do not have a Curio model machine. If it’s not, you would need to use the Sketch Panel as a fill option.
Test – Test – Test! The only way to know if something is going to work for you is to test it!
Even though this was a lost etched project, it helped me to see how the machine would do and I now have my Silhouette Cameo 5 plugged in by USB cord for my next project.
Oh and two last tips!!!
Protect your cutting mat! Be careful unloading and removing any etch piece. Etching creates a dust or shavings that have been removed from the surface. Those stick very, very well to a cutting mat and will affect the lifespan of your cutting mat. A dirty mat will not hold materials well.
Keep your machine clean! The debris created from etching could cause future issues if the machine is not kept clean. Especially with the optical eye and print and cut if the debris is getting under the housing. Here is my blade housing after etching the test subjects this afternoon.
You can see debris sticking to the bottom of the housing. I will be cleaning my machine after this etching. A can of compressed air may be worth having on hand if you decide to etch with your machine. Be careful not to get any of the debris in your eyes or to inhale it.
And a lint roller works great for picking up the debris before it spills onto the cutting mat too!
Additional Projects I tested
Metal 1″ Disc
This is a 1″ metal disc from Amazon. You can see the tool marks in the metal blanks from the etch fill. It is a pretty rough texture when you run your fingers across it. This photo shows an up close look at that. For all of the etchings I used the crosshatch fill at the 0.004″ spacing.
Metal Business Card
This is an Anodized Metal Business Card blank with my logo etched using the same settings. I prefer a much smoother etch and feel the solid platform of the Curio machines does a better job for stability. But, this may also be the quality of the etch using the Silhouette Punch Tool on the Curio 2 as well. I will be testing that in the future and will update once I know more.
Silhouette Metal Etching Sheet #2
But, of course, I couldn’t stop there. Now that my machine is plugged in by the USB cord and won’t lose the connection, I decided to have another go at it while I finished up the details on the blog post.
This time I used Dream Create Inspire Arrow Quote by Sarah Hurley to set up for the etch. The timer estimated 92 minutes and 28 seconds for the complete etch.
It ended up taking 101 minutes to complete.
One other thing to mention that did happen on this project is to keep in mind that any debris build up during the project can cause areas not to be etched well.
This is only visible up close on the blank, but if you get blank areas, this could be why. There is no real easy way to prevent that since you cannot pause and remove the blank like you could with the Curio 1. So just something to keep in mind when etching.
Here’s a look at all the projects that I completed for this blog post that were successful.
While it is not my preferred method, it is now an option in the Silhouette Studio software and I know many users will be wanting to test it out.
If you have any questions please let me know in the comments below.
Save this for future reference by pinning the image below.
Enjoy !
THANK YOU for your support! How can you help? Click HERE & buy a coffee. Every little bit helps with the cost of running the site.
Silhouette Classes
Never stop learning! Let me help you take the anxiety out of learning with Silhouette and get to creating faster! My Silhouette classes are heavily focused on software, so you can take the skills & techniques taught and apply them to many future projects!
**This post may contain affiliate links. What that means is that I may receive compensation if you purchase through the links I have provided. The price you pay for the product or service is not higher but I may get compensated for sharing.
Have you seen these awesome designs for 3D ornaments?
Affiliate links may be present in the following blog post and as an Amazon Associate, I earn from qualifying purchases.
Both Side 3D Christmas Ornament Bundle
This past year 3D designs have become more and more popular. With the options to print on many different materials and use in many different projects.
This past week a group member posted about these files and inspired me to create some projects with them. I want to share 2 ways that you can do this with any 3D files you might find.
You’ll notice that in the photo above, I have a Download button. This is because I recently signed up for Creative Fabrica’s All Access subscription which allows access to millions of graphics, fonts, classes, and more. I held off doing this for a long time, but the sale of $4.99/mo when paid for annually finally got me.
Well, what really got me was I was looking to buy a file for $4.00 and I realized that was almost 1 month of the subscription. So I decided to go for it and have been shopping ever since. I’ve actually used more files in projects since I signed up a few weeks ago, which has more than already paid for what I would have spent without the All Access.
Now, I’m typically not a fan of subscriptions, but there are a few that I’m slowly growing to love and a good deal never hurts either. If you are interested, click HERE. This is a limited time offer, but I know they also offer deals throughout the year too!
Crafting 3D Ornaments: Two Techniques
Once I got started creating with these files, I couldn’t stop. I knew immediately what I wanted to do, but had to gather a few supplies before I could start. I’ll share both the steps and the supplies I used for both below. Make sure to read to the very end as I’m adding additional details at the bottom too!
The 2 ways I used these 3D files are:
Sublimation
Print and Cut – Printable vinyl, sticker paper, Siser DTV, etc.
Not everyone has the equipment to print sublimation designs, so I wanted to share an alternative as well. Whether you use sublimation or print and cut on a material, both are not complex to do.
Craft Pro Heat Press – any heat source with adequate pressure and reaching at least 400 degrees F can work for sublimation
Sublimation is pretty simple, but it does require specialized equipment. With a sublimation printer, you can print on sublimation paper from any software program that can print, and then you press it onto a sublimation blank.
I used Silhouette Studio software to design and print from for these ornaments.
The ornament blanks I was using were 3″ circles. Using the Drawing Tools on the left side, I drew a circle 3.125″. This allowed for a little bit of breathing room in lining up the images and eliminate any white edges if I was off just a bit in placement.
Then I used the Text to Path option in the Silhouette Studio software to add personalization to each ornament with a name and the year. This way the kids wouldn’t fight over which one was theirs.
I filled the text with color so it would print and then changed the line color to transparent on all the text.
Next, make sure to remove any protective paper from the sublimation blanks. This can be difficult to see and sometimes a bit hard to get started to remove. This is to protect the polyester coating that is on the sublimation blanks. Sublimation binds to polyester materials or coating.
Make sure to remove it from both sides before pressing or it can be a mess and melt.
This is where I failed to snap a photo, so I’ll share the steps I took below.
Next, place the sublimation blank down on top of the printed image and line it up as you want. Then secure it with heat tape.
Then, place a piece of parchment paper on the bottom of the heat press platen to protect it. Sublimation ink turns to a gas when it’s heated and you do not want that to be transferred to the top or bottom platen. Make sure to protect both well with parchment paper.
Place the sublimation blank down on the bottom heat press platen with the print on the top. Then place a sheet of parchment paper on top of the ornament to protect your heat press top platen. Very important!
You will have a sublimation sandwich. Parchment paper, sublimation print, sublimation blank, and then parchment paper.
Follow the directions for the specific sublimation blank you are using. I pressed for 60 seconds at 400 degrees F.
Let it cool and peel away the sublimation paper and heat tape to reveal the image.
I pressed each side individually so I could line it up better.
They turned out so good! I didn’t realize when I bought the metal sublimation blanks that they had a bit of glitter or shimmer to them, but they looked awesome when completed!
Print and Cut 3D Ornament Designs
Now even if you do not have a sublimation printer, you can still create ornaments too! These designs could also be printed onto printable vinyl, sticker paper, Siser EasyColor DTV, and more!
Canon TS9521C – any good quality home printer will work
Such fun designs! My husband happened by when I was making them and said, “That is the fittest gingerbread man I’ve ever seen.” We had a good laugh and he is pretty cute!
For this round of ornaments, I set up the design page in the Silhouette Studio software for a print and cut.
This time I used a 3″ circle since I would be applying it directly onto a 3″ acrylic blank and did not want the printable vinyl to hang off the edges.
I sent it to my Canon TS9521C home printer and then placed it on the cutting mat to cut with the Silhouette Cameo 5. I did print using the high quality photo paper matte setting.
The first time it cut, it was just a tiny bit off. Well within the normal 1/16″ allowance of a Silhouette print and cut, but I decided to reprint it and add a print bleed.
Print bleed adds a border of color to the outside edge of the design. You can adjust the size of the print bleed as needed and the colors will depend on the actual colors of the image or design.
Print bleed is great for eliminating any stark white edges that might show around a printed design as the color extends past the cut line.
Of course, the second time I sent it to cut, the print and cut was spot on and perfect. But that’s just how it works sometimes. I am probably the only one who would have noticed the small margin.
I removed the protective cover on the 3″ acrylic circle and then peeled the printable vinyl off the backing and placed it on the acrylic circle.
Once I had both sides added, I used the Diamond Tip Reamer to poke the hole and smooth out the edges of the paper inside the hole for the hanger. I love this little tool! It works great for so many things!
As I mentioned above, the 3D designs have really become popular this past year and there are so many different projects you can do with them from ornaments, coffee mugs, tumblers, etc. Some of the designs are created specifically for a sublimation printer, such as the tumbler or coffee mug designs, but here are others that can work for print and cut projects such as cards and more!
I’ll share a few that I’ve had my eye on below. Maybe it will spark a creative idea for you too!
Remember that any “sublimation” design could also be used as a regular printed design as well. A jpeg or png file does not have cut data, so if you want to cut around it you would need to create that cut line by either drawing a shape as I showed above or tracing to get a cut line around it. There is also the Autotrace feature in Silhouette Studio for transparent png files, but it doesn’t always work the best for all projects.
I hope you’ve picked up a few tips or tricks in this tutorial. Please let me know in the comments below if you have any questions.
Save this for future reference by pinning the image below.
Enjoy !
THANK YOU for your support! How can you help? Click HERE & buy a coffee. Every little bit helps with the cost of running the site.
Silhouette Classes
Never stop learning! Let me help you take the anxiety out of learning with Silhouette and get to creating faster! My Silhouette classes are heavily focused on software, so you can take the skills & techniques taught and apply them to many future projects!
**This post may contain affiliate links. What that means is that I may receive compensation if you purchase through the links I have provided. The price you pay for the product or service is not higher but I may get compensated for sharing.
Affiliate links may be present in the following blog post and as an Amazon Associate, I earn from qualifying purchases.
I recorded the Electrostatic Bed demo from Silhouette Summit and shared it on the Silhouette Secrets+ YouTube channel HERE. I loved seeing everything first hand and in action at the Silhouette Summit!
But, until you get the equipment in hand and start to use it, you never really know how it’s going to go. This is new technology and it does have to be set up properly. It is designed to work with thin, smooth materials that can maintain a charge between the ES bed and the material while it’s being cut.
This was the first time in Silhouette’s history that they released the new machines and features at Silhouette Summit. Usually, in the past, there has been a 4-6 month gap between the announcement and when the new items are released.
I received my Silhouette Curio 2 and immediately started testing and seeing what it could do. I have cut vellum, 65 lb. cardstock, 110 lb. cardstock, sticker paper, adhesive vinyl, and copy paper with the Electrostatic (ES) bed so far.
Check out the video – Tips for Success with the New Silhouette Electrostatic (ES) Bed – Cameo 5, Curio 2, and Portrait 4 HERE.
I share how you can be successful with the Electrostatic (ES) Bed. These tips will work for the Electrostatic (ES) Bed no matter which Silhouette machine model you are using it with. I’ve also included a few more tips down below this video in this post as well.
Electrostatic (ES) Bed Tips
The Electrostatic (ES) Bed is powered by the Silhouette machine. This is one reason that the Electrostatic (ES) bed is not compatible with older model Silhouette machines. The older machines do not have the technology in them to send power to the ES bed.
The electrostatic charge has to be built up. The ES bed needs to be turned on to start building up the charge. It takes time, usually less than a minute for the electrostatic charge to build. It is not a slap it and go. You have to set it up properly for success! Place Electrostatic (ES) Protective Sheet on the Bed and smooth out any air bubbles. Make sure that the Electrostatic (ES) Bed has not turned off. In early versions of the software with the Silhouette Curio 2, the ES Bed automatically turns off after the cut and the user will need to turn it back on each time.
Not all materials work with the Electrostatic Bed. Materials need to be completely flat and smooth to be able to hold and maintain the electrostatic charge. Textured materials will not work or maintain that charge to hold it in place while it’s being cut. Smooth materials down on top of the ES Protective Sheet and allow time to build the charge.
Test the materials with your fingertips to see if the materials move. If it moves, it’s not ready. Start again & take the time to build the charge. If the charge is broken at any time while it’s being cut, it will be a lost cut.
Keep the design away from the edges of the materials. If the cut goes over the edge of the material, it can break the electrostatic charge and the material may move.
Not all designs will work well with this new technology. Keep in mind that the smaller the cut pieces are, the less surface area there is for the material to maintain the electrostatic charge. Pieces that are completely cut may move out of place. This may or may not affect the entire cut. If a loose piece of material gets stuck on the blade as it’s cutting, it may hinder the cutting of the blade.
Get extra materials! It is going to take time and practice to learn a new skill and new equipment.
Silhouette Electrostatic Protector Sheets *Free shipping at CrafterCuts with a $35 purchase **Use code SECRETS to save 10% on supplies at CrafterCuts – does not apply to new machine models
And here is one that I just completed this week cutting copy paper using the new IPT technology to cut 2 sheets that are stacked on top of each other. Yes, you read that right! Stacked materials cut at the same time with the Electrostatic Bed. I’ll be sharing more on that soon!
I’ll be adding more information to the blog and Silhouette Secrets+ YouTube channel as I create projects and play with this new technology. Stay tuned for more!
I hope those tips help you get started and creating with your new Silhouette model machines and the Electrostatic (ES) Bed.
Save this for future reference by pinning the image below.
Enjoy !
THANK YOU for your support! How can you help? Click HERE & buy a coffee. Every little bit helps with the cost of running the site.
Silhouette Classes
Never stop learning! Let me help you take the anxiety out of learning with Silhouette and get to creating faster! My Silhouette classes are heavily focused on software, so you can take the skills & techniques taught and apply them to many future projects!
**This post may contain affiliate links. What that means is that I may receive compensation if you purchase through the links I have provided. The price you pay for the product or service is not higher but I may get compensated for sharing.
Check out the new video on the Silhouette Secrets+ YouTube channel HERE showing how to set up in the Silhouette Studio software for the auto crosscut and watch the machine in action and continue reading below for more information below the video link.
Affiliate links may be present in the following blog post and as an Amazon Associate, I earn from qualifying purchases.
The Silhouette Portrait 4 and Silhouette Cameo 5 models are now equipped to cut the vinyl off using the Autoblade after a cut has been completed for certain materials when set up properly.
The setup for the Auto Crosscut is very specific. It is for use with the Autoblade and when cutting off of a material roll such as adhesive vinyl or HTV.
Note: you should never cut completely through a material such as cardstock, etc. without the proper setup for pop-out cutting or when using the Auto Crosscut feature. Cutting through a material without the proper setup can damage your machine. The reason you can cut matless with adhesive vinyl, HTV, and kiss-cut sticker sheets is because you are only cutting through the top layer and not completely through.
On the Page Setup Panel – Tab 1, choose No Mat under #3 and set the custom media height size to the length of the roll you are cutting from on #4.
Click on the Send tab in the top right corner.
Then the following will need to be set up in order for this feature to show up:
Compatible material selected such as Vinyl – Glossy or Heat Transfer Vinyl
Once those things are completed, you will see a Cross Cut window show up below the cut settings on the Simple Tab where this feature can be enabled and adjusted.
Note: if a custom cut setting is used, the Crosscut option will show under the Cut Settings area when setup to cut without a mat.
After the cut is complete, the Silhouette Autoblade will adjust the blade depth for a complete cut through. The Crosscut action will be performed in several cuts so it can keep the material in place while it cuts through. Once complete, the cut vinyl can be pulled from the backside of the machine.
The Crosscut feature is performed in the channel that runs underneath the blade housing, so it does not damage the machine when it cuts completely through.
Save this for future reference by pinning the image below.
Enjoy !
THANK YOU for your support! How can you help? Click HERE & buy a coffee. Every little bit helps with the cost of running the site.
Silhouette Classes
Never stop learning! Let me help you take the anxiety out of learning with Silhouette and get to creating faster! My Silhouette classes are heavily focused on software, so you can take the skills & techniques taught and apply them to many future projects!
**This post may contain affiliate links. What that means is that I may receive compensation if you purchase through the links I have provided. The price you pay for the product or service is not higher but I may get compensated for sharing.
The Silhouette Portrait is a great little machine, especially if you are looking to travel with a cutting machine. It’s light weight and very portable.
Affiliate links may be present in the following blog post and as an Amazon Associate, I earn from qualifying purchases.
I was asked about a storage tote for traveling with the Silhouette Portrait 4 machine and it took me a bit of time to order and find one that worked to fit not just the machine, but also supplies and keep them safe as well.
Silhouette Portrait 4 Cutting mat – NEW! sizing is different than older model Portrait mats *it will take time for all retailers to stock the new cutting mats
The Silhouette Portrait 4 now has a cutting width of 8.5″, which is a change from the older model Silhouette Portrait machines. This does make a difference and the cutting mat looks different, it has a different size adhesive area, and the actual dimensions of the cutting mat are different than older Portrait cutting mats.
The photo below shows a comparison of the older cutting mat and the new Portrait 4 cutting mat. You can see the difference in the design area and the actual size of the cutting mat is different.
This means that if you use an older model cutting mat in the new Silhouette Portrait 4, it will NOT line up with the on screen cutting mat that you see in the Silhouette Software.
This WILL affect your cut placement and print and cut projects!!!
Make sure when you are order additional cutting mats that you are ordering the correct one for your particular Silhouette Portrait model!
Find the Silhouette Portrait 4 cutting mats HERE. It will take time for retailers world wide to get these new cutting mats in stock and have availability.
Find more information on the Silhouette Portrait 4 HERE.
I hope these tips have helped and I can’t wait to see what everyone is creating with their Silhouette machines!
Save this for future reference by pinning the image below.
Enjoy !
THANK YOU for your support! How can you help? Click HERE & buy a coffee. Every little bit helps with the cost of running the site.
Silhouette Classes
Never stop learning! Let me help you take the anxiety out of learning with Silhouette and get to creating faster! My Silhouette classes are heavily focused on software, so you can take the skills & techniques taught and apply them to many future projects!
**This post may contain affiliate links. What that means is that I may receive compensation if you purchase through the links I have provided. The price you pay for the product or service is not higher but I may get compensated for sharing.
This lightweight and portable Silhouette Portrait 4 model cutting machine was announced at the Silhouette Summit in September 2023. It has many improvements over older Portrait model machines.
Affiliate links may be present in the following blog post and as an Amazon Associate, I earn from qualifying purchases.
Find Silhouette supplies at CrafterCuts or Silhouette America – links provided below *user code SECRETS at CrafterCuts to save 10% on supplies (excludes new machines) & free shipping on orders over $35
The right roller can now be moved to multiple locations. To move, lift the lever on top of the right roller and slide it along the roller bar. Close your eyes and slide it and you will feel where it can be locked in place. I find this is the easiest way for a user to actually feel that roller settle in the locations it can be locked in place. Sometimes our eyes can deceive us to think it’s in the position but it’s not quite there.
If cutting a smaller width of material, slide the middle spring guides to the left and position evenly across the width of the material. These spring guides also look different than they did on previous models, but they are designed to help the materials not bubble up in between the rollers. They do NOT provide any actual pressure or downward force, but are there as guides.
The left roller is a stationary roller. Do not force it or you could break the machine.
Here is a closer look at the right roller on the Silhouette Portrait 4. The new design has the rollers behind the roller bar. I would highly recommend keeping the rollers clean and free of adhesive residue as they will be more difficult to clean. Adhesive residue or build up on the rollers can affect the mat and materials feeding properly, which will affect your cut quality as well.
With the new design of the machine and rollers, this also means that the rollers are NOT rolling on the material or the adhesive of the cutting mat! Wahoo! This was one of the things that I did not like on the older Portrait models. My first cut, it cemented my cardstock to the cutting mat because the rollers were on top of the material and the adhesive.
On the right side of the machine are the operational buttons to run the machine.
Repeat Job
Repeat job is back!!!! This was a highly requested feature and it’s back. I rarely used this before, but I did have to test it out and it worked great!
The middle buttons will move the housing location and the pause button in the middle. If you’ve ever tried to pause a cut with a Silhouette machine, you may have noticed that it is NOT automatic. This is because the data has already been sent to the machine and the machine has to complete the cut line that is in process or the data that it has already received before it can pause.
Emergency Stop
Want the job to stop immediately?
Press the power button on the side of the machine quickly and the machine will immediately stop the job. The job is lost and cannot be restarted, but it will immediately stop the cut.
With the implementation of the Emergency Stop, this means that the Power button also operates a bit differently than older models. You will need to hold the power button in for 3 seconds for the machine to turn on and off. This feature is available on the Silhouette Portrait 4, Cameo 5 models, and the Curio 2.
Blade Installation – do not skip this section!!!
One of the most important steps to setting up any Silhouette machine is proper blade installation. You would be amazed at how many users we troubleshoot weekly with that do not have the blade installed or locked in properly. Until that little thing is fixed, a user will have cut issues. It is not hard to install the Silhouette Autoblade, but it is the #1 cut issue we still see for all Silhouette machines.
Pull the front lock out on the housing.
Carefully slide the Silhouette Autoblade down in the housing. The window on the front of the blade should face forward.
Push the Silhouette Autoblade down and carefully lift up on the front of the lock. This will help the blade settle down in the housing.
There should be NO GAP between the lip of the blade and the housing.
Push the front of the housing in to lock the blade in securely. The hooks on the front of the lock should grab the front of the Silhouette Autoblade.
This is the first thing to look at if you ever have cutting issues too! Most cutting issues can be fixed quickly if the user is willing to start at the beginning.
Blade Adjustment Hole
On the left side of the machine is where the blade adjustment hole is located.
This is not a new feature, but it’s worth mentioning. If debris is in that hole or the hole is blocked by the material or mat, then the Autoblade cannot adjust properly. This is something to be aware of and I hate to think how many Autoblades are in the garbage because a user was not aware of this.
If the Silhouette Autoblade is not hitting the hole properly, it will not adjust properly. I would recommend a blade housing reset.
Blade Housing Reset
Check that the blade is installed and locked properly.
Unplug the Silhouette machine.
Then carefully move the blade housing all the way to the right and all the way to the left. Do this 3 more times.
Leave the housing on the right side.
Plug it back in.
Turn the machine on and the housing will reset.
Type out a capital B and send that as a test cut.
Watch the red line inside the window on the front of the blade. Does the red line adjust to the correct number?
This usually corrects most cut issues, but will only work if the blade is installed properly first. Check out my Troubleshooting video HERE for more details & tips too!
Silhouette Portrait 4 Load Line
The Silhouette Portrait 4 has a new clearly marked load line for the cutting mat and materials. I know that does not sound exciting to most, but this is a major improvement in my opinion.
The new load line now is clearly defined and has an arrow that points to it, just like the Silhouette Cameo models. If you have ever seen an older model Portrait, you will know that the load line was not designated at all. It was very confusing for users to know what line to use to load the mat next to.
NEW!!! 8.5″ Cutting Width on the Silhouette Portrait 4
The Silhouette Portrait 4 now has a cutting width of 8.5″ which is an improvement over older models that are only 8″ wide.
The cutting mat is a specific Silhouette Portrait 4 cutting mat that allows for the new 8.5″ width. Make sure when you are ordering additional cutting mats that you are getting the correct one for your machine model.
Find the Silhouette Portrait 4 cutting mats HERE. It will take time for retailers world wide to get these new cutting mats in stock and have availability.
This does make a difference and the cutting mat looks different. It also has a different size adhesive area and the actual dimensions of the cutting mat are different than older Portrait cutting mats.
The photo above shows a comparison of the older cutting mat and the new Portrait 4 cutting mat. You can see the difference in the design area and the actual size of the cutting mat is different.
This means that if you use an older model cutting mat in the new Portrait 4, it will NOT line up with the on screen cutting mat that you see in the Silhouette Software.
This WILL affect your cut placement and print and cut projects!!!
Included with the Silhouette Portrait 4 is a small power terminal shown in the photo above sitting in front of the machine. DO NOT LOSE THIS!!!!
You will not be able to use the Silhouette Heat Pen tools if you lose this little piece.
This little power terminal plugs into the top of the Portrait 4 tool housing and then the Silhouette Heat Pen can be installed in the housing.
This is a removable part so that the lid on the Silhouette Portrait 4 will close. Do not close the machine lid with the power terminal installed for best results. You do not want to damage this area or the power tools many not work properly.
It will connect on the front of the Silhouette Portrait 4 when the cover is removed. Make sure to switch the unlock button on the bottom of the machine prior to trying to remove the cover on the front.
The setup for the Auto Crosscut is very specific. It is for use with the Autoblade and when cutting off of a material roll such as adhesive vinyl or HTV.
Note: you should never cut completely through a material such as cardstock, etc. without the proper setup for pop-out cutting or when using the Auto Crosscut feature or you can damage your machine. The reason you can cut matless with adhesive vinyl, HTV, and kiss-cut sticker sheets is because you are only cutting through the top layer and not completely through.
On the Page Setup Panel – Tab 1, choose No Mat under #3 and set the custom media height size to the length of the roll you are cutting from on #4.
Click on the Send tab in the top right corner.
Then the following will need to be set up in order for this feature to show up:
Compatible material selected such as Vinyl – Glossy or Heat Transfer Vinyl
Once those things are completed, you will see a Cross Cut window show up below the cut settings on the Simple Tab where this feature can be enabled and adjusted.
Note: if a custom cut setting is used, the Crosscut option will show under the Cut Settings area when setup to cut without a mat.
After the cut is complete, the Silhouette Autoblade will adjust the blade depth for a complete cut through. The Crosscut action will be performed in several cuts so it can keep the material in place while it cuts through. Once complete, the cut vinyl can be pulled from the backside of the machine.
The Crosscut feature is performed in the channel that runs underneath the blade housing, so it does not damage the machine when it cuts completely through.
That is a lot of information and new tips for the Silhouette Portrait 4. I hope it helps you to be successful with your Silhouette machine!
Save this for future reference by pinning the image below.
Enjoy !
THANK YOU for your support! How can you help? Click HERE & buy a coffee. Every little bit helps with the cost of running the site.
Silhouette Classes
Never stop learning! Let me help you take the anxiety out of learning with Silhouette and get to creating faster! My Silhouette classes are heavily focused on software, so you can take the skills & techniques taught and apply them to many future projects!
**This post may contain affiliate links. What that means is that I may receive compensation if you purchase through the links I have provided. The price you pay for the product or service is not higher but I may get compensated for sharing.
I have so much fun creating with the Artesprix sublimation products! This month I had a few helpers and that can always make things interesting. We had some good laughs as I enlisted their thumbs to make a Keepsake Ornament using the Artesprix sublimation supplies!
Affiliate links may be present in the following blog post and as an Amazon Associate I earn from qualifying purchases.
I love how this turned out! The best part is – anyone can do it! Yes! YOU!
THANK YOU for your support! How can you help? Click HERE & buy a coffee. Every little bit helps with the cost of running the site.
Silhouette Classes
Never stop learning! Let me help you take the anxiety out of learning with Silhouette and get to creating faster! My Silhouette classes are heavily focused on software, so you can take the skills & techniques taught and apply them to many future projects!
**This post may contain affiliate links. What that means is that I may receive compensation if you purchase through the links I have provided. The price you pay for the product or service is not higher but I may get compensated for sharing.
Want to learn more in Silhouette Studio and start creating your own designs? I have 2 new classes on designing in the Silhouette Studio software available. on the Silhouette Secrets+ Teachable site.
Affiliate links may be present in the following blog post and as an Amazon Associate, I earn from qualifying purchases.
Easily Create a Custom Gift Tag & Keepsake Ornament in Silhouette Studio
This class uses basic tools in the Silhouette Studio software to design custom tags that could be used for a wide variety of projects. While I demonstrate on a 3″ acrylic circle, once you know the tools used and put them together, you can use it for so much more! Shirts, tote bags, ornaments, wood rounds, and more!
And included with the class is a printable guide for tips to cutting small fonts and designs!
Check out the full class description and supply list HERE.
Easily Create Custom Gift Tags & Keepsake Ornaments in Silhouette Studio
Designing in Silhouette Studio – Creating Keepsake Ornament Designs 2
In this next class, we take it a step farther and move beyond just the basics and get into a little more creative designing. We start off with some basic shapes to see how the tools work and then by the end you have drawn your own holly berry wreath design completely from scratch! Yes! YOU!
Once you have the design steps down, you can easily use the skills to create other designs as well. Everyone has the power inside them! We just need to unlock that and that starts with learning how things work in Silhouette Studio.
Check out the full class description and supply list HERE
Let me help you get started with Silhouette faster and learn more! Find all of the current Silhouette classes available on the Silhouette Secrets+ Teachable site HERE.
Save this for future reference by pinning the image below.
Enjoy !
THANK YOU for your support! How can you help? Click HERE & buy a coffee. Every little bit helps with the cost of running the site.
**This post may contain affiliate links. What that means is that I may receive compensation if you purchase through the links I have provided. The price you pay for the product or service is not higher but I may get compensated for sharing.
Cutting small fonts and intricate designs with your Silhouette can be a game-changer for creating professional-looking projects, but it also comes with unique challenges. From selecting the right materials to fine-tuning your machine settings, every detail matters when working with tiny text or delicate patterns. In this ultimate guide, we’ll share proven tips, tricks, and techniques to help you achieve clean, precise cuts every time. Whether you’re crafting personalized gifts, labels, or detailed decorations, these strategies will take your Silhouette skills to the next level. Keep reading to unlock the secrets to cutting small fonts and detailed designs like a pro!
Affiliate links may be present in the following blog post and as an Amazon Associate, I earn from qualifying purchases.
Have you ever tried to cut something small and it just did NOT work? You may have ended up with a mess of whatever material you were cutting. Well, you are not alone! It happens and I have some tips to help!
Silhouette “Secrets” – Tips to Cutting Small Fonts & Designs
Tip #1 – Font Style Matters
Not all font styles are good for cutting small.
An example is distressed fonts – all of those little bits and areas that show up in red will need to be cut. When you make it smaller, it just makes those areas smaller too!
Look at the Edit Points of a design/font. Fonts may need to be ungrouped in order for edit points to show up.
Make a copy of your original text before ungrouping to look at edit points.
Edit points are the data points that the machine uses to cut the file.
Right click Ungroup the text. Double click on the text selected and the Edit Points = gray dots show up. All of those dots are what the machine uses to complete the cut. It has to connect the dots.
If you scale the design down, it does not decrease the number of edit points, it just squishes them into a smaller space. Which can make cutting small or intricate designs even more difficult as the blade is moving to connect those dots in a smaller location.
When the Edit Points are activated, it should open the Edit Points Panel. If not, click on the Edit Points Panel on the left side tool bar.
Simplifying the Edit Points can help to make it cut smoother.
However, you want to compare the original to the simplified version and see if there is any noticeable change in the design itself.
Make a copy of the text before simplifying and then compare the before and after.
Click off of it to deselect it and compare the designs without the edit points active.
Did it change it enough? Did it change it too much?
Some designs/fonts you will see a drastic change and others you may not notice it at all, but it will help in cutting quality.
Here is another example – Giraffe Zentangle Mandala by Wispy Willow Designs is an awesome design. If you have ever worked with a zentangle style design before, you know they can be intricate. This design opens at 12″ tall and here is a look at the edit points that make up this design. They are a necessary part of the design due to the detail of it.
If you scale that design down to 3″ tall, all of those edit points are then squished together.
This is not a design that will not cut well at a small scale. That’s just not how it was designed because of it’s intricate detail. Zentangles are detailed and intricate designs.
In this case, simplifying the edit points probably still won’t yield good results. It was not designed to be cut small, but is amazing at a large size.
Want to learn even more about Edit Points? Check out this tutorial HERE.
Tip #3 – Use a Sharp blade
A sharp blade is going to cut much cleaner than a dull blade.
Having extra blades and cutting mats on hand will save you time, frustration, and money in the long run.
Keep separate blades for different materials. Just like having separate fabric and paper scissors! Different materials dull the blade at a different rate. This can also increase the lifespan on your blades.
Do not try to sharpen the blade. It is a myth that stabbing tin foil sharpens a blade. Metal cutting metal or stabbing metal does not sharpen a blade. That is like cutting a soda can with a kitchen knife, it only dulls it farther. If it does anything at all, it may clean adhesive off the blade or in a lot of cases we see, it can break the tip of your blade off and you end up with more troubles than you started with.
A brand-new blade is a great thing!
I always recommend having extra blades and cutting mats on hand! Grab some extras at CrafterCuts and use my code SECRETS to save 10% HERE. Free shipping with orders of $35 or more at CrafterCuts! Or grab some extras from Silhouette America HERE and use code SECRETS to save 5%.
Tip #4 – Test Cut, Test Cut, Test Cut!!!
When cutting small fonts, use that font as your test cut.
Type out a capital B to use as your test cut. It has straight lines, corners, and curves and you can see how it will be cut.
Using high quality products can make all the difference! Having issues, try a new brand or a new piece.
Vinyl does have a shelf life and it can depend on how it’s stored. I’ve had some vinyl that I’ve used 7 years later, but others that didn’t last 3 years.
Usually, the way I know it’s no longer good is it is very difficult to release from the backing and I am having to work harder at it than I should.
Small dots or periods are famous for getting lost. Simply make copies and cut a line of dots to add to your project as needed.
If one letter gets messed up, simply re-cut one letter to add to the project. No need to recut the entire design.
Discover even more with the step-by-step class on the Silhouette Secrets+ Teachable site, where I guide you through creating the designs featured above. Check out the Easily Create Custom Gift Tags & Keepsake Ornaments in Silhouette class to bring your creativity to life! View all of the classes available HERE.
Tip #8 – Reverse Weeding
After cutting, weed the large areas
Then place the transfer tape onto the entire design.
Weed it from the transfer tape.
Now, this method takes practice. I hated it the first time I tried it because I did not like that the transfer tape stuck to my hand while weeding. However, it has come in handy with some projects I’ve done and that was the only way I could get it to transfer properly.
I hope those tips help you be successful with future cuts when working with small details and fonts!
Save this for future reference by pinning the image below.
Enjoy !
THANK YOU for your support! How can you help? Click HERE & buy a coffee. Every little bit helps with the cost of running the site.
Silhouette Classes
Never stop learning! Let me help you take the anxiety out of learning with Silhouette and get to creating faster! My Silhouette classes are heavily focused on software, so you can take the skills & techniques taught and apply them to many future projects!
**This post may contain affiliate links. What that means is that I may receive compensation if you purchase through the links I have provided. The price you pay for the product or service is not higher but I may get compensated for sharing.
Take your custom wine-themed kitchen towels to the next level with the perfect finishing touches! Whether you’re crafting these towels as gifts or to enhance your own kitchen décor, adding one final touch can transform your DIY project into a efficient tool.
Affiliate links may be present in the following blog post and as an Amazon Associate, I earn from qualifying purchases.
Do you have projects sitting around that just need that finishing touch? Raising my hand over here.
These wine themed kitchen towels have been hanging out in my studio since I created them in June for the Artesprix YouTube video found HERE.
I found an idea on Pinterest and wanted to add to it. It was so simple and I don’t know why I didn’t get it done sooner.
I picked up some black pot holders and then pinned it to the middle of the hand towel.
Then simply sewed a line right down the middle and added a button on the backside for the loop to hook onto.
Ta-da! Done! Hanging in my kitchen and so handy on my oven door.
Project done! Wahoo! Crossing things off the list… not near as fast as I add them to the list, but I’m going to chalk this up as a win! It’s done.
Check out all the details on what I used to create these custom hand towels HERE.
Save this for future reference by pinning the image below.
Enjoy !
THANK YOU for your support! How can you help? Click HERE & buy a coffee. Every little bit helps with the cost of running the site.
Silhouette Classes
Never stop learning! Let me help you take the anxiety out of learning with Silhouette and get to creating faster! My Silhouette classes are heavily focused on software, so you can take the skills & techniques taught and apply them to many future projects!
**This post may contain affiliate links. What that means is that I may receive compensation if you purchase through the links I have provided. The price you pay for the product or service is not higher but I may get compensated for sharing.
We troubleshoot with thousands of users each week and we have seen some very dirty machines. This will affect the lifespan and usage of your Silhouette machines! There is no way to sugar coat that! Especially now with the new technology released.
The #1 biggest thing is to keep your machines clean and free of debris. Especially with the new powered tool housing and power plug on the Cameo 5, Curio 2, and Portrait 4. Any dirt or debris in that power housing plug and it can affect your results and success!
I recommend keeping the lid on your machine for the Silhouette Cameo 5 and Portrait 4 closed when it’s not in use.
A Silhouette machine dust cover is a great idea too, especially if you have a workspace that has a lot of particles in the air. The Cameo 4 dust covers fit nicely over the Cameo 5 machines. They are pretty similar in size, just a few differences in the design.
With the Silhouette Curio 2, keep it free and clear of debris and materials in the way of the housing and channels on the machine. Any dirt, debris, or materials in the channels can interfere with the Curio 2 function and housing moving freely during use.
I do not recommend storing anything on top of the Silhouette Curio 2 or it could affect the machine function.
For my Curio 2 with acrylic etching/engraving, I’ve been using a handheld vacuum to help with the clean up after the etch.
Silhouette Electrostatic (ES) Bed
The Silhouette Electrostatic (ES) Bed is new! It’s awesome! Keep the boxes if you have not already thrown those away. The Electrostatic Bed should be stored completely flat and I do not recommend storing things on top of it.
The Silhouette Electrostatic (ES) Bed is very specific in that it needs to be completely flat in order to function properly and maintain the charge. Any warping of the bed due to improper storage or materials placed on it over time, can affect the success of using it.
Keep the boxes and packing materials for storage on the Silhouette Electrostatic (ES) Bed. This will be the best protection that you can use and you know it is stored safely when it’s placed back in the box with the packaging foam.
Any damage to the Silhouette Electrostatic (ES) Bed and you will need to replace it. Improper storage of the bed is not a machine fault, but is the responsibility of the user.
The new Silhouette Power Tools are a bigger tool housing than previous Silhouette tools. This means that they may not fit in the previous tool storage that a user had.
The storage of these new power tools will be very important because you not only have to protect the Auto Tool Detection metal plate on the backside of the tool, but you also have a Power Plug on the backside of the tool that needs to be protected as well.
I found a couple options for storage for the tools and they are customizable for what each user might need.
Look around your house and see if there is something you can repurpose for tool storage. You may already have an option that works for the tools you have!
Non-power Silhouette Tool Storage Options
This is the tool holder that I’ve been using for several years with the non-power Silhouette tools such as the Autoblade, Rotary blade, and Kraft blades. As you can see, I have gathered a selection of tools over the years as I’m writing tutorials and teaching classes.
This tool holder has worked for me so far with the smaller blade housings.
Additional Care Tips
Keep the rollers clean of adhesive. The rollers of the Cameo 5 and Portrait 4 should not be rolling on the adhesive of the cutting mat or it can pick up adhesive residue and affect your future cut projects.
All of these tips are 100% the user’s responsibility. You have invested in these machines and with proper care, use, and storage the Silhouette machines, tools, and accessories should work well for you.
Save this for future reference by pinning the image below.
Enjoy !
THANK YOU for your support! How can you help? Click HERE & buy a coffee. Every little bit helps with the cost of running the site.
Silhouette Classes
Never stop learning! Let me help you take the anxiety out of learning with Silhouette and get to creating faster! My Silhouette classes are heavily focused on software, so you can take the skills & techniques taught and apply them to many future projects!
**This post may contain affiliate links. What that means is that I may receive compensation if you purchase through the links I have provided. The price you pay for the product or service is not higher but I may get compensated for sharing.
Affiliate links may be present in the following blog post and as an Amazon Associate, I earn from qualifying purchases.
Silhouette Electrostatic Bed Installation & Tips
New equipment is always fun to get to know and play around with. I will admit that when I opened the box for the Silhouette Electrostatic Bed, I had a bit of a questionable moment as I saw something in the box I didn’t know about.
I had no idea what the “guard tape” was. There is an instruction sheet in the box. Make sure to keep the instructions, your box, and this guard tape for future use.
The Electrostatic Bed is awesome! I have loved creating with some delicate materials using it and can’t wait to share more!
If you are a Silhouette Curio 2 owner, the Electrostatic Bed comes with the machine. Check out additional information on the Silhouette Curio 2 HERE.
Save this for future reference by pinning the image below.
Enjoy !
THANK YOU for your support! How can you help? Click HERE & buy a coffee. Every little bit helps with the cost of running the site.
Silhouette Classes
Never stop learning! Let me help you take the anxiety out of learning with Silhouette and get to creating faster! My Silhouette classes are heavily focused on software, so you can take the skills & techniques taught and apply them to many future projects!
**This post may contain affiliate links. What that means is that I may receive compensation if you purchase through the links I have provided. The price you pay for the product or service is not higher but I may get compensated for sharing.
Affiliate links may be present in the following blog post and as an Amazon Associate, I earn from qualifying purchases.
I think every project I start seems small at the beginning, but seems to grow bigger than I originally thought. It is no different with this list of supplies I use in my projects and have in my studio.
I am asked all the time what I recommend and use, so I have added a header on the website with a list of supplies that I have in my studio and use.
I am a big fan of use what you have, so if you have your favorite tools, use them! I have found new favorites over the years of project creation and thought I’d share. Do you have to use the same exact tools as me? NO! Use what you have, what you love, and what works best for you! I am simply sharing what I use and will add to this list as I find new favorites!
I’d love to hear what are some of your favorite tools! Comment below and let me know!
Save this for future reference by pinning the image below.
Enjoy !
THANK YOU for your support! How can you help? Click HERE & buy a coffee. Every little bit helps with the cost of running the site.
Silhouette Classes
Never stop learning! Let me help you take the anxiety out of learning with Silhouette and get to creating faster! My Silhouette classes are heavily focused on software, so you can take the skills & techniques taught and apply them to many future projects!
**This post may contain affiliate links. What that means is that I may receive compensation if you purchase through the links I have provided. The price you pay for the product or service is not higher but I may get compensated for sharing.
Affiliate links may be present in the following blog post and as an Amazon Associate I earn from qualifying purchases.
The Silhouette Curio 2 is a unique machine that I am enjoying so much! Just like it’s predecessor, it functions a bit differently than the Silhouette Cameo and Portrait model machines. I am not sure it really should have been called a curio, but it is what it is and I don’t control that. What I can control is me and what I’m creating.
I am having a blast learning it and I do think that anyone can use it and learn it if they are willing to take the time to! That is why I’ve created classes to help Silhouette Curio 2 users get started faster and take the guess work out of it. Less anxiety in learning a new machine! I’ve made the mistakes and I am showing step-by-step how you can be successful with your Curio 2 in my classes.
set up an engrave/etch for the Silhouette Power Engrave Tool
create a custom setting for acrylic etching/engrave
do a manual height detection and why I love it!
and more! Bonus tips & demos included as well!
Silhouette Curio 2 – Beginner Acrylic Engrave Class
Step-by-step class for setting up the Curio 2 for exact placement on blanks, creating a template, creating a custom setting for the Acrylic Engrave, auto & manual height detection and why you would use either, engrave tips, and more!
Handheld vacuum or wet wipes – do not inhale or get the acrylic dust in your eyes
Small paint brush to clean off engraving tool
Save this for future reference by pinning the image below.
Enjoy !
THANK YOU for your support! How can you help? Click HERE & buy a coffee. Every little bit helps with the cost of running the site.
Silhouette Classes
Never stop learning! Let me help you take the anxiety out of learning with Silhouette and get to creating faster! My Silhouette classes are heavily focused on software, so you can take the skills & techniques taught and apply them to many future projects!
**This post may contain affiliate links. What that means is that I may receive compensation if you purchase through the links I have provided. The price you pay for the product or service is not higher but I may get compensated for sharing.
Affiliate links may be present in the following blog post and as an Amazon Associate, I earn from qualifying purchases.
Just popping in to share a couple Halloween signs I finished up this week. I mean, there is nothing like decorating 2 days before Halloween right?
I have been collecting round door hangers designs by Diva Watts Designs for a long time and finally just told myself to stop everything else and get it done! She has so many different design styles available, make sure you go check out her store HERE. I’ve already got a list started for Fall and Christmas.
I started by painting the boards. I painted both sides and let it dry overnight.
While the boards were drying, I cut all of the Oracal adhesive vinyl for each sign with the Silhouette Cameo 5 and organized them into piles. This way it was ready for when the boards were completely dry.
And then I started adding each piece to transfer tape and applying to each sign. It went pretty quick, since I had it all cut and organized by sign.
I thought this one was appropriate for my son’s room.
I just loved the look of this one with the eyeballs.
But this one I think is my favorite. I think it just may be because it has so many pieces to puzzle together and it wasn’t that hard.
And this one was just dying to come out….
Hinge Method
Have you ever used the hinge method?
This allows you to apply a small section of the design and get it placed without committing everything at once.
I removed all of the backing off of the vinyl and then cut the backing into sections. Then removed only the top section and lined it up.
This allowed for easier positioning and I didn’t have to commit the entire design all at one time.
Then I removed each section and smoothed it down to the wood round.
So fun! Can’t wait to make more! I may need to buy another package of wood rounds as I keep seeing more doors in my house that need a sign.
Save this for future reference by pinning the image below.
Enjoy !
THANK YOU for your support! How can you help? Click HERE & buy a coffee. Every little bit helps with the cost of running the site.
Silhouette Classes
Never stop learning! Let me help you take the anxiety out of learning with Silhouette and get to creating faster! My Silhouette classes are heavily focused on software, so you can take the skills & techniques taught and apply them to many future projects!
**This post may contain affiliate links. What that means is that I may receive compensation if you purchase through the links I have provided. The price you pay for the product or service is not higher but I may get compensated for sharing.
Affiliate links may be present in the following blog post and as an Amazon Associate, I earn from qualifying purchases.
I’ve been testing out the new heat pen and wanted to share how to set it up in the Silhouette software. I will be demonstrating on the Curio 2, but the setup process is the same in the Silhouette software no matter which machine you are using that is compatible.
This written tutorial will be photo heavy. I also have a video tutorial on the Silhouette Secrets+ YouTube channel HERE and a printable PDF available as a free download exclusively for confirmed newsletter subscribers.
Step 1 – Set up cutting mat by placing cardstock on the cutting mat.
For Curio 2 users only – tape Silhouette cutting mat to debris tray securely. It is NOT recommended to use the heat pen on top of the electrostatic bed. You do not want to damage the electrostatic bed or it will not function properly and will need to be replaced.
The Silhouette Heat Pen setincludes a 1 mm heat pen, 2.5 mm heat pen, roll of Silhouette masking tape, roll of gold foil, and roll of silver foil. 0.5 mm, 1 mm, and 2.5 mm heat pen, roll of Silhouette masking tape, roll of gold foil, and a roll of silver foil.
I used the 2.5 mm heat pen and the gold foil for this tutorial.
The Portrait 4 only has 1 tool housing and will need the power adapter installed prior to installing the Silhouette heat pen (power adapter is included with the Portrait 4 – do not throw it away or lose it). Check out the Portrait 4 unboxing HERE for more information.
Do not worry if the light does not turn on immediately on the front of the Heat Pen. It will come on as the project is set up.
Step 4 – Set up design in the Silhouette software to foil & then cut. You do not want to cut the foil. Silhouette makes it easy for us to set it up for one action and then the other.
First, set up the Page Setup Panel for the machine you are using, the cardstock size and orientation.
Placing the design at the bottom of the sheet of material can make it easier to set up the foiling process and you don’t have to work around the housing. With the Cameo and Portrait machines, it will also make it easier to remove the foil as you do not want to unload the mat between the foiling and cut process.
Select the design and open the Specialty Tools Panel in the top right corner, directly below the Page Setup Panel. Choose the Heat Pen Panel and choose your fill pattern and spacing. I used the cross-hatched pattern and the default fill which showed as 0.016″.
Then I changed the line color of my foiling design to blue using the QAT Line Color option in the top left corner. This is going to allow us to use the Send by Line Color option and set up the design for foiling first and the cut second.
Click the Send button in the top right corner.
Choose the Line option at the top right of the Send tab. Uncheck the red color. Keep the blue color checked and select the “2” option for Tool 2.
*Tip – I do not use the pause option between foiling and cutting as pause does not always work properly.
When the Silhouette Heat Pen is recognized in the software, a pop up will come up and ask if you want to start heating the Heat Pen.
There is no default material setting for the Silhouette Heat Pen currently in the software, but that is no problem. We can create one simply by clicking on the More button in the bottom right of the Send tab. This opens up the Advanced Material Settings and we can set up a material for our foiling.
Click the plus sign on the right side to create a new material. Name the new material to designate what you want. Choose the machine model when asked and then select Carriage 2.
Next, select the larger + sign and select Add Foil Action.
With Carriage 2 still selected, click on the Sketch Action and choose Remove Action.
Adjust the settings for the foil, choose Save, and click the X in the top right corner.
I started with a Force of 10. The only way to know what will work for your material, foil, design, and heat pen is to test it. Start with a small design and test, test, test!
Next, select the new material you created. The setting will be at the bottom of the materials list as a user defined setting.
Verify that the correct color is the one you are changing and that the blue is the color that will be sent to foil.
Step 5 – While the pen is heating, add foil on top of the cardstock in the exact location of the design.
Start by taping the diagonal corners and pulling it as smooth as possible.
Then tape the other 2 corners. Adjust as needed until it is securely held and as smooth as possible. Any movement in the foil can cause the heat pen to catch and the project to be lost.
Step 6 – When the Silhouette Heat Pen shows as Ready, click the Send button to send the job to foil.
If using the Silhouette Curio 2, you will need to do the manual height detection. The height detection does not work accurately on clear or shiny surfaces, so you want to follow the directions to manually detect the height in the software. Check out the video tutorial for a visual on how I do this HERE.
With the Heat Pen set up properly, the auto height detection is automatically disabled to allow for you to set the height manually. This is important to get an accurate reading of the thickness of the material with the Curio 2.
Peek at foiling job when complete. Sometimes if it didn’t foil properly, you could send again if you don’t move the foil too much.
If it’s successful, remove the tape, save and reuse it.
Uncheck the blue cut line and check the red cut line. The blue lines will turn off and the bold red cut line should turn on. Select the appropriate cut setting for your material. Then click Send.
Step 8 – Carefully remove the cut piece.
Keep in mind that if you have the force too high, it can cement the cardstock down to the cutting mat. Be careful removing it and a Silhouette spatula works nicely to help lift it without damaging it.
Save this for future reference by pinning the image below.
Enjoy !
THANK YOU for your support! How can you help? Click HERE & buy a coffee. Every little bit helps with the cost of running the site.
Silhouette Classes
Never stop learning! Let me help you take the anxiety out of learning with Silhouette and get to creating faster! My Silhouette classes are heavily focused on software, so you can take the skills & techniques taught and apply them to many future projects!
**This post may contain affiliate links. What that means is that I may receive compensation if you purchase through the links I have provided. The price you pay for the product or service is not higher but I may get compensated for sharing.
Affiliate links may be present in the following blog post and as an Amazon Associate I earn from qualifying purchases.
This video – whew! If it was going to go wrong, it was going to happen on video! Not just the video but in the editing process too! I had to edit this one twice because my editing software deleted the beginning and I didn’t notice until I was at the end.
Some weeks go smoothly and others not so much – but I got there in the end!
And I’ve been successfully using my Silhouette Cameo 5 since this video was recorded. I have cut more Siser Glow HTV and even used it to sketch out some Halloween shirts in an Artesprix Sublimation Marker video I did this month! It worked beautifully!
Here is a look at my successful cut – the 2nd go around. I decided to keep it all in the video and show you the reality of what happens. It does not always go 100% perfect all the time! I mess up, my machine doesn’t cut right, firmware doesn’t update by Bluetooth – everything that happens to users that we troubleshoot, we encounter too!
The new Silhouette Cameo 5 has some new features: – newly designed roller bar – new rollers – new places the rollers can be locked in place – repeat job (highly requested!!!) – quieter operation – new powered housing in Tool 2 new tools! – front crosscutter option (more on that in the future) – emergency stop (which I’ve already used several times on all my new machines) and more!!! I cannot wait to share more!!!
Another new thing that Silhouette has been working on is that the firmware updates for the Cameo 5, Portrait 4, and Curio 2 will be able to update through the Bluetooth connection. On previous Silhouette model machines, it had to be done through a USB connection and was the only way it would update. An internet connection is required to complete a firmware update.
This is great news! However, I do want to note as you’ll see in the video, the current version of the software is not always successful in this and we have reported that. I did have to connect by USB cable in order to complete that. But, it is great that it will be an option moving forward.
Save this for future reference by pinning the image below.
Enjoy !
THANK YOU for your support! How can you help? Click HERE & buy a coffee. Every little bit helps with the cost of running the site.
Silhouette Classes
Never stop learning! Let me help you take the anxiety out of learning with Silhouette and get to creating faster! My Silhouette classes are heavily focused on software, so you can take the skills & techniques taught and apply them to many future projects!
**This post may contain affiliate links. What that means is that I may receive compensation if you purchase through the links I have provided. The price you pay for the product or service is not higher but I may get compensated for sharing.
And I grabbed one of my little monsters to do a little photo shoot with. This little monster also helped me in the brainstorming behind the project this month as well.
Such a good little monster.
She even tried to bring in the model from last months Artesprix video but he wasn’t feeling like a photo shoot today.
I’ve had so much fun creating and thinking of new ideas to make with the Artesprix sublimation products!
THANK YOU for your support! How can you help? Click HERE & buy a coffee. Every little bit helps with the cost of running the site.
Silhouette Classes
Never stop learning! Let me help you take the anxiety out of learning with Silhouette and get to creating faster! My Silhouette classes are heavily focused on software, so you can take the skills & techniques taught and apply them to many future projects!
**This post may contain affiliate links. What that means is that I may receive compensation if you purchase through the links I have provided. The price you pay for the product or service is not higher but I may get compensated for sharing.
Affiliate links may be present in the following blog post and as an Amazon Associate I earn from qualifying purchases.
Silhouette Curio 2 – Resources
The Silhouette Curio 2 is new but I have resources that can help! I have been having a lot of fun getting to know this new machine and want to share some things that can help you!
If you have happened on this page before getting a Silhouette Curio 2, you’ll be off to a great start with this information for when you receive it. You can find the Curio 2 at CrafterCuts HERE.
Silhouette Curio 2 Manual
The new Silhouette machines now have a QR code on the side of the box and that should be your first step when you open the box. It will help in getting setup with the new machine and your Silhouette account.
The Silhouette America website also has additional information about the Curio 2 in the Support area. These topics are usually frequently asked questions that Silhouette Support gets asked over and over, so it’s a great resource to check out and see if your answer is there before you contact Silhouette Support.
There is no need to Log in, simply type “Curio 2” into the search box and all the articles about the Curio 2 will pop up.
The information provided here can be very helpful and save you from doing things with your machine that it was not designed or tested for. Such as etching with the Tool 1 housing on the Curio 2.
My goal as an instructor is to help users have the best experience they can. I don’t want to be responsible for any issues you encounter with your machine, so you will not see me instruct or recommend techniques with your machine that could have an effect on the warranty or the lifespan of your machine. Others don’t always consider this when they advise a user to do it. As a Silhouette instructor, I feel I just can’t do that. Your experience and being able to get help when you have a problem matter to me.
I hope you will check out the Silhouette Support Freshdesk for more information! It is an important resource that I use ALL THE TIME!
I have more tips for this resource in this post HERE.
Make sure to Like, Subscribe, and click the bell for notifications so you don’t miss anything. It is also a big help to me as a creator as well. The more people watch, interact, like, and comment on a video helps the algorithms show others more.
If you are looking to get started faster and avoid the guessing game, I have also released step-by-step Silhouette Curio 2 classes.
Silhouette Curio 2 First Cuts Step-by-Step
Step-by-step video class to getting started with the Silhouette Curio 2. Learn about proper setup for the Electrostatic Bed, about IPT, and complete the first cuts with the Curio 2. Click below for the full class description.
Step-by-step class to complete 3 projects with the Curio 2 right out of the box. Cutting vellum with the electrostatic bed, perfect print and cut, sketching on thicker materials, and creating templates for exact placement. Click below for the full class description.
Silhouette Curio 2 – Beginner Acrylic Engrave Class
Step-by-step class for setting up the Curio 2 for exact placement on blanks, creating a template, creating a custom setting for the Acrylic Engrave, auto & manual height detection and why you would use either, engrave tips, and more!
Never stop learning! Let me help you take the anxiety out of learning with Silhouette and get to creating faster! My Silhouette classes are heavily focused on software, so you can take the skills & techniques taught and apply them to many future projects!
I hope you have as much fun with your Silhouette Curio 2 as I have been! I’ll be adding additional resources and classes soon – Stay tuned!
Save this for future reference by pinning the image below.
Enjoy !
THANK YOU for your support! How can you help? Click HERE & buy a coffee. Every little bit helps with the cost of running the site.
**This post may contain affiliate links. What that means is that I may receive compensation if you purchase through the links I have provided. The price you pay for the product or service is not higher but I may get compensated for sharing.
What can you do with the Silhouette Curio 2 right out of the box? LOTS!
I have just released the new Silhouette Curio 2 – Out-of-the-box class where you will complete 3 projects step-by-step and learn all about your Curio 2 and setting yourself up for success! No power tools needed!
Silhouette Curio 2 – Out-of-the-Box Class
The first project is creating vellum flowers using the new electrostatic bed on the Silhouette Curio 2. In the class, I’ll share 2 ways you can cut thin, delicate materials on the ES bed. We will look at the differences in a regular cut and the new IPT (Intellectual Path Technology) method. You might find that this new method is successful for more materials that previously did not have a high success rate.
The second project is setting up a print and cut file for a successful cut with sticker paper. While it may seem very basic in written word, I’m sharing my tips for success and the more you can practice with the Silhouette Curio 2 and the electrostatic bed, the more successful you will be in your future projects.
The third project is utilizing the new 20 mm clearance on the Silhouette Curio 2 by sketching on thicker materials. I will share tips for the new height detection, how to perform a manual height detection exactly on your project, and how to create a template so you can get exact placement for your designs on your material. I’ll be showing several different thicknesses in materials and you will have options for this class depending on what you want to sketch on and try first.
And I couldn’t stop sharing, so there are some additional bonus sections in this Curio 2 – Out-of-the-box class where I’m sharing even more tips too!
What you’ll also learn in the class is exactly how I troubleshoot issues when they do come up. You will encounter issues or have times that a project just doesn’t turn out. I did and show how I worked through those and explain why they might happen as well.
I hope you’ll join me in this class to get started making fabulous projects with your Silhouette Curio 2.
Silhouette Curio 2 – Out-of-the-box Class
Step-by-step class to complete 3 projects with the Curio 2 right out of the box. Cutting vellum with the electrostatic bed, perfect print and cut, sketching on thicker materials, and creating templates for exact placement. Click below for the full class description.
I’ve had a blast creating with the Silhouette Curio 2 and I can’t wait to see what you create with it!
Affiliate links may be present in the following blog post and as an Amazon Associate I earn from qualifying purchases.
If you want to add the new Silhouette Curio 2 to your toolbox right now, you can find it HERE.
Save this for future reference by pinning the image below.
Enjoy !
THANK YOU for your support! How can you help? Click HERE & buy a coffee. Every little bit helps with the cost of running the site.
Silhouette Classes
Never stop learning! Let me help you take the anxiety out of learning with Silhouette and get to creating faster! My Silhouette classes are heavily focused on software, so you can take the skills & techniques taught and apply them to many future projects!
**This post may contain affiliate links. What that means is that I may receive compensation if you purchase through the links I have provided. The price you pay for the product or service is not higher but I may get compensated for sharing.
I have been having so much fun creating with the Silhouette Curio 2 and seeing what it can do right out of the box. Let me help you get set up for success and get started with the Silhouette Curio 2 quickly in this step-by-step First Cuts Class!
In this step-by-step video class, we dive into the exciting world of the Curio 2 and its electrostatic bed. You will learn how to set up the Curio 2 with the electrostatic bed, ES protective sheet, and copy paper to ensure successful cuts. Additionally, we will explore two different cutting techniques using the electrostatic bed, including a regular cut and a more detailed cut. I will demonstrate and explain the importance of Intelligent Path Technology (IPT) and how it can contribute to your cutting success.
This class is designed to help you get started quickly with your new Silhouette Curio 2 and set up properly for successful cuts.
Silhouette Curio 2 First Cuts Step-by-Step
Step-by-step video class to getting started with the Silhouette Curio 2. Learn about proper setup for the Electrostatic Bed, about IPT, and complete the first cuts with the Curio 2. Click below for the full class description.
Save this for future reference by pinning the image below.
Enjoy !
THANK YOU for your support! How can you help? Click HERE & buy a coffee. Every little bit helps with the cost of running the site.
Silhouette Classes
Never stop learning! Let me help you take the anxiety out of learning with Silhouette and get to creating faster! My Silhouette classes are heavily focused on software, so you can take the skills & techniques taught and apply them to many future projects!
**This post may contain affiliate links. What that means is that I may receive compensation if you purchase through the links I have provided. The price you pay for the product or service is not higher but I may get compensated for sharing.
I’ve had so much fun with the Siser Glow HTV! If you missed Part 1 – check it out HERE. Siser Glow HTV can be cut with any cutting machine and I was swapping back and forth in my creations between Silhouette and Siser machines. Sometimes I had both going at the same time.
Affiliate links may be present in the following blog post and as an Amazon Associate I earn from qualifying purchases.
I had Siser Juliet set up in one room cutting away, while my Silhouette Cameo was cutting next to my computer (shown in Siser Glow HTV Part 1). With the Siser Juliet connected through WIFI, I regularly cut from one room to the next. The Juliet roll holder came in handy for these projects and my rolls of Siser Glow HTV.
One of the most important steps you can do is – test cut, test cut, test cut. It seems like such a basic step, but it can save you!!! Siser machines make it so easy to perform this simple action directly on the touchscreen and it will save you so much in time, materials, and frustration.
I think I found my new favorite shirt for awhile. I’ve been collecting these designs by Sophie Gallo just waiting for the perfect projects. Find this design HERE. Here is a look at the back of the shirt.
I don’t know why I have never really decorated the back of my shirts and I hadn’t ever though about it until I started following MammaBearKay and watching her post her shirts. She runs an awesome business with adult humor shirts.
Here is a look at the Siser Glow HTV in the dark.
And the same shirt under the blacklight.
I’ve already several compliments on it when I have worn it out. Everyone gets a good laugh.
Here is a look at the front. I just took the little guy out of the original design and cut him smaller for the front. If I did this over, I think I’d put him on the other side, but it’s done now and I can always make another.
Let’s light him up!
After dark
And under the blacklight.
But I didn’t stop there…..
My son loves games, so this design from Leonardo Design Studio was perfect!
What kid doesn’t like a glow-in-the-dark shirt? Unless they are playing hide-and-seek or kick the can of course!
I was having so much fun creating. Little green men should glow right?
And I couldn’t leave Siser Romeo out of the fun! As soon as I had the Siser Glow HTV in my hands I had a BIG idea. It was only after I created the design that I realized I didn’t have Siser Glow HTV in the size I needed. So I called in a special request at The Vinyl Spectrum and ordered larger sizes.
Save this for future reference by pinning the image below.
If you missed Part 1 of the Siser Glow HTV – check it out HERE.
Enjoy !
THANK YOU for your support! How can you help? Click HERE & buy a coffee. Every little bit helps with the cost of running the site.
Silhouette Classes
Never stop learning! Let me help you take the anxiety out of learning with Silhouette and get to creating faster! My Silhouette classes are heavily focused on software, so you can take the skills & techniques taught and apply them to many future projects!
**This post may contain affiliate links. What that means is that I may receive compensation if you purchase through the links I have provided. The price you pay for the product or service is not higher but I may get compensated for sharing.
I have been having a lot of fun…. maybe too much, but once I get started, it’s hard to stop.
Here is a little behind-the-scenes look at what my studio looked like a few weeks back when I was in the middle of all my creations.
Affiliate links may be present in the following blog post and as an Amazon Associate I earn from qualifying purchases.
Siser Easy Glow HTV arrived and I went creative crazy! So many ideas came to mind and I just started designing and cutting. I have lots I want to share with you, but I’ll have to split it into 2 parts to share it all. I may have also made myself my new favorite shirt too! (see Siser Glow Part 2)
The first thing to do is test cut! Let me say it again so it sinks in – test cut, test cut, test cut. I started with the recommended settings on the Siser website for Easy Glow and did my test cuts. Your machine, blade life, and many other factors go into what cut settings will work for you in that moment.
For tips more tips that will save you time and frustration check out this post on Test Cuts and also Perfect Cut Settings.
And then I was off and cutting once I knew I wouldn’t waste materials. My kids are getting older and Trick or Treating is still big in our area, no matter their age. But the little cute plastic buckets aren’t doing it anymore.
Check out this awesome video from Siser North America – I love it!
Grab some Siser Glow HTV and see what creative ideas you can come up with! It is currently available in 5 colors. I’ve included my supply list below for these new trick or treat bags.
Save this for future reference by pinning the image below.
Want more tips, projects, and tutorials delivered right to your inbox? Never miss out of information by signing up for the Silhouette Secrets+ Newsletter. Every Friday (or that’s my goal), I will have a new newsletter released sharing Silhouette information that can help you in your projects and learning more! Sign up below and make sure to confirm your subscription to get the newsletter!
Silhouette Secrets+ Newsletter
Never miss out on the news, tips, “secrets”, deals, classes, and more that I share on Silhouette Secrets+. Sign up for the newsletter and get information delivered to your inbox every Friday. Unsubscribe at anytime.
THANK YOU for your support! How can you help? Click HERE & buy a coffee. Every little bit helps with the cost of running the site.
Silhouette Classes
Never stop learning! Let me help you take the anxiety out of learning with Silhouette and get to creating faster! My Silhouette classes are heavily focused on software, so you can take the skills & techniques taught and apply them to many future projects!
**This post may contain affiliate links. What that means is that I may receive compensation if you purchase through the links I have provided. The price you pay for the product or service is not higher but I may get compensated for sharing.
Affiliate links may be present in the following blog post and as an Amazon Associate, I earn from qualifying purchases.
One of the most asked questions we see is about software upgrades and unlocking features in the Silhouette Studio software.
Silhouette Software Upgrades
Software upgrades can be purchased through an authorized Silhouette retailer. Please be careful buying through sites like Etsy, etc. as they can sometime not be the real deal or exactly as advertised. Look for reviews first.
Sales happen often – check each one to see where you might score the best deal!
What is an upgrade?
A software upgrade is a code you purchase that unlocks additional features in the software. It is a one-time fee that can be active on up to 3 computers per code.
I highly recommend at least the Designer Edition upgrade for all of my students. It makes life easier and saves you time and headache. Just being able to open a SVG file and cut is well worth it.
But I LOVE the Business Edition upgrade because it unlocks it ALL and I never have to question if some tool/feature is available to me. Both are well worth the investment!
Don’t let the name “Business” edition fool you though – you do not have to have a business to use it or have it be useful. There are just some features that are helpful to those that run a business such as using multiple machines.
If you have the basic (free) software, you will want to purchase 1 of 3 options depending on what upgrade you want to go to: Option 1 – Silhouette Studio to Designer Edition (highly recommend at least this) Option 2 – Silhouette Studio to Designer Plus (unlocks a few more features – see below) In all honesty, if you are upgrading to Designer Edition Plus, you might as well go all the way and unlock it all Option 3 – Silhouette Studio to Business Edition (unlocks it all)
Now here is the important part, if you already have an upgrade, you only need to purchase the step up to the next level you want.
For instance, if you already have the Designer Edition upgrade but you want to go to Business Edition, you want to buy the Designer Edition to Business Edition upgrade. You do not need to buy the full upgrade. You would purchase the level that you need to go from to the level you want to be at. On the Silhouette website, you simply select the Business Edition upgrade, and it will recognize which upgrade(s) you already have when you are logged in and only show the price for the upgrade you need.
Now, keep in mind, if you purchase the upgrades in steps it is no different than purchasing the upgrade all together.
What does each level of upgrade do?
Here are a few of my favorite features and the ones I find most might use in the software:
Designer Edition unlocks:
Ability to open SVG and pdf file directly in the software
Edition Toggle (this is great for those of us who teach, so we can see exactly what the students see in their version) And more…
Now, the list above is not the extensive list of all the features unlocked with each upgrade. However, it is a list of the features I find the most useful in each upgrade. For the complete comparison chart click HERE to go look at Silhouette America.
I want you to be successful and use your Silhouette software to the fullest!
How to activate the upgrade
It is now easier than ever to activate an upgrade!
I have all the details outlined in this post depending on what software version you are currently using.
Additional Resources on Silhouette Upgrades & Troubleshooting:
If you have question about an upgrade just let me know in the comments below.
Save this for future reference by pinning the image below.
Sign up for the Silhouette Secrets+ Newsletter for more information delivered to your inbox each week!
Silhouette Secrets+ Newsletter
Never miss out on the news, tips, “secrets”, deals, classes, and more that I share on Silhouette Secrets+. Sign up for the newsletter and get information delivered to your inbox every Friday. Unsubscribe at any time.
THANK YOU for your support! How can you help? Click HERE & buy a coffee. Every little bit helps with the cost of running the site.
Silhouette Classes
Never stop learning! Let me help you take the anxiety out of learning with Silhouette and get to creating faster! My Silhouette classes are heavily focused on software, so you can take the skills & techniques taught and apply them to many future projects!
**This post may contain affiliate links. What that means is that I may receive compensation if you purchase through the links I have provided. The price you pay for the product or service is not higher, but I may get compensated for sharing.
I have loved teaching on the Curio 1 for several years now and you can create amazing projects with it, but it’s time to change it up. I know no one likes change, but it’s inevitable – it’s here!
I will be retiring all of my Curio 1 classes that are out on the Silhouette Secrets+ Teachable site. I also have a discount for supplies at Craft Chameleon too, so read to the end.
There are currently (10) Curio 1 classes on the Silhouette Secrets+ Teachable site. The 60% off sale will run from now until October 31, 2023 at 11:59 pm CST.
All prices shown on the Curio 1 classes reflect the 60% discount off original purchase price. No coupon codes or additional discounts will be applied to the prices.
What happens after 10/31/23? On November 1, 2023, the Curio 1 classes will no longer be available for purchase.
If you have purchased a Curio 1 class with the lifetime access, it will be available to you on the Teachable site for the lifespan of the Teachable site. So you will still have access to the classes you’ve registered for and can access that at anytime under your Teachable account.
You do not lose access to the classes you have in your account.
While retirement can be sad, it can also bring about great things too! Stay tuned for new classes coming to the Silhouette Secrets+ Teachable site in the near future!
Affiliate links may be present in the following blog post and as an Amazon Associate I earn from qualifying purchases.
With my retirement sale of the Curio 1 classes, Craft Chameleon has also given me a discount code for supplies that are under the Curio category.
Check it out HERE and use coupon code CURIO1 and save 10% off. Coupon code is good through October 31, 2023.
If you’d like some ideas on what you can create with the Curio 1, check out this video HERE for some of the projects I’ve made through the years.
Enjoy !
THANK YOU for your support! How can you help? Click HERE & buy a coffee. Every little bit helps with the cost of running the site.
Silhouette Classes
Never stop learning! Let me help you take the anxiety out of learning with Silhouette and get to creating faster! My Silhouette classes are heavily focused on software, so you can take the skills & techniques taught and apply them to many future projects!
**This post may contain affiliate links. What that means is that I may receive compensation if you purchase through the links I have provided. The price you pay for the product or service is not higher but I may get compensated for sharing.
Now through October 3, 2023 all designs are 50% off – check it out HERE or click the photo above.
Clear out those wish lists of the designs or fonts you’ve been eying. Or stock up on things for upcoming projects. During these sales, I go through and try to clear out my wish list. Sometimes I find I may not like the design as much as I did the first time or that I no longer need it for a project. But, most times, I end up collecting it (I mean buying it) anyhow.
After your purchase, if you have any issues getting files to sync up, I’ve got resources that can help too!
If your files do not sync up right away or your library shows Working Offline, check out this step-by-step tutorial on how to get things connected again and syncing properly
Those steps when followed exactly, typically solve most user issues with getting files to sync. However, a few weeks back there was a hiccup with the Silhouette Design Store servers and resulted in a delay for some files.
If you find after completing all of those steps that your files still do not download properly and you want to access for immediate use, I have a short term solution.
If you don’t need the files for immediate use, I would just give it some time and the servers will eventually sort themselves out, then the steps I posted above for Designs Not Downloading should get it all synced back up. Anything you’ve purchased in the Silhouette Design Store can be recovered in one way or another. I know they are working to get the servers back to speaking properly to user’s libraries.
What are you stocking up on? Fonts? Holiday designs? Let us know below in the comments.
Enjoy !
THANK YOU for your support! How can you help? Click HERE & buy a coffee. Every little bit helps with the cost of running the site.
Silhouette Classes
Never stop learning! Let me help you take the anxiety out of learning with Silhouette and get to creating faster! My Silhouette classes are heavily focused on software, so you can take the skills & techniques taught and apply them to many future projects!
**This post may contain affiliate links. What that means is that I may receive compensation if you purchase through the links I have provided. The price you pay for the product or service is not higher but I may get compensated for sharing.
What an exciting week it’s been! The new Silhouette Curio 2 arrived on my doorstep this week and I’m having a ball playing with it and testing it out!
If you have followed me for any time, you’ll know that I am proficient with the Curio 1 and love all the fantastic projects that can be made with it. It is still a good machine and if you have one, you can still use it! I can help with that too!
On the Silhouette Secrets+ Teachable site you will find 10 step-by-step classes that are all focused on the Curio 1. Check it out HERE.
Now that the Silhouette Curio 2 has been released, I’ll be developing step-by-step classes for that too! So watch the Silhouette Secrets+ Teachable site for future classes.
Affiliate links may be present in the following blog post and as an Amazon Associate I earn from qualifying purchases.
For all the details regarding the 3 new machine models released at the Silhouette Summit 2023, check out this post – New!!! Curio 2, Cameo 5, and Portrait 4
Now, before I go too much farther, I do want to let you know that the Curio 2 is limited in quantity in 2023. What is currently available is what is the inventory for the rest of 2023. But, don’t panic! There will be more coming in 2024 and there is lots of time to learn this new machine.
And to make it easy to find machine specific information, I’ve created a Silhouette Curio Playlist on the Silhouette Secrets+ YouTube channel. Find that HERE.
The Silhouette Curio 2 is a completely different machine than the first model! It is a large machine too! The footprint of the machine measures in at 20″ x 24″ and will need a dedicated space to function properly. Please consider that before you purchase!
However, I had a group member bring up a really good point. While the Silhouette Curio 2 is a large footprint that needs a dedicated space for it, it does take up less room than if you purchased a Silhouette Cameo 5 and the new Electrostatic Bed for the Cameo 5. It really depends on what your specific situation is and how your workflow is for you! Each user might be different and one machine may work better for one person vs another.
I am having a blast with the new Silhouette Curio 2! It is a new machine and it will take time to learn! I feel that every single person could be successful with this machine IF you take time to learn it and use it properly. If you do not, you will likely hate it. That is not a machine fault, it is simply a personal preference.
I want to share a few projects I’ve been doing with the Silhouette Curio 2.
I had several questions about print and cut, so of course I had to test that! Here is a letter size sheet of sticker paper that was cut on the Curio 2 using the new ES bed. The new ES bed means that you no longer have to use a cutting mat for materials that are flat and smooth. The materials can be held in place by static charge. The ES bed is new for the Silhouette Cameo 5, Curio 2, and Portrait 4. It will take time to learn and you will need to set it up properly, but I can see so many new possibilities on projects and successful cuts when using it. The ES bed comes with the Silhouette Curio 2 in the box.
And you probably guessed it, I shared it on YouTube too! Find the video on Silhouette Print and Cut – 12″ x 12″ HERE. See how easy it was with the new ES bed and cutting cardstock.
On a side note, while at the Silhouette Summit 2023, I also was able to meet several of the Silhouette Design Store Designers for the first time – Wispy Willow Designs, Diva Watts Designs, and Sarah Hurley. We spent several meals together and it was a blast. Check out my introduction video direct from Summit HERE. Make sure to follow these amazing designers too, they are a few of my favorites from the Design Store. I look forward to future collaborations with them! Stay tuned!
One of the new features of the Silhouette Curio 2 is it has a clearance of 20 mm. WOW! Yes, 20 mm. This is clearance under the tool housing. It is NOT cutting depth.
It also has auto detection of material thickness. This is awesome!
This means it opens up the possibilities of what projects can be done with the Silhouette Curio 2. Such as sketching on canvas and other thicker materials.
You will notice that the canvas is taped down on top of the ES Protective Sheet. I did have the ES bed on so the ES Protective sheet was secure and then taped the canvas to the machine so it would not move. Due to the surface of the backside of the canvas, it will not build up a charge directly on the ES bed to secure it. I also have a piece of wood inside the middle of the canvas for support.
I did try to use the Silhouette Type A pen holder in the Carriage 1 housing, but 3 different pens I tried did not reach the material. I will need to test that some more and figure out why it wasn’t working like it normally would.
I can’t wait to share more! So many projects, so little time!
Save this for future reference by pinning the image below.
Sign up for the Silhouette Secrets+ Newsletter too! Tips, “secrets”, announcements, tutorials, classes, and more delivered to your inbox each Friday.
Silhouette Secrets+ Newsletter
Never miss out on the news, tips, “secrets”, deals, classes, and more that I share on Silhouette Secrets+. Sign up for the newsletter and get information delivered to your inbox every Friday. Unsubscribe at anytime.
THANK YOU for your support! How can you help? Click HERE & buy a coffee. Every little bit helps with the cost of running the site.
Silhouette Classes
Never stop learning! Let me help you take the anxiety out of learning with Silhouette and get to creating faster! My Silhouette classes are heavily focused on software, so you can take the skills & techniques taught and apply them to many future projects!
**This post may contain affiliate links. What that means is that I may receive compensation if you purchase through the links I have provided. The price you pay for the product or service is not higher but I may get compensated for sharing.
Affiliate links may be present in the following blog post and as an Amazon Associate I earn from qualifying purchases.
Have you ever tried to have a photo shoot with your pets? This month I was working with the Artesprix Sublimation paints and the Artesprix pet bandanas to create pet costumes. I needed a few good models.
Bader was pretty dashing in his bow tie.
However, Goldy was not having any of it and took off right after I snapped this photo.
But Bader was such a good sport and actually came back for more photos after his sister decided she was not participating.
Or it could have been the treats he was getting too!
And my daughter grabbed one and decided it was now hers for her stuffy to dress up for Halloween.
It was easy to do and even though I’m no artist I freehanded the designs to show how easy it can be done.
THANK YOU for your support! How can you help? Click HERE & buy a coffee. Every little bit helps with the cost of running the site.
Silhouette Classes
Never stop learning! Let me help you take the anxiety out of learning with Silhouette and get to creating faster! My Silhouette classes are heavily focused on software, so you can take the skills & techniques taught and apply them to many future projects!
**This post may contain affiliate links. What that means is that I may receive compensation if you purchase through the links I have provided. The price you pay for the product or service is not higher but I may get compensated for sharing.
Just announced at Silhouette Summit in Hawaii (September 2023)!!! Silhouette will be releasing 3 new machine models! Curio 2, Cameo 5, and a Portrait 4.
All of these models have been redesigned and I’ll be sharing new tutorials and classes for each of them. Make sure to read to the end as I have a couple additional tips as well!
Follow me on social media on Facebook, YouTube, Instagram, and Teachable for lots more information coming out as I get these machines and learn the ins and outs.
Let’s take a quick look at each of these models and I’ll share a bit on some of the new features with each model.
Affiliate links may be present in the following blog post and as an Amazon Associate I earn from qualifying purchases.
Curio 2
If you have followed me in the past, you’ll know the Curio 1 was amazing and I have quite a few classes where I show how to make fabulous things available on Teachable. All of those classes will still apply to the Curio 1.
The Curio 2 is updated and completely redesigned! Now available at CrafterCuts HERE!
New Curio 2 Features:
Flatbed cutting machine
Material stays stationary instead of rolling through machine
Clearance of thicker materials – up to 20 mm
Autodetection of material thickness
12″ cutting area
12″ Silhouette cutting mats can be used
12″ Embossing mat available
Electrostatic bed and cutting mat – holds material in place without an adhesive mat. Additional accessories needed.
Curio Debris Tray – for use with Power Engraver, cutting mat, or Embossing mat
Tool 1 housing utilizes current Auto detection tools such as Type B Autoblade (see below)
Powered Carriage 2 housing
Carriage 2 has higher cutting force – max 5 kgf
New Tools for Tool 2: Heat Pen, Power engraver, and Leather Punch Tool (cannot be used for genuine leather), Embossing Tool, and Pen Holder
Emergency Stop to quickly stop a job without turning power off or disconnecting
Bluetooth
Things to note:
Limited quantities as it rolls out, but more on the way
Accessories are not yet available at release but are coming!
Compatible Tools for Curio 2 Carriage 1 – Autoblade Type B, Manual blade 1 mm, Manual blade 2 mm, 2 mm Kraft blade, Pen Holder Type B Carriage 2 – Rotary Blade, Punch Tool, 3 mm Kraft blade, Power Engraver, Leather Punch Tool, Heat Pen Set, Embossing Tool Type C, Pen Holder Type C
I am so excited to open the box on this new Curio 2 model! I love the challenge of learning a new machine and this is no different. I think this is going to be great with the ability to accommodate up to 20 mm in material thickness. Now, keep in mind, that does NOT mean a cutting depth of 20 mm. The cutting depth is still going to be only what the blade maximum length is, with test cuts and practice.
As with any new machine model, it will take time to learn! Rome was not built in a day. You will need to take some time to get the feel for any new machine!
Cameo 5
New Cameo 5 features:
New sleek design including sliding lid
Easy Adjust Rollers – can adjust down to utilize 5″ wide materials
Autoblade adjustment area updated for efficiency
Adaptive Sensor – automatically adjusts the sensitivity of scanning sensor to properly scan materials for scanning on shiny or glossy surfaces
Electrostatic 12″ x 12″ mat for use with Electrostatic Protection Sheet
Attachable Roll Holder – included with machine
Auto Crosscutter – on front of machine
Repeat Job available on touchscreen
12″ cutting width
Powered Carriage 2 housing
Carriage 2 has higher cutting force – max 5 kgf
New Tools for Tool 2: Heat Pen, Embossing Tools, and Pen Holder
Can utilize 12″ x 12″ Embossing mat
Emergency Stop to quickly stop a job without turning power off or disconnecting
Also available in Cameo 5 Plus – white – cutting width of 14.6″ like current Cameo 4 Plus
Things to note:
Limited availability as it is released, but more on the way! New releases always take time.
Accessories are not yet available at release but are coming!
Compatible Tools for Cameo 5 Carriage 1 – Autoblade Type B, Manual blade 1 mm, Manual blade 2 mm, 2 mm Kraft blade, Pen Holder Type B Carriage 2 – Rotary Blade, Punch Tool, 3 mm Kraft Blade, Heat Pen Set, Embossing Tool Type C, Pen Holder Type C
Black machines will be the first available Cameo Plus will be available in white Please note the shipping notices and be aware that machines are in transit. This means that there could be delays. We all know that shipping delays are unpredictable, especially the past 3 years. Nothing as changed in that area or can be predicted.
Many of the items that users were asking for on the Cameo 4 are now available on the Cameo 5. This includes the ability to move the rollers easier and in more places, repeat job, additional tools, embossing, cut and sketching ability without swapping tools, and more!
I look forward to testing this out! Watch for more details on the Silhouette Secrets+ social channels I linked at the beginning.
Portrait 4
New Portrait 4 features:
Easy Adjust Rollers – can adjust roller down for smaller widths
Adaptive Sensor – automatically adjusts the sensitivity of scanning sensor to properly scan materials for scanning on shiny or glossy surfaces
Electrostatic mat for use with Electrostatic Protection Sheet
Auto Crosscutter – on front of machine
Repeat Job button
8.5″ cutting width
Powered housing
New Tools: Heat Pen Set
Emergency Stop to quickly stop a job without turning power off or disconnecting
Bluetooth
Things to note:
Limited availability as it is released, but more on the way! New releases always take time.
Accessories are not yet available at release but are coming!
Compatible Tools for Portrait 4 Carriage 1 – Autoblade Type B, Manual blade 1 mm, Manual blade 2 mm, 2 mm Kraft blade, Pen Holder Type B
Search Portrait Please note the shipping notices and be aware that machines are in transit. This means that there could be delays. We all know that shipping delays are unpredictable, especially the past 3 years. Nothing as changed in that area or can be predicted.
The Portrait model is great for those who travel, sticker makers, quick cuts, or those who do not need to cut wider than 8.5″. It is easily portable at 4.41 lbs (2.0 kg). While lightweight and the smallest machine that Silhouette manufacturers, it is a powerful machine that can utilize the Silhouette Studio software offline, just like the larger Silhouette models.
—————————
Whew! That is a lot of information to throw out at you! I am excited! I love to learn new things and to share them!
This news is fresh out of the Silhouette Summit September 2023, which means that things announced are not always available immediately. You will see these new things rolling out over the next few months.
Now, the bigger question is….. Do you need any of these machines?
Only you can answer that! Will you use them? Do you have a need (or want) for the new features on the Curio 2, Cameo 5, or Portrait 4?
If the answer is yes – grab it CrafterCuts HERE or wait and follow along on my journey with the new machines. I will be sharing new things as I unbox and start to test the machines and see what they can really do!
One of the biggest things I can tell you is all new machines take time to learn! It really does not matter your experience level and often we find that “experienced” users have a harder time adjusting to a new machine because they think it should work like the older model. New machine = new cut settings = new ways of doing things = new tools = new learning curve = new possibilities!
The next biggest tip I can give is, if you do get it, GET IT OUT OF THE BOX! If it’s just going to sit in the box, then there is no rush to get a new machine. These are brand new, freshly released machines and will be around for awhile. There is no need to rush into anything.
See, I don’t make a great salesperson. I am not a salesperson at all. I want you to be successful and I want to see you make fabulous things! That is why I share and teach!
I hope you will join me on my journey of learning! Make sure to follow on my social media channels Facebook, YouTube, Instagram, and Teachable as I share more!
Sign up for the Silhouette Secrets+ Newsletter too! Tips, “secrets”, announcements, tutorials, classes, and more delivered to your inbox each Friday.
Silhouette Secrets+ Newsletter
Never miss out on the news, tips, “secrets”, deals, classes, and more that I share on Silhouette Secrets+. Sign up for the newsletter and get information delivered to your inbox every Friday. Unsubscribe at anytime.
Save this for future reference by pinning the image below.
Enjoy !
THANK YOU for your support! How can you help? Click HERE & buy a coffee. Every little bit helps with the cost of running the site.
Silhouette Classes
Never stop learning! Let me help you take the anxiety out of learning with Silhouette and get to creating faster! My Silhouette classes are heavily focused on software, so you can take the skills & techniques taught and apply them to many future projects!
**This post may contain affiliate links. What that means is that I may receive compensation if you purchase through the links I have provided. The price you pay for the product or service is not higher but I may get compensated for sharing.
Lots of exciting things are happening at Silhouette Secrets+ and I cannot wait to share it all! I will be headed to the Silhouette Summit this week in Hawaii. This is the first one since covid cancelled it in 2020. I cannot wait to share from Summit and connect with others!
This week I wanted to share some of the things I’ve been working on behind-the-scenes to prepare for new events and announcements coming!
Silhouette Secrets+ Website Updates
This summer, right before I lost my external hard drive with 9 months of data, I had just updated the look and flow of the Silhouette Secrets+ website. I had recorded a video tour, but lost it with the hard drive crash and it’s taken me awhile to get back in the swing of things. But, all things happen for a reason and I’ve had lots of updates since then, including new logo updates and more!
With the update to the Silhouette Secrets+ website, I am hoping it is easier to find the resources that will help you best.
On the home page, you will now see a brief introduction to me and if you scroll down the page, you will see buttons to click on for more information on the most searched topics when viewers come to the Silhouette Secrets+ website.
Lots of things have changed over this past year and I continued to get complaints from Facebook followers that they were not seeing content even though I post all the time.
So I set out to find a new way to get information delivered direct to those who want it. I have recently launched the Silhouette Secrets+ weekly newsletter. This newsletter is delivered every Friday directly to your inbox with tips, tutorials, news, announcements, classes, events, and more!
Now, you might be saying – Weekly? Holy cow! That’s a lot! YES – I know – because I have to write the content every single week, so it’s a new thing added to my plate. So there are 2 reasons for this right now.
First, I have Silhouette content dating back to 2016 when I first started as Silhouette Instructor. That’s a lot of information that is still relevant to users today! With a weekly newsletter, I can share tips and tutorials that will help user’s on their journey. Each week will be different topics and if might not be something you need right this minute, but I’m getting lots of great feedback that it is very helpful for most. Or you might find that it helps you help someone else with the information provided.
And the next reason, is frankly, money. This is a service I have to pay for. It is a cost to me and in order to make the most of it, I decided weekly was the way to start.
Silhouette Secrets+ Newsletter
Never miss out on the news, tips, “secrets”, deals, classes, and more that I share on Silhouette Secrets+. Sign up for the newsletter and get information delivered to your inbox every Friday. Unsubscribe at anytime.
Once you subscribe, make sure to look for the confirmation email and confirm you want to receive the subscription. I cannot resend this confirmation and the newsletter will not be delivered until you confirm you want to receive it.
We’ve also seen where some email providers are known to block emails – yahoo is the worst, but sometimes gmail does it too. The confirmation email is sent pretty quickly. You can try to search your inbox for “Silhouette Secrets” or “silhouettesecretsplus@silhouette-secrets.com” to see if it will pop up. If you do not see it after a time, please try to subscribe again. I have done everything on my end securities wise to have the best chance to be delivered to you.
If you still do not see it, you can send me an email at silhouettesecretsplus@silhouette-secrets.com and I can see what I can see on my end to try to help it get delivered.
Silhouette Secrets+ Blog Notifications
Since 2016, I have published information on the Silhouette Secrets+ blog. Followers can choose to subscribe to the blog to be notified by email when a new blog post is published. This is completely different than the newsletter and is sent out direct from WordPress when a new blog post goes live.
If you want to have those delivered as soon as they are released, make sure to subscribe above or come back to check out what’s new on the Silhouette Secrets blog HERE.
My goal is 1 new post a week, but sometimes I get excited and cannot hold back my fingers from pushing publish as soon as it’s written.
Silhouette Secrets+ on YouTube
I have also been putting out video content on the Silhouette Secrets+ YouTube channel. Some tutorials are easier to show on a video while others written instructions are easier. So it’s a balance, especially when a tutorial is getting photo heavy, a video can be easier to view.
Make sure to like, subscribe, and click the bell for notifications. I am currently on the way to 10,000 subscribers. I appreciate your support and look forward to sharing more!
Silhouette Supplies
Affiliate links may be present in the following blog post and as an Amazon Associate I earn from qualifying purchases.
In 2022 I was connected with a Silhouette retailer by Silhouette America to work with and I wanted to share that. I always recommend keeping extra blades and cutting mats on hand as a good practice. This will save you time, money, and frustration when you are in the flow of creating with your Silhouette.
CraftCuts is my authorized Silhouette retailer that Silhouette America referred me to. Check out their website HERE. They have free shipping with a $35 order and have bundles to help stock up on supplies too! Use code SECRETS to save 10% with my link HERE.
Silhouette America does still sell direct as well, however, they no longer have free shipping and I know that is a big deal to many. Shipping costs can get expensive for both the shipper and the buyer. If you are a Silhouette Club member, you can get free shipping with a $50 order from Silhouette America. Use my code 10OFF to save 10% at Silhouette America with this link HERE.
*note – coupon codes may not apply to deeply discounted products, bundles, or newly released products.
I am looking forward to sharing more content with you soon! Happy crafting!
Enjoy !
THANK YOU for your support! How can you help? Click HERE & buy a coffee. Every little bit helps with the cost of running the site.
Silhouette Classes
Never stop learning! Let me help you take the anxiety out of learning with Silhouette and get to creating faster! My Silhouette classes are heavily focused on software, so you can take the skills & techniques taught and apply them to many future projects!
**This post may contain affiliate links. What that means is that I may receive compensation if you purchase through the links I have provided. The price you pay for the product or service is not higher but I may get compensated for sharing.
This post has been sitting on my to-do list for the past year. Yes! An entire year, but I guess all things have their timing. In this case, I made these water bottle decals over a year ago and they are still holding up amazing. So I can share how I did it and share also the longevity of it.
Affiliate links may be present in the following blog post and as an Amazon Associate I earn from qualifying purchases.
Waterproof Water Bottle Decals with Silhouette
For this project, I used Silhouette Printable Vinyl and Oracal 651 clear adhesive vinyl to create the waterproof decals.
Now, the first thing I want to emphasize is that if you are creating decals to sell, this is probably not the method for you. But, it is a great option for personal use. I’ll explain a bit more as we go through the tutorial.
Check out the video tutorial on the Silhouette Secrets+ YouTube channel HERE or find the written tutorial below.
Since this was a project for my daughter, she helped with the entire process.
First was picking the designs and setting them up to print and cut with Silhouette.
Once the file was set up, we sent it to the printer.
Make sure that the ink is completely dry before touching when you are doing print and cut. You do not want any part of the design, including the registration marks to smear. Smeared registration marks can affect the accuracy of a print and cut with Silhouette.
After printing, we placed it on the cutting mat and sent it through the Silhouette to cut around the design.
Next, it was time to setup the offset with the Oracal 651 clear. I recommend saving this file and then using File > Save As to save a file with the offsets, just in case you want to come back to this project later.
Silhouette makes this so easy with Offset Panel. Adjust the distance as needed for your project and your design.
When creating the offset, keep in mind that it’s designed to keep water out. I’d recommend a good size offset, but you don’t want it larger than necessary. Clear as mud right! Each project & design may vary. You want to make sure that the printed material is well protected so water doesn’t sneak in under it.
I no longer need the graphics or the original cut lines, so I can arrange the offset cut lines to maximize my space on my material and then send this to cut out of Oracal 651 clear.
Clean the surface of the blank with alcohol and allow it to dry. This gets rid of any oils or debris that could interfere with a clean adherence.
Weed the excess away from the Silhouette printable vinyl and the Oracal 651 clear.
Then simply apply the Oracal 651 clear over top of the printed design as centered as possible.
I’m sure you could find many ways to get it lined up exactly perfect, but in reality, I just eyeballed it. If I mess up, I can reprint and recut – So Simple!
It turned out fantastic! Here are the original photos on the day it was created.
That was in August 2022 and it has held up so well. A year later here is what it looks like.
There are a few nicks and dings where she dropped it and some residue from other stickers she thought she could add to it. Those “stickers’ didn’t last through the first wash.
She was headed out the door for her first day of school and we snapped these photos. As you can see it has held up nicely, even with ice water and extended use through an entire year.
Now, a few more tips for success!
Make sure to clean the surface of your blank, so you get the best adhesion with your materials.
After applying the decal, wait 48 – 72 hours prior to use. I’d recommend 72 hours. This allows the adhesive on the material and vinyl to set up or cure.
Then hand wash, no picking, no scrubbing, no dishwasher for best results.
Now, I mentioned at the beginning that if you are a seller, this probably isn’t the best method. Why?
Well, there are few reasons.
The method I used is not UV safe. So it’s not recommended for outdoor use. It has worked great for water bottles used daily, but they aren’t out in the sun.
It may not be efficient for mass production. After applying the Oracal 651 clear layer to the printed material, if it’s left too long it could start to cure to the backing of the printed material. For best results, I would recommend for immediate application. But, you never know until you try.
It has worked great for my daughter’s water bottle that she has used almost daily for an entire year and is still going strong.
Save this for future reference by pinning the image below.
Enjoy !
THANK YOU for your support! How can you help? Click HERE & buy a coffee. Every little bit helps with the cost of running the site.
Silhouette Classes
Never stop learning! Let me help you take the anxiety out of learning with Silhouette and get to creating faster! My Silhouette classes are heavily focused on software, so you can take the skills & techniques taught and apply them to many future projects!
**This post may contain affiliate links. What that means is that I may receive compensation if you purchase through the links I have provided. The price you pay for the product or service is not higher but I may get compensated for sharing.
I used my Siser Juliet cutting machine and set it up to sketch out my text. You could use any cutting machine that the Artesprix sublimation markers fit in or even hand letter a design too!
I briefly covered how I set up the sketch in the Artesprix video. For a more detailed look at sketching with Siser Juliet or Romeo, check out this new video on the Swift Creek Customs YouTube channel.
And then I did some experimenting as well with color saturation on the backside. I LOVE how these have a bright, metallic look to them!
THANK YOU for your support! How can you help? Click HERE & buy a coffee. Every little bit helps with the cost of running the site.
Silhouette Classes
Never stop learning! Let me help you take the anxiety out of learning with Silhouette and get to creating faster! My Silhouette classes are heavily focused on software, so you can take the skills & techniques taught and apply them to many future projects!
**This post may contain affiliate links. What that means is that I may receive compensation if you purchase through the links I have provided. The price you pay for the product or service is not higher but I may get compensated for sharing.
Affiliate links may be present in the following blog post and as an Amazon Associate I earn from qualifying purchases.
We are seeing some cooler temperatures here and in a short time the kids will be headed back to school. The summer has gone too fast!
Although I do enjoy Fall and the cooler temperatures, maybe we can hang onto that summer feeling a little bit longer….
The Summer Days of Downloads hosted by Heat Transfer Warehouse
I’m so excited to be participating in this! Heat Transfer Warehouse sent out a request and I’m so glad I answered the call. I love a good challenge and I love learning new things! I’ve been designing in the Silhouette Studio software for over 10 years now and I love to create things!
Grab free designs on the Heat Transfer Warehouse website that are created by other crafters and influencers like me and have fun!
I used Siser EasyColor DTV and print and cut with the Silhouette to create my design, but you can use the SVG file for any materials you want to cut it out of! Adhesive vinyl, HTV, cardstock, and more!
I am sharing it all!!! I ran into some issues and things did not go perfect, but I’m going to share how I made it a successful project in the end. From printer issues to user error, I’ll show you how I fixed both!
I love Siser EasyColor DTV and have been using it for over a year now! My shirts have been through 30+ washes and still look awesome! I wear some of them almost weekly. The biggest thing is to follow the directions for Siser EasyColor DTV exactly! I have several tutorials and updates on my Siser EasyColor DTV results HERE.
Behind-the-Scenes Look
I’ll be sharing a how-to video soon showing the exact steps I took to create this design in the Silhouette Studio software. The hardest part is coming up with the design idea, well…. actually, the hardest part is picking fonts for me. And in this case, I had to use fonts that I knew had a commercial use license and allowed designs to be created and shared. Make sure to read those terms of use for the fonts and designs you get and know exactly what they can be used for!!!
Here is a behind-the-scenes look at my creation process.
I save my work in many steps along the way in case I mess up or change my mind. Now, this is my working file and I started saving as a back up file along the way too! This way if anything happened, I had something to fall back on and I didn’t lose all the hours of work.
It did take time, but I loved it! I love being able to create things and sometimes I lose track of that in all the hustle and bustle!!! I thrive off of being able to create!
Now, let’s zoom in and did you see these color palettes next to my design?
These color palettes helped me to choose colors for my design! So simple!
Check out this tutorial – Create Custom Color Palettes in Silhouette HERE I show you exactly how you can use color palettes in your creations! Want to change up the colors of my SVG file? You can! And you can use color palettes to help too!
Want to create something with this design or simply collect it – grab the file HERE
And stay tuned for a how-to video coming soon! I’ll post the link here when it’s complete!
Save this for future reference by pinning the image below.
Enjoy !
THANK YOU for your support! How can you help? Click HERE & buy a coffee. Every little bit helps with the cost of running the site.
Silhouette Classes
Never stop learning! Let me help you take the anxiety out of learning with Silhouette and get to creating faster! My Silhouette classes are heavily focused on software, so you can take the skills & techniques taught and apply them to many future projects!
**This post may contain affiliate links. What that means is that I may receive compensation if you purchase through the links I have provided. The price you pay for the product or service is not higher but I may get compensated for sharing.
Affiliate links may be present in the following blog post and as an Amazon Associate I earn from qualifying purchases.
Did you hear? Glowforge® recently announced the release of a new “craft” laser machine called Aura™. You can find the Glowforge® Aura™ at Michaels or Joann stores currently.
A “craft” laser sounds pretty cool and enticing. I think one thing that’s appealing to most is the price tag. While other models of Glowforge® have increased in price, the Glowforge® Aura™ is coming into the market at $1299 $1199. This is a lot less than a larger Glowforge® model, so I can see how it might be appealing.
But, I think there is more to it than just the price to consider.
I cannot answer that, but I can give you some information about it and some things to think about in your decision making process.
I currently own a Glowforge® Pro and having a laser machine is pretty cool. I love using the Silhouette Studio Business Edition to create designs for use in the laser and I even have class on it too (more on that below).
While having a laser machine is cool, I think there are some things to note about it before diving in. And I would highly recommend doing your own research as well too! I’ll share some resources for more information at the end.
Things to Think About
“Craft” laser machine
What does that mean? Basically, it’s not as powerful as the other models of Glowforge® lasers. If you are looking for a laser machine to produce items to sell, this may not be the machine for you. The Aura™ is not going to be an efficient, high production machine. It is slower than other Glowforge® models, much slower.
The Glowforge® Aura™ is a 6 watt diode laser machine. This is what makes it slower than the other models of Glowforge® that are CO2 machines. To compare, the Glowforge® Pro, which is the model I have, is a 45 watt CO2 laser. From what I’ve seen in comparison watching it all unfold, it is about 4 times slower than the Glowforge® Pro.
Since it is a diode laser at 6 watts, it cannot cut all of the same materials that the CO2 lasers can. So make sure to research that as well to make sure it’s going to cut what you want.
The Glowforge® Aura™ has a bed that is 12″ x 12″. The smaller footprint is also what makes it a “craft” laser and more appealing for a crafter’s space.
Filter or Venting
Just like it’s bigger laser friends, the Glowforge® Aura™ has to be vented or used with a filter. This is something to consider before you purchase any laser.
I have my Glowforge® Pro vented out of a window in my space. I open the window and place the venting prop that my husband built in the window and close it down. It is constructed out of scrap plywood, nothing fancy. We have pets, so leaving the window open while using the machine is not ideal.
He installed a dryer vent on the outside of the window prop, so it opens when the Glowforge® fan turns on.
If you live in an area that has fluctuating temperatures, I would recommend having a system that you can pull the venting back inside when not in use.
Glowforge® did release an air filter that can be used with the Glowforge® Aura™. It is $399 to purchase and is a replaceable filter. However, I have not been able to find any information on how much a replacement filter is. They do not seem to be available yet. The Glowforge website says the filter has a lifetime of 100 hours of printing.
On that note, I have followed several Glowforge® groups in the past 2 years and always see comments about users who cannot get replacement filters as they are always out of stock. It does not seem to be a matter that they sell out quickly, but they have been low inventory the last few years. If you are looking into a Glowforge®, I would highly recommend joining some Facebook groups and watch the posts and comments as part of your research.
Personally, I’d recommend venting it out a window if you are able to do that.
WIFI Connection
In order to use a Glowforge® laser machine, you have to be connected to WIFI at all times when using the software/app and machine. This means you need a good internet connection. And it requires a 2.4 GHz WIFI connection. It does not work off a 5 GHz connection.
Another area you will want to research is materials. Materials used in the Glowforge® or any laser machine need to be laser safe. Not all materials are laser safe and some can be toxic when used with a laser.
I’d highly recommend starting with proof grade materials. This takes the guess work out of the settings and gives you a better chance of success quickly.
What are proof grade materials? These are Glowforge® materials that they know work in the machine. Materials by Glowforge® have a QR code on it and the camera reads it and recognizes the material. This makes getting started easier than a bunch of testing to find out what settings work.
Safety
A laser machine is fire. The machine should never be left unattended or running without supervision.
Another thing I’d highly recommend is laser safety glasses. While the Glowforge® Aura™ is a lower wattage laser, you only get one set of eyeballs. Please be safe in your use with lasers.
Maintenance
One of the biggest things I see that users run into problems with their machines is in the maintenance. Keeping the machine clean and following the cleaning instructions will help to increase the lifespan of your machine and decrease the likelihood of running into issues. A lot of issues can be prevented if the machine is cleaned regularly.
The materials that are used in the Glowforge® will make a difference in how often it needs cleaned. For instance, cutting or engraving wood produces different dust than cutting and engraving acrylic.
Location, Location, Location
Think about where you would put a laser machine. According to the Glowforge® website, the recommended operating temperature is 60 degrees F – 75 degrees F.
A location that is not temperature controlled can affect the lifespan of the equipment. Too hot or too cold of temperatures is not good for laser equipment.
The Glowforge® Aura™ has a 12 month warranty, however, if you are not following the guidelines recommended by Glowforge®, the warranty does not cover that. It is not their fault if you are operating outside of the recommendations.
Glowforge® uses the term “printing” for everything. Even though it’s a laser that cuts and engraves, “print” is the terminology they use. So just keep that in mind when you are researching. It is not a printer like we think of that prints with ink on paper.
That is a lot of information, but I hope that it’s given you a few things to think about in your decision making process.
Resources
Silhouette and Glowforge®
If you do have a laser machine and it uses svg files, you can design in the Silhouette Studio Business Edition software and export it as a svg to use with the laser machine. I love the ability to customize and create my own designs to use with my Glowforge® Pro.
By request I designed a class called Creating SVG files in Silhouette Studio – Great for Laser machine owners or designers! The class shows you how to create a design for use in the laser machine and I show a demonstration with bringing it into the Glowforge® app/software to cut with your machine.
Glowforge® Aura Information
This was not written with the intention of detouring you from getting a Glowforge® Aura™, but to provide information for you to make the best decision for you. As I mentioned above, I would highly recommend doing your own research to make sure that the machine you choose is going to be right for you. If you are an occasional user, it may not be worth the investment in a laser at this time or the Glowforge® Aura™ might be just right for you. If you are a business owner or looking to invest in a machine to get started with selling laser products, you might find that a bigger, faster machine is more efficient and will save you time and money for running a business.
If you are looking at a larger Glowforge model, click HERE to save a bit. With my referral link you could get the equivalent of $500 USD off a Pro, $250 USD off a Plus, and $125 USD off a Basic.
Here are a few additional resources for Glowforge® and the Glowforge® Aura™:
I hope that has helped to give you some thinking points on if a laser is the right equipment to add to your space!
Enjoy !
THANK YOU for your support! How can you help? Click HERE & buy a coffee. Every little bit helps with the cost of running the site.
Silhouette Classes
Never stop learning! Let me help you take the anxiety out of learning with Silhouette and get to creating faster! My Silhouette classes are heavily focused on software, so you can take the skills & techniques taught and apply them to many future projects!
**This post may contain affiliate links. What that means is that I may receive compensation if you purchase through the links I have provided. The price you pay for the product or service is not higher but I may get compensated for sharing.
Have you seen edit points pop up in Silhouette Studio before? Do they intimidate you? Well let’s see if we can change that.
Affiliate links may be present in the following blog post and as an Amazon Associate, I earn from qualifying purchases.
What are Edit points?
Edit points are basically the data points the Silhouette reads to make a particular shape of the object. Each edit point has qualities on how it is supposed to act such as straight line, corner, curved, etc. and this is how a shape is made up.
The edit points will come up on an object if you double click on the object or use the keyboard shortcut letter “A” with the object selected.
If you draw a circle, it is made up of 4 edit points.
A square also has 4 edit points but the type of edit point are different than the above circle.
By clicking on an edit point, you can see what property it has in the Point Editing Panel.
Why Edit Points Might Not Show
In order for the edit points to appear, the object has to be a single object and an ungrouped object.
For instance, if I type out text, it is not treated as a design. So the edit points won’t appear.
If it is converted to a path, the edit points still will not appear because even though it’s acting as a design, it is still grouped together. If the design is ungrouped the edit points will appear because all the pieces are now separate.
Or if the design is made into a Compound Path, then the edit points will appear.
Altering Edit Points
There are many ways to change the edit points.
By clicking on an existing point, it turns white, indicating that it is the point selected.
It will tell you what kind of edit point it is. This one is a corner. Grab the blue squares on either end and this will adjust the outcome of this edit point.
To select multiple edit points, hold down the Shift key & drag the selection box around all the points you would like to select. Then make changes to a group of edit points all at one time by moving or choosing a new property for those selected.
All edit points that are selected will show as white points.
Point Editing Panel
When the editing points are active, the Point Editing Panel should pop up or click on the Edit Points tool on the left side menu.
This panel has many options for how you can alter an edit point(s). The name of each tells you exactly what behavior it will have. Each design you work with will react differently to what is changed.
Remember, edit points are the data points that your Silhouette software relays to your Silhouette machine to connect the cut.
The Cameo machine needs to hit every single one of those edit points in order to make the cut. Some files such as dxf files or traced images can have lots of edit points and this can make the Cameo sound odd when cutting. The Cameo is not broken, but has to connect each of those edit points to make the cut.
Simplifying Edit Points
Some files can have the edit points simplified without changing the look of the design. For instance, this Leafy Mandala by Rhonna Farrer from the Silhouette Design Store has a lot of edit points when I first opened it.
In the Edit Points Panel, select Simplify.
You should notice less edit points in the design.
In this case, the design did not change in the look at all, but the edit points are now much less.
The best way to learn how edit points act is to find a design and just play around with the different options.
While they can look intimidating when they pop up on the screen, once you understand their purpose and how they work, I think it makes it seems a lot less daunting when you see them.
Save this post for future reference by pinning the image below.
Enjoy !
THANK YOU for your support! How can you help? Click HERE & buy a coffee. Every little bit helps with the cost of running the site.
Silhouette Classes
Never stop learning! Let me help you take the anxiety out of learning with Silhouette and get to creating faster! My Silhouette classes are heavily focused on software, so you can take the skills & techniques taught and apply them to many future projects!
**This post may contain affiliate links. What that means is that I may receive compensation if you purchase through the links I have provided. The price you pay for the product or service is not higher but I may get compensated for sharing.
THANK YOU for your support! How can you help? Click the link to buy a coffee. Every little bit helps in the cost of running the site.